battery VOLKSWAGEN GOLF 1993 1H / 3.G Owners Manual
[x] Cancel search | Manufacturer: VOLKSWAGEN, Model Year: 1993, Model line: GOLF, Model: VOLKSWAGEN GOLF 1993 1H / 3.GPages: 156, PDF Size: 6.36 MB
Page 5 of 156
Downloaded from www.Manualslib.com manuals search engine CONTROLS AND EQUIPMENT
Dashboard and Controls ..... 4
. ey s, Cen tral locking . . .... 6, 7
::"tl-thef t warning system .... 8
Joors .......................... .... 9
oot lid .... ........... . . . . . 10
::Iectric windows .. . .. 10
• ~Irrors . . ..... . ... 12
Seal belts 13
"" rbag System . . . . . 18
Safe ty for children .. ... 21
ead restraints . . . . . .. 24
= ro nt seats . . . . . . . . . . . .. 25
Rear seat . . . 27
L u ggage compartment ... . ... . ...... 28
M esh partition (Estate) ...... 29
L u ggage compartment cover /
F olding/sliding cover
... 30
Pedals, Hand brake .. 31
Manual gearbox .... ... .... 31
Automati c gearbox . . . .. .......... 32
H eig ht-adjustable steering wheel ..... 35
I gnition lock. . . . . .. 35
Starting/stopp ing engine 36, 38
\lIstrumellts .. .... 39
Warning lamps ....... 46
Switches . . . . . . . . . . . . . . 50
Turn signal and dip lever ............. 53
Cruise control system ........... 54
Wi ndscreen wipe r and washer system 55
Heating an d ventilation .. . ...... 56
Air cond itioner ......' 59
Sliding/ti ltin g roof. . . . . . . . . . . . ... 65
Sun visors / Interior lights 66,67
Cigarette lighter, Ash tray ..... 68
Shelves and boxes . . . . . . . . . . . ... 69
Roof rack / Roof ra ilings ... 70
DRIVING TIPS
The firs t 1500 km -and after wards .... 71
Driving economically and ecologically .. 72
Brakes. . . . . . . . . . . . . . . . 75
Tra iler tow ing . .. ..... . .... ... ...... 77
Driving a four- wheel drive vehicle .. 79
GENERAL MAINTENANCE
Filling the tan k, Fuel. 81, 82
Care of vehicle ........ .. . . 85
Bonnet . . ... 90
Engine compartment .. ...... .... .... 91
Engine oil ..... .......... ........... 92
Automatic transmission fluid (ATF)* ... 96
Power-assisted steering .. 96
Cooling system . . . . . . . . . . .. . 97
B rake fluid ...... 99
Battery . . . . .. 100
Spark plugs. V-belts . . . . . . . . . 102
Washer system
... . .. 103
Windscreen w iper blades . . . 104
Dust a
nd pollen filter * . 104
Wheel s . 105
D riving abroad ..... ............... 110
Accessories, modifications and
renewa l ot parts .............. III
Mobile telephones and tw o-way rad ios 111
DO -lT-YOURSELF
First -aid kit, Warn ing triangle ........ 112
Storage of vehicle tools, spare wheel
a n d ball coupling trailer bracket ...... 113
Vehicle tools, Spare wheel 114
CONTENTS
Changing w heels . 116
F uses . ........ .. .. . . . ... . .... 119
Changing bulbs. . .... .. . 121
Installing radio . . . . .. 127
E mergency starting .. .. 128
Tow starting / to wing . . .. 129
L ift ing vehicle ......... 131
SPECIAL INFORMATION
Body ..... .... . .......... 132
Environmental compatibility ... 133
TECHNICAL DATA
Engine data . .. , .... .... . 134
P er forman ce .. ... ... ... . .. 136
Fuel consump tion .. 137
Wh eels
. . 139
T yre pressures
.. .. ... .. . . .. ... 1 4 1
Weights ... 143
Trailer weights .. 144
Dimensions. ...... .. ... 145
Capacities " ..... 146
Vehicle identification data ... 147
ALPHABETICAL INDEX
Alph abetical index ... 148
3
Page 8 of 156
Downloaded from www.Manualslib.com manuals search engine CONTROLS AND EQUIPMENT
Keys
The vehicle is supplied with two keys .
These keys fit all locks on the vehic le .
Attention
When leaving the vehicle unattended -even if only for a few moments -always take the keys with you.
Key tag
The key number is on the plastic tag. With
th e aid of the number , a replacement key can be ordered from a Volkswagen dealer .
It must then be stated if it is the main key or
the second key
The key tag should be kept separ· ately as keys can only be replaced using this number.
If you sell the vehicle , you should also give
the buyer this key tag .
B1H-08 7 I
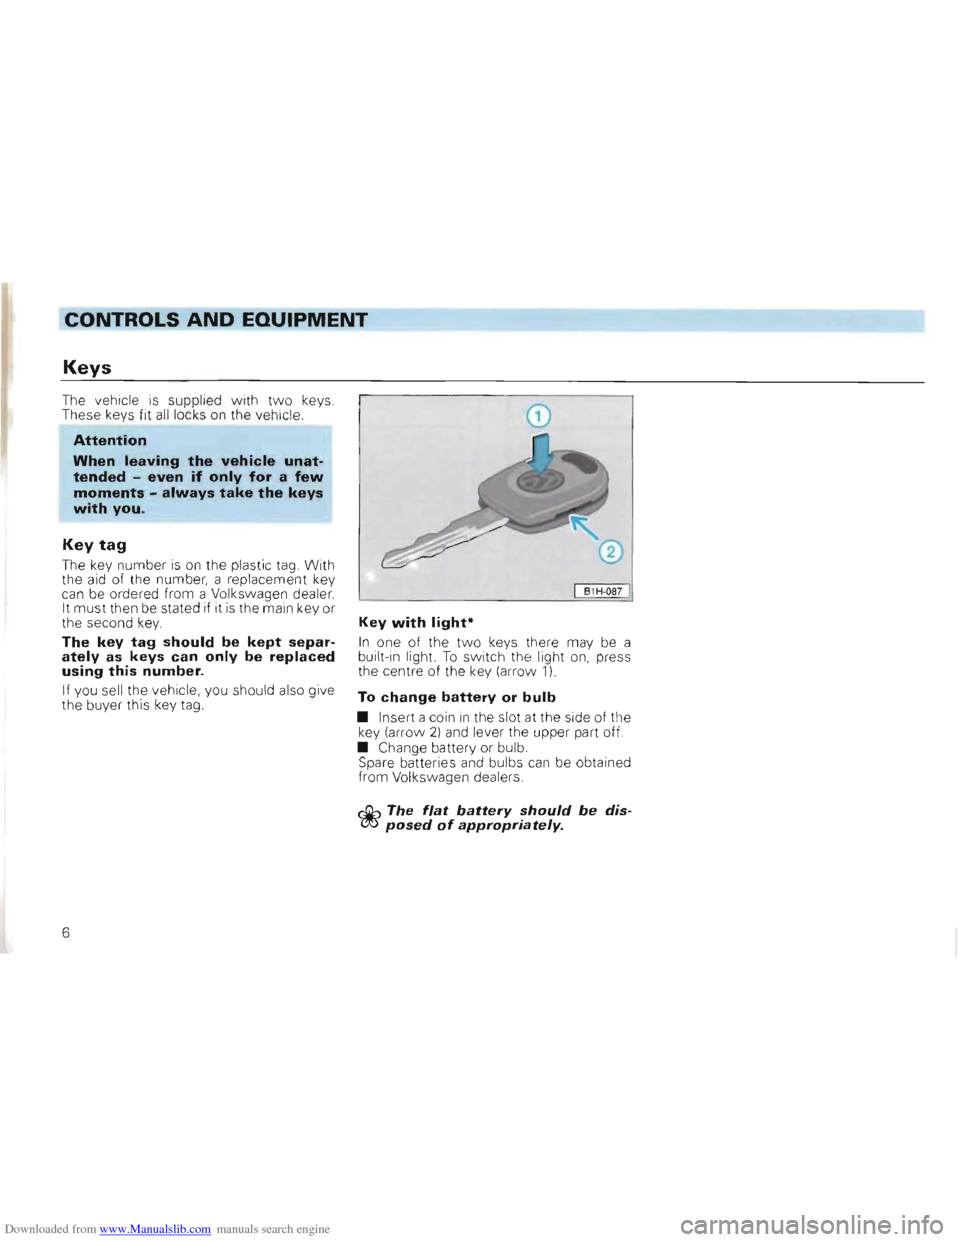
Key with light*
In one of the two keys there may be a
built-in light. To sw itch the light on, press the cent re of the key (arrow 1)
To change battery or bulb
• Insert a coin in the slot at the side of the
key (arrow 2) and lever the upper part off.
• Change battery or bulb .
Spar e batte
ries and bulbs can be obtained
from Vol kswagen dealers .
&... The flat battery should be dis~posed of appropriately.
6
Page 10 of 156
Downloaded from www.Manualslib.com manuals search engine CONTROLS AND EQUIPMENT
Anti-theft warning
system*
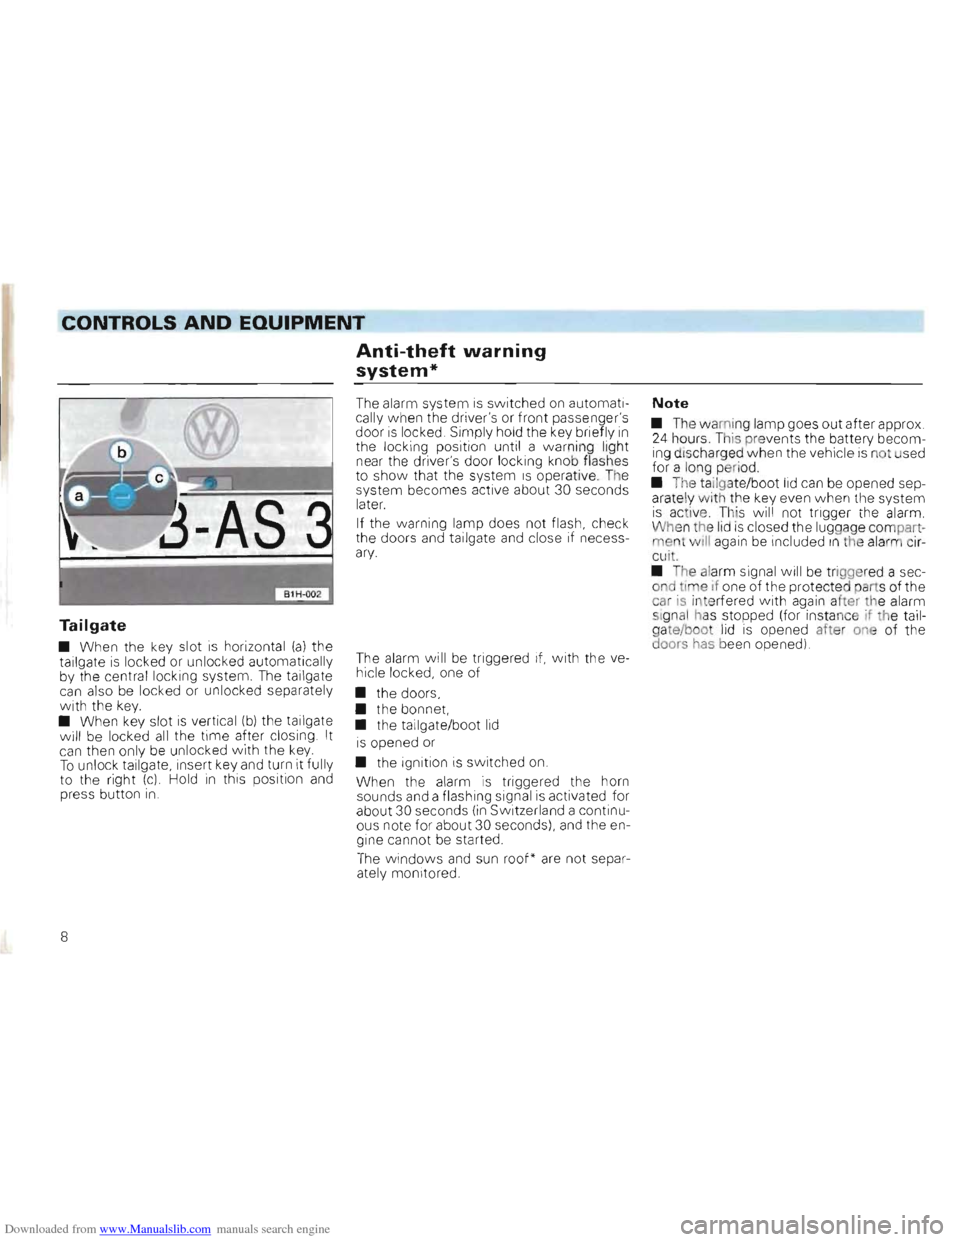
Tailgate
• When the key slot is horizont al (a) the
tailgate is locked or unloc ked automatically
by the central locking system. The tallgate can also be locked or unloc ked separately with the key. • When key slot is vertical (b) the tailgate
will be locke d all the time after closing . It can the n only be unlocked with the key. To unlock tailgate , insert key and turn It fully
to the right (c) Hold in this position and press button in .
The alarm system is switched on automatically when the driver's or front passenger's door is locked. Simply hold the key briefly in the locking position until a warni ng light
near the driver's door locking knob flashes
t o show that the system IS operative. The
system becomes active about 30 seconds
lat
er.
If the warning lamp does not flash, check
the doors and tailgate and close if necessary.
The alarm will be triggered if, with the ve
hicle locked, one of
• the doors,
• the bonnet,
• the tailgate/boot
lid
is opened or
• the ignition is switched
on.
When the alarm is triggered the horn
sounds and a flashi ng signal is activated for
about 30 seconds (in Switz erland a continu
ous note for about 30 seconds), and the en
gine cannot be started .
The windows and sun roof* are not separ
ately monitored .
Note
• The wa mi ng lamp goes out after approx . 24 hours. T hiS pre ven ts the battery becom
ing disc harged when the vehicle is not used for a long peri od
• The
tailgate/boo t lid can be opened sep
arate ly wi th the key even w hen the system is active . This wi ll not trigger the alarm .
Whe n the lid is closed the luggag e compartment wili again be included In the alarm circu it.
•
The alarm signal will be triggered a sec
ond time if one of the protecte d part s of the
car
is inte rfered w ith again aher th e alarm
si gnal has stopped (for insta nce if the tailgate/boo t lid is opened after one of the
doors has been opened)
8
Page 36 of 156
Downloaded from www.Manualslib.com manuals search engine CONTROLS AND EQUIPMENT
• Attention • When the engine is running it is necessary to hold the vehicle with the foot brake in all gears. Because with an automatic gearbox the transfer of power is not fully interrupted even at idling speed -and the vehicle tends to "creep". If a driving range is selected while the vehicle is stationary, the throttle must on no account be opened (e.g. by hand from inside the engine compartment). The vehicle can then start moving, possibly even when the hand brake is applied.
Before working on a running engine, ensure that selector lever is
in position "p" and thatthe handbrake is applied.
Moving off
Select driving range (R, 0, 3, 2, 1) Wait until the gearbox has shifted and the power flow is made to the driving
wheels (light selection jerk perceptible). Then one can accelerate.
Stopping
To stop vehicle temporarily such as at traffic
lights, it is only necessary to apply the
brakes. It is not necessary to move selector
lever to "N". The engine should however on ly be running at idling speed.
Parking
On level ground all you need do is engage
the parking lock. On a gradient the hand
brake should be applied firmly first and then
the parking lock engaged. This will ensure
that the locking mechanism
is not too heav
ily loaded and makes the lock easier to dis
engage .
Tow starting
On vehicles w ith automatic gearbox the en
gine cannot be started by towing or pushing
the vehicle. See page130 .
When the battery
is flat. the engine can be started from the battery of another vehicle
by using jumper cables See" Emergency starting", page 128.
Towing
If the vehicle has to be towed at any time ,
you must read the instructions in the sec
tion "Towing/tow starting on page 129.
Emergency programme
If functional defects occur in the electronic system the gearbox can, amongst other
things, carry on operating in two emergency
programmes: •
The gearbox continues to change up
and
down automatically as before but hard shift
jerks are however noticeable. The vehicle
should
be taken to a Volkswagen dealer.
• The gearbox no longer changes up and
down automatically.
The gearbox can then be shifted manually
but in the selector leve r positions "0", "3"
and "2" only the 3rd gear is available.
I n se lector lever positions " 1 " and " R", the
1 st and reverse gears
are available as nor
mal .
However, the converter must. due to the
absence of 2nd gear work harder ,
and under
certain circumstances this causes the con
verte r to overheat.
In a case such as this the
vehicle should be taken, as soon as poss
ible, to a Volkswagen dealer.
34
Page 38 of 156
Downloaded from www.Manualslib.com manuals search engine CONTROLS AND EQUIPMEN-=-T-=------___
Starting the engine
General hints
Attention When starting the engine in confined spaces there is a danger of poisoning.
• Before starting, move gear lever to neu·
tral (with automatic gearbox: Selector lever in "P" or"N" position) and apply handbrake fi rmly
•
On vehicles with a manual gearbox de
press the clutch pedal when operating
starter
so that starter only has to turn en
gine .
• As soon
as engine starts, release the
ignition key so that starter can dise ngage .
• After starting a co
ld engine It may sound
noisy for a moment or two because the 011 pressure has to build up in the hydraulic
tappets first. This is normal and no cause for
alarm .
~Do not warm engine up by run~ning it with vehicle stationary. Drive off straight away.
Do not overrev or use full throttle until the
engine has reached the normal operating
temperature .
• On vehicles with a catalytic converter the engine must not be started by towing the vehicle in ex· cess of 50 m. Otherwise unburnt fuel can pass into the converter and lead to damage.
• Before trying to start engine by towing, the battery from another ve· hicle should be used for starting if possible -see page 128.
Petrol engines
These engines are equipped with a petrol in
jection system that automat ically supp lies
the correct fuel/air mixture at all ambient
temperatures.
When engine
is cold or at operating temperature do not accelerate before or
during the starting procedure.
I f the engin e does not start at once, stop
us ing th e starter after 10 secs. wait about
half a m in ute and then try again.
If the engine sti
ll does not start, the electric
fuel pump fuse may have blown -see page
119 .
When the engine
is very hot it may be
neces sary to accelerate slightl y after the
engine has start
ed.
/
36
Page 39 of 156
Downloaded from www.Manualslib.com manuals search engine ___CONTROLS AND EQUIPMENT
Diesel engines
Glow plug system
Ith the 47 and 66 kW Diesel engines. ~fter sw itching to the driving position (ignion on ), the required glow plug warm-up
• m e is Indicated by a lamp which is con
:r oll ed by the coolant temperature -see
p ag e 47 .
On he
55 kW Diesel engine the glow pl ug sys tem is automaticall y activated after ~'osing the driver's door. If the engine is not subsequentl y sta rted, the glow plug syst em .111 not be activated by each further opening an closing of the driver's door.
Cold starting aid/idling speed
boost (47 and 55 kW engines only)
-0 facilitate starting from cold, there is a
c old starting device (cold sta rting aid) in the nJec tion pump.
he cold starting device is actuated when "'1e knob on h e left of the steerinq column
s pulle d out fully.
fl addition , the idling speed can be in~reased with the knob to reduce any vehicle
• br ation which may occur .
47 and 55 kW engines
Starting a cold engine
• At ambient temperatures down to -155C, pull the cold start knob out fully before operating the sta rter .
At lower t em pe rature s, the knob should not
be pulle d out until engine is firing regularly -the engine wi ll then start more
readily .
•
Turn the key in the igniti on lock to posi
tion 2 (see page 35) -the glow plug wa rning
lamp comes on. It goes out when the igni
t ion tempera ture is reached (see page 47) While the glow plugs are working do not switch on any other heavy current consumers because this would place an unnecessary load on the battery.
• When the w arning lam p goes out, start
the engine immediatel y
D o not depress the acce lerator while star
ting
If the
engine only fire s irregul arly, continue to ope rate the starter a few seconds longer (30 seconds at maximum) until the engine
runs under its own power. If
the eng ine does not start , switch the g
low plugs on again and try starting it again as de
scr ibed . If th e eng ine still doe s not start the
fuse for the glow plugs may have blown
page 120 .
• Push the cold start aid knob
in fully as soon as the engin e has rea ched its norma l
operating te mper ature.
If ve hicle vibrati on then
occurs whe n i dling,
the knob can be pul led out again until the en
gine runs free of vibration at the lowest
pos sible idling speed
Starting a warm engine
The glow plug lamp does not come on -the engin e can be started straight away. D o not pull the cold s tart aid knob and do not press
the accelerator pedal.
37
Page 40 of 156
Downloaded from www.Manualslib.com manuals search engine CONTROLS AND EQUIPMENT
Stopping engine
66 kW engine
Starting a cold engine
Ambient temperature above +5 0C:
The engine can be started without pre
glow Do not depress throttle during the
starting procedure.
Ambient temperature below +5 0C:
• Turn the key in the ignition lock to posi
tion 2 (see page 35) -the glow plug warning
lamp comes on It goes out when the igni
tion temperature is reached (see page 47). While the glow plugs are working do not switch on any other heavy current consumers because this would place an unnecessary load on the battery.
• When the warning lamp goes out, start
the engine immediately
If the engine does not start, repeat
preglow and try starting it again as described. If the
engine still does not start the fuse for the glow plugs may have blown -see page 120.
Starting a warm engine
The glow plug lamp does not come on -the
engine can be started straight away
When engine has been running fast for a long time, let it idle for about 2 minutes so that it can cool down slightly before being switched off.
Attention After the engine has been stopped the fan can continue running for a while (up to about 10 minutes) with the ignition switched off. It can also start to run again suddenly after a short time if -the coolant temperature increases due to heat build-up
-when engine is hot and the engine compartment is heated additionally by strong sunlight.
Special care must therefore be taken when working in the engine compartment.
On vehicles with a catalytic converter, the ignition must not be switched off as long as the vehicle is rolling with a gear engaged, otherwise, unburnt fuel can pass into the catalytic converter and cause damage.
38
Page 42 of 156
Downloaded from www.Manualslib.com manuals search engine CONTROLS AND EQUIPMENT
1 -Service interval display
The display appears after switching on the
ignition (engine not started) for a few sec
onds in place of the mileage recorder in speedometer. If no service is necessary IN 00 will be displayed.
If a service is due,
the following appears in the display for a few seconds even after
starting the engine
• 0
E: L - Engine oil change
• :n 0 : -Inspection service
• : n 02 -I nspection service with addi
tional work After a service has been carried out, each
service must be called up individually and
the display zeroed . If for instance the in
spection service
IN 02 with oil change is car
ried out, the OEL, IN 01 and IN 02 must be
zeroed . The zeroing will be carried out by
the Volkswagen dealer
as follows : •
The zeroing of the service interval dis
play should only be carried out
in "total" mileage recorder mode. If the service interval display is zeroed in the "trip" recorder
mode the trip recorder can be erased .
•
With the ignition switched off, press and
hold the button below the speedometer
(left arrow)
• Switch
off ignition and release button.
The word OEL can be seen in the display By briefly pressing the button for adjusting the analog clock (right arrow) or the minute but
ton of the digital clock will zero the service.
•
By again pressing the button below the
speedometer the other services will be dis
played and can be cancelled
individually
• Switch on ignition.
Notes
• Do not zero the display between the ser
vice intervals -otherwise an incorrect read
ing will be shown.
• If the battery
is disconnected the details in the service display are retained.
• If a defective speedometer is replaced,
the service interval display
must be repro
grammed This should be carried out by a Volkswagen dealer. Should the display not
be reprogrammed , then the service work must be carried out in accordance with the Service Schedule and not according to the
service display. The service display only be
comes valid again after
an inspect ion IN 02 is carried out and the service display is zeroed.
40
Page 45 of 156
Downloaded from www.Manualslib.com manuals search engine CONTROLS AND EQUIPMENT
-0 call up the da ta th e memories are se
ac ted by means of the switch A in the wiper
ev er:
. - S
ingle jou rne y memory
2 -
Total jo urne y memory
l1e foll owi ng data can be ob tained from the
m em ories :
•
Driving time
• Distance drive n
• Average speed
• Averag e fuel cons umpti
on
he amount of fuel used IS not indicated.
Erasing the memories
With the ignition switched on, both mem
ories can be eras ed separate ly in eac h switch positio n by pres sing sw itch A
p assed the appro priate detente position to opositio n for longer than one second.
If t
he battery is discon nected for any reason, the stored information is automaticall y
erased .
The displays
No symbol -Time
The time is shown even when the ignitio n
i s switched off.
The time can be set with the butt ons (h and min) on right below the rev count er -see
"Dig ita l Clock" page 41
G -Driving time
In switch position 1 the driving time
which has elapsed since ig nition was
switc hed on or the memory cance lled is indica ted -see previous page also "Single
j o urney memo ry"
In switch position 2 the total driv ing time for all IndiVidual jo urneys is ind icatedsee previous page also " T otal journey mem
ory"
The maximum time in both sw itch positions is 99 hours 59 minutes. When thi s figure is exceeded the indicatio n starts at zero again.
km -Distance covered
The remarks made under "Dri ving time" also aoply in principle to "Dist ance cov
ered" 'T he maxim um distance indicated is
9999 km or 6214 miles.
km/h -Average speed
Afte r swi tching on the ignitio n or eras ing
the memory being used, the average speed is in d ic ated after a dista nce of about 100 m . Up to th is point a dash appea rs instead of a
figure.
In switch position 1 the ave rage speed
for the current single journe y is ind icated.
In switch position 2 the average speed
indicated is tha t achieved during all single
j ourneys -see prev ious page "total jou rne y
memory"
Itr./100 km -Average fuel
consumption
It is the ave rage fuel cons umption which is in dicated and not the momentary consump
t ion at the time of reading. In principle the
remarks made under "average speed" also
apply here.
Note
The amount of fuel used is not indicated.
43
Page 49 of 156
Downloaded from www.Manualslib.com manuals search engine CONTROLS AND EQUIPMENT
2 -Engine oil pressure ~
e wa rning lamp flashes when ignition is :ched on. the lamp must go out when ,=~g ne has started.
, 'Il e warning lamp does not go out or
ash es when driving -a buzzer also sounds
-' e!,gine spe,eds above 2000 rpm -stop, switch engine off, check oil level and if ecessary, add oil -see page 94.
- - he lamp comes
on although the oil level 5 n order, do not drive on. Do not even "'., t he engine at idling speed -call in expert ~slstance.
-du ring the Journe y the engine is operated
a : a speed less than idling speed, it ca n ~ appen that the oil warning lamp lights up. "crease engine speed by accelerating or :'langing down .
Note Th e oil pressure warning lamp is not an oil level indicator. The oil level shou.'d therefore be checked at reg, ular Intervals, preferably every time the fuel tank is filled.J
3 -Alternator
The warning lamp comes on w hen the igni
tion IS sWitched on and must go out when
the engine is started .
The alternator
is driven by a long-life ribbed
belt.
If the warning lamp lights during the
Journey ,
stop, switch off engine and
check ribbed belt.
If
t~e ribbed belt is loose or broken, do not
drive on -the coolant pump is no longer
being driven. The ribbed belt must be
checked/renewed by the next Volkswagen
dealer.
If the ribbed belt
is not loose or broken, one
can normally drive on to the next Vo lks
wag en dea ler. However as the battery is
then discharging co ntinuously , all electrical
consumers which are not absolutely essen
tial should be switched off.
4 -Glow plugs
(Diesel engines only)
When the engine
is cold the w arning lamp
come s on when key IS turned to Drive posi
tion (ignition on)
If the warning lamp does not come on, there IS a defectln the glow plug system -call in expert assistance.
When the lamp goes out, start the engine
Immediately -see page 37.
As the 55 kWDiesel engine glow period be
gins automatically after closing the drivers'
door,
It can happen that after switching to
the driving position (Ignition on) with a cold
engine, that the glow plug warning lamp
does not light up . The engine
can be started
straight away
When the engine
is warm the glow plug
lamp does not come on -the engine ca n be started straight away
Note
If while driving a fault occurs in the engine
management system of the 66 kW Diesel
engine, this
is indicated by a flashing warnIng lamp The engine must be checked by a
Volkswagen dealer as soon as possible.
47