tow VOLKSWAGEN GOLF 1993 1H / 3.G Owners Manual
[x] Cancel search | Manufacturer: VOLKSWAGEN, Model Year: 1993, Model line: GOLF, Model: VOLKSWAGEN GOLF 1993 1H / 3.GPages: 156, PDF Size: 6.36 MB
Page 5 of 156
Downloaded from www.Manualslib.com manuals search engine CONTROLS AND EQUIPMENT
Dashboard and Controls ..... 4
. ey s, Cen tral locking . . .... 6, 7
::"tl-thef t warning system .... 8
Joors .......................... .... 9
oot lid .... ........... . . . . . 10
::Iectric windows .. . .. 10
• ~Irrors . . ..... . ... 12
Seal belts 13
"" rbag System . . . . . 18
Safe ty for children .. ... 21
ead restraints . . . . . .. 24
= ro nt seats . . . . . . . . . . . .. 25
Rear seat . . . 27
L u ggage compartment ... . ... . ...... 28
M esh partition (Estate) ...... 29
L u ggage compartment cover /
F olding/sliding cover
... 30
Pedals, Hand brake .. 31
Manual gearbox .... ... .... 31
Automati c gearbox . . . .. .......... 32
H eig ht-adjustable steering wheel ..... 35
I gnition lock. . . . . .. 35
Starting/stopp ing engine 36, 38
\lIstrumellts .. .... 39
Warning lamps ....... 46
Switches . . . . . . . . . . . . . . 50
Turn signal and dip lever ............. 53
Cruise control system ........... 54
Wi ndscreen wipe r and washer system 55
Heating an d ventilation .. . ...... 56
Air cond itioner ......' 59
Sliding/ti ltin g roof. . . . . . . . . . . . ... 65
Sun visors / Interior lights 66,67
Cigarette lighter, Ash tray ..... 68
Shelves and boxes . . . . . . . . . . . ... 69
Roof rack / Roof ra ilings ... 70
DRIVING TIPS
The firs t 1500 km -and after wards .... 71
Driving economically and ecologically .. 72
Brakes. . . . . . . . . . . . . . . . 75
Tra iler tow ing . .. ..... . .... ... ...... 77
Driving a four- wheel drive vehicle .. 79
GENERAL MAINTENANCE
Filling the tan k, Fuel. 81, 82
Care of vehicle ........ .. . . 85
Bonnet . . ... 90
Engine compartment .. ...... .... .... 91
Engine oil ..... .......... ........... 92
Automatic transmission fluid (ATF)* ... 96
Power-assisted steering .. 96
Cooling system . . . . . . . . . . .. . 97
B rake fluid ...... 99
Battery . . . . .. 100
Spark plugs. V-belts . . . . . . . . . 102
Washer system
... . .. 103
Windscreen w iper blades . . . 104
Dust a
nd pollen filter * . 104
Wheel s . 105
D riving abroad ..... ............... 110
Accessories, modifications and
renewa l ot parts .............. III
Mobile telephones and tw o-way rad ios 111
DO -lT-YOURSELF
First -aid kit, Warn ing triangle ........ 112
Storage of vehicle tools, spare wheel
a n d ball coupling trailer bracket ...... 113
Vehicle tools, Spare wheel 114
CONTENTS
Changing w heels . 116
F uses . ........ .. .. . . . ... . .... 119
Changing bulbs. . .... .. . 121
Installing radio . . . . .. 127
E mergency starting .. .. 128
Tow starting / to wing . . .. 129
L ift ing vehicle ......... 131
SPECIAL INFORMATION
Body ..... .... . .......... 132
Environmental compatibility ... 133
TECHNICAL DATA
Engine data . .. , .... .... . 134
P er forman ce .. ... ... ... . .. 136
Fuel consump tion .. 137
Wh eels
. . 139
T yre pressures
.. .. ... .. . . .. ... 1 4 1
Weights ... 143
Trailer weights .. 144
Dimensions. ...... .. ... 145
Capacities " ..... 146
Vehicle identification data ... 147
ALPHABETICAL INDEX
Alph abetical index ... 148
3
Page 15 of 156
Downloaded from www.Manualslib.com manuals search engine CONTROLS AND EQUIPMENT
Seat belts
Why have seat belts?
It has been proven that seat belts give good protection in accidents. In most countries therefore the wearing of seat belts is required by law.
Attention • The belts should be put on be
fore every journey -even in town
traffic. This also applies to the
rear seats.
Pregnant women too should al
ways wear a seat belt.
• The routing of the belt is of
major importance to the protec
tive effect of the belt. How the
belt should be worn is described
on the next pages.
How children can be carried safely in the ve
h icle is explained on pag e 21 .
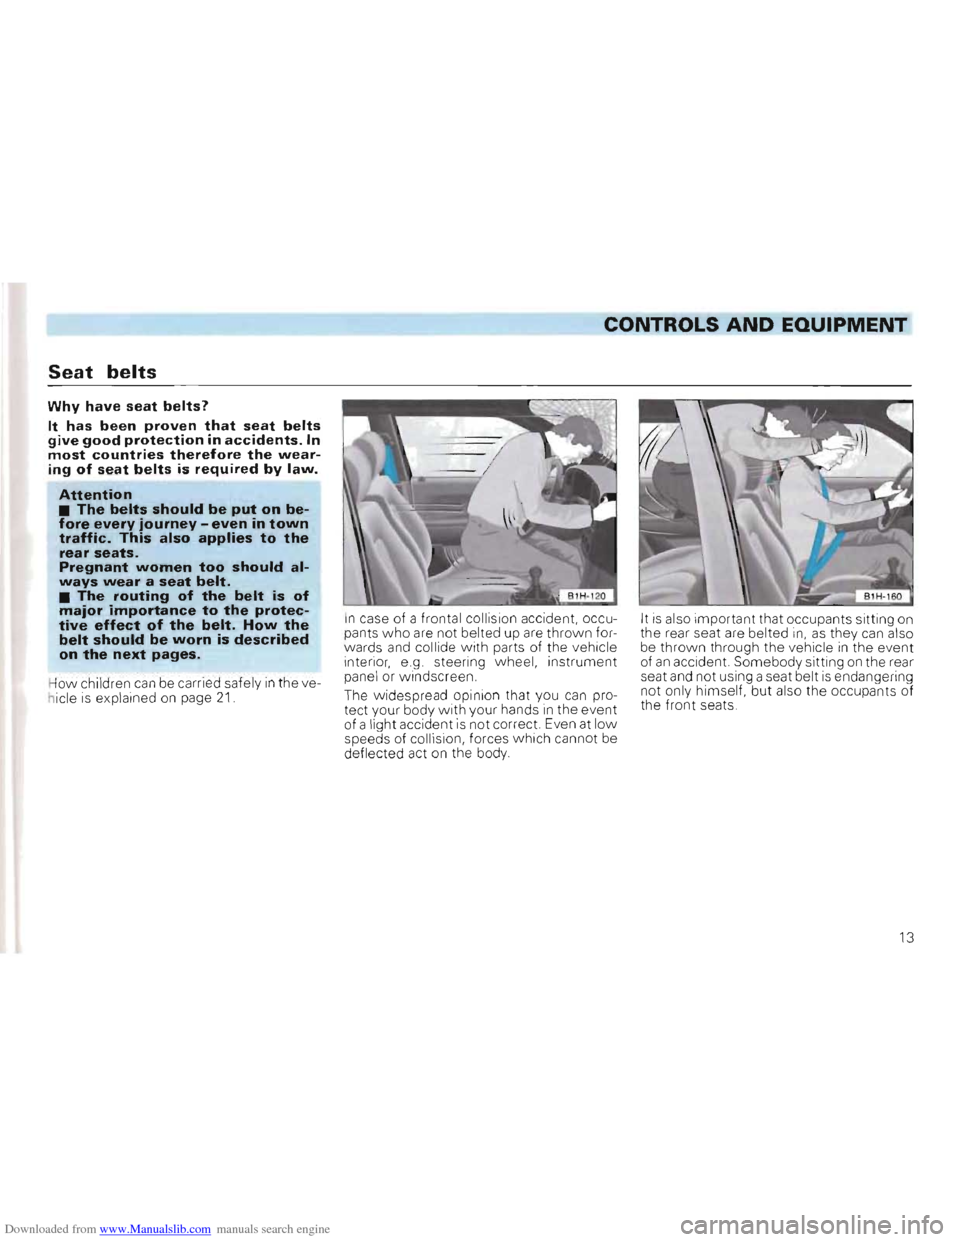
In case of a frontal collision accident, occu
pants w ho are not belted up are thrown for
w ards and collide with parts of the vehicle
interior, e.g steering wheel, instrument panel or w ind screen.
The wide spread opinion that you can pro
tect your body with your hands in the event
of a light accident is not corr ect. Even at low speeds of collision, forces which cannot be
deflected act on the body. It
is also
important that occupants sitting on
the rear se at are belted in, as they can also
be th rown throu gh the vehicle in the event
of an accident. Somebody sitting on the rear
seat and not u sing a seat belt is endangering
not only himself , but also the occupants of the front seats.
13
Page 17 of 156
Downloaded from www.Manualslib.com manuals search engine L-___________________________________________________~~~_CONTROLS AND EQUIPMENT
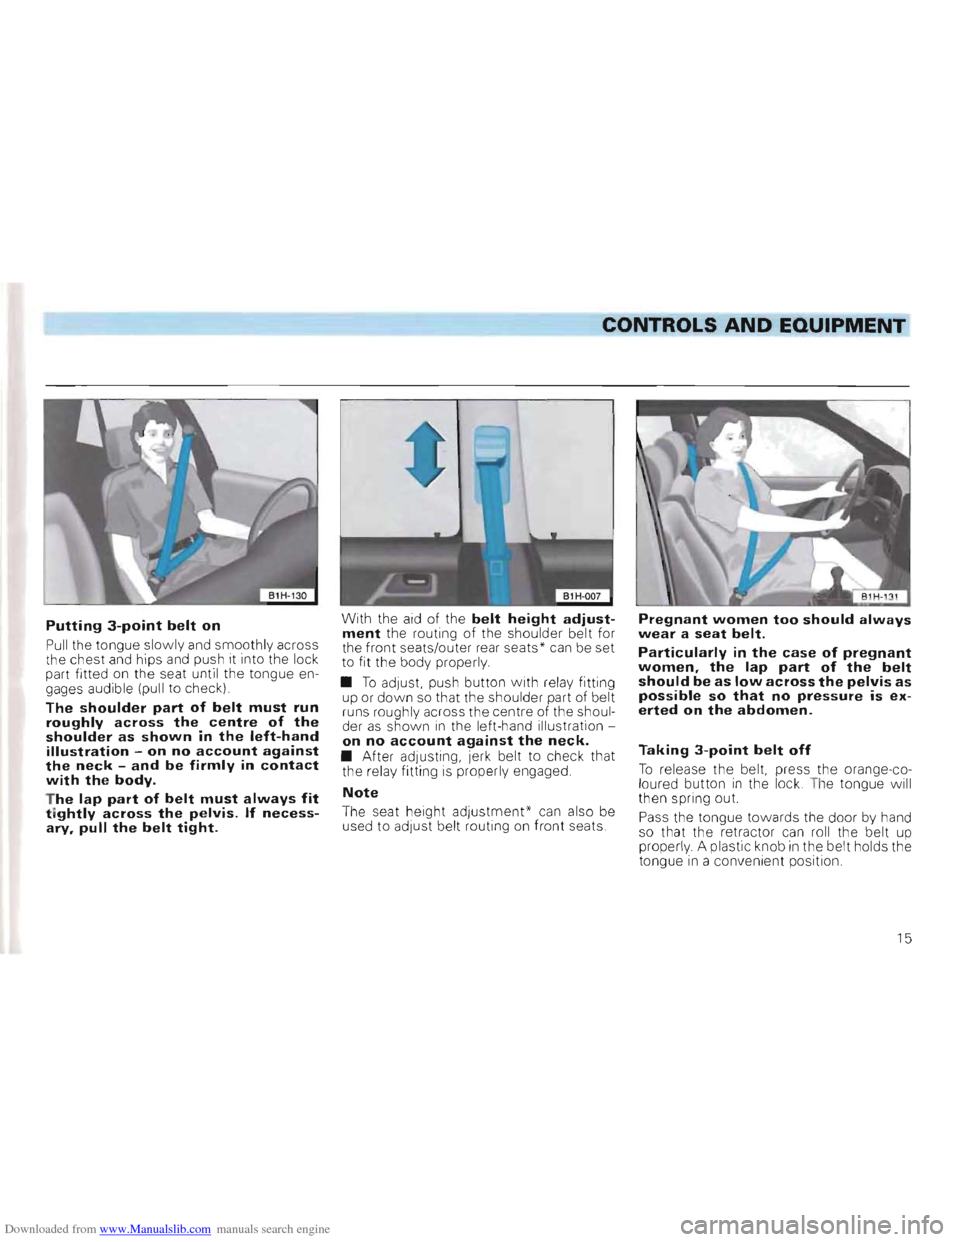
Putting 3-point belt on
Pull the tongue slowly and smoothly across
t he chest and hips and push it into the lock
part fitted on the
seat unti l the tongue en
gages audible (pull to c heck)
The shoulder part of belt must run roughly across the centre of the shoulder as shown in the left-hand illustration -on no account against the neck -and be firmly in contact with the body.
T he lap part of belt must always fit tightly across the pelvis. If necessary, pull the belt tight.
With the aid of the belt height adjustment the routing of the shou lder belt for
the fron t seats/outer rear seat s * can be set
t o fit the body properly.
• T o
adJUSt. push button with re la y fitting
up or down so that the shoulder part of be lt
runs rough ly across the cen tre of the shoul
der as shown i n the le ft-h and illustration on no account against the neck. • After adjustin g, jerk belt to check that
the relay fitting is properly engaged.
Note
The seat height adjustment' can also be
used to adju st be lt routing on front seats.
Pregnant women too should always
wear a seat belt.
Particularly in the case of pregnant
women, the lap part of the belt
should be as low across the pelvis as
possible so that no pressure is ex
erted on the abdomen.
Taking 3-point belt off
To re lease the belt, press the orange-co
l oured button in the lock . T he to ngue will
th en s pring out.
Pass the tongue
towards the door by hand
so that the retractor can roll the belt up
prope
rly . A plastic knob in the belt holds the
t o ngue in a convenient position .
15
Page 30 of 156
Downloaded from www.Manualslib.com manuals search engine CONTROLS AND EQUIPMENT
Luggage compartment
In the interests of good handling ensure that
the load (persons and luggage) is distributed
e ven ly. Heavy items should always be car
ried as near to the rear axle as possible or
better still, between the axles. The permissible axle and gross weights must on no account be exceeded see page 143.
Attention • It should be noted that when transporting heavy items the handling will change due to the displacement of the centre of gravity. Driving style and speed must be altered to suit. • The load must be stowed so that no items of luggage can fly forward if brakes are applied suddenly.
One should ensure that
- the heater element
wires in the rear window are not damaged by articles rubbing
against them and
- the ventilation slots
in the luggage com
partment side trim * are not co vered .
Attention
Never drive with the tailgate not properly closed as exhaust gas
can then be drawn into the vehicle interior.
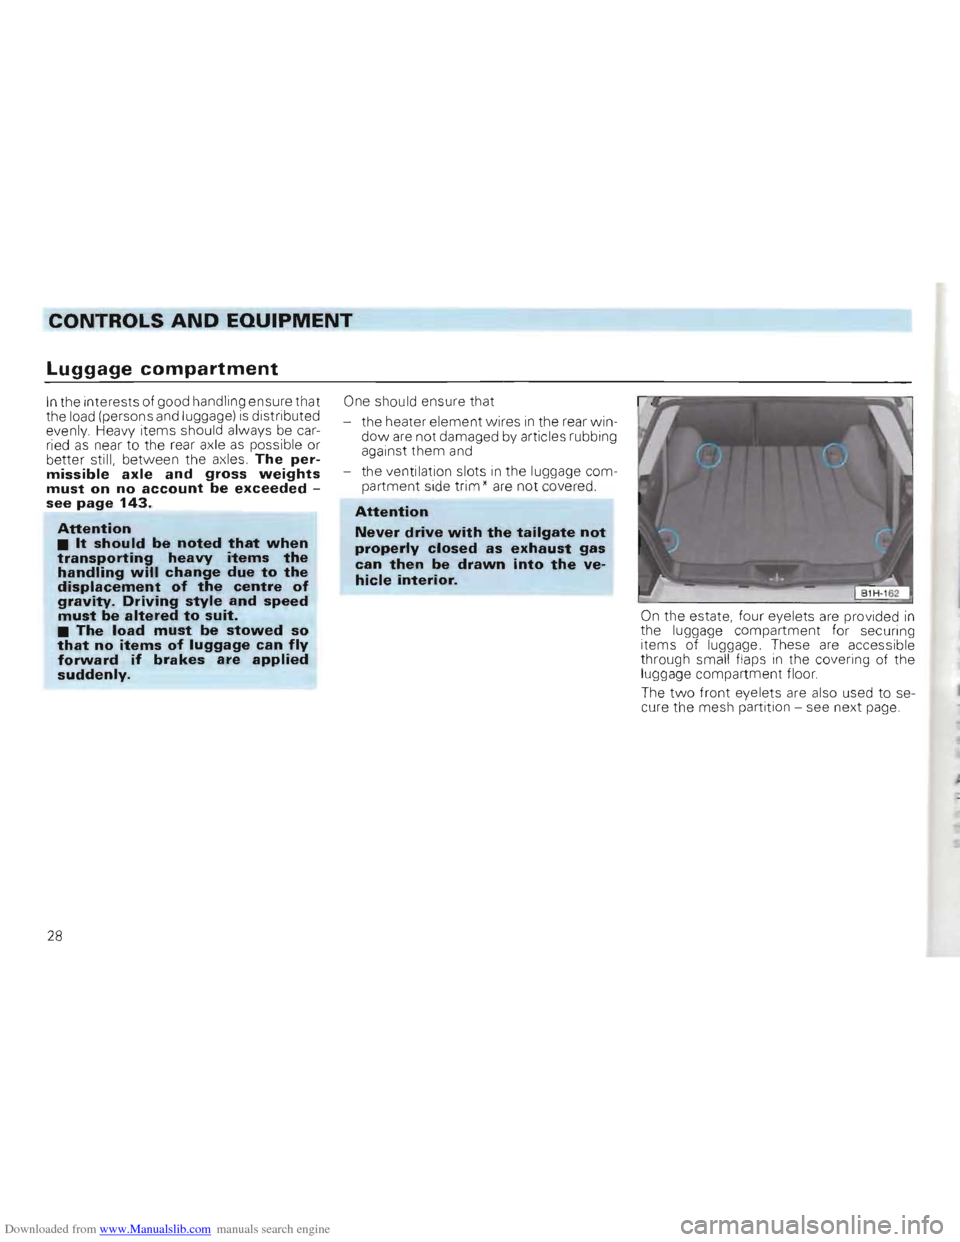
On the estate , four eye lets are provided in the luggage compartment fo r secur ing
items of luggage. These are accessib le
thr ough small flaps in the covering of the luggage compartment floor.
The
two front eyelets are also used to se
cure the mesh partition -see next page.
28
Page 36 of 156
Downloaded from www.Manualslib.com manuals search engine CONTROLS AND EQUIPMENT
• Attention • When the engine is running it is necessary to hold the vehicle with the foot brake in all gears. Because with an automatic gearbox the transfer of power is not fully interrupted even at idling speed -and the vehicle tends to "creep". If a driving range is selected while the vehicle is stationary, the throttle must on no account be opened (e.g. by hand from inside the engine compartment). The vehicle can then start moving, possibly even when the hand brake is applied.
Before working on a running engine, ensure that selector lever is
in position "p" and thatthe handbrake is applied.
Moving off
Select driving range (R, 0, 3, 2, 1) Wait until the gearbox has shifted and the power flow is made to the driving
wheels (light selection jerk perceptible). Then one can accelerate.
Stopping
To stop vehicle temporarily such as at traffic
lights, it is only necessary to apply the
brakes. It is not necessary to move selector
lever to "N". The engine should however on ly be running at idling speed.
Parking
On level ground all you need do is engage
the parking lock. On a gradient the hand
brake should be applied firmly first and then
the parking lock engaged. This will ensure
that the locking mechanism
is not too heav
ily loaded and makes the lock easier to dis
engage .
Tow starting
On vehicles w ith automatic gearbox the en
gine cannot be started by towing or pushing
the vehicle. See page130 .
When the battery
is flat. the engine can be started from the battery of another vehicle
by using jumper cables See" Emergency starting", page 128.
Towing
If the vehicle has to be towed at any time ,
you must read the instructions in the sec
tion "Towing/tow starting on page 129.
Emergency programme
If functional defects occur in the electronic system the gearbox can, amongst other
things, carry on operating in two emergency
programmes: •
The gearbox continues to change up
and
down automatically as before but hard shift
jerks are however noticeable. The vehicle
should
be taken to a Volkswagen dealer.
• The gearbox no longer changes up and
down automatically.
The gearbox can then be shifted manually
but in the selector leve r positions "0", "3"
and "2" only the 3rd gear is available.
I n se lector lever positions " 1 " and " R", the
1 st and reverse gears
are available as nor
mal .
However, the converter must. due to the
absence of 2nd gear work harder ,
and under
certain circumstances this causes the con
verte r to overheat.
In a case such as this the
vehicle should be taken, as soon as poss
ible, to a Volkswagen dealer.
34
Page 38 of 156
Downloaded from www.Manualslib.com manuals search engine CONTROLS AND EQUIPMEN-=-T-=------___
Starting the engine
General hints
Attention When starting the engine in confined spaces there is a danger of poisoning.
• Before starting, move gear lever to neu·
tral (with automatic gearbox: Selector lever in "P" or"N" position) and apply handbrake fi rmly
•
On vehicles with a manual gearbox de
press the clutch pedal when operating
starter
so that starter only has to turn en
gine .
• As soon
as engine starts, release the
ignition key so that starter can dise ngage .
• After starting a co
ld engine It may sound
noisy for a moment or two because the 011 pressure has to build up in the hydraulic
tappets first. This is normal and no cause for
alarm .
~Do not warm engine up by run~ning it with vehicle stationary. Drive off straight away.
Do not overrev or use full throttle until the
engine has reached the normal operating
temperature .
• On vehicles with a catalytic converter the engine must not be started by towing the vehicle in ex· cess of 50 m. Otherwise unburnt fuel can pass into the converter and lead to damage.
• Before trying to start engine by towing, the battery from another ve· hicle should be used for starting if possible -see page 128.
Petrol engines
These engines are equipped with a petrol in
jection system that automat ically supp lies
the correct fuel/air mixture at all ambient
temperatures.
When engine
is cold or at operating temperature do not accelerate before or
during the starting procedure.
I f the engin e does not start at once, stop
us ing th e starter after 10 secs. wait about
half a m in ute and then try again.
If the engine sti
ll does not start, the electric
fuel pump fuse may have blown -see page
119 .
When the engine
is very hot it may be
neces sary to accelerate slightl y after the
engine has start
ed.
/
36
Page 50 of 156
Downloaded from www.Manualslib.com manuals search engine CONTROLS AND EQUIPMENT
5 -Brake system
(CD)
The warning lamp* co mes on when
• the handb rake is
on • the brake fluid level is too low The ignition must be switched on.
Attention
If the lamp does not go out when handbrake is released or comes on when driving, the fluid level in the reservoir is too low. Immedi
ately contact a Volkswagen dealer and have the brake system
examined.
You can drive on carefully to the
nearest Volkswagen dealer but allow for higher pedal pressures and longer braking distances on
the way.
I6 -Brake pad wear I,'0',
indicator*
The wa rning lamp lights up for one second when the ignition is switched on as a func
tiona l check.
If the lamp then does not go out or it lights
up dur ing the Journey , the front brake pads
are worn. You should visit a Volkswagen
dealer to have the brake pads checked.
As the brake pad wea r indicator only moni
t ors the front brake pads, we recommend
that you have the rear brake linings checked as well.
7 -Turn signals
The warn ing lamp flashe s when turn signals are sWitched on. If a turn signal fails, the
warning lamp flashes tw ice as fast. (Not
w hen towing a trailer )
Fur ther details are given
on pages 49 and 53.
8 -Main beam
The warning lamp come s on when th e main
beam is on or when the headligh t flas her is used.
48
Page 51 of 156
Downloaded from www.Manualslib.com manuals search engine ----CONTROLS AND EQUIPMENT
Q1~ Trailer turn signals(8 ) Anti-locking Brake System
(ABS)* The warning lamp" flashes when turn sig
nals are switched on when towing a trailer. The warning lamp comes on for a few sec
onds when the ignition is switched on. The If a turn signal fai ls on the trailer or vehicle,
lamp goes out after
an automatic test se the
warning lamp does not flash.
quence has taken place,
If the ASS warning lamp does not go out. or if the ASS warning lamp comes on when
driving, the system is fau lty The vehicle can then only be braked with the normal system
- that is w ith out ASS. The vehicle must be taken to a Vol kswagen dealer as soon as possible .
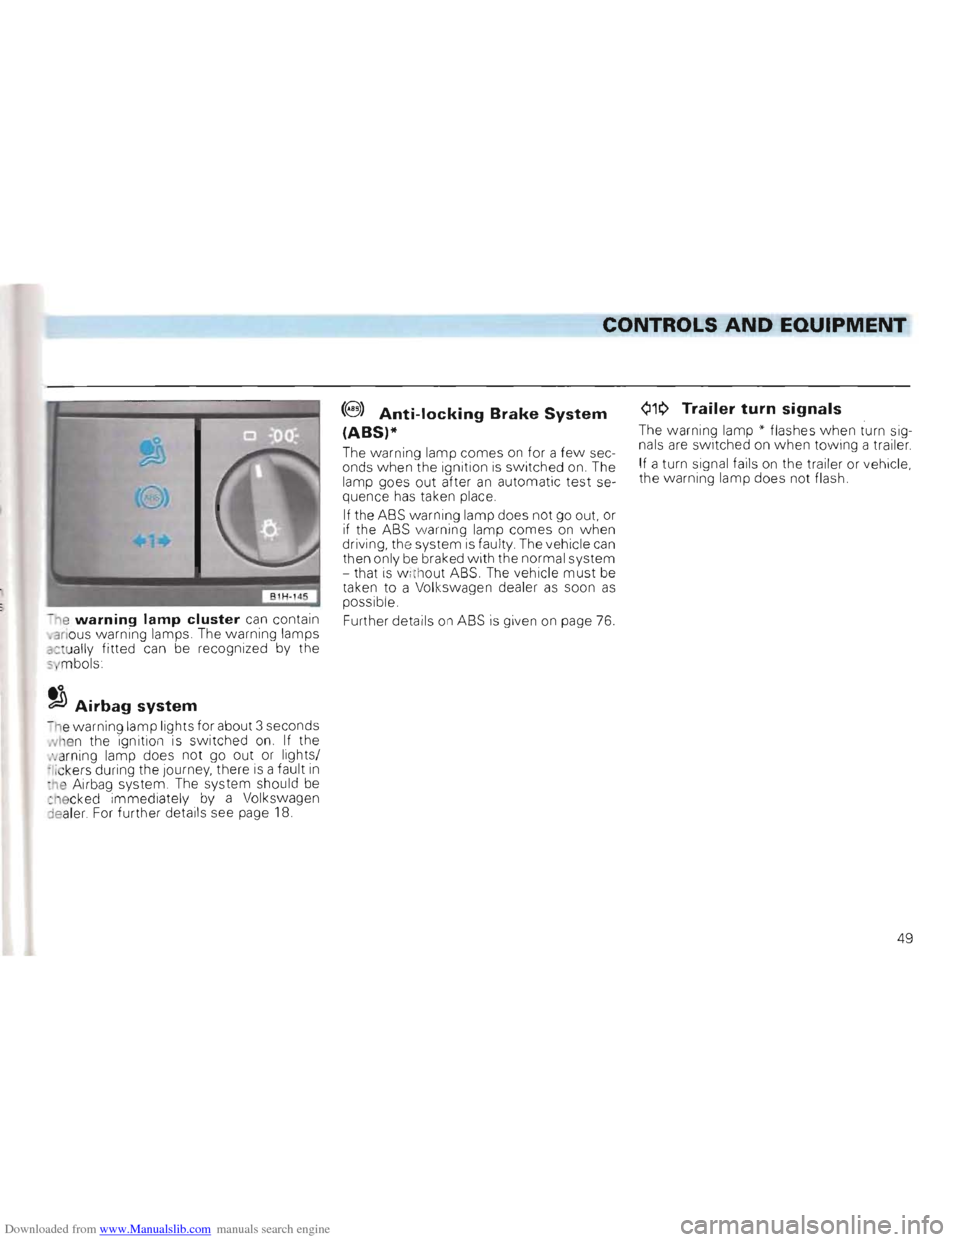
- ne
warning lamp cluster can contain Further details on ASS is given on page 76 . •anous warning lamps. The warning lamps actually fitted can be recognized by the 5 mbols
to ~Airbag system
n e warning lamp lights for about 3 seconds Nhen the ignition is switched on. If the
N arning lamp does not go out or lights/
;Iickers during the Journey, there is a fault in :he Airbag system , The system should be ct16cked immediately by a Volkswagen
:lealer For further details see page 18.
49
Page 55 of 156
Downloaded from www.Manualslib.com manuals search engine CONTROLS AND EQUIPMENT
Tu rn signal and dip lever
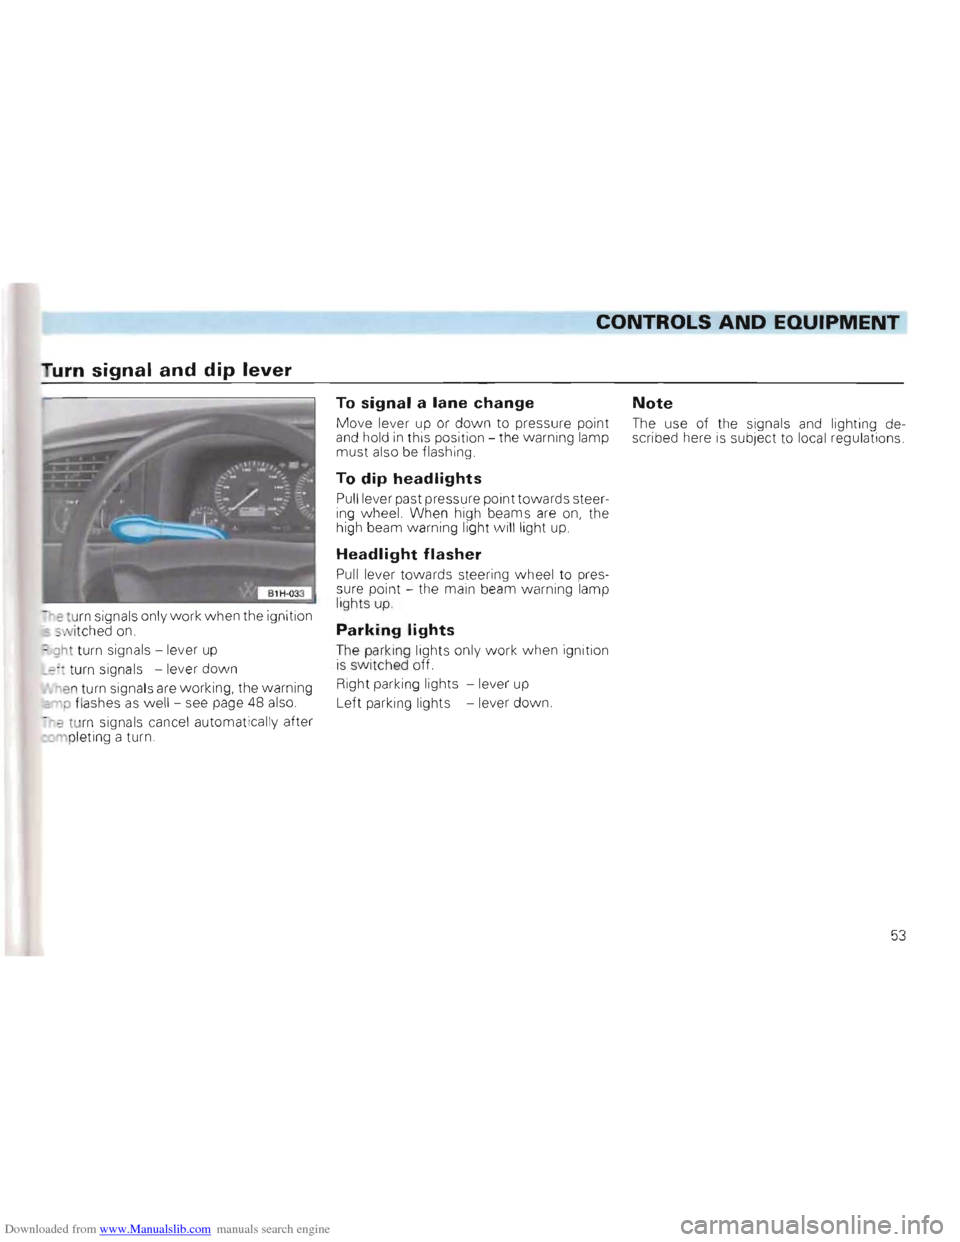
~eturn sign als only w ork when the ignition -wit ched on.
~ gh t turn signa ls -lever up
_z turn signa ls -lever down
"en turn signa ls are working, the warning
p flashes as well - see page 48 also.
-'? tur n signa ls cance l automatica lly after rnplet ing a turn
To signal a lane change Note
Move le ve r up or do w n to pres sure point The use of the signals and lighting deand hold in th is position the w arning lamp
scribed he re is subje ct to local regu lations
must also be f lash ing
To dip headlights
Pull le ve r past pressure point towards steering w heel. When high beams are on, the
high beam warning lig ht w ill light up
Headlight flasher
Pull lever towards steeri ng wh eel to pres
sure poin t - the main beam wa rning lamp
light s up .
Parking lights
The park ing lights on ly work when ignition is s w itched off.
Right park
ing lights -lever up
L
eft park ing li ghts -lever dow n.
53
Page 57 of 156
Downloaded from www.Manualslib.com manuals search engine CONTROLS AND EQUIPMENT
Windscreen wiper and washer system
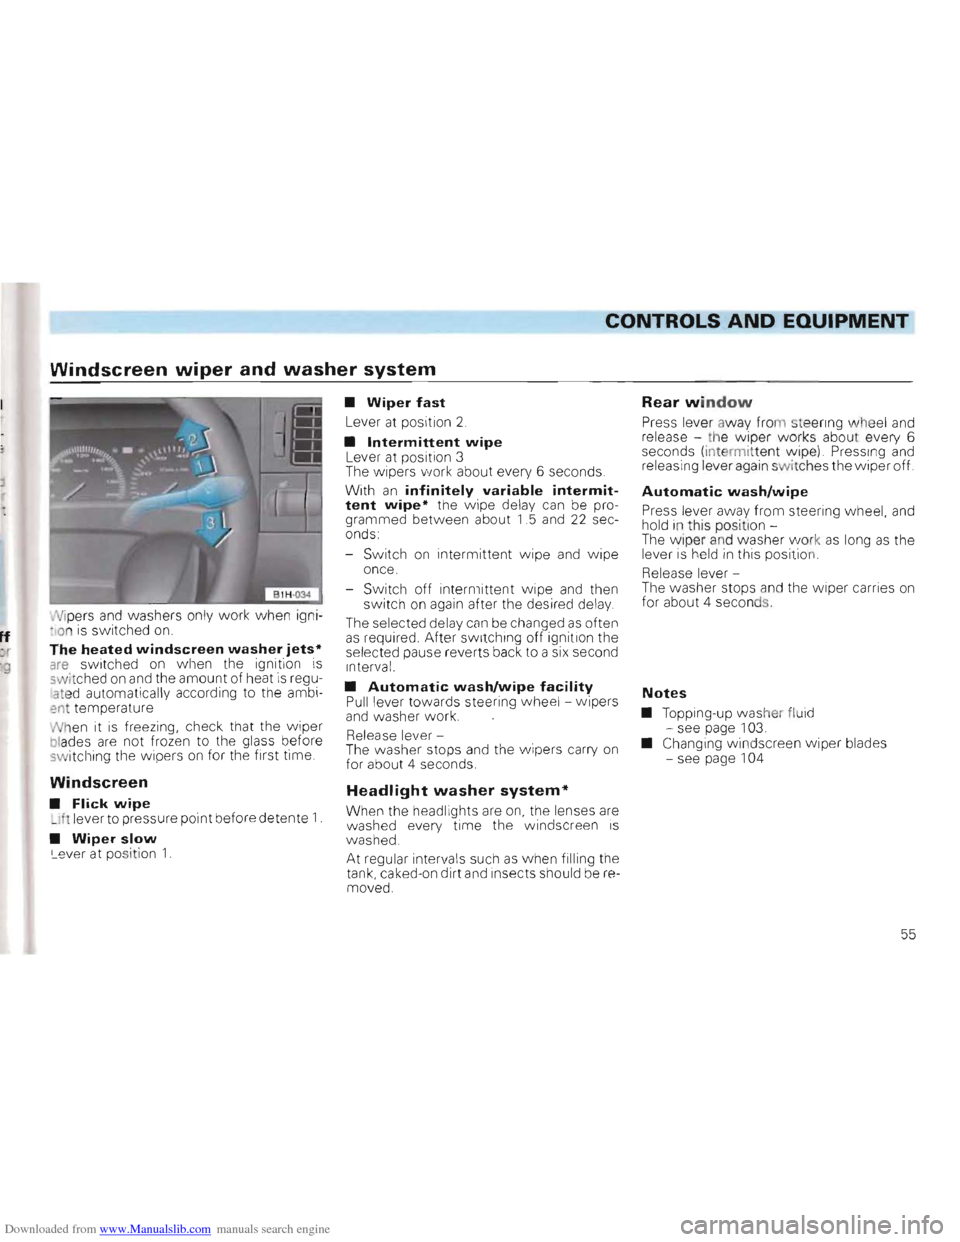
Vipers and washe rs o nly work w hen igni
t io n is switched on.ff : r The heated windscreen washer jets* are swit c hed o n when the ign ition is 9 swi tc hed on and the amoun t of heat is reguat ed automa tically acco rding to the ambi ent tem peratu re
Wh
en it is fr eez ing, ch eck that th e wipe r blades are not fro zen to t he g lass before switching the wipers on for the first time .
Windscreen
• Flick wipe _Ih lever to pressure point befo re deten te 1 .
• Wiper slow Le ve r at pos it io n 1.
• Wiper fast
Lever at posit ion 2
• Intermittent wipe Lever at posit io n 3 The w ipers "vork about every 6 seco nds.
W ith
an infinitely variable intermit
tent wipe* the wipe dela y can be pro
gram med betw een abou t 1.5 and 22 sec
o nds:
- Sw it c h
on intermitte nt wipe and wipe
once.
- Swi tc h off intermitte nt wi
pe an d then swi tch on again afte r the desired delay
The selec ted delay can be ch anged as oft e n as required. A fter switching off ignition the
se lec ted pause r ever ts back to a six seco nd
I n terv al.
• Automatic washJwipe facility Pull leve r tow ards steer ing whee l -wipe rs
and wash e r work.
R elease
lever-
The was he r st ops an d th e wi pers ca rry on
for abo ut 4 seconds.
Headlight w asher system*
Whe n the head lights are on, the lenses are
washed ev ery tim e the windsc reen is w ashed.
At r egular intervals such a s when filli ng t he tank, cake d-o n dir t a nd Insec ts should be re
m oved.
Rear window
Press lever aw ay fr om steenng whee l and release -th e wipe r works about every 6
seco nds (inte rm ittent wip e) Pressing and releasi ng lever agai n switches the w iper off.
Automatic wash/wipe
P ress lever away from stee ring wh eel, an d
ho ld in t his positi on The wip er an d was her wor k as long as th e
l ever is he ld in thi s posi tio n
Release leve r
T he was her stops and th e wiper carr ies on for abo ut 4 seco nd s,
Notes
• T opp ing-up was her fluid
- se e page 103. • Changing winds creen w ipe r blades
- see page 1 04
55