VOLKSWAGEN GOLF 2005 Owners Manual
Manufacturer: VOLKSWAGEN, Model Year: 2005, Model line: GOLF, Model: VOLKSWAGEN GOLF 2005Pages: 444, PDF Size: 92.7 MB
Page 361 of 444
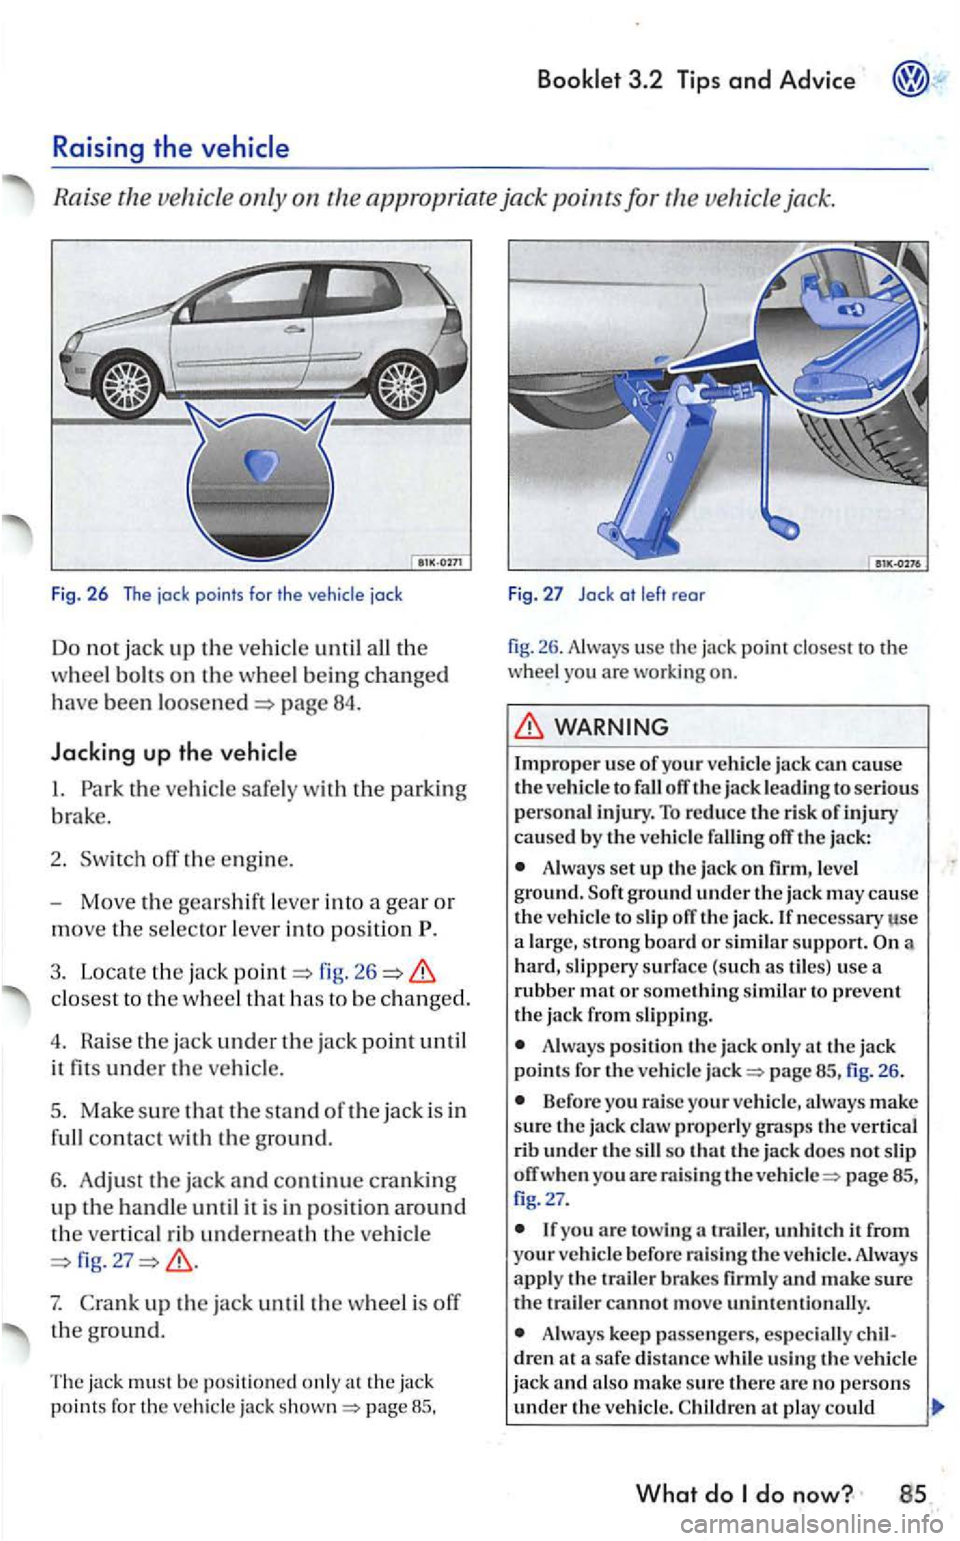
Ra ise th e ve hicle only o n th e app ropr iate jack points fo r vehic le jack.
Fig. 26 The jock points for the
page 84.
Jacking up the
fig . 26
closest to the w heel th at h as to be c h anged.
4. Ra i
se the jack under th e jac k p oin t until
it
fit s under the ve hicl e.
5. Make s
ure th at the sta nd o f th e jack is in
full contact wi th th e ground.
6. Adj
ust th e jack and continue crankin g
up th e han d le until i t is in positio n around
t h e ve
rtical r ib unde rneath th e ve hicle
fig.
fo r t he jack p age 85.
Fig. 27 Jock of left rear
fig. 26. A lways use the jack closest to the whee l you are worki ng on.
WARNING
Impro pe r u se of your vehi cle jack can cause the ve hicl e to fa ll off th e jack leadi n g to serious personal in jury. To reduce th e risk o f injury cause d b y the ve hicle fa llin g ofT the ja ck :
A lways set up t he jack on firm , level
g round. Soft g round unde r the ja c k m ay cause the v ehi cle to slip jack. If n ecessary large , s tro ng b oard or similar s upport. a
hard , slip pe ry surface (such as tiles) use a
rubb er m at or so mething similar to p rev en t ja ck from slippi ng.
Alwa ys position the jac k only th e jack
points fo r t he veh icle page 85 , fig . 26 .
Befor e yo u r aise your ve hicle, a lways make
sure th e ja ck claw properl y grasp s th e vertica l
rib und er the sill so that th e jack do es no t sli p
off whe n yo u are ra isi ng th e page fig. 27.
trailer, unhit c h it from
your v ehicl e befo re ra is in g th e
Alwa ys keep passen ge rs, es peci ally dren at a safe dis ta nce w hile using th e veh icl e
j ack and als o make sure there arc no pers o ns under th e v ehicl e. C hild ren at play c ould
What do do now? 85
Page 362 of 444
3.2 Tips and Advice
(continued)
knock the vehicle ofT the jack or hid e under a
vehicle.
Never support your body weight on the hicle when it is up on the jack.
Never allow anyone to stay in the vehicle when raising the ve hicle with th e jack or when it is up on the jack.
Never let anyone place any part of their body underneath the ve hicle when supported by th e jack.
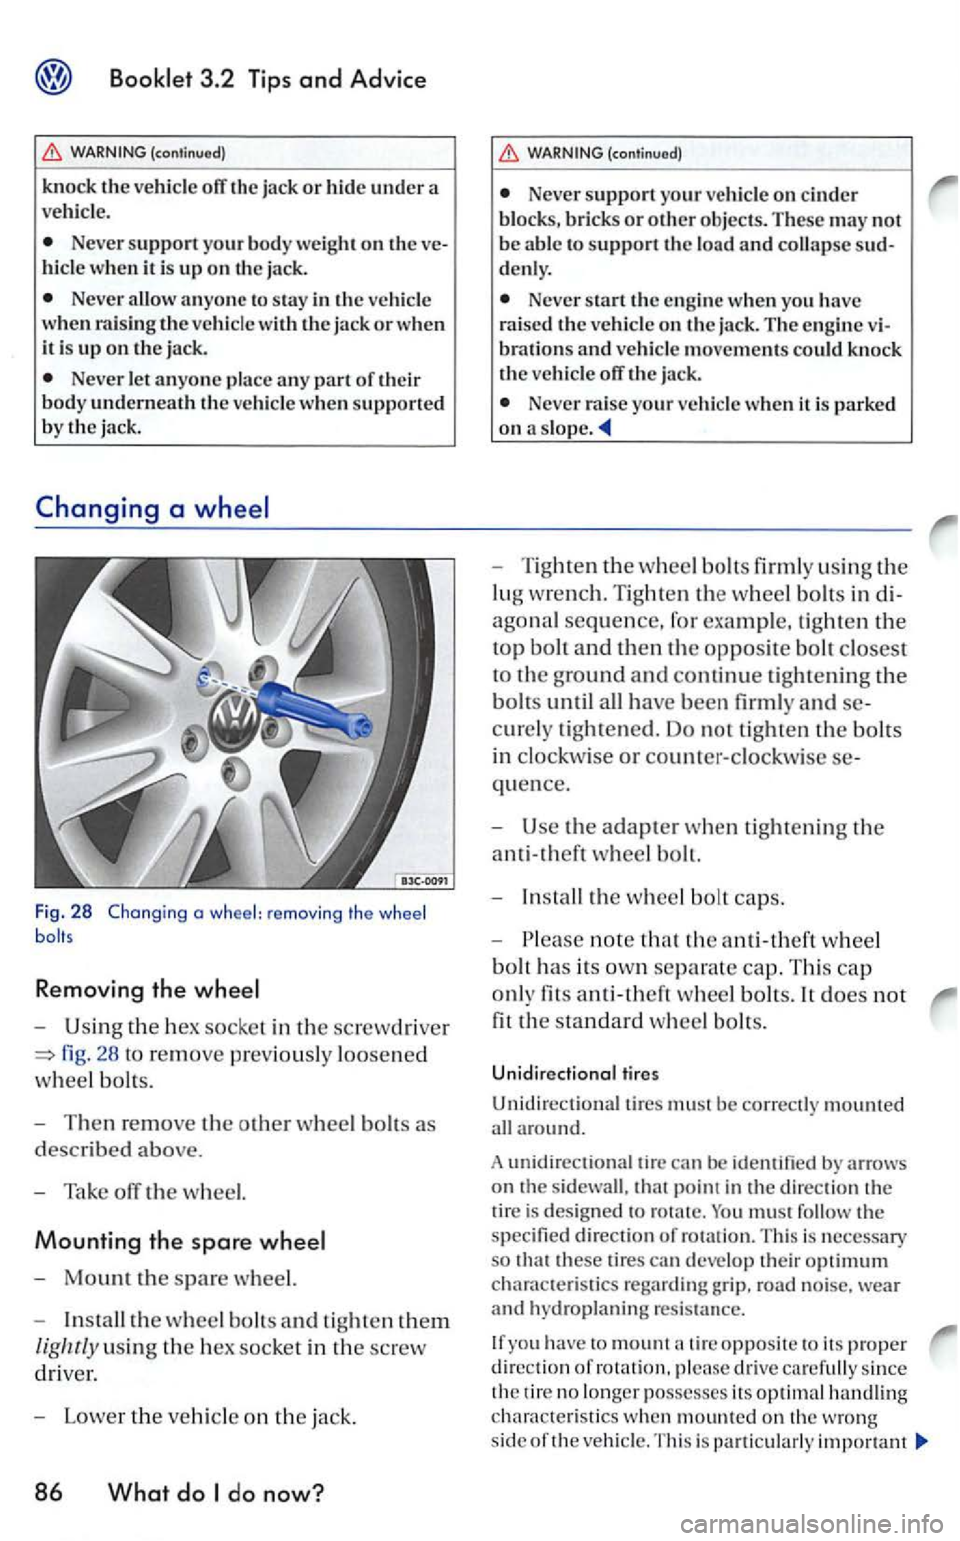
Fig. 28 Changing a wheel: remov ing the wheel
Removing the
U sing the hex socke t in the screwd rive r
fig. 28 to re move pr ev iously loosened
w
hee l bolts.
Then remove th e o ther wheel bolts as
d
escribed above.
Tak e off the w heel.
Mounting the spare
Mount the spare wheel.
In stall the wheel bolts and tight en them
lig hrly using the hex socket in the screw
driv er.
Lower the vehicle on th e jack.
86 What do do now?
(continued)
Ne ver support your vehicle on cinder blo ck s, bricks or ot her objects . These may not
b e abl e to support the load and collapse denl y.
Neve r start th e en gine when you have
rai sed the veh icle on th e jack. The engine brations and ve hicle movements could kno ck
th e ve hicle off the jack.
Neve r raise your ve hicle when it is parked on a s lope .
Tighten the w hee l bolt s firml y using th e
lug wre n ch. Tighten
the w heel bolt s in
agonal sequence, fo r exa mple, tighten the
top bolt and then the opposite bolt closest
to th e ground and continue tight ening the
bolts until all have been firmly and
quence.
Use the adapter w hen tight enin g th e
anti-theft wheel bolt.
In stall the w heel bolt caps.
note that the anti-theft w heel
bolt h
as its ow n separate cap. This ca p
o nl y
fits whee l bolts. It does not
fit the standard wheel bolt s.
Unidirectional tires
Unidirectiona l tires must be correctl y mount ed
all around.
A unidir
ectional tire can
must follow the specifie d direction of ro tatio n. T his is necessary
s o these tire s can deve lop their optimum chara cte ristics regard ing gr ip. road noise. wear and hydroplaning resis ta nce.
you have to mount tir e opposite to its proper d ire ction of rotati on, please drive carefull y since
th e tir e no lo ng er posse sses its optimal ha ndlin g
c h arac te rist i
cs when mounted on th e wro ng
s id e of th e ve hicl e. T hi s is particu larly impo rtant
Page 363 of 444
in wet con dition s. o rd er t o f ully exploi t th e
b en efits of un idi re c tional tires ag ain, yo u sh o uld
imm ed iat ely r eplace or chan ge th e tire in o rd er
t o r estor e th e co rrect direc tio n o f rotat ion.
WARNING
Imprope rl y tig h te n ed or mainta ined wheel
bo lts can b ec ome lo ose causing loss o f co n tro l,
a c olli sion and serious p erso nal inju ry:
Always keep the wh eel bolt s and th e
thread s in the wh eel hu bs clean so th e wheel
b olt s can turn eas ily and be properly
N eve r g re ase or oil th e w heel bo lts and the
threads in the wheel hub s. They can become loose whil e dri vin g if gr ease d or oiled , eve n if
ti ghten e d t o the sp ecified t orque.
After changing a
-secure the jack and
tool kit in th e luggage
-
page 86 .
- H
ave the tire pressures all
the d e tect an
page 62 o r
Always read a nd heed all and oth e r important pa ge 79,
Note
The s pecified to rqu e for th e w hee l bolts is
88 ft / lb s N m). The torque must be c hecke d
a s soon as possib le w ith a torq ue w re n ch -erably by an authorize d Volkswa gen deale r o r
q ualified wo rksho p.
rod ed and pla ced befo re you ha ve the torq ue chec ked or have the b olts ti g htened to th e proper to rq ue.
H ave th e damage d tire replace d with a tire o f
th e sa me brand . s p ecifi ca tio ns a nd tread
WARNING
Alw ays properly secure the vehicl e jack an d
too l kit in the lu gg ag e compartment.
ment. Loose item s in th e ve hicle ca n fly
a round the in sid e o f the ve hicl e d urin g hard brakin g or in a c rash causin g se riou s perso nal
in jury.
Note
Th e specified to rqu e fo r th e w heel bolts is
88 N m). Th e torqu e must be c hec ked as soo n as possi ble w ith a torqu e w renc h -erably by an a uth orized Volk sw age n deale r o r
qua lified wo rk s h o p.
yo u no tice that the w he el b olts arc rode d and ha rd to tu rn . they mu st b e rep la ced
b efor e yo u have the torq ue c hec ke d or have th e
b olts tight en ed to the prop er
W ha t d o
Page 364 of 444
remote key or the central locking malfu nctio ns, all door s can be locked or
u
nlocked manually.
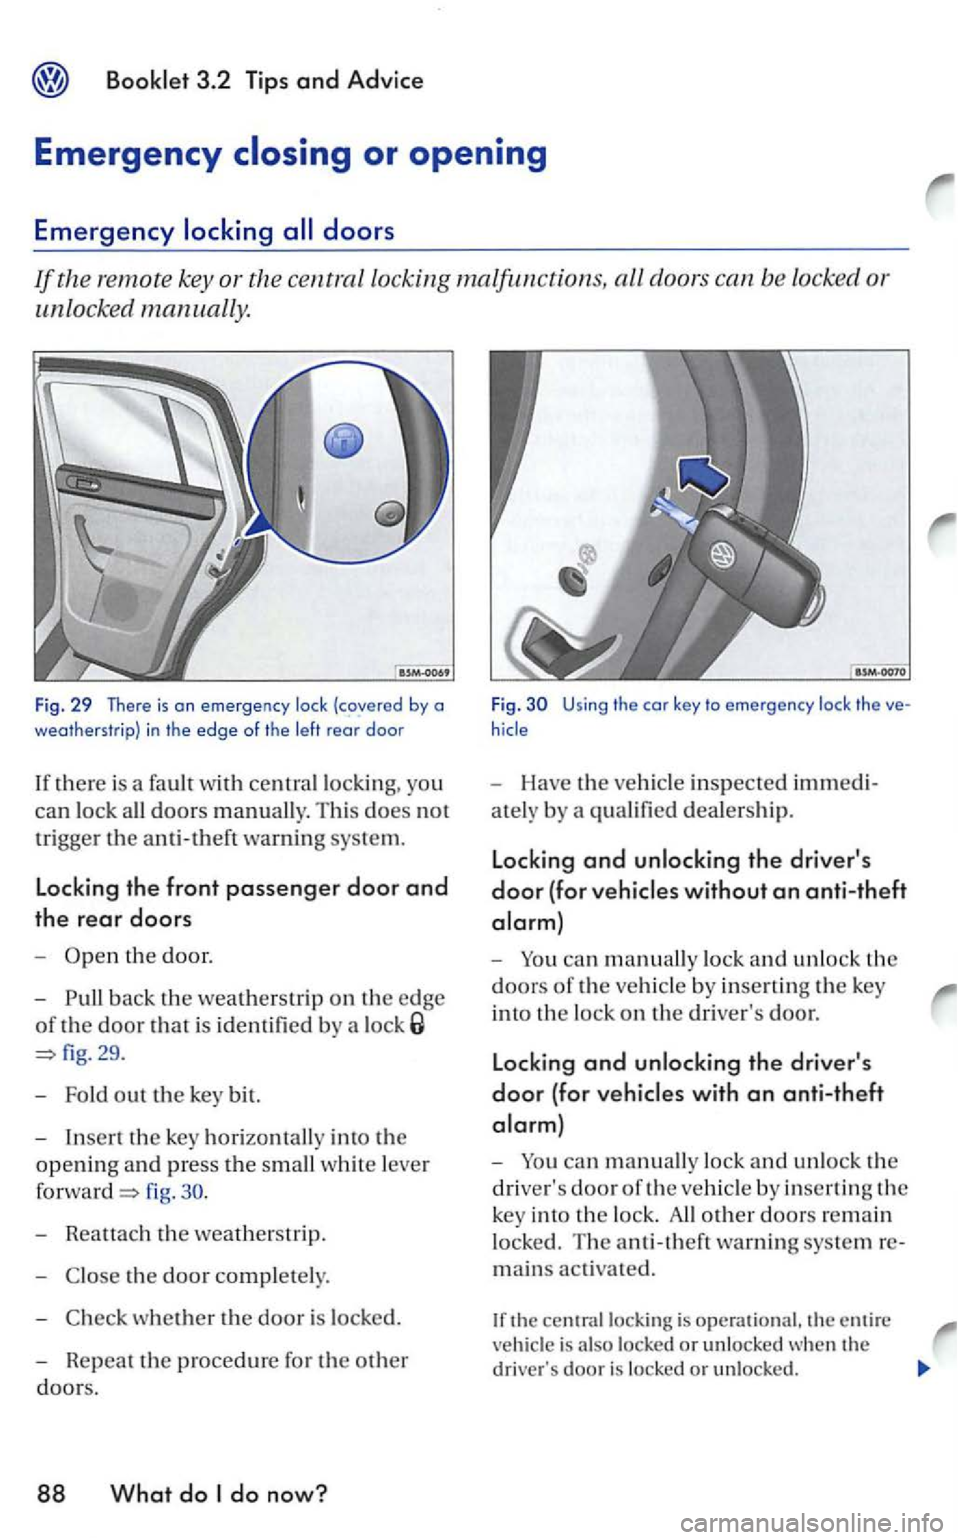
Fig. 29 There is on emergency lock (covered by a
weatherstrip) in the edge of the left rear door
If there is a fault w ith central locki ng, you
can lock all doors manually. This does not
trigger the ami-theft warning sys te m.
Locking the front passenger door and
the rear doors
-th e door.
-
back the weather s trip on the edge
of the door tha t is identifi ed by a
fig.
- Reattach the weatherstrip.
- Cl
ose th e door completely.
- C heck
whether the door is locked.
- R
epeat the procedure for the other
doors.
88 What do do now?
Fig . U sing the co r key to emergency lock the
-Have the ve hicl e inspected
-You can m anually lo ck and unlock th e
doors of the ve hicl e by insertin g the key
in to
the lock on th e driver's door.
Locking and unlocking the driver's
door (for with an anti-theft
alarm)
-You can manually lock and unlock the
driver's door of the ve hicle by insertin g th e
key in to
the lock. All other doors remain
lock ed. The anti -th
eft warning system
mains activated .
is operational, the ent ire
ve hicle is also locked or un locked
Page 365 of 444
WARNING
Alwa ys sto p the as soon as it is safe
to do so and move th e a safe di stance off the road where it is sa fe to lock doors in an em erge ncy. Turn on the em erg ency to warn approaching traffic.
Neve r a door without making sure that it is s afe to do so. ca n injure self or other people. Always make certain that no one is in the way of the door that is be ing
3.2 Tips and Adv ic e
(continue d)
Never le ave childr en, di sa ble d person s or
anyo ne w ho cannot he lp themselves in the
in peo pl e bein g trapped in the in em erge ncy. For example, depending o n th e time of year, people trapp ed in the can be ex posed to very high or low temperatures.
Tips
ca n unlock the passenger's door a nd the rear doors from the inside again if yo u the door openin g leve r once .
rea r lid can be opened from inside the luggag e compartment.
__ _ ,
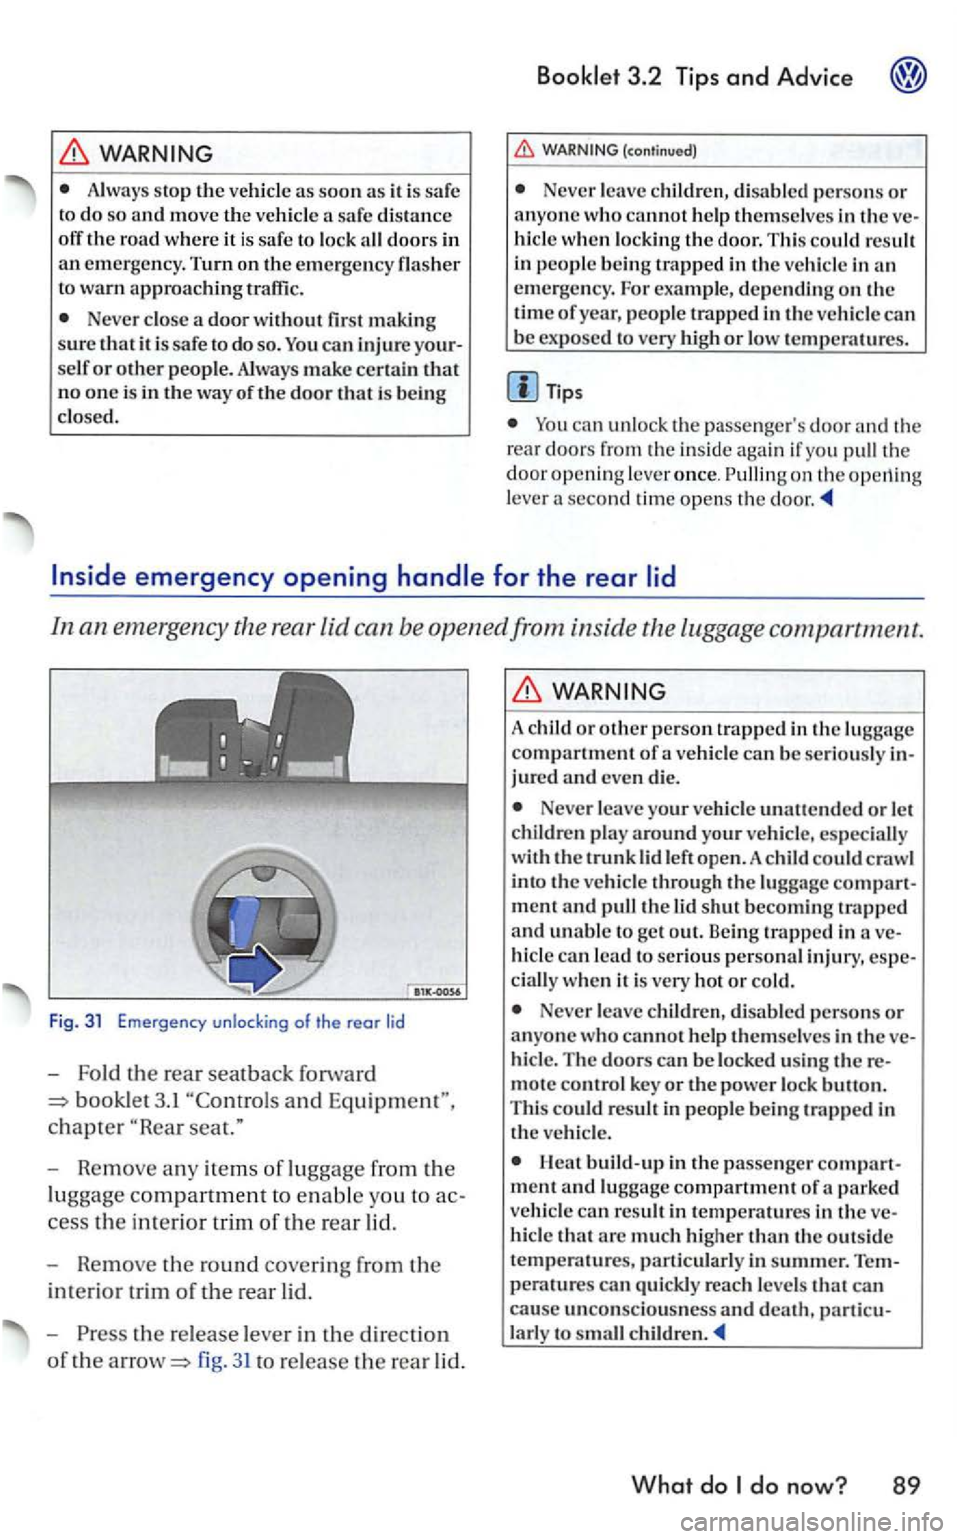
Fig. 31 Emergency unlocking of t he rear lid
-Fold the rea r seat back forward
booklet 3.1
the release lever in the direction
of the fig. 31 to re lease the rear lid .
WARNING
A chi ld or oth er p erson trapped in the lu ggage compartment of a can be se riously jure d and eve n die .
Neve r leave your unatt ended or let
childr en play around your especia lly
wit h th e trunk lid le ft open.A child could cra wl
int o th e through the lugga ge ment and
wh en it is very hot or cold .
Neve r leave childr en, disabled persons or
a n yone T he doors ca n b e lock ed usi ng mote contro l key or the powe r lock butto n .
T his could res ult in peop le bei ng trapped in
th e
ment and lugg age compartment of a parked vehicle can resu lt in tempe ratures in the that arc mud1 higher than th e outs ide
t emperatur es , particu larly in summer. peratures can quickl y reac h levels that can cause unconscio usn ess and d eath, larly to c hildr en .
What do do now? 89
Page 366 of 444
left side of the instrument panel and behind fu se box covers in
the engine
compa rtment.
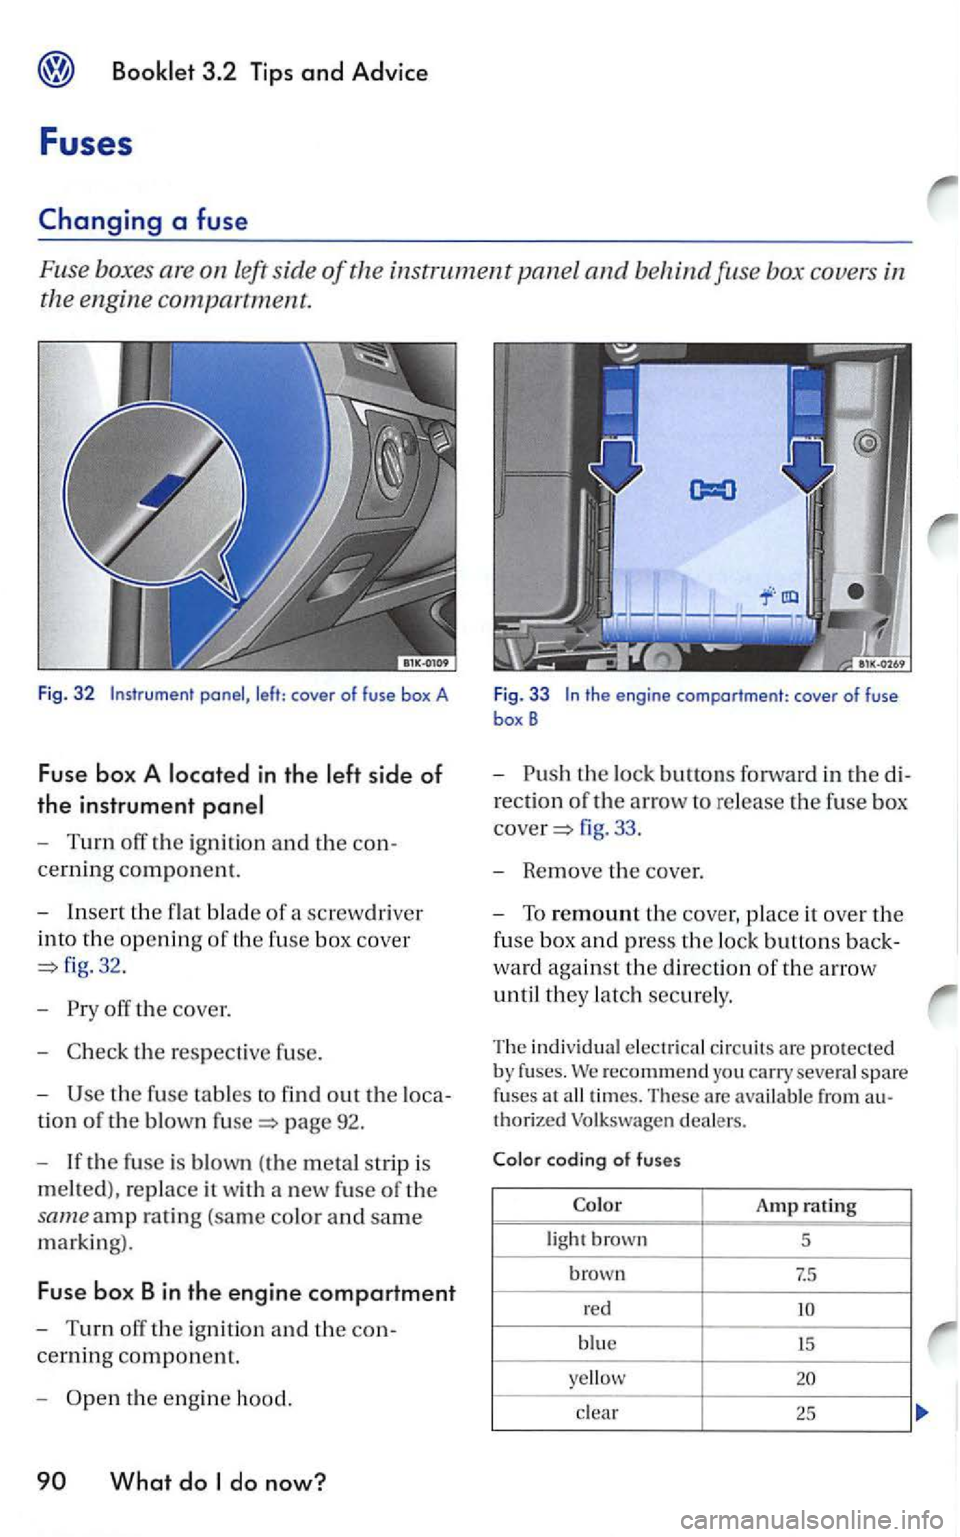
Fig. 32
- Turn off the igni tion and the con
cerning component.
-
Insert the flat blade of a screwdri ver
into
the openin g of th e fuse box cove r
32.
-
the respeclive fuse.
-
the fuse tables to find out the loca-
tion of the blown page 92.
- If
the fuse is blown (the m etal strip is
melted) , replace it w ith a new fuse of the
same amp ra tin g (sa m e co lo r and sam e
marking).
Fuse bo x Bin the engine compartment
-Turn off the ign ition an d the con
cerning component.
-th e eng in e hood.
fig . 33 .
- Remove
the cover.
-To remount the cover, place it ove r the
fuse box and press th e lock buttons back
ward aga inst the directio n of the arrow
until
they latch securely .
Th e indi vidual electric a l c ir cuit s are pro tected by fuses. recommend you carry severa l spare
f uses at
clear 2 5
Page 367 of 444
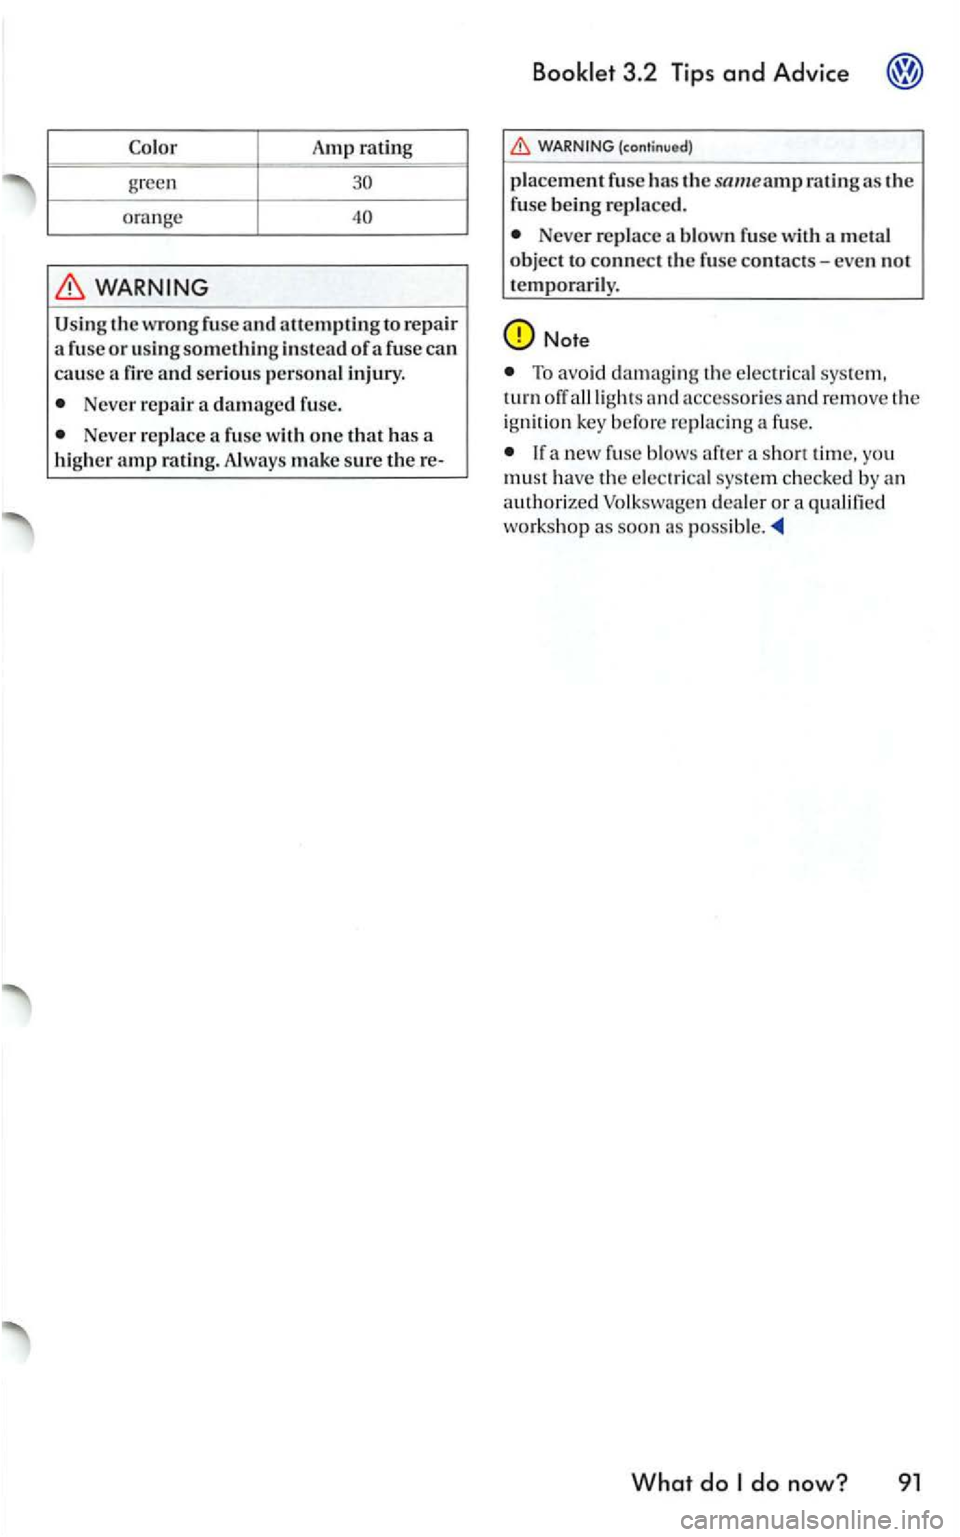
Amp rating -green
ora n ge
WARNING
U sing the wrong fuse and allempting to rep air
a fuse or using something in stead of a fuse can cause a
Never repair a damaged fuse.
Neve r repl ace
(continu ed) -------------------1 p lacement fuse has th e snmeamp rat ing as the fuse being rep laced.
Neve r rep lace a blown fuse with a m eta l
object to connect the fuse contacts-even not
t emporar ily.
Note
T o avo id damagin g the elec trica l sys te m ,
turn
If a new fuse blow s afte r sh o rt time, you mus t h ave the e lec trica l system c h ec ke d b y an authori zed workshop as soo n as
What do
Page 368 of 444
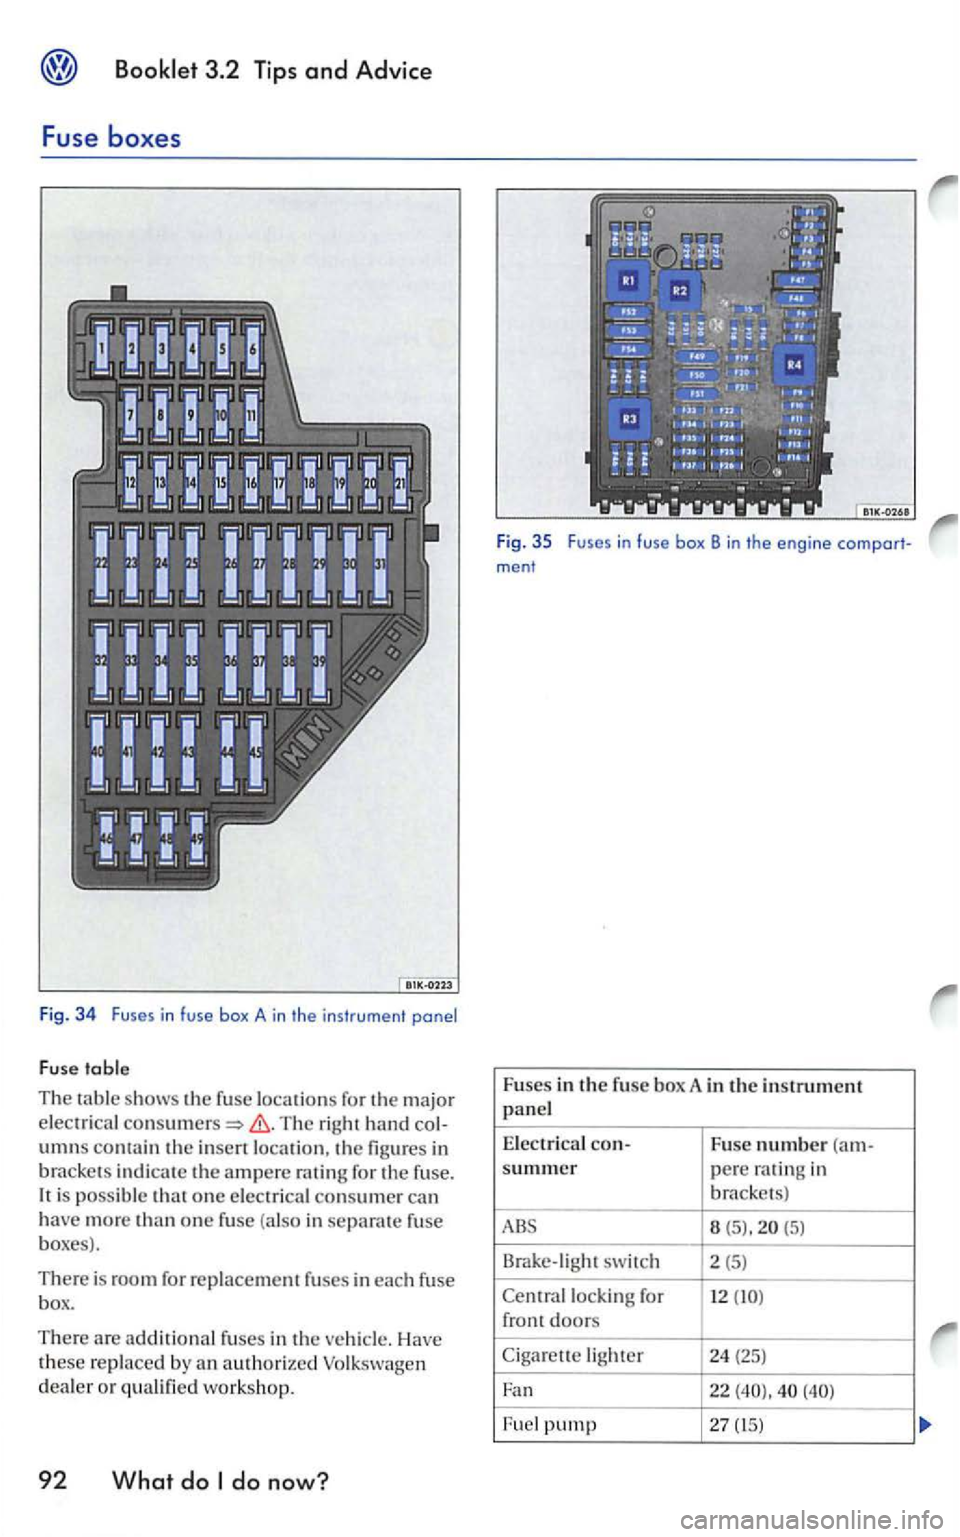
Fig . 34 Fuses in fuse box A in the instrument panel
F
use table
The s h ows the fuse locations for th e major
elec trical hand columns comainth e location , th e the ampere for the fu se. is po ssible that one electr ical con sumer can
have more tha n one fuse (a lso in separate fuse boxes ).
There is room for replacement fuses in each fuse
box.
There are additiona l fuses in the Have these rep laced by an authorized
brac kets)
8 (5), (5)
Brake -light switch 2 (5) -Cen tral for 12
-Fuel pump 27 (15)
Page 369 of 444
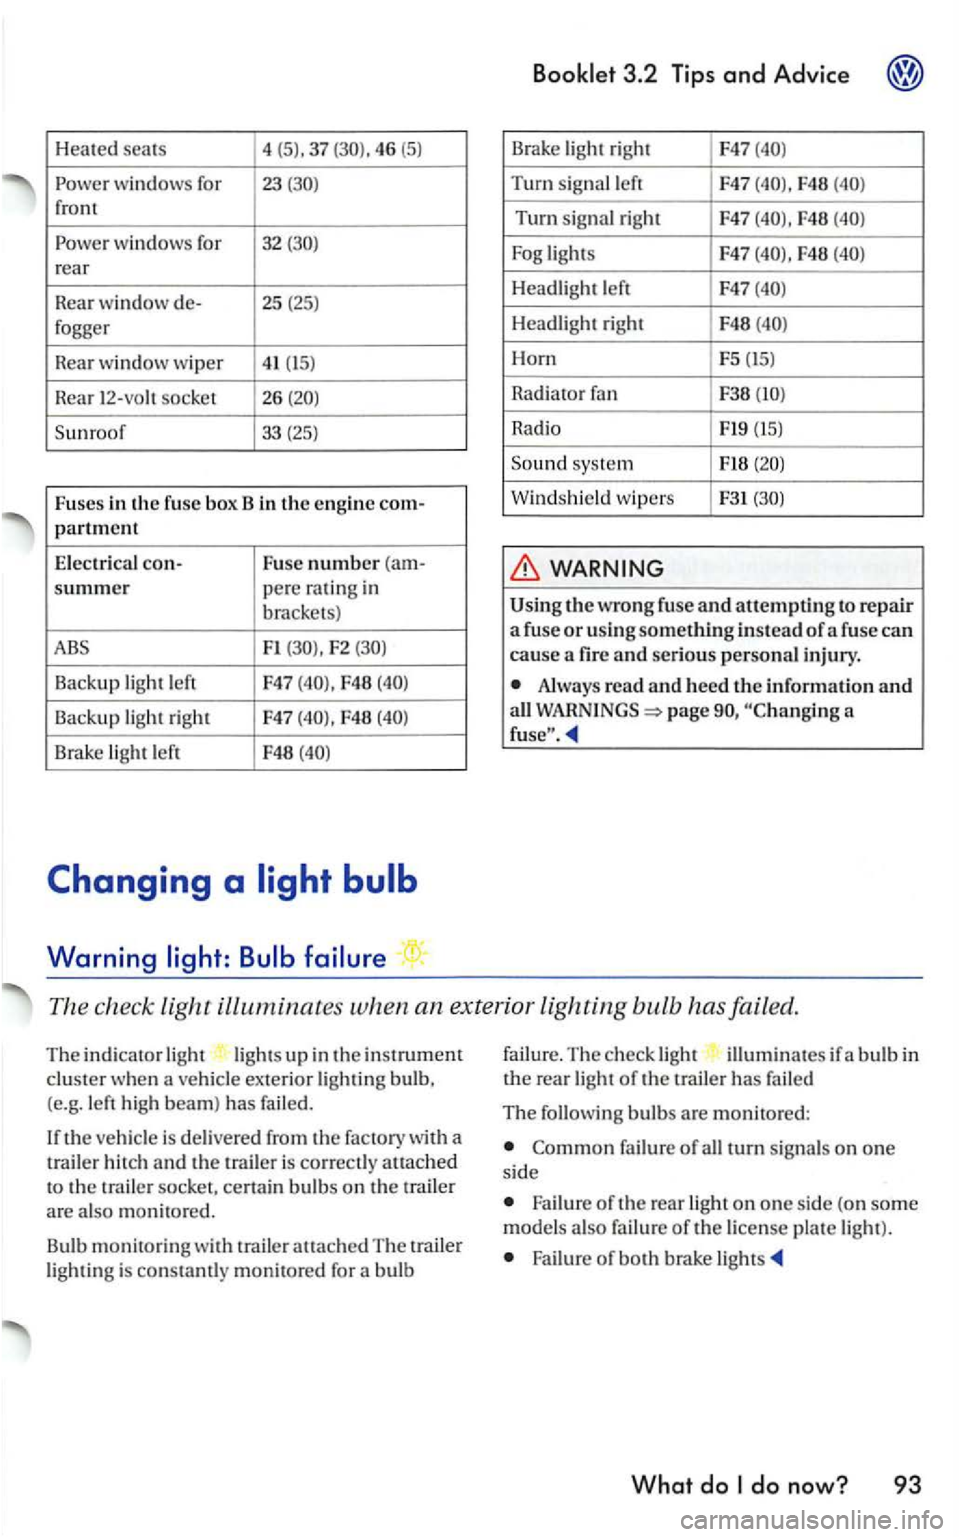
Heated seats 4
(5). 37 46 (5)
windows for 23 front
wind ows for 32 rear
Rea r
window de- 25 (25) fogger
R
ear w indow wiper 41 (15)
R ear 12-vo h socket 26
F1 F2
Backup light left F47 F48
Backup light right F47 F48
Brake light left F48
Warning
Brake light righ t F47
Turn sig na l left F47 F48
Turn signal right F47 F48
F48
Headlight left F47
Headli gh t right F48
Horn F5 (15)
Rad i
ator
Radio Fl9 (15)
Sound syste m
Windshield wipers F31
the wrong fuse and attempti ng to re pair a fuse or usi ng something instead of a fuse can
cause a fir e and serious personal injury.
Alway s read and heed the information and all page a
The check light ill uminates when an ex terior lighting bulb has failed.
The indicato r light lig ht s up in the instrument clus ter when a ve hicle exterior lightin g bulb,
(e.g. le ft high beam) has failed.
th e ve hicle is delivered from the factory with a
t railer h itch and the is correct ly atLached to the trai le r socket, cert ain bulb s on the trail er are also monit ore d .
Bu lb
monitorin g with trailer attach ed The traile r light ing is con stamly monitored for a bulb failu
re.
The ch eck ligh t illumin ates if a b ulb in the rea r light of the trailer has fai led
The following bulbs are mon itored:
failure of all turn signa ls on one si de
Failure o f the rear light on one si de (on som e
model s als o failu re of the license pla te light ).
Failure of both brake li gh ts
What do
Page 370 of 444
Booklet 3.2 Tips and Advice
Changing
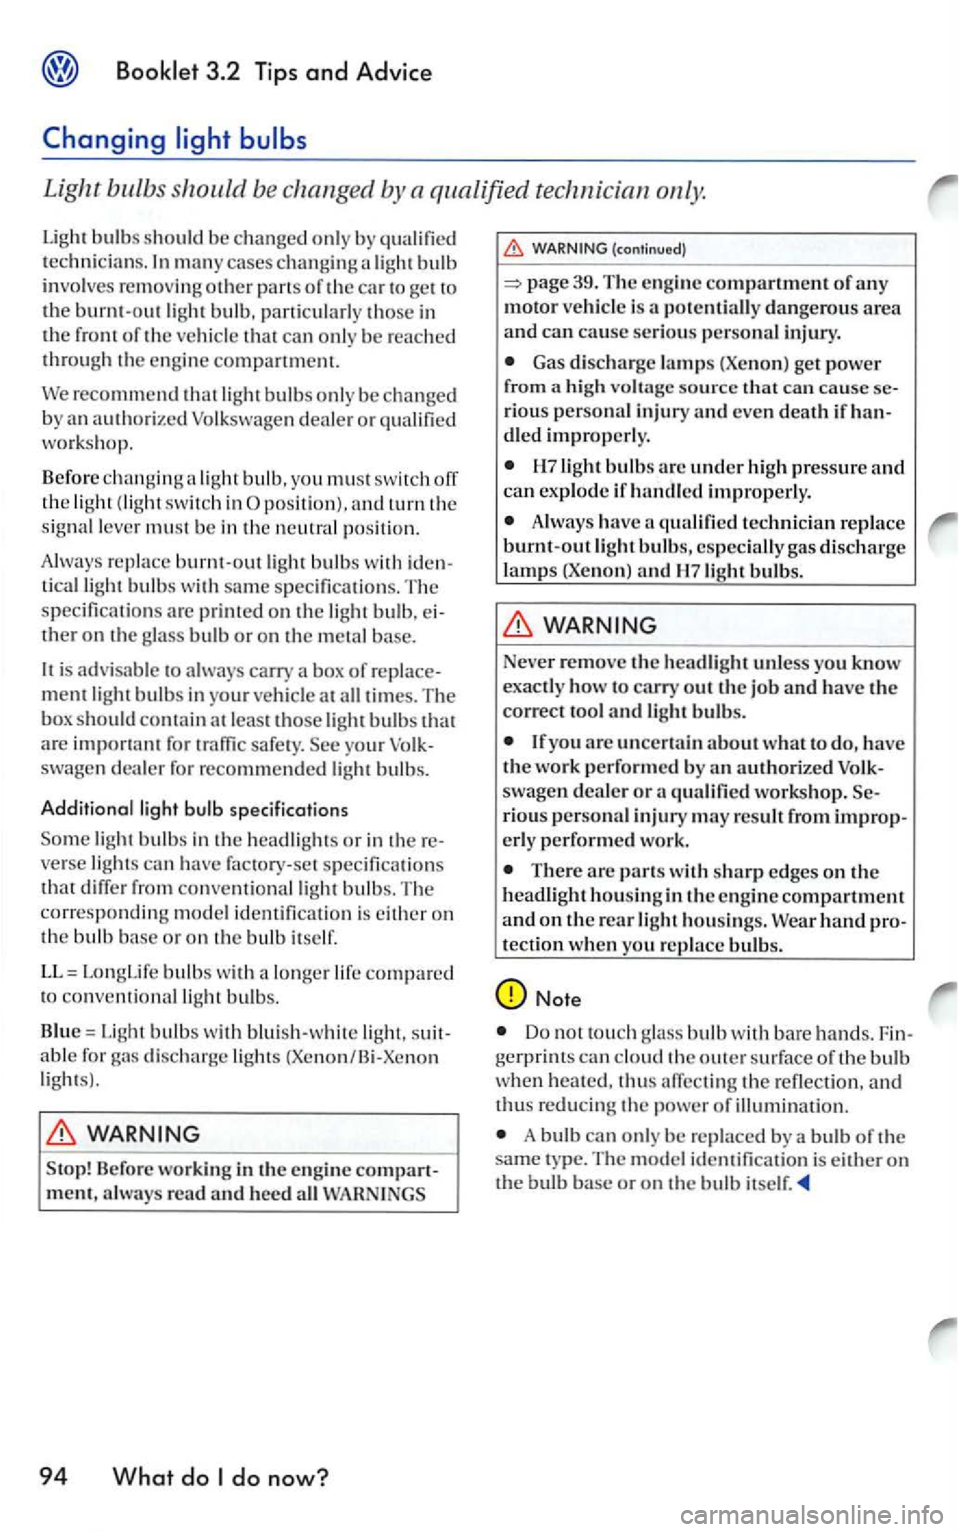
Light bulbs should be changed by a qualified technician
m an y cases changing a light bul b
invol ves remov in g other pa ns of the car to
recommen d light bulbs o nl y be chan ge d
b y an authorized Volkswage n dea le r or qual ified workshop.
Before changin g a light bulb. yo u must sw itch ofT the light (lig ht switch in
tical light bulbs w ith sam e s pecificati o ns. The
s p ecifi catio ns arc prime d on the lig h t bulb . ther on the glass bulb or o n th e m eta l base.
is advi sable to alw ay s carry a box of
for traffi c safe ty. swage n dealer for re comm ended light bulbs.
Additional light specificati o ns
light bulbs in the headli gh ts or in verse lights can hav e fac tory-set s pecifi cntion s that diffe r fro m conventi onnllight bulbs. Th e corresp onding model identifi cation is either on the bulb bas e or on th e bulb itself.
LL = LongLife bulbs w ith a lo nger life compared to con ve ntional light bulb s.
Blue =
Light bulbs w ith blui sh -w hite abl e for di scharge light s (Xenon/Bi-Xcno n light s).
Stop! Before workin g in the engine always read and heed all
94 What do
(cont inued)
page 39. The engine compartment of any motor vehicl e is a p otentiall y dangerous area and can cause serious personal injury.
Gas discharge la m ps (Xen on) get power from a high voltage source that can cause rious personal injury and even death if dled improperly.
bulbs arc under hi gh pressure and can exp lode if handled improperly.
Always have a qualified technician r eplace burnt-out light bulbs, especially gas discharge
lamp s (Xenon) and bulbs.
Neve r remove the headlight unless you know exactly how to carry out the job and have the correct tool and li ght bulbs.
yo u arc uncertain about what to do, have the work performed by an auth orize d swagen d ealer or a qualified workshop. rious personal injury m ay result from erly performe d work.
There arc parts w ith sh arp edges on the headlight h ousin g in the en gi ne compartment and on the rear light h o usings.
Do not touc h glass bulb with bare hands. can clo ud the o uter surface of the bul b when thus afTccting the refle ction , and th us reducing the power of illuminat ion.
A bulb can only be re placed b y a bulb of the sam e ty pe . The m odel identifica tion is either o n the bulb base or on the bulb itself.