VOLKSWAGEN GOLF 2005 Owners Manual
Manufacturer: VOLKSWAGEN, Model Year: 2005, Model line: GOLF, Model: VOLKSWAGEN GOLF 2005Pages: 444, PDF Size: 92.7 MB
Page 371 of 444
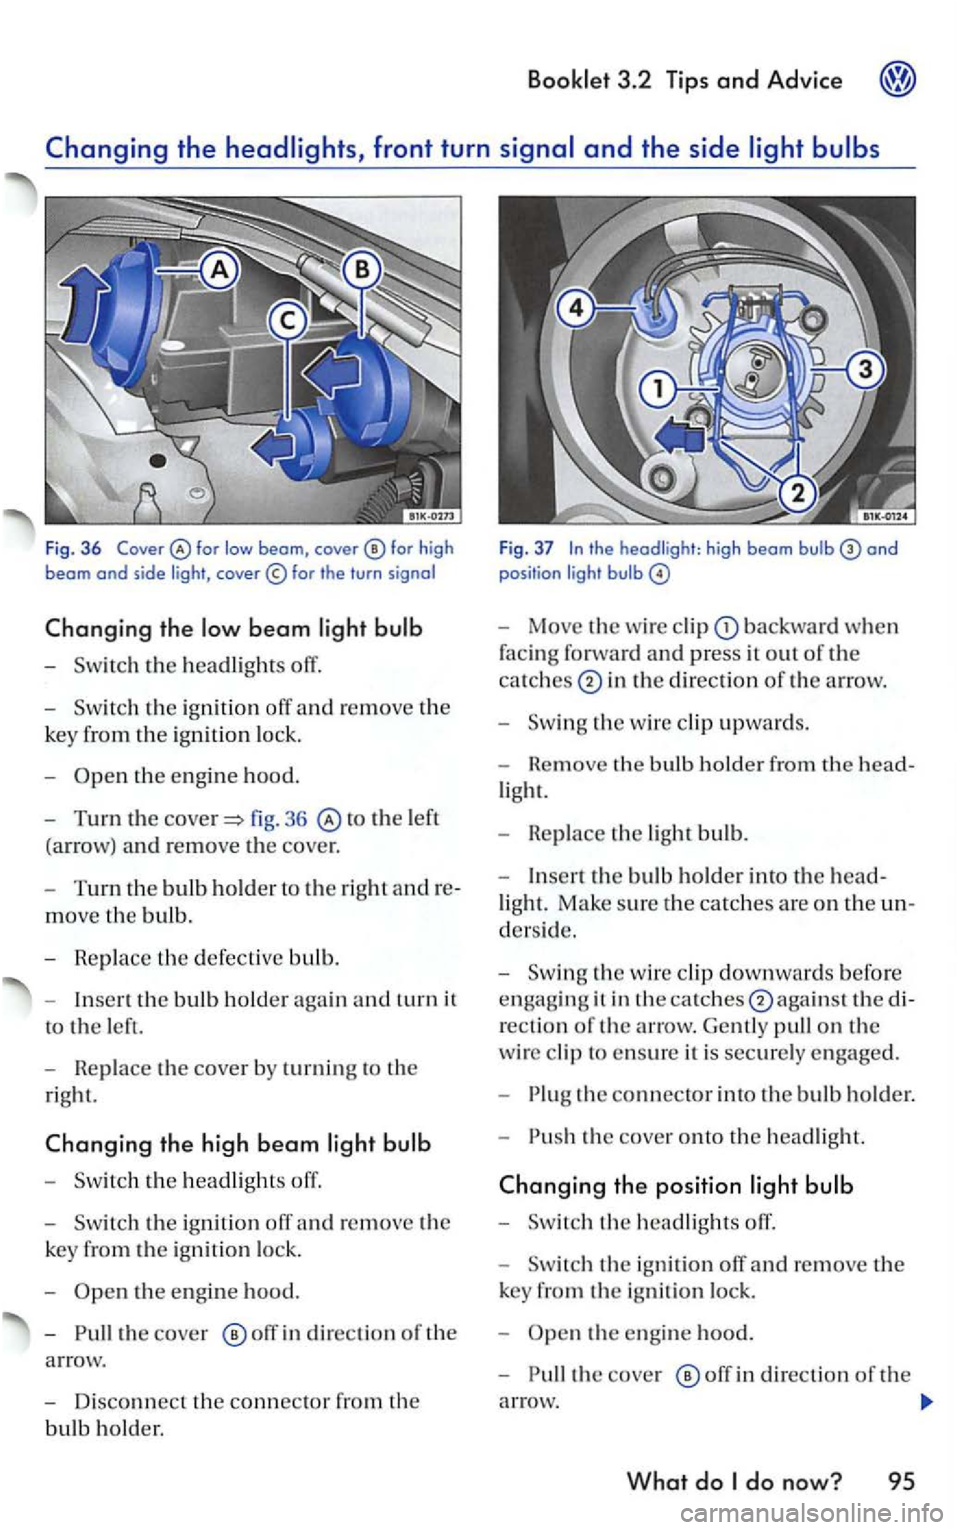
Fig . 36 for high beam and side light ,
th e ignition off and re m ove the
k
ey fro m the ignition lo ck .
-
to the left
(a rrow) a
nd re move the cove r.
- T
urn th e bulb holder t o the right andre
move th e bulb.
- R ep lace th e defec tive bulb.
-
t h e bulb h o ld er again and turn it
t o
the left.
-
Replace t h e cover by turning to th e
rig ht.
the high beam light bulb
-
the ig nition
th e en gin e hood.
-
o ff in direc tio n of the
a rrow.
- Disco
nnect the connec tor fro m the
bulb hold er.
Bookl et 3.2 Tips and Advice
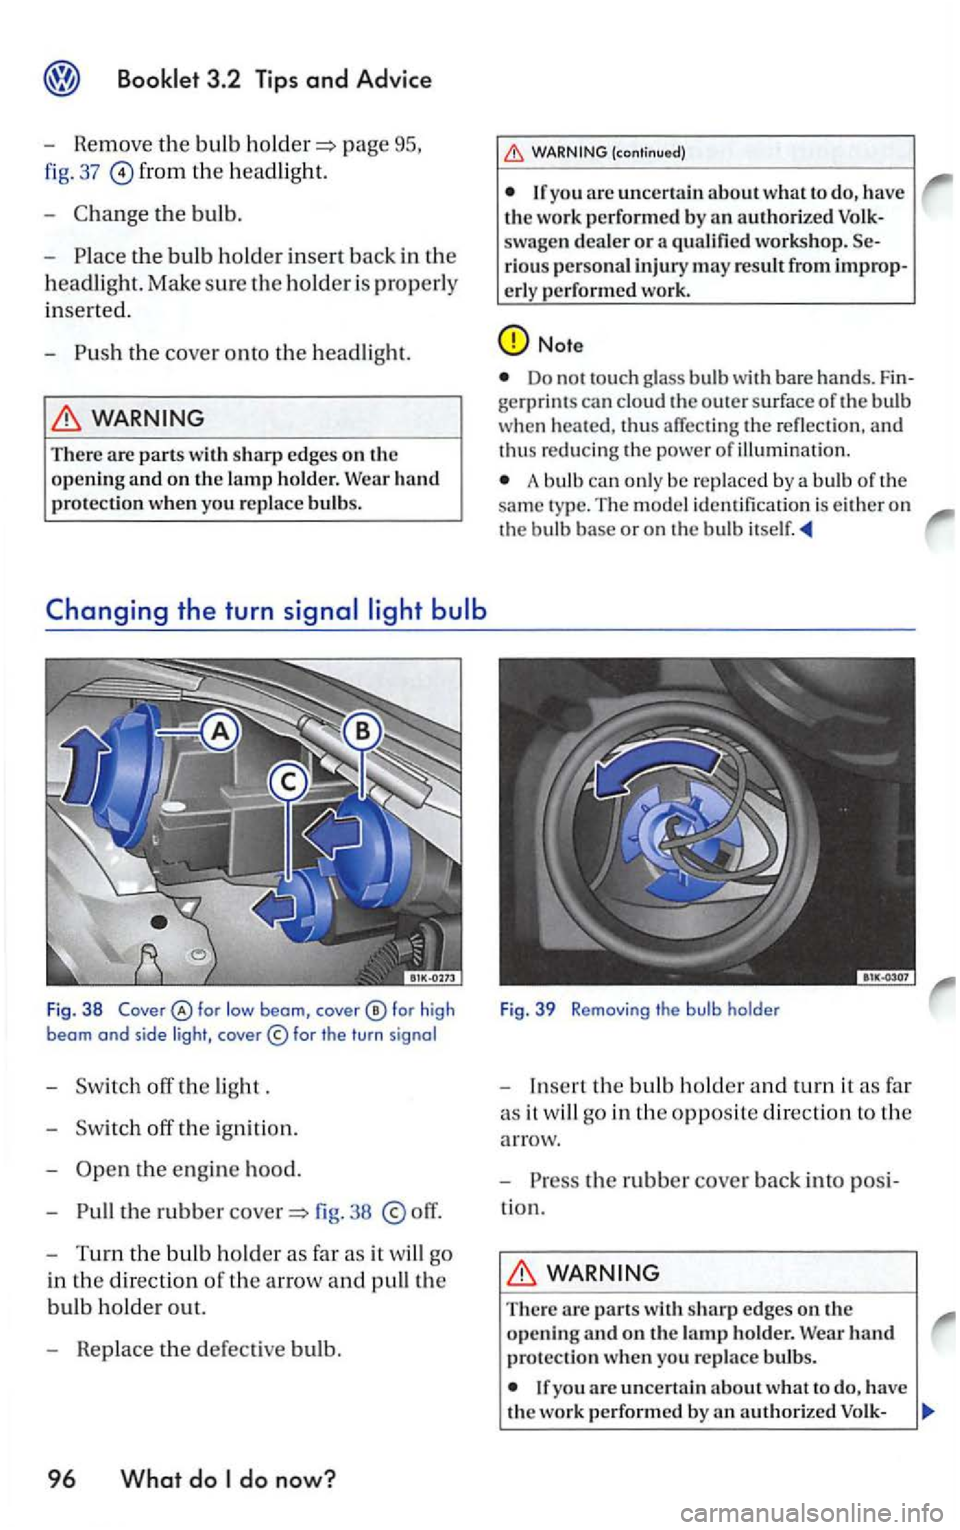
Fig. 37
- Move th e wi re cli p backward when
f
acin g forwa rd and press it ou t of the
ca tc h
es in th e di rection of the arrow.
-
the w ire clip upward s.
- Rem ove th e bul b ho ld er fro m the h
ead-
light.
- Repl
ace th e light bu lb .
- In
sert the bulb ho ld er into th e head-
light. Make sure the catches are on th e un
d ers ide.
-
the wire clip downwards befo re
e n
gagin g it in thecatc hes0again sl the di
r
ectio n of th e arrow. Gently pull on th e
wire clip to ensure it is securely e ngage d.
-
th e connector into the bul b ho ld e r.
-
the cove r onto the hea dlight.
the e ngi ne hood.
-
the cove r off in direction of t h e
a rro
w.
What do
Page 372 of 444
page
fig. 37 from the headligh t.
-
the bulb.
-
headlight. Make sure the holder i s properly
inserted.
-
WARNING
There are parts with
the e ngine hood.
-
the rubbe r 38
WARNING (continu ed)
are uncertain about what to the work performed by qualified workshop. riou s personal injury may result from improp-
erly performed work.
Note
Do no t to uch glass bulb with bare hands. gerprint s can cloud the o uter surface of the bulb
whe n thus affectin g th e refl ectio n . and thus reducing th e pow er o f illuminatio n .
A bulb can only be replaced by a bulb of th e
sa me ty p e. The mod el identifica tion is either on
the bulb base or on the bulb
Fig. 39 Re moving the bulb holder
- Insert the bulb h old er and turn it as fa r
a s it w ill go in th e
opposite direct io n to th e
arrow.
-
the rubbe r cover back into
WARNING
The re wit h sharp edges on th e opening
If yo u the work performed by
Page 373 of 444
(continued)
swagen dealer or a qualified workshop. rious personal injury m ay resu lt from erl y perfo rmed work.
Booklet 3.2 Tips and Advice
Note
Do not touch glass bulb with bare hands.
A bulb can on ly be rep laced by a bulb of the same type. The model identification is either on the bulb base or on the bulb
turn
The rear light contains a light bulb fo r the rear turn signal and a light bulb for the
rea r brake light.
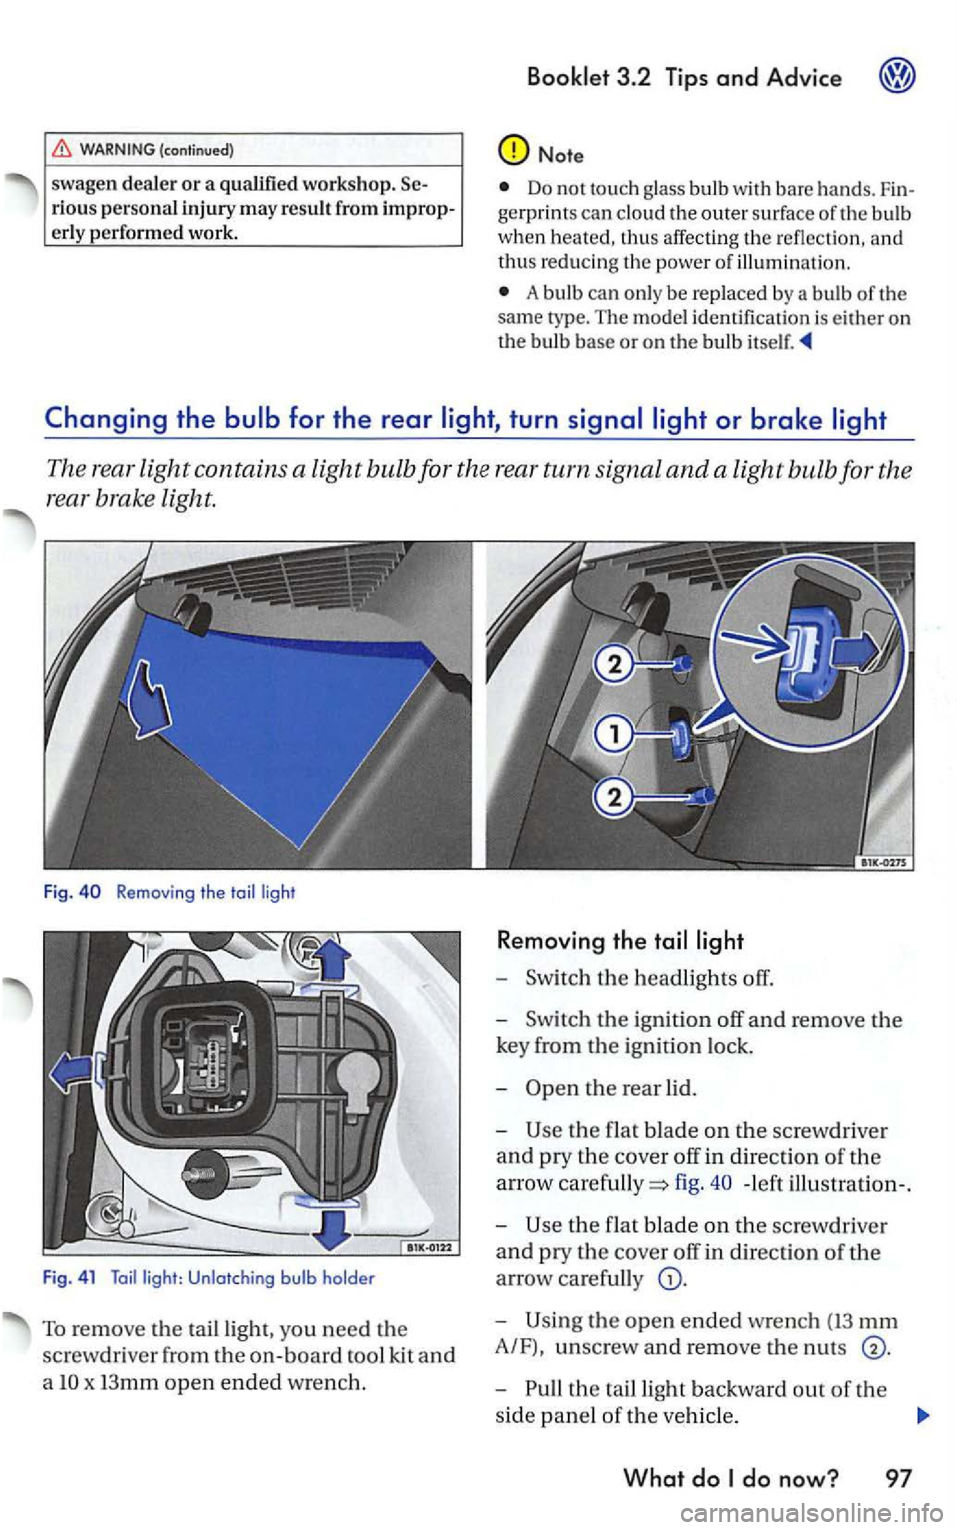
Fig . Removing the toi l ligh t
F ig . 4 1
Toil light: Unlotching bulb holde r
To remov e the tailligh t, yo u need the
screwdr iver from th e
on-board tool kit and
a
x I3mm open ended wrench.
R e moving the
-the headlights off.
-the ign ition off and remove the
key from the ignition lock.
-
the flat blade on th e screw driver
and pry the cover off in direction of th e
arrow
fig. - left illu stration-.
-
the f lat b lade on the sc rewdri ver
and pry the cover off in direction of the
arrow carefully
the open ended wrench (13 mm
A/F), unscrew and remo ve the nut s
the ta illight backward out of the
side panel
of th e veh icle .
What do
Page 374 of 444
-the ta illight remove d from th e
hicle on a clean, non-abrasive s urfac e.
-
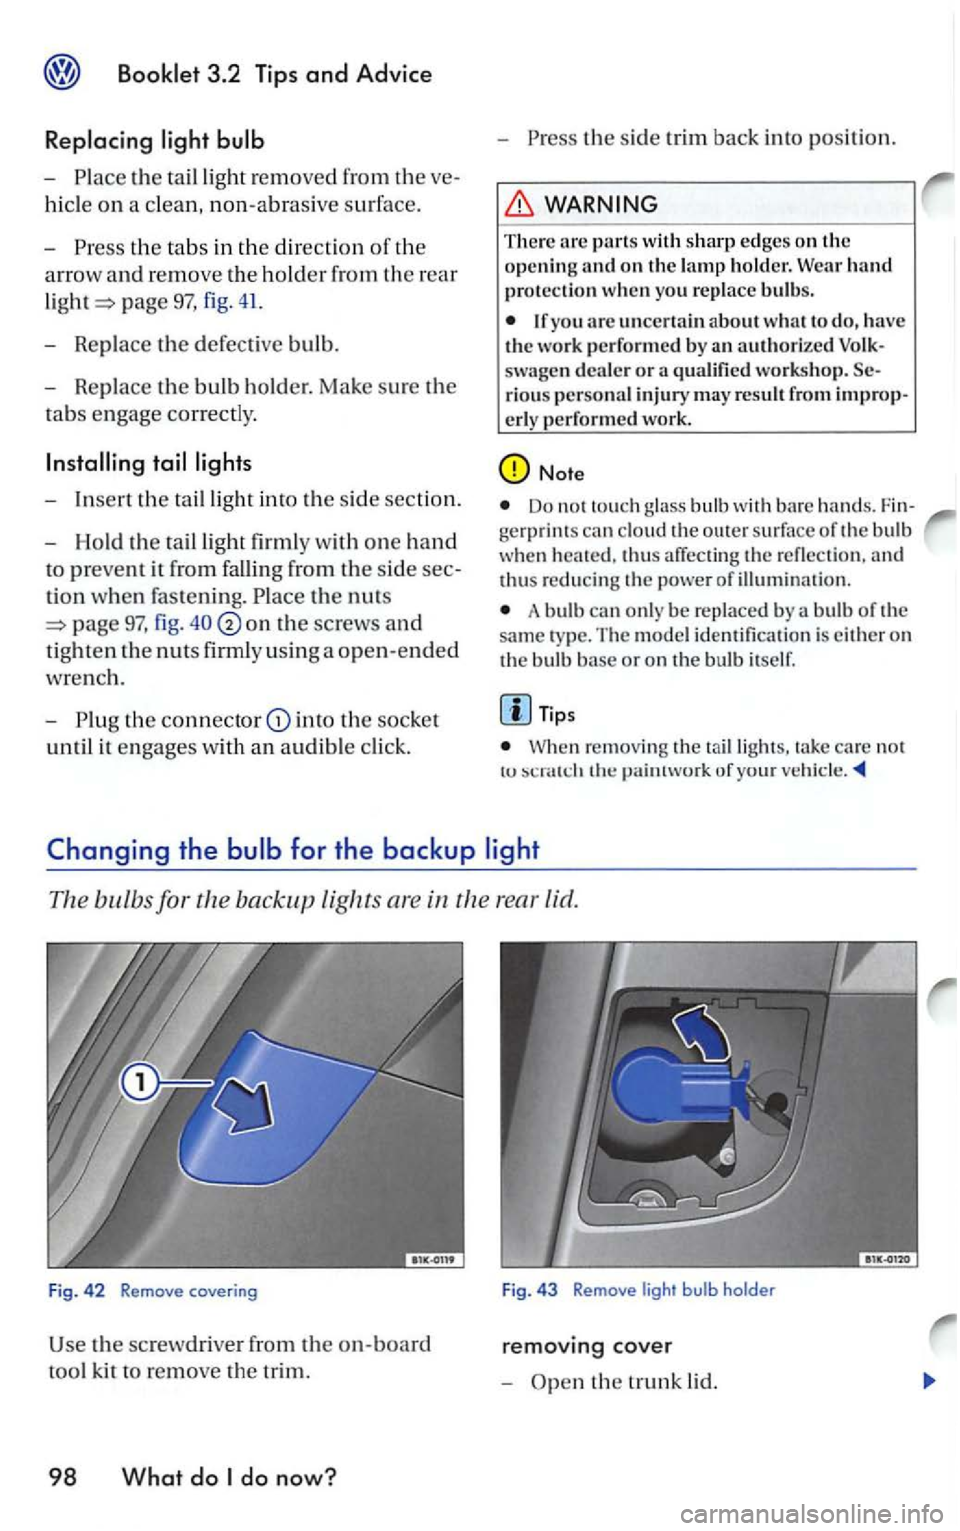
t h e tabs in the direction of th e
a rr ow a
nd remove th e holder from the rear
page 97, fig. 41.
- Replace the defectiv e bulb.
- Replace the bulb h old er. Mak e sure the
tabs engage correctly.
- Insert the taillig ht int o the s ide section.
- Hold
the taillight firml y with one hand
to prevent it from fall in g from the sid e
tion when fasten ing.
page 97, fig . on the screw s and
tighten the nuts firml y using a o pen-ended
w re n ch.
-
in to the sock e t
until it engages with an audible click. -
the s
ide trim back into position.
WARNING
There arc parts with sharp edges on the
o pening an d o n the lamp ho ld er. Wear hand protection when yo u bulbs.
an authorized workshop . rio us person al injury may result from
Do not touch the o ut er surface o f the bulb heated. thus of
A bul b only be replaced by a of the same ty pe. The m odel identificatio n is e ither on the bulb base or on the bulb itself.
Tip s
When re m ov in g the take ca re no t tu ofyuu r
bulb
removing cover
-the trunk lid.
Page 375 of 444
-Place the flat blade of th e screwdri ver
into the fig. 42
the cover off care full y in the dir ec
tio n of the a rrow.
Replacing
th e ig nit ion off and remove th e
key fr
om the ig nitio n lock.
- T
urn the lamp holder upwards and pull
the lamp holder out alo ng w ith the lig ht
bulb.
- Rep l
ace th e light bulb.
- Install
the lamp h o lder w ith the new
light bulb.
-
Turn t h e lamp hold er against the direc
tio n of th e a rrow back to its o rigina l posi
tion until it e n gages.
Booklet 3.2 Tips and Advice
-Press on the cove r until it engages
firmly.
There are parts with sharp ed ges on the opening and on the lamp holder. h and protection when yo u replace bulbs .
authorized Volk
s w age n dealer or a qu alifi ed workshop. rious person al injury may
Do not touch glass bulb with hands. Fingerprints can cloud the outer s u rface of the bulb
w hen heated. thus affect ing th e reflection, th us reducing the power of illumin at io n .
A bulb can o nly be rep laced by a bulb of the sam e type. The model identificat io n i s ei ther on the bulb base or on the bulb
cables must h ave sufficient wire cross section.
the engine does not is
disch arged, your vehicle's can be connected the batt ery of another vehicle to start the engine.
Jumpe r cables
T he wi re cross section mu st be in2
(25 1111112
) fo r g asoli ne e ngines.
Do no t let the ve hicles each other, o therwise current could flow as soon as th e plus(+) terminals areconnected.lf necessary.use longer jumpe r cables.
T he discharged battery must be p roperly connected to th e ve hicle's
What do
Page 376 of 444
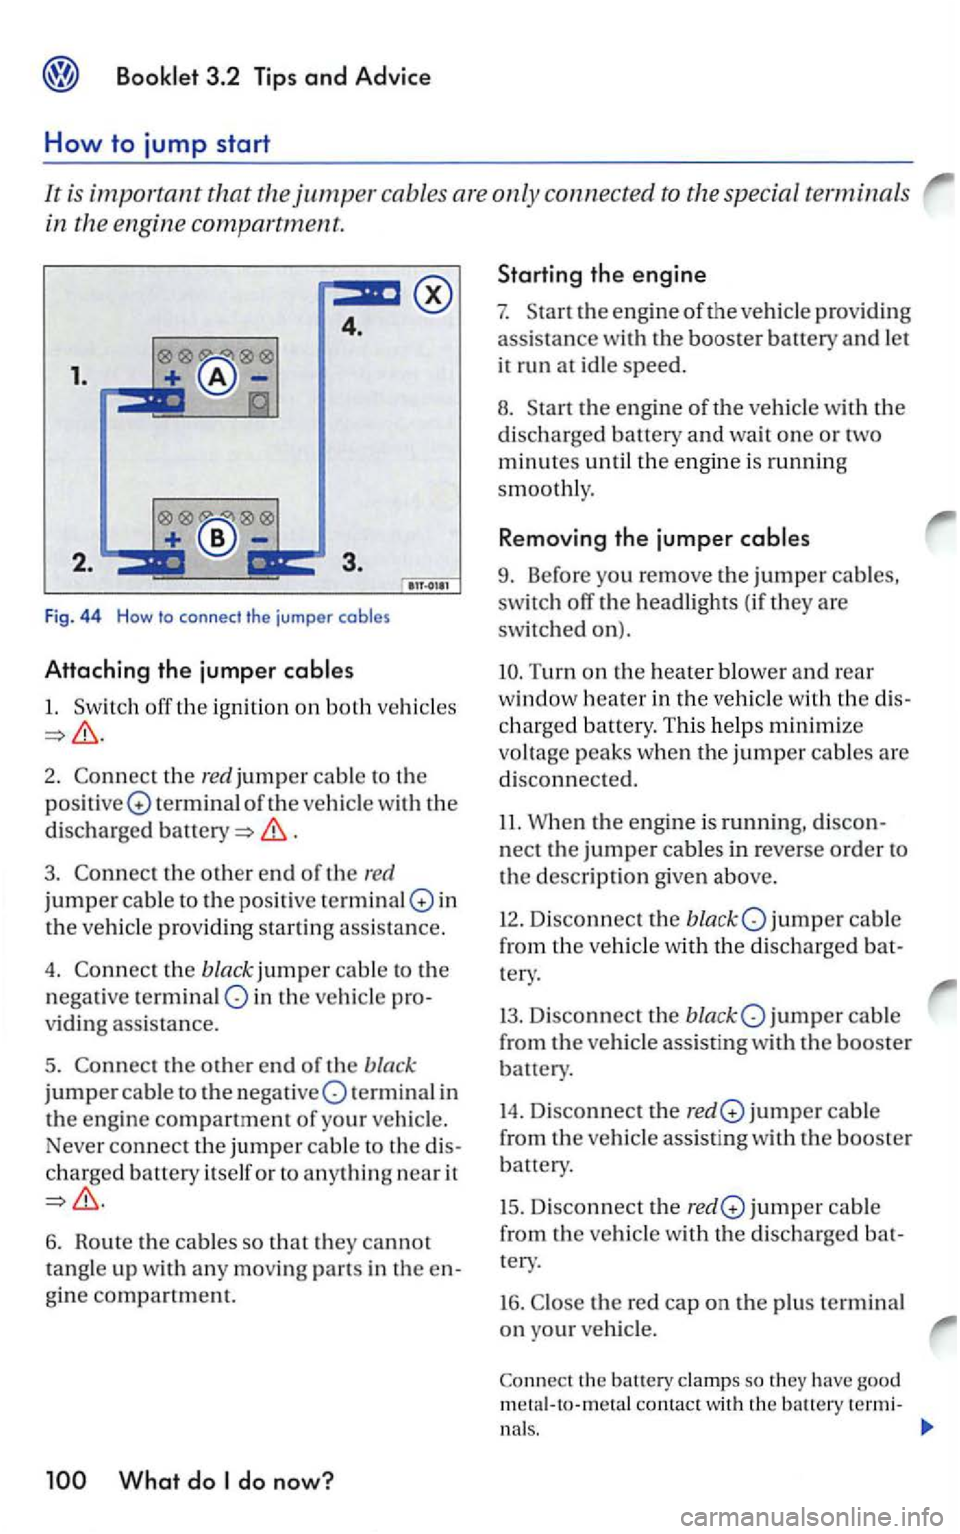
4.
1.
F ig. 44 How to connect the jumper cables
Attaching the jumper
1.
2. the red jumper cable to the
positi ve Q terminal of the vehicle with the
disch arg ed
.
3 . the other end of th e red
jumpe r cable to the posit ive terminal in
the veh icle providing startin g ass is ta n ce.
4. the black jumper ca ble to the
negative terminal in the vehic le
v idin g assistance.
5.
ch arged battery itself or to anything near it
6. Route the cables so that they cannot
tangle up with an y mo vin g parts in the
the engine of the vehicle with the
discharged battery and wait one or two
minutes until the engin e is running
s m
oothly.
Removing the jumper
9. Before you remove th e jumper cables,
switch off the headlights (if they are
switched on).
Turn on the heater blower and rear
window heater in the vehicl e with the
charged battery. This helps minimi ze
voltage peaks wh
en the jumper cables are
di sconnected.
11. Whe n the engine is running,
nect the jumper cables in r everse order to
the description given above.
12. Disconnect the jumper cable
fro m the vehicle with the di
scharged
jumper cable
from
the ve hicle assist ing with the booster
battery.
14. Disconn ect the jumper cabl e
from
the ve hicle assisting w ith the booste r
battery.
15. D isconnect the jumper ca ble
from the
vehicle with the discharged
th e re d cap on th e plu s te rminal
on your vehicle .
contact with the battery
Page 377 of 444
If th e e ng ine docs not stan, rum off the aft er ab o ut se cond s a nd try again about seconds.
39. The engine compartment of an y
motor vehicle is a potentiall y dangerous area and can cause seriou s personal injury.
tery explos ion:
Always make sure that the battery viding starting ass istance has the same voltag e as the di scharged battery (12 V) and
appr oximate ly the same capacity (see battery
lab el).
Never jump start a ve hicl e wit h a fro zen
battery. The battery can explode. If a battery i s or h as been frozen, re place it.
Batteries give off exp losive hydrogen gas.
Always keep sparks, open flame and
s moking mate rial s away from batteries.
(continued)
Never short out the battery poles by necting the positive and negative pole s
with each other.
Always follow the jumper cables '
Never connect the negativ e cable from the other vehicle directly to the negativ e terminal of th e di sc harged battery. The hydrogen from the battery is exp los ive.
Never attach the negativ e cabl e from the ve hicl e provid.ing starting assis tanc e to parts of the fuel system or to the brake hoses or brake lines.
Never the non-in sulated parts ofthe battery clamps to touc h. Never allow the jumper cable attached to the positive battery
terminal to contact metal parts of the vehicle.
Always rout e the jumper cables so that
they cannot tangled up w ith moving parts in the engin e compartment.
Note
Install ing jumper cables imp roper ly can
ca use expe nsive damage to the vehicl e's trical system.
Do not let the vehicle s tou ch each othe r. e rwise current could flo w between th e cars as soon as the plus(+) te rminal s arc
What do
Page 378 of 444
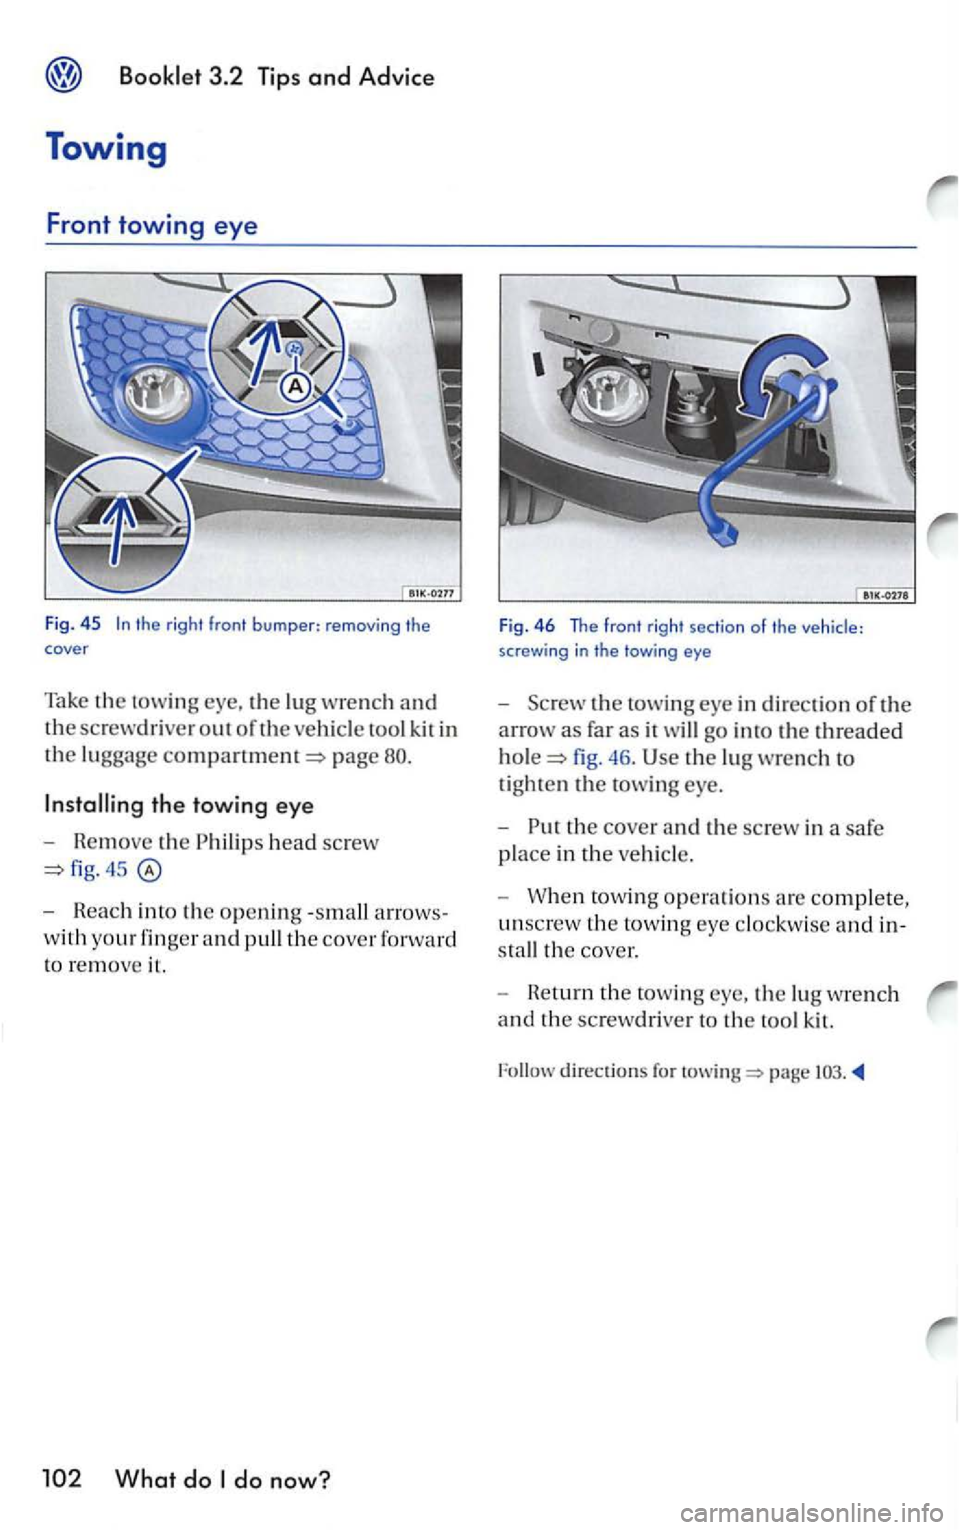
the right front bumper: removing the cover
Take the towing the lug wrench and
the screwdriver out of the vehicl e tool kit in
the luggage page
the towing eye
- Remove the Ph ilips head screw
- Reach into the opening -small arrows
with your finger and pull th e cover forward
to remove i l.
the towing eye in direction of the
arrow as far as it will go into the threaded
46. the lu g wrench to
tighte n the towing eye.
-
the cover and the sc rew in a safe
p l
ace in the ve hicl e.
-
When towin g operations a re complete,
unsc rew the towing eye clockw ise and in
s ta
ll the cover.
-
He turn the to wi ng the lu g w re n ch
a
nd the screwdrive r t o the to ol kit.
Follow directions for
Page 379 of 444
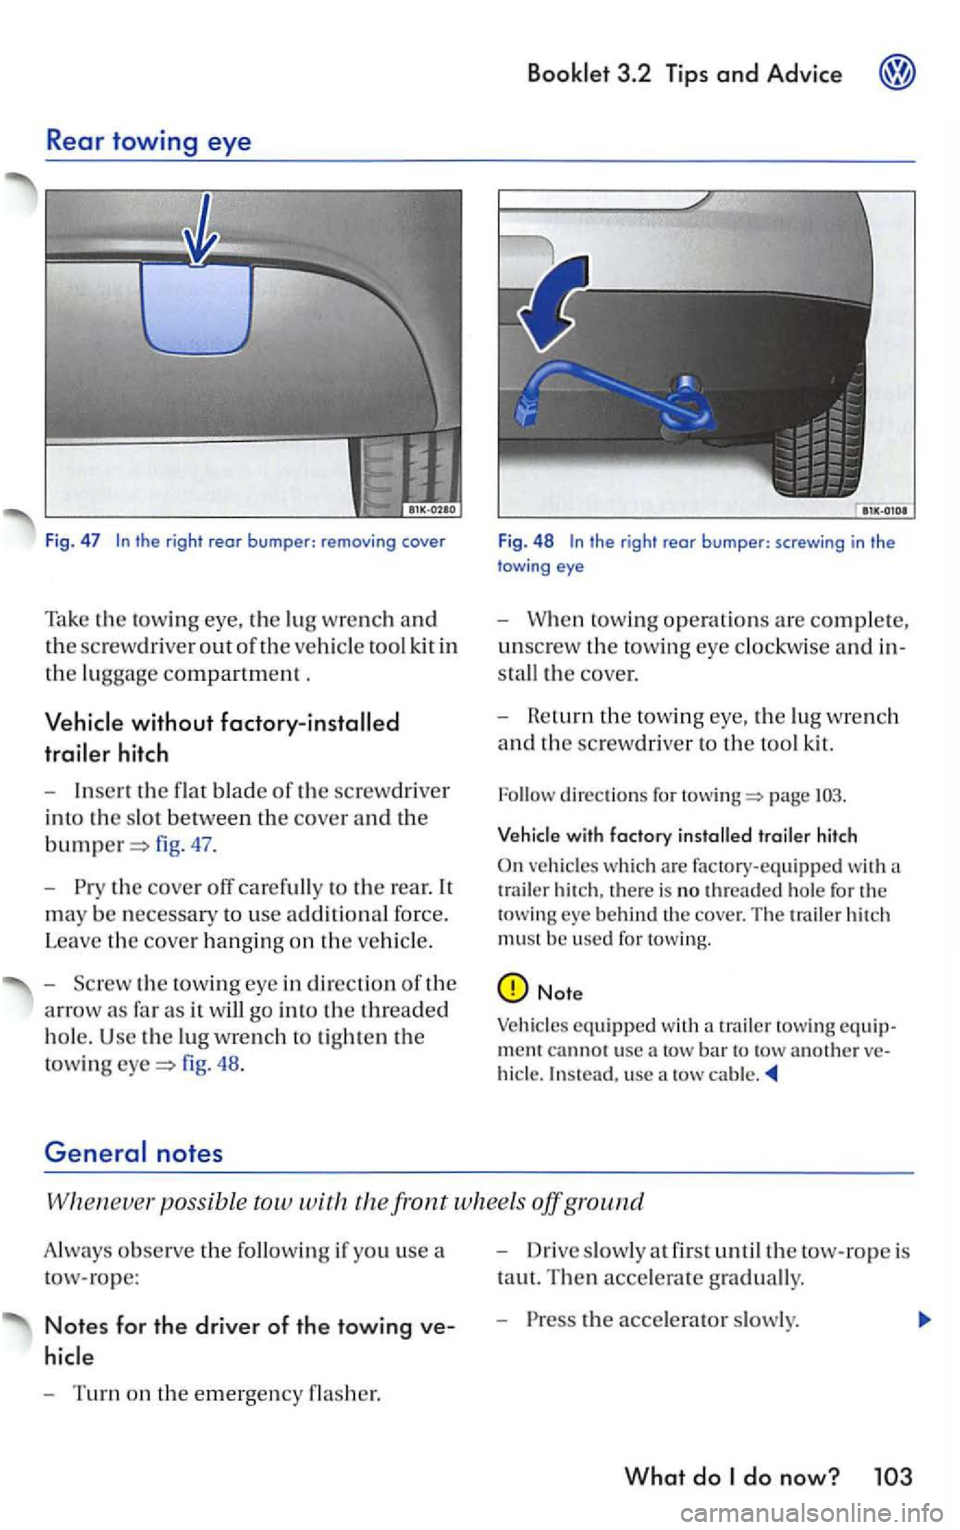
Rear towing eye
Fig. 47
without
hitch
-Inse rt the flat blade of the screw driver
i n to
the slo t between th e cover and the
fig . 47 .
-
th e cove r off carefully to the re ar. It
m
ay be necessar y to use addi t ional force.
Lea
ve the cove r hanging on the veh icle.
- Scr
ew the tow ing eye in di rectio n of th e
arrow as fa r as it will go into the threa ded
hole. Use the lu g wrench tigh te n the
to wing fig . 48 .
3.2 T ip s and Advice
Fig. 48 the right rear bumper: screwing in the eye
-towing operations are comple te,
unsc rew the towing eye clockwise and in
s ta
ll t h e cover.
-
He turn t h e tow ing eye , the lug wre nch
and th e screwdriver to the too l kit.
page
trailer hi tch
On veh icles whic h are fac tory-equipped wit h a
t rai ler hitch . there is no threaded hole for th e
to w in g behind th e cover. The trailer hitc h
must be use d for towing.
Note
Vehicle s equi pped with a trailer towing cannot use a tow bar to usc a
possib le tow the front w hee ls off g round
Always observe the followi ng if yo u use a
tow-rope :
Notes for the driver of the towing ve
-Turn on the emergency
- Drive slowly at fir s t until the tow-rope is
t a u
t. Th en accelerate gradually.
-the acce lerator s lowly.
What do
Page 380 of 444
hicle yo u are tow ing. Brake earlier and
more gently than you wou ld normally
- Do not drive faster than mph
miles
-Turn on the emergency flasher.
-Move the se lecto r lever or gearshift
l eve r to
the neutral position (N).
- Make s
ure that the tow-rope is taut at all
Tow-rope or lo w-bar
bar. use a tow -rope if you do not have a
tow -bar.
A tow-ro pe s ho uld
be slightl y elastic to reduce the loading on both ve hicl es. Use a tow -rope made of synthetic fiber or similar ela stic
load ing and damaging the anchorage points.
T he ignition
of the vehicle bein g to we d must be switched on to ensure
will
hav e to apply considera bly more press ure to the brak e pedal than you would normally.
Move the selec tor leve r toN.
Do not drive fas te r than mph
Do not tow farth er than mil es km).
a tow truck is used, the vehicl e must be tow ed with all wheels the ground.
Tow starti ng
For technica l rea sons,
it is not pos sibl e to tow start you r vehicle, if the vehicl e is without trical power. The engine management systems may not operate prop erly.
Use jumper cables page
WARNING
Towing a ve hicle changes th e way your ve hicle
h an dles and brakes. To help reduce the risk of
a n accident lea ding to serio us personal i njury, note the fo ll owi ng:
T he drive r of the vehi cle t hat is being towed:
Will have to press the brake pedal
Will have to use considerably more force
to turn t h e s teering wheel, because th e
power s teerin g is no t ac tive.
The driver of the vehicle that is towing:
Must accelerate gradually and gently avoid jerking movements.
Mus t brake earlie r and more ge ntl y than you would normally.
Tips
For technical r easo ns, it is not possible to sta rt a ve hicle with an aut omati c transmission.
th ere is no fluid in the vehicle transmission because o f a defect. th e vehicle must be tow ed
w ith the dri ve whee ls t h e ground.
a veh icle with an automati c tra nsmission has to be towed more th an miles