VOLKSWAGEN GOLF MK6 2012 Owners Manual
Manufacturer: VOLKSWAGEN, Model Year: 2012, Model line: GOLF MK6, Model: VOLKSWAGEN GOLF MK6 2012Pages: 516, PDF Size: 105.12 MB
Page 401 of 516
Reinsert the cover cap from top to bottom and
press i t
The anti-theft system remains activated
for the unlocked vehicle. But the
the driver door. The
The driver door can be unlocked separately from the inside the the door
handle to open the door
The anti-theft alarm system is not activated when the vehicle is
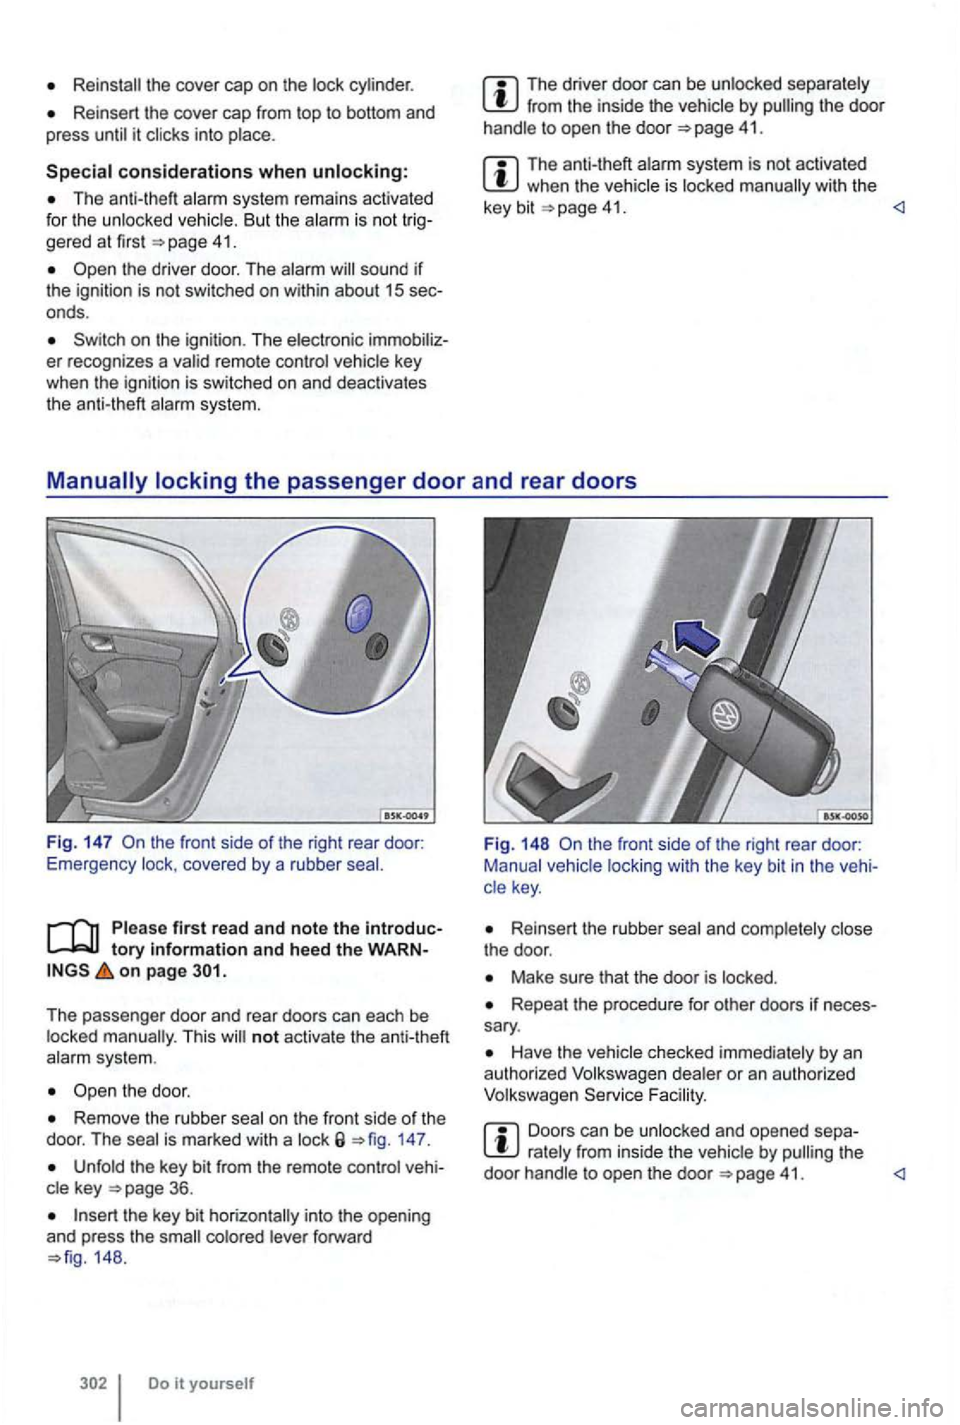
covered by a rubber
Pl ease first read and note the introductory information and heed the on page
This will not activate the anti-theft
the door.
Remove the rubber on the front side of the
door. The 147.
Unfold the key bit from the remote control
forward 148.
the front side of the right rear door:
Manual vehicle locking with the key bit in the
Reinsert the rubber the door .
Make sure that the door is locked .
Repeal the procedure for other doors if sary.
Facility.
Doors can be unlocked and opened the
door
Page 402 of 516
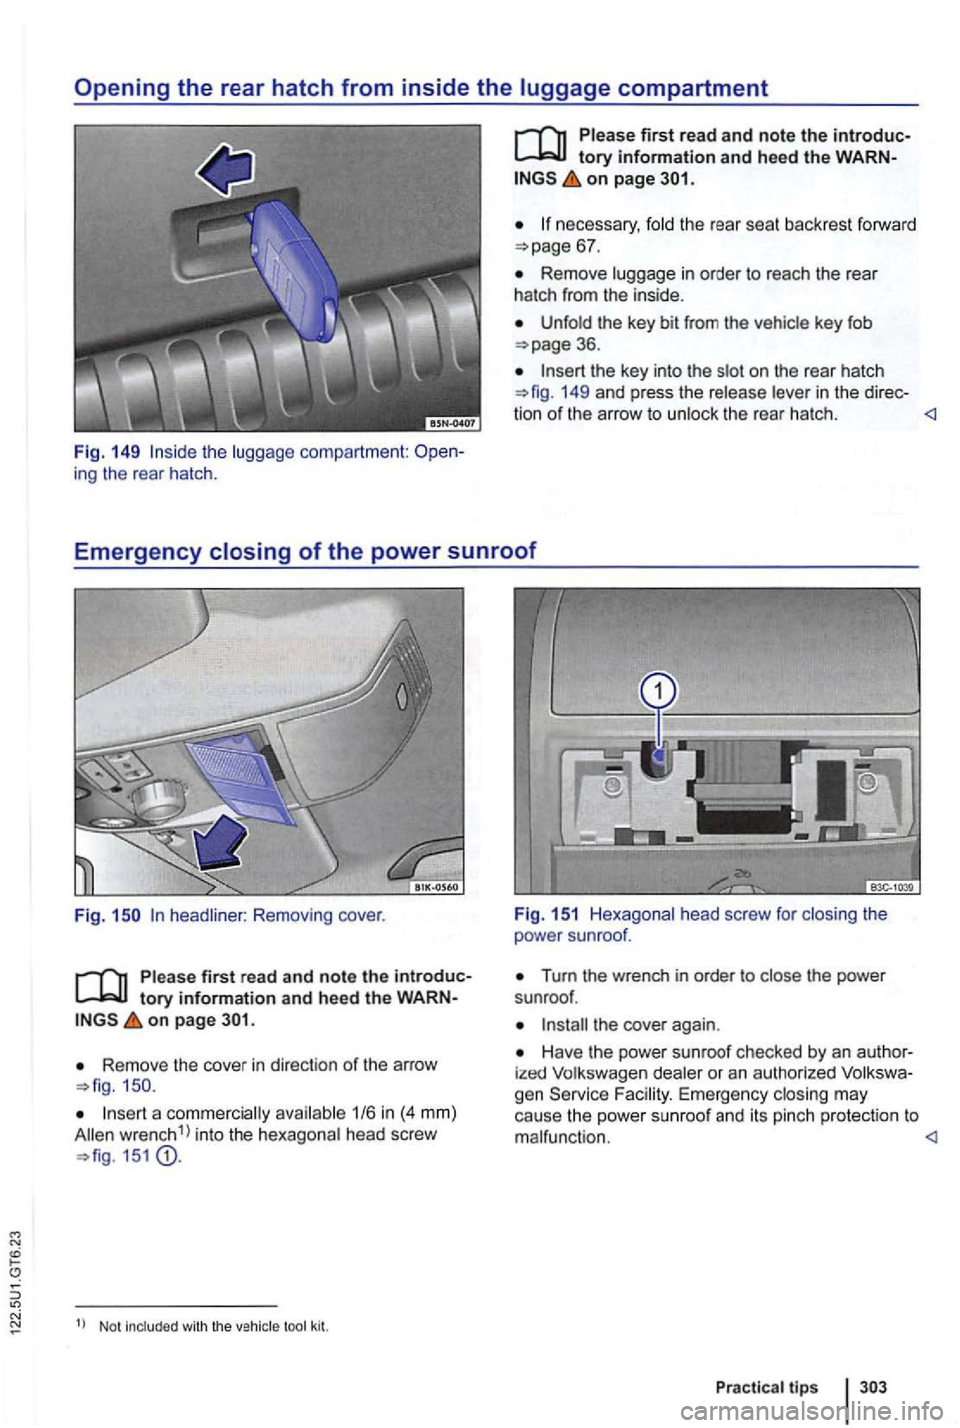
the luggage compartmen t: ing the rear hatch .
on page
necessary, fold the rear seat bac kres t forw ard
Remove lu ggage in o rder to reach the rear
h atch fr om the in si de.
U nfo ld the key bit fr om the vehicle key fob 36.
the key in to the slot on the rear hatc h 149 and pr ess the release leve r in the dir ec-
tio n of t he arr ow to un loc k th e rear h atc h .
headliner : Rem oving cove r.
Please first r e ad a nd note th e
on page
Remove the cover in d irec tion of th e arrow
wre nch 1
) in to t he hexagona l head scre w 15 1
Fig . 151 Hexagonal head screw for clos ing the
power sunroof.
Turn the wre nch in order to the power
sunroof .
th e cover again.
Have the po wer su nroof checked by an ized Volkswage n dealer or an autho rized
1
) Not included with the vehi cle
P ractical tip s
Page 403 of 516
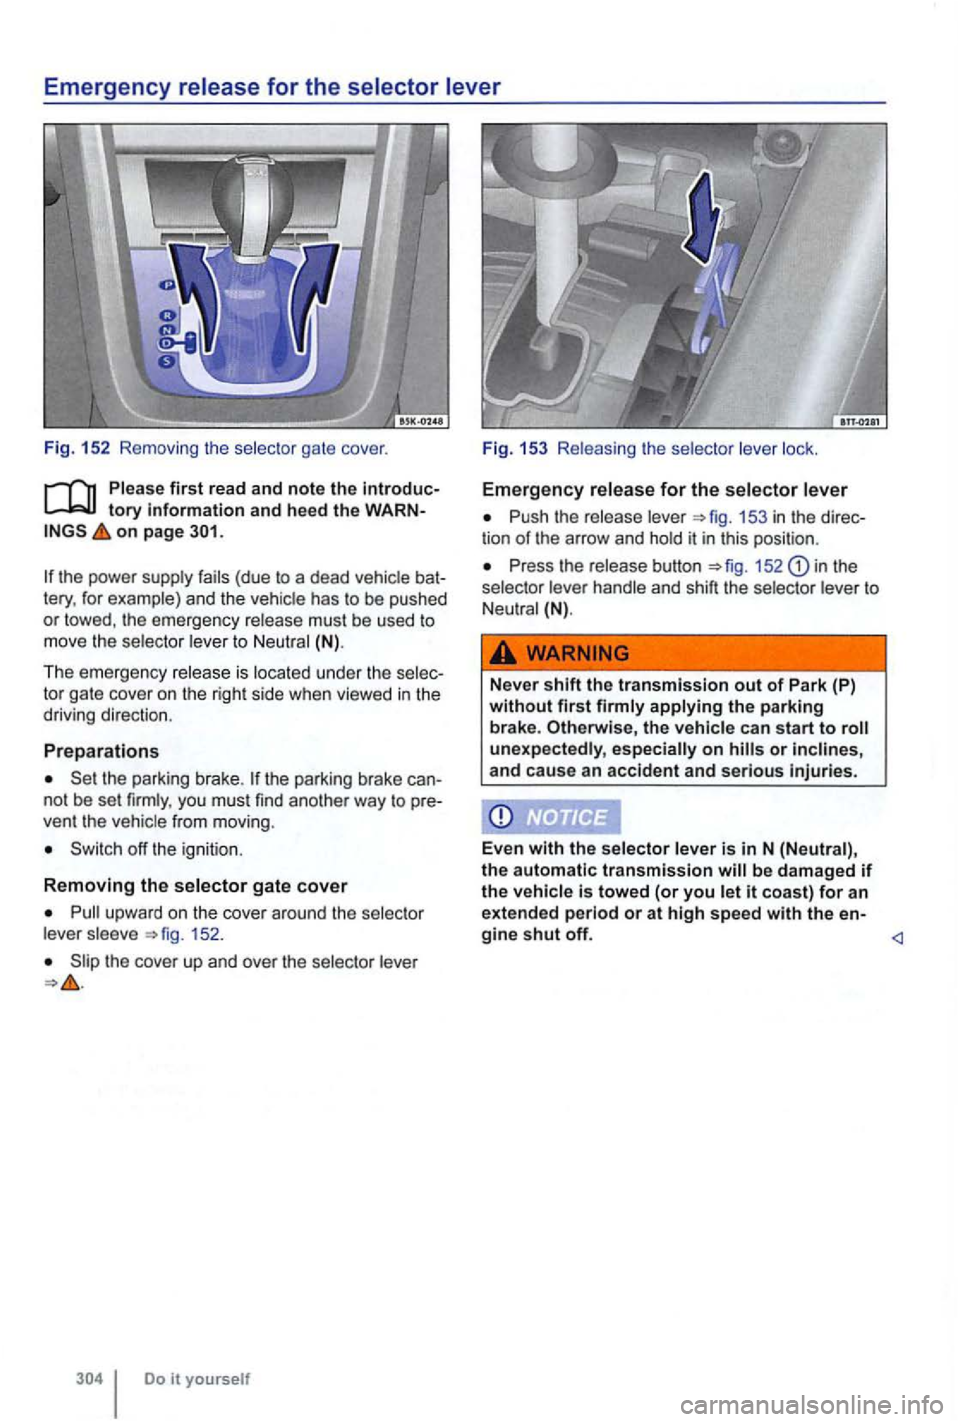
Emergency
on page
the power supply fails (due to a dead vehicle bat
tery , for example) and the vehicle has to be pushed or towed , the emergency release must be used to move the selecto r lever to N eutral (N).
Th e emerge n
cy release is located under the selec
tor gate cover on the right side when viewed in the
driving direction .
Preparations
Set the parking brake. the parking brake can
no t be set firmly , you must find another way to pre
vent the vehic le from moving .
Switch off the ignit ion.
Removing the selector gate cover
Pull upward on the cover aroun d the selec tor
lever sleeve fig. 152 .
Slip the cover up and over the selector lever
Push the release lever 153 in the direc
t ion of the arrow and hold it in this position .
Press the release button fig. 152 the
selector lever handle and shift the selector lever to Neu tral (N) .
WARNING
Never shift the tran smi ssion out of Park (P) without first firmly applying the parking
brake . the vehicle can start to roll unexp ectedly, especially on hills or inclines,
a nd cause an accident and serious injuries.
Ev en
with the selector lever is in N (Neutra l), the automatic transmission will b e damaged if the vehicle is towed (or you let it coast) for an extended period or at high speed with the en-
gine shut off.
Page 404 of 516
N
N N
Introduction
this section fin d information about:
Storage . . . . . . . . . . . . . . . . . . . .
Contents . . . . . . . . . . . . . . . . . . . . . . . . . . .
applicable legal requ irements .
More information:
Preparat ions for working in th e engine ment 222
an eme rge ncy
Changing a wheel
Loose tools and other items in the veh icle tool kit and a loose spare (or compact spare)
wheel may be thrown through the passenger
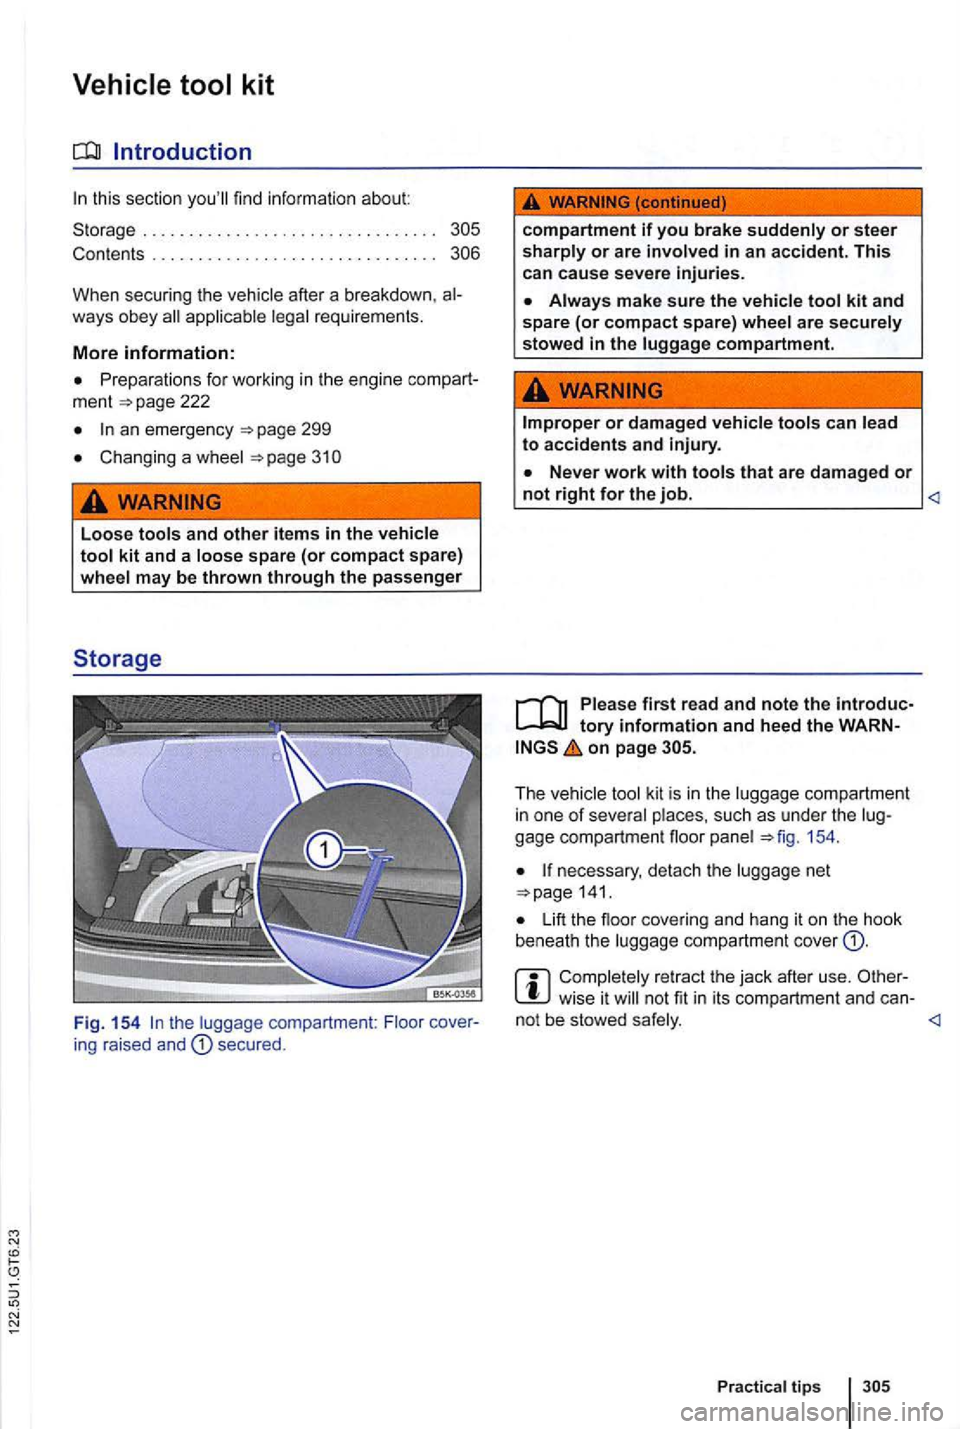
F ig. 154
the luggage compartment: Floor
compartment
Always make sure the vehicle tool kit and spare (or compact spare) wheel are securely stowed in the luggage compartment.
or damaged vehicle tools can lead to accidents and injury.
on page 305.
Th e vehic le tool kit is i n the luggage compartment
in on e of severa l pla ces, such as under the 154.
If necessary , detach the luggage net 141.
Lift the noor covering and hang it on the hook
beneath the luggage compartment cover
Completely re tract the jack after use. wise it not fit in its compartme nt and can-
Page 405 of 516
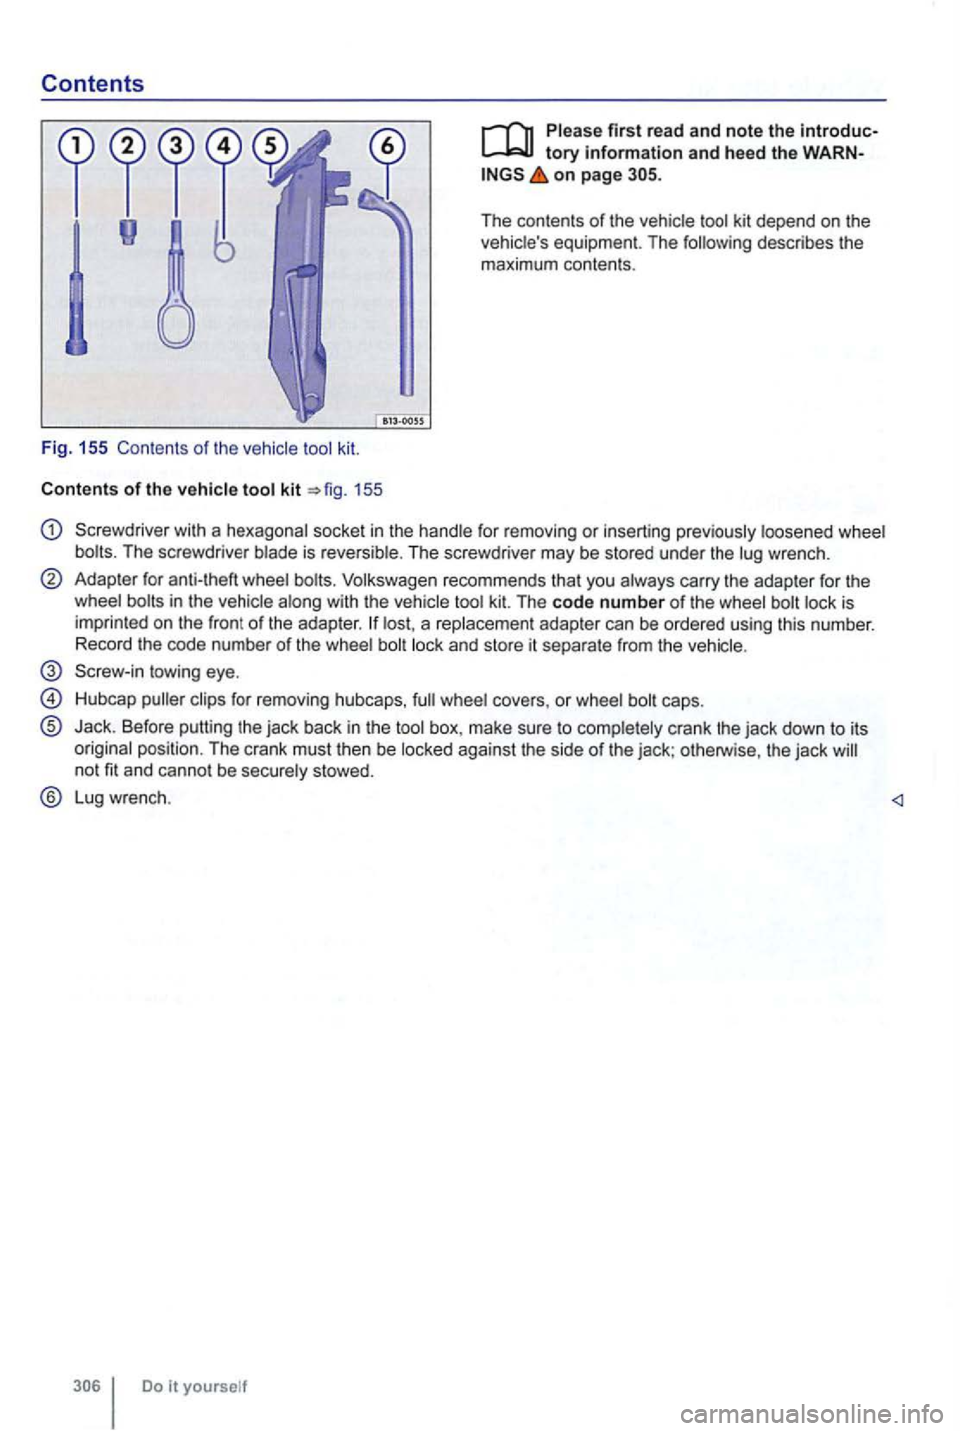
Contents
Fig. 155 Contents of the
155
first read and note the
on page
The contents of the kit depend on the equipment. The describes the
maximum contents.
Screwdriver with a hexagonal socket in the is reversible . The screwdriver may be stored under the wrench .
Adapter for anti-theft recommends that you with the a rep lacement adapter can be ordered using this number.
R ecord the code number of the
Screw -in towing eye.
Hubcap for removing hubcaps, caps.
® Jack . Before putting the jack back in the
not fit and cannot be secu rely stowed .
® Lug wrench .
Page 406 of 516
this section
tool kit
Changing a wheel
..
Unsuitable wheel covers and improper lation of wheel covers can cause accidents and severe injuries.
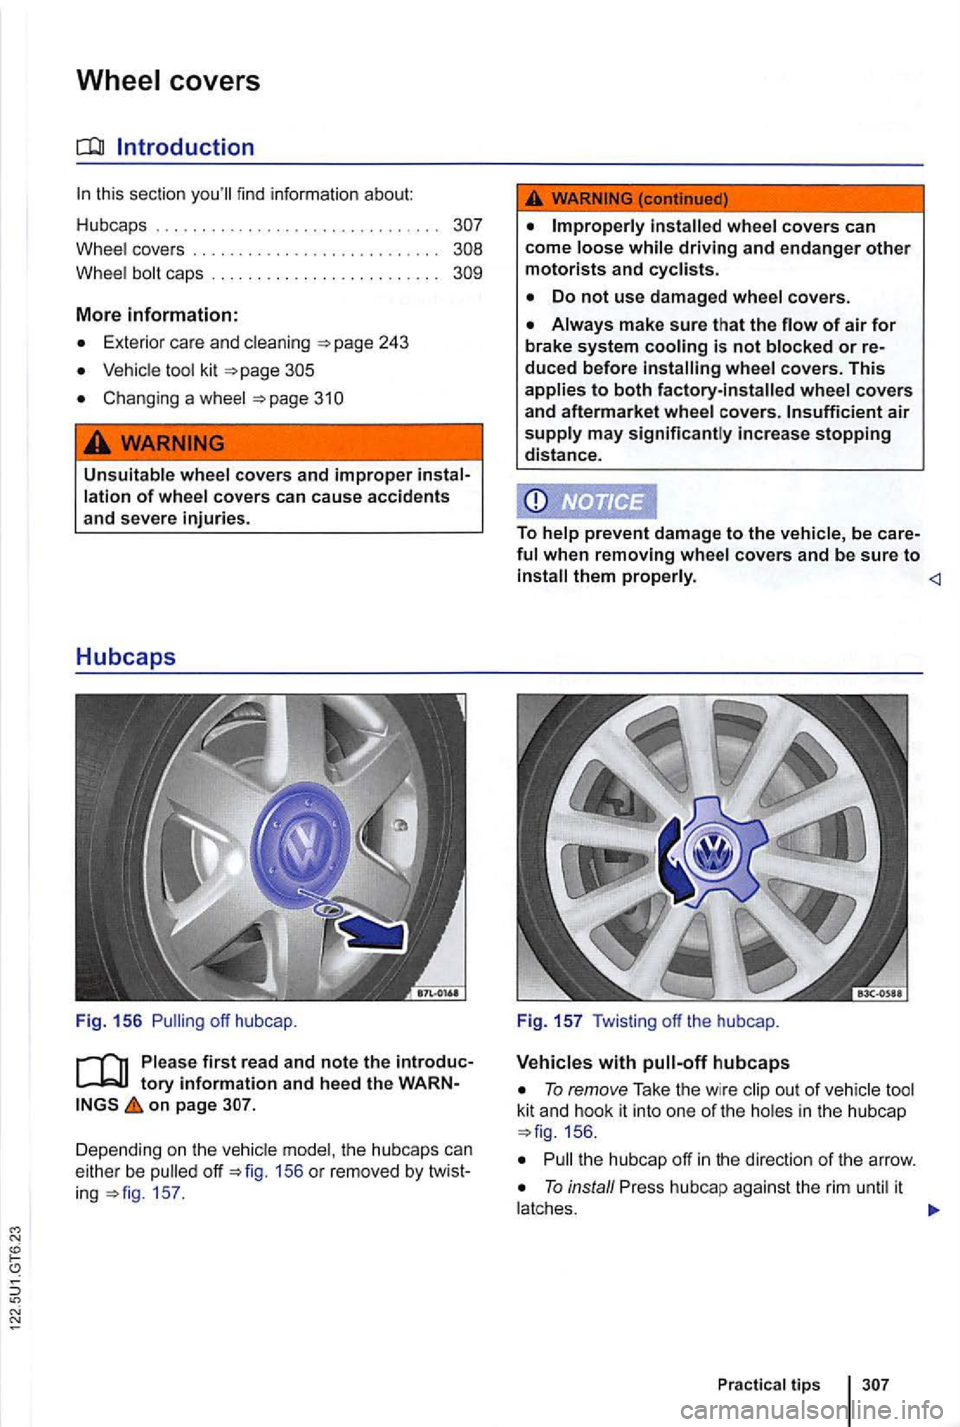
F ig . 15 6
on page
Depending on th e vehicle model, the hubcaps can
either be fig . 156 or removed by 157.
not blocked or
To remove Take the wir e out of ve hicle tool
kit and hook it into one of th e holes in th e hubcap 156 .
the hubcap off in the direction of the arrow .
To install Press hubcap against th e rim until it
latches.
Practical tips
Page 407 of 516
with twist-off hubcaps
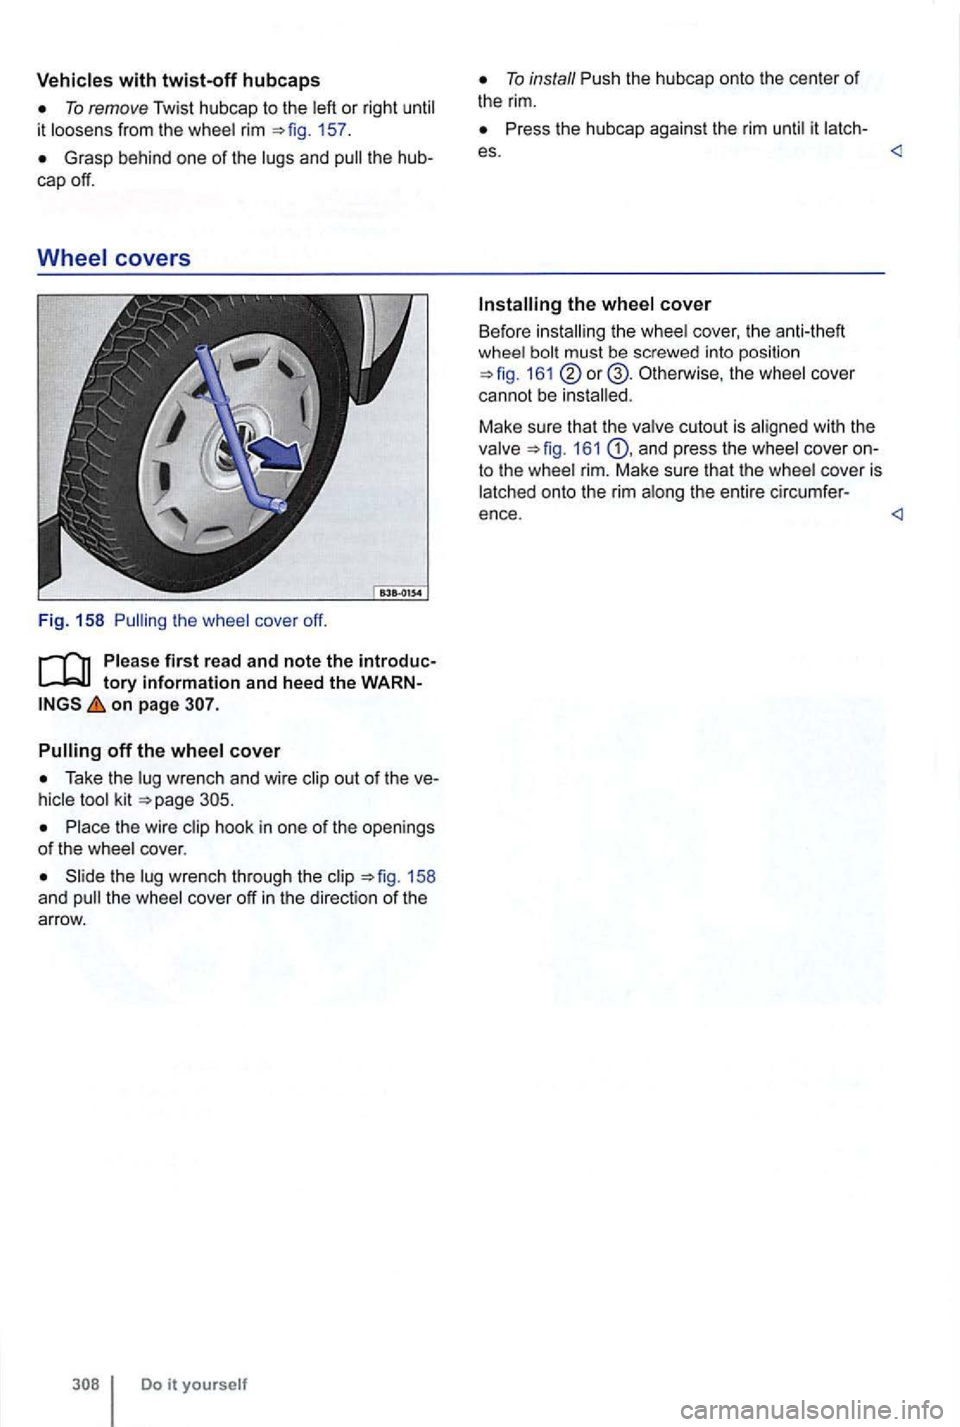
To remove Twist hubcap to the left or right until
it loosens from the whee l rim 157 .
Grasp behind one of the lugs and pull the
tory information and heed the on page 307.
Pulling off the wheel cover
Take the lug wrench and wire clip out of the
Place the wire clip hook in one of the openings
o f the whee l cover.
the lug wrench through the clip 158
and pull the wheel co ve r off in th e dire ction of th e
arrow.
Do i t yourself
To install Push the hubcap onto the center of the rim.
Press the hubcap against the rim until it latch-
es.
Installing the wheel cover
Before installing the whee l cover, the ant i- theft
whee l bolt must be screwed into position
16 1 Otherwise , the wheel cover
cannot be installed .
Make sure that the valve cutout is aligned with the
valve
16 1 and press the wheel cover
Page 408 of 516
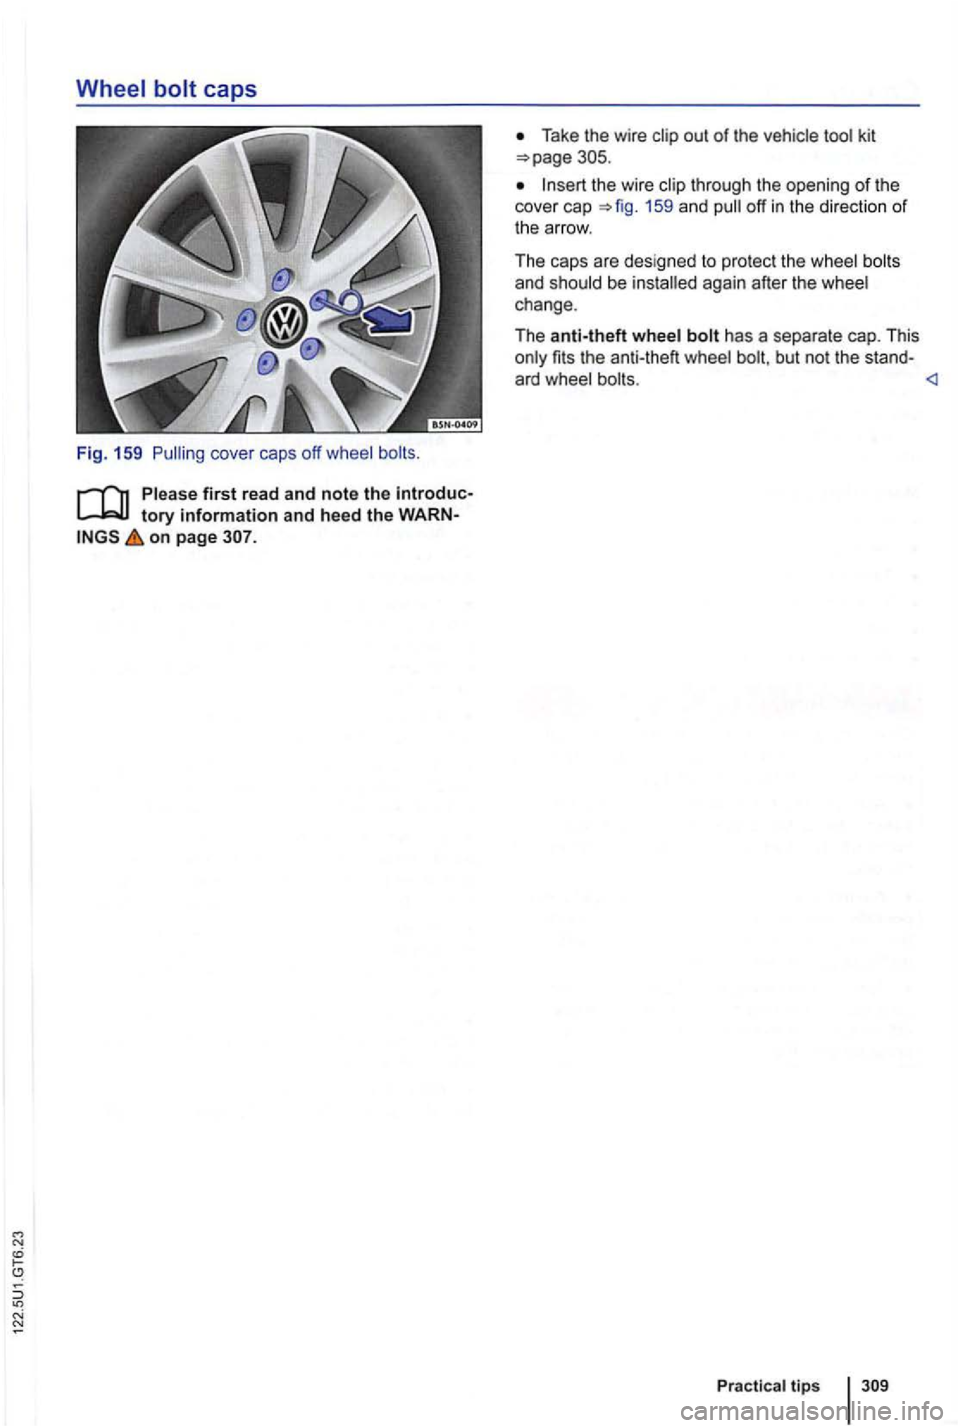
Fig . 159
on page
Take the wire out of the vehicle
159 and off in the direct ion of t h e a rrow .
The caps are design ed to protect the wheel bolts
and should be again after the wheel
change .
Th e a
nti-theft wheel has a separate cap. This fits the anti-theft wheel but not the stand -
ard wheel
Page 409 of 516
Changing a wheel
Introduction
this sect ion you 'll find informati on about:
for changi ng a wheel . . . . . . . . . 311
Wheel bolts . . . . . . . . . . . . . . . . . . . . . . . . . . . . 311
Lifting the vehi cle with the vehicle jack . . . . . . 313
Changing a whee l ....................... 315
After ch anging a wheel
................... 315
Change a wheel by yourse lf only if the vehicle is
park ed in a safe loca tion , you are fam
ilia r with
safe ty procedures and the technical steps, and you
ha ve proper too ls ava ilable . Otherwise , get expert
ass istan
ce.
More information:
Exterior views 6
Vehicle key set
Tires and whee ls 258
an em ergency
Vehicle tool kit
W heel covers
Changing a wheel ,
proaching traffic.
you are towing a trailer, always unhitch it from your vehicle before starting to change the wheel. Always apply the trailer brakes firmly and make sure the trailer cannot move unintentionally.
ing the transmission in Par k (P) or in gear
proved for use on other Volkswagen models.
es , and serious personal injuries, never en the screws on rims with threaded rim rings.
rate torque wrench.
Page 410 of 516
Preparations for changing a wheel
on page
Getting ready to cha n ge a these steps in the order here
1. you have a tire, move as fa r away from tr affic a s possi ble. Park t he
etc .
2. the parki ng brak e to fr om movi ng
165.
5 . 171.
6. Hav e
the diagonally opposite with a c hock or anot her suitab le object.
8. from the prope rly .
9. th e R emove th e luggage.
Take th e s pare or compac t spare ki t ou t of the
cove rs
may
ries.
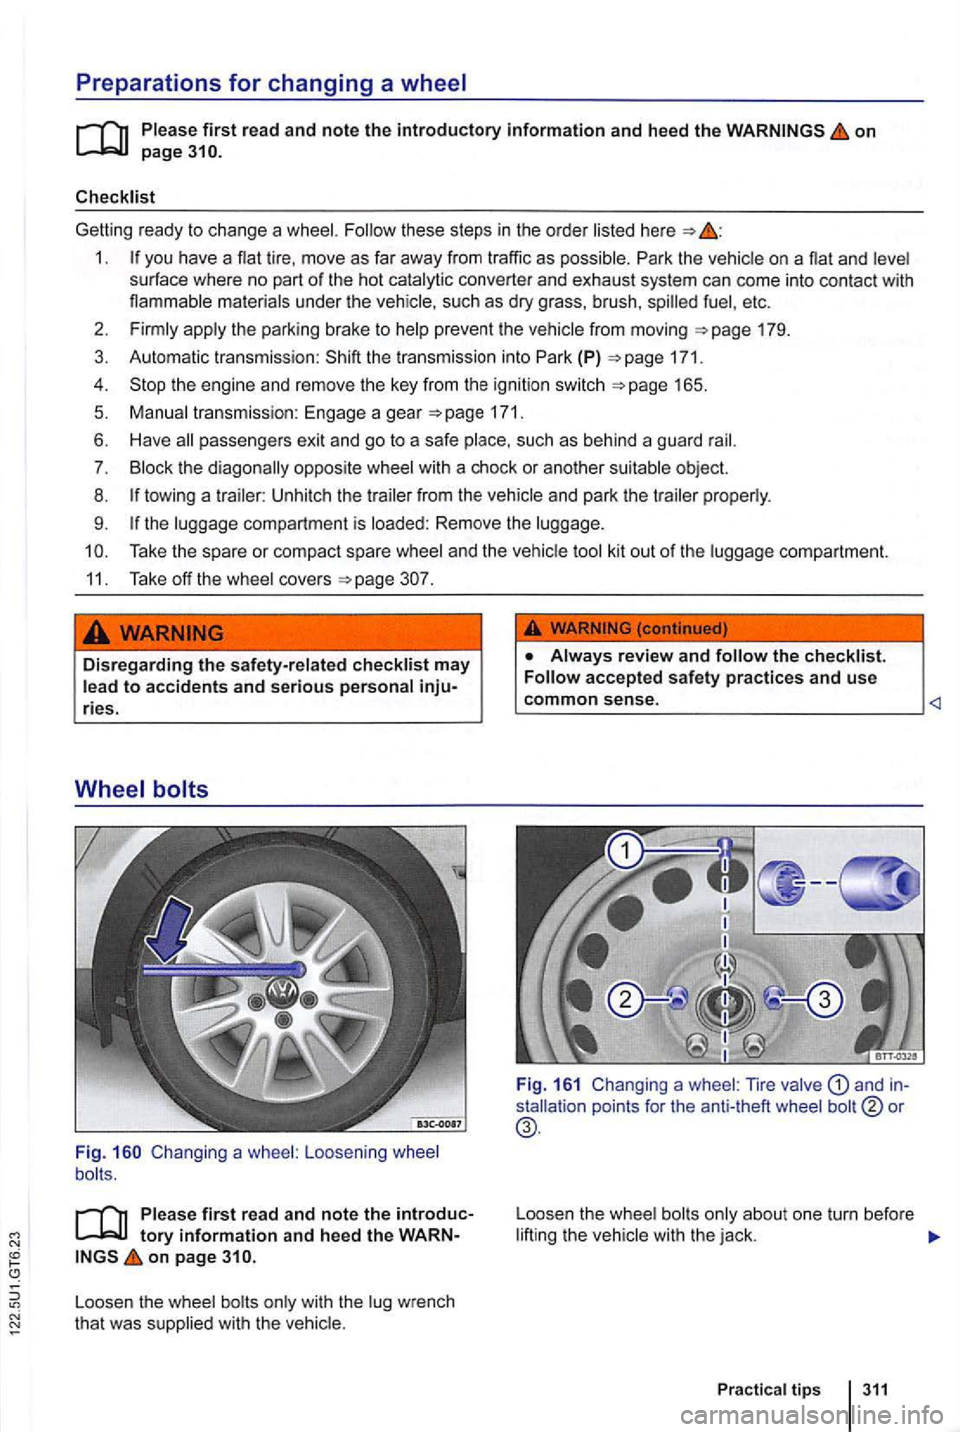
Wheel bolts
Fi g. Changing a Loosening
tory information and heed the on page
Loose n the that was
the checklist. accepted safety practices and use
L c_ o_ m __ m_o_n __ s_en_s_ e_ . ______________ ________
Fig. 161 Changing a Tire
Loosen the the
tips 311