VOLKSWAGEN GOLF PLUS 2004 Owners Manual
Manufacturer: VOLKSWAGEN, Model Year: 2004, Model line: GOLF PLUS, Model: VOLKSWAGEN GOLF PLUS 2004Pages: 541, PDF Size: 98.86 MB
Page 351 of 541
When the vehicle battery is jump-started, it give s off hydroge n gas , which is highl y exp losive!
A lw ays keep fire, sparks, ope n flame , and smoking materi als fa r away from vehicle
necting or disco nnecting jumper cable s.
Jump-s ta rt batterie s only in well-ventil ated
areas. Batteries give off highly explosive
Always route the jumper cables so that they cannot get caught in any moving parts in the
..
Never short out the battery terminals by
connecting the positi ve termina l(+) and
Never connect the negative c abl e from the other vehicle directly to the negativ e terminal of the di scharged b atte ry, as thi s may cause the
hyd rog en gas given off by the di sc harg ed battery
to explod e.
Never att ac h the negati ve cable from the hicl e providing starting assistance to any
Never allow the non-insulat ed parts of the battery clamps to tou ch.
Never allow the jumper cable attached to the
po sitive battery te rminal to contact metal parts of the vehicle.
Note
To avoid doing exte nsive damage to the vehicle
elect rica l system, read and heed t11e following:
Connecting jumper cables imprope rl y can ca use a short cir cuit and do expensive damage to the ve hicl e's electric al sys te m.
Do not le t the ve hicles touch eac h other whil e
the jumper cab les are conncc te d.Iftl1 ey do,
Page 352 of 541
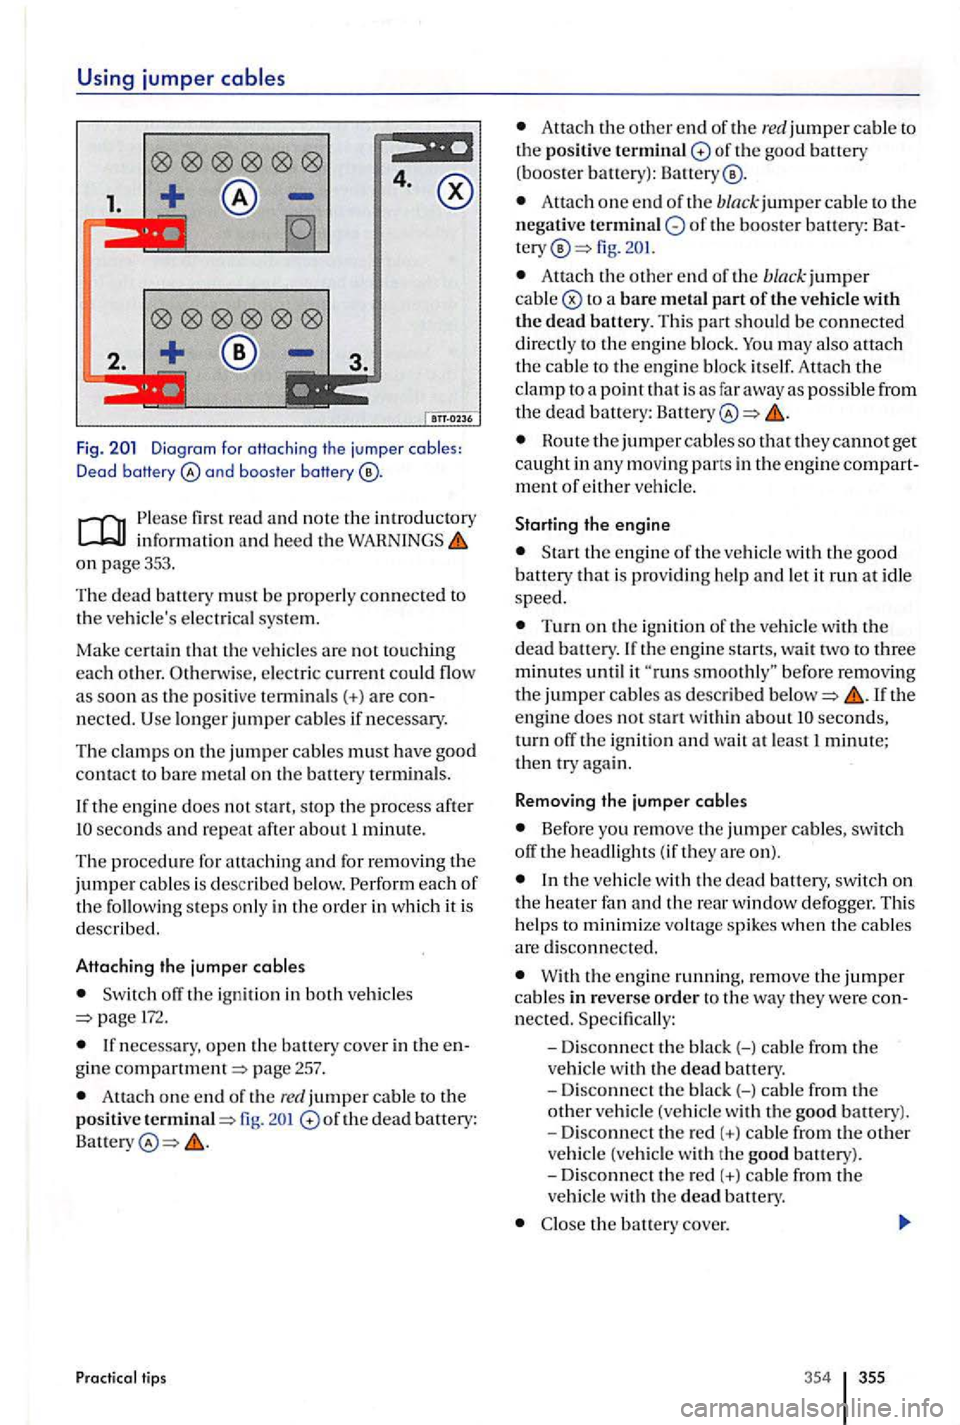
Using jumper
4.
1.
2.
Fig. and boos te r baHery
informat ion and heed the on page 353.
Th e
dead battery must be properly connected to
th e ve hicle's electri cal sys tem.
Ma
ke certain
pos iti ve termin als(+) a re
the engine does not start, stop the process after seconds and repeat after about 1 minute.
Th e procedu re for attach ing
and for removing the jumper cables is desc ribed below.
off the ign ition in both vehicle s 172.
gine compartment=> page 257.
Attach one end o f th e red jumper cable to the positive termina l=> fig. of th e dead battery:
Pr actical tips
Atta ch the o ther end of the re d jumper cable to th e positive terminal of the good battery (booster battery):
Attach one e nd of the black jumper cable to th e
n egative of the booste r battery : fig.
Attac h the oth er e nd of the bla ck jumper cable
may also attach the cable to the e ng in e bl oc k itself. Attach the clamp to a poi nt that is as far away as possible from the dead battery: Battery
Route the jumper cable s so that they cannot get caught in a ny moving pans in th e engine ment of either vehicle.
Starting the engine
is prov idi ng h elp and let it run at i dle speed.
Turn on the ign ition of the ve hicle with the dead battery.
seconds, turn off th e ignition and wa it at least 1 minute; then try again.
Remo ving the jumper cables
Before yo u remove the jumper cables , switch
off the headligh ts ( if they are on).
the ve hicl e w ith the dead battery, switch on the heater fan and the rear window defogger. This
h elp s to minimize voltag e spikes when the cables are disconne cted.
With the engin e running. remove the jumper cable s in reverse order to the way they we re
the bauery cove r.
354 355
Page 353 of 541
Improper usc of jumper cables when starling a ve hicl e wit h a dead battery can cause the battery to exp lode, leading to serious sonal injury. To help red uce the risk of battery
explo sion:
All work on the batteri es or the elec trical
sys tem in your veh icle can cause serious acid burns, fire s, or e lec trica l shocks. Always read and heed the followin g WARNINGS and safety
precaution s before working on the batteries or the electrical page 257,
Always wear proper eye protection. Never
lean over the vehicle batteries.
Attach the jumper cables in the correct order:
first the positive cable, then the negative cable.
Never connect the negative cable from the ve hicl e providing starting assistance to parts of th e fuel system or to the brake hoses or brak e
line s.
Never allow no n-i nsu lated parts of the battery clamp s to touch. Never allow the jumper cable attache d to the positive battery terminal to
contact metal parts of the ve hicle.
Do it yourself
hicl e battery. If you cannot sec the color ofthe window clearly, never usc a cigare tte
light er, or other open Use
Avoid electrosta tic dischar ge in the vicinity of the ve hicl e battery . Sparks may cause the
Neve r jump start
A lways follow the instru ction s of the jumper cable manufacturer.
Always make sure that the battery providing
star ting assistance has th e same vo lta ge as the dead battery (12 V) and about the same capacity
(sec battery lab el).
Batterie s give off explos ive hydrogen gas. ways keep fire, sparks , open and smoking
materials away from batteri es.
Never connect the negat ive cab le from the other vehicle directly to the negative terminal of the dead battery. The hydrogen gas from the battery is exp losive.
Neve r short out the battery te rminals by co nn ecting the positi ve(+) and negati ve(-)
terminal s with each other.
Page 354 of 541
Tow-starting and towing
Introduction
In thi s sec tion you'll find informati on on the low ing:
ti ps on towin g your vehicle . . . . . . . . . . . . . . . . . . . 357
Installing the towing eye in the fron t . . . . . . . . . . . . . 358
In stalling the towing eye in the rear . . . . . . . . . . . . . 359
Driving tips while towing . . . . . . . . . . . . . . . . . . . . . .
Ob serve lega l regulations tow -startin g and
t ow ing.
For technical rea sons: A vehicle with dead battery must never be towed;
Engin e control and emissio n control system page315
Never tow a vehicle without any electrica l
power.
Neve r remove the vehicle key from the
first r ea d and no te th e introductory inf ormation and heed the WARNINGS on page357.
Towing eye; bar
A to w ing eye is includ ed in your vehicl e's tool kit.
Thi s ca n b e inserted in a th rea ded h ole in the front bumper a nd use d whe n your ve hicl e is bei ng
t owed by an o th er ve hicle.
Towing a veh icle change s th e way it handles and brake s. To help reduce the risk of an accident and serious personal injury, note the following:
The driver of the ve hicl e that is being towed:
-
need to
press harder on the brak e pedal to slow down or stop. Always be alert so as not to rear-end the towing vehicle.
-
You will have to use conside rably more
force to turn the steerin g whee l because the power steering is not working.
The driver of the ve hicl e that is doing the towing:
- Accelerate gradually
and gently and avoid
jerking movements.
- Do
not brake hard or stee r sharply.
- Brake earlier
and more gently than in normal driving.
Note
Be careful not to damage the paint when stalling and removing the eye and the cove r for the threaded hole behind the bumper.
Unburned fuel can get into the catalytic verter during towing and damage it.
The tow rope s ho uld be nexib le e no ug h to help
protect both v ehicle s from damage . thetic fiber rope or simil ar rope.
A tta ch th e
tow rope or tow bar onl y to the towing
eye included in the vehicl e tool kit for thi s
the transmission in Ne utra l (N).
Do not tow faster than mph km /h ).
D o not tow more than miles
Page 355 of 541
If transmission has leake d out of th e missio n.
If there is o r n o oil in th e transmiss io n cause of damage to your ve hicl e, it mus t be moved
w ith th e dri ve wheels off th e ground.
If the front and rear w heels cannot t u rn.
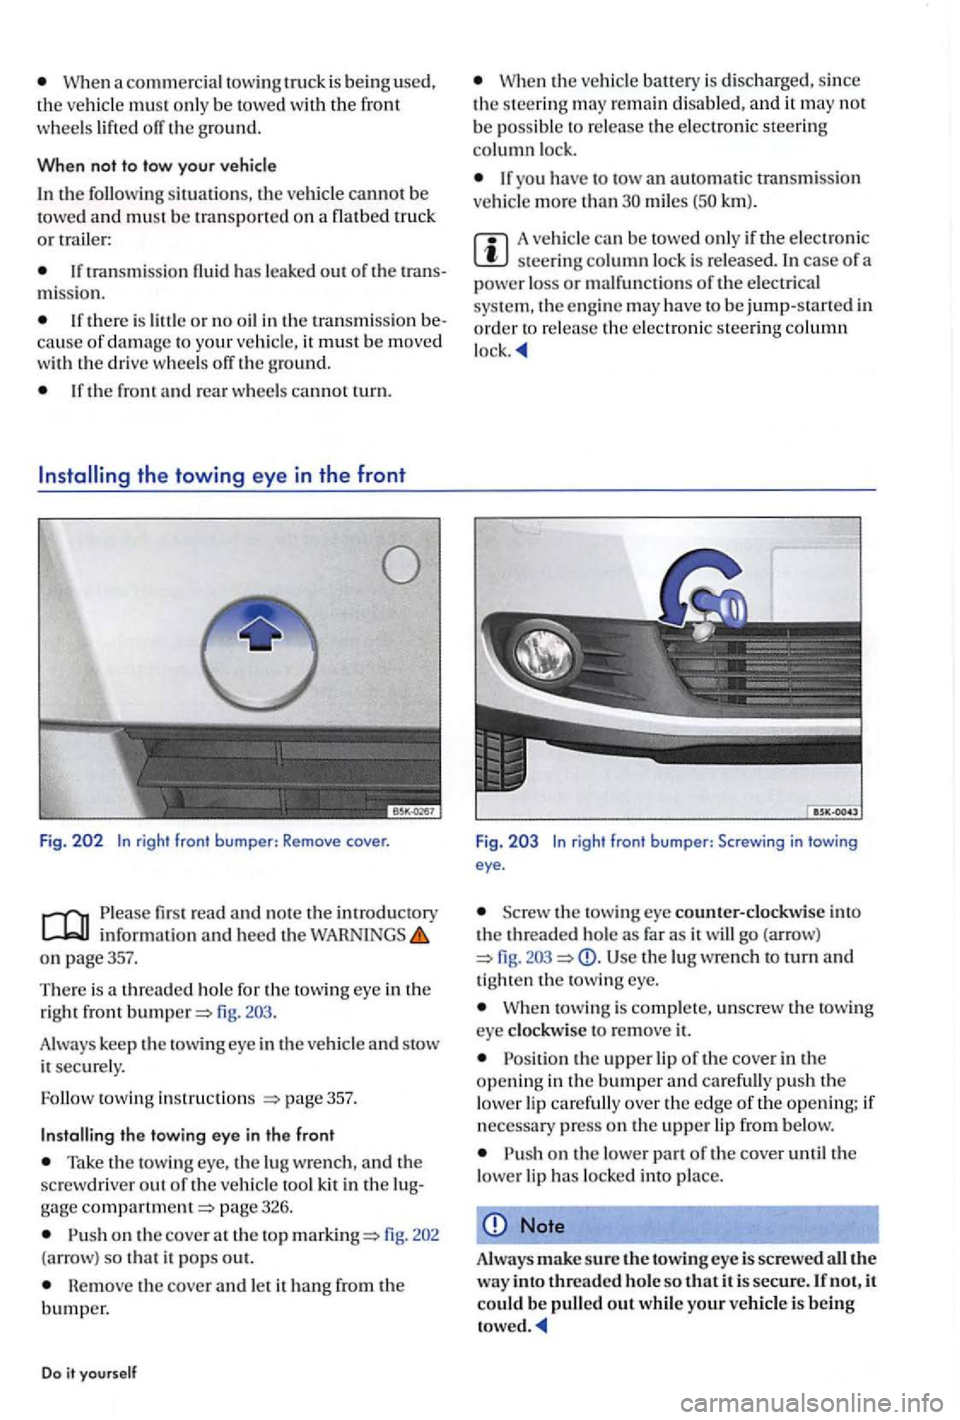
Fig . 202 In righ t front bumper : Remove cover.
read and note the introdu ctory information and heed the on page357.
T he re is a thread ed hole for
the tow ing eye in the
right front
Take the tow ing eye, the lu g wre nch, and the
sc rewdriver out o f the ve hicle too l kit in the page 326.
on the cove r at the top 202
(a rrow ) so that it pops out.
Remove the cover and let it hang from the bumper.
Do it yourself
the ve hicl e battery is disc harged, since the s teering re m ain disabled, and it may not be poss ibl e to release the elect ro ni c steerin g column lock.
If yo u have to tow an automatic tran smissio n
ve hicl e m ore th an miles km ).
A vehicle can be to we d onl y if the electro nic steerin g co lumn lock is released. In case of a
power loss or malfunc tions of the e lectrical
sys te m , th e e ngine may have to be jump-start ed in order to re lease the electroni c steerin g column
Fig . 2 0 3 In righ t front bumper: Screwing in t owi ng eye .
the tow ing eye counter-clock wise into the threaded ho le as far as it will go (arrow) Use the lug wrenc h to turn and tig ht en th e towing eye.
towing is compl e te, unscrew the towi ng eye cl ock wise to re m ove it.
on the lower part of the cover until the
lower lip has locke d into pla ce.
Note
Always make sure the towin g eye is screwe d all the w ay into threaded hole so that it is secure. If not, it could be pull ed out while your vehicle is being
Page 356 of 541
the towing eye in the rear
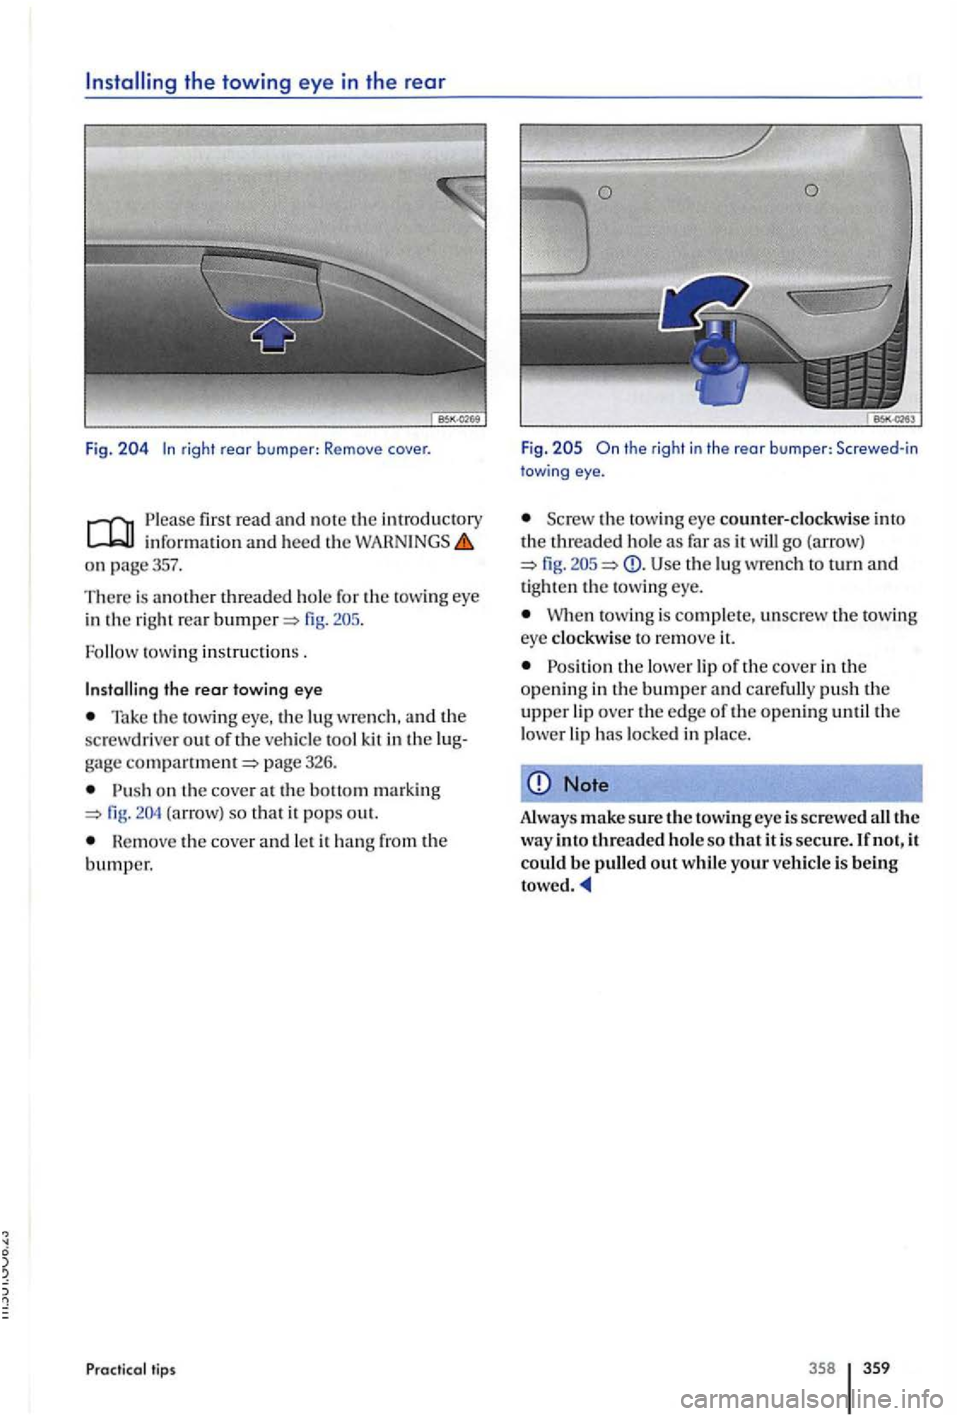
Fig. rig ht rear b umper: Remove cover.
P le ase first read and not e th e information and heed the
on page357.
The re is another threaded hole for the towing eye
in the right rear
tow ing instruction s .
the rear towing eye
Tak e the towing eye, the lu g w rench, and the
sc rewdrive r out of the veh icle tool kit in the
Pu sh on the cove r at the (arrow) so that it po ps out.
th e cover and le t it
tips
Fig .
the towing eye counter-clockwise into
th e threade d hol e as far as it will go (arrow) fig. Use th e lu g wrench to turn and tighten th e towin g eye.
W hen t owi ng is complet e, unscrew the towin g
eye clockwise to remove
Position th e lower lip of th e cover in th e
o penin g in the bumper and ca re full y push th e upper lip over the edge of th e opening until the
l ower lip has locke d in plac e.
Note
Always make sure the towing eye is screwe d all the way into threaded ho le so that it is secure . If n ot, it could be pulled out while your veh icle is being
358 359
Page 357 of 541
Driving tips towing
Please fir st read and note the introd uctory in form ation and heed the on p age357.
Tow
ing r equires som e ex perience, especiall y w hen
u sin g a tow rop e. Both drivers mus t be familiar
w ith the techniques required f or towin g.
paved roa d, there is always a risk of overloading and damaging th e a ttachment points.
your ve hicl e is bein g towe d, it can still sign al turns eve n if the em erge ncy flashers are activate d , as lo n g as the ig nit ion is switched on. the turn sig nal in the no rm al way. The e merge ncy flashers
go off as l ong as th e tu rn sig nal is blin kin g. As soon as the turn sig nal lever returns to its ne u tr a l tio n . the e merge ncy flash e rs are auto matically tiv ated agai n.
The driver of the vehicl e towed:
your vehicle is the on e being towed, the ti on switch m ust b e swit ch ed on to keep the
Do it yourself
s teeri ng wheel from loc king. Also m ake sure that the turn signal s, horn , winds hi eld wip ers, and w indshi eld was he rs wo rk properly.
power steering does not wo rk w hen th e
e ngi ne is swi tc h e d off, more e ffort is needed t o
s teer th e ve hicl e.
the brak e booster also does no t w ork when the engin e is s topped, you will need t o press harder o n the brak e ped al to slo wdown or stop. Do not hit the towing vehicl e.
Head and heed the inform ation and in the tow in g ve hicle's owners m anu al.
The driver of the towing vehicle:
Accele rat e g raduall y and gentl y a nd avoid
jerking move men ts. Do no t s teer s h arply.
Brake earli er and m ore ge ntl y than in normal driving.
Head and heed the informatio n and in the owner's m anual of the ve hicl e bein g
tow ed
Page 358 of 541
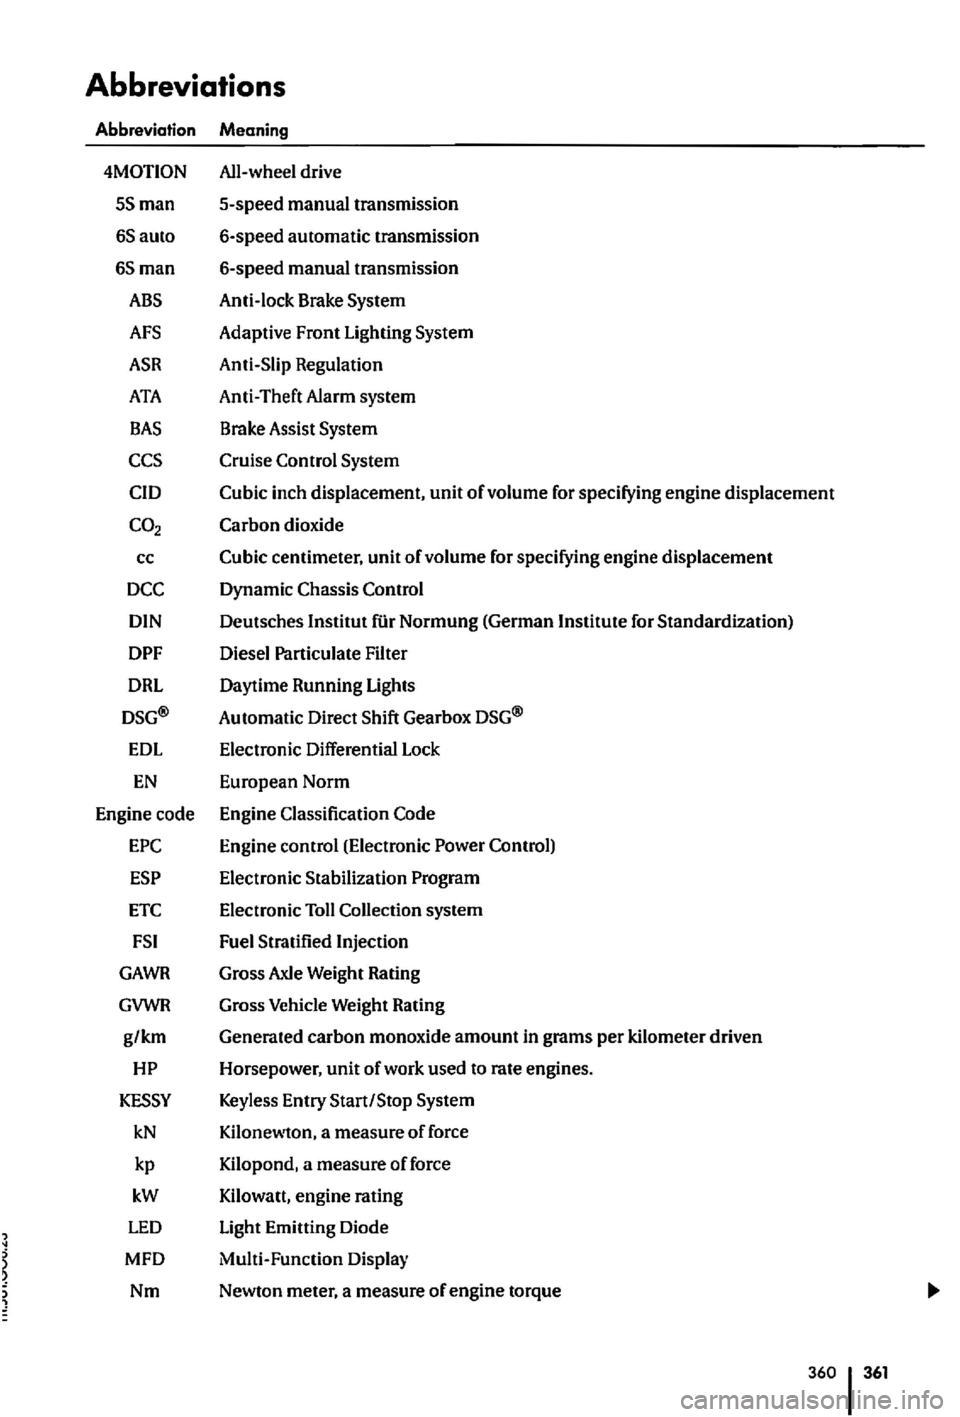
Abbreviations
Abbreviation
Page 359 of 541
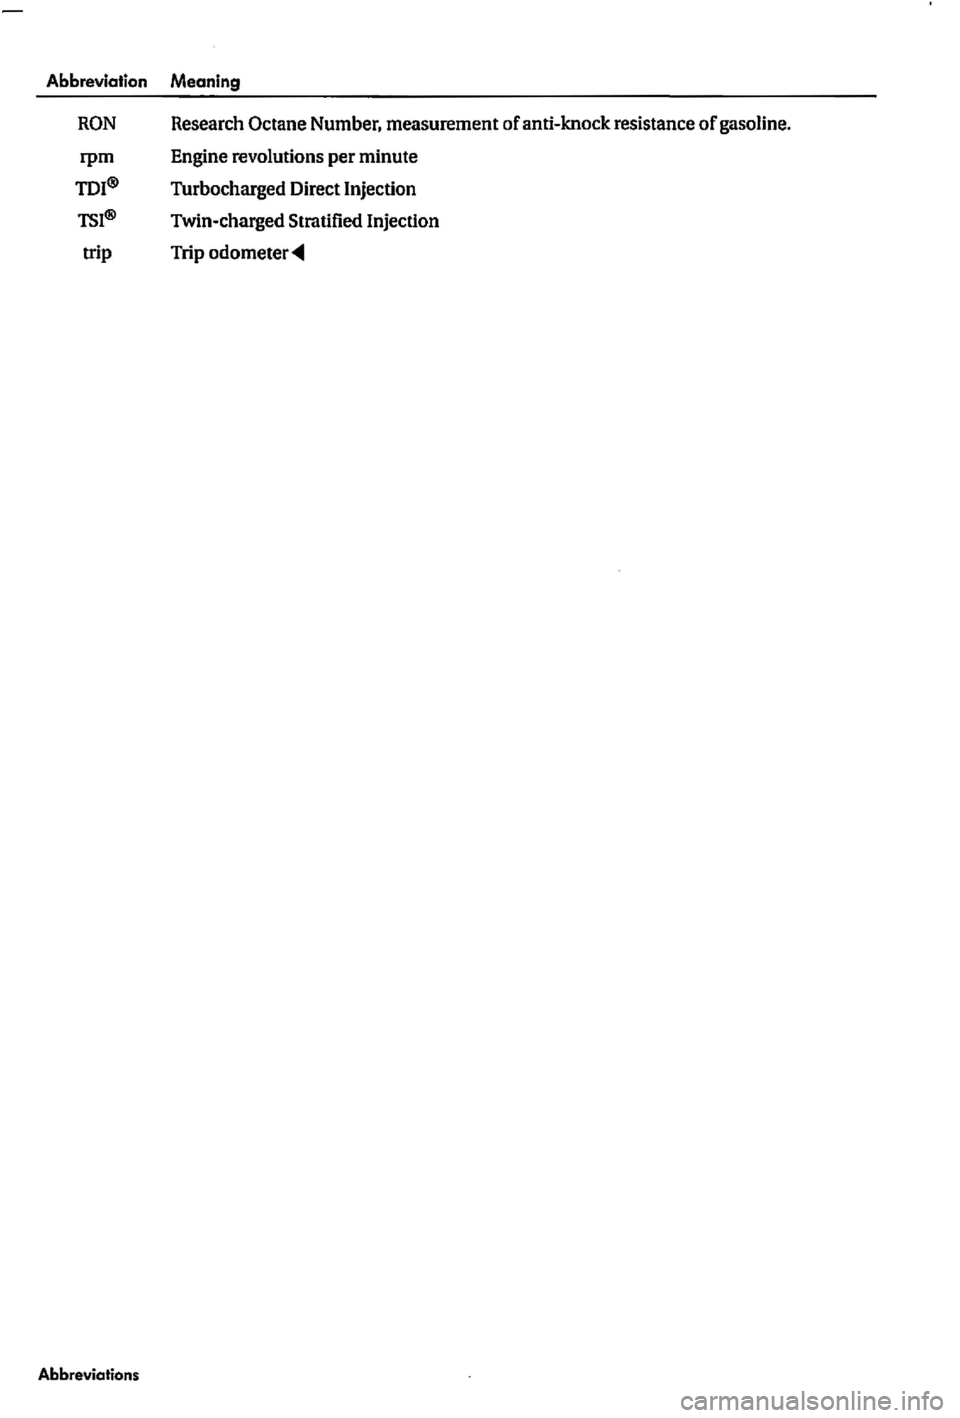
Abbreviation
Page 360 of 541
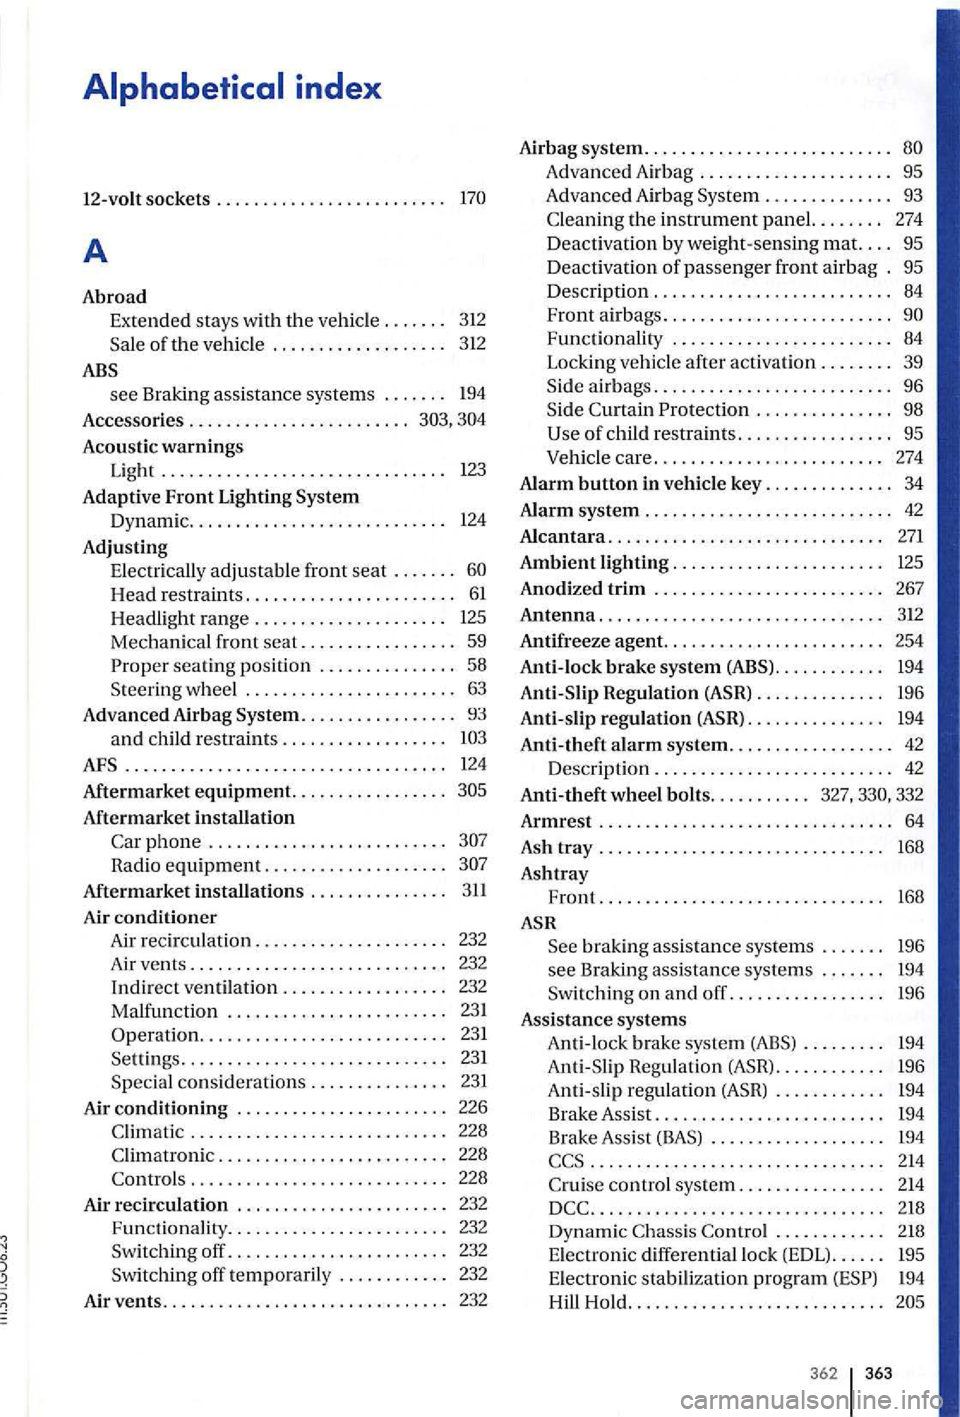
. . . . . . . . . . . . .
A
Abroad
Extended stays with th e vehicle . . . . . . . 312
Sale of the vehicle ................... 312
see Braking assistance systems . . . . . . . 194
Accessories . . . . . . . . . . . . . . . . . . . . . . . .
Acoustic warnings Light . . . . . . . . . . . . . . . . . . . . . . . . . . . . . . . 123
Adaptive Front Lighting System
Dynamic. . . . . . . . . . . . . . . . . . . . . . . . . . . .
124
Adjusting
Electrically adjustable front seat . . . . . . .
Aftermarket installation Ca r phone ......................... .
232
Airbag system. . . . . . . . . . . . . . . . . . . . . . . . . . .
airbags. . . . . . . . . . . . . . . . . . . . . . . . . . 96
Side Curtain Protection . . . . . . . . . . . . . . . 98
of child restraints ................. 95
Vehicle
care ..................... .... 274
Alarm button in vehicle key. . . . . . . . . . . . . . 34
Alarm system . . . . . . . . . . . . . . . . . . . . . . . . . . . 42
Alcantara. . . . . . . . . . . . . . . . . . . . . . . . . . . . . . 271
Ambient lighting. . . . . . . . . . . . . . . . . . . . . . . 125
Anodized trim . . . . . . . . . . . . . . . . . . . . . . . . . 267
Antenna. . . . . . . . . . . . . . . . . . . . . . . . . . . . . . . 312
Antif reeze agent. . . . . . . . . . . . . . . . . . . . . . . . 254
Anti-lock
brake system (ABS)............ 194
Ant i-Slip Regulation (ASRJ . . . . . . . . . . . . . . 196
Anti-slip regulation (ASR). . . . . . . . . . . . . . . 194
Anti-theft alarm system .................. 42 Description . . . . . . . . . . . . . . . . . . . . . . . . . . 42
Anti-theft wheel bolts ...........
Armrest ................................ 64
Ash tray ............................... 168
Ashtray
Front ............................... 168
brakin g assis tance systems ....... 196
see Braking assistance systems ....... 194
Swit ch in g on and off ................. 196
Assistance systems
Ant i- lock brake syste m (ABS) ......... 194 Anti-Slip Regulation (ASR) ............ 196 Anti-slip regulation (ASR) ............ 194
Brake Assist ......................... 194
Brake Assist
(BAS) . .. ................ 194
ccs ................................ 2 14
Cruise control syst
em ........ ........ 214
............................... 218 Dynamic Chass is Contro l ............ 218 Electronic differentia l lock (EDL) ...... 195
E l
ectronic stabilization program 194
Hill Hold ............................
362 363