VOLKSWAGEN GOLF PLUS 2007 Repair Manual
Manufacturer: VOLKSWAGEN, Model Year: 2007, Model line: GOLF PLUS, Model: VOLKSWAGEN GOLF PLUS 2007Pages: 541, PDF Size: 98.86 MB
Page 61 of 541
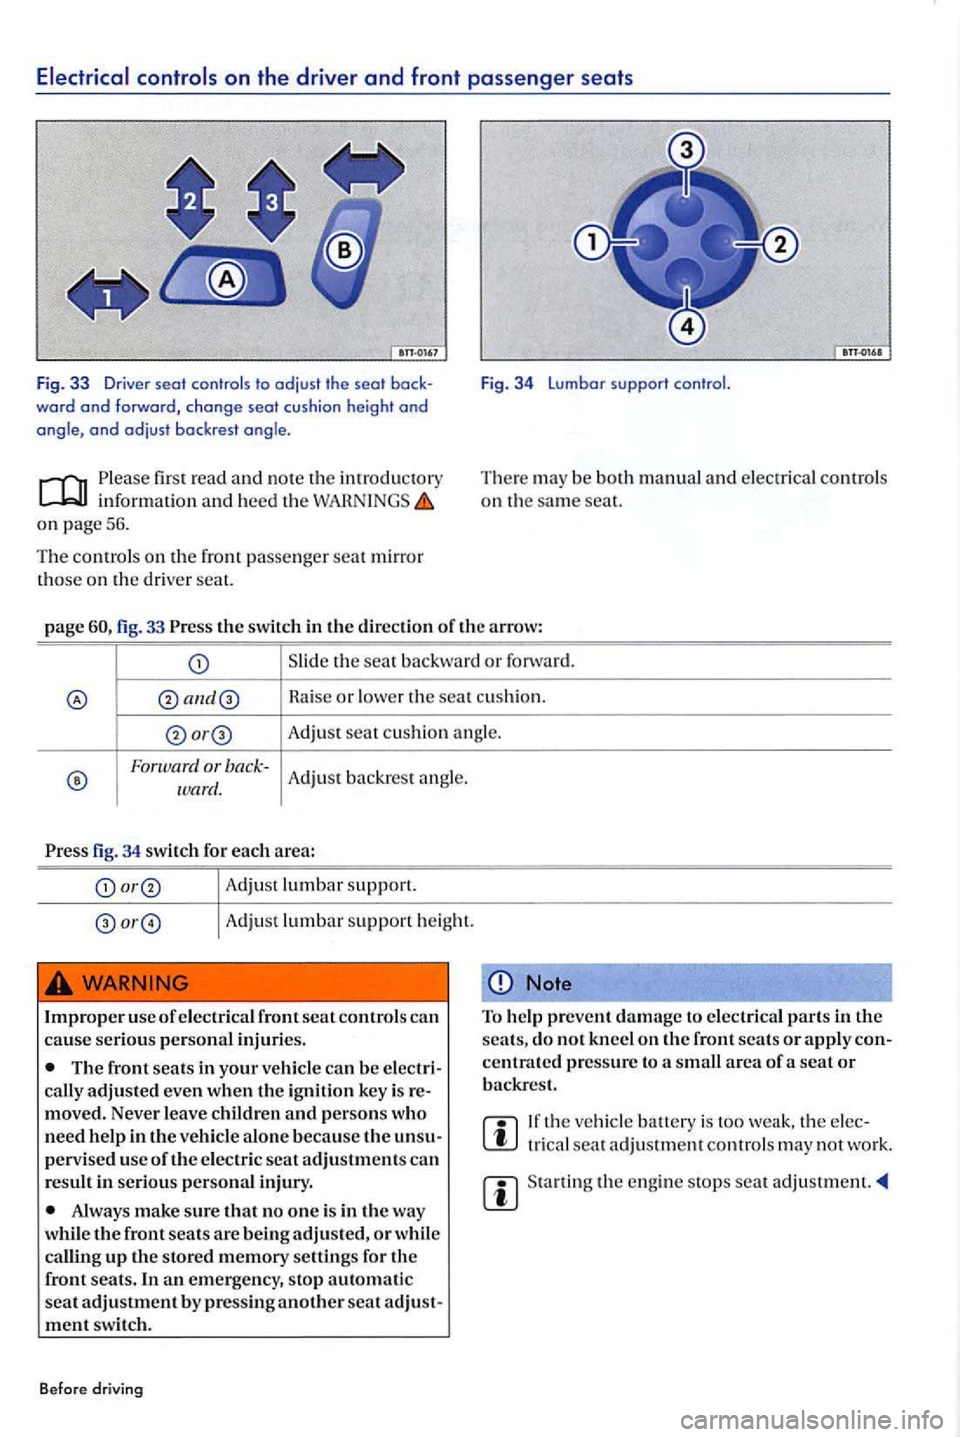
word and forward , change seat cushion height and angle, and adjust backrest angle.
first r ead and note the inf orm atio n and hee d t he WAH N INGS on pag e 56.
T he co ntrols
on f ront passe nge r seat mi rro r on th e driver se at.
F ig. 34 Lumbar su pport control.
T he re m ay be bo th manual and e lectri ca l controls
o n th e sa me seat.
page fig. 33 th e sw itch i n th e d irec tion of th e a rrow:
Slid e th e seat b ackwa rd or forw ard .
Haise or l owe r th e seat cu sh io n .
Adjust sea t c u shi on an gle .
Forw ard or bac k-Adju st b ack res t an gle. ward.
fig. 34 switch f or each area:
Adju st lumbar s upport .
Adjust l umb ar suppo rt heig ht.
WARNING
Im prope r use of e lec tr ica l front sea t control s ca n cause serio us pe rso nal inju ries.
T he front sea ts in your vehicl e ca n b e
moved. Neve r leave children and p erso ns w ho
need h elp in the ve hicl e alo ne beca use the p erv ise d u se oftheelec tric sea t adjustments can
re sult in seriou s personal inju ry.
way
w hil e the front seats are bein g adju ste d, o r w hil e
ca llin g up sto re d m em ory settings for the
fr ont seats . In an em erge ncy, sto p aut om atic
seal adjustment b y pre ss ing a nother seat
N ote
T o help prev ent damage t o e lec trical p arts in the
s ea ts , do no t kn eel o n the front seals o r a ppl y
tr ica l seat adju stm ent contro ls m ay not w ork.
th e e ng in e s to p s se at
Page 62 of 541
Adjusting head restraint s
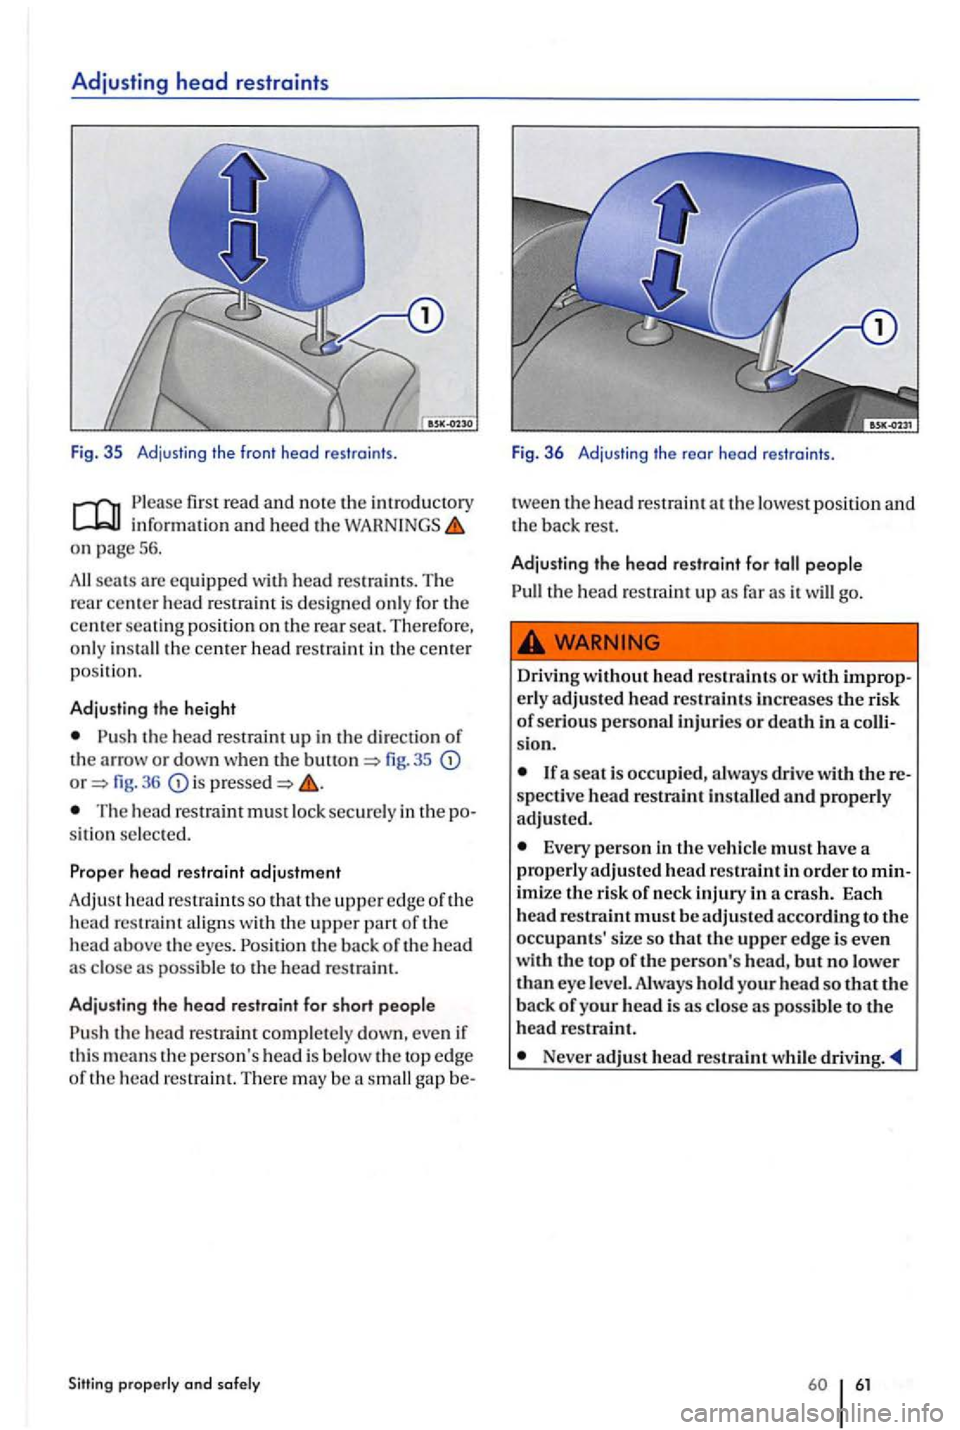
Fig. 35 Adjusting the front h ead rest rai nts .
o n 56.
se ats are equipped with head restraints. T he
rear ce nter head restraint is desig ne d only fo r th e center
35 36 is presse d
siti on se lec te d.
th e back of th e head as poss ib le to th e head res traint .
Adjusting the
head res traint for short people
the hea d rest raint compl ete ly down , eve n if
thi s m ean s th e perso n's head is below the top edge of th e head restraint . T he re m ay be gap be-
Sitting
go.
Driv ing without head restraints or with erly adjusted head restraints incre ases the risk of serious personal injuries or death in a sion.
If a seat is occupied, always drive with spectiv e head restraint installe d and properly
adjusted.
Every pe rso n in the must have a
prop erly adjusted head restraint in order to
Never adjust head restraint whil e driving .
Page 63 of 541
Removing and head restraints
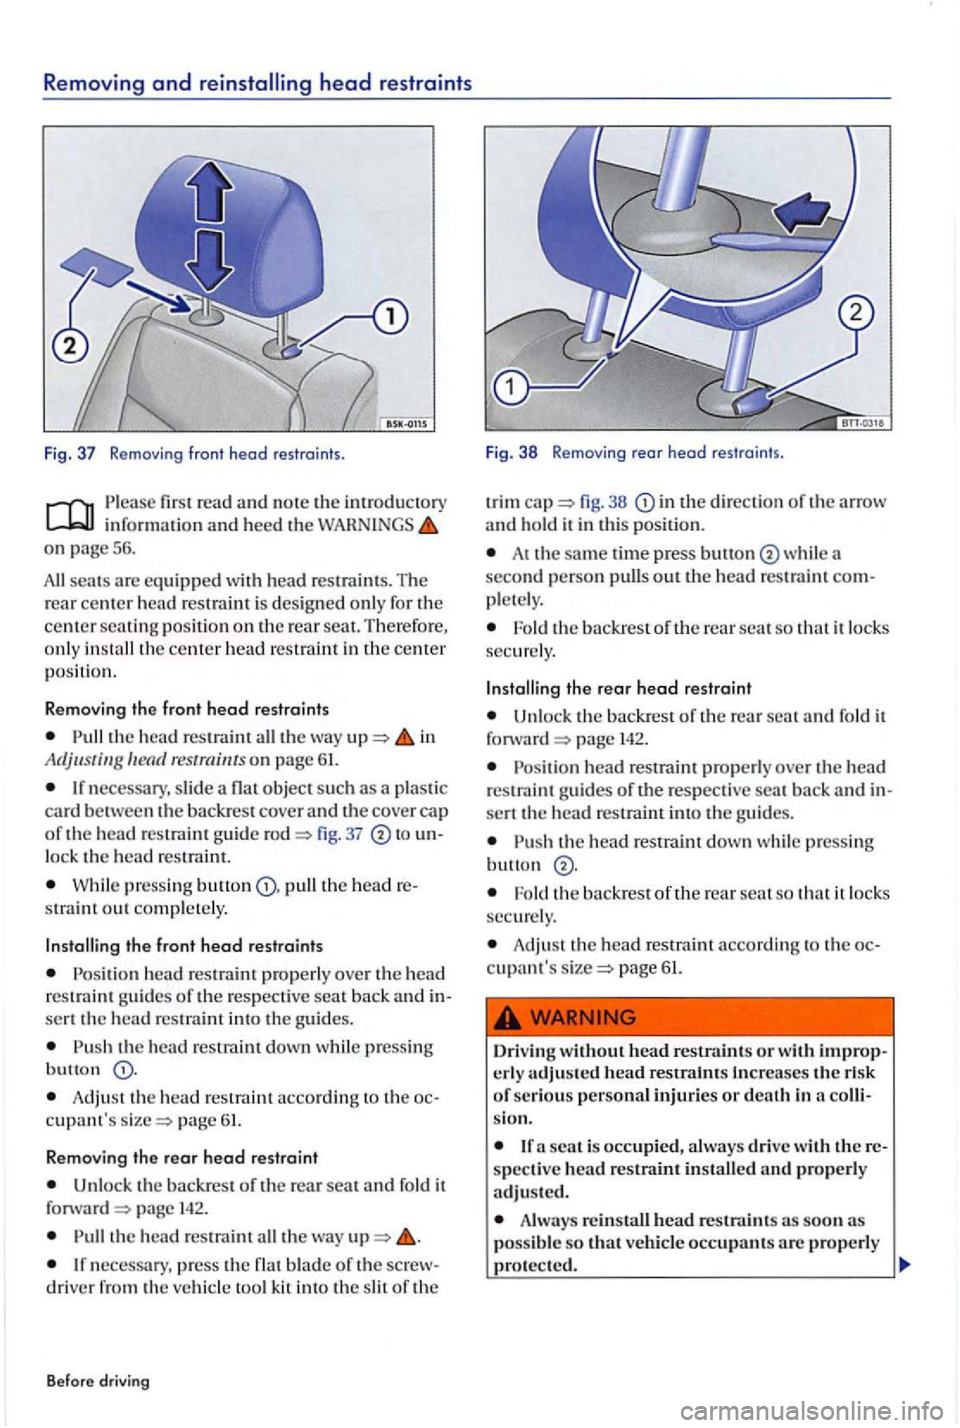
Fig. 37 Removi ng fro nt head restr aints.
read and note the introduc tory informat ion and heed the on page 56 .
scats arc equipped with head restrain ts . The rear c e nt er h ead restrai nt is des igned onl y fo r the ce nter seat ing positi on on th e rear sea t. Th erefo re ,
o nl y
the head re straint the wa y in Adjustin g res traints on page 61.
necessary , slide object su ch a s a pla sti c
ca rd be tween the backre st cover and the co ver cap
of the head restraint g uid e 37
W hil e pres sing pull the head straint out compl ete ly .
the front head restraints
P o sition head restrain t prop erly ove r th e head
r e s tr ain t gu ides of th e respective seat back and sert the head rc s trai m into th e g uid es.
the hea d restraim down whil e pressin g
but to n
Adjust the h ead re strai nt acco rding to the c upant's page 61.
Removing the rear head restraint
Unlock the backrest o f th e re a r seat and fold it
f orward p age
th e head re straint th e wa y
necess ary, pre s s th e flat blade of th e drive r from th e ve hicle too l kit into the s lit of th e
B efore driving Fig
. 38 Remov ing r
ear hea d restra in ts .
trim in the direction o f th e arrow and hold it in thi s posit ion.
At th e same time press bullon second person pull s out th e head restraint
th e backrest of th e rear scat so that it lock s
secure ly.
the rear head restraint
Un lock the backrest of the re a r scat fo ld it
f o rward page 14 2.
h ead restraint prop erly ove r th e head restra int guides of th e re spective sca t back and sert the head restraint into the g uide s.
the head res traint down whil e p ressin g
Fold the backres t of the rear seat so that it lo cks secure ly.
Adju st th e head re straint a ccord in g to the page 61.
Driving without head restraints or wit.h crly adjusted head restra .lnts Increases the ri sk of seriou s personal injuries or death in co
scat is occupied, always drive with
Always reinstall head r estraints as soon possib le so that veh icle occupan ts properl y
Page 64 of 541
Note
When removin g or reinstalling the head restrai nt,
take car e t ha t head restraint does not strik e the headliner or the back of the front seat. T he
headlin er or oth er parts of the vehicle could erw ise be
position
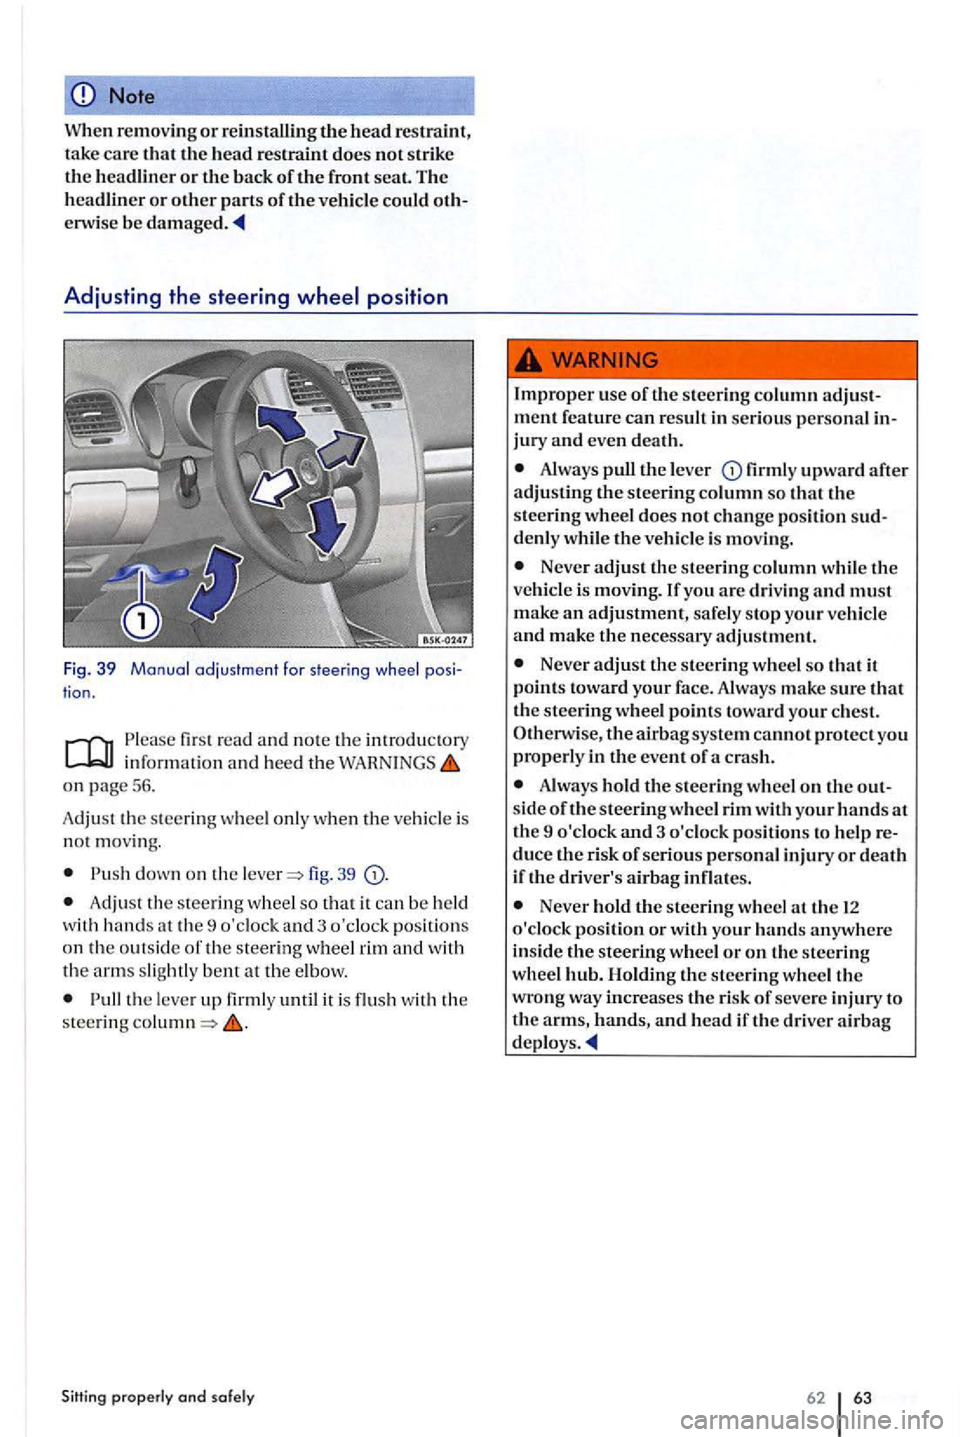
Fig. 39 Manual adjustment far steering whee l pos i
tion.
firs t read and note the introd ucto ry
on page 56.
A dju st th e
steering wheel only when the vehicle is not movin g.
fig. 39
Adju st th e steerin g w hee l so th a t it ca n be held
w ith hands at th e 9 o'clock and 3 o'clock pos itions on the ou ts ide of the stee ring whee l rim and w ith
the arm s slight ly at the e lb ow.
the lever up firmly until it is flu sh with the steering
Always puLl the lever firml y upward after adjustin g th e steering column so that th e
s teering wheel does not ch ange positi on sud
d enl y whil e U1e vehicl e is movin g.
Neve r adjust the stee rin g column w hile the ve hicl e is moving. you are driving and must make an adjustment, safely s top you r vehicle and make the necessary adjustment.
Neve r adjust the steerin g wheel so that it points toward your fac e. Alway s make sure th at
Alwa ys hold U1e steering w hee l o n th e out side of th e steering wheel rim with your hands at
th e 9 o'clo ck and 3 o'clock positions to h elp
Neve r hold the steering w heel at the 12 o'clock position or with your hands anywhere
in side the s teering wheel o r on th e steering
w hee l hub. Holdin g th e stee rin g wheel the wro ng way increases the r isk of seve re injury to the arms, hands, and head if th e driver airb ag
62 63
Page 65 of 541
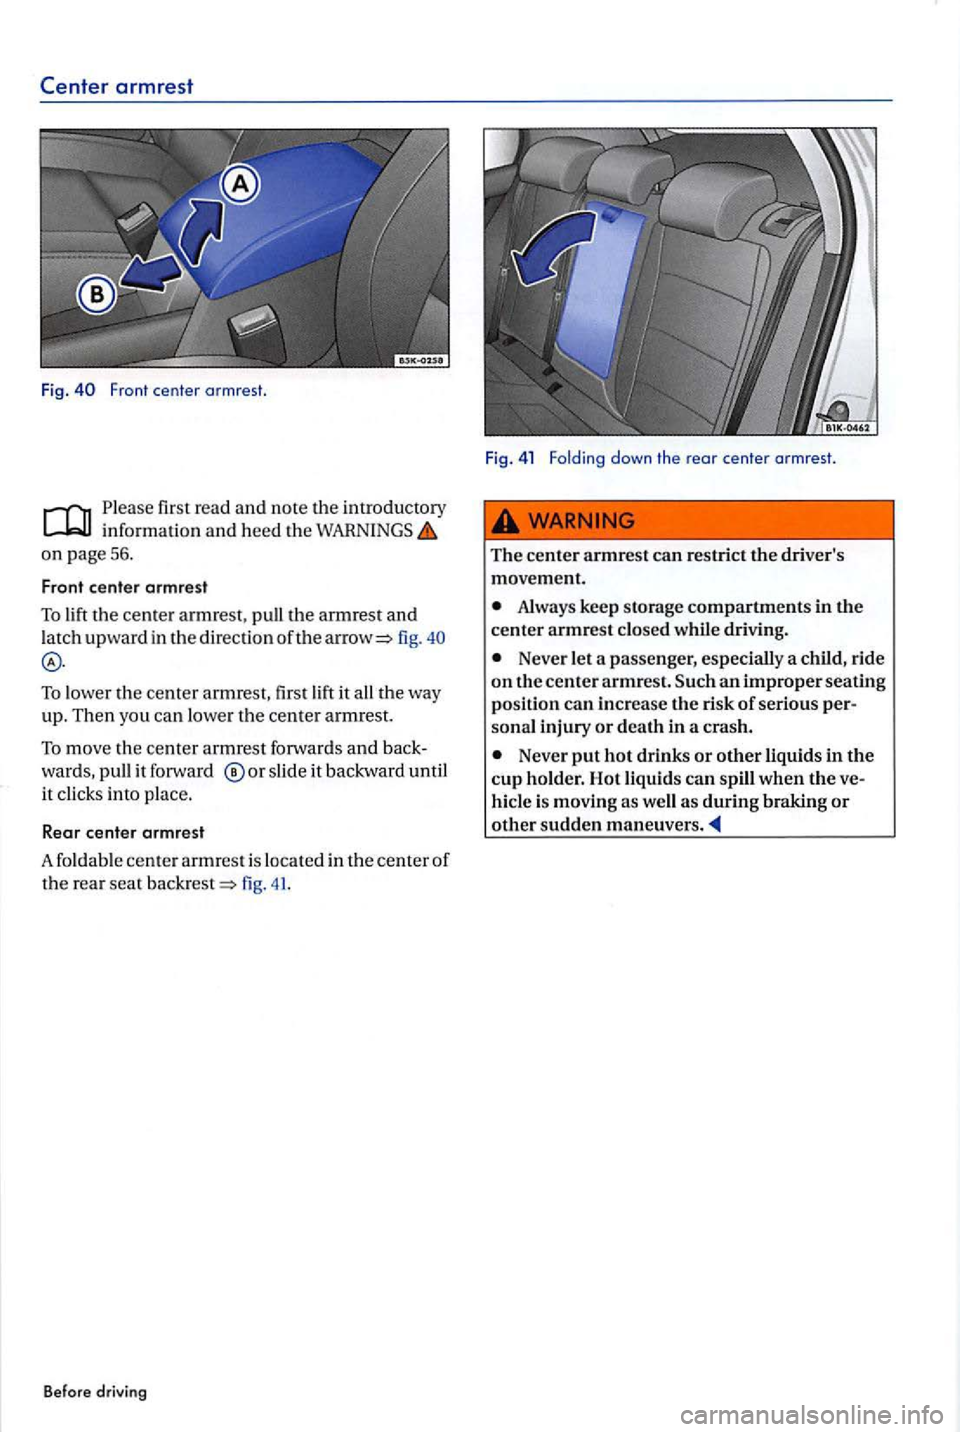
Please fir st read and note the in tro ductory
on page 56.
Front center armrest
To lift the cente r a rm rest, pull the armrest and
l atc h upward in th e direction of the fig.
To lowe r th e center armre st, first lift it all the way up. Then you ca n lowe r the center armre st.
To move the center armrest forwards and back
wa rds, pull it forwa rd slid e it backward until
it click s into place.
Rear center armrest
A foldabl e ce nter armrest i s loca te d in the center of the rear sea t fig. 41.
Before drivi ng Fig
.
41 Folding d own th e rear center armrest.
The center armrest can restrict the driver 's
movement.
Always keep storage compartments in the center armrest closed whil e driving .
Never let a pas se nger, esp ecially a child , ride on thecenterarmrest. an improper seating position can increas e the risk of se rious personal injury or death in a cras h.
Never put hot drinks or other liquids in the cup h old er. Hot liquid s can spill wh en the ve
hicl e is moving as well as during braking or other sudden maneuvers.
Page 66 of 541
In this sec tion yo u'll find informa tion on the lowing:
h eating . . . . . . . . . . . . . . . . . . . . . . . . . . . . . 65
More information:
Adju stin g th e seati ng page 56
page
A irb ag sys te m p age
safety and child page
Out sid e page
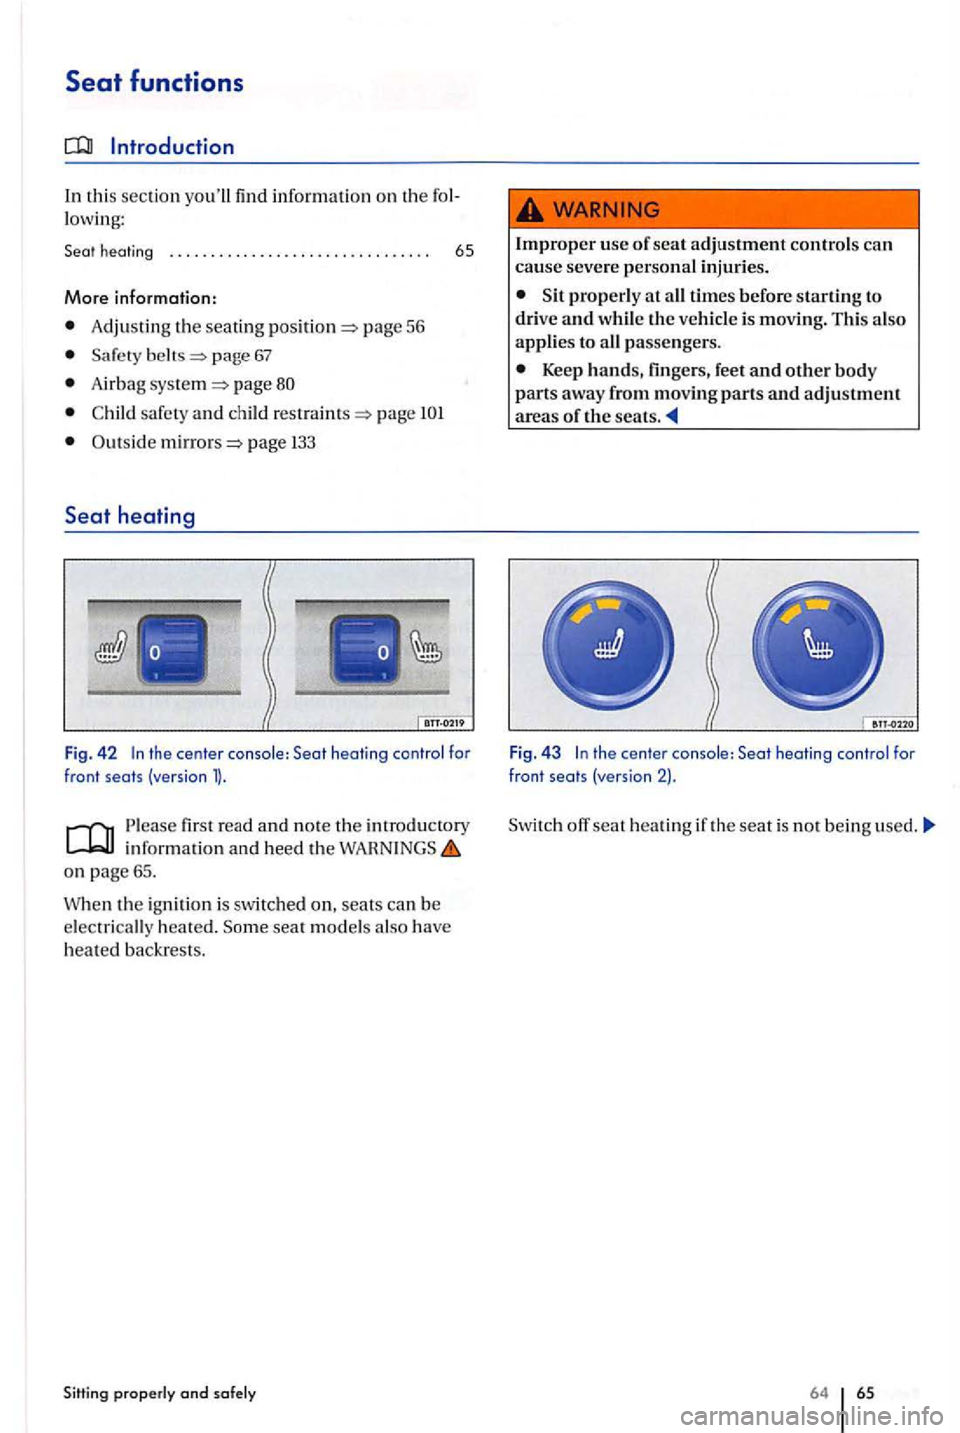
hea ting contr ol for front seats (version
first r ead and note th e introd uctory
o n page 65.
When th e igni tion is sw itched on, seats ca n be
e lec trically heated. sea t models als o have
h ea ted backre sts.
properly and safely
Improper use of seat adjust ment control s can cause seve re personal injuries.
prope rly at all times before starting to
drive and while the vehicl e is moving. This also
applies to all passe ngers.
Keep hands, fingers, feet and other body parts away from moving parts and adjustment areas of th e seats .
Fig . 43 In the center console: healing contr ol for front seats (version 2).
off seat heating if th e seat is not b eing used
64 65
Page 67 of 541
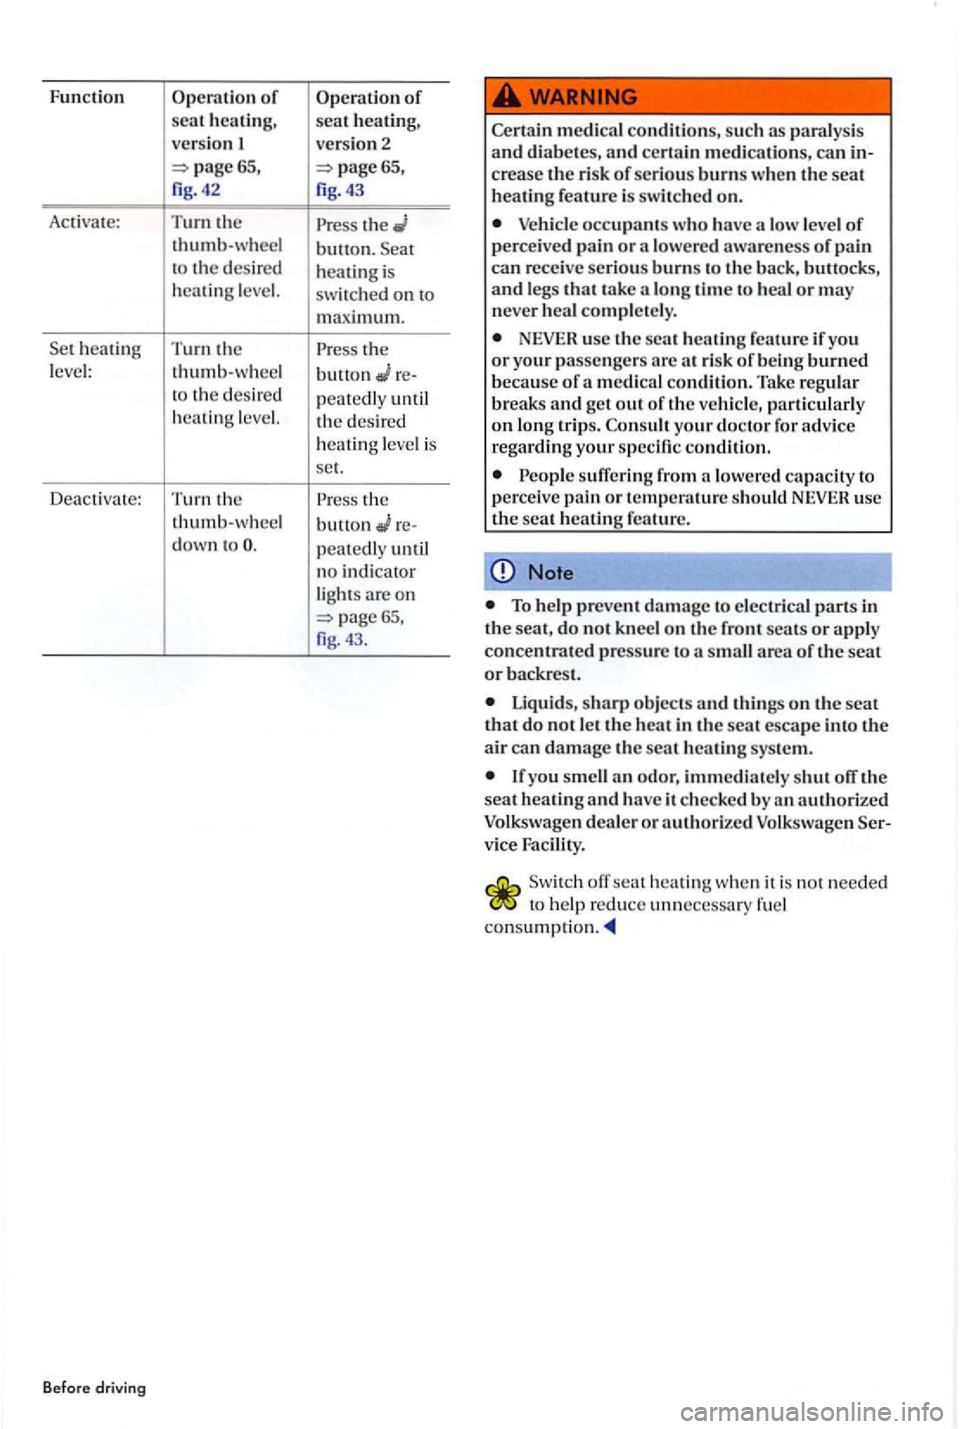
Function Operation of scat heating,
versio n
Activate:
Turn the
thumb-wheel
t o th e desired
h eat
ing level.
heatin g T urn the
l eve l: thumb- w heel to th e desired
heatin g level.
D eac tivate:
Turn the
thumb-w hee l
down t o
Befo re driving
Operation of sca t heating,
versio n 2
th e button. heating is
switc h ed on maximum.
the
button
re-
p
eat e dl y until
th e des ired
h
eatin g leve l is
set.
th e
button
rc-
pcat cdly until
n o indi cator
light s are o n
Certain medical conditions, su ch as pa ralysis and diabetes, and certai n medication s, can crease the risk of seriou s burns when the seat heating feature is swi tched on.
Vehicle occupants who have a low level of perceived pain or a lowered awareness of pain can rece ive seriou s burns to the back, buttocks, and leg s that take a long tim e to heal or may neve r heal completely.
NEVER usc the scat
To help preven t damage to elec trica l parts in the seat, do not kneel on the front scats or apply concentrated pressure to a small area or the seat or backrest.
Liquids, sharp objects and things on the scat that do not le t th e heat in the seat escape into the air can damage the seat heating system.
lfyou smell an odor, immediatel y shut off the seat heating and have it checked by an authorized
Volkswagen dealer or authorized Volkswagen vice Facility.
off
Page 68 of 541
Safety
Introduction
this sec tion y o u'll find informatio n on th e lowing:
Warning light ................ .... .. , .. .. , . . . 68
F ro ntal collis ions and l ows of ph ys ics . . . . . . . . . . . . 69
Whot happens to passengers no t wearing a safety
b elt? . . . . . . . . . . . . . . . . . . . . . . . . . . . . . . . . . . . . . . .
. . . . . . . . . .
. . 7 5
Safety belt exte nder . . . . . . . . . . . . . . . . . . . . . . . . . . 7 6
Safety belt retractor , pre te nsio ner, load limiter . . . . 78
Serv ice and d isposal of belt prete nsioners . . . . . . . 78
th e co nditi on of all safe ry belt s re gul arly. If a
sa fe ty belt s h ows da m age to we bbin g, b in din gs,
r et rac tors or bu ckles, have the safe ty belt replaced
b y an auth orized Volkswagen deafer or an rized Volk swagen Service rized Volkswagen deale rs and authorize d sw age n Se rv ice Fa cilities
Adju stin g th e seatin g pos ition
A ir ba g page
safety and c hild page
erl y position ed safety belt increa ses th e risk of severe pe rsona l injury or death. S afety belt s
offer optimum protection only whe n they are
u sed pro perly.
Safety belt s are the singl e most effecti ve
m eans availabl e to reduce th e r is k of seriou s jury and dea th in automobil e accid ents. For
your protection and that of your passengers ,
hicl e is moving.
Sitting properly and safely
Every person in the vehicle must b e properly
seat ed on
for e the vehicl e starts to move, and must k eep the belt properl y fastened while riding in the hicle. This applie s to the drive r and all g ers, ev en when ju st dri ving around town.
Alwa ys secure children in the vehicl e with a
restraint s ys te m appropriate for their age,
weight and page
Never attac h the safety belt to the buckl e o f another seat. Attachin g the safety belt to the wrong buckle will reduce safe ty belt
Never le t any obje cts or liquids get into the
s a fety belt latch and pre v ent it from working
prop erly. Alway s keep the belts clean. Dirty belt s
m ay n ot work correctly and can impair the
Neve r remove a safety belt w hil e the ve hicl e
i s moving. Doing so will increas e your risk of being injured or kill ed.
Ne ve r strap more than one person, includin g
s mall child ren, into any single safety belt .
N eve r let children or ba bies ride sitting on your lap and never place
Several layers of heavy clothing may
Ne ver wea r belt s ove r rigid or breakabl e jects in or on your clothing, such as eye glas ses,
p ens, keys etc., as these may ca us e injury.
Never use comfort clips or device s that creat slack in tl1e shoulder belt. Howev e r, spe cial clips may be require d for the correct use of some
c hild restraint sy ste m s.
Always ke ep saf ety belt buckl es fre e of anything
that may prevent the buckle from la tchin g sec urely.
Safe ty belt s off er optimum protecti on only when th e scat b ack is upright and belts a rc correctl y position ed on th e body
66 67
Page 69 of 541
Damage to safety belt s reduces their ef
fectiven ess increase s the ris k of seriou s perinjury is
b ein g used.
Neve r safety belt s beco me damage d by
b ei ng caught in the door or seat hardware.
Torn or frayed safety te ar, and dam
aged safety hardware break in accident.
Warn ing
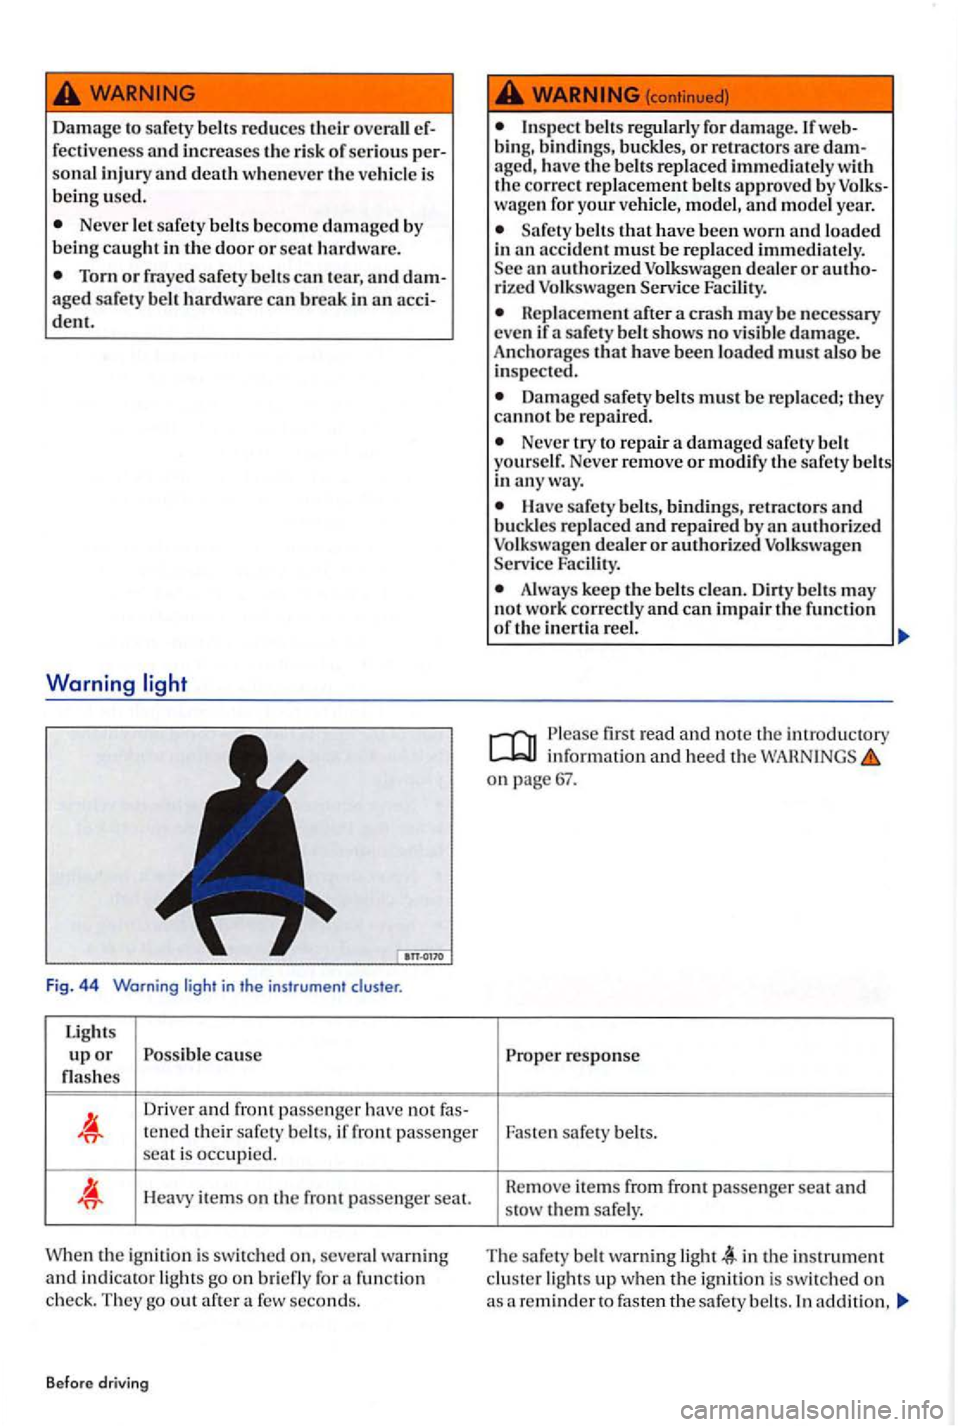
Fig. 44 Warning
Light s
u p o r cause
Driver and fron t pa sse nger have not fas-te n ed their safety if fron t passenger
sea t is occupied.
H eavy items on the front passenger seal.
the ignition is switched on. warning and in dica tor go on fun ction c he ck. They out after few seconds.
Before driving
for damage. If web
bin g, bindings, or re tra cto rs are damaged, have the approve d by wage n for your and year .
Safety that have bee n worn and in an accide nt must be
after a cras h may be nece ssary
eve n if safety sho ws no damage.
Anchorages that have been must
Damage d safety the y canno t b e re p air ed.
Neve r try to re pair a damage d sa fety Never remove or m odify th e safety
Have sa fety belts, binding s, retractor s and
or authorized Serv ice
k ee p the may
n ot work correct ly and ca n impair the function
o f th e in erti a
firs t rea d and note the introductory information and heed the on page 67.
Proper respo nse
Faste n safe ty
T he safety warning in the instrument
In add ition,
Page 70 of 541
you hear a warn ing chime. The warning light stop
when the driver and front passenger correctly fas ten their sa fety belts. If the safety belts have not been fastened when a speed of more than 15 mph is reached or if the safety be lts are unfastened
while the vehicle is moving , a warning chime for
up to seco nds. The belt warning light also
When the ignition is sw itched on, the warning
and of phy sic s
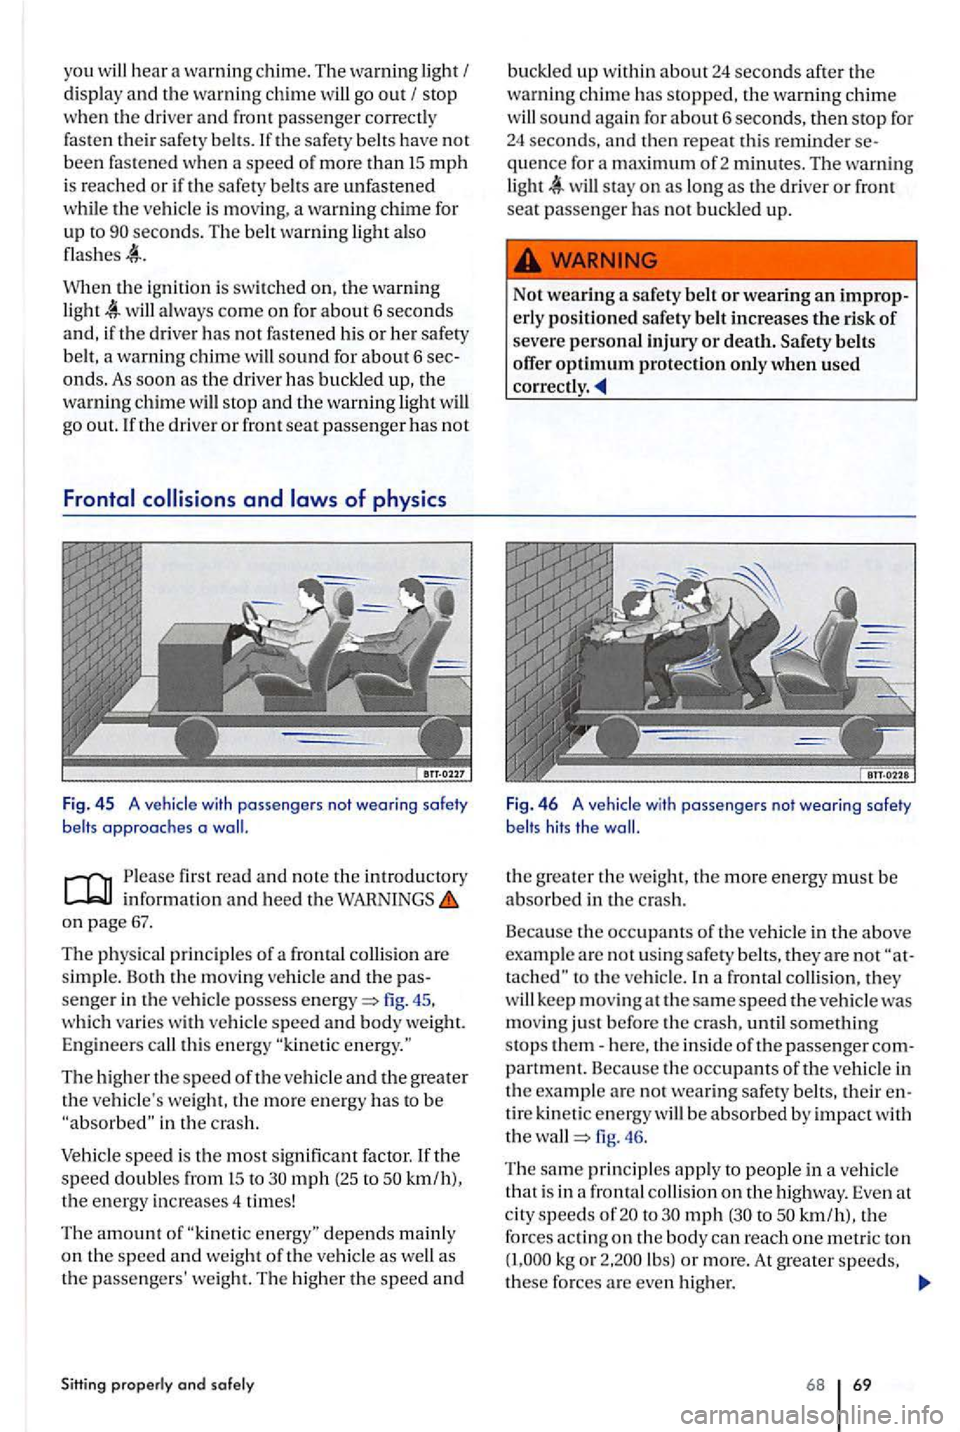
Fig. 4 5 A vehicle with passengers not wearing safety belts approaches a
on page 67.
The physical principles of a frontal
fig . 45.
which varies wit h vehicle speed and body weight.
Engineer s
The higher the speed of the ve hicle and the greater
the vehicle's weight. the more en ergy has to be in the cras h.
Vehicle speed i s th e most sig nificant factor. If the speed doubl es from to mph (25 to kmlh),
the energy increases 4 times!
The amount of as
the passengers' weight. The higher the speed an d
Sitting properly and solely
buckled up within about24 seconds after the
warn ing chim e has stopped, the warnin g chime sound again for about 6 seco nds, then stop for 24 seconds, and then rep eat this reminder sequence for a
Fig. 4 6 A vehicle with passengers not wearing safety
belts hits the
the greater the we ig ht, the more energy must be abso rbed in the crash.
Beca use the occupants of th e vehicle in the above
example a re not usi ng safety belts, they are not
kee p m oving at the same speed the vehicle was
mo vin g just before the crash, until somethin g
stops th em-here, the inside of the passenger com
partment. Because the occupants of the vehicle in
th e exa mpl e are not wearing safety belt s, th eir en
tire kine
tic energy be absorbed by impact with
the fig. 46.
Th e
same pri ncipl es app ly to p eople in a veh icle
th at is in a fron ta l
to mph to kmlh), the forces acting on th e bod y can reach one metri c ton kg o r lbs) or more. At grea te r speeds,
th ese forces are even hi ghe r.
68 69