VOLKSWAGEN GOLF PLUS 2011 Owner´s Manual
Manufacturer: VOLKSWAGEN, Model Year: 2011, Model line: GOLF PLUS, Model: VOLKSWAGEN GOLF PLUS 2011Pages: 138, PDF Size: 49.24 MB
Page 51 of 138
Downloaded from www.Manualslib.com manuals search engine Adjusting the head restraints
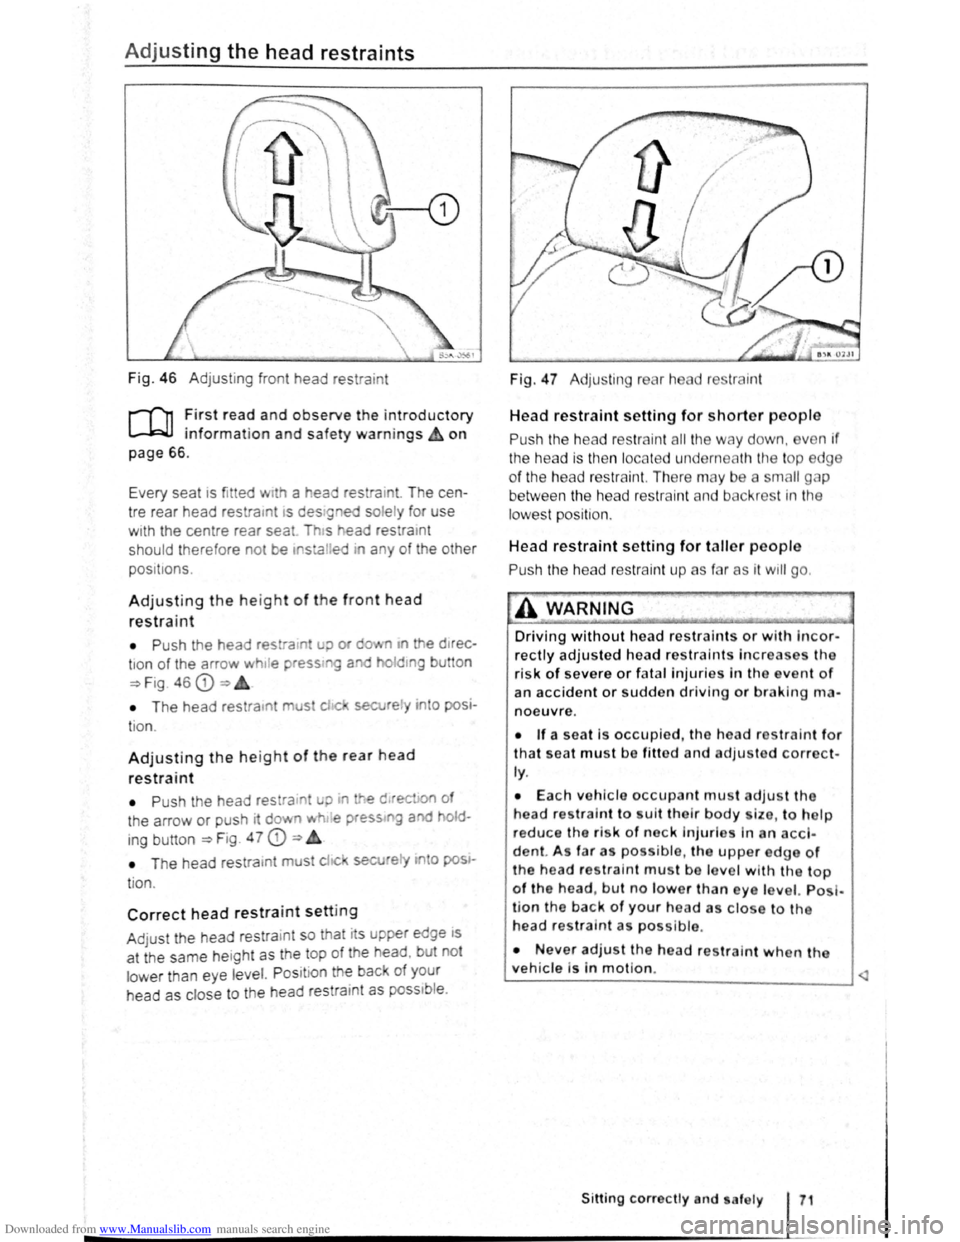
Fig. 46 Adjustin g f ront head restra int
r-T'n :irst rea? and observe the introductory
L..-.WJ 1nfor mat1on an d safety warnings & on
page
66 .
Ev ery s
eat 1s fit ted w1th a t'lea r es ra10t. T he ce n
tre rear head restra rnt
IS d e stgned so le ly for use
wrth the centre rear sea Th s ead res ratnt
s hould therefore no t be ,stalred ira any of th e othe r
pos 1t 1ons .
Adjusting the height of th e front head
restraint
• P ush th e head res ra in u;> or cfo.• n •n e d Jrec -
tron of the arrow h1Je pressmg a holdtng bu tto n
~Fig 46 CD=>
• T he head re stratn mus chc sec re~y n o posi
t io n.
Adjusting the height of the rear head
restraint
• P ush the head res ra in! uo ~ e d rec on of
t h e a rrow
or push rt do vn wh . e press g aod old
ing b utton ~Fig. 4 7 CD ~
• T he head re str a tn t must c! c secJ 'e i'1 o pos •
t io n.
Correct head restraint setting
A dju st the head rest ra 1nt s o t hat its upper ed ge rs
a t th e sa me he ig ht as th e top of th e head . b ut no t
l o w
er th a n eye le vel. P osit ion th e bac of you r
h ead
as close to th e hea d res tram t as poss1b le .
Fig. 47 Adju ting rear h ad r str ai nt
Head restraint setting for shorter people
Push the he ad restra in t all the w ay d own , ve n if
the head is then locat e d un derneath th e top edg e
of the head res traint. There may b e a sm all g p
between the head res trai nt and b ck ros t in tt1e
lowes t position .
Head restraint setting for taller people
Pus h the hea d r estrain t up as f r as it w ill go .
A WARNING
Driving without head restraints or with Incor
rectly adjusted head restraints Increases tho
risk of severe or fatal injuries In th o even t of
an accident or sudden driving or braking rlHl
noeuvre.
• If a seat is occupied, the hea d r traint for
that seat must be fitted and adjusted corre ct·
ly.
• Each vehicle occupant mu t adjus t the
head restra i
nt to uit tho lr body ize , to h lp
reduce the risk of nock injurlo in an acci
d ent. A s fa r a po s ibl e, the upper edge of
the head res tra int mu t be lo ve l w ith the top
of the head , but no lower 'than eye le vel. Po I·
l ion the back of your head as clo e to th e
head restra int as possible .
• Never adjust the hea d restraint when tha
vehicle is in motion. ~
Sitting correctly nd . af ely
Page 52 of 138
Downloaded from www.Manualslib.com manuals search engine ~emoving and fitting head restraints
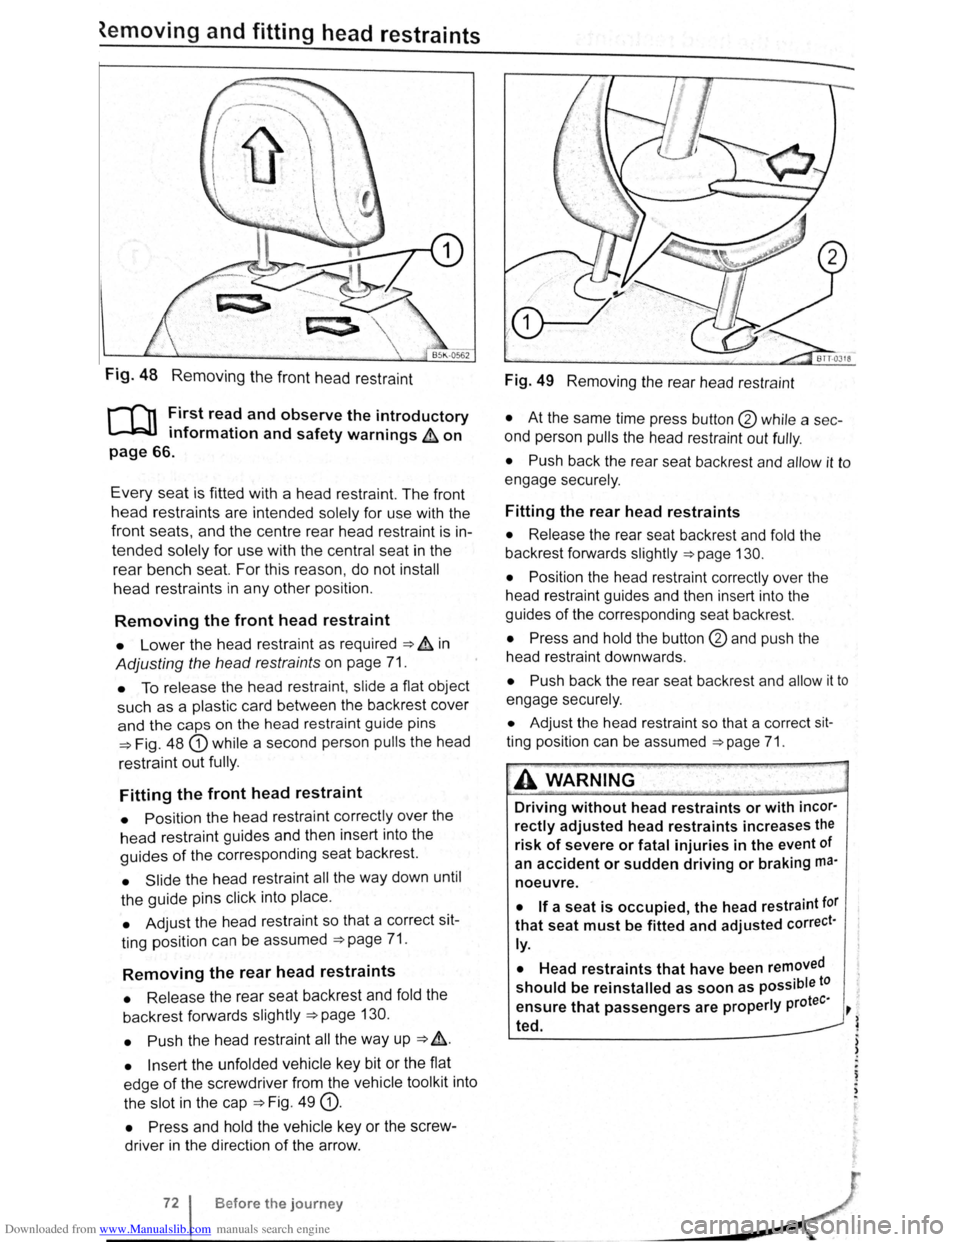
Fig. 48 Removing the front head restraint
r-f'n First read and observe the introductory
L-lcJJ information and safety warnings & on
page 66.
Every seat is fitted with a head restraint. The front
head restraints are intended solely for use with the
front seats, and the centre rear head restra int is in
tended solely for use with the central seat in the
rear bench seat. For this reason , do not install
head restraints in any other position.
Removing the front head restraint
• Lower the head restraint as required ===> & in
Adjusting the head restraints on page 71.
• To release the head restraint , slide a flat object
such as a plas tic card between the backrest cover
and the caps on the head restraint guide pins
===>Fig. 48 G) while a second person pulls the head
restraint
out fully .
Fitting the front head restraint
• Position the head restraint correctly over the
head restraint guides and then insert into the
guides of the corresponding seat backrest.
• Slide the head restraint all the way down until
the guide pins click into place .
• Adjust the head restraint so that a correct sit
ting position can be assumed
===>page 71.
Removing the rear head restraints
• Release the rear seat backrest and fold the
backrest forwards slightly
===>page 130.
• Push
the head restraint all the way up ===> &.
• Insert the unfolded vehicle key bit or the flat
edge
of the screwdriver from the vehicle tool kit into
the slot in the cap
===>Fig. 49 G).
• Press and hold the vehicle key or the screw
driver in the direction
of the arrow .
Before the journey
Fig. 49 Removing the rear head restraint
• At the same time press button @ while a sec
ond person
pulls the head restraint out fully .
• Push back the rear seat backrest and allow it to
engage securely .
Fitting the rear head restraints
• Release the rear seat backrest and fold the
backrest forwards slightly
===>page 130.
• Position
the head restraint correctly over the
head restraint guides and then insert into the
guides
of the corresponding seat backrest.
• Press and hold the button @and push the
head restraint downwards .
• Push back the rear seat backrest and allow it to
engage securely.
• Adjust the head restraint so that a correct sit
ting position can be assumed ===>page 71.
A WARNING .
Driving without head restraints or with incor·
rectly adjusted head restraints increases the
risk of severe or fatal injuries in the event of
an
accident or sudden driving or braking ma·
noeuvre.
• If a seat is occupied, the head restraint tor
that seat must be fitted and adjusted correct·
ly.
•
Head restraints that have been removed
should be reinstalled as soon as possible to
tee· ensure that passengers are properly pro ~
~ ted.
) )
.
~ . ,
Page 53 of 138
Downloaded from www.Manualslib.com manuals search engine -
When removing or fitting head restraints, make
sure that they do not hit the roof or other parts
of the vehicle. The roof and other vehicle parts
could otherwise be damaged.
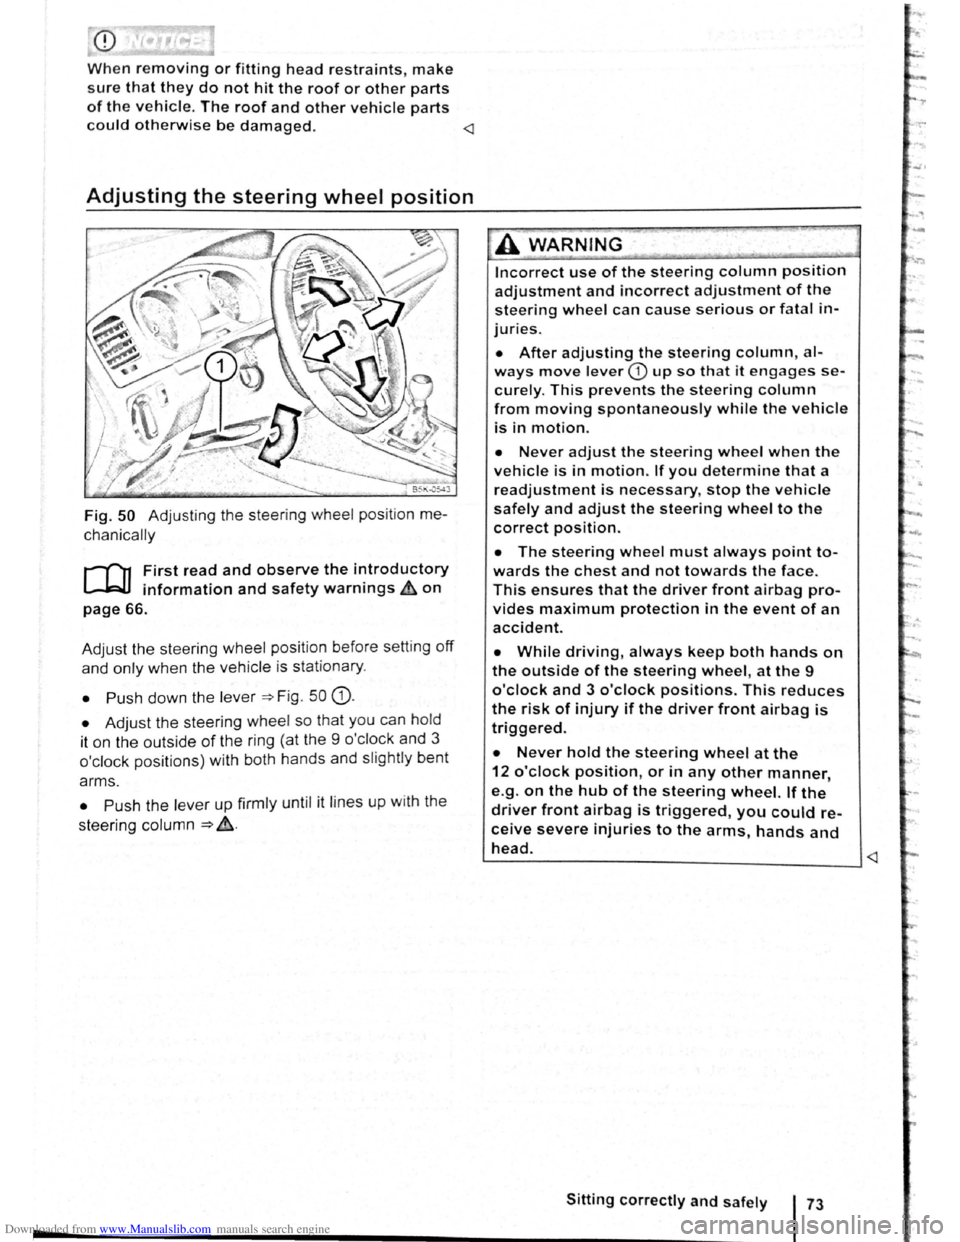
Fig. 50 Adjusting the steering wheel position me
chanically
r-f"'n First read and observe the i~troductory
~ information and safety warnmgs ~on
page 66.
Adjust the steering wheel position before setting
off
and only when the vehicle is sta tionary.
• Push down the lever =>Fig . 50 G).
• Adjust the steering wheel so that you can hold
it on the outside
of the ring (at the 9 o'cl ock and 3
o'clock positions) with both hands and slightly bent
arms.
• Push the lever up firmly until it lines up with the
steering column
=> ~-
Incorrect use of the steering column position
adjustment and incorrect adjustment of the
steering wheel can cause serious or fatal in
juries.
• After adjusting the steering column, al
ways move lever CD up so that it engages se
curely. This prevents the steering column
from moving spontaneously while the vehicle
is in motion.
• Never adjust the steering wheel when the
vehicle is in motion. If you determine that a
readjustment is necessary, stop the vehicle
safely and adjust the steering wheel to the
correct position.
• The steering wheel must always point to
wards the chest and not towards the face.
This ensures that the driver front airbag pro
vides maximum protection in the event of an
accident.
• While driving, always keep both hands on
the outside of the steering wheel, at the 9
o'clock and 3 o'clock positions. This reduces
the risk of injury if the driver front airbag is
triggered.
• Never hold the steering wheel at the
12 o'clock position, or in any other manner,
e.g .
on the hub of the steering wheel. If the
driver front airbag is triggered, you could re
ceive severe injuries to the arms, hands and
head. ~--------------------------____ _j
Page 54 of 138
Downloaded from www.Manualslib.com manuals search engine Centre armrest
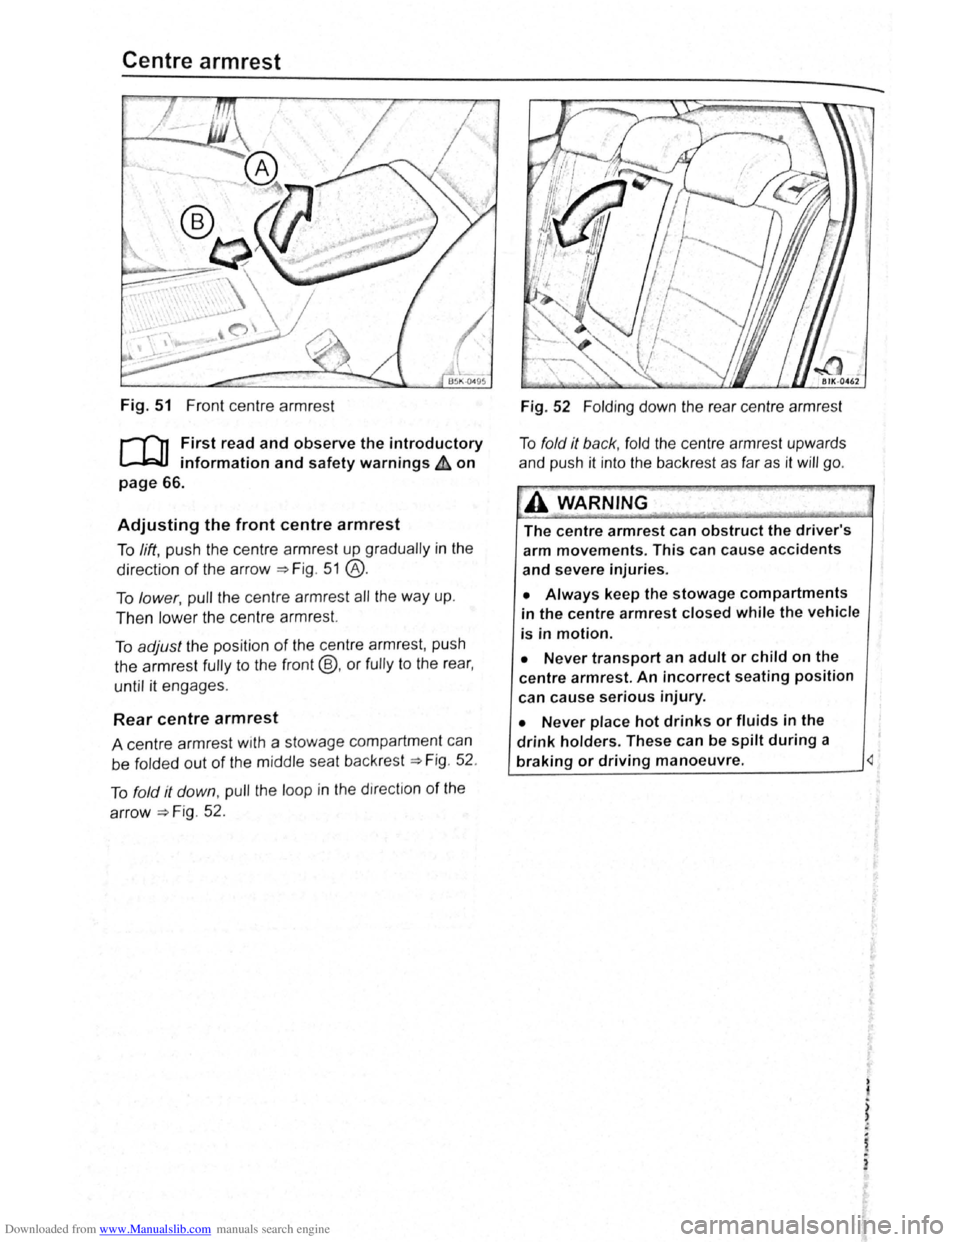
Fig. 51 Front centre armr est
r-T'n First read and observe the introductory
L-.!::J.I information and safety warnings & on
page 66.
Adjusting the front centre armrest
To lift , pu sh th e ce ntr e a rmres t up grad ua lly in the
directio n of th e arrow~ Fig . 5 1 @ .
To lower, pull th e ce ntre armr est all the way up .
Then low er th e ce ntr e a rmr est.
To adjust the posi tio n of the ce ntr e a rmr est, pu sh
th e
armrest fully to the front@, or fully to the rea r,
until it engages .
Rear centre armrest
A centre armr est w1th a stowage compartmen t can
be
f o lded out of the m idd le sea t back rest~ Fig . 52 .
T o
fo ld it down , pull the loop in t he direc tio n of the
arrow~ F ig. 52 .
Fig . 52 Folding d o wn the rea r cen tre a rmr est
T o
fo ld it back , fo ld the ce ntr e a rmr est upw ards
a nd pu sh it int o
the bac kres t as fa r as it will go .
A WARNING~
The centre armrest can obstruct the driver's
arm movements. This can cause accidents
and severe injuries.
• Always keep the stowage compartments
in the centre armrest closed while the vehicle
is in motion.
• Never transport an adult or child on the
centre armrest. An incorrect seating position
can
cause serious injury.
• Never place hot drinks or fluids in the
drink holders. These can be spilt during a
braking or driving manoeuvre.
)
i
,.
2
Page 55 of 138
Downloaded from www.Manualslib.com manuals search engine Seat functions
[ Introduction
1 hi · chnptor contnins inforrnntion o n th e follo wing
sub wrts :
'" t dt ll 'nting . . . . . . . . . . . . . . . . . . . . . . . . . . . 75
8dl.k nm~S<. g fun ction . . . . . . . . . . . . . . . . . . . 76
F lldm .. th front Pt ~seng r s n t bac kres t
ft.)rWflrd.. . . . . . . . . . . . . . . . . . . . . . . . . . . . . . . . 77
Additiona l inforn1ation and warnings:
• Adjus ting the s t1t po sitio n ;;. page 66
• S at b Its -:-pag e 79
• Airbrtg sys te m => pag e 88
• Child s ts (accessories ) ::::>page 97
• Ex t rior mirr ors =-> pflge 1 22
• Arr condi tio ning ->page 256
Seat heating
c.:.:..J L.:..J L..:..l
BAJ -0013
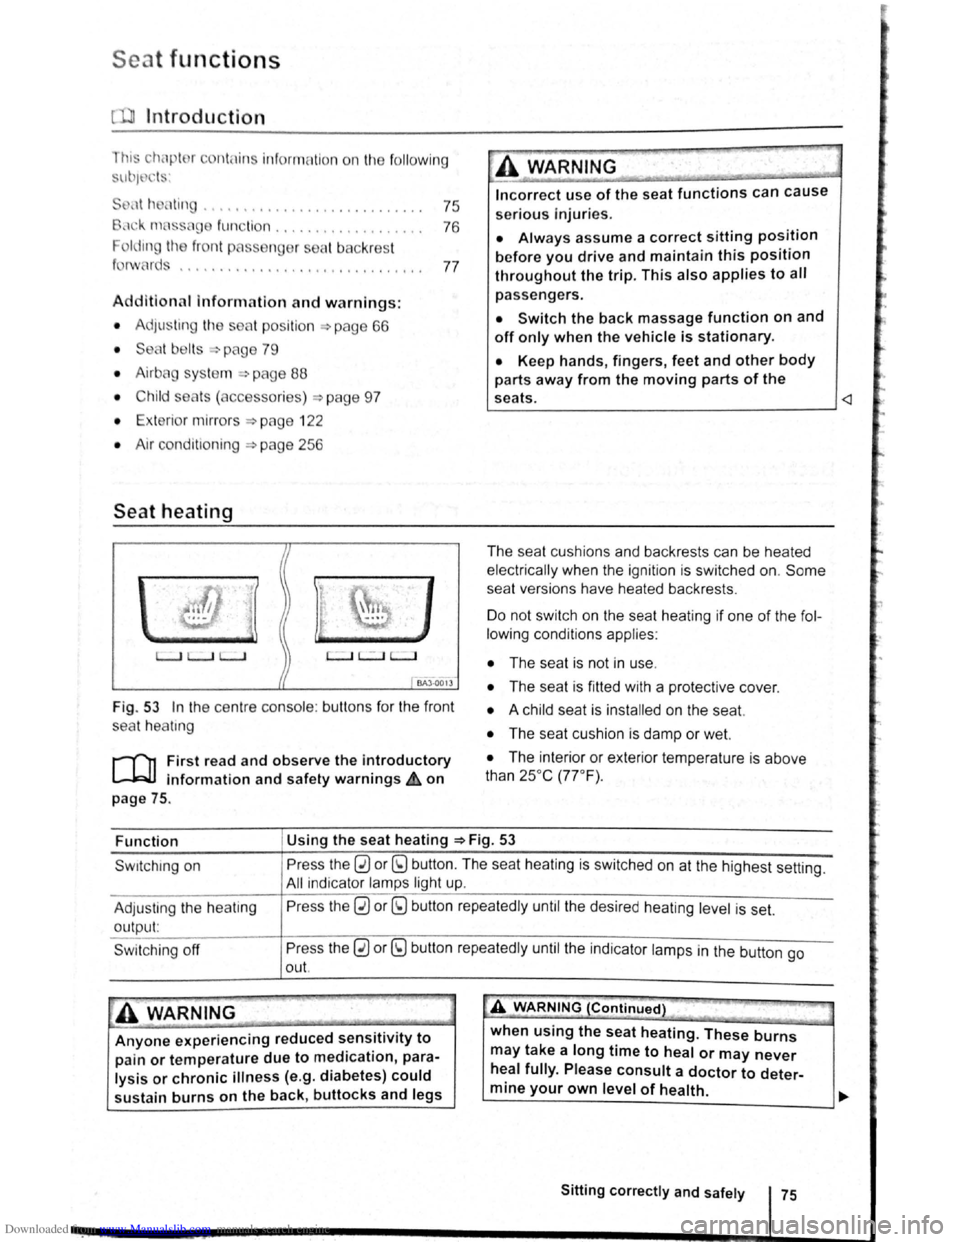
Fig . 53 In the ce ntre conso le : butt ons for the front
sea t
hea trng
i""""fl1 First read and observe the introductory
L-...lr::JJ information and safety warnings £ on
page
75.
Incorrect use of the seat functions can cause
serious Injuries.
• Always assume a correct sitting position
before you drive and maintain this position
throughout the trip. This also applies to all
passengers.
• Switch the back massage function on and
off only when the vehicle is stationary.
• Keep hands , fingers, feet and other body
parts away from the moving parts of the
seats.
elec trical ly when the ignition is switched on.
Some
seat ve rsions have heated backrests .
Do not switc h on the seat heating if one of the fol
lowing conditions applies:
• The seat is not in u se.
• The seat is fitted with a protect ive cover.
• A chi ld seat is installed on the seat.
• The seat cushion is damp or wet.
• The interior or exterior tempera ture is above
than 25oc (77 °F) .
Function Using
the seat heating ::::>Fig. 53
Swrtching on
Adjus ting
the heating
output:
Swi tchi ng off
Press the 0 or (9 button. The seat heating is switched on at the highest setting.
All indicato r l amps light up.
Pre ss the
0 or (9 button repeatedly until the desired heating level is set.
Press the
0 or (9 button repeatedly until the ind ica tor lamps in the button go
out.
~A WARNING (Continued) " ._..~~1 ~...... -~.~. ~-~ ~----J
Anyone experiencing reduced sensitivity to
pain or temperature due to medication, para
lysis or chronic illness (e.g. diabetes) could
sustain burns on the back, buttocks and legs when
using the
seat heating. These burns
may take a long time to heal or may never
heal fully. Please consult a doctor to deter
mine your own level of health.
~--------------~--------~~
Sitting correctly and safely 75
Page 56 of 138
Downloaded from www.Manualslib.com manuals search engine Folding the front passenger seat backrest forwards
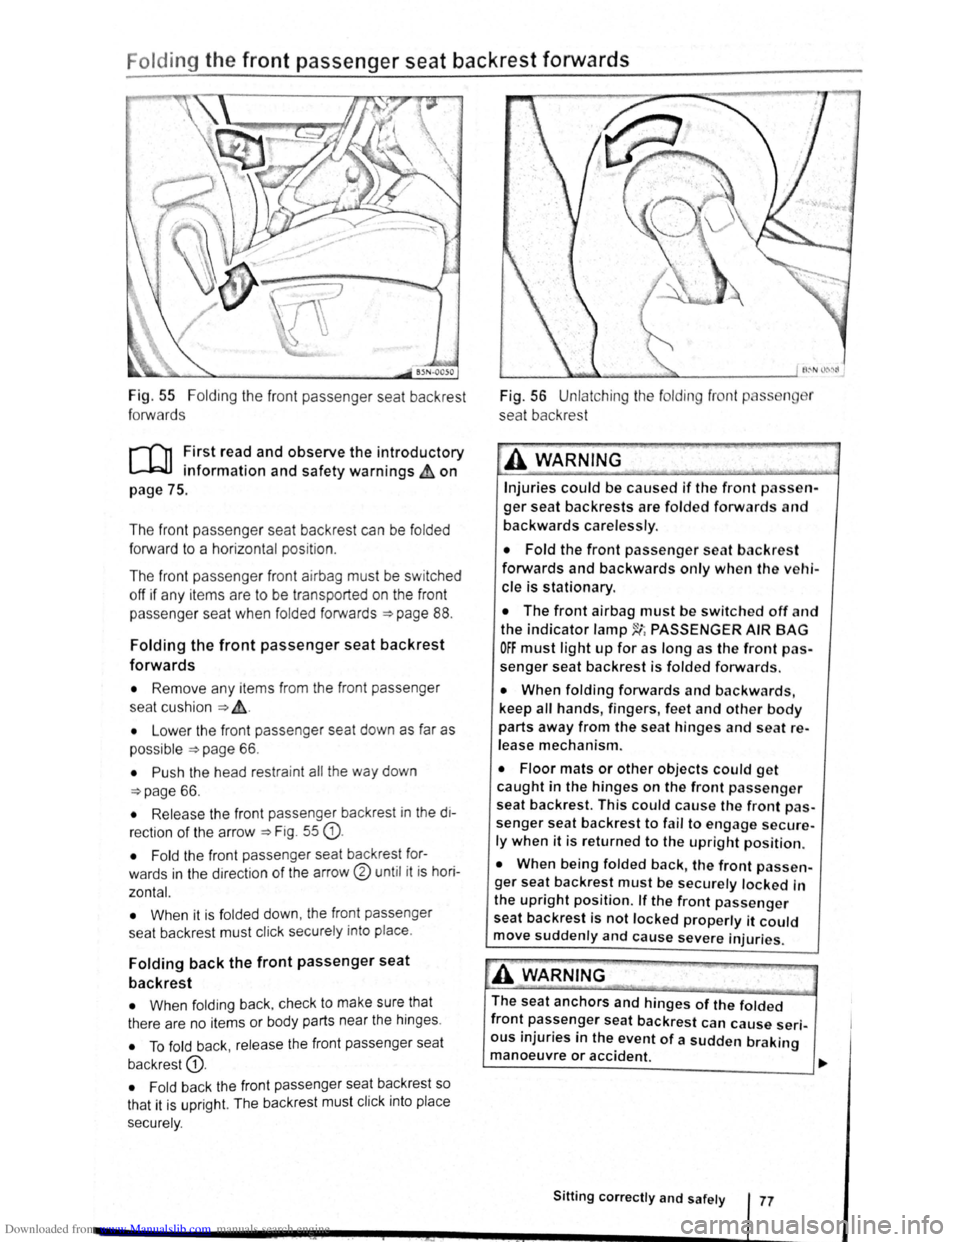
Fig. 55 Folding the front passenger seat backrest
forwards
r-('n First read and observe the introductory
l-.b1.l information and safety warnings~ on
page
75 .
The front passenger seat backrest can be
folded
forward to a horizontal position .
The
fron t pass enge r front airbag must be switched
off if any it e ms are to be transported on the front
p asse nger seat when
folded forwards ~page 88.
Folding the front passenger seat backrest
forwards
• Remove any items from the front passenger
seat cu shio n
~ ~-
• Lower the front passenger seat down as far as
possible
~page 66 .
• Push the head restra int all the way down
~page 66.
• Release the front passenger backrest in the di
rection
of the arrow ~Fig. 55 G).
• Fold the front passe nger seat backrest for
wards
in the dir ec tion of the arrow® until it is hori
zontal.
•
When it is fol ded down , the front passenger
sea t backrest must click securely into place .
Folding back the front passenger seat
backrest
• When foldi ng back , check to make sure that
there are no items or body parts near the hinges .
• To fold back , release the front passenger seat
backrest
G).
• Fold back the front passenger seat backrest so
that it is upr
ight. The backrest must click into place
sec urely .
Fig. 56 Unlatching the fo lding front p ss n r
seat backrest
A WARNING '·
Injuries could be caused if the front passen
ger seat backrests are folded forwards and
backwards carelessly .
• Fold the front passenger seat backres t
forwards and backwards only when the vehi
cle is stationary.
• The front airbag must be switched off and
the indicator lamp~~ PASSENGER AIR BAG
OFF must light up for as long as the front pas
senger seat backrest is folded forwards.
• When folding forwards and backwards,
keep
all hands , fingers , feet and other body
parts away from the seat hinges and seat re
lease mechanism.
• Floor mats or other objects could get
caught in the hinges on the front passenger
seat backrest. This could cause the front pas
senger seat backrest to fail to engage secure
ly when it is returned to the upright position.
• When being folded back, the front passen
ger seat backrest
must be securely locked in
the
upright position. If the front passenger
seat backrest is not locked properly it could
move suddenly and cause severe injuries.
A WARNING
The seat anchors and hinges of the folded
front passenger seat backrest can cause seri
ous injuries in the event of a sudden braking
manoeuvre or accident.
~------------------------~~
Sitting correctly and safely 77
Page 57 of 138
Downloaded from www.Manualslib.com manuals search engine Lights and vision
Lights
Introduction
Th1s ·hapt r c nt 1n inf rm lion on th e f llowing
utject :
lnd1 ator lamps . . <>-~ • .. .. .. .. .. • .. .. ~ • .. • .. • • .. •
Turn s1gnal and main beam lever ..•.......
Svvitching lights on and off .............. .
Lights
and v1sion -functions ............ .
~1ain beam ass1st . . . . . . . . . . . . . . . . ... .
Ma king or sv itching over headlights for
dnving abroad (travel mode) . . . . ........ .
Commg Home and Leaving Home functions
(onentation
lighting) . . . . . . . ............ .
Headl i
ght range control, instrument and
s~ itch lighting . . . . . . . . . . . . . . . ....
Interior and reading hght s ...............•.
105
106
107
108
110
111
111
112
113
Observe any country-spec•fic regu lations when us
ing veh1c le lighting.
The driver 1s responsib le for the correct headlight
pos1t1on and the correct headlight settm g.
Addit ional information and warnings:
• Exterior views ~page 6
• lnfotamment system ~page 31
• Changing bulbs ~page 362
Indicator lamps
A WARNING
Accidents and serious injuries can occur if
roads are not sufficiently illuminated and oth
er r oad users have d ifficulty seeing the vehi
cle, or cannot see it at all.
• Always switch the dipped beam head
lights on if it is dark, raining or visibility is
poor.
A WARNING
Setting headlights too high, and the incorrect
use of the main beam, could d istract and daz
zle other road users. This can lead to acci
dents and serious injuries.
• Always ensure that the headlights are ad
justed correctly.
• Never use the main beam or the headlight
flasher if other road users could be dazzled.
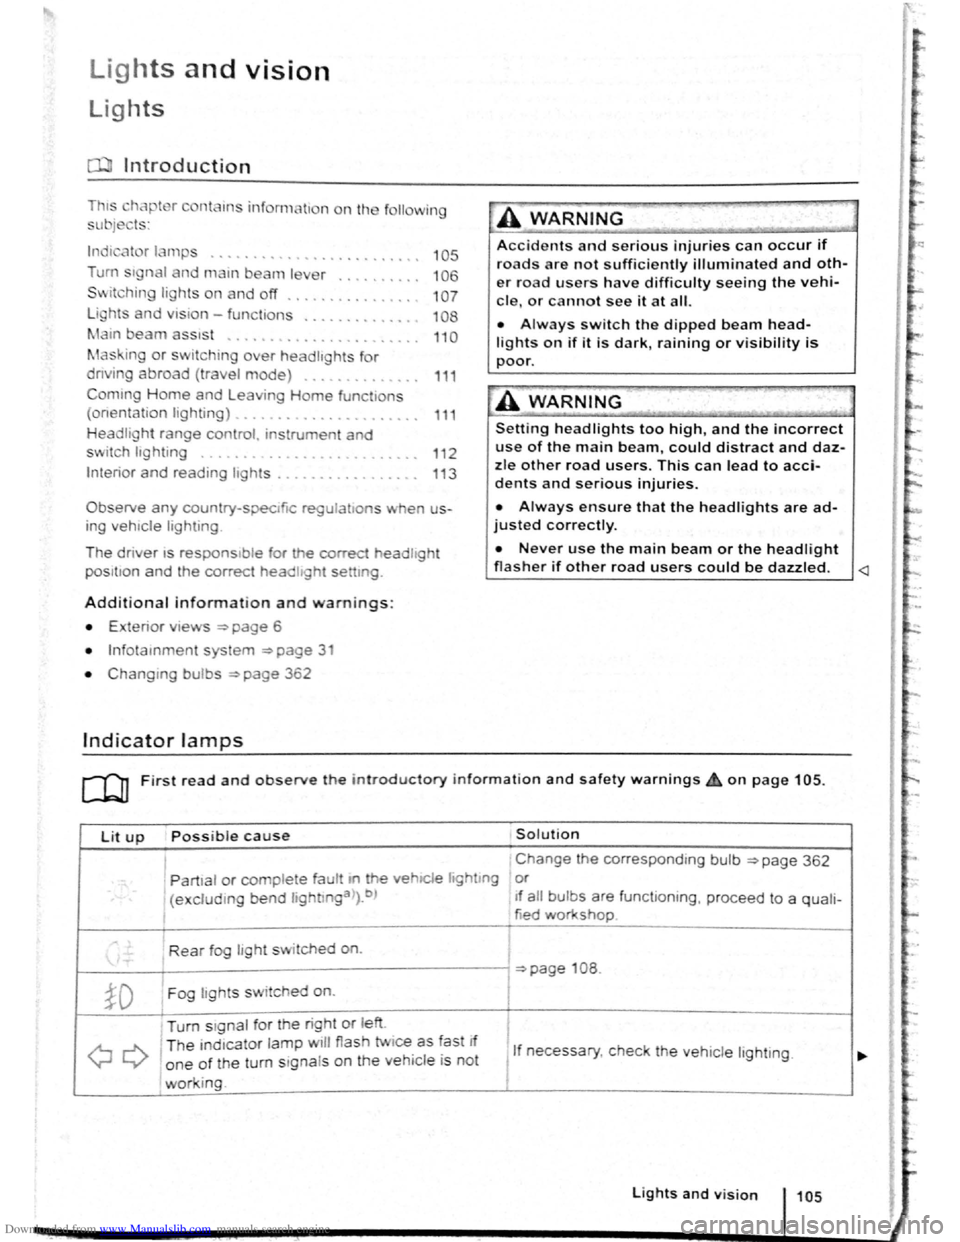
Lit up Possi ble cause Solution
I Change the corresponding bulb ~page 362
' Partial or complete fau tt m he vehiCle hghtmg or
(excluding bend lightlnga>).b ) If a ll bulbs are functioning , proceed to a quali-
tied workshop
Rear fog light switched on.
~page 108 .
~D Fog lights sw itched on. I
Turn stgnal for the right or left i
I
QQ
T he ind1cator lamp will flash twice as fast If
1 If necessary, c heck the vehicle lighting. o ne of the turn signals on the vehicl e is not
working. I
Lights and v is ion 105
Page 58 of 138
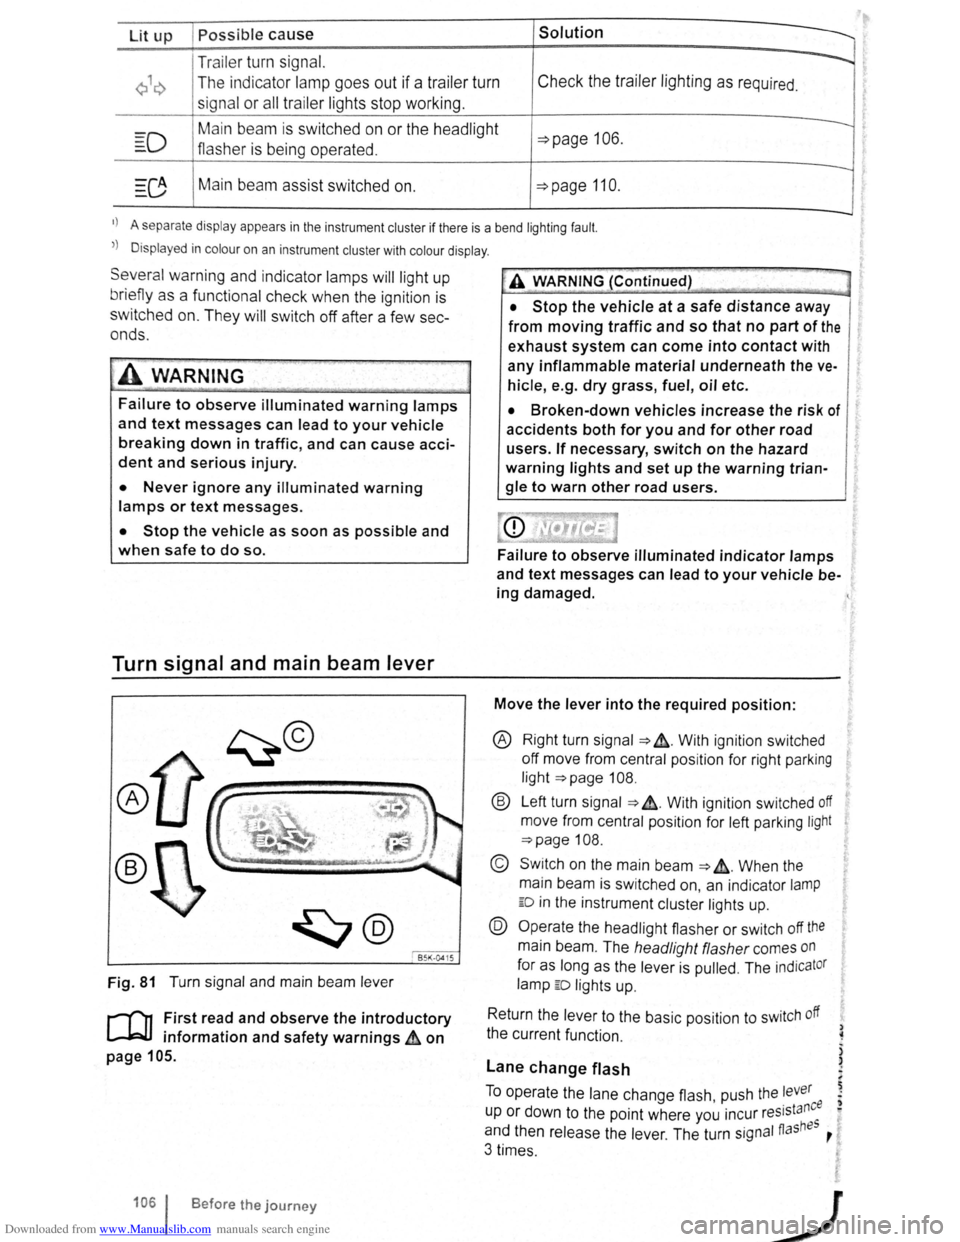
Downloaded from www.Manualslib.com manuals search engine Lit up Possible cause Solution
Tr ailer turn signal. -......
Q\~ The indica tor lamp goe s out if a tra iler turn Check the trailer l ighting as required.
signal
or all trailer lig ht s st op working .
Main beam is swi tc h e d on or the headlight
----D =>pa ge 106 .
flasher is being opera ted .
-
0 Main beam ass ist swi tc hed on. =>page 110 .
-1
) A separate display appears in the instrumen t cluster if there is a bend lighting fault.
>) Displayed in colour on an instru ment cluster with colour display .
Several warning and indicato r lamps will light up
briefly as a
functiona l check when the ign iti on i s
switched
on. T he y will swi tc h off after a few sec
onds.
--·--~-
Failure to observe illuminated warning lamps
and text messages can lead to your vehicle
breaking down in traffic, and can cause acci
dent and serious injury.
• Never ignore any illuminated warning
lamps or text messages.
• Stop the vehicle as soon as possible and
when safe to do so.
Turn signal and main beam lever
®
B5K ·0415
Fig. 81 T urn signa l and main beam lever
r-('n F irst read and observe the introductory
1.-J=JJ information and safety warnings~ on
page 105 .
1061 Before the journey
--
~>A WARNING (Continued) -
• Stop the vehicle at a safe distance away
from moving traffic and so that no part of the
exhaust system can come into contact with
any inflammable material underneath the ve
hicle, e .g . dry grass, fuel, oil etc.
• Broken-down vehicles increase the risk of
accidents both for you and for other road
users. If necessary, switch on the hazard
warning lights and set up the warning trian
gle to warn other road users.
Failure to observe illuminated indicator lamps
and text messages can lead to your vehicle be
ing damaged.
Move the lever into the required position:
® Right turn signa l ~ &. W it h ignit ion swi tched
off m ove from centr al posit io n for right parking
li g ht
~page 108.
® Left turn sig na l ~ ~. W ith ignition switched off
move from centra l posi tion for left parking light
~page 108 .
© Switch on the main beam ~ &. Whe n the
main beam is switc hed on, an indicator
lamp
ED in the instr ument cluster lights up.
@ Operate the headlight flasher or switch off the
main beam. The h eadligh t flasher comes on
for as long as the leve r is pulled . The indicator
lamp ED lights u p .
R etu
rn the le ver to the basic position to switch off
the c urrent fu nc tio n.
Lane change flash
) ~
)
)
To o pe rate the la ne c hange flash push the lever ' . nee I) u p or d own to the poin t where you incur reslsta eo
and th en release the le ver. The turn signal fiashBS ,
3 times .
Page 59 of 138
Downloaded from www.Manualslib.com manuals search engine ..,
of turn signals, a failure to use
r f rg tting to switch off a turn
nfuse other road users. This can
nt and serious Injuries.
• lw. y activate the turn signal In good
tim wh n ch anging lanes and performing
'lt king or turning manoeuvres.
• Alw ys switch off the turn signal once the
le ne change or overtaking or turning ma-
n euvre has been completed.
A W~RNING
In correct use of the main beam headlights
ca n lead to accidents and serious injuries as
the main beam headlights can distract and
dazzle other road users.
Switching lights on and off
m The turn signal will only work when the igni
W tion is switched on. The hazard warning lights
a ls o work
when the ignition is switched off
=>page 336.
m If one turn signal fails, the indicator lamp will
W start flashing twice as fast.
m The main beam headlights can only be
W switched on if the dipped beam headlights
are already on.
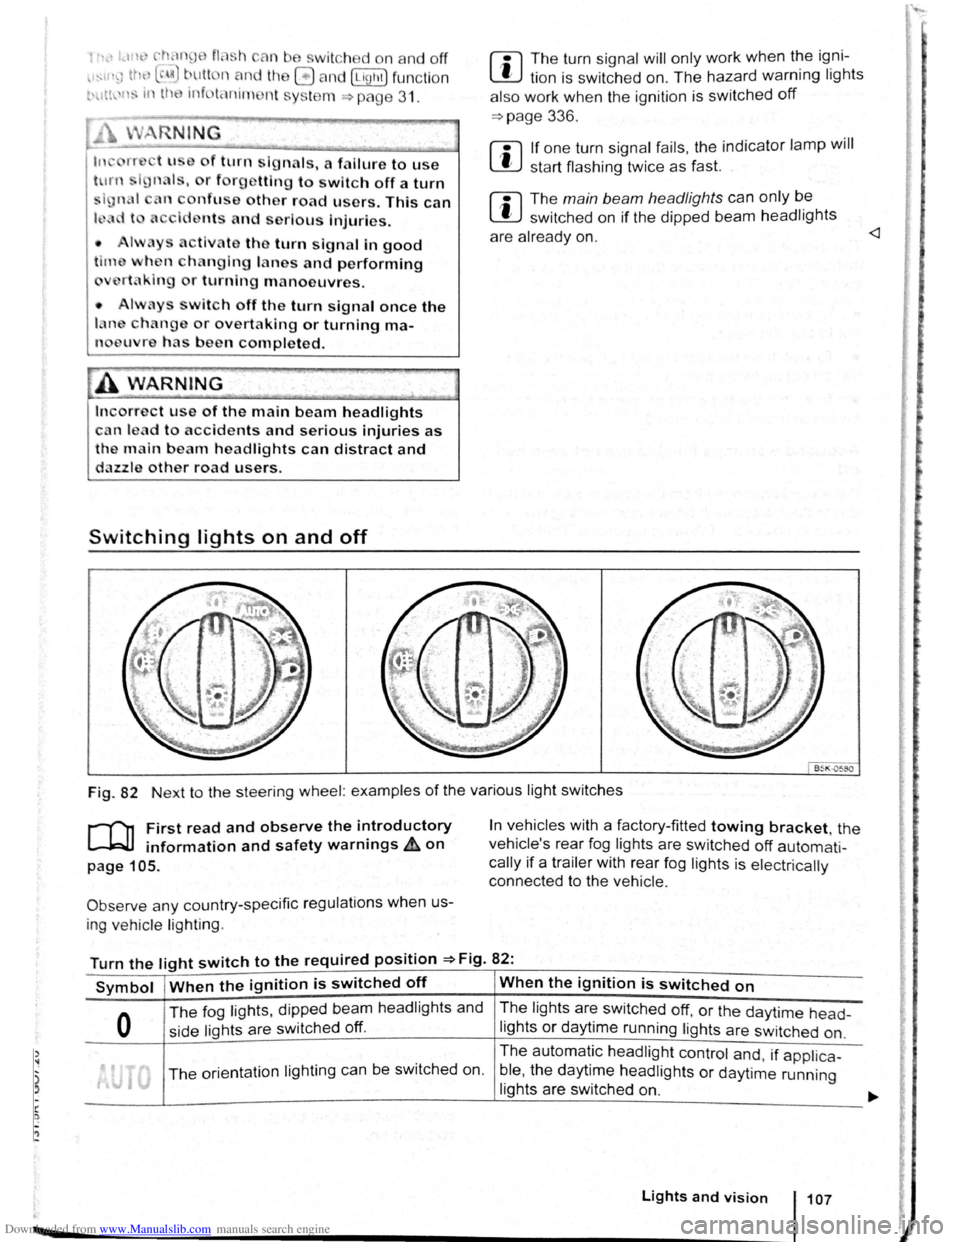
Fig. 82 Next to the steering wheel: examples of the various light switches
r-("n First read and observe the introductory
L-.W1 information and safety warnings ~on
page 105.
Observe any country-specific regulations when us
ing ve hic le lighting .
In vehicles with a factory-fitted towing bracket, the
vehicle's rear fog lights are switched
off automati
cally if a trailer with rear fog lights is electrically
connected to the vehicle .
Turn the light switch to the required position =>Fig. 82:
Symbol When the ignition is switched off When the ignition is switched on
0
The fog lights, dipped bea m headlights and
side lights are switched
off.
The lights are switched off, or the daytime head-
lights or daytime running lights are switched on.
The orientation lighting ca n be switched on. The
automatic
headlight control and, if applica -
ble ,
the daytime headlights or daytime running
lights are switched
on.
Lights and vision 107
Page 60 of 138
Downloaded from www.Manualslib.com manuals search engine urn tho llo ht wit h t tll rr qulr d rH l tlon -.t Il l · U :
ymbo l w lll .. h~tl off
00
-, h fl dlp 111Jd bCJ:un lu,:uJiljltl JUJ wllr ,l rt J d
tJff. ll•o ; ld o 11 Jlrt r-nr,y -IIIII IJirt up ru r tj
11ior t tlrnu
o tioht
lt(J lndlei,lu r lnrrrp ~ 10 or ()I ht U10 li,J frl wltdl ur
lllllr urn onl clu l liJr ltt
• o witc h on !11 fuy llut1t tD: pu ll Uru lit l1l ·w ltdl
out to Ill fir I t HJi c h.
• lo wllc h un l11o runr fu o llo l1t 0 1: pulllltu lly lrl
· w itc h o
ut o fnr n lt will u11.
• ·r o witc h th o ro u llu tl l off, pro !110 ll u lrl
w
itc h o r movo ll l<) p o Jlt lurt 0 .
A cou tic warning If llyht aro n o t wltch utl
of'f
If lho ko y I rurncJV cJ fro m l11u lu , lll un lu ck nncJ ll• u
d riv o f
door I o puliu d, on 1-JGO U tic wnrnln~ J w ill
o
und In any of th o fo llu w ln o ltu u llu " . h[lt w ill
ro rnl
11tJ yo u t o wit ell o ff tt 10 llu lrt u nu eufl : •ry .
• If llr
pnuo 1 00 .
• Jr lite llu hl wit c h I In p o ltl on :» a~ or OL
Gas dlschargo bulbs
G a ult:ch oro o buiiJ yfJnu ru te urlu ttt. uniform ll1Jill
fo r bottor lllu min
Lights and vision -functions
r-fl1 Firs t road and ohsorvo tho Introductory
L-J,.:JJ Information and safoty w
Parking light
Wt1o n U1 pa rk in g llu t•t (I fl and rlt~lll tu rn lu nn l )
ar sw itr.J1o d o n , ttw h adliu trt ond th o tailliu trt on
tt• co rr ponffin ld o or th o vo hlcl lluht u p . T ho
parkin g tiyhl only llg trl up whon U1 l(Jnilion is
wlt ch od o ff and If tll o turn k. nnl a n d m
o t
ocl.
108 6 fom th j,,.,m y
IP J'JI , I h ti II~ Jill (r'Hll !) H i lJJ~t.ll lft)I J I) IIII J In gnnur.
J fn d IJ y p tJ Jrd fl!) J V IJfY III!Jil fllt leftiC , 11 l il ft 111 bfl.
lW '.1'H l lwc ) tJ II ,c)ttJdll' 1111: tfW J In (J!t. ·fillc,(j ~lllb
Jlr~J l; lo r, t rt J dtJ;J W' J 11 (JV' r l lntfl, wl1lc;l1 lnc;r t n~11s
t111J d lo t ,,,,,1} I;IIIWtl t J tllltt Jrll, lilt ,()r lt ro l w11t fo r th
{Jil 1Jf1 d ll lf(j tj ~)IJIIJfl flqftJt) fl1lf ,lt ll l{Jtl ncJ ltr ffj, .
IJ. lflt) (Jfqt ,ltjl, tll,IJfli/Jit lt) f Jil 1111) 11111111 q t)I)Q (·
11lucJ II~Jilt ttJtt H rlrl , IJ tl!)llt lt H IIIn lfn rrn,
lltJW'J V IJr , ~JIJr
unlr orr rt lltJitl. Ut~p,,ttdli 10 011 tll(J V tJf1k ;lo 0 q11lpm(,nt
ltJVIJI , n v m ''' p o rldlnu w •rnlno nttr. I!JO mny bo
u n lforrn ll tJirl, prtJtAJt J rJ to . q11 1llfln d wwk. flOp lm·
rnodls.tu ly t'> f l:IVIJ tll I H J ldlliJirl ' 111 t; k n cl.
A WARNING
Tho 61
o h oa
tl ond to o n uro tho t othor root! ut>ors ore
ublo to oo you.
• Alwo y w it c h tho d lppod bourn hoad
lluht on If lt I dark, rolnlng or visibility Is
poor.
Pormanont parking light on both sldos of the
vohlclo
If UJO ll{)lll w ltc;h Is In p o ilion ~:with ttl ifJnition
s
wltc h od off , end t11e vo hl clo Is lo cke d from the oul·
ski , U 1 porm~nont po rk lno llullt o n both sldos
wltc tl o s on . In tills c.-. , o nly both hoa tlli g ht with
Id 11u~1l nd p art o f U1 lll r nr llullt clu. to r lrghl
up.
Daytime headlights
With dnytlrn e h atJII!Jhl s , U1 dlppo d bo r-1rn hoed·
llutHs o r I
lo nltl o n Is switc h e d o n If t h e lig ht sw it c h Is In p osl· ~
lion 0 o r AUTO. T he ln d ic