service VOLKSWAGEN GOLF PLUS 2012 User Guide
[x] Cancel search | Manufacturer: VOLKSWAGEN, Model Year: 2012, Model line: GOLF PLUS, Model: VOLKSWAGEN GOLF PLUS 2012Pages: 541, PDF Size: 98.86 MB
Page 95 of 541
tronic control unit to regu late deployment of the front Advanced Airbag on th e passe nger side.
A n airbag monitoring syste m and indicator
light in the in strument page 82.
The BAG light in the center of th e instru ment panel tells you when
th e front Advan ced Airbag Sys te m on th e been turned ofT.
A sensor in sid e the safe ty belt buckle for the fro nt passenger scat to measure th e te nsio n on the safe ty belt. Thi s te n sion on th e safe ty belt and th e
we ig ht regis te re d b y th e weigh t sens ing -mat help
t h e control unit w heth er th e passenger
front airbag should be turned ofT or not.
A switch in the safe ty bel t b uckle for the driver and for the front seat passen ge r senses
w hether th at safety belt is lat ched or n o t and
va nced Airbag System from working properly.
Repairs to th e front passenger seat should be performed by an authorized Volkswagen dealer or an authorized Volkswagen Service Facility.
Never remove the front passenger scat or driver seat from the vehicle .
Never re move the upholstery from the front passenger scat.
Neve r disassemble or take parts off the seat or disconnect wires from it.
Never carry sharp objects in your pockets or put them on the seat. If the weight-sensing mat in passenger scat is punctured it cannot work properly.
Befor e driving
Never carry things on your lap or carry jects on the front passenger scat.
sending the wrong information to the airbag control unit. T hese objects can also cause serious personal injury if th e ai rbag in nates.
Nevers tore items under the front scats. ponents of the Advanced Airbag Sys tem located under the front seats could be damaged, which coul d prevent them and the airbag system fro m
working properly.
Never put seat covers or replac em ent
cifically approved by Volk swage n.
Seat cove rs can prevent the Adva nced Airbag
System from recognizing child rest cupants on the passenger scat and ca n preve nt the side ai rbag in the seat backre st fro m
Never usc cushions, blankets, or simila r items on the front passenger seat. The additional padding will prevent the
tering a child restraint or person on the seat and will prevent the Advanced Airbag System frum
functioning prope rly.
If yo u must use a ch ild restraint on the front passenger seat and the child re straint
foam cushion or somethin g similar to properly the c hild restraint, m ake certain that the AIR BAG light or AIR BAG ligh t comes on and stays on whenever the child restra int is installed on the front passenger seat.
I f the AIR BAG light o r
immediately install the chi ld
r ized Volkswagen dealer or auth orized
Page 97 of 541
To reduce the risk of se riou s injury, make sure
tl1at the or
front
p asse nger seat and
SENGER
rized Volkswagen dealer or swagen Service Facility immediately.
light or
on the front passenger seat.
install the child restraint system on the rear seat!
first re ad and note th e introdu ctory
on pag e
Changes in weight on the passenger seat during travel ca n switch the passe nger front airbag on or so that it does no t deploy when it should or deplo ys when it should
o n your la p or trans
port things on the passenger seat. weight registered b y the weight-sensing
Never reduce weight on the passenger seat
by hold ing the handle above the passenger door,
suppo rting body weight on the armrest , or by holdin g th e grab handl e on the instrument panel.
Alway s m ake sure that child restraint s are correc tly regi stered by the weight-sensing mat. If the statu s of tl1e Advanced Airbag System has
changed while the vehicl e is moving, the SENGER light blinks for about 5
seconds to catc h the dri ver's attention. If this happens, always stop as soo n as it is safe to do so and check t o make sure that the airbag on/off status is correct for the passeng er riding on the
front passe nger seat
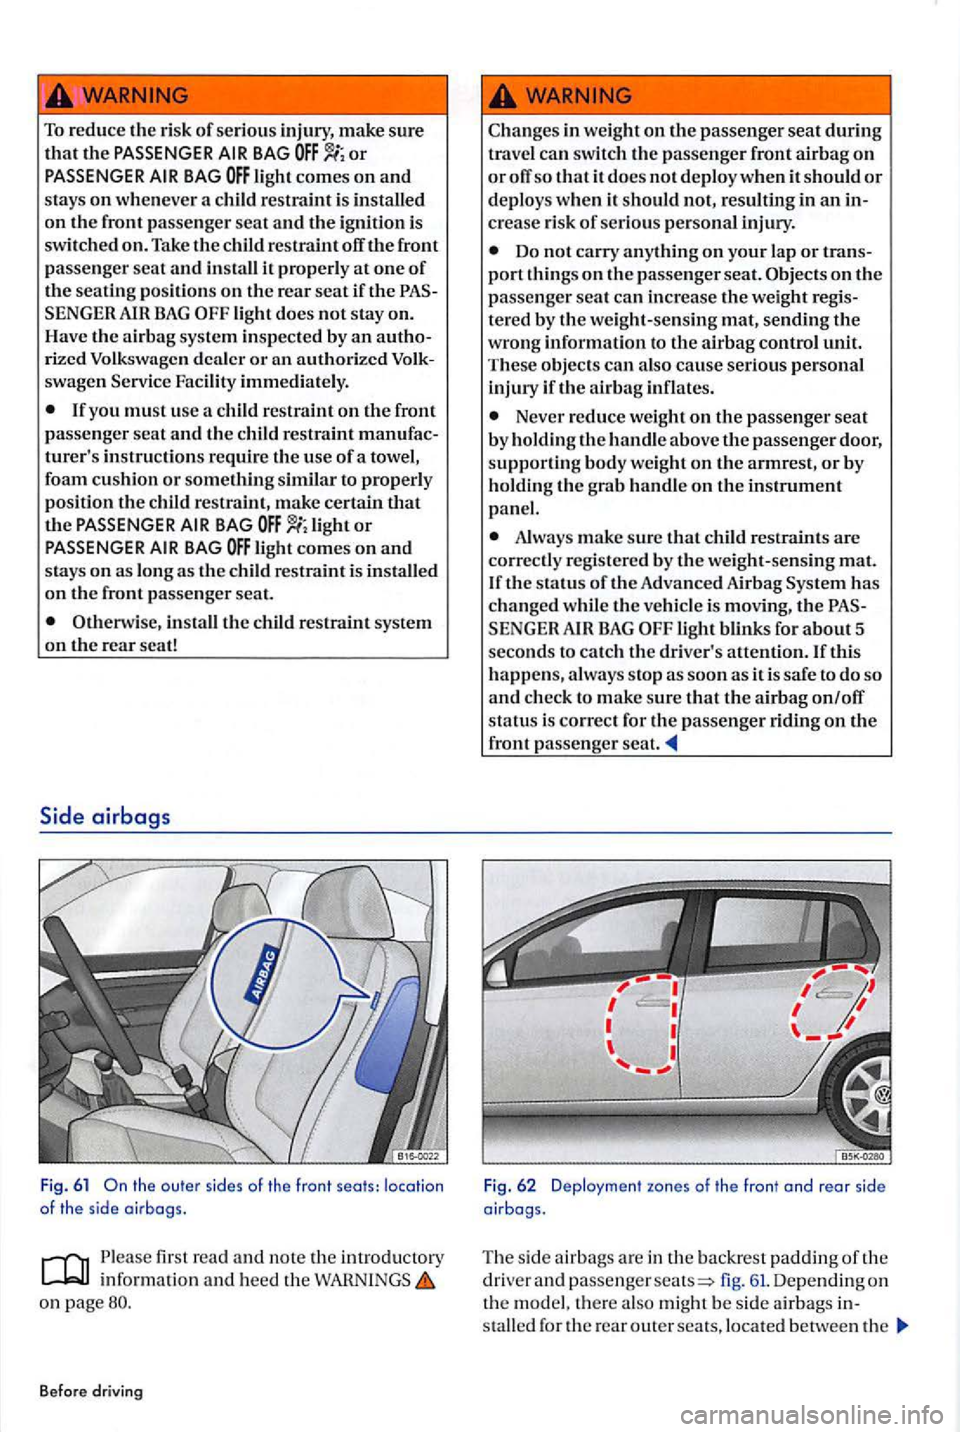
Fig . 62 Dep loymen t zones of the front ond rear side
o irbogs.
Th e side airbags are in th e ba ckre st paddin g of the
drive r a nd passe nge r fig. 61. Dep endin g on
t h e model, th e re al so migh t be side airb ags
Page 99 of 541
Always make sure that th e side airbag can inflate without interfe re nce :
- Neve r in sta ll
seat covers or replacement uphols tery over th e front seat backs that h ave
not been specifically approved by Volk
swage n. the s ide airbag may not
b e able to deploy fully.
-Neve r put seat c u shi ons, blanke ts , or other cove rings over th e areas where th e s ide ai r
b ags inflate.
Side Curtain Protection ® Airbag
-Damage to th e original seat covers or to the seam in the area of the si de airbag module must a lways be repaired imme di
a te ly by an au thorized Vol kswagen dealer or authorized Volkswage n Service Facility.
Always prevent th e sid e airbags from
b eing damaged b y heavy objects hitting the
s ides of the seat back s or force be ing put on the scat backs, especially in the area w here the
s id e a irbag modul e is located. The air bag sys te m
A lways have work involving the s ide airbag system, including removal, rep lacement, and ins talla ti on of airbag compo n en ts, or other re pairs performed by an authorized Volkswagen deale r o r authorize d Volkswage n
Service Facility. the airbag system may not work correctly. Neve r remove th e front seats from th e vehicl e or modify parts of the front seats. Never attempt to modify a ny components of the air bag system in any way. I f excess ive force is exerted on the seatback bols te rs, the s ide airbags may deploy not at al l o r
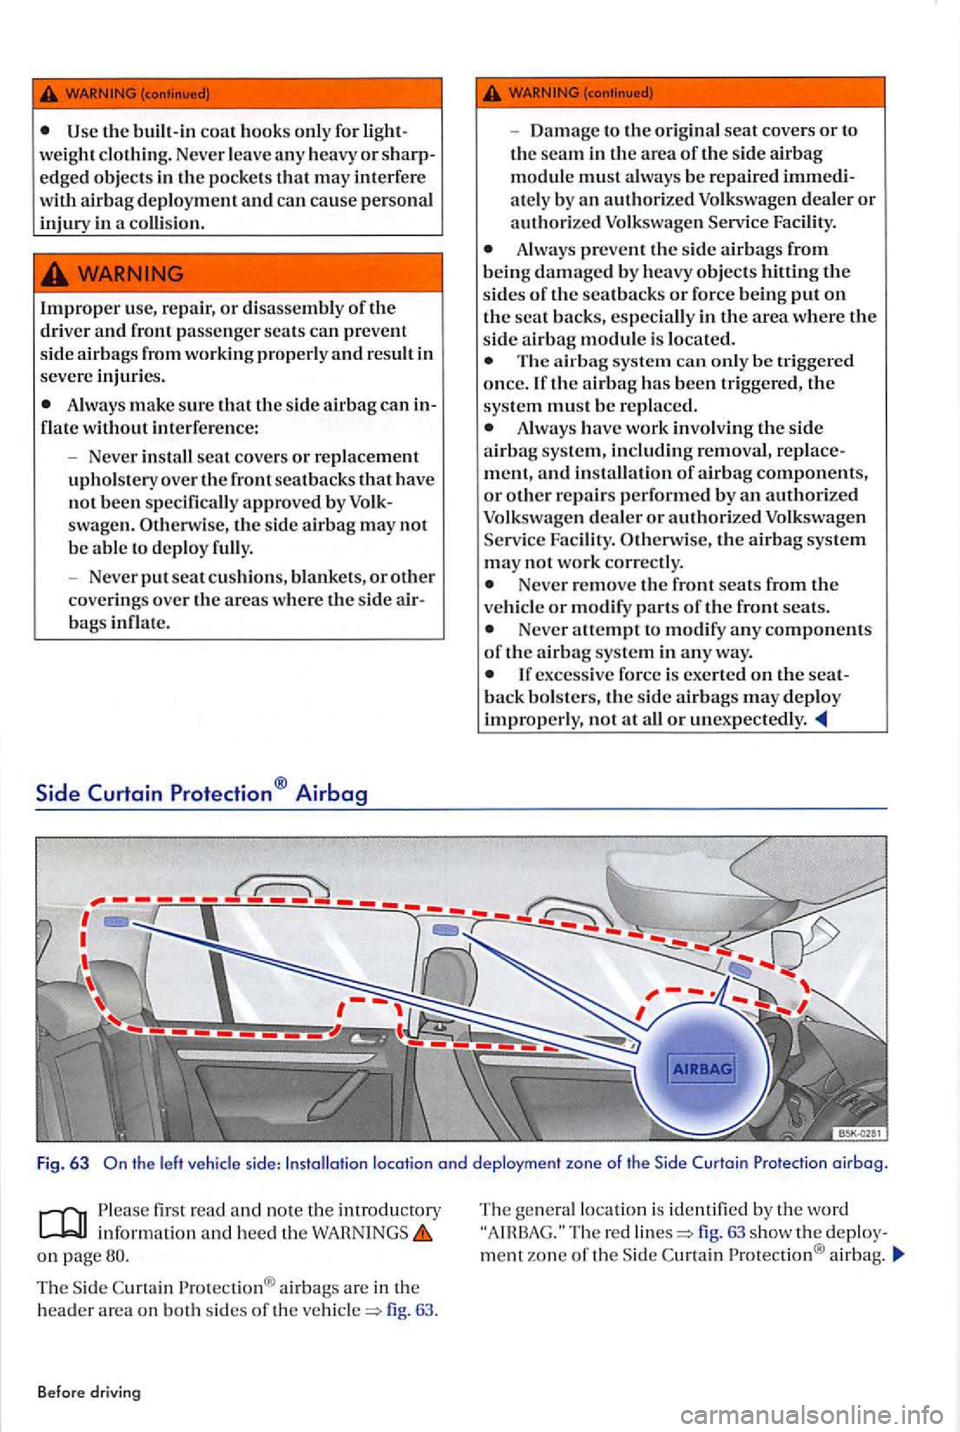
Fig. 63 th e left ve hicle side: In stallation location and deploym ent zone of th e Side in airbag.
information and h eed th e WARNINGS on page
Th e Sid e C urta in ai rbags are in the
h eader are a on bot h sid es of th e fig. 63.
Befo re driv ing
The ge nera l lo ca tion is id entified by the word The red fig. 63 sho w th e deploymen t zo ne of the Sid e Cu rtain airbag .
Page 106 of 541
To reduce th e risk of serious injury, make sure
t hat the PASSENGER BAG ligh t comes on and stays on w hen ever a is stalled o n th e front passenger seat and th e tion is swit ched on.
Take the child off the front sen ge r seat and install it properly
does not stay on.
Have the airbag system inspected by your auU1orized Volkswagen dealer or author ized Volkswagen service facility
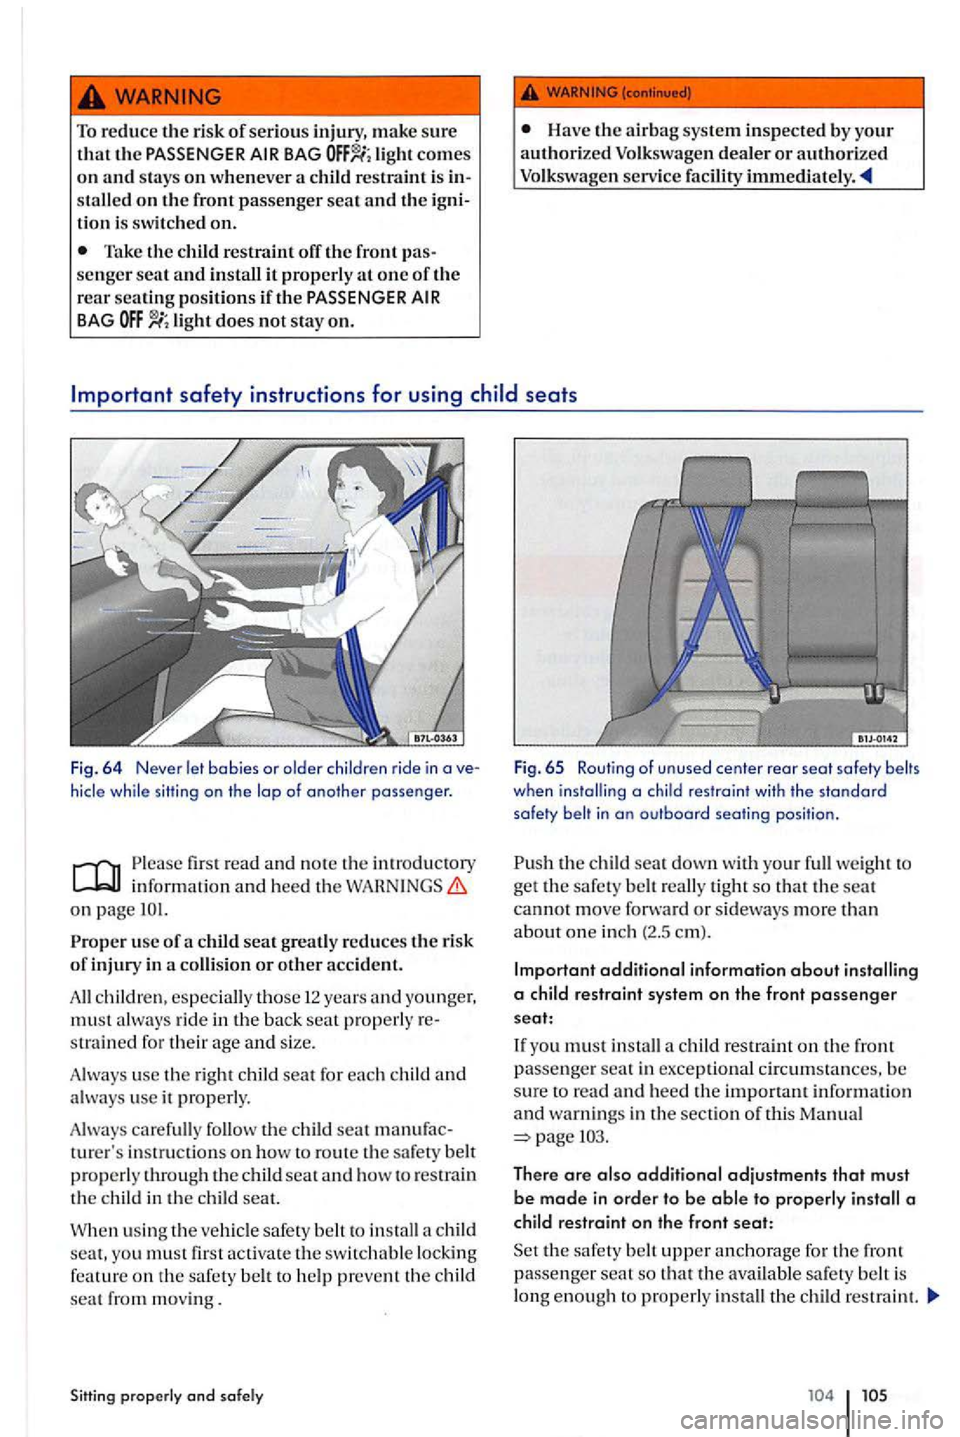
hicle while sitting on the lap of another passenger .
first read and note th e intr oductory information and hee d th e on page
rid e in the back seat properly s tr ain ed for their age and size.
A lwa ys u
se the right child seat for ea c h chi ld and always use it properly.
Always carefully follow the child seat ture r's instru ction s on how to ro ut e th e safety belt
properly through the child seal a nd how to restrain
th e child in the chiJd seat.
When using th e veh icle safety
to a child seat , you mus t firs t activate the switch able locking
featur e on the safety belt to help p revelll the c hild seal from movin g.
Sitting
really tight so tha t
additional information about
a child restraint syste m on the front passenger seat:
If you must in stall a child restraim on th e passe nger seat in excep tional circum stan ces, be
sure to read and heed th e importan t info rmation and warnings in the section of thi s Manual
There are additional adjustments that must
be made in order to be
the safety upper a nchorag e for the fron t passenge r seal so that the availabl e safely belt is
l o ng enough to pro p erly in stall the child restraint.
Page 108 of 541
-Always make sure that the forward-facing seat has been designed and certified by its manufacturer for use on a front passenge r seat with a front and side airbag.
- Always carefully follow the
turer's instructions provided with the child seat or carrier.
- Never install a child restraint without a
properly attached top
tether strap if th e child
restraint manufacturer's instructions quire the top tether strap to be used.
- Never
put the forward-facing child
ment panel.
- Always set
the safety belt upper anchorage to the adjustment position that permits proper installation in accordance with tl1e child restraint manufacturer's instructions.
- Always move the
passenger seat to the high est position in the up and down
straint.
- Always make sure
that nothing prevents the front passen ge r's seat from being moved
to the rearmost position in its fore and aft
-Always make sure that the backrest is in the upright position.
- Never place additional
item s on th e seat that can increase the total weight registered
by the weight-sensing mat and ca use injury
in a crash.
Always buckle the child seat firmly in place
eve n if a
Alway s read and heed aU WARNINGS eve r using a child restraint in a vehicle page
light
comes on and stays on whenever a child straint is installed on tl1e front passenger seat and the ignition is switched on.
AIR BAG
page82.
the off senger seat and install it properly at one of the rear seating positions if the
Have the airbag system inspected by your authorized Volkswagen dealer or aulhorized Volkswagen Service Facility immediat ely .
Page 129 of 541
In this section you'll find information on th e lowing:
Indicator light . . . . . . . . . . . . . . . . . . . . . . . . . . . . . . 128
func tions . . . . . . . . . . . . . . . . . . . . . . . . . . . . .
w iper service pos itio n . . . . . . . . . . . .
Rain sensor . . . . . . . . . . . . . . . . . . . . . . . . . . . . . . . . . 131
and refilling wind shi eld washer fluid 132
More information :
Air condition er air rec irculation mode page 226
Preparatio ns for working in the engin e page 242
Exte rior care and cleaning=> pag e 262
washer fluid without enough frost can freeze on the windshield and duce visibility.
Never use the wind shield wipers/washers when it is freezing without first defrosting the windshield. The washer solution may freeze on the windshie ld and reduce visibility.
sonal injury.
Always replac e wiper blades that are worn,
damaged, or do not kee p the windshield clear.
Note
To help prevent damage to the wiper blades and the wiper motor when it is cold outside, always make sure that blades are not frozen to the shi eld before operating the wipers. When parking the vehicle in freezing weather, it can be he lpful to
plac e th e windshield wipers in the so they do not fr eeze to the windshie ld
Plea se first read and note th e imrodu cto ry informati on and hee d the on page 128.
Light s up Possibl e ca use
was her and re ar windo w
was he r fluid leve l too low.
the ignition is switc h ed Note
Failure to heed warning ligh ts or text can resu lt in ve hicl e damage
Page 131 of 541
Wiper functions
first read and note th e introductory informat ion an d heed the on page 126.
Wip
er p erformanc e in diffe rent situations:
W he n th e veh icle is
not mov ing : The wip er speed changes tempo ra ril y to the next lower speed.
W hil e
the washer sys te m is wo rking, the climate control
During automatic wipe/wash: sys
te m switches to recircul ation for about seconds h elp prevent th e w asher flu id odor from enterin g the ve hicl e int e-rior.
D urin g int e
rmittent wip ing: S
peed-dependent interval con tro l: The high er th e speed, the faste r the wipers m ove.
Heated washer nozzles
The heatin g tha ws frozen wash er nozzles, but not the fluid suppl y hoses. When the ig niti on is
sw itch ed on, th e heat applied to the was he r zles is au to mat ically regulate d d ep ending o n th e
outs id e ai r t emperature .
Headlight washer system
T he headlight washer sys te m clea ns the headli ght
glass.
I f th e ign it io n
and the headli ghts (high or lo w arc swit ch ed on, the headlight s time and every fifth time th e front windshi eld washers a re activa te d. Thi s happen s only when the low or hig h beams are on whe n th e
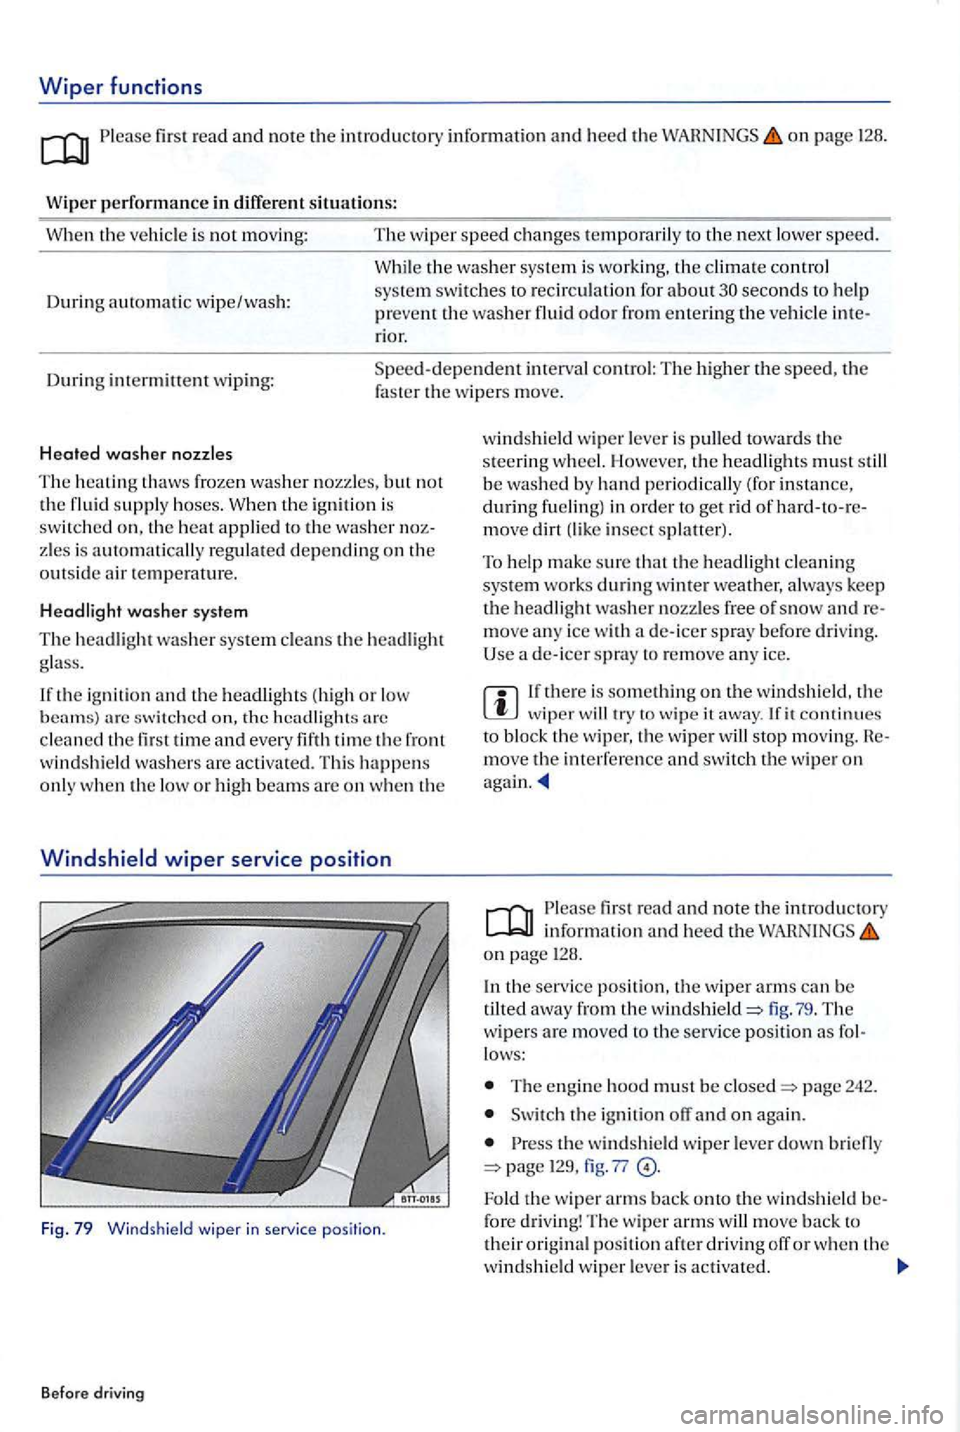
Windshiel d wi pe r service posit ion
Fig. 79 Wind sh ield wiper in ser vice position .
Before driving
windshi eld wip er leve r is pulle d towards th e
s teering w heel. Howeve r, th e headli ghts must s till
b e was hed by ha nd periodically (for i nstance, during fue ling) in order to get riel of move dirt insect splaller).
T o hel p
make sure th at th e headli gh t cleanin g syste m wo rk s during winter weather, a lways keep the headlight washer nozzles fre e of snow move an y ice w ith de- icer spray before drivi ng.
Use a de- icer spra y to re m ove an y ice.
wiper will try to wip e it away . fit continues bloc k the wiper, th e wiper wil l s top moving. move th e in terfer ence and swit ch th e wip er on
firs t read and note the introductory in formation and heed th e o n page 128 .
I n
the service posit io n, th e wiper arms can be
tilted away from the windshield=> lig . 7 9 . The w ipers are move d to the ser vice pos it io n as lows:
T he e ngin e hood must b e closed=> page 242.
Switch the ig nition o n again .
th e windshie ld wiper leve r down brie fly page 129, fig . 77
Fold the wipe r arm s back onto the w indshi eld fo re driving! Th e w iper arms will move back t o their origin al positi on afte r dri vin g off or w he n th e
winds hi eld wip e r leve r is activa te d .
Page 153 of 541
In thi s section lowing:
Techni cal requirem ents ..... ............•. . . . 153
Hitching up and connecting a trailer . . . . . . . . . . . 154
Loading the traile r . . . . . . . . . . . . . . . . . . . . . . . . . . 155
Dri ving with a trailer . . . . . . . . . . . . . . . . . . . . . . . . 156
mo unt . . . . . . . . . . . . . . . . . . . . . . . . . . . . . . . . 157
Retrofitting a traile r hitch . . . . . . . .
country -s pecifi c requir em elll s about trailer
towin g and trai ler hit ches.
Your Volkswage n was mainl y designed f o r ca rryin g
passen gers. If yo u plan to tow a trail er, ple ase member your ve hicl e will be perfo rming job for
which it wa s no t primarily in tende d . Th e tion alload will aiTec t durabi lity, handling, fu el
economy, and p e rf ormance , and may re quir e th e
veh icle to be service d mo re ofte n.
T ra
iler towing only place s more str ess on th e
ve hicle , calls for more concentration from the
dri ver. Always follow the o p era ting and dri ving s tru ction s give n, and use common sense.
perm issible bar load
exerted on th e ball moulll should not exceed
More informati on:
ala rm pag e 38
page
Sav ing fuel and h elpin g th e en vir onment 198
S tarti ng ass istanc e page
T ires and page 276
acc essories, repairs and modifica tion s
Riding in a trailer is dangerou s and may be legal.
Before driving
Improper use o f the trailer hitch ca n cause
correct, or damaged trailer hitch ca n cause the
trailer to separate from the towing ve hicl e and cause se rious personal injuri es.
use an undamaged , properly mounted trailer hitch.
Never repair or modify the trailer hitch.
To reduce the risk of injury in rear-end sio ns and th e risk to pedestrians and cyclists when the vehicle is parked, always remove the ball mount when a trailer is not being used.
Neve r in stall a or hitch on you r ve hicle. The hicle was not design ed for these kind s of trailer
hit ch es. The hitch attachment can fail , ca using
th e trailer to tear loose from
Improper trailer towin g can cause loss of vehicle
co ntrol and serio us personal injury.
Driving with a trailer and carry ing heavy
o r large things can change th e way the vehicl e handles, increase the distance it need s to sto p
safely, and ca use accidents.
Always secure the load properl y with suitable and und amaged straps so that th e load will not
s hift .
Alw ays adapt your sp ee d and driv in g to
th e heav ier load and weight distribution in the vehicle. Take road, weather, traffic, and
Reduce your s pe ed even more th an yo u otherw is e would when going downhill and und er
unfavorabl e lo ad, weather, or wind co ndition s.
a lo w center of grav ity.
Always avo id sudd en maneu vers and hard
Be especiall y caref ul when pas sin g other ve hicl es. Reduce sp eed immediately if the traile r
shows the slightest sig n of swaying.
Page 156 of 541
Any problems with the vehicle's elec trica l system when attached to a trailer should be chec ked by an authorized Volkswagen dealer or authorized Volkswagen Service Facility.
Loading the trailer
Pleas e first read and note the introductory information and heed the on page 152.
Towing capacity and tongue weight
Towing capac ity is the load that th e vehicle can
159.
The towing capacity and tongue weigh t indicated on the model plate o f the trail er hit ch are only re f
e ren ce value s. The vehicle-specific values, which are often below these values, can be found in the vehicle document s. Specificat ions in officia l ve
hicl e documents alwa ys take precedence.
To help en sure optimum handling and driving safe ty, Volkswagen recommends always using the
not handle as well.
Tongue weight increases the load on the rear axle and, in turn, reduces the remaining pay load your ve hicl e can cor
rect load limit.
Combined towing weight
towing weight is th e we ight of the
l oaded tow in g vehicle plus th e we igh t of th e
l oaded trailer.
In some countries, su ch a s th e States and Ca nada, trailer s are organ ize d in to cla sses. swagen recommend s askin g an authori zed swage n dealer or auth orized Volksw agen Se rvice
Facili ty about suitabl e trailer s.
Thi s
vehicle has not been desig n ed to tow a traile r and must n eve r be retrofitted to tow a II trailer. Always make sure that your vehicl e has been designed to tow the trai le r you want to use and that is is legal to tow the traile r where you be driving.
T ronsporting
Loading the trailer
The weig ht dist ribution in the vehicle and tra iler
mu st be balanced. th e maximum permissible
tongue weight and make sure that the load in the
trail er i s eve nly di stributed and that it is not front
h eavy or back-heavy:
Distribut e th e load in th e trail er so that heavy objec ts are directly above the axl e or as close as
po ssibl e to the
Secu re load s properly on the trail er.
Tire pressure
Always follow th e trail er manufac turer' s tir e pres
s ure recommendations fo r the trailer tires.
W h
en towing, inflat e th e towin g vehicl e's tir es to the maximum permissible press ure listed on th e
tir e pressure la bel pag e 276.
Exceeding
the maximum gross axle and tongue weight ratings, as well as the gross vehicle or combined towing weight ratings, can cause accidents and serious personal injury.
Never exceed the stated va lues.
Never let the actual weight at the front or rear axle exceed the Gross Axle Weight Rating for that
axle. Never let the combined front and rear weights exceed the Gross Vehicle Weight Rating.
Trailer loads
that are not properl y secured can shift when the vehicl e is moving or braking and suddenly change the way the vehicle handles,
causing accidents and severe injuries.
Always load the trailer properly.
Always secure the load properly with suitable, undamaged straps that can be tightened so that th e load cannot shift.
154 155
Page 158 of 541
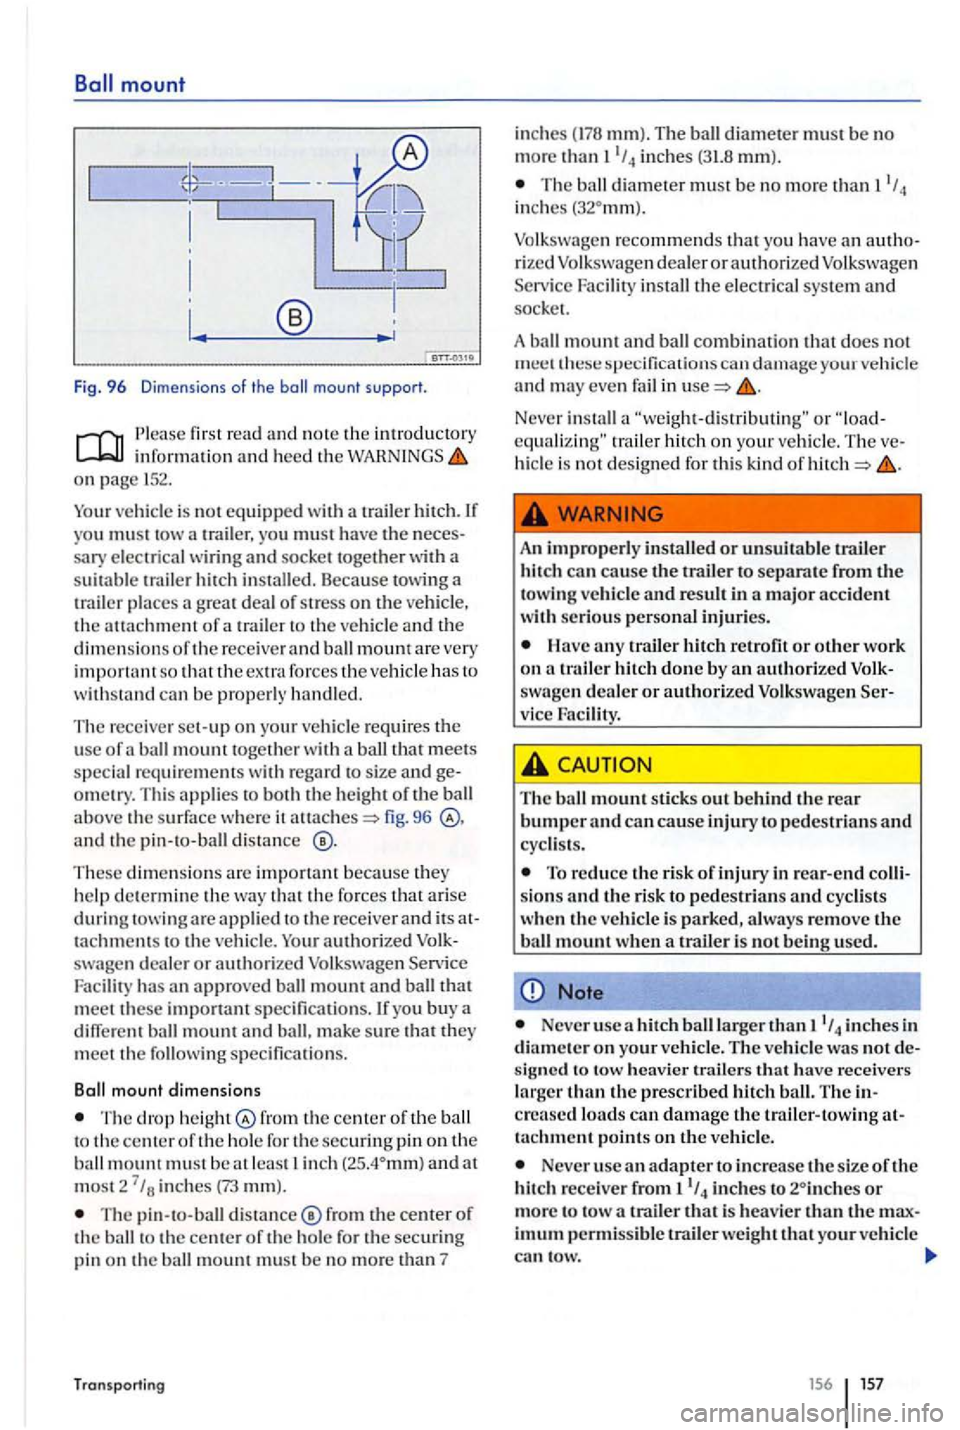
Fig. 96 Dimensions of the mount support.
first read an d note the int rod uctory inform ati o n an d heed th e on 152.
Your vehicle is not equipped with a trailer h itch. you must tow a trailer, yo u must h ave the
ca n be pro perly ha nd le d.
The rec eive r set-up on yo ur ve hicle requ ires the use of ball mount togeth e r a ball that meet s
s pecia l re quire ments with regard to size and om etry. Th is app lie s to bot h th e height of th e ball above the surface where it fig. 96 and th e pin -to-ball distance
These dimen sion s are im po rtant because they h elp dete rmi ne th e th a t the forces that a rise during a re applie d to t he receiver and its tachments to th e ve hicle. Your authori zed dealer or authori zed Volksw agen Service
Faci lit y has approved ball mount an d ball th a t
meet these importa nt specifica tion s. you buy a
diff ere nt ball mount and ball, make s ure that th ey
meet t he following specifica tion s.
Ball
mount dimensions
T he drop heig ht fro m th e ce nter of th e ball to th e cente r of th e ho le fo r th e sec uring pin on th e ball mount mus t b e a t least in ch
T he pin-to -ball dista n ce ® from th e center of th e ball to th e ce nter o f th e hole fo r t he sec uring
pin on th e ball mount must b e no mo re th an 7
Transporti ng
inches mm). The ball diamete r must be no
m ore thanl1
/ 4 in ches (31.8 mm).
T he ball d iamete r must b e no more th a n in ch es
rize d Volkswagen dealer o r a u th o rized Volkswag en
S ervice Facility in stall tl1e electri c a l sys te m and socket.
A ba
ll mount and ball combin ation that does not specifi cat io ns can d amag e your ve hicle and may ev en fail in
o r tr ailer hi tch on you r veh icle . The h icle is not desig ned for this kind of
A n impro pe rl y instal led or unsuit abl e trailer
hi tch can cause the tra iler t o separa te from towing ve hicle and result in a m ajo r ac cident
with seri o us personal inju ries.
H ave any trail er hitch retro fit or
dealer or authorize d Volkswagen vice Faci lity.
Th e ball m ount sti ck s out b ehind th e rear bumper an d can cause injury to pedestria ns a nd
cyclis ts.
T o reduce the risk of inju ry in rea r-end
Note
Neve r usc a hit ch b all larger th an inches in
d ia m ete r o n your vehi cle. The ve hicl e was no t sig ne d t o tow he avier trailers h ave receivers
l a rger than th e pres c rib ed hit ch ball. The cre ased loads ca n d amage the trailer- towin g tachment points on the ve hi cle.
Neve r use adapter to inc rease the size of th e
hit ch r eceive r fr om inches to is heav ie r