turn signal VOLKSWAGEN JETTA 2008 Owners Manual
[x] Cancel search | Manufacturer: VOLKSWAGEN, Model Year: 2008, Model line: JETTA, Model: VOLKSWAGEN JETTA 2008Pages: 477, PDF Size: 77.6 MB
Page 15 of 477
® Booklet 0.1 General Index
Unplea sant odo r 3.1: 83
Upho ls tery
Pr ess ure marks 2.1: 67
V
Veh. sta tus 3.1: 15
Veh icle
Lift ing 3.2: 89
Ve hicle battery 3.2 : 49
Ve hicle care
Exterior 3.2: 17
Ve hicle care products 3 .2: 16
Vehicle contro l module s 3.2: 6
Ve hicl e electric syste m 3.1: 24
Ve hicle phon e 3.2: 29
Ve hicle sta tu s 3.1: 15
Ve hicle tool kit 3.2: 67
Ven tilati on slots 2.1: 11
V olk swagen Service Rep air Manuals 3.2: 91
w
Warning light
E lectro nic Power Co ntrol (EPC) 3. 1: 23
Warning li gh ts 3.1: 20
Emergency flasher 3.1 : 48
P ASS EN GER AIR BAG OFF 2. 1: 39
Sa fety bel ts 2.1: 14
Turn signals 3 .1: 49
Warn ing texts in the dis pl ay 3.1: 11
Warn ing triang le 3. 1: 74
War ranty cove rages 3.2: 15
Wa sh er fluid 3.2: 45
Wa shin g by hand 3.2 : 17
Was hing the vehicle 3.2: 1 7
Was hing wit h pow er cl eaners 3 .2 : 18
Waxing How often sh o uld I wax my car? 3.2: 19
Wear indicator 3.2: 59
What does it m ean w hen I fee l a sli ght vibra
ti on on the bra ke pedal? 3.2: 3
What hap pens if yo u do not wea r your safety
belt ? 2.1: 16
W hat happen s if you wea r yo ur safety belt too
l oose? 2.1: 20
W hat happe ns to occu pants not wear ing
sa fety
2. 1: 16
12 Alphabetical inde x
What if I p urch ase poor quality f uel? 3 .2: 32
W hat impair s driv ing safety? 2.1: 3
Wha t is LATCH? 2 .1: 64
What is the correct brake fluid leve l?. 3.2 : 47
What is the right way
to brea k-in my vehicle?
3.2:7
What kind of brake fluid sho uld I use? 3.2: 48
What kind of engine oil sh ou ld I put in my ve
hi cle? 3.2: 37
What should I do af ter ch an ging a whee l? 3.2:
57, 74
W hat s hould I do after replac ing w hee ls? 3.2 :
57
What sh ould I do if I want to add an accessory
to my ve hicl e? 3.2: 27
W hat should I do if I want to modify my vehi
cle? 3.2: 28
What sh ould I do if I want to repair my ve hi
cle? 3.2: 28
What sho uld I do if the brake warning light
comes on? 3.2: 47
Wha t types ofCRS a nchor s are availab le and
how are they related to child safety? 2. 1:
64
Wha t wo uld happ en if I put lead ed gaso line
in my ca r? 3.2: 32
What you m ust do after reconnec t th e batt ery
3.2: 49
What you should know when driving with
chi ld ren? 2.1: 51
Whee l b olt caps 3.2: 69
W hee l b olt s 3.2: 71
To rque 3.2: 66
W heel c hangin g 3.2: 68
Wheel s 3.2: 51
When can yo ur vehicl e not be towed? 3.2: 88
When must a safety belt be re pl ace d? 2.1: 17
When must the airbag system be in spected?
2 .1: 39
When parking on slopes 3.1 : 10 5
When sh ou ld I adju st the tire pressures? 3.2 :
57
W hen sho uld I ch eck the en gin e o il leve l? 3.2 :
38
W hen should I check the tire press ures? 3.2:
57
W hen sh ou ld I re fuel the tank of the ve hicle?
3 .1: 7
Page 227 of 477
Booklet 3.1 Controls and Equipment
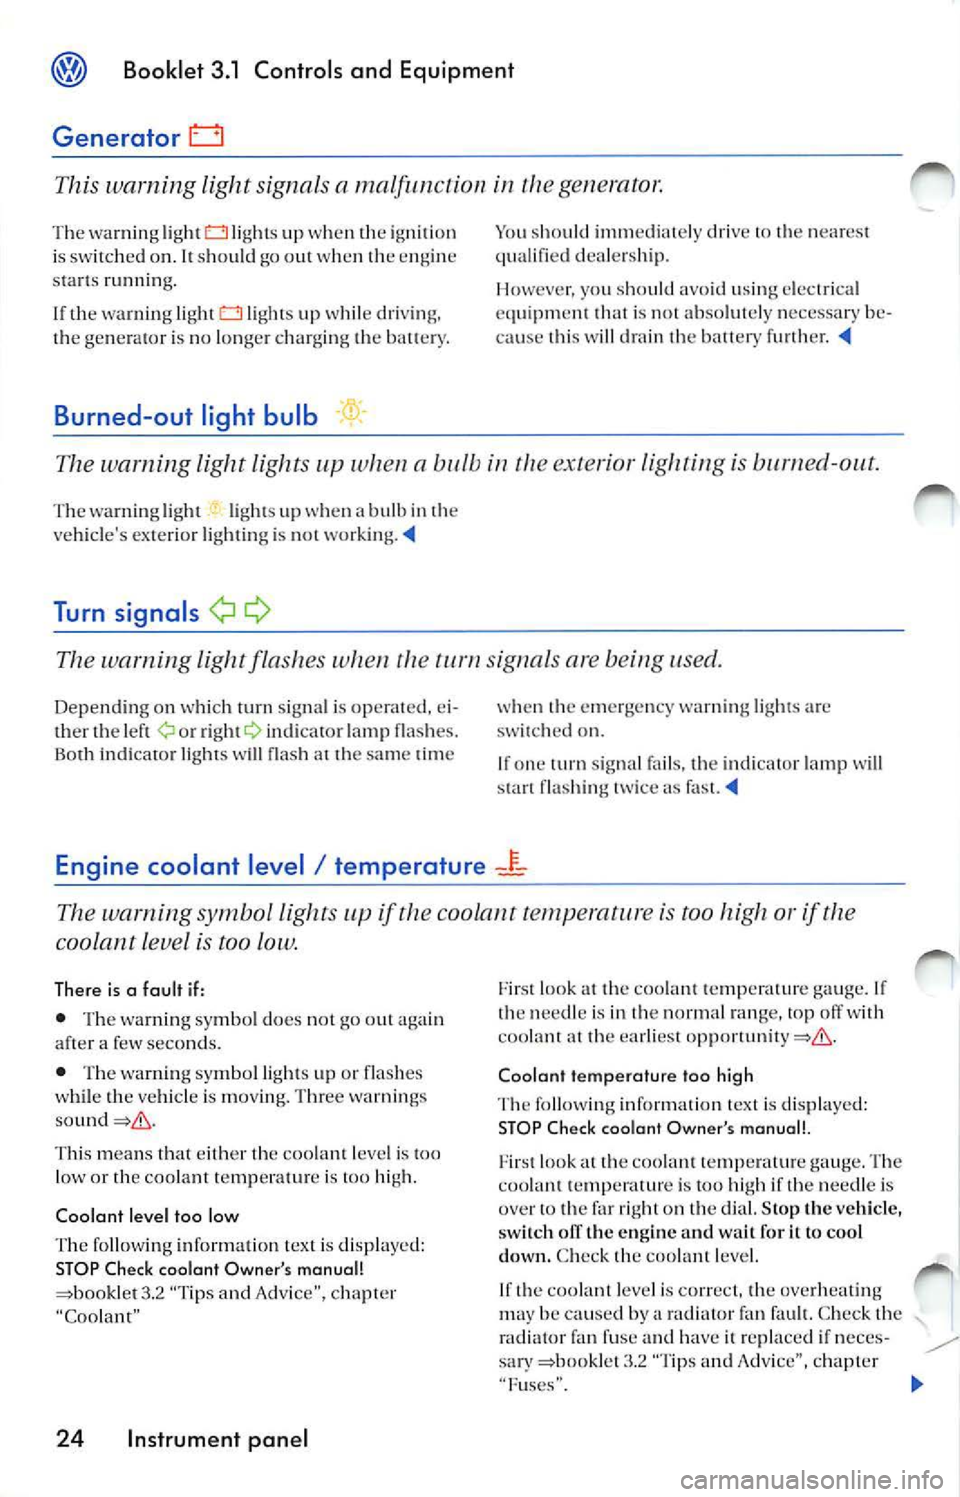
Generator
This warning light signal s a m alfun ction in ge nerator.
Th e w arni ng lig ht lig ht s up when th e ig niti on
i s sw itch ed on . It sh ould go o ut when th e e ngin e
s tart s runnin g.
If th e w arnin g ligh t
lights up while driv ing .
t h e ge nera to r i s no lo nge r ch a rgi ng th e ba ucry.
Burned-out light bulb
Yo u sh ou ld imm ed ia tely drive 1 0 q u al ifie d d eale rs hip .
I l owever, you sh o uld avoid usin g elec tr ic a l
is no t ab so lut ely necessa ry be
cau se w ill d rain th e ba ttery furth er.
The warning light lights a bul b exte rior li ghtin g is
T he w arnin g lig ht light s up when a bulb i n vehicl e's exte ri or light in g is no t
Turn
Th e warnin g light fla sh es w hen sig nal s ar e bein g use d.
Depen ding on w hich tu rn signa l is opera ted, ei
th er th e lef t or in dicato r la mp fl ashes.
Bo th indi cato r light s w ill flas h at th e sam e tim e the em erge ncy wa rnin g light s are
sw itch ed on.
I f one tu rn sig nal fa ils, th e in dica to r l amp will
s tart flas hin g tw ice as
Engine coolant level I temperatu re
Th e warning symbo l li ght s if th e coolant is too high or if
coolant l eve l is too low .
There is a fault if:
• The wa rning symbol do es not go out again a few seco nds.
• Th e warning symb ol li g ht s up or fl ashes
w hil e th e ve hicle is m ov in g. Thr ee wa rnings
Thi s m ean s that eith er th e coo la nt leve l is too
l ow or coolant t emp eratur e is hi gh .
C oo lant level too low
The followin g information tex t is di spla yed: STOP Check coolant Owner's manual! 3.2 "Tip s and Advice" , c h apt er
"C oolant "
24 Instrument panel
Fir st l ook at th e coo la nt te mp eratur e gauge. If
t h e nee dle is in th e no rmal ran ge, top ofTw ith
coo lant at
ea rliest
Coo lant temperature too high
The fo llow ing in form atio n t ext is di spla yed: ST OP Check coolant Owner's manual!.
lo ok a t the coo la nt gau ge. The is 1 00 high if the need le is
over 10 th e far ri ght on th e di al. Stop the veh icle, olT the engi ne and wait for it to cool
down. Chec k th e coo lant level.
I f
coo la nt leve l is corr ect, th e ove rheat ing
m ay be cau sed b y fa n C hec k th e
r a diat or fa n fuse and have re pla ced if neces
s a ry 3 .2 'Tip s and /\dvi ce", c h apt er
" Fu ses".
Page 235 of 477
Booklet 3.1 Controls and Equipment
Remote control key
Locking and unlocking the vehicle
The remote control key can be used to lock and unlock the vehicle from a distance.
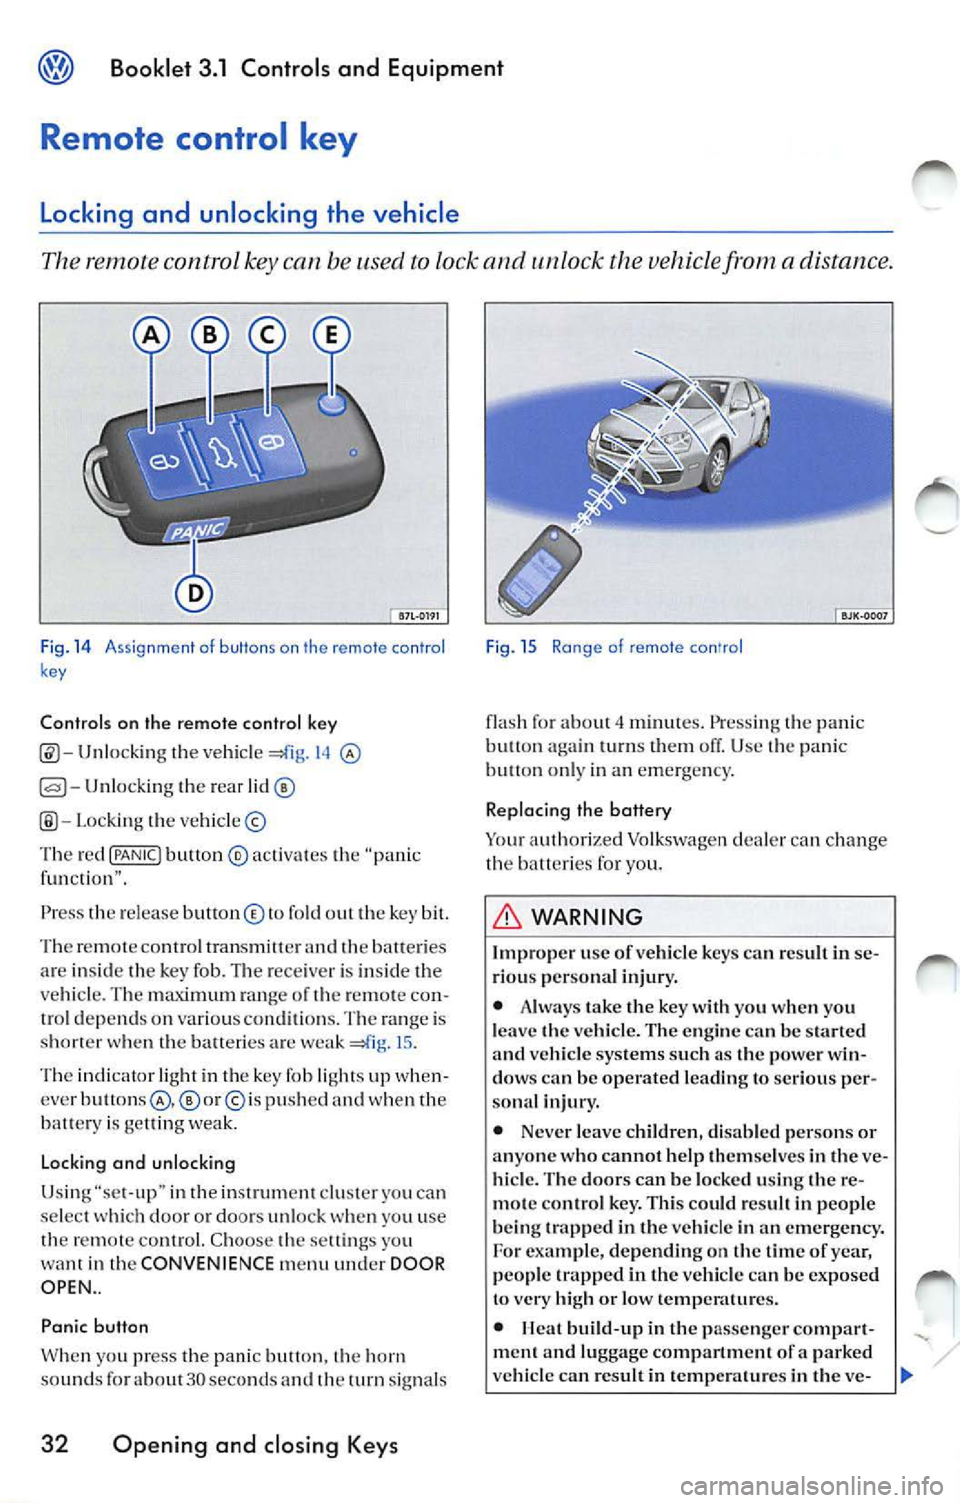
Fig. 14 A ssi gnme nt o f buttons on th e remote con tro l
k ey
Controls on the remote control key
Unlocking the vehicl e 14
Unlocking the rear
Lo cki ng the vehicle ©
Th e red
{PANIC! button ® activa tes the "pa nic
f un cti on" .
Press th e re le ase button © to fold out the key bit.
Th e re m ote contro l tran smitter and
batte ri es
ar e insid e th e key fob. The rece iver is in side the
ve hicle . T he maximum ran ge of th e remo te con
trol dep end s on various conditions. The range is
s h o rter when the balteric s are weak
15 .
The indicator light in th e key fob li ght s up when
cver
p u sh ed and when the
batt ery is ge llin g we ak.
Lo cking and unlocking
Usi ng "se t-up" in the inst rument clu ster you ca n
se lect doo r or doors un loc k you u se
th e remot e control. C hoo se th e sett ings yo u
want in the CONVENIENCE menu under DOOR
OPEN ..
Panic button
W hen yo u press t he panic butt on. horn
sou nds fo r about 30 seco nds an d th e turn signal s
32 Opening and closing Keys
Fig . 15 Ra nge of remote con'ro l
flash fo r about minut es. Press ing the pani c
butt on turn s them off. Use panic on ly in an emerge ncy.
Replacing the battery
Yo ur auth orized Volkswagen dealer can ch ange
the b atteri es for you.
WARNING
Improp er use of vehicl e key s ca n resu lt in se
ri ous per sona l injury.
• Alwa ys take the key with you when you
l e ave the vehicle. The en gine
be start ed vehicle systems such a s the power win
dow s can be operated le ading to seriou s per
sona l injur y.
• Never leave childr en, disab le d pe rsons or
anyone who cannot help them se lves in
ve
hicl e. The door s can be locked using the re
m ote con tro l ke y. This could r esult in peop le
b eing trapp ed in the vehicle in an emergency.
For exam ple, depending on the tim e of yea r,
people trapped in the vehicle can be exposed
to very high or low temp eratures.
•
build -up in the passenge r compar t
ment a nd luggage compartment of a parked
ve hicle can re sult in temp erature s in the ve-
Page 239 of 477
Booklet 3.1 Controls and Equipment
lock ca n be switch ed on and off using a key in th e
opened door.
Anti-theft alarm system
Applies to vehicles: with anti-theft alarm
Description of anti-theft alarm system
The anti-theft alarm triggers an alarm unauthorized movements are detected
around the vehicle.
Activating the anti-theft alarm system
- Lock the vehi cle.
Switching the alarm off
-Un lock the vehicle using the unlo ck
button in the remote control key or unlock
the veh icle by inserting the vehicle key into
the driver's door lock.
The anti-th eft alarm make s it more difficult break into the vehicle or steal You will hea r
and see the alarms if someone tri es break inlO
th e ve hicle.
Whe n yo u lock the ve hicle, the an ti-t heft alarm
syste m is aulOmat ica lly sw itched on.
Close all windows a nd doors compl etely befo re
locking the vehicle so that the ant i-t hef t system
does no t tr igger alarms unnecessar ily.
What triggers th e alarm?
With the vehicle locked, th e alarm will go
under th e fo llowing circ umstances:
• Man ually open ing of the rear lid u sing the ve
hi cle key,
36 Opening and closing Keys
• Opening a doo r,
• Ope ning th e en gine ho od,
• Opening the rea r lid.
Wh en th e alarm is triggered, th e horn
will sound
for about 30 seco nds and the turn signals wi ll
fla sh for about 4 minutes.
Ho w c an I switch off the ala rm system?
You ca n sw itch th e anti- theft alarm sys te m ei
ther by unlock ing th e veh icle using the unl ock
the remote contro l or by unlocking
the vehicle in se rting th e key into the driv er's
d oor lock.
Tips
• When the alarm stops sound ing and you
op en anothe r door or the rear lid or any other
part
th e vehicle that is monito red by the anti
th eft alarm system, the alar m will be triggered
aga in.
• The anti-t heft ala rm syste m works even if t he
battery is disconnected or not wo rking
prop erl y.
Page 251 of 477
Booklet 3 .1 Control s and Equipment
Instrument cluster illumination
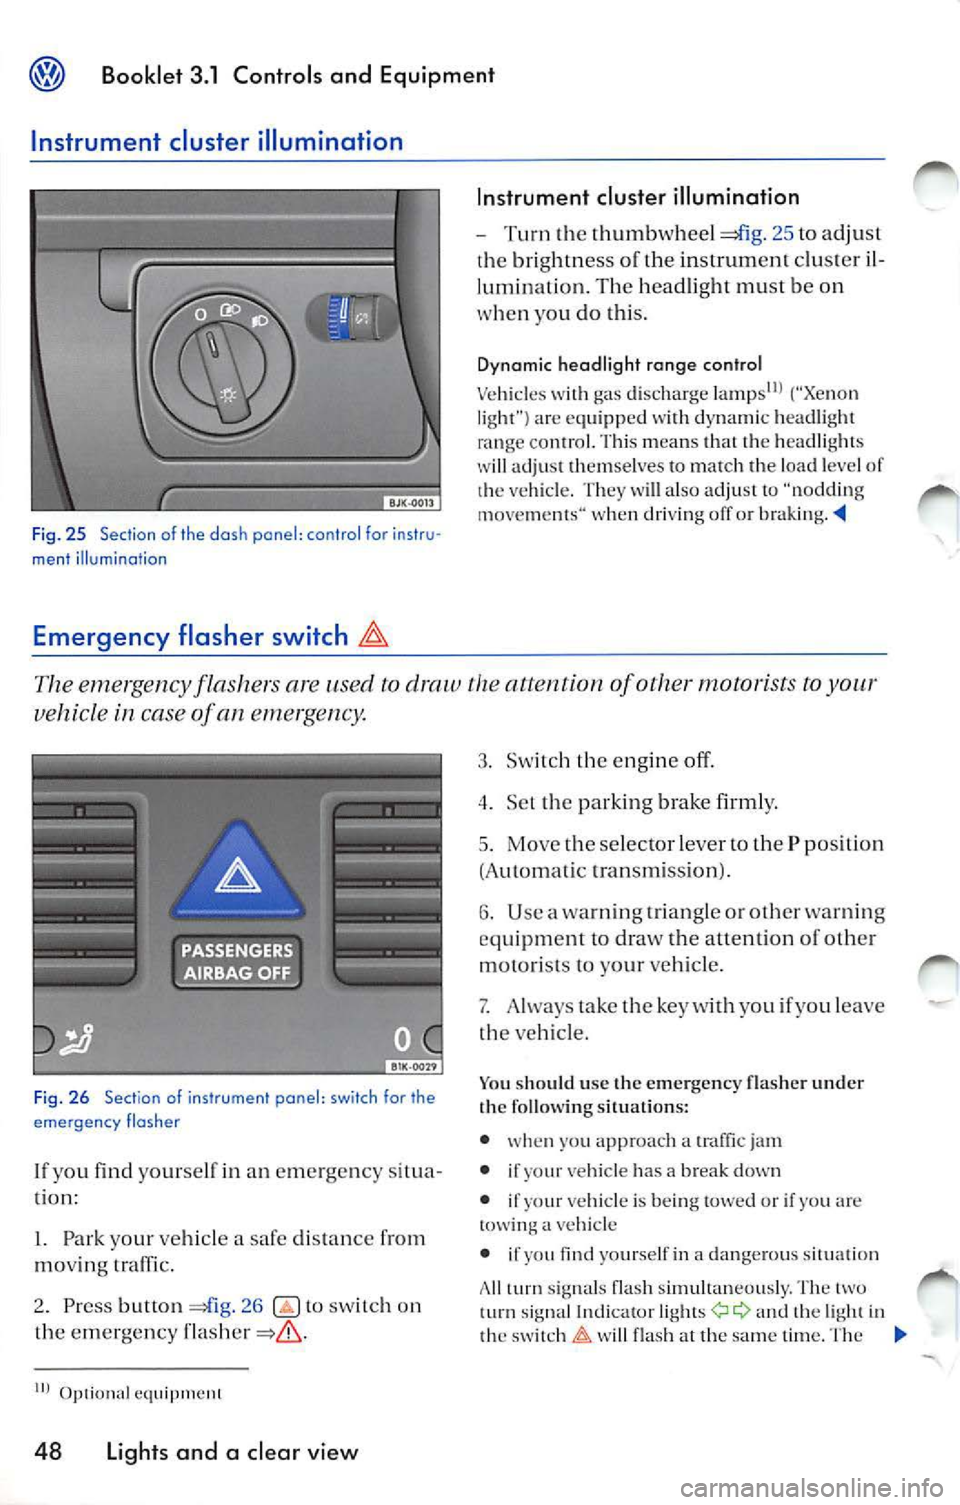
Fig. 25 Section of the dash pane l: co ntr ol fo r instr u·
ment illumination
Emergency flasher switch
In strument cluster illumination
- Turn the thumbwh eel 25 to adju st
bri ghtne ss of the in strum ent clu ste r il
lum inatio n. Th e hea dlig ht mu st be on
w hen yo u do this .
Dyn amic hea dligh t ra nge con tro l
Ve hicl es gas discharge ("Xe non
l ig ht ") are eq uipped wit h dynami c head light
ra nge con trol. Thi s m ea ns th at the head lig ht s
wi ll adju st th em se lves to match th e load leve l of
ve hicl e. T hey will also adju st "noddi ng
m ove ments " when driving off or braking . -'4
The emergency fla sher s are used to draw the attention of other motorists
vehicl e in case of an eme,ge ncy .
Fig . 26 Section of ins trument panel: switch for the
eme rgen cy flasher
lf yo u find yourself in an em erge ncy situ a
tion:
l. Park your ve hicl e a safe distance from
moving traffic.
2. Press button
26 to sw itch on
the emergency
IIJ
48 Light s and a cl ea r vi ew
3. Sw it c h th e eng in e off.
4 . Set th e par king brake firml y.
5. Move t he se lec tor l ever to the P position
(A utomatic transmis sion ).
6. Use a warn ing tr ia ngle or other wa rning
equ ipm en t to draw the allen tion of other
motori sts to y our vehicle.
7. Always take the key with you if you le ave
t h e ve hicle.
Yo u sh oul d use th e em ergency flash er under
the fo llow ing situation s:
• whe n yo u approach a
jam
• if
vehicle has a break down
• if
vehi cle is being tow ed or if yo u arc a vehicle
• if
yourself in a dangero us s itua tion
A ll
sig nal s fla sh simultaneou sly. The turn signal a nd the ligh t in
t h e w ill fla sh at the same time . T he
Page 252 of 477
Booklet 3.1 Controls and Equipment
em erg ency flasher also works when th e ign ition
i s sw itched off .
L'.D, WARNING
A vehicle stalled or stopped on or bes ide a
highway can be st ruck by ot her vehicl es and
increase the risk of se rious per sonal injury.
• Whenever s tall ed or stopp ed fo r repair ,
move th e ve hicl e a safe distan ce off the road,
s top the engine, and turn of the emergency
WARNING (continued)
flash er and use a warning tria ngle or similar
d ev ice to warn approa ching
• Never park the vehicle in areas w here the
h ot cata ly tic con verter and exhaust system
ca n come in contac t w ith dry grass, brush, fu el
s pill or oth er mater ia l that can ca use fire.
Tips
Yo u can disc harge the ve hicle batt ery if yo u le ave
t h e eme rgency flash er on for a Jo ng time
Turn and high beam lever
The tum signal and high beam lever also operates the headli ght flashe,:
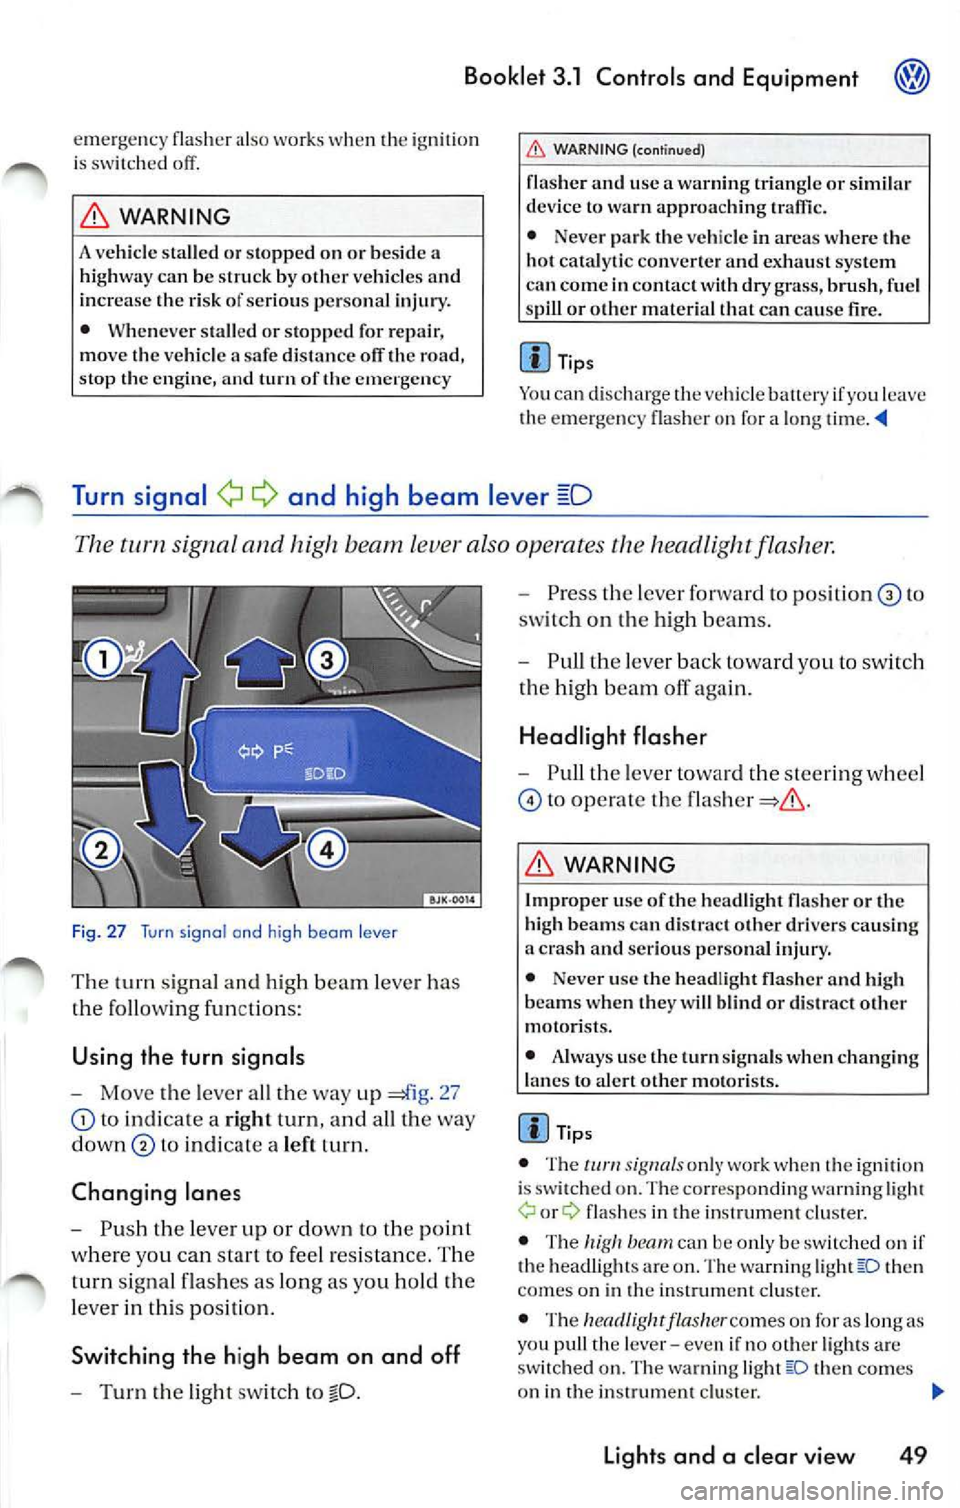
F ig. 27 Turn signal and high beam lever
The turn sig nal a nd high b eam lever has
rhe follo win g fun ctions:
Using the turn signals
-Mo ve the leve r a ll th e way up 27
to indicate a right turn, and all th e way
down
t o in di cat e a left turn .
Changing lane s
-Push the lever up or down to the point
w here yo u ca n start to feel res is tan ce. The
t u rn sig nal fla sh es as lon g as yo u hold the
l ever in thi s po sit ion.
Switching the h igh beam on and off
- Turn the light sw itch to
- Press th e lever fo rwa rd to po sit io n to
sw itch on the high beam s.
- Pull th e le ver back toward you to swit ch
th e hig h b eam off again.
Headlight flasher
- Pull th e lev er tow ard t he s tee rin g w hee l
to operate the
L'.D, WARNING
I mp roper use of the hea dlight fla sh er or the
hi gh b eams ca n di strac t oth er dri vers ca usin g
a cras h and serio us personal injury.
• Never use the head light flash er and high
bea ms w hen the y w ill bl ind or di stra ct ot her
m otor is ts .
• Always use the turn sig nals when chan gin g
l a n es to al ert ot her motori sts.
Tips
• The signa ls o nl y work w hen the ign ition
i s swi tched on. The co rrespo nding warnin g light
fla sh es in th e in strum ent clust er.
• The
then
co me s on in th e in strum ent clust er.
• The
flasher co mes on for as lon g as
yo u pu ll th e leve r- eve n if no oth er light s are
s w itch ed on. The warning lig ht
th en comes
o n in the instrum ent cluste r.
Light s and a clear view 49
Page 401 of 477
Booklet 3.2 Tips and Advice
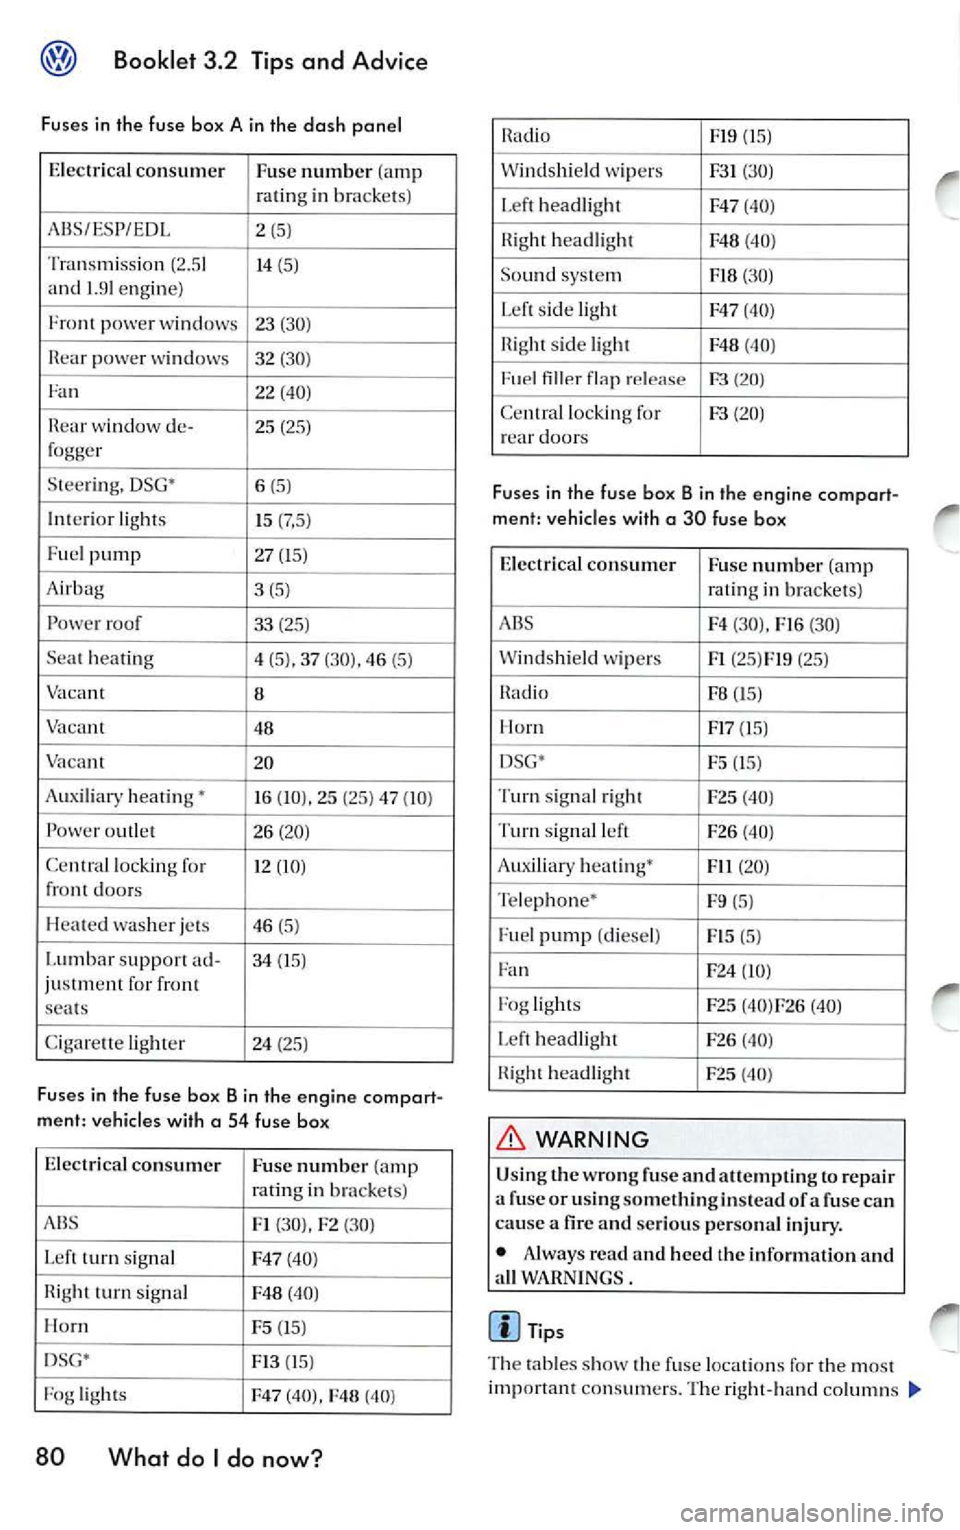
Fuses in the fuse box A in the dash panel
Electrical consumer
Fuse number (amp
ratin g in bra cke ts )
ABS /ESP/E DL 2
(5)
Tran sm iss ion (2.5 1 14 (5)
and 1.91 engine)
Front pow er wi nd ows 23 (30)
powe r 32 (30)
Fan 22 (40)
wi ndow de- 25 (25)
fogger
S tee rin g. DSG • 6 (5)
Int erior light s
15 (7,5 )
Fuel pump 27 (15)
A irbag 3 (5)
roof
33 (25 )
Se at hea ting
4 (5), 37 (30). 46 (5 )
8
48
V aca nt
20
Auxiliary hea tin g'
16 (10), 25 (25) 47 (10)
Pow er outl et 26 (20)
Cc n
lock ing for 12 (IO}
fr ont doo rs
H eat ed was her je ts 46 (5)
Lumb ar support ad- 34 (15)
ju stment for front
sea ts
C igare tte light er
24 (25)
Fuses in the fuse box Bin the engine compart
ment: vehicles with a
54 fuse box
Electrical consumer
Fuse numb er (amp
rating in bra cke ts)
Fl (30). F2 (30)
L eft turn signa l F47 (40 )
turn s ignal (40 )
I-lorn F5 (15)
D SG' FI3 (15 )
light s
F47 (40), (40)
80 What do I do now?
F19
v\l ind shi eld wip ers (3 0)
Lef t headlight F47
(40)
headlight F48 (40 )
So und system
(30)
L ef t sid e lig ht F47 (40 )
sid e light F48 (40 )
release
Ce ntral lock ing for (2 0) rea r door s
Fuses in the fuse box B in the engine compart
ment: vehicles with
a 30 fuse box
Electrical co nsum er
Fuse number (amp
rat ing in bra ckets )
A BS F4 (30),
(30)
W ind shi eld wip ers Fl (25 )FJ9 (25)
F8 (15 )
H orn FI7 (15 )
DSG' F5
(15)
Turn sig nal ri ght
F25 (40 )
Turn signal left F26 (40 )
Aux iliary heat ing •
Fil (20)
T e le phon e•
F9 (5)
Fu el pump (di esel)
(5)
Fan F24 (IO )
F og lig ht s F25 (40 )F26 (40)
h ea dli ght
F26 (40 )
headlight F25 (40 )
WARNING
Using the wrong fuse and attempting to repair
a fu se or u singsomethingin stead of a fuse can
cause a fire and serious per sonal inju ry.
• Always read and hee d the information and
a ll WARN INGS.
Tips
T he tabl es show the fu se loca tion s for the mo st
important consumers. The right -hand column s
Page 403 of 477
Booklet 3.2 Tips and Advice
Changing the headlights and front turn signal bulbs
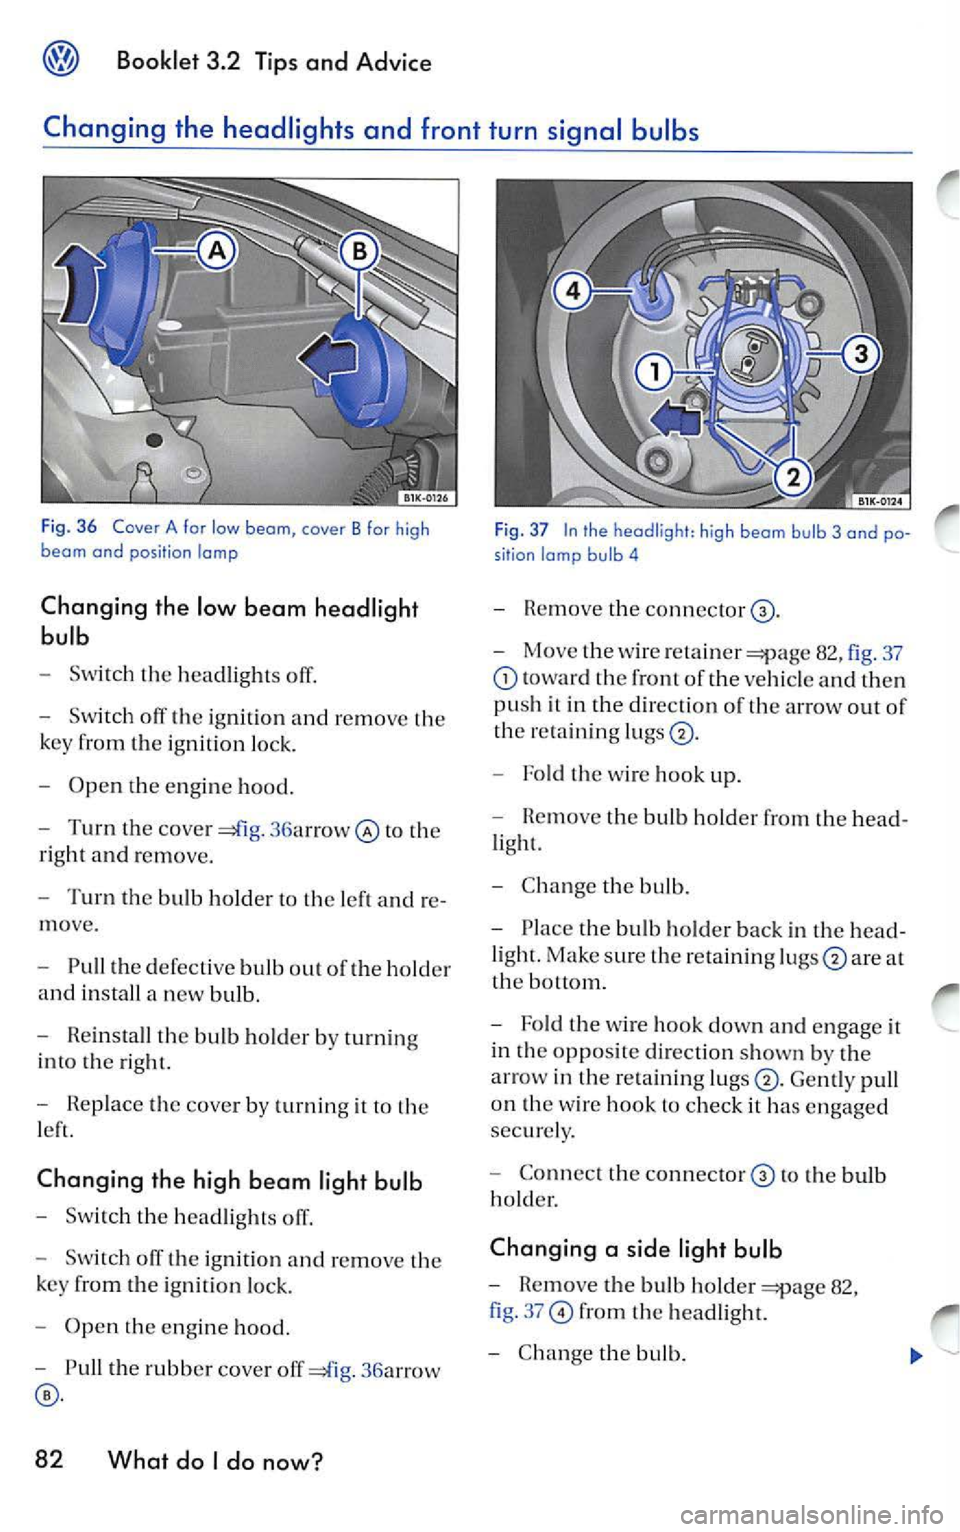
Fig. 3 6 Cove r A fo r low b eom , co ver B for high
beom a nd position lamp
Changing th e low beam headlight
bulb
- Switch the headlights ofT.
- Sw itch off the ign ition and remove the
k ey from the ig nition loc k.
- Ope n the engi ne hood.
- Turn the cover
36arrow @ to the
ri ght and re m ove .
- Turn the bulb hold er t o the lef t and re
move.
- Pull t he defec tive bul b out of the h older
a nd install a new bul b.
- Rein sta ll th e bu lb holder by turning
int o th e rig ht.
- Replace the cover by turnin g it to th e
left.
Changing the high beam light bulb
- Switch the head light s off .
- Switch off the ig ni tion and re m ove the
k ey from the ignit ion lock.
- Op en the en gin e hood.
- Pull the rubb er cover off
36a rrow
82 What do I do now?
F ig . 37 In the headlight : high beam bulb 3 and po
sition lamp bu lb 4
- Remove the conn ector @.
- Move the w ire retainer
82, fig. 37
towa rd the front of the vehicl e and the n
pu sh it in the d irec tion of th e a rrow out
th e re tai nin g lug s
- Fold the w ire hook up.
- Remove the bulb holder from the head-
li ght.
- C hange the bulb.
- Place the bulb holder back in the head-
l ight. Make sure th e reta ining
a t
th e botto m.
- Fold the w ire hook dow n and engage it
in th e opposit e di rect ion sh own by th e
arrow in the re ta inin g
Gently pu ll
o n th e w ire hook to check it h as engaged
sec urely.
- Connec t the connector @to th e bulb
ho lder.
Changing a side light bulb
- Remove the bulb holder 82,
fi g. 37
from the headli ght.
- Change the bulb.
Page 404 of 477
-Place the bulb holder insert back in the
h ead light. Make sure the hold er is prop erl y
i n se rted.
- Push the
82, fig. 36
th e headlight.
Replacing the turn signal light bulb
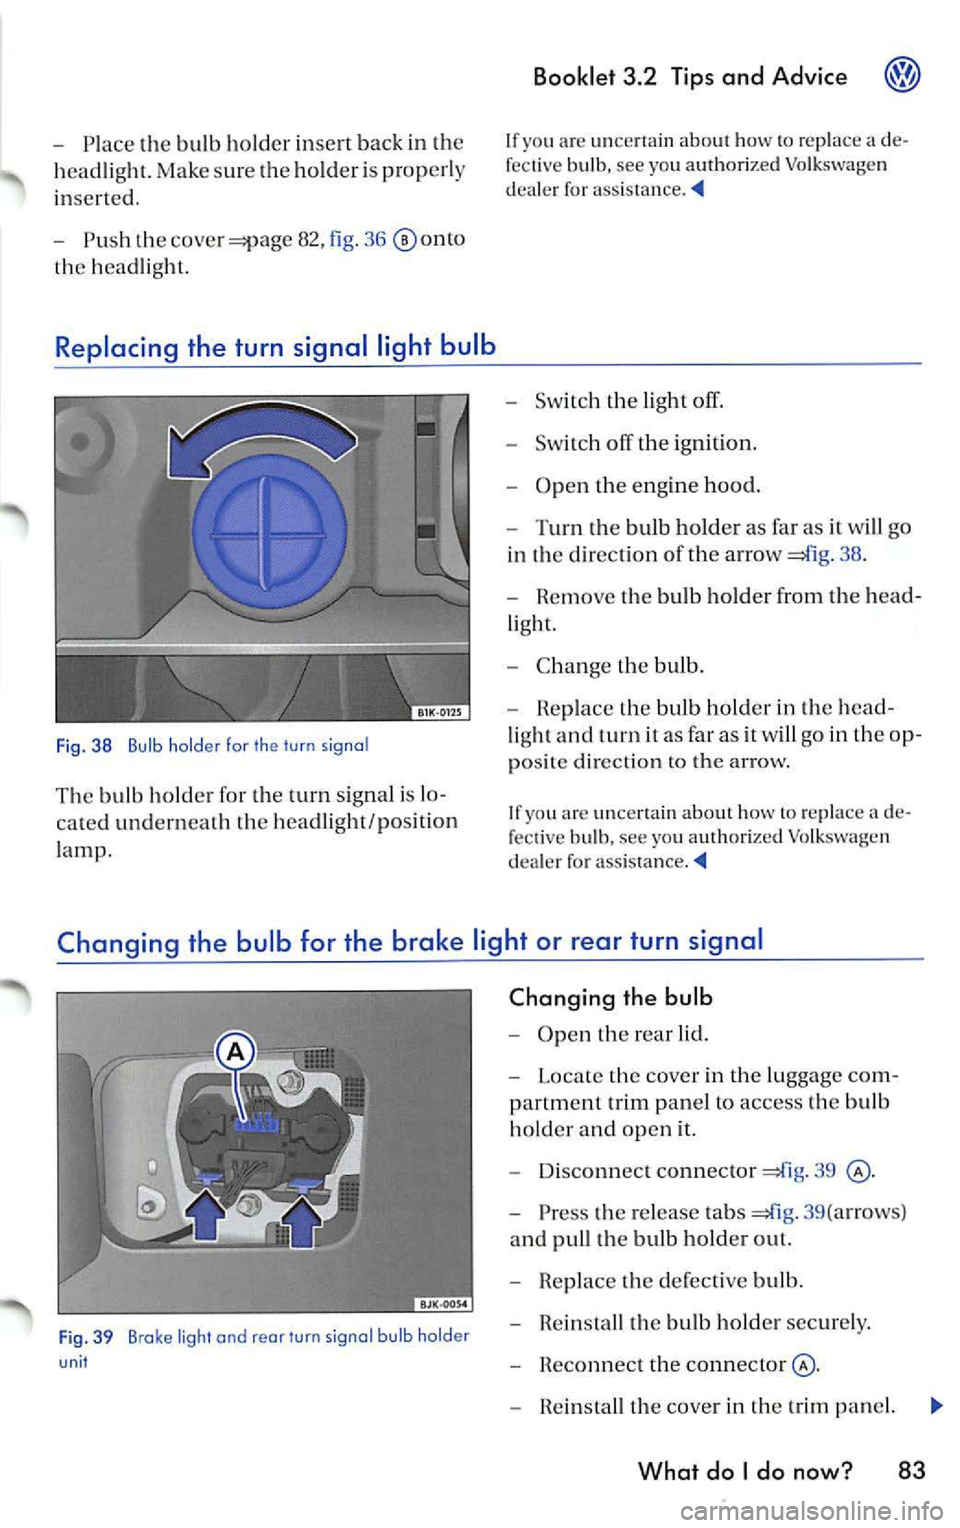
Fig . 3 8 Bulb ho ld er for the tu rn signo l
The bulb ho lde r for the turn signal is lo
ca ted undern eath the headlight /po sition
l amp.
Booklet 3.2 Tips and Advice
If yo u ar e unc ert ain ho w rep lace a de
fective bulb, see yo u authorized Volk swage n
de aler for assis tance.
- Swi tc h the light off.
- Switch off the ig nition .
- Open the eng ine hood.
- Turn the bulb holder as far as it wi ll go
in the direc tion of the a rrow
38 .
- Remove the bulb holder from the hea d
light.
- Cha nge the bulb.
- Rep lace the bul b holder in th e head-
li ght and turn it as far as it will go in the op
po site direction to the arrow.
If you are un certain abo ut how re pla ce a d e
f ec tive bulb , see you authorized
dea le r fo r ass is tance.
Changing the bulb for the brak e light or rear turn signal
Fig . 3 9 Broke light and rear turn signa l bu lb holder unit
Changing the bulb
- Open the rea r lid.
- Loca te th e cover in the luggage com-
partm ent trim panel to access the bulb
hold er and open it.
- Disco nn ect co nn ector
39
- Press the release ta b s =£l g. 39 (a rrow s}
and pull the bulb h older ou t.
- Repla ce the defe ctiv e bulb.
- Rein sta ll th e bu lb hold er secur ely.
- Reconnec t the connecto r@ .
- Rein stall the cove r in th e trim panel.
What do I do now ? 83
Page 409 of 477
Booklet 3.2 Tips and Ad vic e
Attach the tow-rope or the tow-bar only to th e
tow ing eyes provid ed .
D riv in g s ty le
T ow ing require s some exper ie nc e, es pecia lly
when using a tow -rope. Both driv ers should be
familiar w it h th e tec hn iqu es required for tow ing.
In ex perienced drivers should not try to tow an
o th er ve hicle.
Do not pu ll to o hard w ith th e towing vehicle and
a vo id j erking the tow- rope . When tow in g on an
unpa ved road, there i s alway s
risk of over
l oad ing and damaging the an ch orage points .
T he ignition oft he ve hicle be in g towed must be
s witched on to prevent the stee ring whee l fro111
lo ck ing. Also ensur e that the turn signals, horn,
windshield wipers and wash ers work properl y.
Keep in mind that the brake b ooste r d oes not
work when th e e ngine is not running. You will
hav e to apply considerably more pressure to th e
brak e pedal than you wou ld nor111a lly.
A lso the pow er stee rin g do es not work when the
e n g in e is not running. You will n eed m ore for ce
to stee r than you would norma lly.
Tow in g ve hicl es w it h an aut om atic tran smi ssio n
• Move the se lec tor leve r to N. •
Do not drive fa ster than 30 mph (50 km/h)
wh en towing a ve hicl e.
• Do not tow further t han
3 0 111iles (50 km ).
• lfa tow tru ck i s use d, th e ve hicle must be
tow ed with a ll w heels off the ground .
WARNING
Towing a vehicle c hange s th e way yo ur vehi cle
h an dles a nd br akes. To help re du ce t he risk of
an acci den t lead ing to se rious persona l injury,
no te th e fo llow ing:
• T he dr ive r of t he ve hicle t hat is be ing
towe d:
- Will h ave to p ress th e bra ke peda l con
s id era bly harder than no rm al beca use th e
b ra ke boos te r i s not a cti ve. Always be alert
no t to rear-end the tow ing ve hicle .
- Will h ave to use cons idera bly more fo rce
t o t urn th e steerin g w hee l, b eca use th e
power steer ing is not active.
• The driver o f the ve hicle that is tow ing:
- Must accelera te grad ually a nd ge ntle,
avo id je rkin g m oveme nts.
- Must b ra ke ear lier a nd more gentle t han
yo u wo uld norm ally
When can your vehicle not be towed?
Yo ur ve hicle m ay no t be towe d un der the fo l
l ow ing con ditions:
• If th e tran sm iss ion mal fun cti o ns and there is
no tran smis sion flui d.
• I f th e veh icle e lectr ical sys tem is not func
ti o nin g beca use the s tee ring will lock up.
• If yo u ha ve to driv e fu rth er th an 30 mile s (5 0
• If the front or rea r axl e is off th e ground
because you dama ge th e gea r.
In the se cases the vehicl e mu st be transport ed
o n a car c arrie r or trailer.
WARNING
If you still tow your ve hicle un der these co ndi
tio ns, you could ca use an acci dent or ca use
d am age to th e ve hicle. Thi s w ill n ot b e covere d
by your Limit ed New Ve hicle Warra nty .
88 Wha t do I do no w?
Do no t tow your ve hicl e beh ind a re cre a tional
vehicle . The Automatic transmi ssio n can be se
ve re ly damaged. This can happ en even if these
l ec to r lever is in th e N (Ne utral) pos ition.
• If th ere is no oil in th e tra nsmi ssio n because
o f dama ge to yo ur vehicle , th e veh icl e s hould b e
mo ved with a ca r carrier .
• If th e front or rear axle is lift ed off th e grou nd,
thi s will serio us dama ge the dr ive gea r.
• If th e veh icl e ha s to be towe d more than 30
mi les (5 0
all whee ls must be rai sed to tow
t he vehicle. The vehicle should be m oved with a
car carrier .
• If vehicle has no e lec trica l po we r, th e
s te erin g will be locked. The ve hicle must