VOLKSWAGEN PASSAT 1995 B3, B4 / 3.G Service Workshop Manual
PASSAT 1995 B3, B4 / 3.G
VOLKSWAGEN
VOLKSWAGEN
https://www.carmanualsonline.info/img/18/7419/w960_7419-0.png
VOLKSWAGEN PASSAT 1995 B3, B4 / 3.G Service Workshop Manual
Trending: ESP, wheel, four wheel drive, wheel bolt torque, instrument, ad blue, run flat
Page 251 of 369
Downloaded from www.Manualslib.com manuals search engine 47-10
Front brake caliper,
servicing
(Teves/Ate)
Note: When repairing install all
parts supplied in repair kit. Apply thin coat of brake
cylinder paste to brake
cylinders, pistons and
seals.
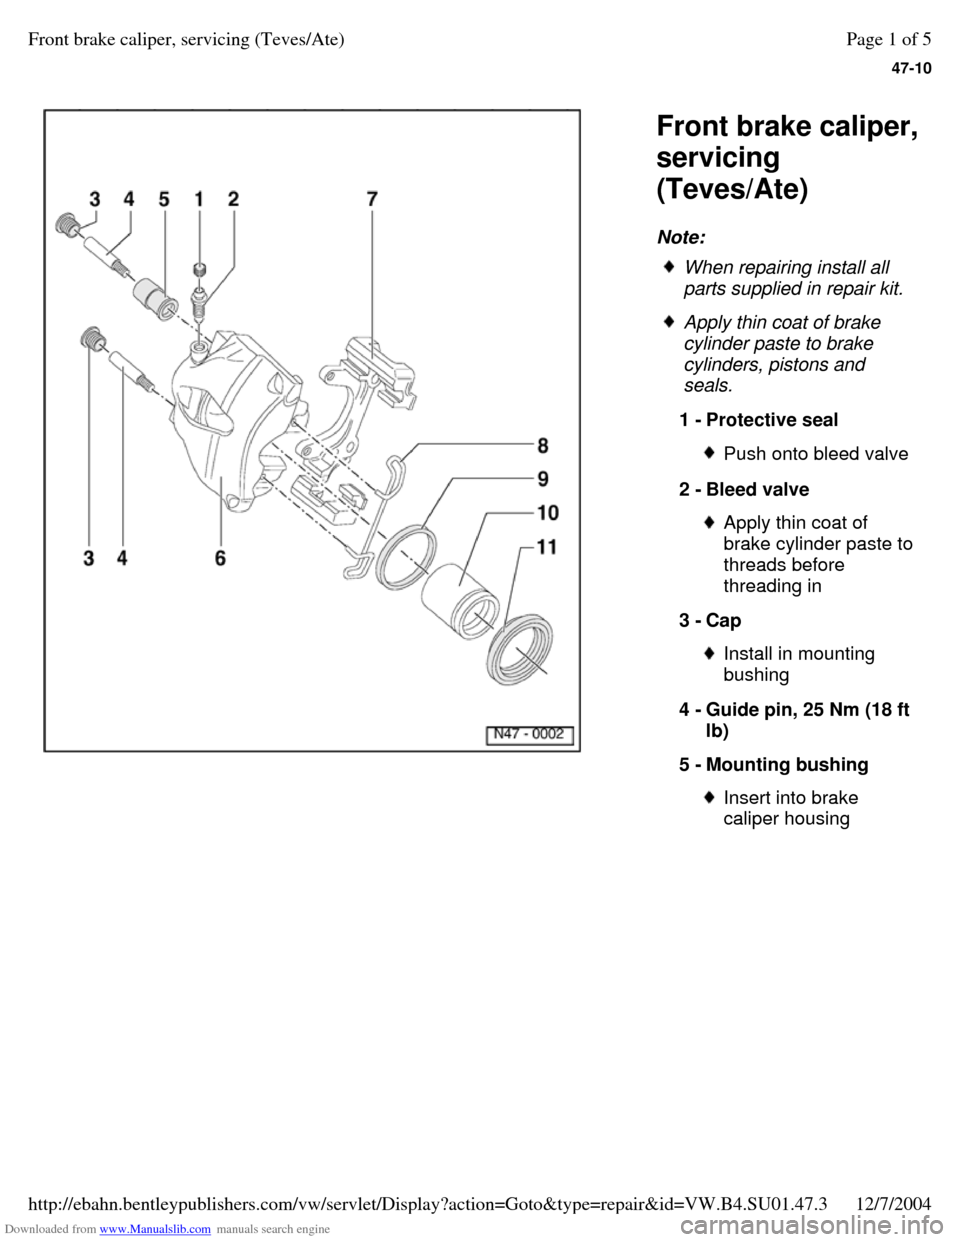
1 - Protective seal Push onto bleed valve 2 - Bleed valve Apply thin coat of brake cylinder paste to threads before
threading in
3 - Cap Install in mounting
bushing
4 - Guide pin, 25 Nm (18 ft
lb)
5 - Mounting bushing Insert into brake
caliper housing Page 1 of 5Front brake caliper, servicing (Teves/Ate)12/7/2004http://ebahn.bentleypublishers.com/vw/servlet/Display?action=Goto&type=repair&id=VW.B4.SU01.47.3
Page 252 of 369
Downloaded from www.Manualslib.com manuals search engine 47-11
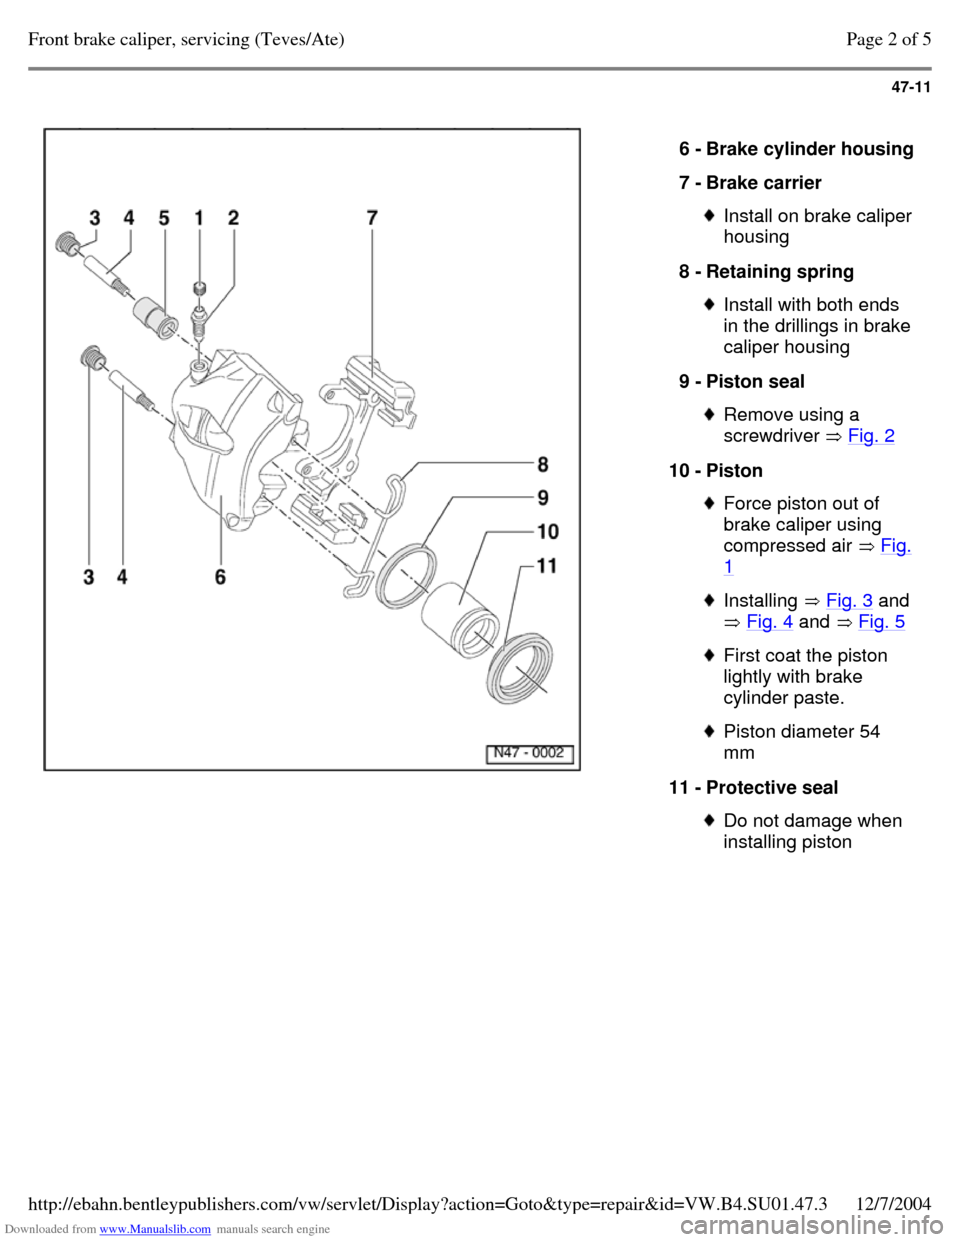
6 - Brake cylinder housing 7 - Brake carrier Install on brake caliper
housing
8 - Retaining spring Install with both ends
in the drillings in brake
caliper housing
9 - Piston seal Remove using a
screwdriver Fig. 2 10 - Piston Force piston out of
brake caliper using
compressed air Fig. 1 Installing Fig. 3 and
Fig. 4 and Fig. 5 First coat the piston
lightly with brake
cylinder paste. Piston diameter 54
mm
11 - Protective seal Do not damage when
installing piston Page 2 of 5Front brake caliper, servicing (Teves/Ate)12/7/2004http://ebahn.bentleypublishers.com/vw/servlet/Display?action=Goto&type=repair&id=VW.B4.SU01.47.3
Page 253 of 369
Downloaded from www.Manualslib.com manuals search engine 47-12
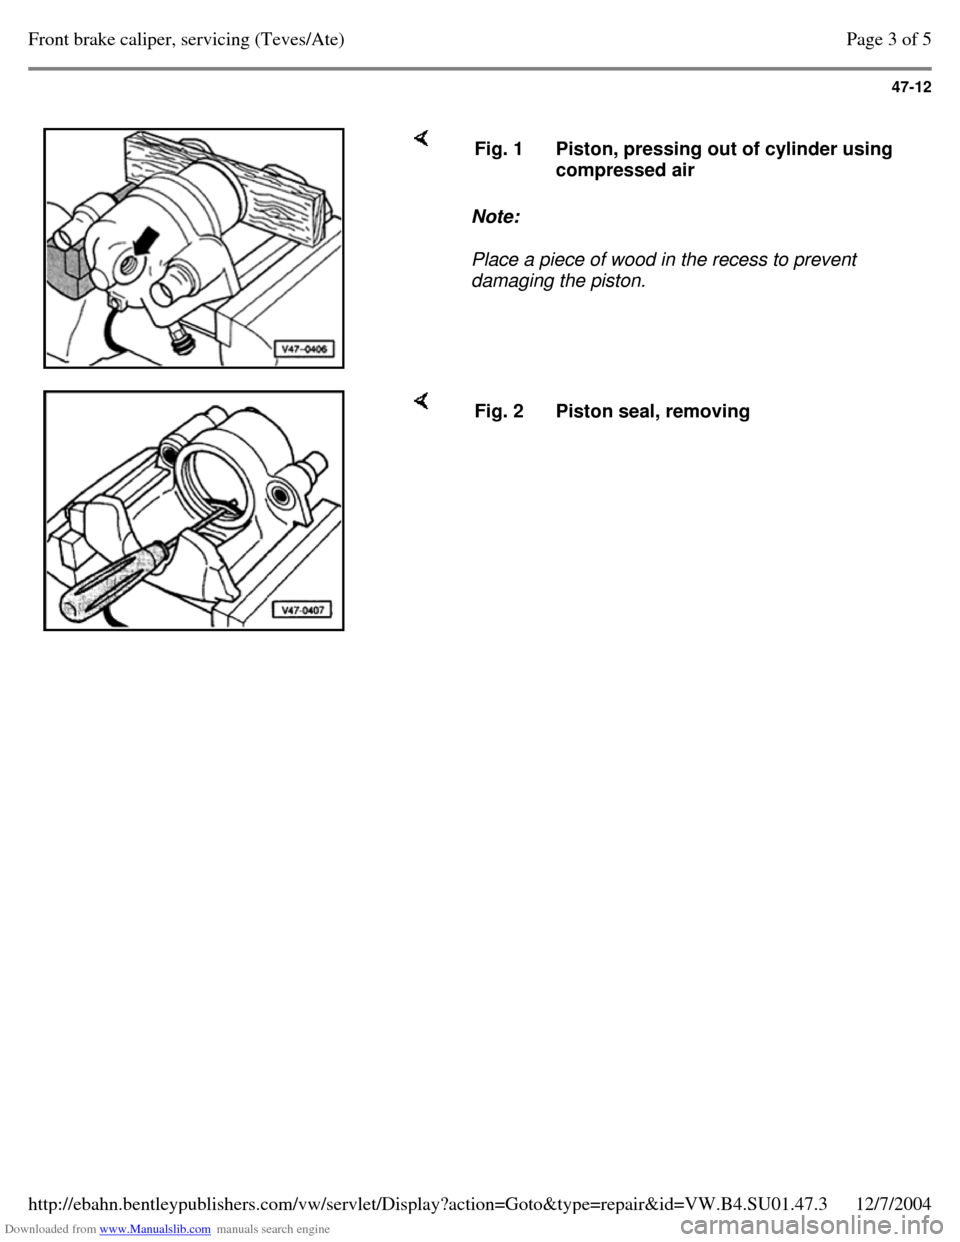
Note:
Place a piece of wood in the recess to prevent
damaging the piston. Fig. 1 Piston, pressing out of cylinder using
compressed air Fig. 2 Piston seal, removing Page 3 of 5Front brake caliper, servicing (Teves/Ate)12/7/2004http://ebahn.bentleypublishers.com/vw/servlet/Display?action=Goto&type=repair&id=VW.B4.SU01.47.3
Page 254 of 369
Downloaded from www.Manualslib.com manuals search engine 47-13
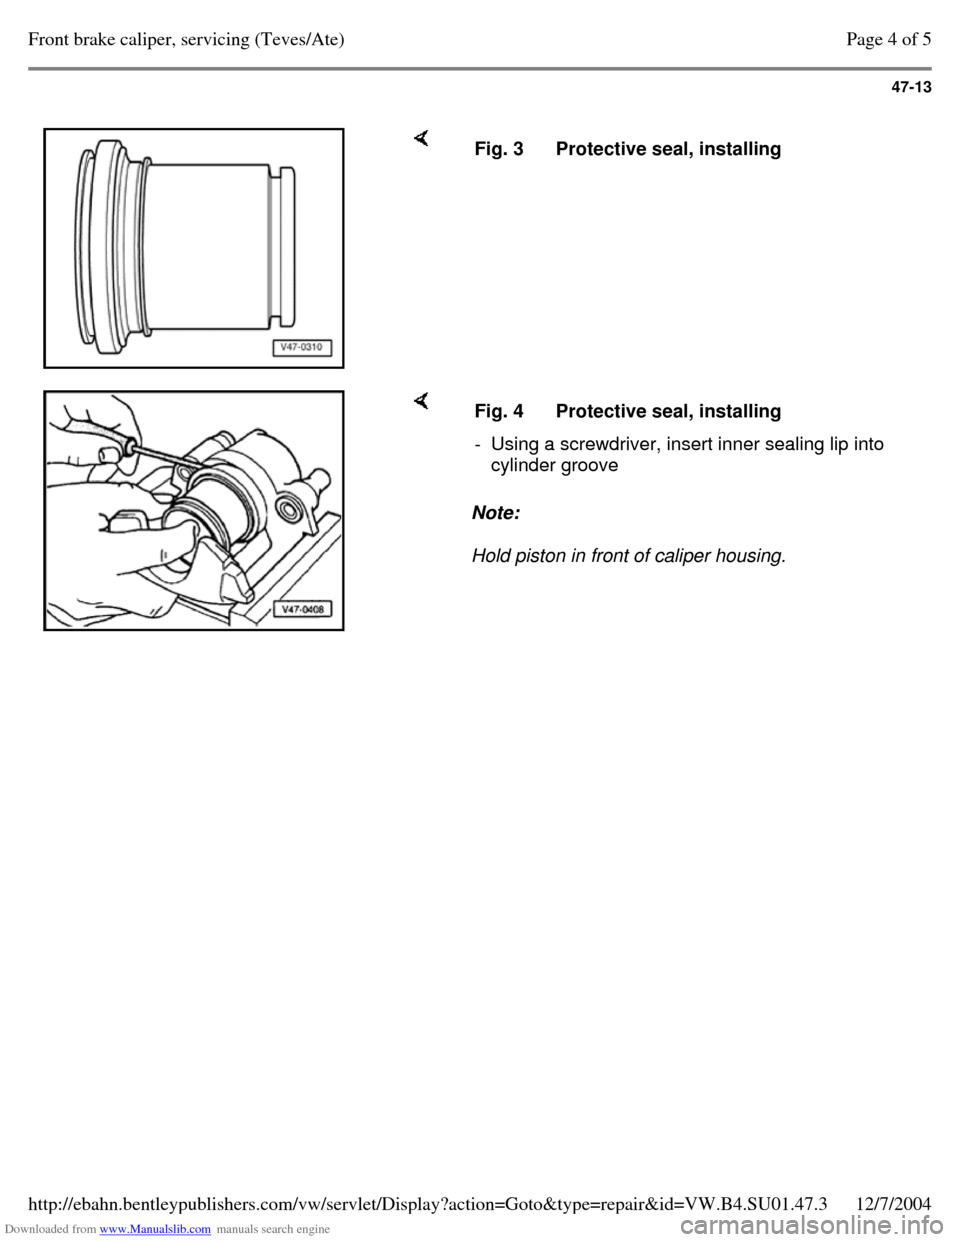
Fig. 3 Protective seal, installing Note:
Hold piston in front of caliper housing. Fig. 4 Protective seal, installing - Using a screwdriver, insert inner sealing lip into
cylinder groove Page 4 of 5Front brake caliper, servicing (Teves/Ate)12/7/2004http://ebahn.bentleypublishers.com/vw/servlet/Display?action=Goto&type=repair&id=VW.B4.SU01.47.3
Page 255 of 369
Downloaded from www.Manualslib.com manuals search engine 47-14
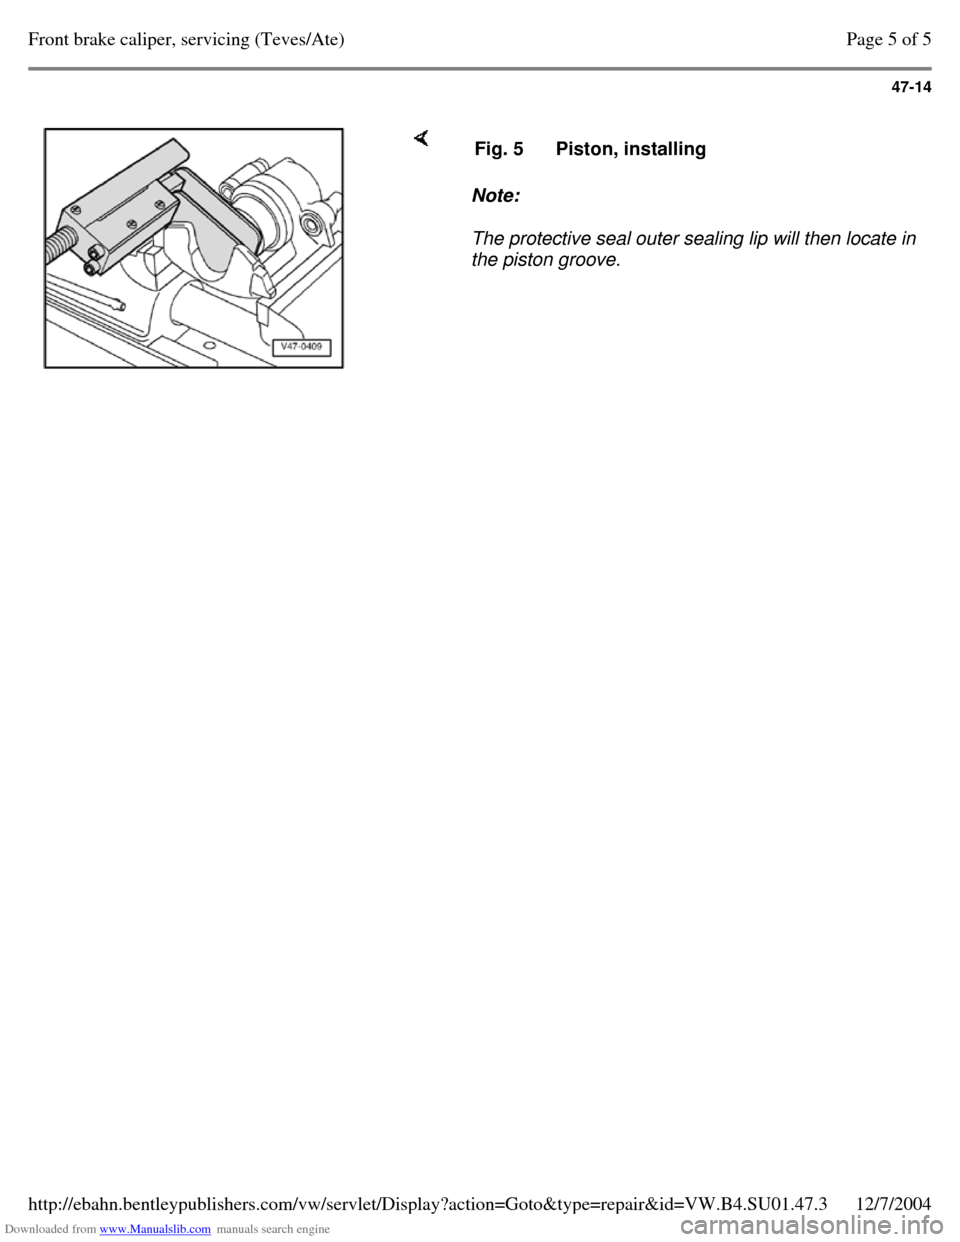
Note:
The protective seal outer sealing lip will then locate in
the piston groove. Fig. 5 Piston, installing Page 5 of 5Front brake caliper, servicing (Teves/Ate)12/7/2004http://ebahn.bentleypublishers.com/vw/servlet/Display?action=Goto&type=repair&id=VW.B4.SU01.47.3
Page 256 of 369
Downloaded from www.Manualslib.com manuals search engine 47-15
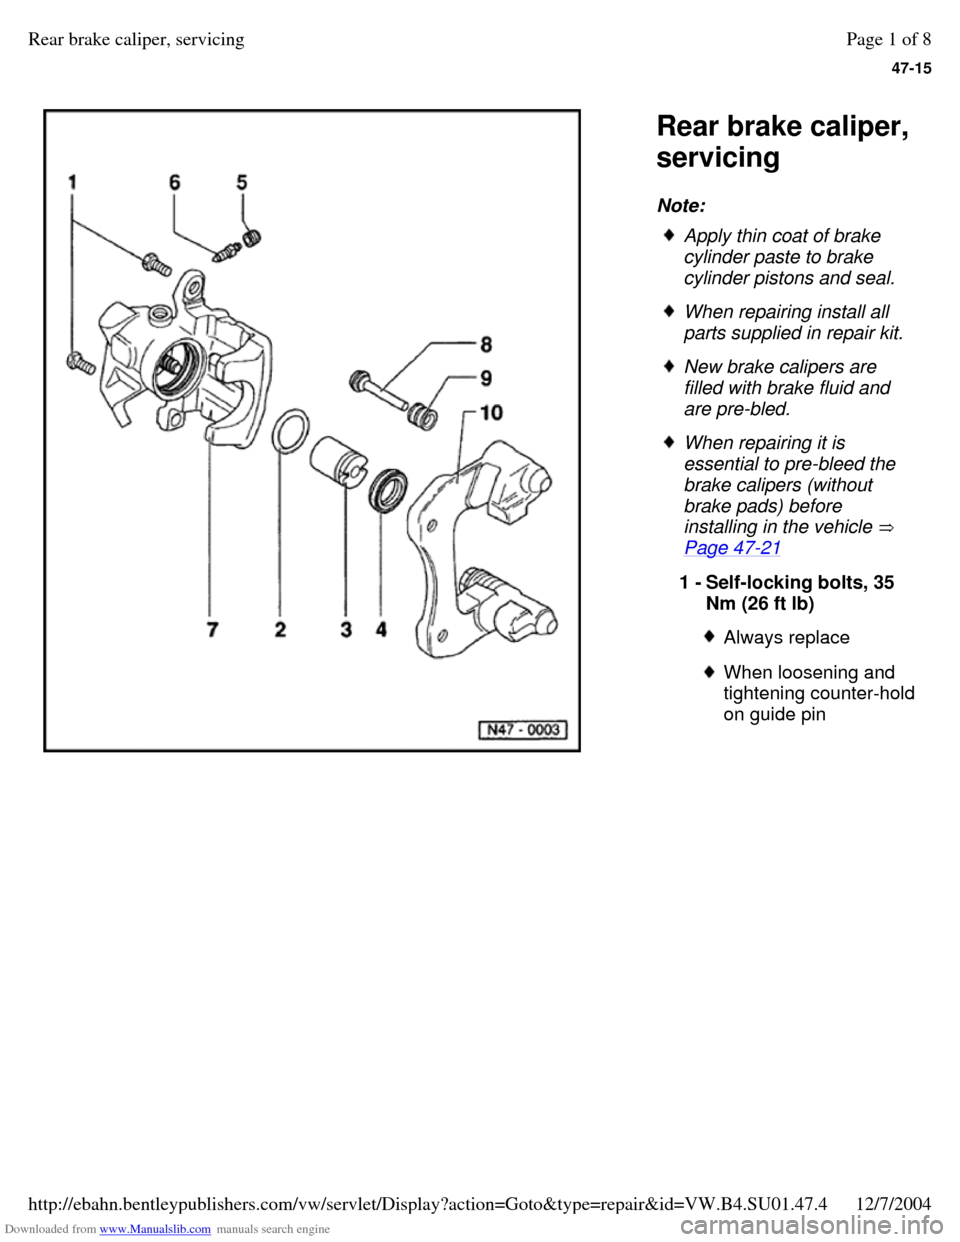
Rear brake caliper,
servicing
Note: Apply thin coat of brake
cylinder paste to brake
cylinder pistons and seal. When repairing install all
parts supplied in repair kit. New brake calipers are
filled with brake fluid and
are pre-bled. When repairing it is
essential to pre-bleed the
brake calipers (without
brake pads) before
installing in the vehicle
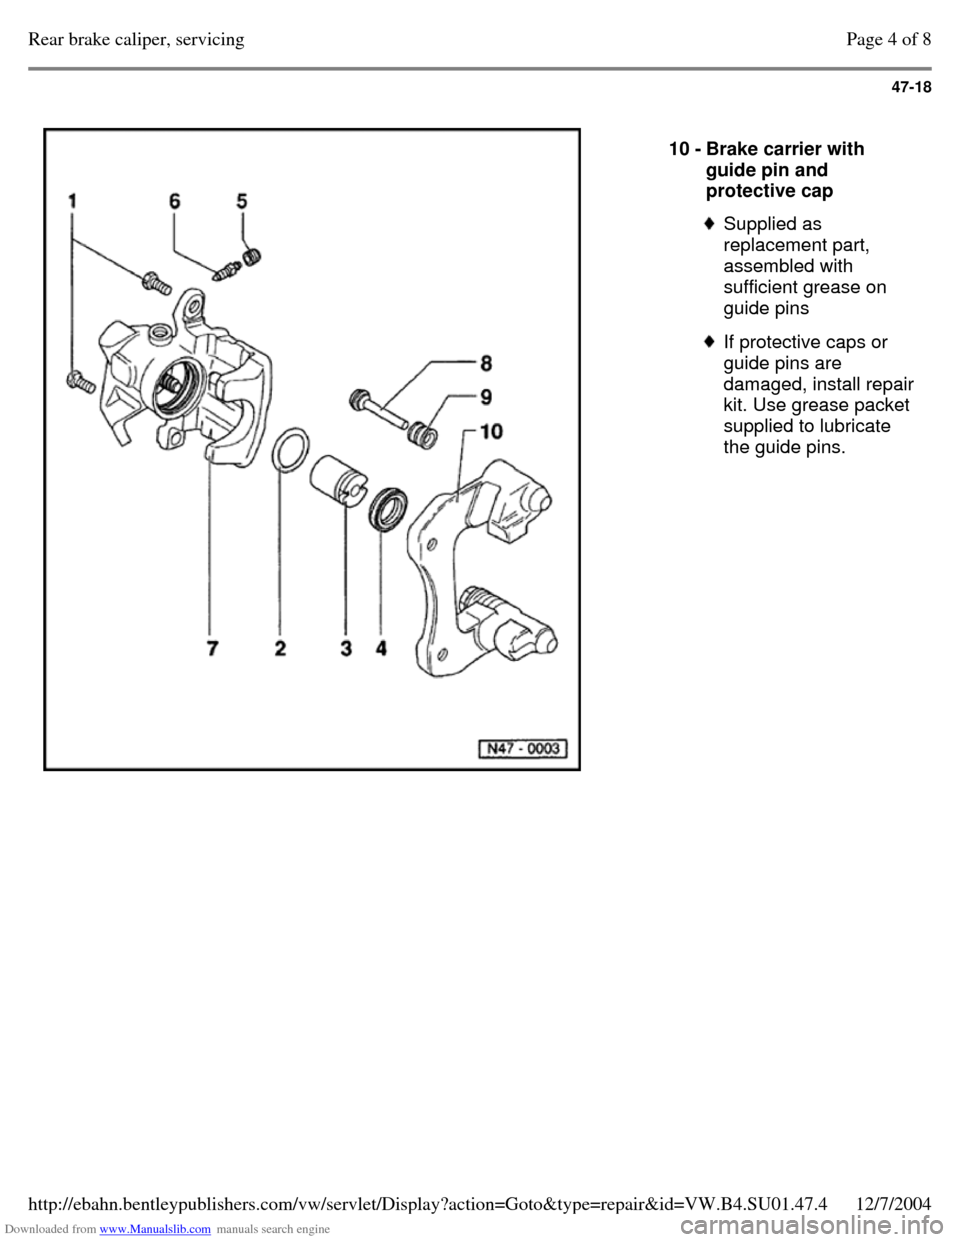
Page 47-21 1 - Self-locking bolts, 35
Nm (26 ft lb) Always replace When loosening and
tightening counter-hold on guide pin Page 1 of 8Rear brake caliper, servicing12/7/2004http://ebahn.bentleypublishers.com/vw/servlet/Display?action=Goto&type=repair&id=VW.B4.SU01.47.4
Page 257 of 369
Downloaded from www.Manualslib.com manuals search engine 47-16
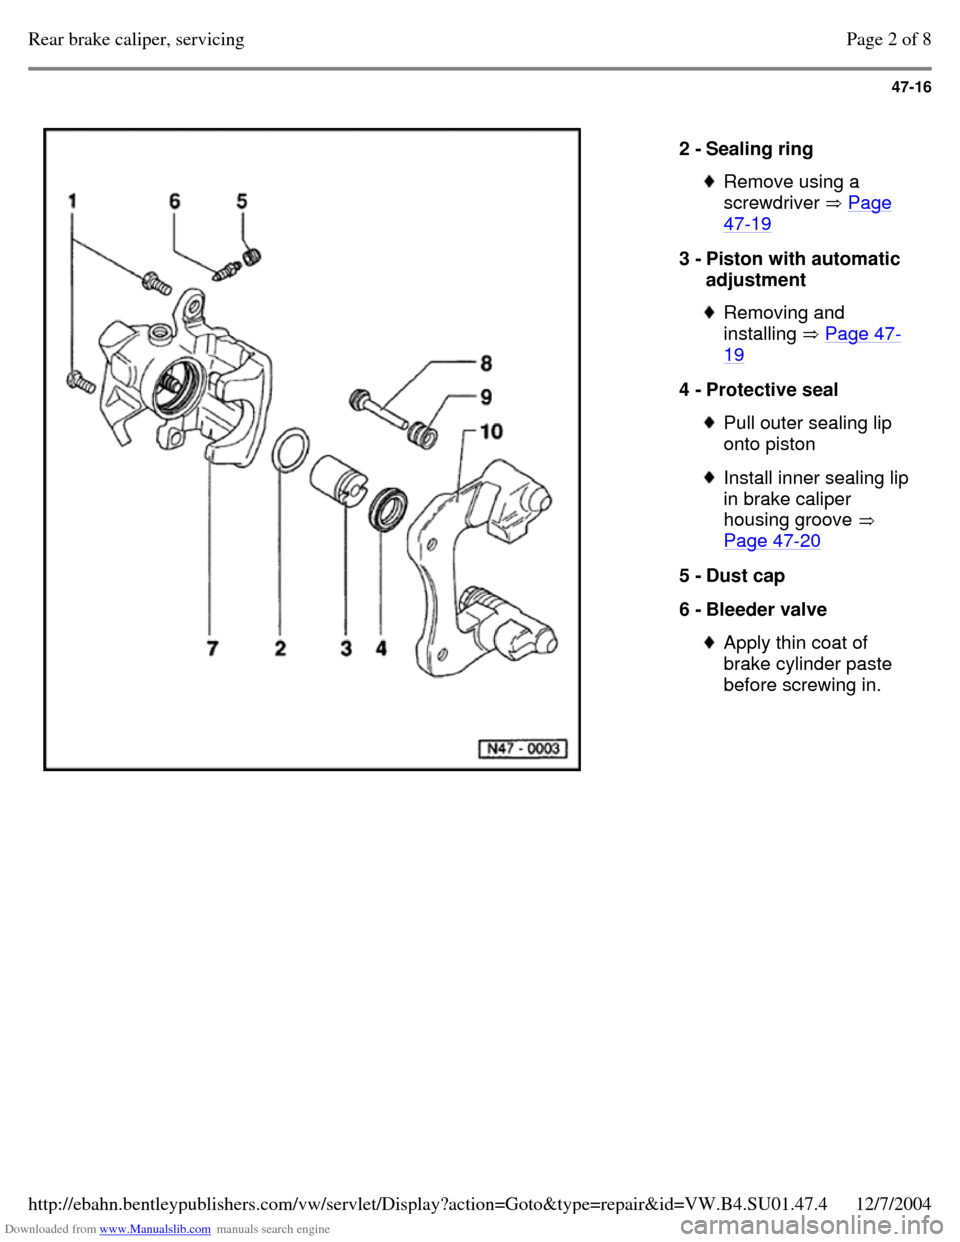
2 - Sealing ring Remove using a
screwdriver Page 47-19 3 - Piston with automatic
adjustment Removing and
installing Page 47-19 4 - Protective seal Pull outer sealing lip
onto piston Install inner sealing lip
in brake caliper
housing groove
Page 47-20 5 - Dust cap
6 - Bleeder valve Apply thin coat of
brake cylinder paste
before screwing in. Page 2 of 8Rear brake caliper, servicing12/7/2004http://ebahn.bentleypublishers.com/vw/servlet/Display?action=Goto&type=repair&id=VW.B4.SU01.47.4
Page 258 of 369
Downloaded from www.Manualslib.com manuals search engine 47-17
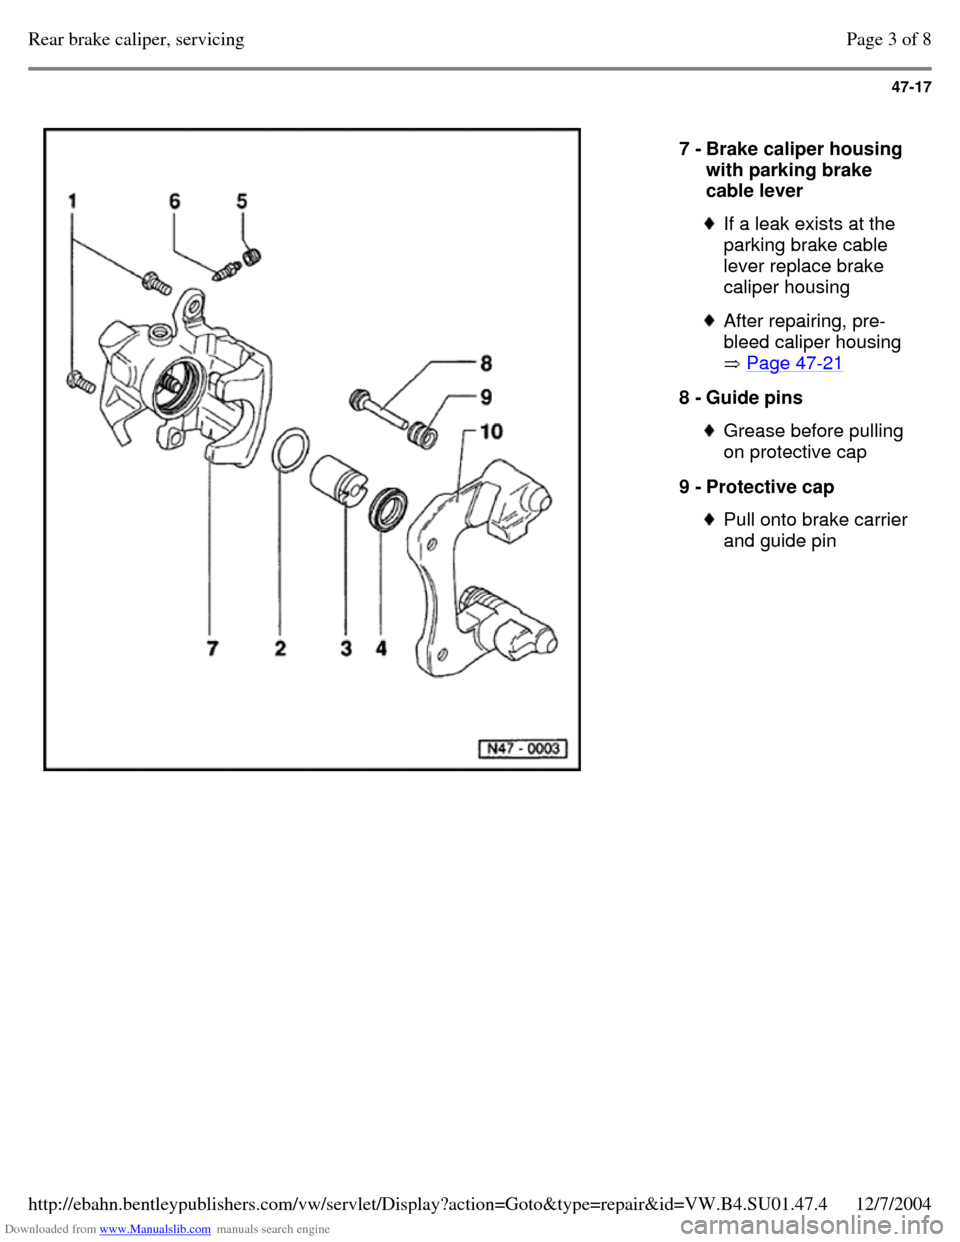
7 - Brake caliper housing
with parking brake
cable lever If a leak exists at the
parking brake cable
lever replace brake
caliper housing After repairing, pre-
bleed caliper housing
Page 47-21 8 - Guide pins Grease before pulling
on protective cap
9 - Protective cap Pull onto brake carrier
and guide pin Page 3 of 8Rear brake caliper, servicing12/7/2004http://ebahn.bentleypublishers.com/vw/servlet/Display?action=Goto&type=repair&id=VW.B4.SU01.47.4
Page 259 of 369
Downloaded from www.Manualslib.com manuals search engine 47-18
10 - Brake carrier with
guide pin and
protective cap Supplied as
replacement part,
assembled with
sufficient grease on
guide pins If protective caps or
guide pins are damaged, install repair kit. Use grease packet
supplied to lubricate
the guide pins. Page 4 of 8Rear brake caliper, servicing12/7/2004http://ebahn.bentleypublishers.com/vw/servlet/Display?action=Goto&type=repair&id=VW.B4.SU01.47.4
Page 260 of 369
Downloaded from www.Manualslib.com manuals search engine 47-19
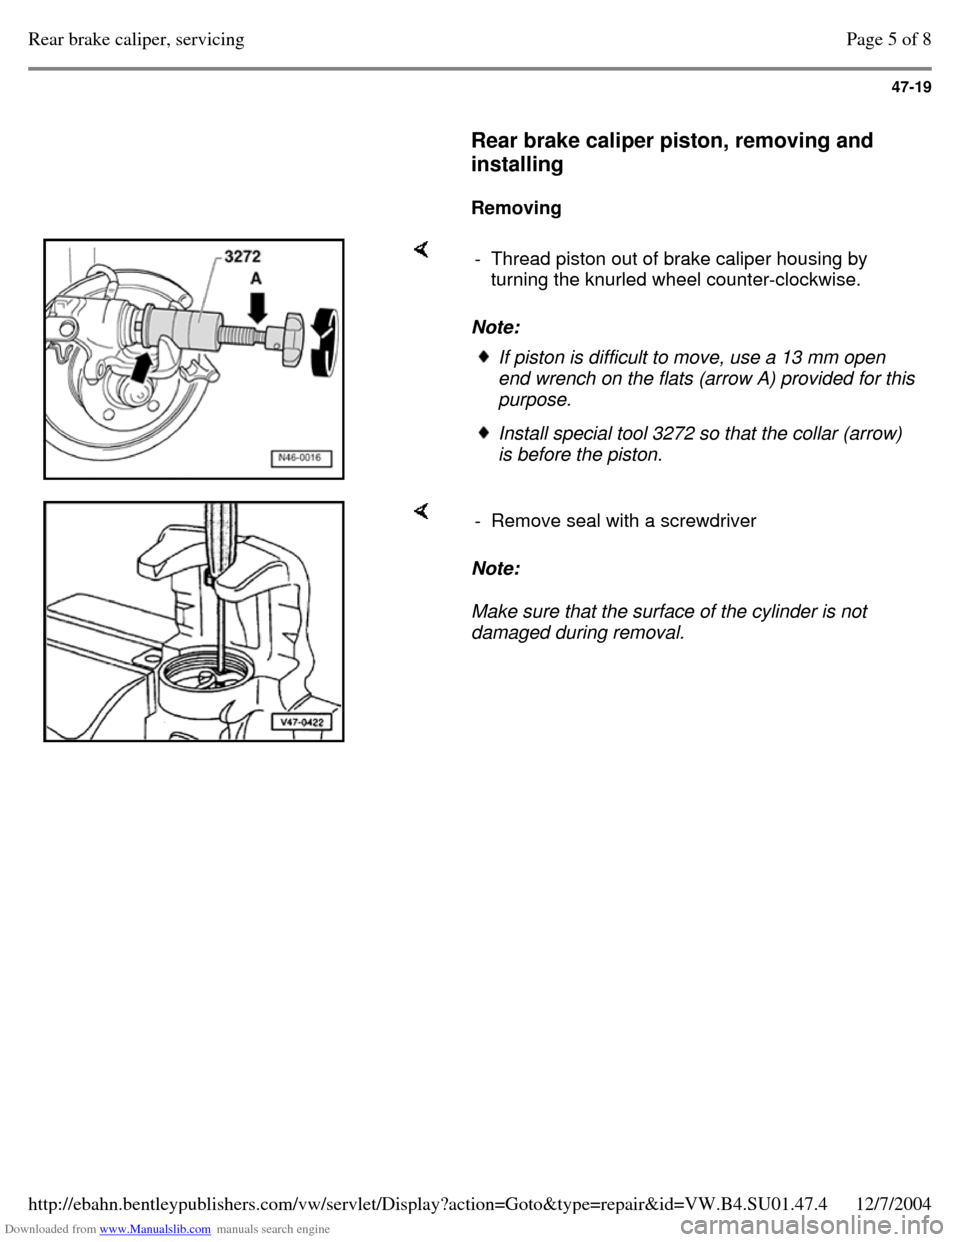
Rear brake caliper piston, removing and
installing
Removing Note: - Thread piston out of brake caliper housing by
turning the knurled wheel counter-clockwise. If piston is difficult to move, use a 13 mm open
end wrench on the flats (arrow A) provided for this
purpose. Install special tool 3272 so that the collar (arrow)
is before the piston. Note:
Make sure that the surface of the cylinder is not
damaged during removal. - Remove seal with a screwdriver Page 5 of 8Rear brake caliper, servicing12/7/2004http://ebahn.bentleypublishers.com/vw/servlet/Display?action=Goto&type=repair&id=VW.B4.SU01.47.4
Trending: suspension, check engine light, center console, change wheel, spare wheel, cooling, Power steering
