VOLKSWAGEN PASSAT 1995 B3, B4 / 3.G Service Workshop Manual
PASSAT 1995 B3, B4 / 3.G
VOLKSWAGEN
VOLKSWAGEN
https://www.carmanualsonline.info/img/18/7419/w960_7419-0.png
VOLKSWAGEN PASSAT 1995 B3, B4 / 3.G Service Workshop Manual
Trending: ABS, Compartment, warning, load capacity, suspension, wheel bolt torque, tow
Page 311 of 369
Downloaded from www.Manualslib.com manuals search engine 48-41
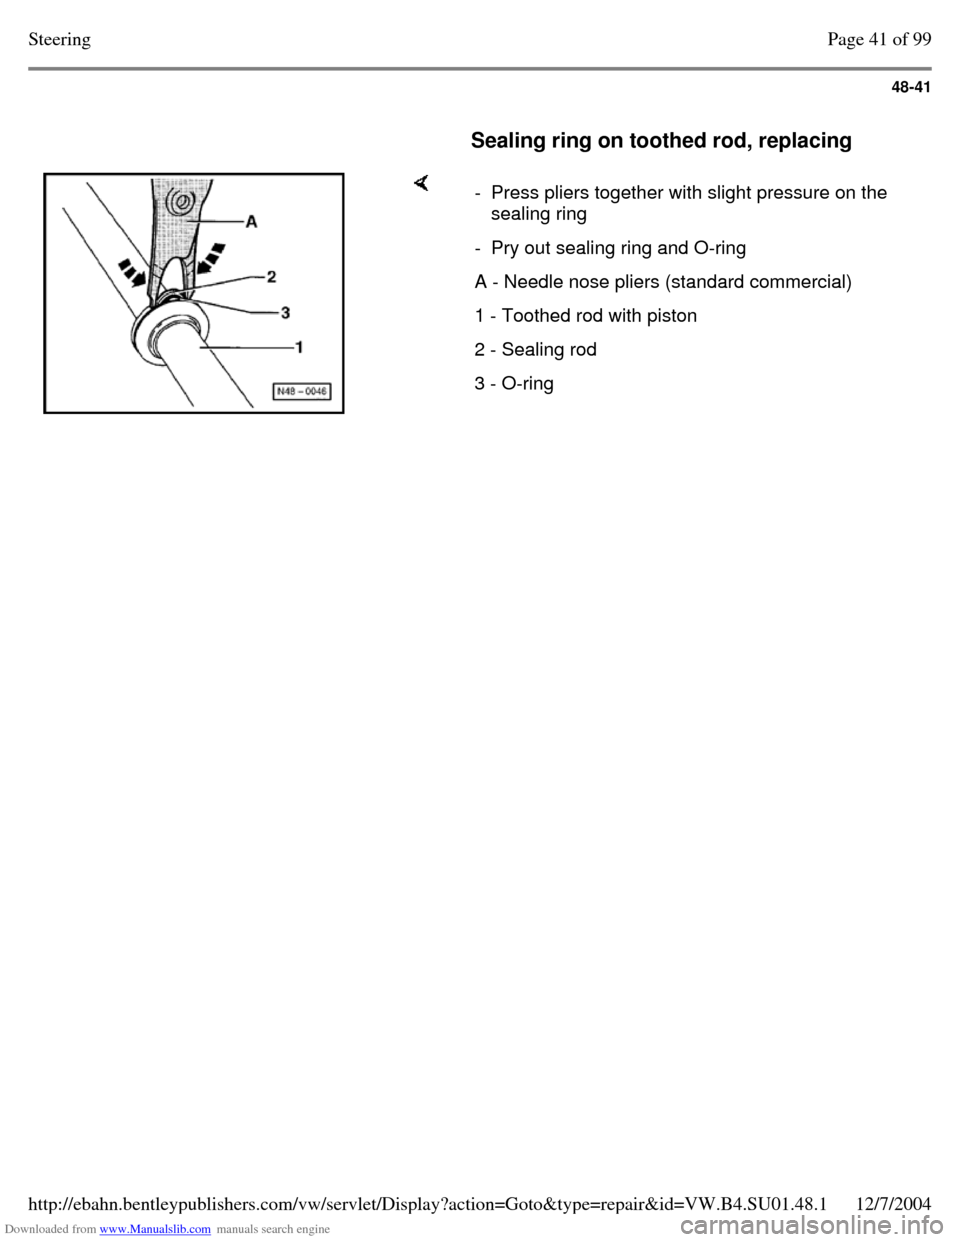
Sealing ring on toothed rod, replacing - Press pliers together with slight pressure on the
sealing ring
- Pry out sealing ring and O-ring A - Needle nose pliers (standard commercial) 1 - Toothed rod with piston 2 - Sealing rod 3 - O-ring Page 41 of 99Steering12/7/2004http://ebahn.bentleypublishers.com/vw/servlet/Display?action=Goto&type=repair&id=VW.B4.SU01.48.1
Page 312 of 369
Downloaded from www.Manualslib.com manuals search engine 48-42
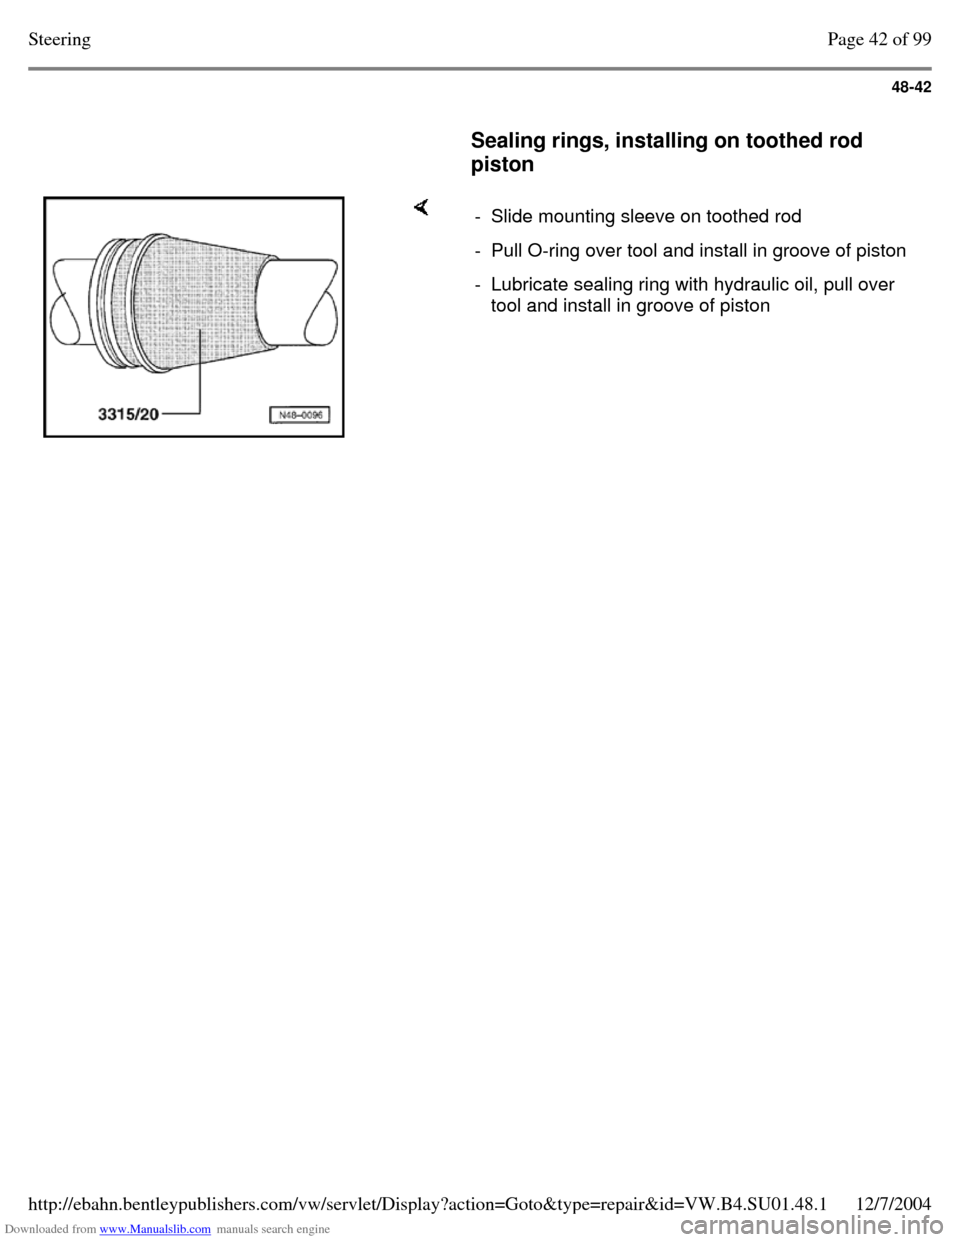
Sealing rings, installing on toothed rod
piston - Slide mounting sleeve on toothed rod - Pull O-ring over tool and install in groove of piston - Lubricate sealing ring with hydraulic oil, pull over
tool and install in groove of piston Page 42 of 99Steering12/7/2004http://ebahn.bentleypublishers.com/vw/servlet/Display?action=Goto&type=repair&id=VW.B4.SU01.48.1
Page 313 of 369
Downloaded from www.Manualslib.com manuals search engine 48-43
Power steering gear, assembling
Note;
All sealing rings should be lubricated with
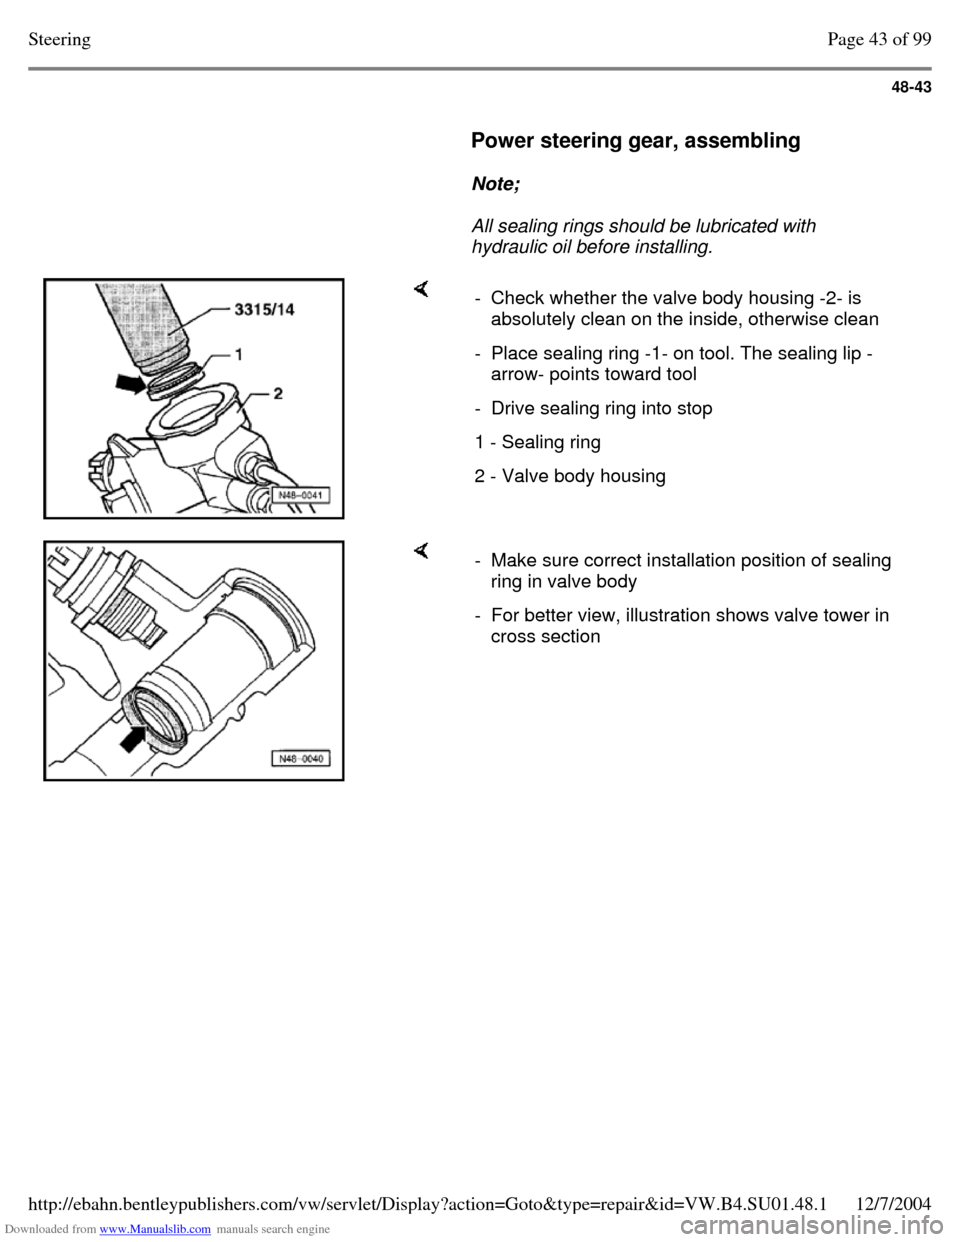
hydraulic oil before installing. - Check whether the valve body housing -2- is
absolutely clean on the inside, otherwise clean
- Place sealing ring -1- on tool. The sealing lip -
arrow- points toward tool
- Drive sealing ring into stop 1 - Sealing ring 2 - Valve body housing - Make sure correct installation position of sealing
ring in valve body
- For better view, illustration shows valve tower in
cross section Page 43 of 99Steering12/7/2004http://ebahn.bentleypublishers.com/vw/servlet/Display?action=Goto&type=repair&id=VW.B4.SU01.48.1
Page 314 of 369
Downloaded from www.Manualslib.com manuals search engine 48-44
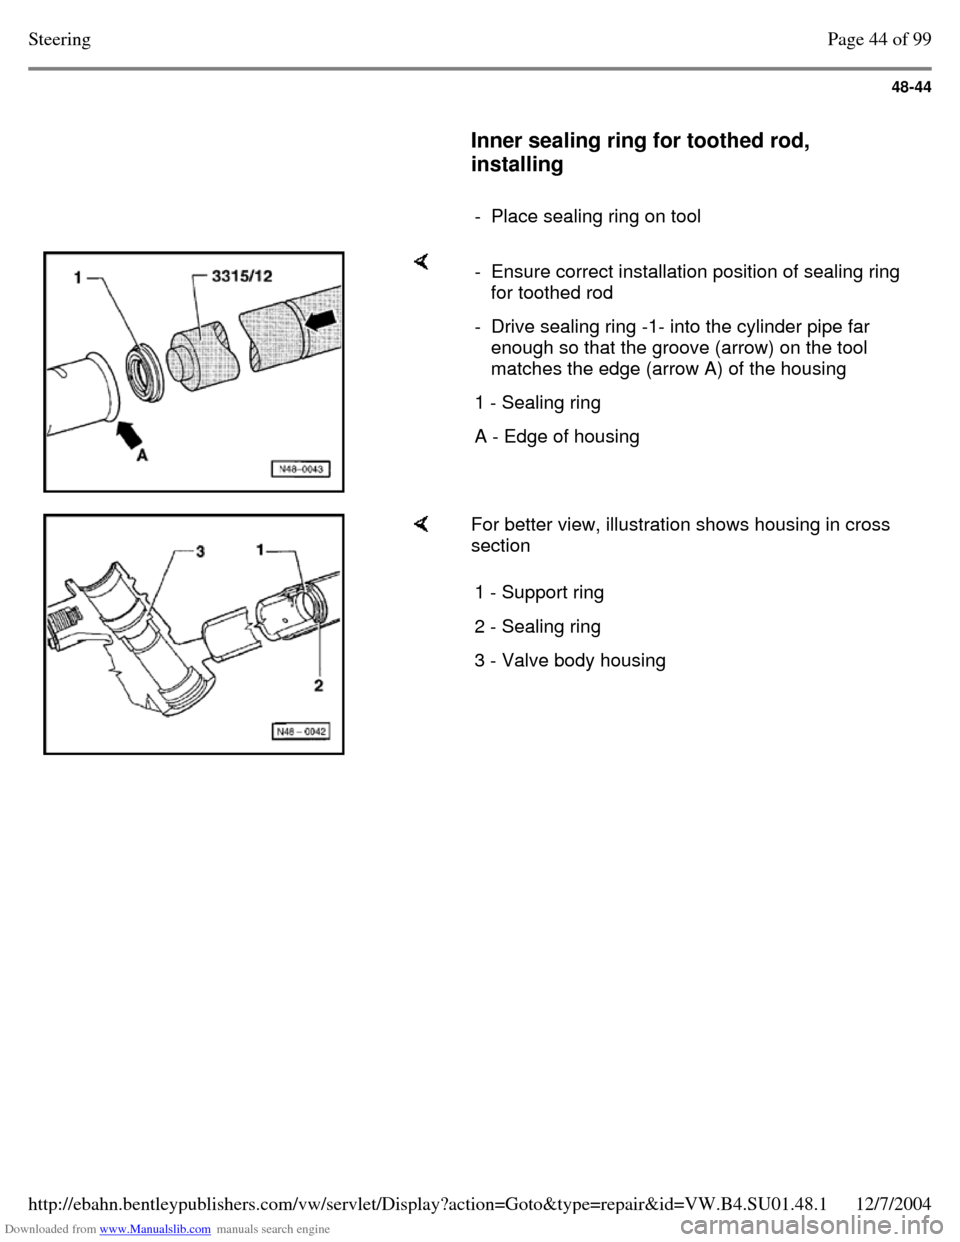
Inner sealing ring for toothed rod,
installing
- Place sealing ring on tool - Ensure correct installation position of sealing ring
for toothed rod
- Drive sealing ring -1- into the cylinder pipe far
enough so that the groove (arrow) on the tool
matches the edge (arrow A) of the housing
1 - Sealing ring A - Edge of housing For better view, illustration shows housing in cross
section
1 - Support ring 2 - Sealing ring 3 - Valve body housing Page 44 of 99Steering12/7/2004http://ebahn.bentleypublishers.com/vw/servlet/Display?action=Goto&type=repair&id=VW.B4.SU01.48.1
Page 315 of 369
Downloaded from www.Manualslib.com manuals search engine 48-45
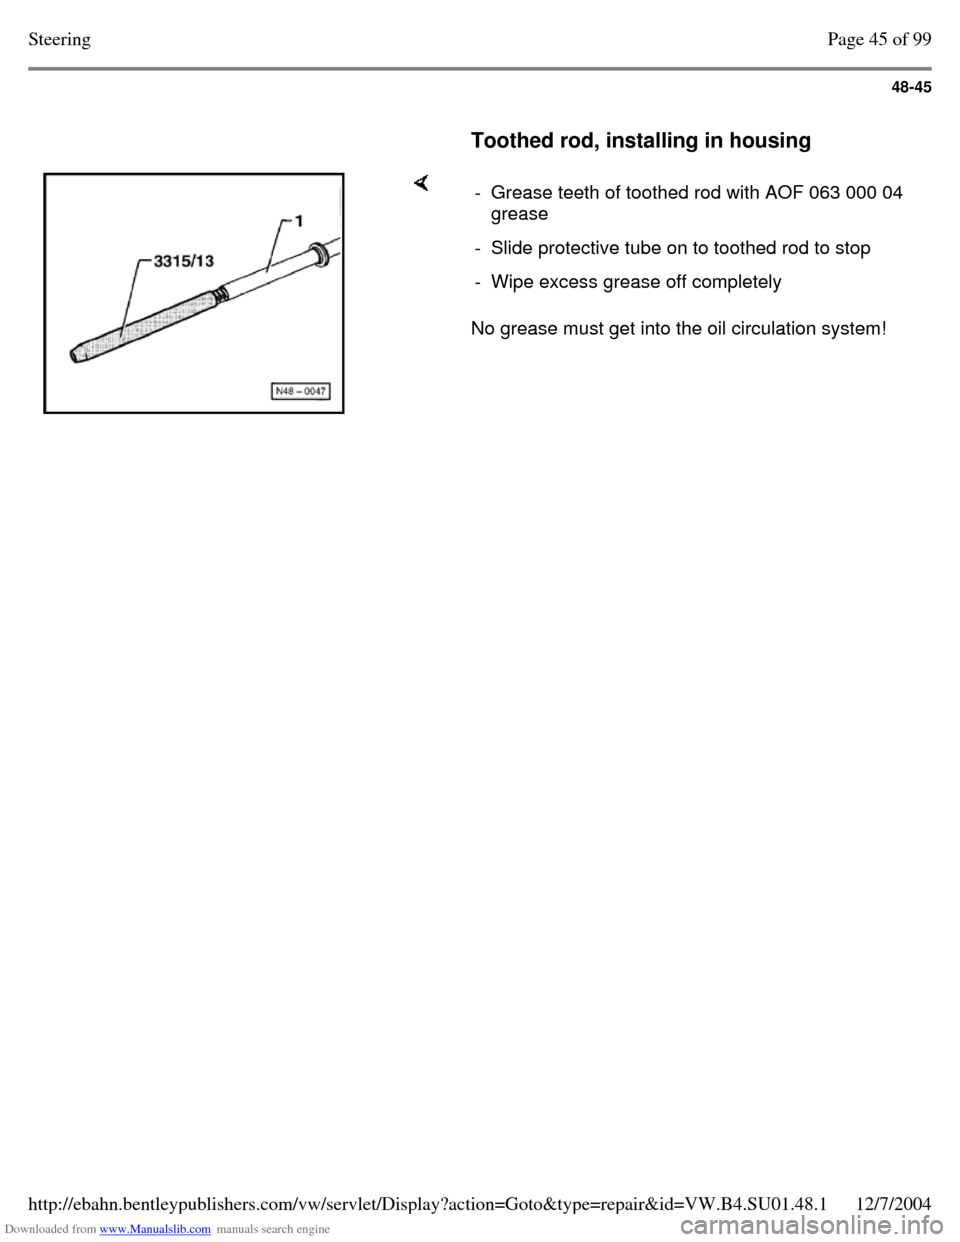
Toothed rod, installing in housing No grease must get into the oil circulation system! - Grease teeth of toothed rod with AOF 063 000 04
grease
- Slide protective tube on to toothed rod to stop - Wipe excess grease off completely Page 45 of 99Steering12/7/2004http://ebahn.bentleypublishers.com/vw/servlet/Display?action=Goto&type=repair&id=VW.B4.SU01.48.1
Page 316 of 369
Downloaded from www.Manualslib.com manuals search engine 48-46
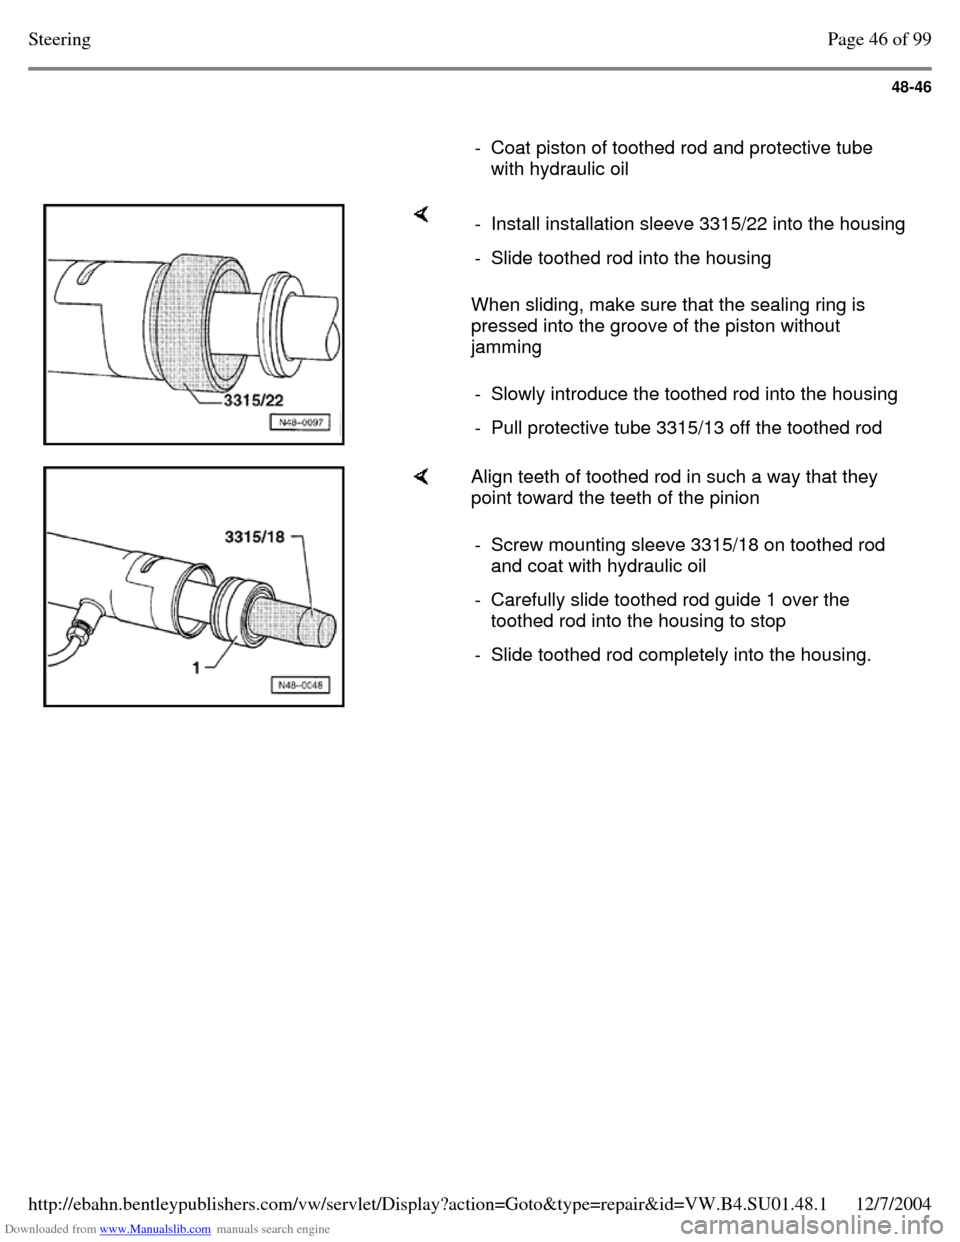
- Coat piston of toothed rod and protective tube
with hydraulic oil When sliding, make sure that the sealing ring is
pressed into the groove of the piston without
jamming - Install installation sleeve 3315/22 into the housing - Slide toothed rod into the housing - Slowly introduce the toothed rod into the housing - Pull protective tube 3315/13 off the toothed rod Align teeth of toothed rod in such a way that they
point toward the teeth of the pinion
- Screw mounting sleeve 3315/18 on toothed rod
and coat with hydraulic oil
- Carefully slide toothed rod guide 1 over the
toothed rod into the housing to stop
- Slide toothed rod completely into the housing. Page 46 of 99Steering12/7/2004http://ebahn.bentleypublishers.com/vw/servlet/Display?action=Goto&type=repair&id=VW.B4.SU01.48.1
Page 317 of 369
Downloaded from www.Manualslib.com manuals search engine 48-47
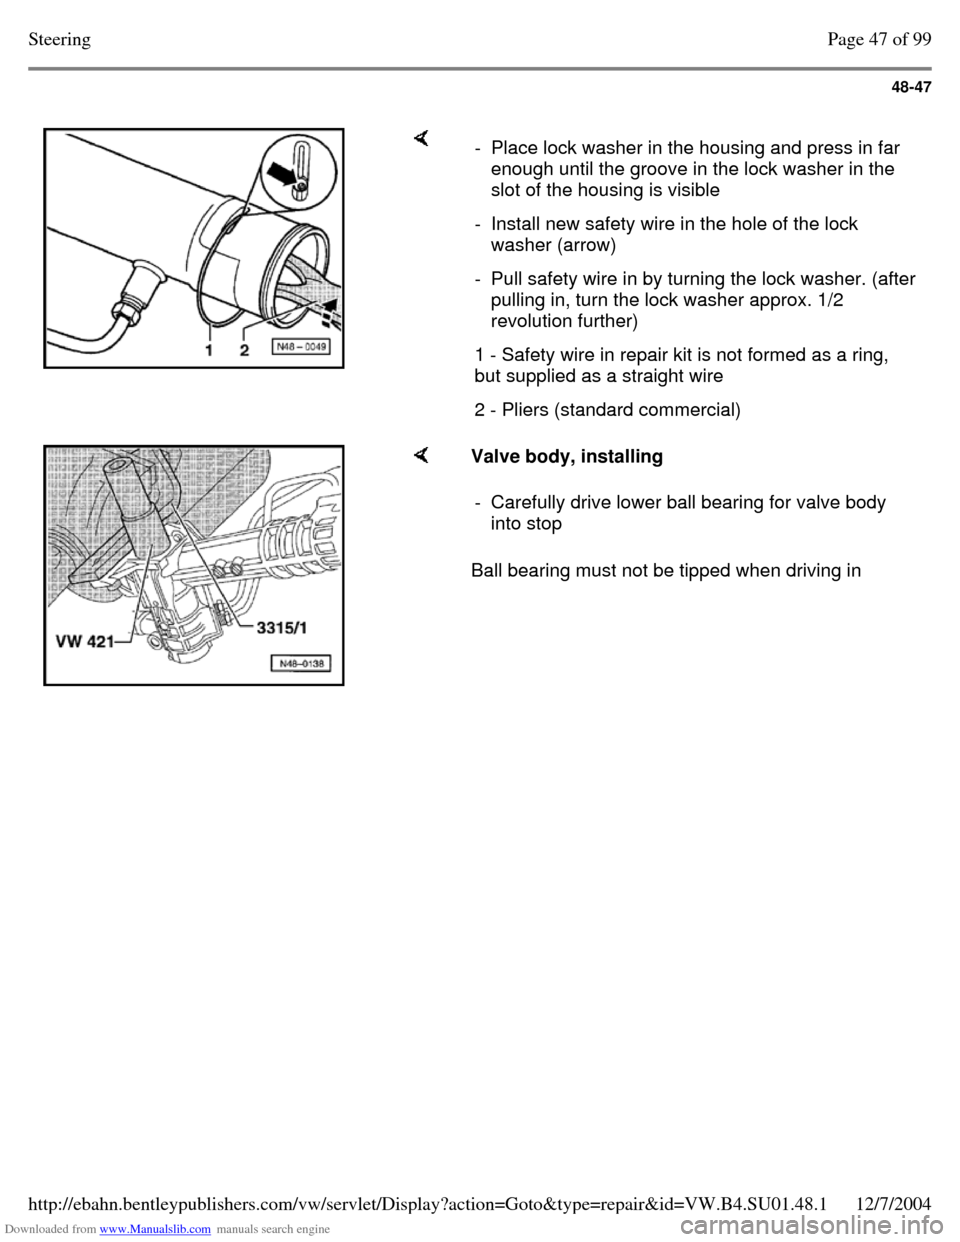
- Place lock washer in the housing and press in far
enough until the groove in the lock washer in the
slot of the housing is visible
- Install new safety wire in the hole of the lock
washer (arrow)
- Pull safety wire in by turning the lock washer. (after pulling in, turn the lock washer approx. 1/2
revolution further)
1 - Safety wire in repair kit is not formed as a ring,
but supplied as a straight wire
2 - Pliers (standard commercial) Valve body, installing
Ball bearing must not be tipped when driving in - Carefully drive lower ball bearing for valve body
into stop Page 47 of 99Steering12/7/2004http://ebahn.bentleypublishers.com/vw/servlet/Display?action=Goto&type=repair&id=VW.B4.SU01.48.1
Page 318 of 369
Downloaded from www.Manualslib.com manuals search engine 48-48
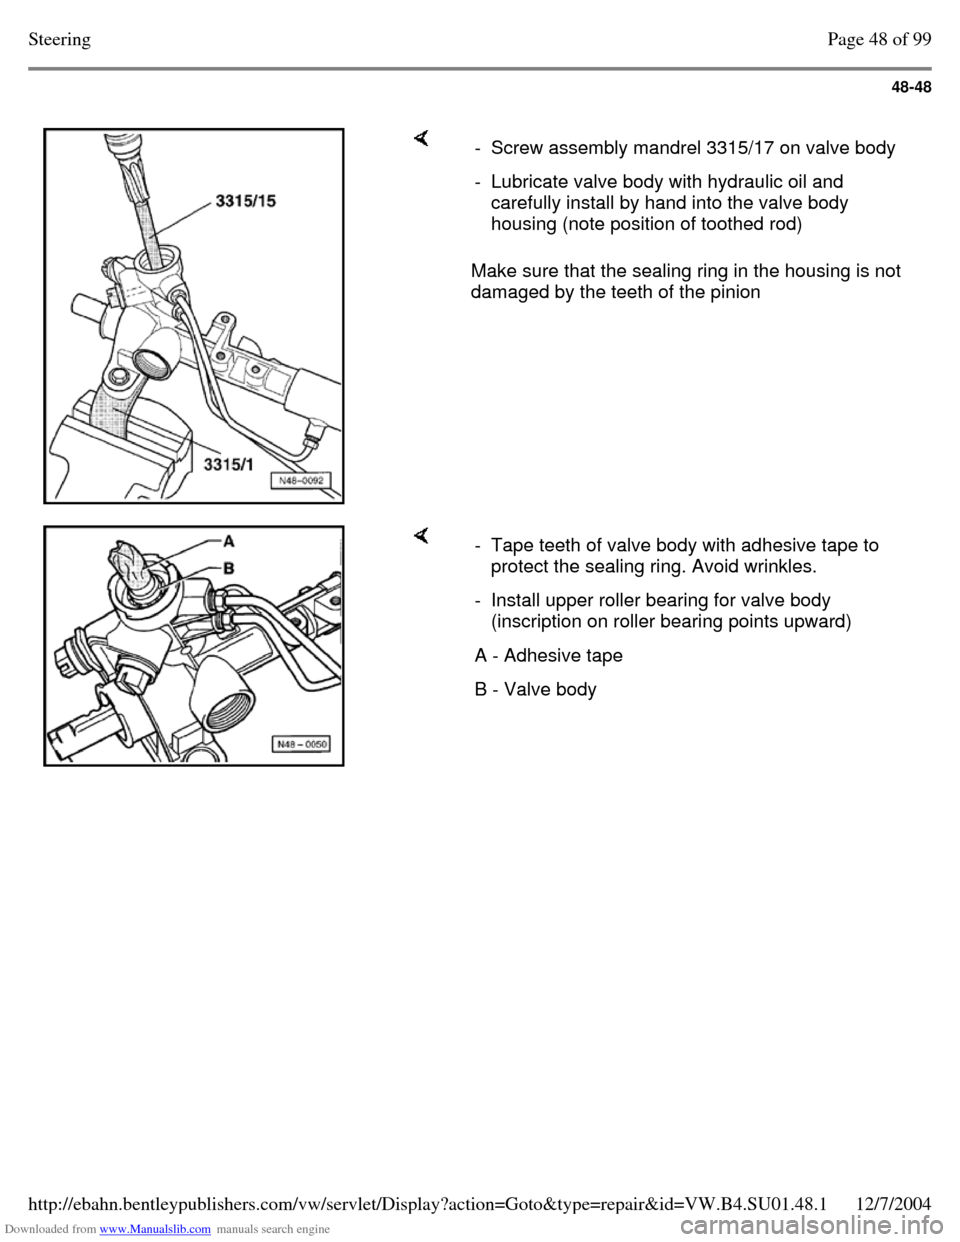
Make sure that the sealing ring in the housing is not
damaged by the teeth of the pinion - Screw assembly mandrel 3315/17 on valve body - Lubricate valve body with hydraulic oil and
carefully install by hand into the valve body
housing (note position of toothed rod) - Tape teeth of valve body with adhesive tape to
protect the sealing ring. Avoid wrinkles.
- Install upper roller bearing for valve body
(inscription on roller bearing points upward)
A - Adhesive tape B - Valve body Page 48 of 99Steering12/7/2004http://ebahn.bentleypublishers.com/vw/servlet/Display?action=Goto&type=repair&id=VW.B4.SU01.48.1
Page 319 of 369
Downloaded from www.Manualslib.com manuals search engine 48-49
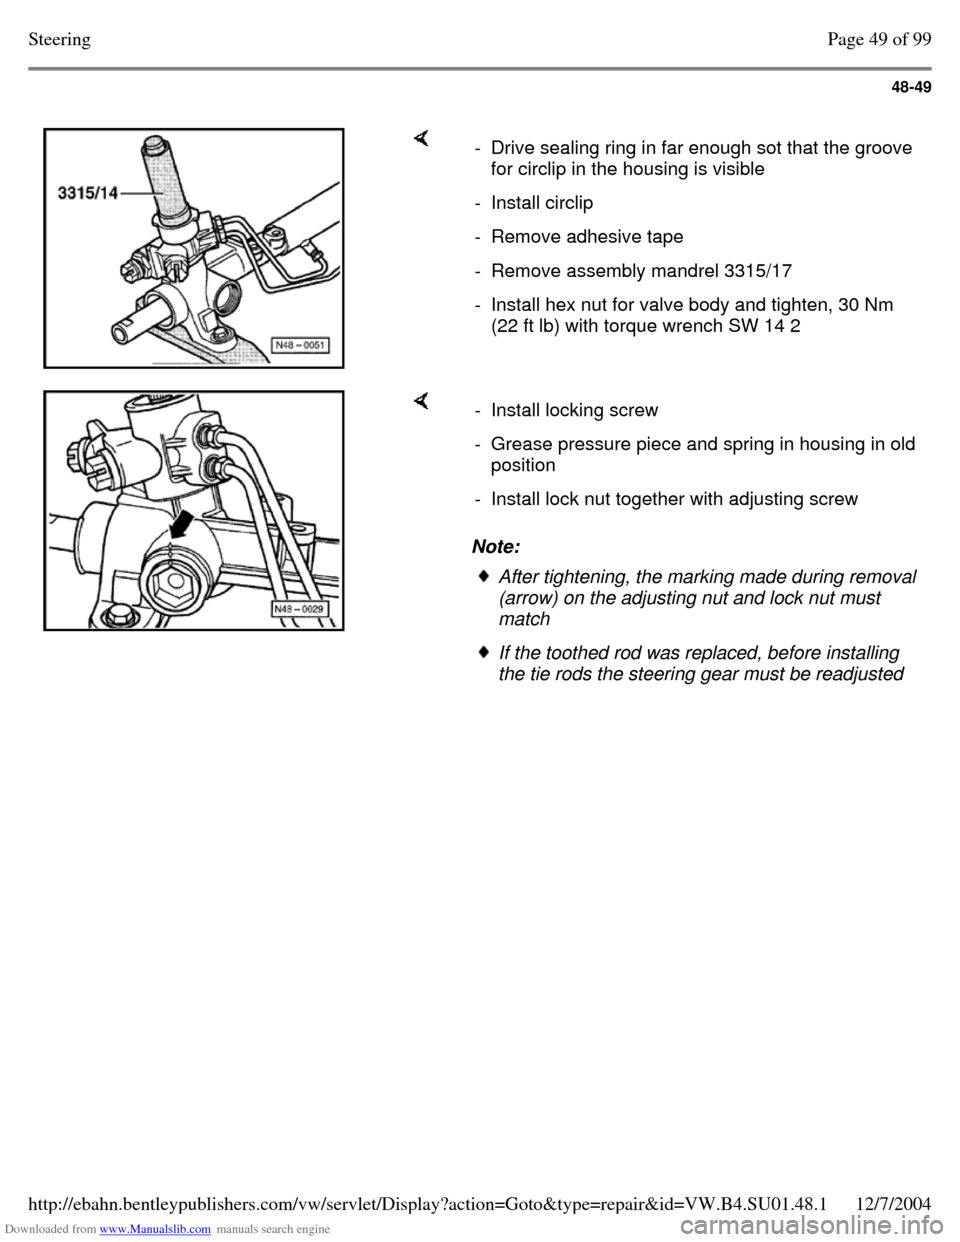
- Drive sealing ring in far enough sot that the groove for circlip in the housing is visible
- Install circlip - Remove adhesive tape - Remove assembly mandrel 3315/17 - Install hex nut for valve body and tighten, 30 Nm
(22 ft lb) with torque wrench SW 14 2 Note: - Install locking screw - Grease pressure piece and spring in housing in old position
- Install lock nut together with adjusting screw After tightening, the marking made during removal (arrow) on the adjusting nut and lock nut must
match If the toothed rod was replaced, before installing
the tie rods the steering gear must be readjusted Page 49 of 99Steering12/7/2004http://ebahn.bentleypublishers.com/vw/servlet/Display?action=Goto&type=repair&id=VW.B4.SU01.48.1
Page 320 of 369
Downloaded from www.Manualslib.com manuals search engine 48-50
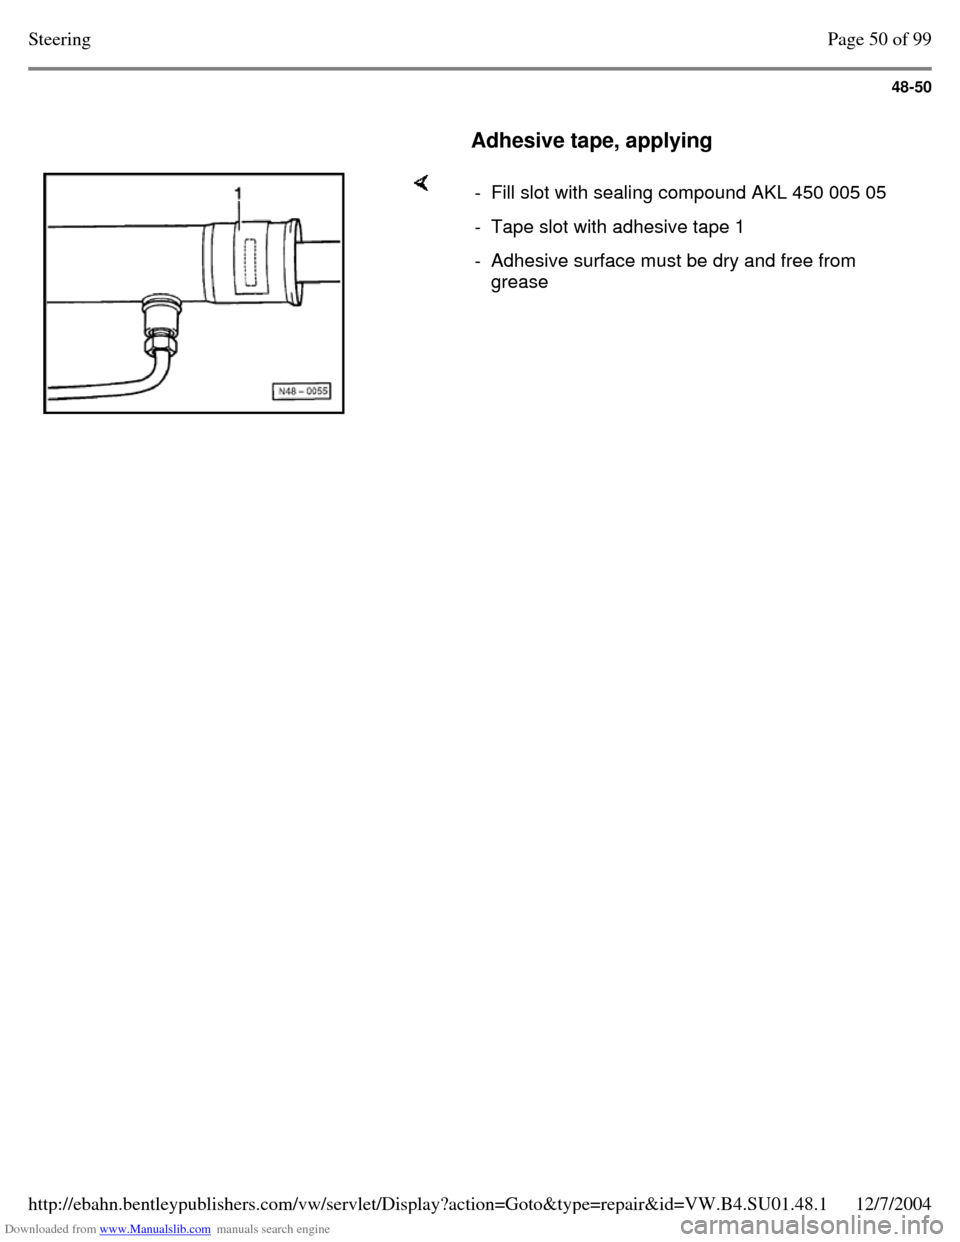
Adhesive tape, applying - Fill slot with sealing compound AKL 450 005 05 - Tape slot with adhesive tape 1 - Adhesive surface must be dry and free from
grease Page 50 of 99Steering12/7/2004http://ebahn.bentleypublishers.com/vw/servlet/Display?action=Goto&type=repair&id=VW.B4.SU01.48.1
Trending: instrument, seat adjustment, load capacity, air suspension, power steering fluid, run flat, tire pressure
