boot VOLKSWAGEN PASSAT 1996 B3, B4 / 3.G Service Owner's Manual
[x] Cancel search | Manufacturer: VOLKSWAGEN, Model Year: 1996, Model line: PASSAT, Model: VOLKSWAGEN PASSAT 1996 B3, B4 / 3.GPages: 369, PDF Size: 12.33 MB
Page 91 of 369
Downloaded from www.Manualslib.com manuals search engine 40-77
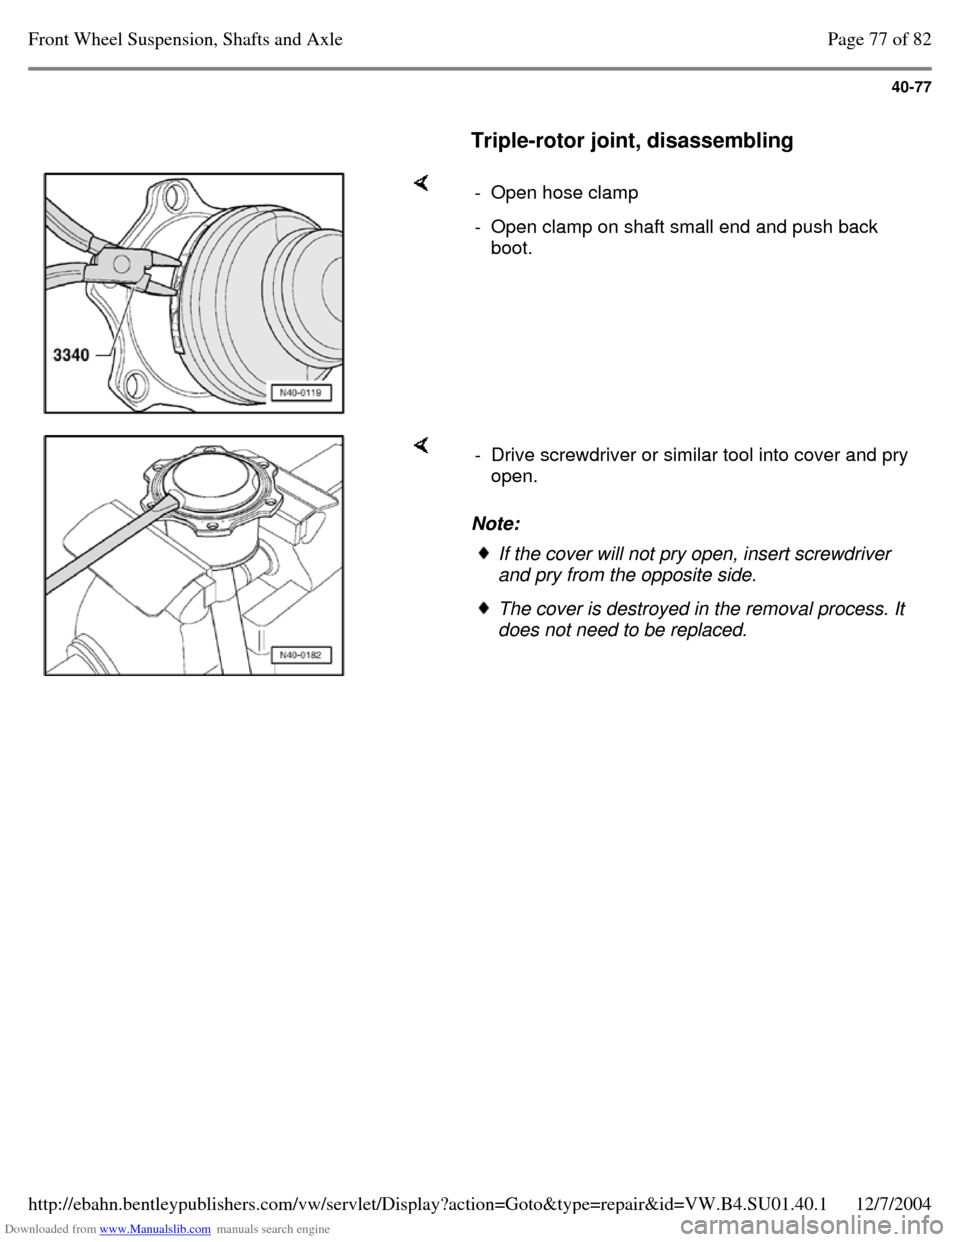
Triple-rotor joint, disassembling - Open hose clamp - Open clamp on shaft small end and push back
boot. Note: - Drive screwdriver or similar tool into cover and pry
open. If the cover will not pry open, insert screwdriver
and pry from the opposite side. The cover is destroyed in the removal process. It
does not need to be replaced. Page 77 of 82Front Wheel Suspension, Shafts and Axle12/7/2004http://ebahn.bentleypublishers.com/vw/servlet/Display?action=Goto&type=repair&id=VW.B4.SU01.40.1
Page 94 of 369
Downloaded from www.Manualslib.com manuals search engine 40-80
Triple-rotor joint, assembling
- Slide small diameter boot clamp onto shaft.
- Slide triple-rotor joint boot onto shaft.
- Slide triple-rotor joint housing onto shaft.
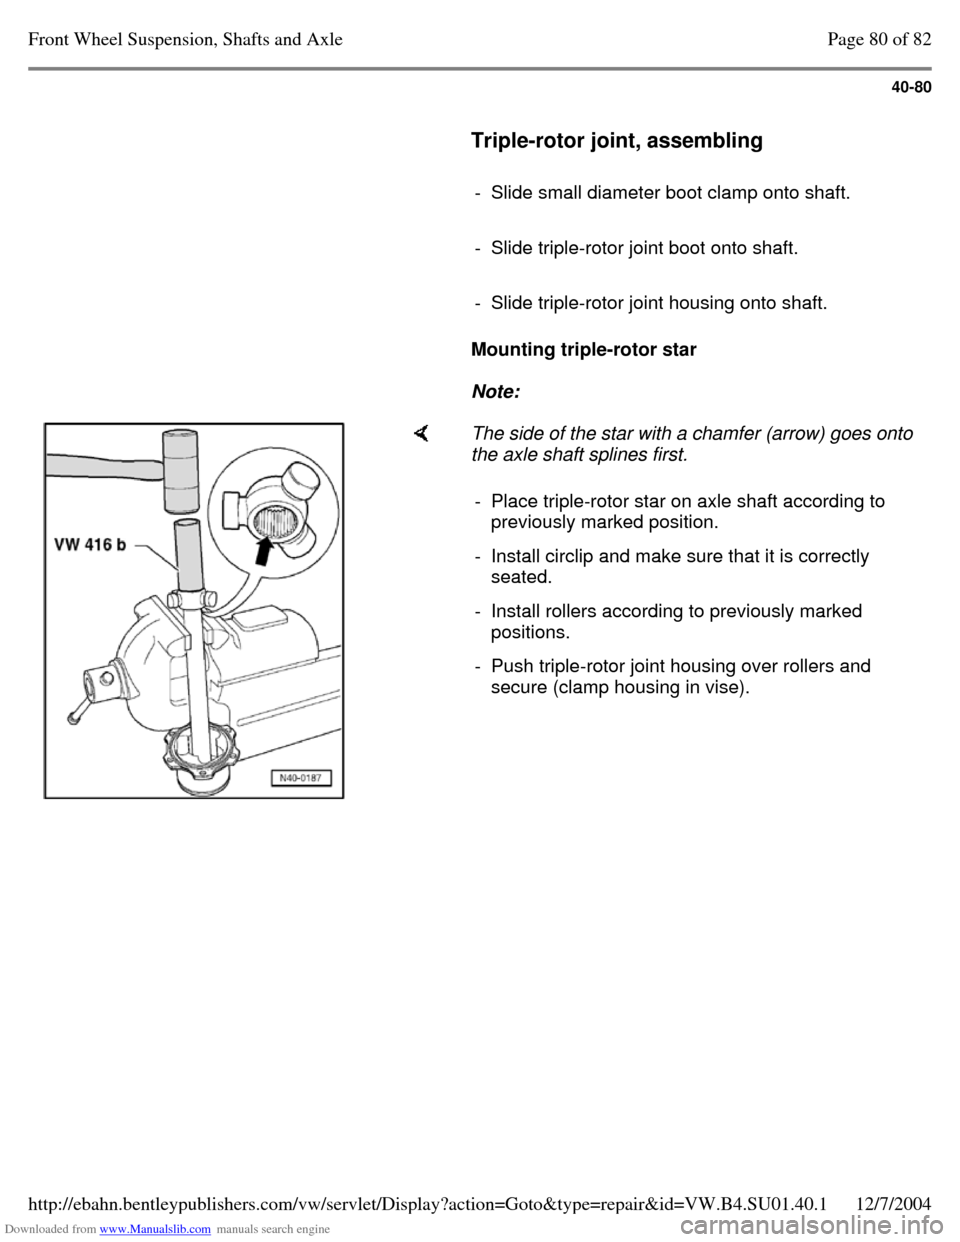
Mounting triple-rotor star
Note: The side of the star with a chamfer (arrow) goes onto
the axle shaft splines first.
- Place triple-rotor star on axle shaft according to
previously marked position.
- Install circlip and make sure that it is correctly
seated.
- Install rollers according to previously marked
positions.
- Push triple-rotor joint housing over rollers and
secure (clamp housing in vise). Page 80 of 82Front Wheel Suspension, Shafts and Axle12/7/2004http://ebahn.bentleypublishers.com/vw/servlet/Display?action=Goto&type=repair&id=VW.B4.SU01.40.1
Page 95 of 369
Downloaded from www.Manualslib.com manuals search engine 40-81
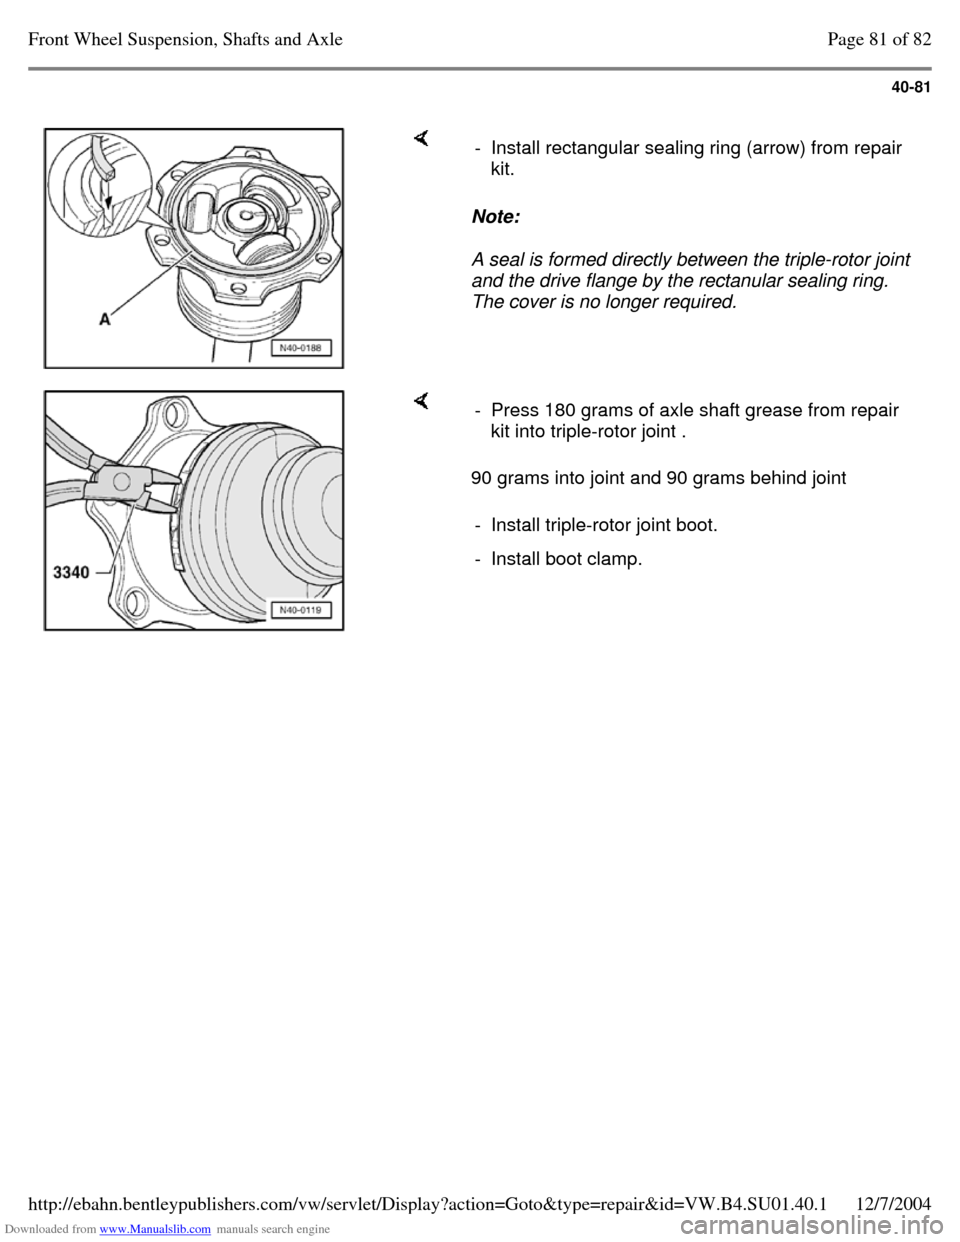
Note:
A seal is formed directly between the triple-rotor joint
and the drive flange by the rectanular sealing ring.
The cover is no longer required. - Install rectangular sealing ring (arrow) from repair
kit. 90 grams into joint and 90 grams behind joint - Press 180 grams of axle shaft grease from repair
kit into triple-rotor joint .
- Install triple-rotor joint boot. - Install boot clamp. Page 81 of 82Front Wheel Suspension, Shafts and Axle12/7/2004http://ebahn.bentleypublishers.com/vw/servlet/Display?action=Goto&type=repair&id=VW.B4.SU01.40.1
Page 142 of 369
Downloaded from www.Manualslib.com manuals search engine 42-46
Rear drive shafts, servicing
Removing and installing drive shafts Page 42-37
Note:
Grease quantity:
- - outer constant velocity joint 80 g G-6.3
- - inner constant velocity joint 80 9 G-6.3 Greasing outer joint: press half of the grease
into the joint, and the other half evenly into the
boot.
Greasing inner joint: press half of the grease
into the inner joint from both sides, the other
half evenly into the boot.
When replacing the boot, regrease joint if
required. Page 1 of 7Rear drive shafts, servicing12/7/2004http://ebahn.bentleypublishers.com/vw/servlet/Display?action=Goto&type=repair&id=VW.B4.SU01.42.4
Page 144 of 369
Downloaded from www.Manualslib.com manuals search engine 42-48
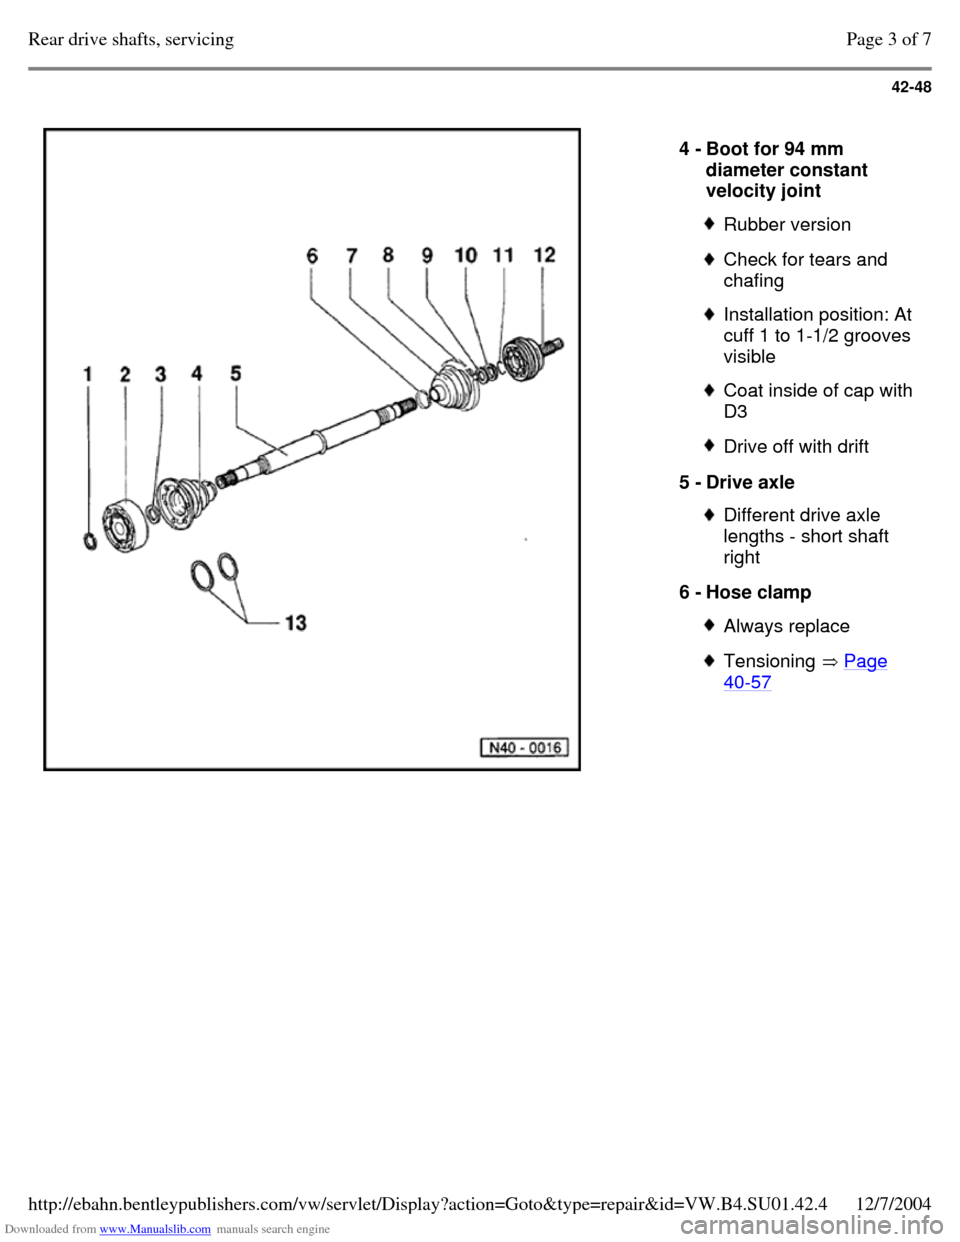
4 - Boot for 94 mm
diameter constant
velocity joint Rubber version Check for tears and
chafing Installation position: At
cuff 1 to 1-1/2 grooves
visible Coat inside of cap with D3 Drive off with drift 5 - Drive axle Different drive axle
lengths - short shaft
right
6 - Hose clamp Always replace Tensioning Page 40-57 Page 3 of 7Rear drive shafts, servicing12/7/2004http://ebahn.bentleypublishers.com/vw/servlet/Display?action=Goto&type=repair&id=VW.B4.SU01.42.4
Page 145 of 369
Downloaded from www.Manualslib.com manuals search engine 42-49
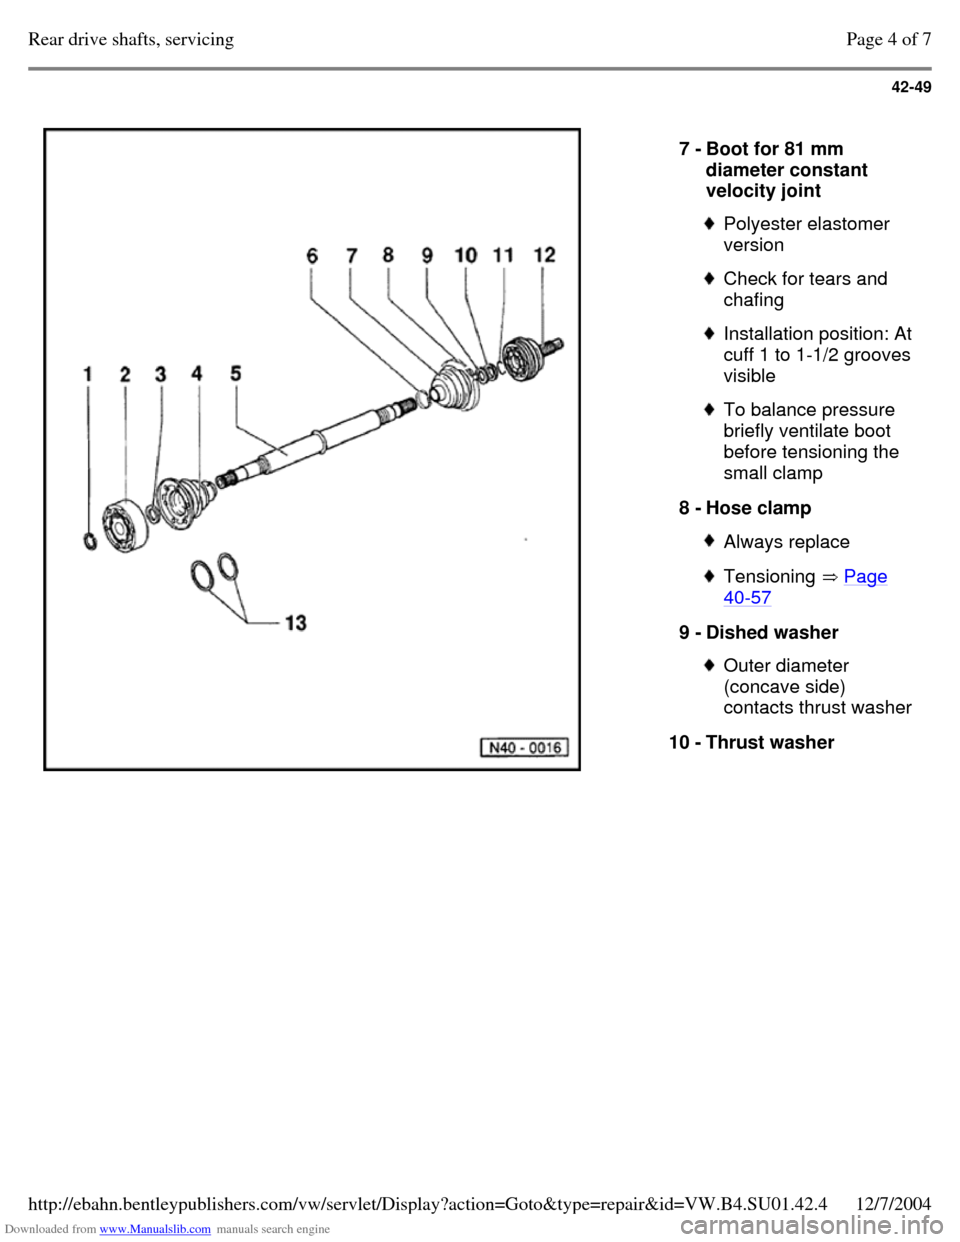
7 - Boot for 81 mm
diameter constant
velocity joint Polyester elastomer
version Check for tears and
chafing Installation position: At
cuff 1 to 1-1/2 grooves
visible To balance pressure
briefly ventilate boot
before tensioning the
small clamp
8 - Hose clamp Always replace Tensioning Page 40-57 9 - Dished washer Outer diameter
(concave side)
contacts thrust washer
10 - Thrust washer Page 4 of 7Rear drive shafts, servicing12/7/2004http://ebahn.bentleypublishers.com/vw/servlet/Display?action=Goto&type=repair&id=VW.B4.SU01.42.4
Page 146 of 369
Downloaded from www.Manualslib.com manuals search engine 42-50
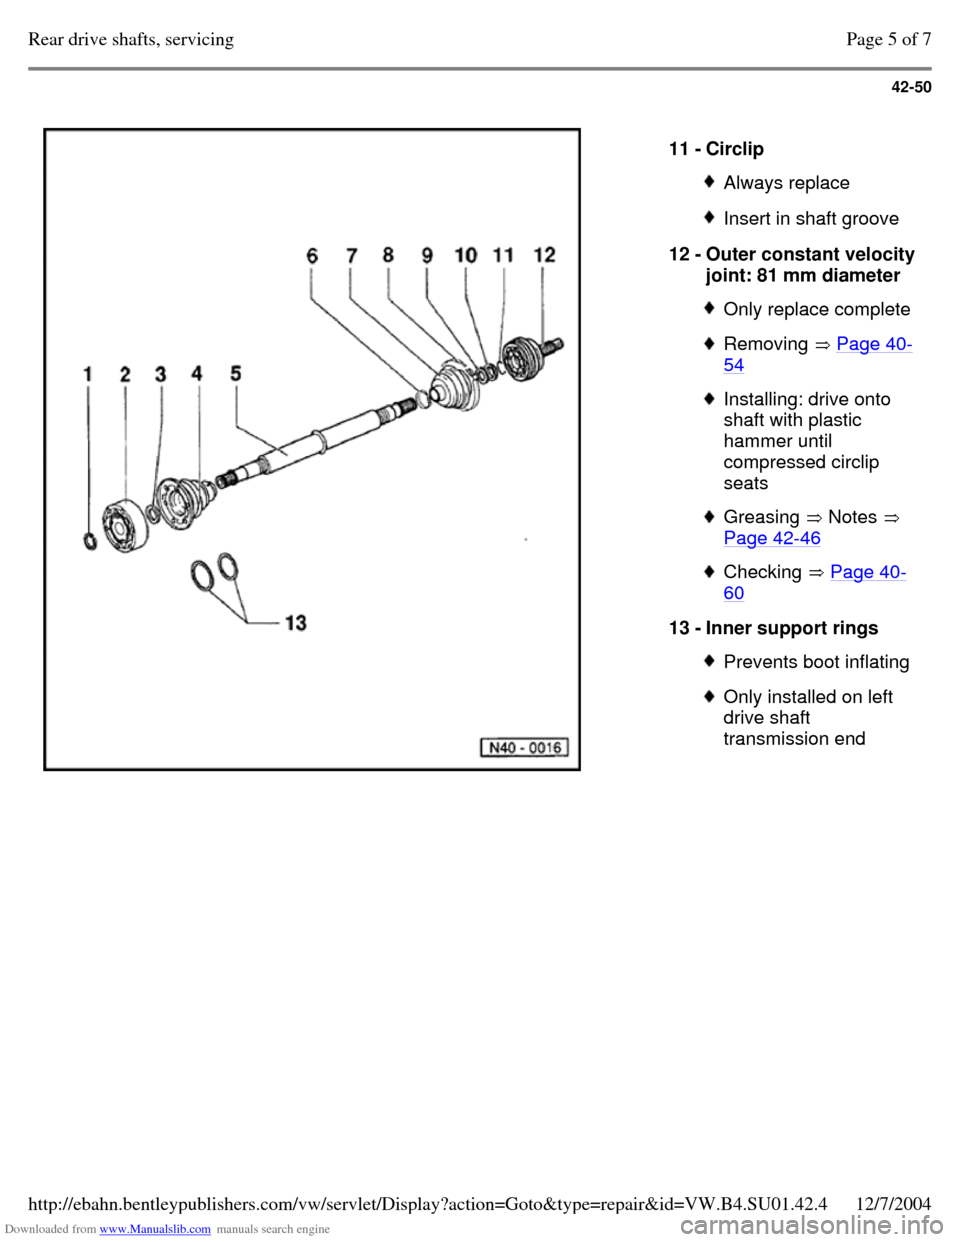
11 - Circlip Always replace Insert in shaft groove 12 - Outer constant velocity joint: 81 mm diameter Only replace complete Removing Page 40-54 Installing: drive onto
shaft with plastic
hammer until
compressed circlip
seats Greasing Notes
Page 42-46 Checking Page 40-60 13 - Inner support rings Prevents boot inflating Only installed on left
drive shaft
transmission end Page 5 of 7Rear drive shafts, servicing12/7/2004http://ebahn.bentleypublishers.com/vw/servlet/Display?action=Goto&type=repair&id=VW.B4.SU01.42.4
Page 150 of 369
Downloaded from www.Manualslib.com manuals search engine 42-54
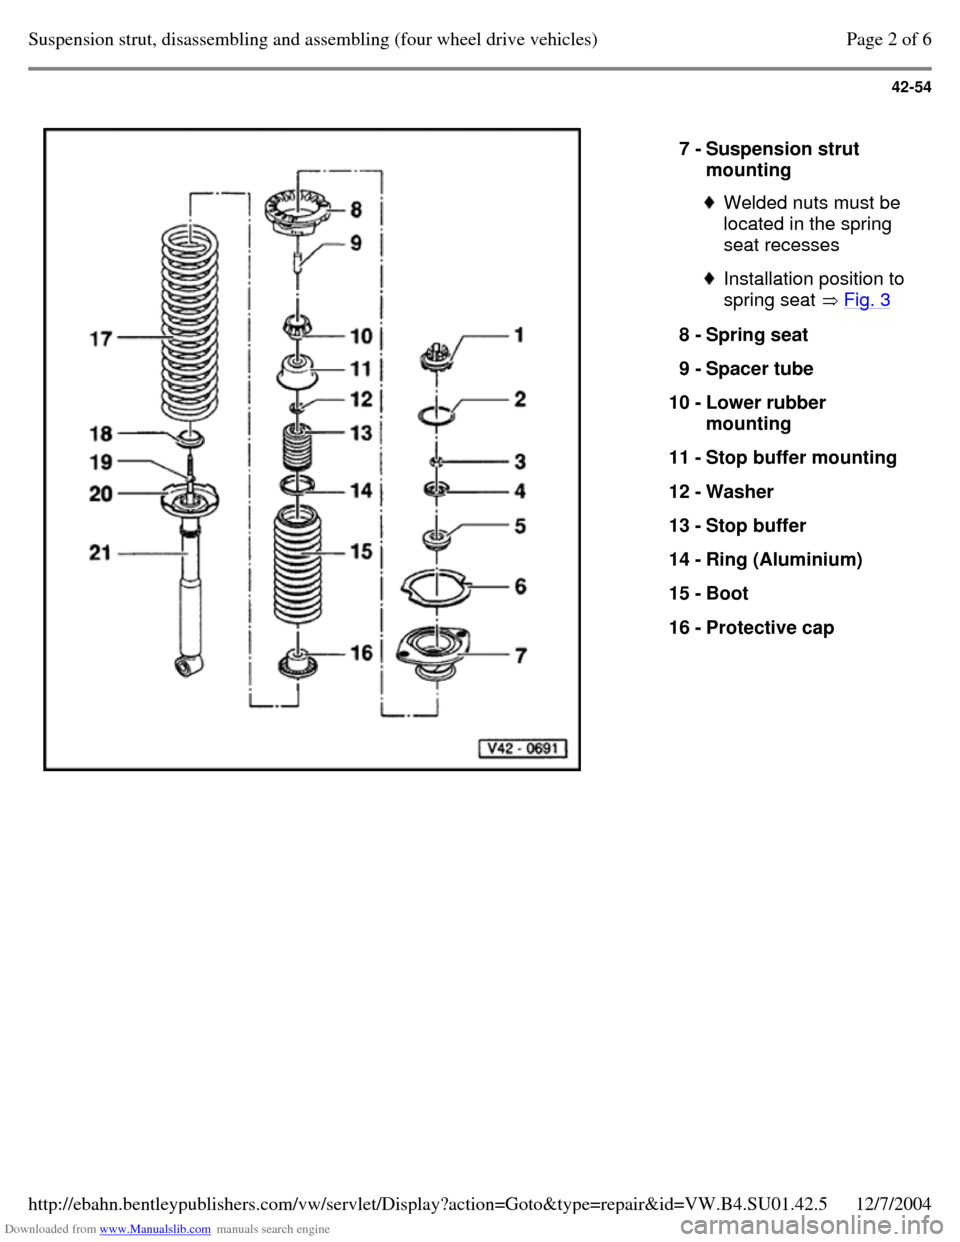
7 - Suspension strut
mounting Welded nuts must be
located in the spring
seat recesses Installation position to
spring seat Fig. 3 8 - Spring seat
9 - Spacer tube
10 - Lower rubber
mounting
11 - Stop buffer mounting
12 - Washer
13 - Stop buffer
14 - Ring (Aluminium)
15 - Boot
16 - Protective cap Page 2 of 6Suspension strut, disassembling and assembling (four wheel drive vehicles)12/7/2004http://ebahn.bentleypublishers.com/vw/servlet/Display?action=Goto&type=repair&id=VW.B4.SU01.42.5
Page 218 of 369
Downloaded from www.Manualslib.com manuals search engine 46-22
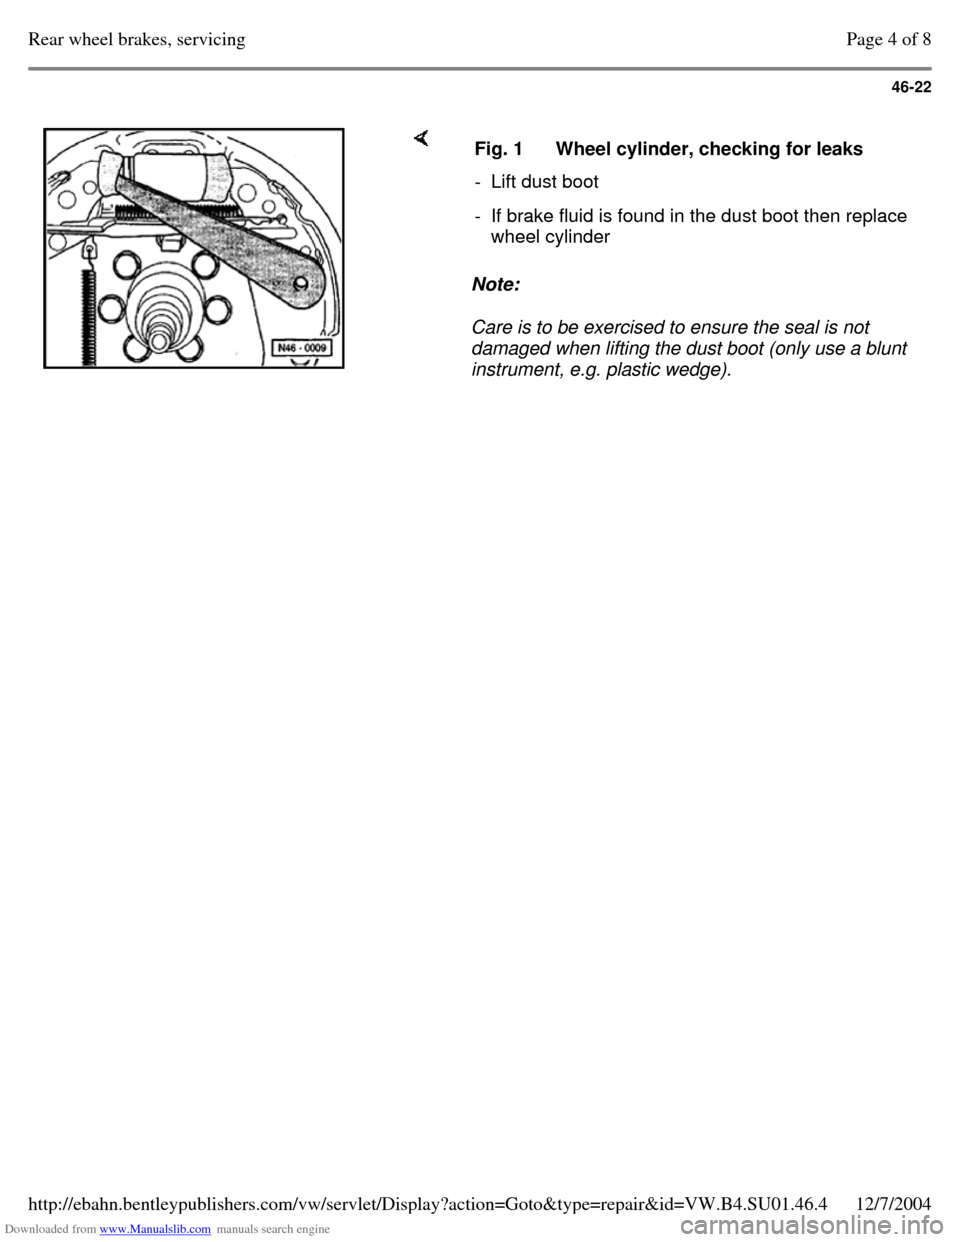
Note:
Care is to be exercised to ensure the seal is not
damaged when lifting the dust boot (only use a blunt
instrument, e.g. plastic wedge). Fig. 1 Wheel cylinder, checking for leaks - Lift dust boot - If brake fluid is found in the dust boot then replace
wheel cylinder Page 4 of 8Rear wheel brakes, servicing12/7/2004http://ebahn.bentleypublishers.com/vw/servlet/Display?action=Goto&type=repair&id=VW.B4.SU01.46.4
Page 284 of 369
Downloaded from www.Manualslib.com manuals search engine 48-14
- With engine running at idling speed. Close cut-
off valve (not longer than 5 seconds) and read
off pressure.
Specification: 85 - 95 bar (1232 - 1377
psi)
Note:
If the reading is higher or lower than specified
replace pump.
Vehicles with up to 110 kW engine Page 48-90 . Vehicles with 128 kW engine Page 48-97 . If reservoir fluid level is low then check steering
system for leaks.
For leaks at the pinion first check the lines/line
connections for leaks and if necessary tighten
and wipe dry.
If the pinion seal or the rack seals in steering
box housing are leaking then replace steering
gear.
To check the rack seals loosen the clamp on
the boot and push to one side. Page 14 of 99Steering12/7/2004http://ebahn.bentleypublishers.com/vw/servlet/Display?action=Goto&type=repair&id=VW.B4.SU01.48.1