display VOLKSWAGEN PASSAT 1997 B3, B4 / 3.G Service Workshop Manual
[x] Cancel search | Manufacturer: VOLKSWAGEN, Model Year: 1997, Model line: PASSAT, Model: VOLKSWAGEN PASSAT 1997 B3, B4 / 3.GPages: 369, PDF Size: 12.33 MB
Page 188 of 369
Downloaded from www.Manualslib.com manuals search engine 45-19
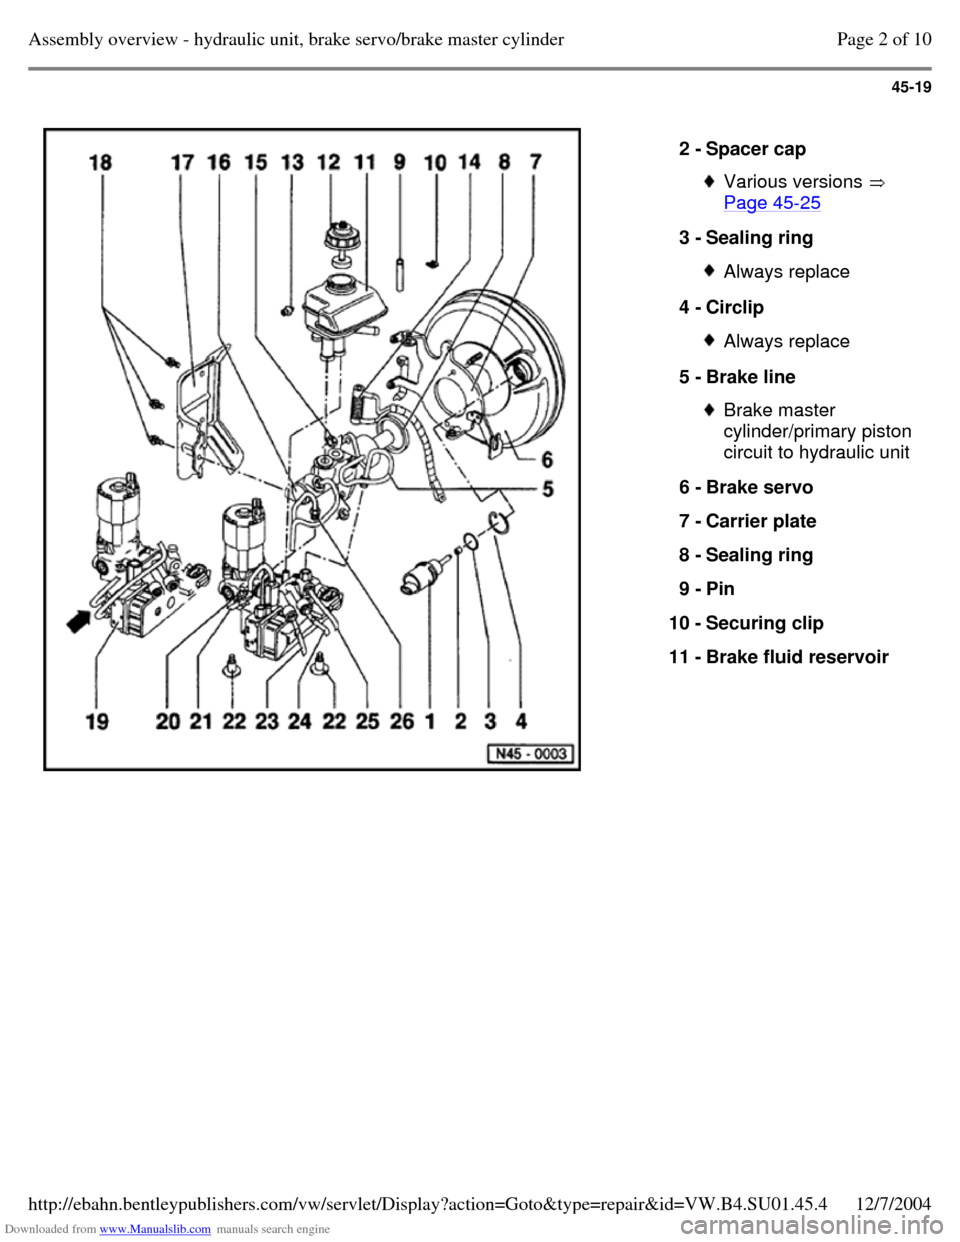
2 - Spacer cap Various versions
Page 45-25 3 - Sealing ring Always replace 4 - Circlip Always replace 5 - Brake line Brake master
cylinder/primary piston
circuit to hydraulic unit
6 - Brake servo
7 - Carrier plate
8 - Sealing ring
9 - Pin
10 - Securing clip
11 - Brake fluid reservoir Page 2 of 10Assembly overview - hydraulic unit, brake servo/brake master cylinder12/7/2004http://ebahn.bentleypublishers.com/vw/servlet/Display?action=Goto&type=repair&id=VW.B4.SU01.45.4
Page 189 of 369
Downloaded from www.Manualslib.com manuals search engine 45-20
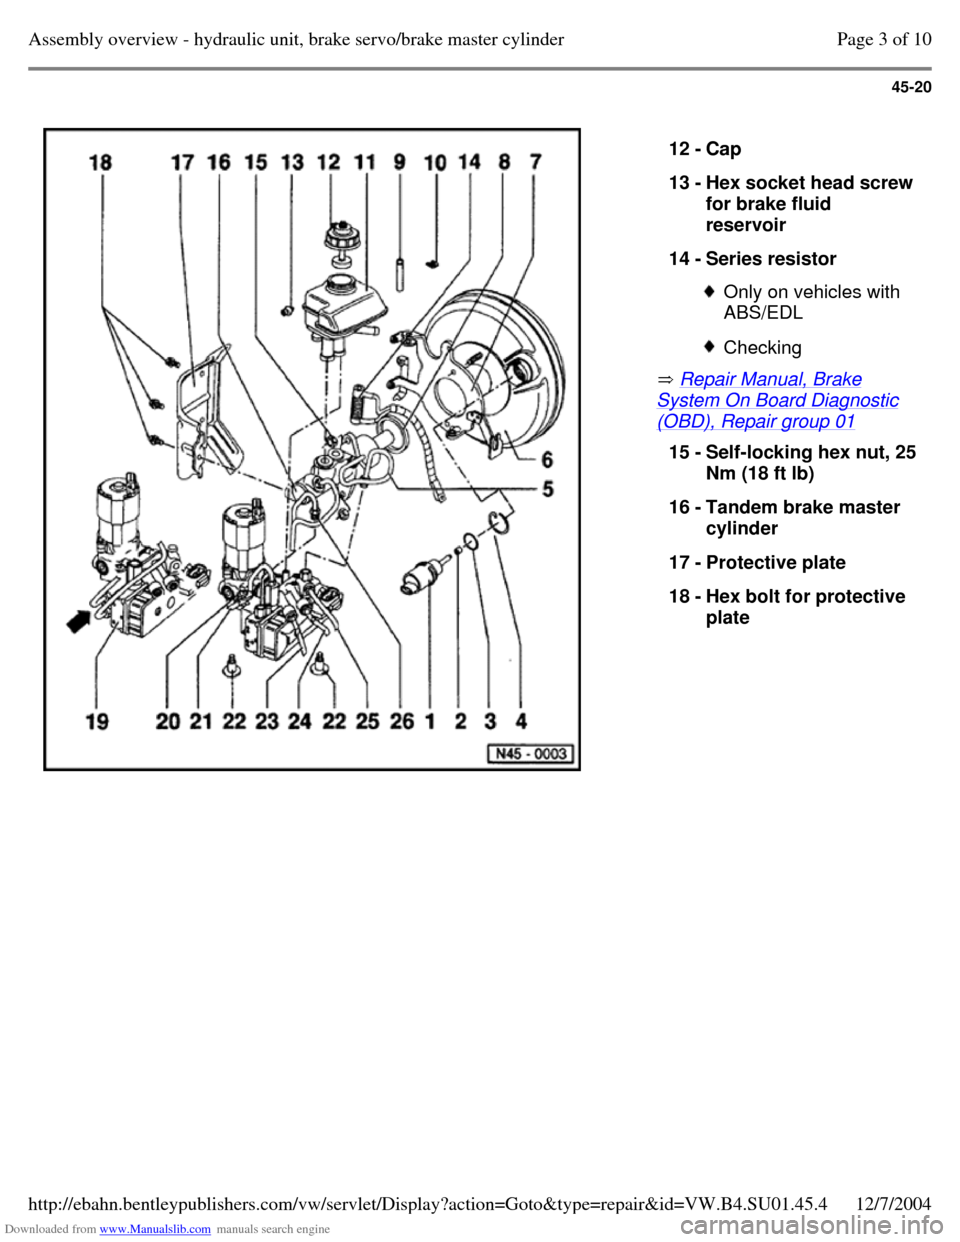
Repair Manual, Brake System On Board Diagnostic (OBD), Repair group 01 12 - Cap
13 - Hex socket head screw for brake fluid
reservoir
14 - Series resistor Only on vehicles with
ABS/EDL Checking 15 - Self-locking hex nut, 25 Nm (18 ft lb)
16 - Tandem brake master
cylinder
17 - Protective plate
18 - Hex bolt for protective
plate Page 3 of 10Assembly overview - hydraulic unit, brake servo/brake master cylinder12/7/2004http://ebahn.bentleypublishers.com/vw/servlet/Display?action=Goto&type=repair&id=VW.B4.SU01.45.4
Page 190 of 369
Downloaded from www.Manualslib.com manuals search engine 45-21
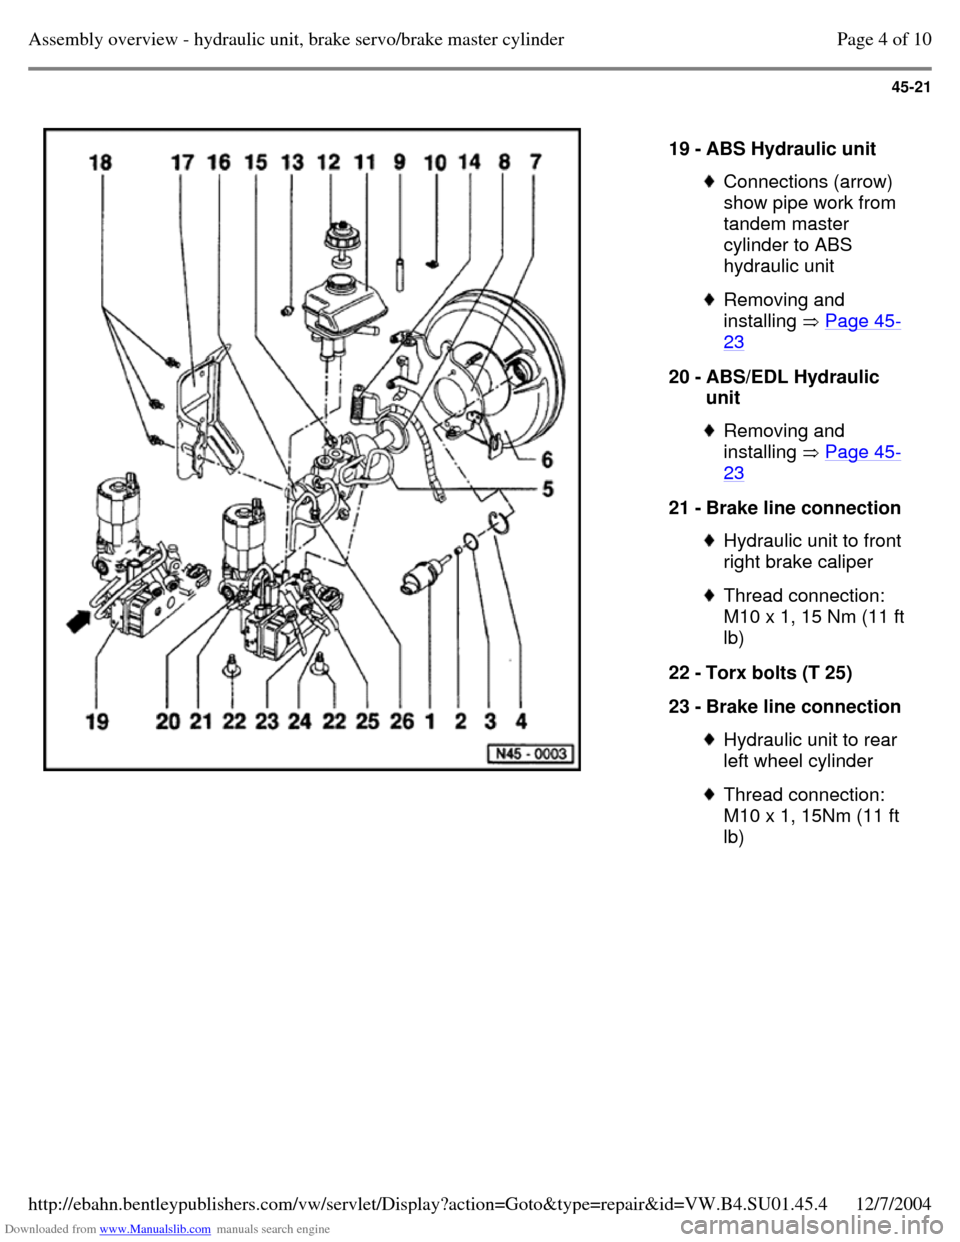
19 - ABS Hydraulic unit Connections (arrow)
show pipe work from
tandem master
cylinder to ABS
hydraulic unit Removing and
installing Page 45-23 20 - ABS/EDL Hydraulic
unit Removing and
installing Page 45-23 21 - Brake line connection Hydraulic unit to front
right brake caliper Thread connection:
M10 x 1, 15 Nm (11 ft
lb)
22 - Torx bolts (T 25)
23 - Brake line connection Hydraulic unit to rear
left wheel cylinder Thread connection:
M10 x 1, 15Nm (11 ft
lb) Page 4 of 10Assembly overview - hydraulic unit, brake servo/brake master cylinder12/7/2004http://ebahn.bentleypublishers.com/vw/servlet/Display?action=Goto&type=repair&id=VW.B4.SU01.45.4
Page 191 of 369
Downloaded from www.Manualslib.com manuals search engine 45-22
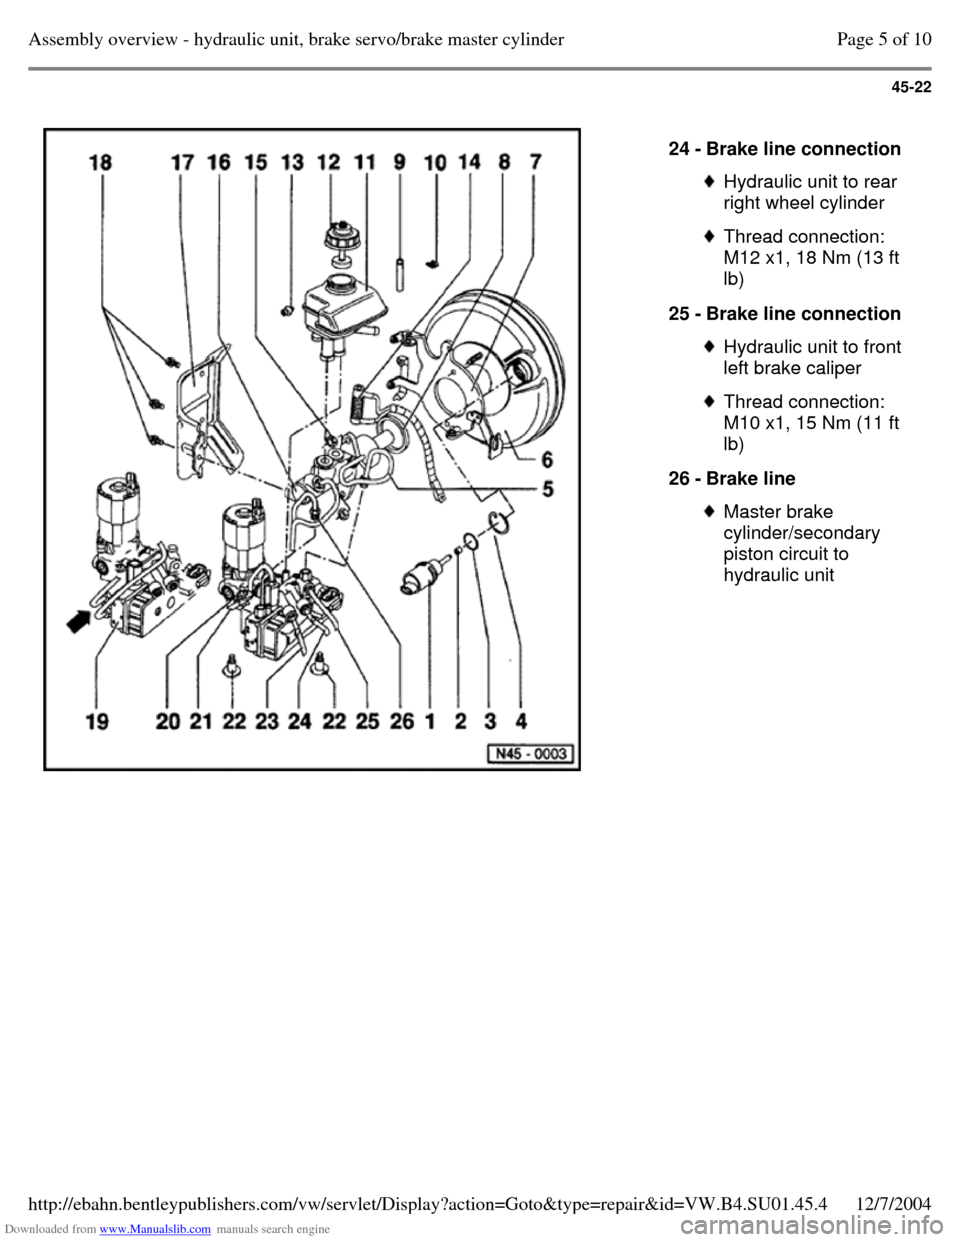
24 - Brake line connection Hydraulic unit to rear
right wheel cylinder Thread connection:
M12 x1, 18 Nm (13 ft
lb)
25 - Brake line connection Hydraulic unit to front
left brake caliper Thread connection:
M10 x1, 15 Nm (11 ft
lb)
26 - Brake line Master brake
cylinder/secondary
piston circuit to
hydraulic unit Page 5 of 10Assembly overview - hydraulic unit, brake servo/brake master cylinder12/7/2004http://ebahn.bentleypublishers.com/vw/servlet/Display?action=Goto&type=repair&id=VW.B4.SU01.45.4
Page 192 of 369
Downloaded from www.Manualslib.com manuals search engine 45-23
Hydraulic unit, removing and installing
Note:
For easier disassembling and assembling, it is
more practical to remove the hydraulic unit
complete with brake servo and brake master
cylinder.
Removing
- Disconnect battery Ground (GND) strap.
- Separate all electrical connections on ABS
unit.
- Remove as much brake fluid as possible from
brake fluid reservoir using a suction bottle.
- Disconnect brake lines from ABS hydraulic unit
and seal threaded holes with plugs from repair
kit, Part No. 1HO 698 311.
- Remove left-hand trim under instrument
panel.
- Disconnect brake pedal from brake servo unit
Page 46-44 . Page 6 of 10Assembly overview - hydraulic unit, brake servo/brake master cylinder12/7/2004http://ebahn.bentleypublishers.com/vw/servlet/Display?action=Goto&type=repair&id=VW.B4.SU01.45.4
Page 193 of 369
Downloaded from www.Manualslib.com manuals search engine 45-24
- Remove nuts from brake servo/bulkhead.
- Carefully remove hydraulic unit and brake servo
with brake master cylinder from engine
compartment.
Installing
Note:
Hydraulic units supplied as replacement parts
are already filled with hydraulic fluid and bled.
Only remove sealing plugs on hydraulic unit
when the relevant brake line is going to be
connected.
If the sealing plugs are removed too early,
brake fluid can escape, it is then no longer
guaranteed that the unit is sufficiently filled or
adequately bled.
- Preassemble hydraulic unit and brake servo with tandem master cylinder away from vehicle.
- Secure hydraulic unit, brake servo with tandem
master cylinder to bulkhead.
- Connect brake lines.
- Reconnect all electrical connections on ABS unit (ensure correctly connected).
- Bleed brake system Page 47-27 .
- Install left-hand trim under instrument panel. Page 7 of 10Assembly overview - hydraulic unit, brake servo/brake master cylinder12/7/2004http://ebahn.bentleypublishers.com/vw/servlet/Display?action=Goto&type=repair&id=VW.B4.SU01.45.4
Page 194 of 369
Downloaded from www.Manualslib.com manuals search engine 45-25
Brake Pedal Position Sensor, removing
and installing
Note:
The Brake Pedal Position Sensor is only
supplied as a repair kit. Apart from the sender,
this repair kit contains a sealing ring, circlip and
four different spacer caps.
- - one white spacer cap
- - one green spacer cap
- - one blue spacer cap
- - one red spacer cap The spacer caps are of differing length. When replacing the sensor note the color of
spacer cap. The new sensor must have the
same color cap as the old sensor.
On the brake servo housing in the vicinity of the
sever location there is a colored spot, which is
identical to that of the spacer cap. Page 8 of 10Assembly overview - hydraulic unit, brake servo/brake master cylinder12/7/2004http://ebahn.bentleypublishers.com/vw/servlet/Display?action=Goto&type=repair&id=VW.B4.SU01.45.4
Page 195 of 369
Downloaded from www.Manualslib.com manuals search engine 45-26
Removing
- Release brake servo vacuum by operating the
brake pedal several times.
- Remove connector from expansion tank.
- Swing coolant expansion tank to side.
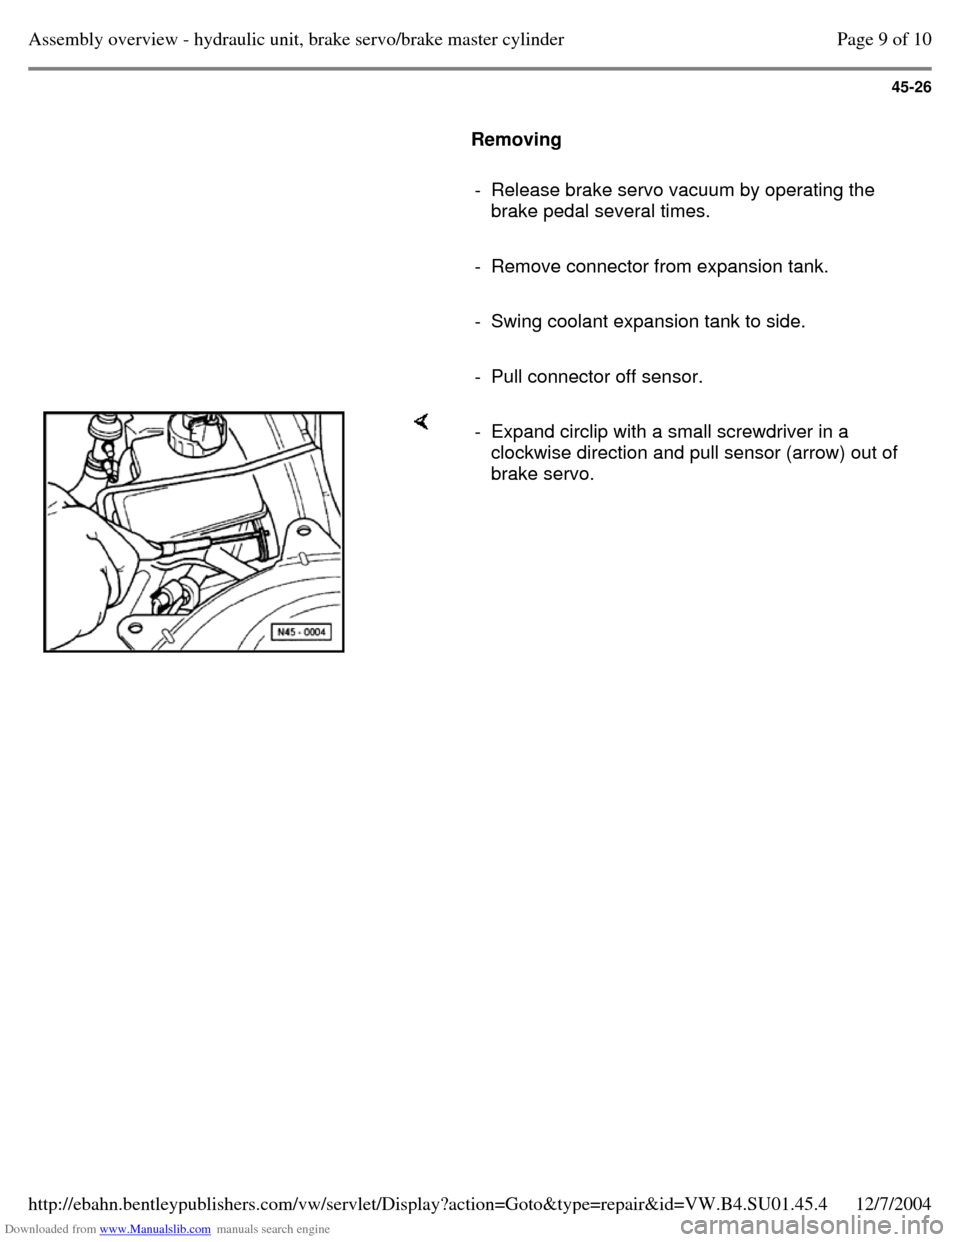
- Pull connector off sensor. - Expand circlip with a small screwdriver in a
clockwise direction and pull sensor (arrow) out of
brake servo. Page 9 of 10Assembly overview - hydraulic unit, brake servo/brake master cylinder12/7/2004http://ebahn.bentleypublishers.com/vw/servlet/Display?action=Goto&type=repair&id=VW.B4.SU01.45.4
Page 196 of 369
Downloaded from www.Manualslib.com manuals search engine 45-27
Installing
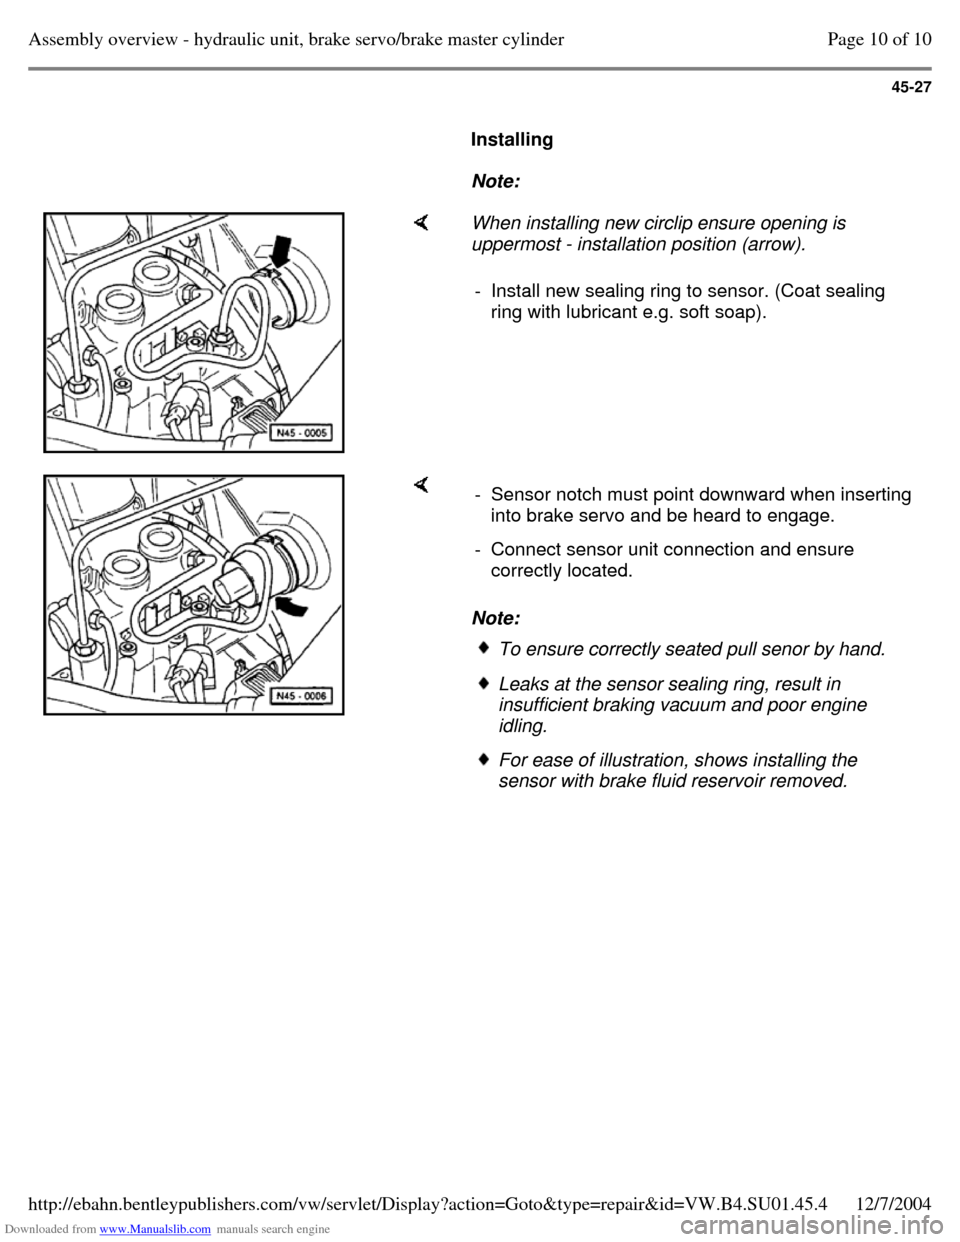
Note: When installing new circlip ensure opening is
uppermost - installation position (arrow).
- Install new sealing ring to sensor. (Coat sealing
ring with lubricant e.g. soft soap). Note: - Sensor notch must point downward when inserting
into brake servo and be heard to engage.
- Connect sensor unit connection and ensure
correctly located. To ensure correctly seated pull senor by hand. Leaks at the sensor sealing ring, result in
insufficient braking vacuum and poor engine
idling. For ease of illustration, shows installing the
sensor with brake fluid reservoir removed. Page 10 of 10Assembly overview - hydraulic unit, brake servo/brake master cylinder12/7/2004http://ebahn.bentleypublishers.com/vw/servlet/Display?action=Goto&type=repair&id=VW.B4.SU01.45.4
Page 197 of 369
Downloaded from www.Manualslib.com manuals search engine 46-1
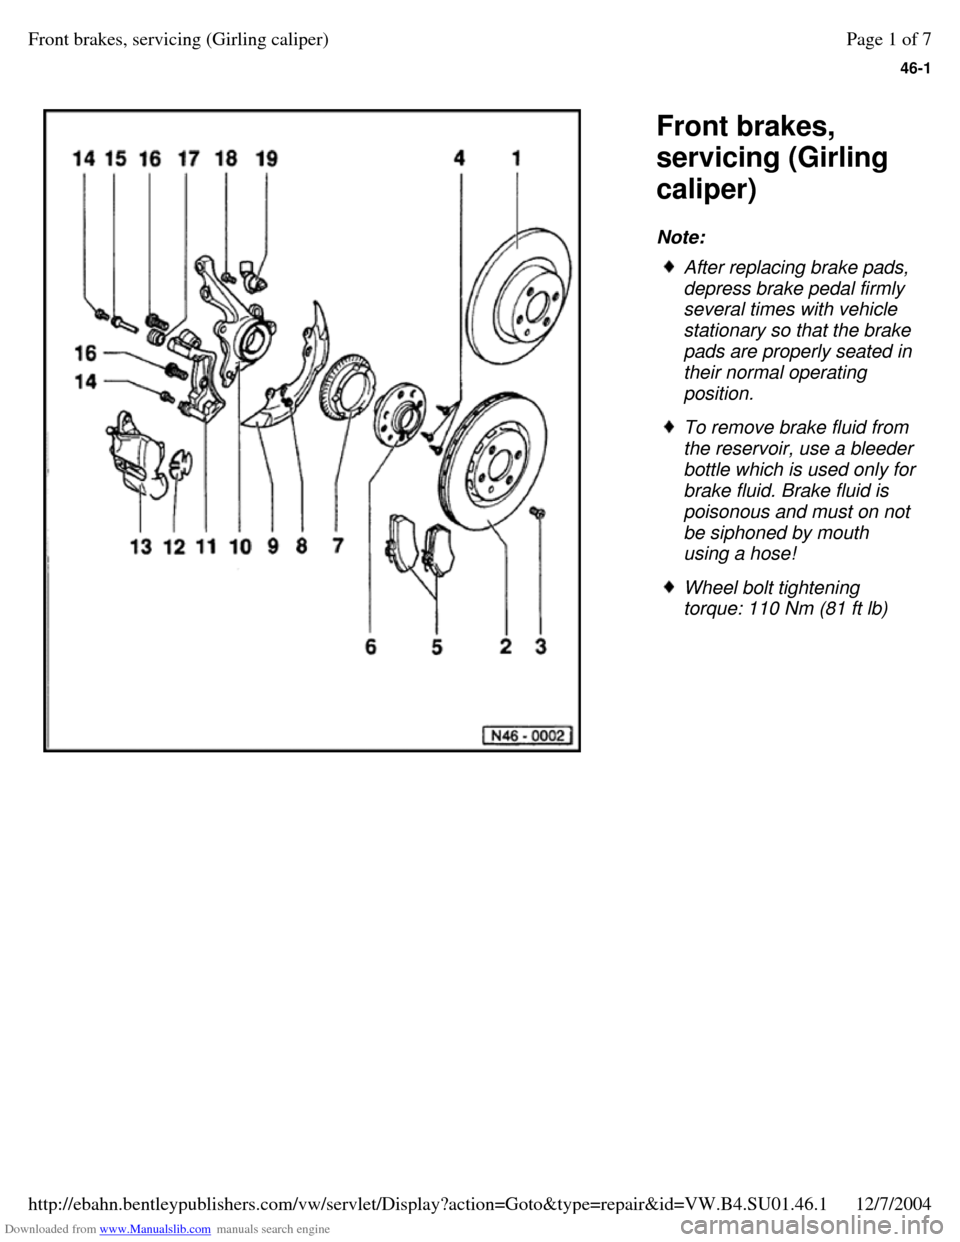
Front brakes,
servicing (Girling
caliper)
Note: After replacing brake pads,
depress brake pedal firmly
several times with vehicle
stationary so that the brake
pads are properly seated in
their normal operating
position. To remove brake fluid from
the reservoir, use a bleeder
bottle which is used only for
brake fluid. Brake fluid is
poisonous and must on not
be siphoned by mouth
using a hose! Wheel bolt tightening
torque: 110 Nm (81 ft lb) Page 1 of 7Front brakes, servicing (Girling caliper)12/7/2004http://ebahn.bentleypublishers.com/vw/servlet/Display?action=Goto&type=repair&id=VW.B4.SU01.46.1