tow VOLKSWAGEN POLO 2015 OwnerôÇs Manual
[x] Cancel search | Manufacturer: VOLKSWAGEN, Model Year: 2015, Model line: POLO, Model: VOLKSWAGEN POLO 2015Pages: 100, PDF Size: 4.14 MB
Page 5 of 100
Downloaded from www.Manualslib.com manuals search engine 12/29/2015Bedienungsanleitung < Service & ZubehûÑr < Volkswagen Deutschland
2/32
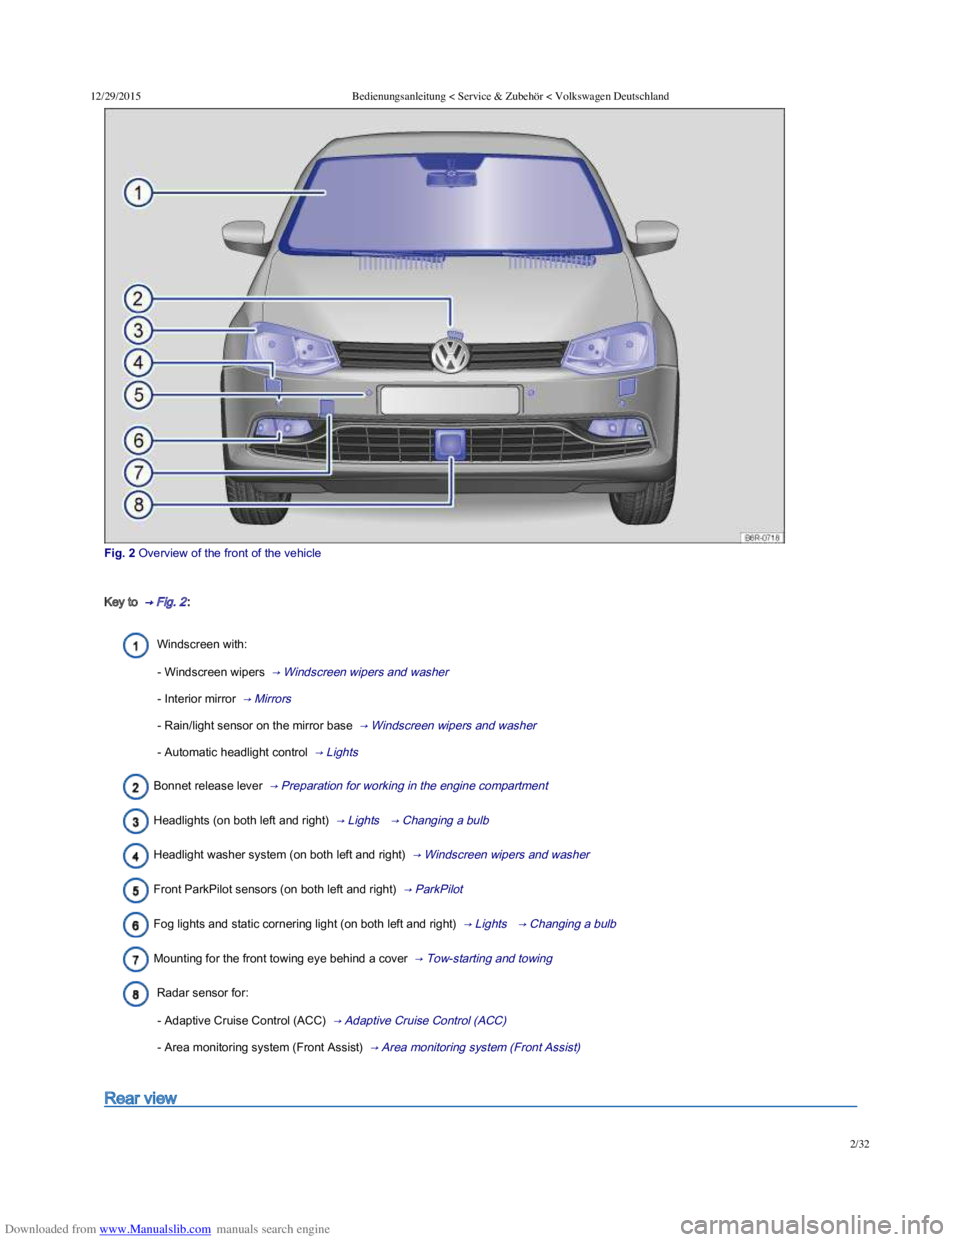
Fig.ô 2ô Overviewô ofô theô frontô ofô theô vehicle
Key to ô ãô Fig.ô 2ã₤:
Windscreen with:
- Windscreen wipers ô ãô Windscreen wipers and washer ã₤
- Interior mirror ô ãô Mirrors ã₤
- Rain/light sensor on the mirror base ô ãô Windscreen wipers and washer ã₤
- Automatic headlight control ô ãô Lights ã₤
Bonnet release lever ô ãô Preparation for working in the engine compartment ã₤
Headlights (on both left and right) ô ãô Lights ã₤ ô ãô Changing a bulb ã₤
Headlight washer system (on both left and right) ô ãô Windscreen wipers and washer ã₤
Front ParkPilot sensors (on both left and right) ô ãô ParkPilot ã₤
Fog lights and static cornering light (on both left and right) ô ãô Lights ã₤ ô ãô Changing a bulb ã₤
Mounting for the front towing eye behind a cover ô ãô Tow-starting and towing ã₤
Radar sensor for:
- Adaptive Cruise Control (ACC) ô ãô Adaptive Cruise Control (ACC) ã₤
- Area monitoring system (Front Assist) ô ãô Area monitoring system (Front Assist) ã₤
Rear view
Page 6 of 100
Downloaded from www.Manualslib.com manuals search engine 12/29/2015Bedienungsanleitung < Service & ZubehûÑr < Volkswagen Deutschland
3/32
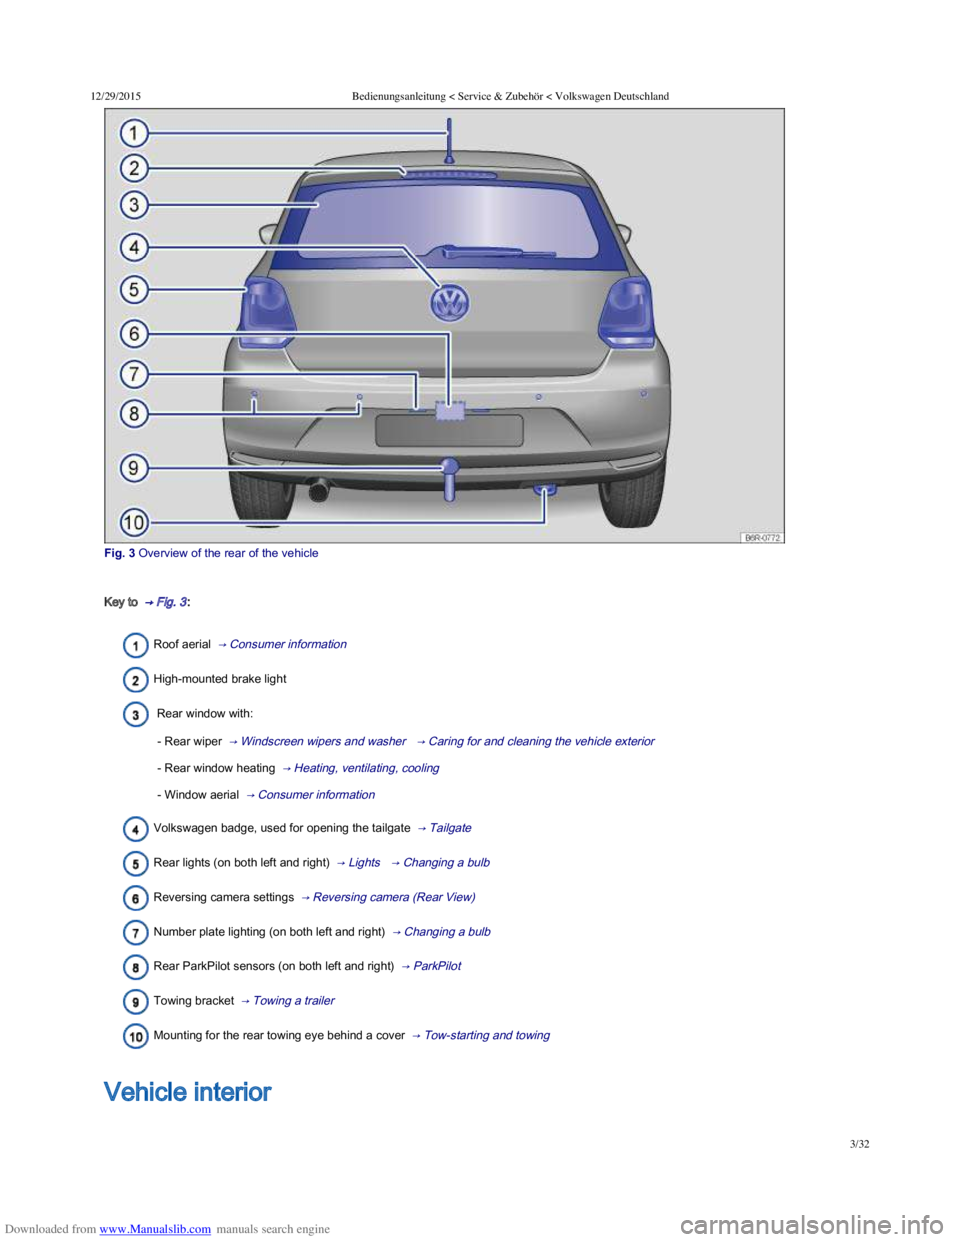
Fig.ô 3ô Overviewô ofô theô rearô ofô theô vehicle
Key to ô ãô Fig.ô 3ã₤:
Roof aerial ô ãô Consumer information ã₤
High-mounted brake light
Rear window with:
- Rear wiperô ô ãô Windscreen wipers and washer ã₤ ô ãô Caring for and cleaning the vehicle exterior ã₤
- Rear window heating ô ãô Heating, ventilating, cooling ã₤
- Window aerial ô ãô Consumer information ã₤
Volkswagen badge, used for opening the tailgate ô ãô Tailgate ã₤
Rear lights (on both left and right) ô ãô Lights ã₤ ô ãô Changing a bulb ã₤
Reversing camera settings ô ãô Reversing camera (Rear View) ã₤
Number plate lighting (on both left and right) ô ãô Changing a bulb ã₤
Rear ParkPilot sensors (on both left and right) ô ãô ParkPilot ã₤
Towing bracket ô ãô Towing a trailer ã₤
Mounting for the rear towing eye behind a cover ô ãô Tow-starting and towing ã₤
Overview of the driver door
Vehicle interior
Page 7 of 100
Downloaded from www.Manualslib.com manuals search engine 12/29/2015Bedienungsanleitung < Service & ZubehûÑr < Volkswagen Deutschland
4/32
Overview of the driver door
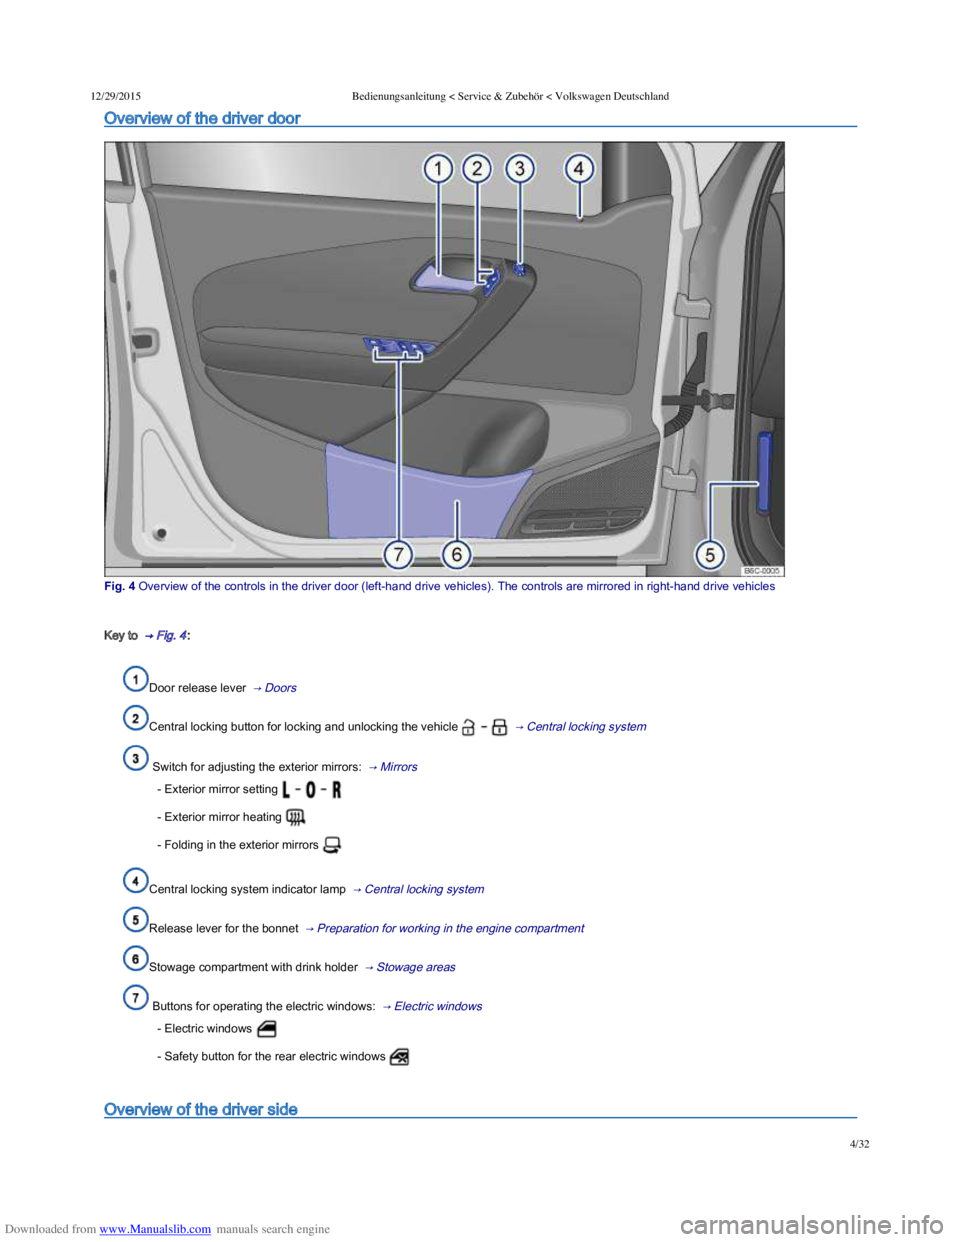
Fig.ô 4ô Overviewô ofô theô controlsô inô theô driverô doorô (leftôÙhandô driveô vehicles).ô Theô controlsô areô mirroredô inô rightôÙhandô driveô vehicles
Key to ô ãô Fig.ô 4ã₤:
Door release lever ô ãô Doors ã₤
Central locking button for locking and unlocking the vehicleô ô ãô Central locking system ã₤
Switch for adjusting the exterior mirrors: ô ãô Mirrors ã₤
- Exterior mirror setting
- Exterior mirror heating
- Folding in the exterior mirrors
Central locking system indicator lamp ô ãô Central locking system ã₤
Release lever for the bonnet ô ãô Preparation for working in the engine compartment ã₤
Stowage compartment with drink holder ô ãô Stowage areas ã₤
Buttons for operating the electric windows: ô ãô Electric windows ã₤
- Electric windows
- Safety button for the rear electric windows
Overview of the driver side
Page 11 of 100
Downloaded from www.Manualslib.com manuals search engine 12/29/2015Bedienungsanleitung < Service & ZubehûÑr < Volkswagen Deutschland
8/32
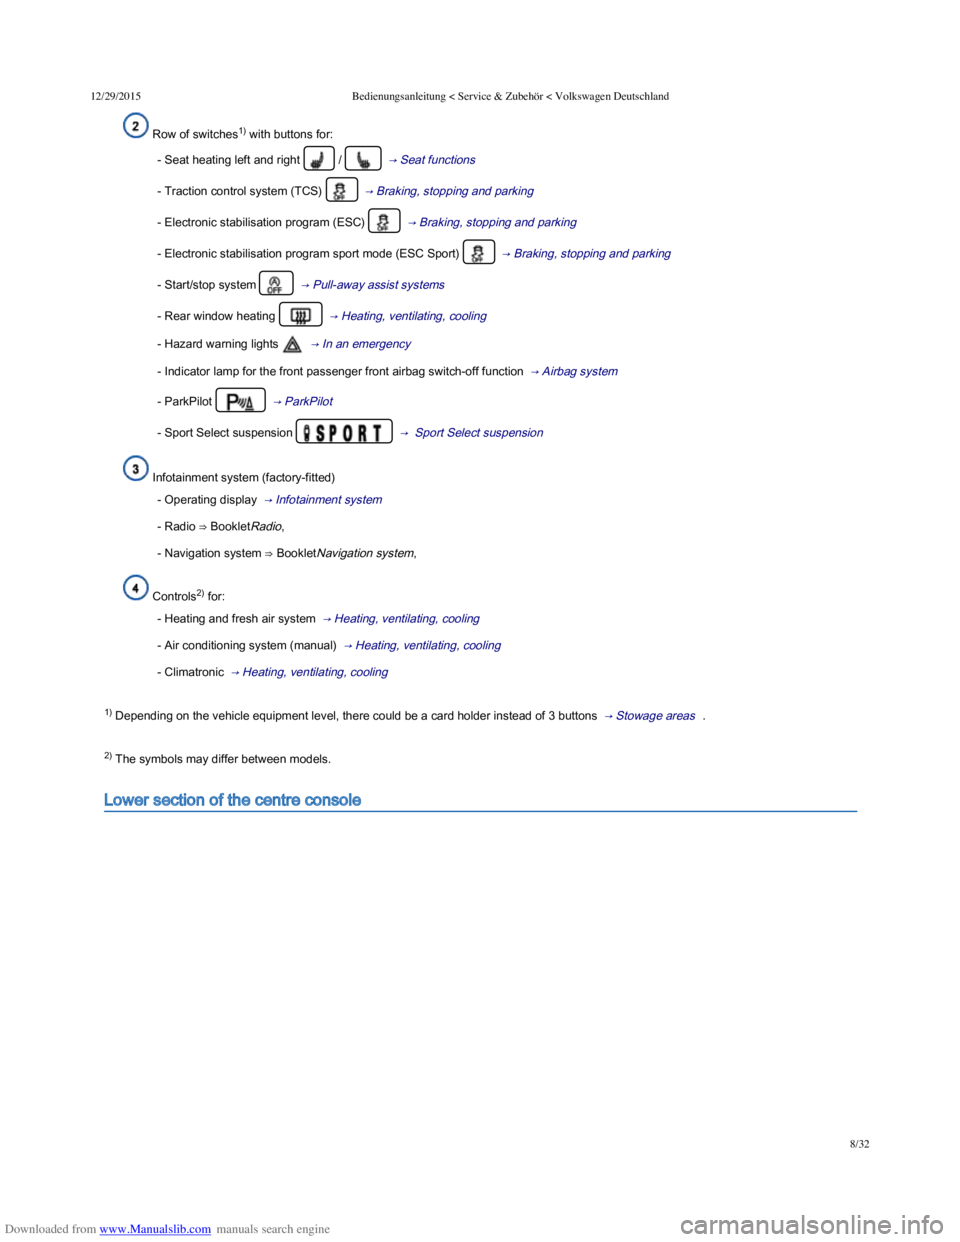
Row of switches1) with buttons for:
- Seat heating left and right /ô ô ãô Seat functions ã₤
- Traction control system (TCS) ô ãô Braking, stopping and parking ã₤
- Electronic stabilisation program (ESC) ô ãô Braking, stopping and parking ã₤
- Electronic stabilisation program sport mode (ESC Sport) ô ãô Braking, stopping and parking ã₤
- Start/stop system ô ãô Pull-away assist systems ã₤
- Rear window heatingô ô ãô Heating, ventilating, cooling ã₤
- Hazard warning lightsô ô ãô In an emergency ã₤
- Indicator lamp for the front passenger front airbag switch-off function ô ãô Airbag system ã₤
- ParkPilotô ô ãô ParkPilot ã₤
- Sport Select suspension ô ô ãô Sport Select suspension ã₤
Infotainment system (factory-fitted)
- Operating display ô ãô Infotainment systemã₤
- Radio ãô BookletRadio,
- Navigation system ãô BookletNavigation system,
Controls2) for:
- Heating and fresh air system ô ãô Heating, ventilating, cooling ã₤
- Air conditioning system (manual) ô ãô Heating, ventilating, cooling ã₤
- Climatronic ô ãô Heating, ventilating, cooling ã₤
1) Depending on the vehicle equipment level, there could be a card holder instead of 3 buttons ô ãô Stowage areas ã₤ .
2) The symbols may differ between models.
Lower section of the centre console
Page 12 of 100
Downloaded from www.Manualslib.com manuals search engine 12/29/2015Bedienungsanleitung < Service & ZubehûÑr < Volkswagen Deutschland
9/32
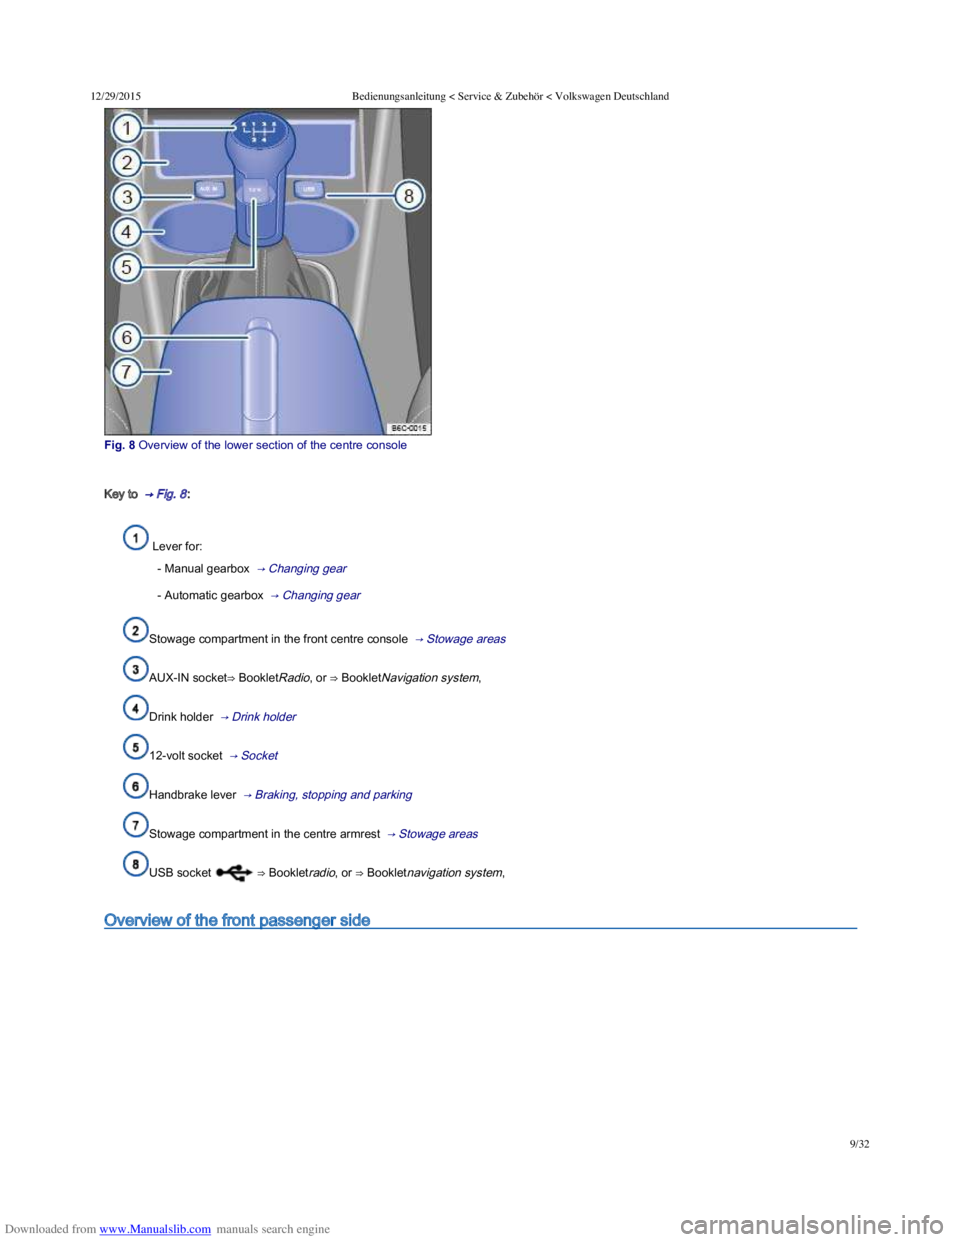
Fig.ô 8ô Overviewô ofô theô lowerô sectionô ofô theô centreô console
Key to ô ãô Fig.ô 8ã₤:
Lever for:
- Manual gearbox ô ãô Changing gear ã₤
- Automatic gearbox ô ãô Changing gear ã₤
Stowage compartment in the front centre console ô ãô Stowage areas ã₤
AUX-IN socketãô BookletRadio, or ãô BookletNavigation system,
Drink holder ô ãô Drink holder ã₤
12-volt socket ô ãô Socket ã₤
Handbrake lever ô ãô Braking, stopping and parking ã₤
Stowage compartment in the centre armrest ô ãô Stowage areas ã₤
USB socket ãô Bookletradio, or ãô Bookletnavigation system,
Overview of the front passenger side
Page 13 of 100
Downloaded from www.Manualslib.com manuals search engine 12/29/2015Bedienungsanleitung < Service & ZubehûÑr < Volkswagen Deutschland
10/32
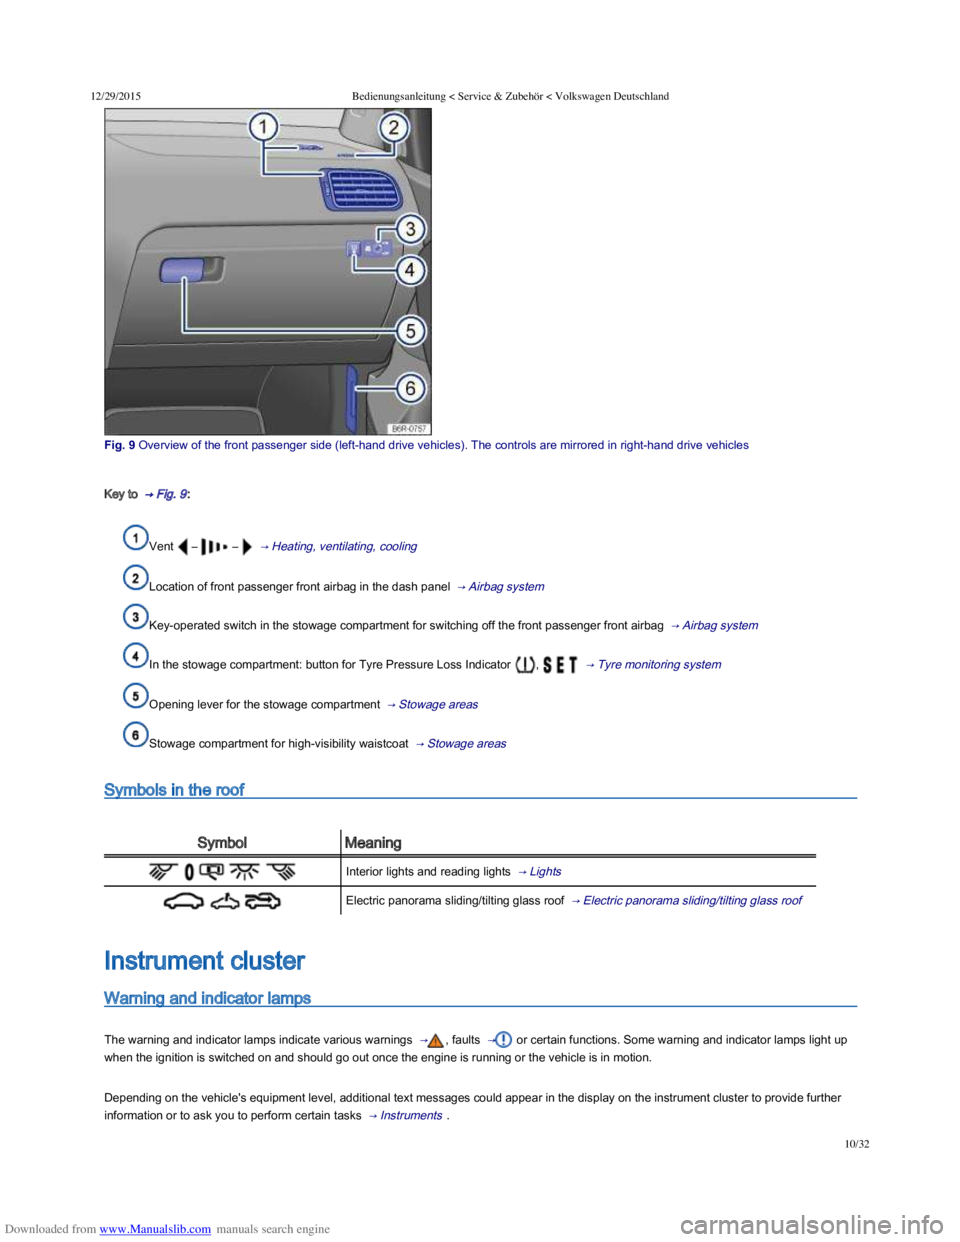
Fig.ô 9ô Overviewô ofô theô frontô passengerô sideô (leftôÙhandô driveô vehicles).ô Theô controlsô areô mirroredô inô rightôÙhandô driveô vehicles
Key to ô ãô Fig.ô 9ã₤:
Vent ô ãô ô ãô ô ãô Heating, ventilating, cooling ã₤
Location of front passenger front airbag in the dash panel ô ãô Airbag system ã₤
Key-operated switch in the stowage compartment for switching off the front passenger front airbag ô ãô Airbag system ã₤
In the stowage compartment: button for Tyre Pressure Loss Indicator ,ô ô ãô Tyre monitoring system ã₤
Opening lever for the stowage compartment ô ãô Stowage areas ã₤
Stowage compartment for high-visibility waistcoat ô ãô Stowage areas ã₤
Symbols in the roof
SymbolMeaning
Interior lights and reading lights ô ãô Lights ã₤
Electric panorama sliding/tilting glass roof ô ãô Electric panorama sliding/tilting glass roof ã₤
Warning and indicator lamps
The warning and indicator lamps indicate various warnings ô ãã₤, faults ô ãã₤ or certain functions. Some warning and indicator lamps light up
when the ignition is switched on and should go out once the engine is running or the vehicle is in motion.
Depending on the vehicle's equipment level, additional text messages could appear in the display on the instrument cluster to provide further
information or to ask you to perform certain tasks ô ãô Instrumentsã₤ .
Instrument cluster
Page 36 of 100
Downloaded from www.Manualslib.com manuals search engine 12/29/2015Bedienungsanleitung < Service & ZubehûÑr < Volkswagen Deutschland
1/136
Check that all lights and turn signals are working properly.
Check the tyre pressure Wheels and tyres Wheels and tyres Tyres see Wheels and tyres_3 and fuel level Filling the tank Filling the tank
.
Make sure that you have a good, clear view through all of the windows.
Air intake to the engine must not be obstructed, and the engine must not be covered with any kind of insulating materials .
Secure any objects and luggage in the stowage compartments, the luggage compartment or on the roof Transporting items Transporting
items .
ô Introduction
Thisô chapterô containsô informationô onô theô followingô subjects:
ô ãô Preparing for a journey and driving safely ã₤
ô ãô Driving abroad ã₤
ô ãô Driving through water on roadsã₤
An engine and transmission guard may prove useful, depending on the conditions in which the vehicle is to be driven. An engine and
transmission guard can reduce the risk of damage to the vehicle's underbody and engine oil sump, for example when driving over kerbs,
driveways or unsurfaced roads. If you wish to have one fitted, Volkswagen recommends contacting your Volkswagen dealership.
Additional information and warnings:
Sitting correctly and safely ô ãô Sitting correctly and safelyã₤
Transporting ô ãô Transporting items ã₤
Starting the engine, changing gear and parking the vehicle ô ãô Starting the engine, changing gear and parkingã₤
Driving with respect for the environment ô ãô Driving with respect for the environment ã₤
Consumer information ô ãô Consumer information ã₤
Preparing for a journey and driving safely
Firstô readô andô observeô theô introductoryô informationô andô safetyô warningsô ãIntroductionã₤
Checklist
Observe the following information both before and during every journey to ensure your own safety, and the safety of all passengers and other
road users ô ãã₤:
Before the journey
Before setting off
Driving tips
Driving under the influence of alcohol, drugs, medication or narcotics can cause serious accidents and fatal injuries.
Alcohol, drugs, medication and narcotics can severely impair perception, reaction times and driving safety. This could cause you to lose
control of the vehicle.
WARNING
Page 42 of 100
Downloaded from www.Manualslib.com manuals search engine 12/29/2015Bedienungsanleitung < Service & ZubehûÑr < Volkswagen Deutschland
7/136
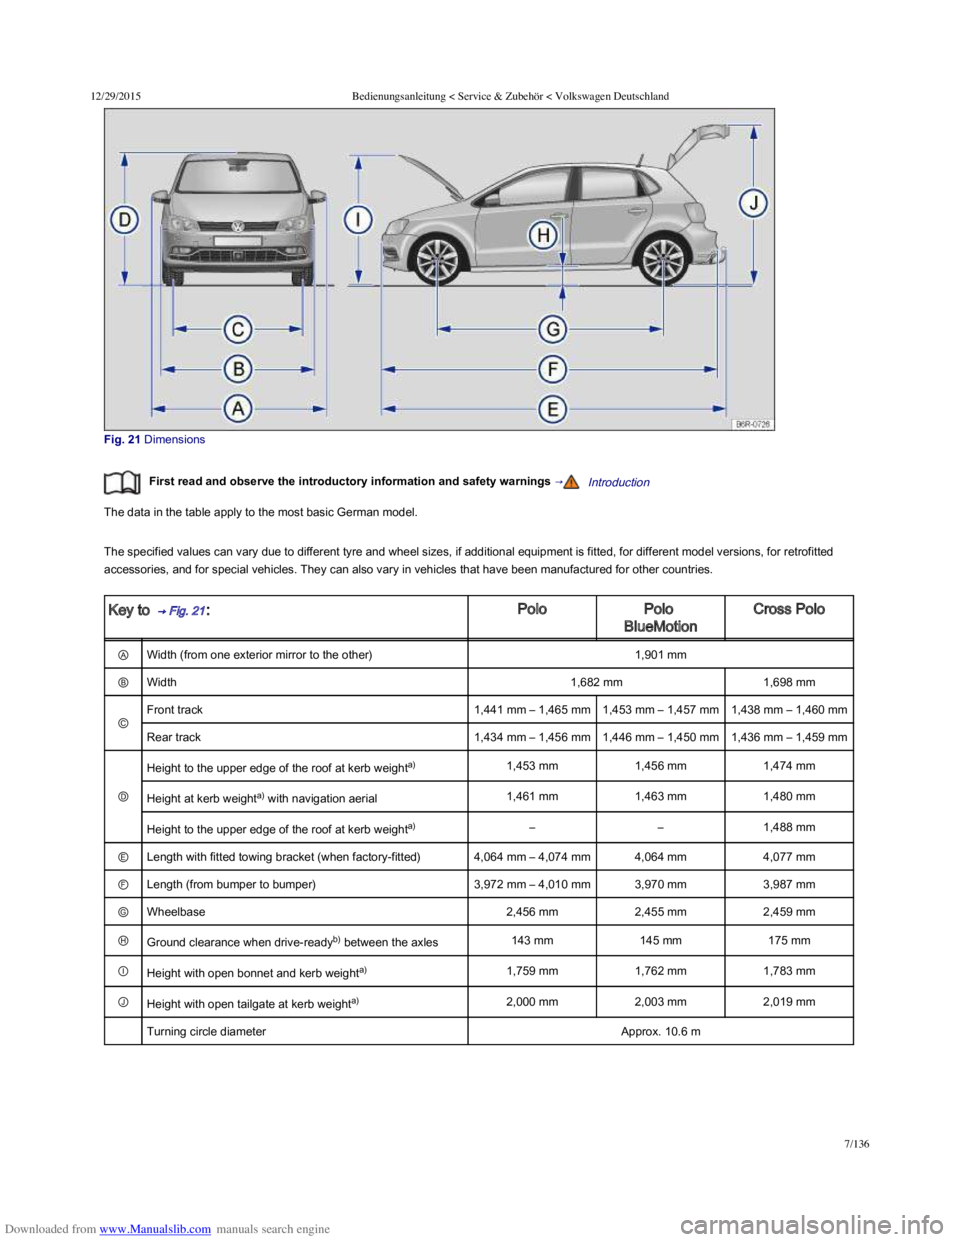
Fig.ô 21ô Dimensions
Firstô readô andô observeô theô introductoryô informationô andô safetyô warningsô ãIntroductionã₤
The data in the table apply to the most basic German model.
The specified values can vary due to different tyre and wheel sizes, if additional equipment is fitted, for different model versions, for retrofitted
accessories, and for special vehicles. They can also vary in vehicles that have been manufactured for other countries.
Key to ô ãô Fig.ô 21ã₤:PoloPolo
BlueMotion
Cross Polo
ãÑWidth (from one exterior mirror to the other)1,901 mm
ãñWidth1,682 mm1,698 mm
ã¡
Front track1,441 mm ã 1,465 mm1,453 mm ã 1,457 mm1,438 mm ã 1,460 mm
Rear track1,434 mm ã 1,456 mm1,446 mm ã 1,450 mm1,436 mm ã 1,459 mm
ã¿
Height to the upper edge of the roof at kerb weighta)1,453 mm1,456 mm1,474 mm
Height at kerb weighta) with navigation aerial1,461 mm1,463 mm1,480 mm
Height to the upper edge of the roof at kerb weighta)ãã1,488 mm
ã¤Length with fitted towing bracket (when factory-fitted)4,064 mm ã 4,074 mm4,064 mm4,077 mm
ã£Length (from bumper to bumper)3,972 mm ã 4,010 mm3,970 mm3,987 mm
ã¥Wheelbase2,456 mm2,455 mm2,459 mm
ã§Ground clearance when drive-readyb) between the axles143 mm145 mm175 mm
ãƒHeight with open bonnet and kerb weighta)1,759 mm1,762 mm1,783 mm
ã¢Height with open tailgate at kerb weighta)2,000 mm2,003 mm2,019 mm
ô Turning circle diameterApprox. 10.6 m
Page 47 of 100
Downloaded from www.Manualslib.com manuals search engine 12/29/2015Bedienungsanleitung < Service & ZubehûÑr < Volkswagen Deutschland
12/136
Replacing the battery
Fold out the key bit of the vehicle key ô ãô Opening and closing the key bitã₤ .
Pull up the cover on the rear side of the vehicle key ô ãô Fig.ô 24ã₤ in the direction of the arrow ô ãã₤.
Using a suitable thin object, lever the battery out of the battery compartment ô ãô Fig.ô 25ã₤.
Insert the new battery as shown ô ãô Fig.ô 25ã₤ and push it into the battery compartment against the direction of the arrow ô ãã₤.
Fit the cover as shown ô ãô Fig.ô 24ã₤ and push it onto the vehicle key housing against the direction shown by the arrow until it engages.
ô Dispose of discharged batteries in accordance with regulations governing the protection of the environment.
ô The battery in the vehicle key may contain perchlorate. Please comply with any legal requirements and regulations when handling and
disposing of these batteries.
Synchronising the vehicle key
Firstô readô andô observeô theô introductoryô informationô andô safetyô warningsô ãIntroductionã₤
It may no longer be possible to lock or unlock the vehicle with the remote control if theô ô button is pressed repeatedly outside of the
effective range of the vehicle key. If this is the case, the vehicle key should be re-synchronised as follows:
Fold out the key bit of the vehicle key ô ãô Opening and closing the key bitã₤ .
Press the ô button on the vehicle key. Remain standing close to the vehicle.
Unlock the vehicle with the key bit within one minute. The synchronisation process is complete.
Fold in the key bit of the vehicle key.
ô Introduction
Thisô chapterô containsô informationô onô theô followingô subjects:
ô ãô Indicator lamp ã₤
ô ãô Description of the central locking system ã₤
ô ãô Locking and unlocking the vehicle from the outside ã₤
ô ãô Locking and unlocking the vehicle from the inside ã₤
ô ãô SAFELOCK mechanism ã₤
ô ãô Anti-theft alarm ã₤
ô ãô Interior monitoring system and anti-tow alarm ã₤
The central locking system will only work correctly when all doors and the tailgate are properly closed. The vehicle cannot be locked with the key
if the driver door is open.
If the vehicle is unlocked and not used for a long time (e.g. in your own garage) the vehicle battery could discharge or the engine may not start.
The vehicle key can be damaged if the battery is not changed properly.
Unsuitable batteries can damage the vehicle key. Replace discharged batteries only with new batteries of the same voltage rating, size and
specification.
Make sure that the battery is fitted the right way round.
NOTICE
Central locking system
Page 48 of 100
Downloaded from www.Manualslib.com manuals search engine 12/29/2015Bedienungsanleitung < Service & ZubehûÑr < Volkswagen Deutschland
13/136
Additional information and warnings:
Exterior views ô ãô Exterior views ã₤
Infotainment system ô ãô Infotainment systemã₤
Vehicle key set ô ãô Vehicle key set ã₤
Doors ô ãô Doors ã₤
Tailgate ô ãô Tailgate ã₤
Electric windows ô ãô Electric windows ã₤
Electric panorama sliding/tilting roof ô ãô Electric panorama sliding/tilting glass roof ã₤
Mirrors ô ãô Mirrors ã₤
Towing a trailer ô ãô Towing a trailer ã₤
Cleaning and caring for the vehicle exterior ô ãô Caring for and cleaning the vehicle exterior ã₤
Manual opening and closing ô ãô Manual opening and closing ã₤
Indicator lamp
Firstô readô andô observeô theô introductoryô informationô andô safetyô warningsô ãIntroductionã₤
The central locking system indicator lamp is located in the driver door ô ãô Vehicle interiorã₤ .
Depending on the vehicle equipment level, the vehicle may have an anti-theft alarm and a SAFELOCK mechanism ô ãô SAFELOCK mechanism ã₤ .
After locking the vehicleMeaning
Without anti-theft alarmWith anti-theft alarm and
SAFELOCK mechanism
A red LED flashes for approximately 2ô seconds, firstly at short
intervals and then more slowly.Vehicle is locked.Vehicle is locked and SAFELOCK is
activated.
A red LED flashes for approximately 2 seconds and then goes
out. The light starts to flash again after approximately 30
seconds.
ãVehicle is locked and SAFELOCK is
deactivated.
A red LED flashes for approximately 2ô seconds in short
Improper use of the central locking system could lead to serious injury.
The central locking system locks all doors. Locking the vehicle from the inside can prevent accidental opening of the doors and unauthorised
persons from entering the vehicle. However, locked doors can delay assistance to passengers inside the vehicle in the event of an accident
or emergency.
Never leave children or people requiring assistance alone in the vehicle. All doors can be locked from the inside using the central locking
button. This may mean that people lock themselves in the vehicle. People locked in the vehicle may be subjected to very high or very low
temperatures.
Temperatures inside a locked vehicle may reach extremes of heat or cold, according to season. This can cause serious injuries and illness
or fatalities, especially to small children.
Never leave anyone inside a locked vehicle. People in the vehicle could become trapped in an emergency and may not be able to get
themselves to safety.
WARNING