tow VOLKSWAGEN T-ROC 2019 Owner's Manual
[x] Cancel search | Manufacturer: VOLKSWAGEN, Model Year: 2019, Model line: T-ROC, Model: VOLKSWAGEN T-ROC 2019Pages: 502, PDF Size: 8.58 MB
Page 122 of 502

Introduction
This chapter contains information on the followingsubjects:
Folding the backrests on the rear bench seat forwards and backwards
The following section describes the options for adjusting the rear seats. Always ensure that you
adjust the correct sitting position Sitting position
WARNING
Incorrect adjustment of the rear seat can cause accidents and serious injuries.
The rear seat should be adjusted only when the vehicle is stationary as the rear seat could otherwise
move unexpectedly while the vehicle is in motion. Furthermore, an incorrect seating position is
adopted while adjusting the seat.
Adjust the rear seat only when there is no one in the adjustment area of the rear seats.
WARNING
Cigarette lighters left in the vehicle can become damaged or may ignite unnoticed. This can cause
serious burns and vehicle damage.
Before adjusting the seats, always make sure that there is no lighter on or near the moveable parts
of the seat.
Before closing stowage areas or compartments, always make sure that there is no lighter in the way.
Never stow lighters in stowage areas, compartments or on other surfaces in the vehicle. Cigarette
lighters may self-ignite as a result of high surface temperatures, particularly in summer.
WARNING
In order to reduce the risk of injury while the vehicle is in motion, the centre armrest must always be
folded up and the stowage compartment must be closed.
The middle seat on the rear bench seat must never be used when the centre armrest is folded down
neither by adults nor children. An incorrect sitting position can cause serious injuries.
Never transport an adult or child on the centre armrest.
Close the stowage compartment only when there is no one in its closing path.
NOTICE
Page 128 of 502

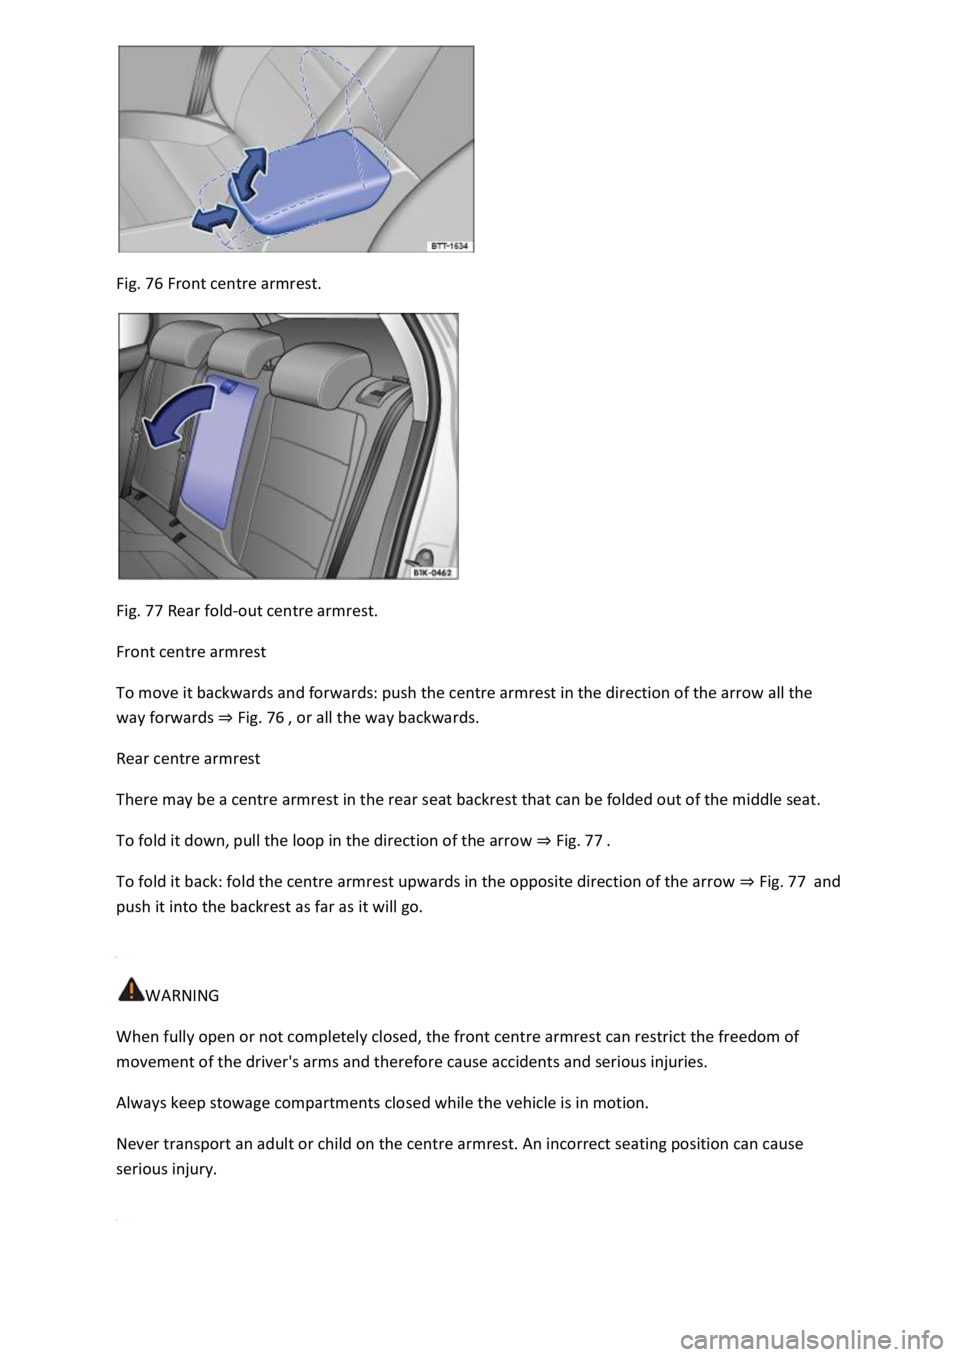
Fig. 76 Front centre armrest.
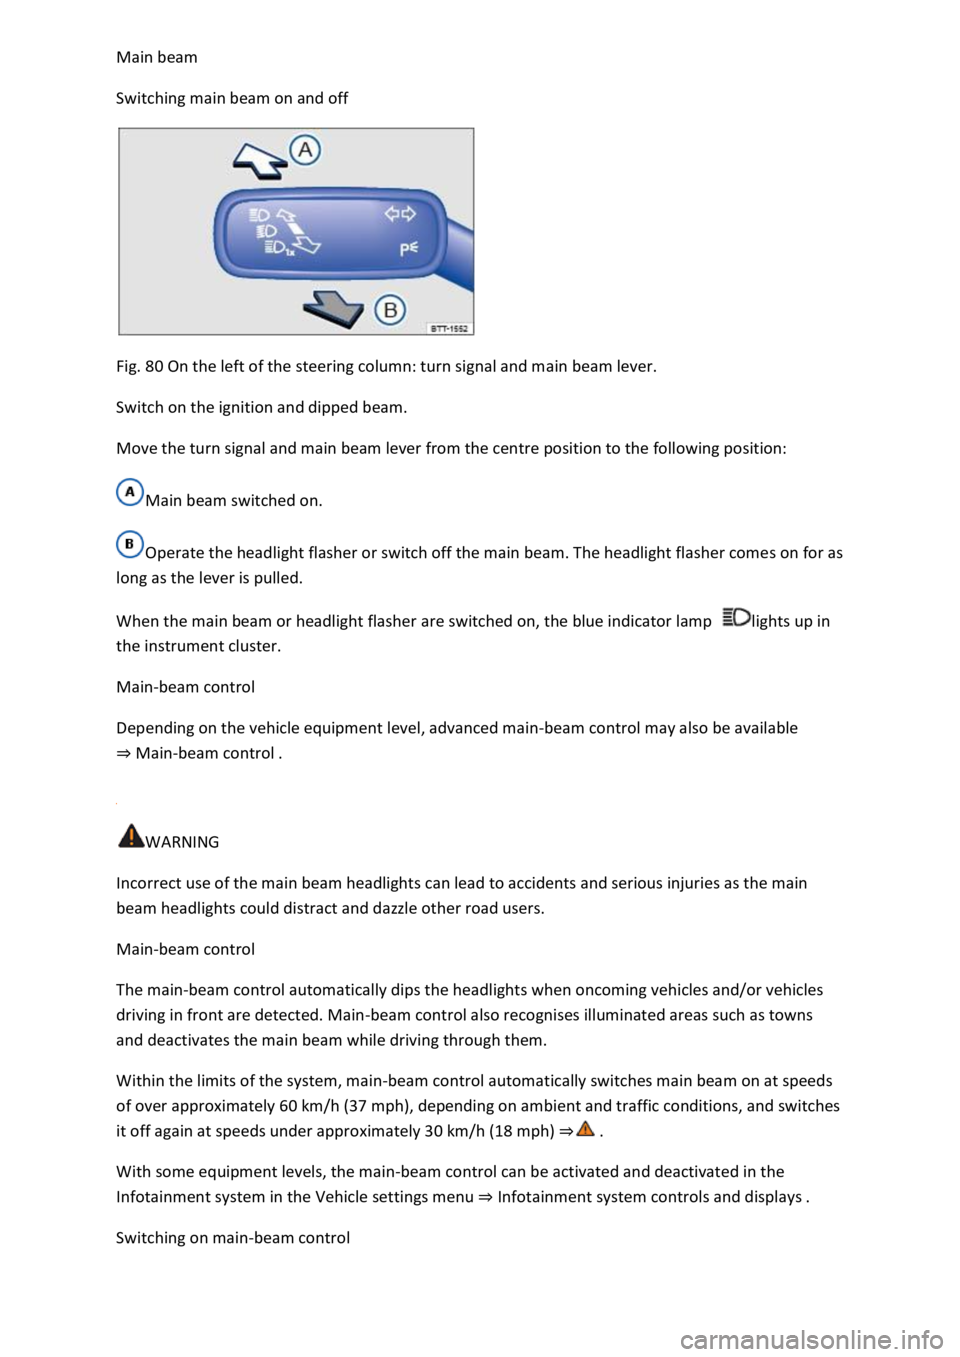
Fig. 77 Rear fold-out centre armrest.
Front centre armrest
To move it backwards and forwards: push the centre armrest in the direction of the arrow all the
way forwards Fig. 76
Rear centre armrest
There may be a centre armrest in the rear seat backrest that can be folded out of the middle seat.
To fold it down, pull the loop in the direction of the arrow Fig. 77
To fold it back: fold the centre armrest upwards in the opposite direction of the arrow Fig. 77and
push it into the backrest as far as it will go.
WARNING
When fully open or not completely closed, the front centre armrest can restrict the freedom of
movement of the driver's arms and therefore cause accidents and serious injuries.
Always keep stowage compartments closed while the vehicle is in motion.
Never transport an adult or child on the centre armrest. An incorrect seating position can cause
serious injury.
Page 132 of 502

both sides of the vehicle switches on to
provide better illumination of the surrounding area when manoeuvring.
Switching the fog lights on and off
Switching on the front fog lights : pull the light switch Fig. 79out to the first position. The
indicator lamp in the light switch lights up green.
Switching on the rear fog light : pull the light switch all the way out. The indicator lamp in the
instrument cluster lights up yellow.
To switch the fog lights off, press in the light switch or turn it to position .
When the automatic headlights are switched on and the front or rear fog lights are switched
on, the dipped beam headlights will also be switched on irrespective of the current light conditions
outside.
In vehicles with a factory-fitted towing bracket: the vehicle's rear fog light is not switched on if a
trailer with rear fog light is electrically connected to the vehicle Trailer towing
Light functions
Side lights
If the side lights are switched on, both headlights light up with the side lights, parts of the tail
light clusters, the number plate lighting and the buttons in the centre console and the dash panel.
The daytime running lights also switch on when the ignition is switched on.
If the vehicle is not locked from outside when the ignition is switched off, the continuous parking
light on both sides of the vehicle switches on automatically after around 10 minutes to reduce 12-
volt vehicle battery discharge Switching the parking lights on and off
Automatic headlights
If the automatic headlights are switched on, the vehicle lighting and the instrument and
switch lighting will switch on and off according to the light conditions. When the lights are switched
on, the indicator lamp lights up yellow.
The automatic headlights are merely an aid and will not always be able to detect all driving
situations.
In vehicles with a corresponding equipment level, the switch-on time of the automatic headlights
can be adjusted in the Infotainment system in the Vehicle settings menu Infotainment system
controls an
Cornering light
A cornering light is switched on when turning slowly or travelling around very tight bends.
Signal tones if lights are not switched off
Page 134 of 502

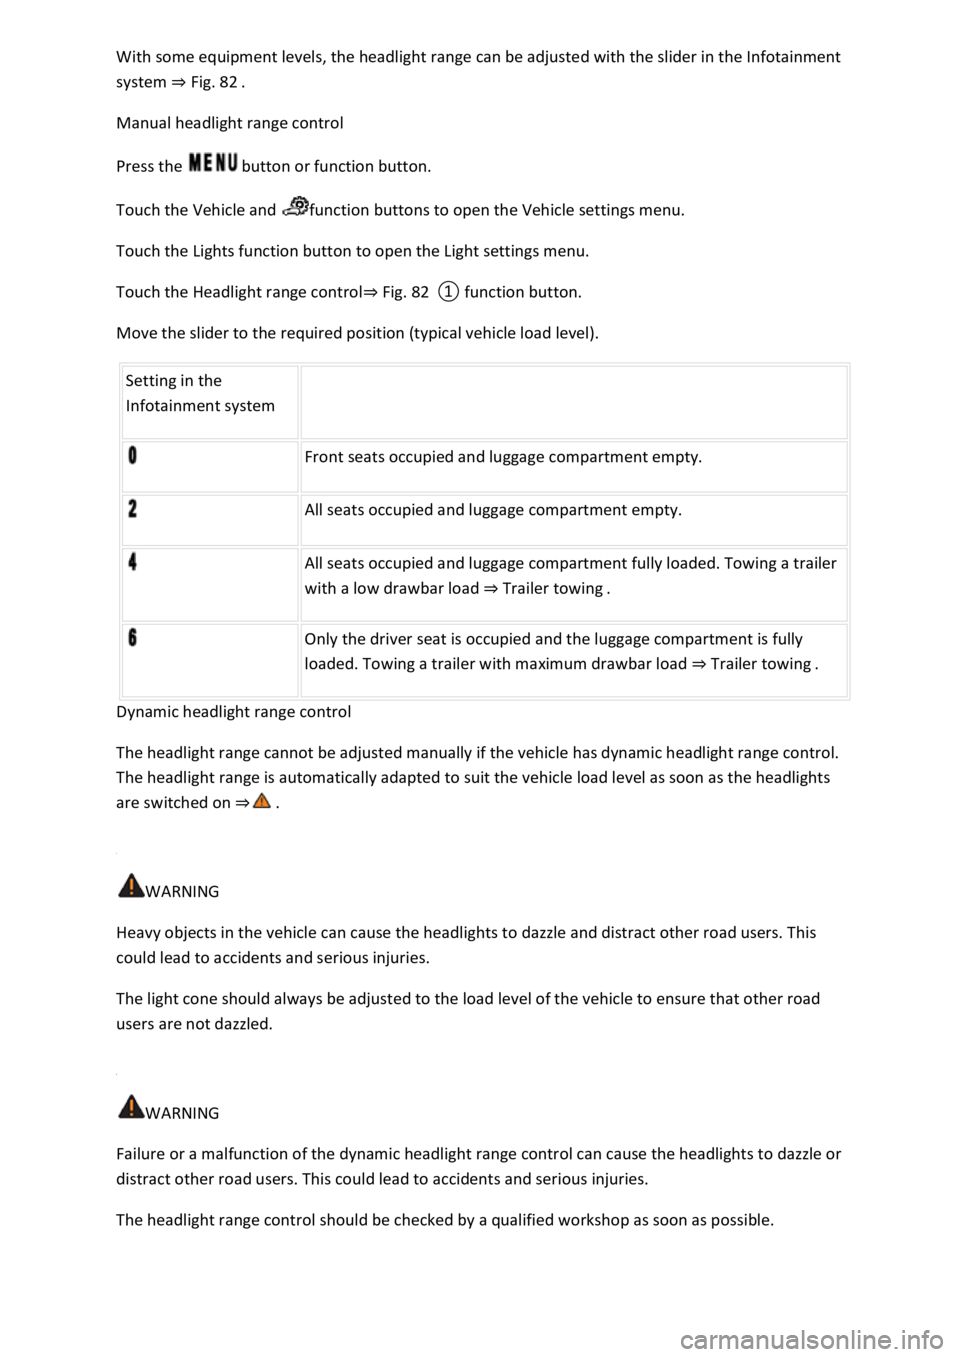
Switching main beam on and off
Fig. 80 On the left of the steering column: turn signal and main beam lever.
Switch on the ignition and dipped beam.
Move the turn signal and main beam lever from the centre position to the following position:
Main beam switched on.
Operate the headlight flasher or switch off the main beam. The headlight flasher comes on for as
long as the lever is pulled.
When the main beam or headlight flasher are switched on, the blue indicator lamp lights up in
the instrument cluster.
Main-beam control
Depending on the vehicle equipment level, advanced main-beam control may also be available
Main-beam control
WARNING
Incorrect use of the main beam headlights can lead to accidents and serious injuries as the main
beam headlights could distract and dazzle other road users.
Main-beam control
The main-beam control automatically dips the headlights when oncoming vehicles and/or vehicles
driving in front are detected. Main-beam control also recognises illuminated areas such as towns
and deactivates the main beam while driving through them.
Within the limits of the system, main-beam control automatically switches main beam on at speeds
of over approximately 60 km/h (37 mph), depending on ambient and traffic conditions, and switches
it off again at speeds under approximately 30 km/h (18 mph)
With some equipment levels, the main-beam control can be activated and deactivated in the
Infotainment system in the Vehicle settings menu Infotainment system controls and displays
Switching on main-beam control
Page 139 of 502

system Fig. 82
Manual headlight range control
Press the button or function button.
Touch the Vehicle and function buttons to open the Vehicle settings menu.
Touch the Lights function button to open the Light settings menu.
Touch the Headlight range controlFig. 82
Move the slider to the required position (typical vehicle load level).
Setting in the
Infotainment system
Front seats occupied and luggage compartment empty.
All seats occupied and luggage compartment empty.
All seats occupied and luggage compartment fully loaded. Towing a trailer
with a low drawbar load Trailer towing.
Only the driver seat is occupied and the luggage compartment is fully
loaded. Towing a trailer with maximum drawbar load Trailer towing.
Dynamic headlight range control
The headlight range cannot be adjusted manually if the vehicle has dynamic headlight range control.
The headlight range is automatically adapted to suit the vehicle load level as soon as the headlights
are switched on
WARNING
Heavy objects in the vehicle can cause the headlights to dazzle and distract other road users. This
could lead to accidents and serious injuries.
The light cone should always be adjusted to the load level of the vehicle to ensure that other road
users are not dazzled.
WARNING
Failure or a malfunction of the dynamic headlight range control can cause the headlights to dazzle or
distract other road users. This could lead to accidents and serious injuries.
The headlight range control should be checked by a qualified workshop as soon as possible.
Page 140 of 502

If you have to drive a right-hand drive vehicle in a left-hand drive country, or vice versa, the
asymmetric dipped beam headlights may dazzle oncoming traffic. The headlights must therefore be
switched over when you travel to these countries.
With some equipment levels, the headlight alignment can be adjusted in the Infotainment system in
the Vehicle settings menu Infotainment system controls and displays
In vehicles in which the headlights cannot be switched over in the menu, masking stickers should be
applied to certain parts of the headlight lenses, or the headlights should be adjusted by a qualified
workshop. A qualified workshop can provide you with further information. Volkswagen recommends
using a Volkswagen dealership for this purpose.
Travel mode may be used only for a short period. Please contact a qualified workshop for a
permanent conversion. Volkswagen recommends using a Volkswagen dealership for this purpose.
Interior lighting
Instrument and switch lighting
The brightness of the instrument and switch lighting can be adjusted in the Infotainment system in
the Vehicle settings menu Infotainment system controls and displays
The brightness setting is automatically adjusted to the changing light conditions in the vehicle.
When the light switch is in position , a sensor will switch the dipped beam and the lighting in
the instruments and switches on and off automatically depending on the ambient brightness level.
When the light is switched off and the ignition switched on, the instrument and switch lighting
(needles and scales) is switched on. As the ambient light becomes lower, the illumination of the
scales is automatically reduced and may be switched off entirely. This function is intended to remind
the driver to switch on the dipped beam in good time, i.e. when driving through tunnels.
Interior and reading lights
Press the appropriate button or move the switch to the appropriate position:
Switch off the interior light.Switch on the interior lights.The interior lights are switched on
automatically when the vehicle is unlocked, a door is opened or the vehicle key is removed from the
ignition.Switch the reading light on or off.
Stowage compartment and luggage compartment lights
A light will be switched on and off when the stowage compartment on the front passenger side or
the boot lid is opened or closed.
Background lighting
Page 151 of 502

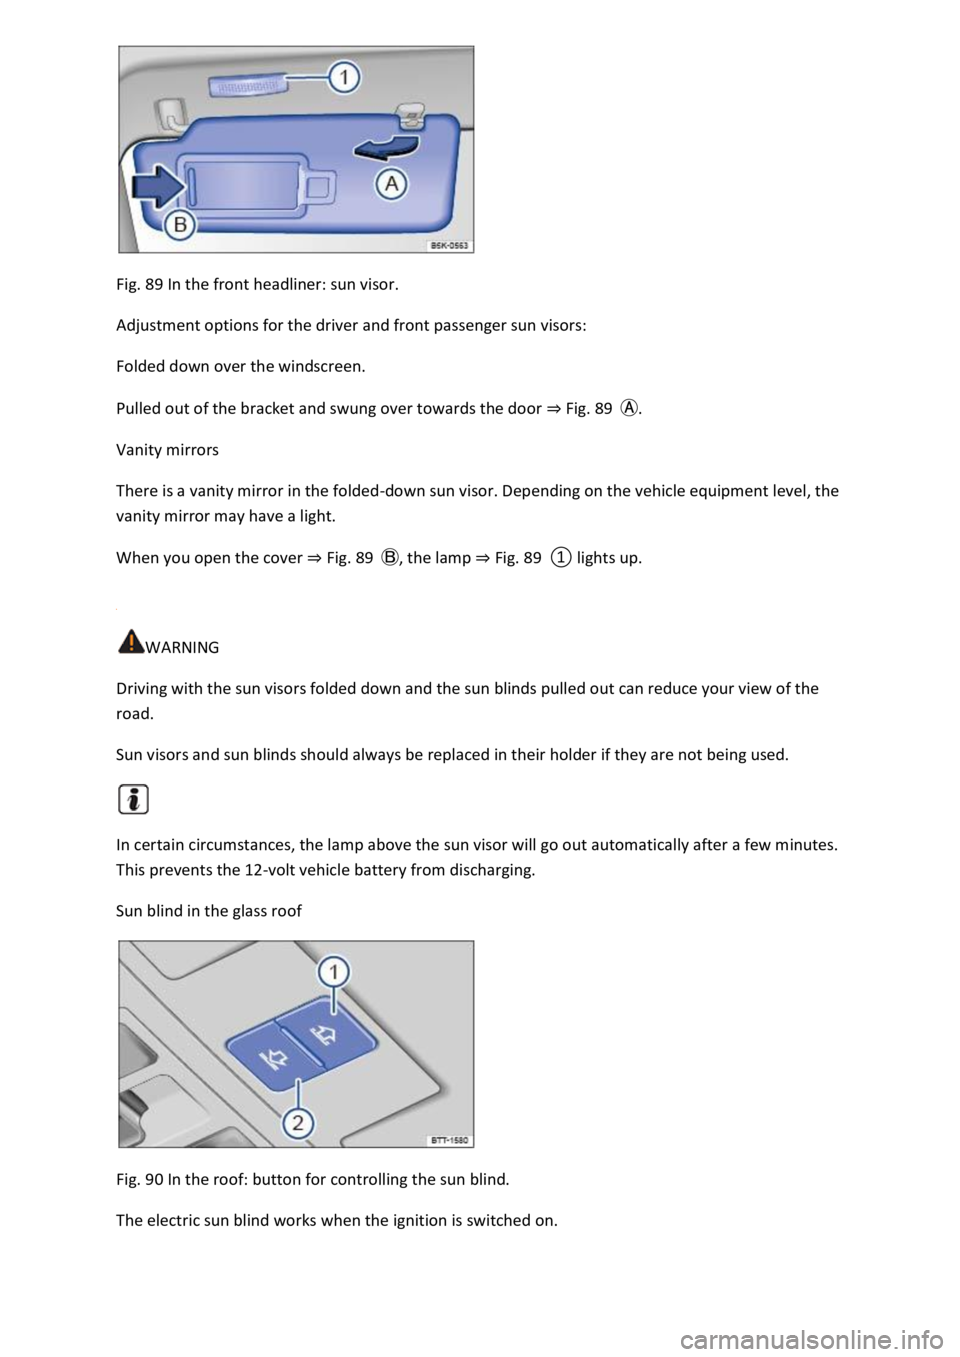
Fig. 89 In the front headliner: sun visor.
Adjustment options for the driver and front passenger sun visors:
Folded down over the windscreen.
Pulled out of the bracket and swung over towards the door Fig. 89
Vanity mirrors
There is a vanity mirror in the folded-down sun visor. Depending on the vehicle equipment level, the
vanity mirror may have a light.
When you open the cover Fig. 89Fig. 89
WARNING
Driving with the sun visors folded down and the sun blinds pulled out can reduce your view of the
road.
Sun visors and sun blinds should always be replaced in their holder if they are not being used.
In certain circumstances, the lamp above the sun visor will go out automatically after a few minutes.
This prevents the 12-volt vehicle battery from discharging.
Sun blind in the glass roof
Fig. 90 In the roof: button for controlling the sun blind.
The electric sun blind works when the ignition is switched on.
Page 175 of 502

nment system can
distract you from the road.
Always drive carefully and responsibly.
Information on the brakes
New brake pads cannot generate the full braking effect during the first 200 to 300 km and must first
be run in
pressure on the brake pedal. During the run-in period, the braking distance is longer for full or
emergency braking than when the brake pads have been run in. In the run-in period, full braking
should be avoided and also situations that create a heavy load on the brakes, e.g. when driving up
close to the vehicle ahead.
The wear of the brake pads depends to a great extent on the conditions under which the vehicle is
operated and the way the vehicle is driven. If the vehicle is used for regular urban trips, short
journeys, and is driven with a sporty driving style, the brake pads must be regularly checked by a
qualified workshop.
When driving with wet brakes, for example after driving through water, after heavy rainfall or after
washing the vehicle, the braking effect may be delayed as the brake discs will be wet, or possibly
iced up (in winter). The brakes must be dried as quickly as possible by careful braking at higher
speed. Please ensure that no following vehicle and no other road user is put at risk as a result of this
action
A layer of salt that accumulates on the discs and pads will reduce the braking effect and increase the
braking distance. If the vehicle has not been braked for a long time on roads which have been gritted
with salt, the layer of salt must be reduced through careful braking
Corrosion on the brake discs and dirt in the brake pads are facilitated through long standstill times,
low mileage and low load levels. If the brake pads have been hardly used or if they are corroded,
Volkswagen recommends that the brake discs and brake pads be cleaned by braking strongly several
times from high speed. Please ensure that no following vehicle and no other road user is put at risk
as a result of this action
Brake servo
The brake servo will function only when the engine is running and reinforces the pressure applied by
the driver on the brake pedal.
If the brake servo does not function or the vehicle is being towed, the brake pedal will have to be
depressed more forcefully as the braking distance will be increased due to the lack of assistance for
the brake system
WARNING
Driving with worn brake pads or with a faulty brake system can cause accidents and serious injuries.
If the warning lamp lights up either alone or together with a text message in the instrument
cluster display, go to a qualified workshop immediately to have the brake pads checked and the
worn brake pads replaced.
Page 176 of 502

WARNING
New brake pads will not have the optimal braking effect when first fitted.
New brake pads cannot generate the full braking effect during the first 300 km and must first be run
in. A reduced braking effect can be increased by applying more pressure to the brake pedal.
In order to reduce the risk of accidents, serious injuries and the loss of control over the vehicle, you
must drive particularly carefully when driving with new brake pads.
Never drive too close to other vehicles during the run-in time for the new brake pads and never
create a driving situation that will place a heavy load on the brakes.
WARNING
Overheated brakes reduce the braking effect and considerably increase the braking distance.
When driving downhill, the brakes are placed under particular strain and become hot very quickly.
Before driving down a long, steep gradient, reduce speed and change to a lower gear (with manual
gearboxes or in Tiptronic mode with the automatic gearbox). This will make use of the engine
braking effect and relieve the load on the brakes.
Non-standard or damaged front spoilers could restrict the airflow to the brakes and cause them to
overheat.
WARNING
Wet brakes or brakes coated with ice or road salt react more slowly and require longer braking
distances.
Carefully apply the brakes to test them.
Always dry brakes and clean off any coating of ice and salt with a few cautious applications of the
brake when visibility, weather, road and traffic conditions permit.
WARNING
Driving without the brake servo can considerably increase the braking distance and thus cause
accidents and serious injuries.
Never switch the engine or ignition off while the vehicle is in motion.
If the brake servo does not function or the vehicle is being towed, the brake pedal will have to be
depressed more forcefully as the braking distance will be increased due to the lack of assistance for
the brake system.
Page 177 of 502

If the front brake pads are checked, the rear brake pads should be checked at the same time. A
visual check of the thickness of all brake pads should be carried out regularly by checking the brake
pads through the openings in the rims or from the underside of the vehicle. If necessary, remove the
wheels to carry out a comprehensive check. Volkswagen recommends using a Volkswagen
dealership for this purpose.
Driving a loaded vehicle
For good vehicle handling when driving a loaded vehicle, please observe the following:
Stow all items of luggage securely Stowing luggage and loads
Accelerate particularly cautiously and carefully.
Avoid sudden braking and driving manoeuvres.
Brake earlier than in normal driving.
If applicable, observe the information concerning the roof carrier Roof carrier
WARNING
Moving loads can severely impair the vehicle's stability and driving safety which could cause
accidents and serious injuries.
Secure items properly so they cannot slide about.
Use suitable lashing or securing straps when securing heavy objects.
Securely engage the rear seat backrests.
Driving with an open boot lid
Driving with an open boot lid is particularly dangerous. All objects and the open boot lid must be
secured properly. Take the appropriate measures to reduce the amount of poisonous exhaust fumes
that could enter into the vehicle.
WARNING
Driving with an unlocked or open boot lid can cause serious injuries.
Always drive with the boot lid closed.
Always stow all items in the luggage compartment securely. Loose objects can fall out of the luggage
compartment and injure other road users.
Always drive especially carefully and think ahead.