start button VOLKSWAGEN T-ROC 2019 Owners Manual
[x] Cancel search | Manufacturer: VOLKSWAGEN, Model Year: 2019, Model line: T-ROC, Model: VOLKSWAGEN T-ROC 2019Pages: 502, PDF Size: 8.58 MB
Page 6 of 502

In the engine compartment
Fuse box cover Changing fuses
Lever for adjusting the steering column position Steering wheel
Light switch Vehicle lighting
Turn signal and main beam lever Vehicle lighting
With switches and buttons for the driver assist systems Button for driver assist systemsDriver
assist systems
Vents Heating and air conditioning system
Instrument cluster Instrument cluster
With warning and indicator lamps Symbols in instrument cluster
Lever for wipers and washers Wipers
With buttons for operating the menus Instrument cluster
Controls on the multifunction steering wheel:
Operating driver assist systems Operating using the multifunction steering wheelDriver assist
systems
Audio, navigation
Opening the telephone menu or accepting telephone calls
Volume adjustment
Activating voice control (no function in some models)
Horn
Location of the driver front airbag Airbag system
Ignition lock Starting and stopping the engine
Pedals Pedals
Page 14 of 502

Introduction
This chapter contains information on the followingsubjects:
Analogue instrument cluster
Rev counter
Digital instrument cluster (Active Info Display)
Displays
Instrument cluster menus
Service menu
Driving data display (multifunction display)
Warning and information messages
Driver Alert System (recommendation for rest breaks)
Dynamic Road Sign Display (Sign Assist)
Time
Lap timer
Fuel gauge
Coolant temperature display
Service interval display
The vehicle is equipped either with an analogue or a digital instrument cluster (Active Info Display).
When you start the engine after the 12-volt battery has been totally discharged or changed, you may
find that system settings (time, date, personal convenience settings and programming) have been
changed or deleted. Check and correct the settings as necessary once the 12-volt vehicle battery has
been sufficiently charged.
WARNING
Accidents and injuries can occur if the driver is distracted.
Never press the buttons on the instrument cluster while the vehicle is in motion.
Any settings for the instrument cluster display and displays in the Infotainment system should be
made only when the vehicle is stationary in order to reduce the risk of accidents and serious injuries.
Page 15 of 502

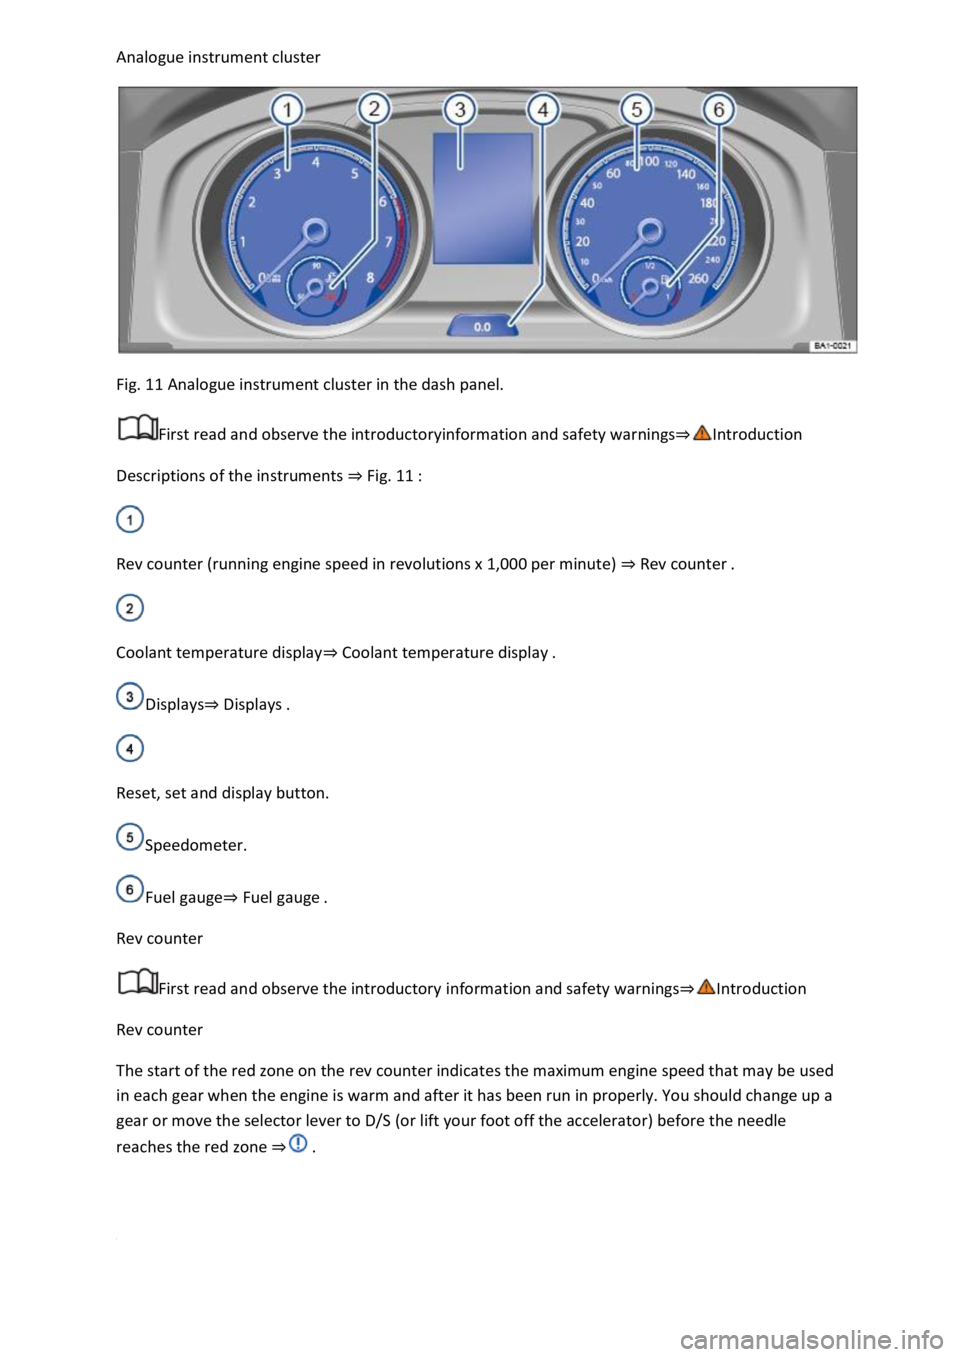
Fig. 11 Analogue instrument cluster in the dash panel.
First read and observe the introductoryinformation and safety warnings
Descriptions of the instruments Fig. 11
Rev counter (running engine speed in revolutions x 1,000 per minute) Rev counter
Coolant temperature displayCoolant temperature display
DisplaysDisplays
Reset, set and display button.
Speedometer.
Fuel gaugeFuel gauge
Rev counter
First read and observe the introductory information and safety warnings
Rev counter
The start of the red zone on the rev counter indicates the maximum engine speed that may be used
in each gear when the engine is warm and after it has been run in properly. You should change up a
gear or move the selector lever to D/S (or lift your foot off the accelerator) before the needle
reaches the red zone
Page 18 of 502

or arrow button on the multifunction steering wheel to select the required
map size. A frame appears around the selected option.
Press the button on the multifunction steering wheel to confirm your selection.
With some equipment levels, navigation is shown on two screens or only one. The navigation map
can be displayed on the Active Info Display and Infotainment system or only on the Infotainment
system display. In the latter case, only navigation arrows are shown on the Active Info Display.
Displays
First read and observe the introductoryinformation and safety warnings
Possible instrument cluster displays
Open doors, bonnet and boot lid.
Warning and information messages.
Mileage displays.
Time Time
Radio and navigation information ookletInfotainment system,.
Telephone information Infotainment system,.
Outside temperature.
Compass display.
Selector lever positions.
Gear-change indicator Gear-change indicator
Driving data display (multifunction display) and menus for various settings Instrument cluster
menus
Service interval display Service interval display
Speed warning Instrument cluster menus
Speed warning for winter tyres.
Start/stop system status display Start/stop system
Road signs detected by the Dynamic Road Sign Display system Dynamic Road Sign Display (Sign
Assist)
Status display for Active Cylinder Management (ACT
Page 22 of 502

Settings can be made in the Service menu1) depending on the vehicle equipment.
Opening the Service menu
To open the Service menu, select the Range information profile and press and hold the OK button on
the multifunction steering wheel for around four seconds. You can now navigate in the menu in the
usual way using the buttons on the multifunction steering wheel.
Resetting the service interval display
Select the Service menu and follow the instructions on the instrument cluster display.
Resetting oil change service
Select the Reset oil service menu and follow the instructions on the instrument cluster display.
Resetting driving data
Select the Reset trip menu and follow the instructions on the instrument cluster display to reset the
desired value.
Engine code
Select the Engine code menu. The engine codes are now shown on the instrument cluster display.
Setting the time
Select the Time menu and set the correct time with the arrow buttons or .
1) Only in vehicles with an Active Info Display.
Driving data display (multifunction display)
First read and observe the introductoryinformation and safety warnings
The driving data display (multifunction display) shows a variety of travel and fuel consumption data.
Switching between displays
Vehicles without multifunction steering wheel:
Press the rocker switch on the wiper lever Operating using the wiper lever
Vehicles with multifunction steering wheel:
Press the or button Operating using the multifunction steering wheel
Switching between memories
Press the button on the wiper lever, or press the button on the multifunction
steering wheel.
Since start memory
Page 25 of 502

First read and observe the introductoryinformation and safety warnings
The Driver Alert System informs the driver if their driving shows signs of tiredness.
Fig. 13 On the instrument cluster display: Driver Alert System symbol.
Function and operation
The Driver Alert System determines the driving behaviour of the driver at the start of a journey and
uses this to calculate a fatigue assessment. This is continuously compared with the current
behaviour of the driver while driving. If the system detects that the driver may be tired, an acoustic
warning signal will sound and a symbol Fig. 13will be displayed on the instrument cluster display
as a visual indication in combination with a supplementary text message. The message in the
instrument cluster display is displayed for about five seconds and may be repeated once. The last
displayed message is saved by the system.
The message on the instrument cluster display can be switched off by pressing the
button on the wiper lever or the button on the multifunction steering wheel Operating the
instrument clustere can be displayed again on the instrument cluster display using the
multifunction display W
Function conditions
The driving behaviour can be evaluated only when the speed is above 60 km/h (37 mph) up to
approximately 200 km/h (125 mph).
Switching on and off
The Driver Alert System can be activated and deactivated in the vehicle settings in the Infotainment
system Vehicle settings menu
Function limitations
The Driver Alert System has system-related limitations. The following conditions can limit the
function of the Driver Alert System, or prevent it from working altogether:
Speeds below 60 km/h (37 mph).
Speeds above 200 km/h (125 mph).
Twisting roads.
Poor roads.
Adverse weather conditions.
Page 31 of 502

-level menus can be displayed:
Lap timer
Lap (with the current lap number)
Statistics
Switching between the menus
Vehicles without multifunction steering wheel:
Press the rocker switch on the wiper lever Operating the instrument cluster
Vehicles with multifunction steering wheel:
Press the or button Operating the instrument cluster
The following list shows an example of how the menus in the instrument cluster display are
structured. The actual scope of the menus and the names of the individual menu options vary
according to the instrument cluster design and the vehicle electronics.
Menu displays and functions
Lap timer menu
StartStarts the lap timer.Since startTiming starts when the vehicle drives off. If the vehicle is already
in motion, timing will begin when the vehicle has come to a temporary standstill.StatisticsAn
overview of the laps driven until now are displayed.
Lap menu
Stop!Active timing is interrupted. This will not end the lap.ContinuePaused timing resumes.Split
time:A split time will be displayed for approximately five seconds. Active timing continues parallel to
this.New lapTiming of the current lap will then be interrupted and a new lap will begin. The time of
the completed lap will be carried over to the statistics.Abort lapThe timing is ended and disregarded.
The current lap is not entered into the statistics.EndTiming is ended. The lap is entered into the
statistics.
Statistics menu
BackIt will be reset to the previous menu.ResetAll stored statistics data will be reset.
In the Statistics menu, the lap times most recently achieved are shown. If the maximum number of
99 laps or the maximum time of 99 hours, 59 minutes and 59 seconds has been reached, a new
timing can only be started after the statistics have been reset.
WARNING
Accidents and injuries can occur if the driver is distracted.
Make lap timer settings and access statistics only when the vehicle is stationary.
Page 41 of 502

When you start the engine after the 12-volt vehicle battery has been totally discharged or changed,
you may find that system settings (time, date, personal convenience settings and programming) and
user accounts have been changed or deleted. Check and correct the settings as necessary once the
12-volt vehicle battery has been sufficiently charged.
Vehicle settings menu
First read and observe the introductoryinformation and safety warnings
You can switch individual functions and systems on and off and make settings in the vehicle settings
of the Infotainment system.
Opening the Vehicle settings menu
Switch on the ignition.
Switch on Infotainment system if necessary.
Press the button or function button.
Touch the Vehicle and function buttons to open the Vehicle settings menu.
Touch the corresponding function buttons to open additional menus in the Vehicle settings menu or
to make settings in the menu options.
If the checkbox in the function button is ticked , the respective function is switched on.
Touch the function button to return to the previous menu.
Performance monitor
First read and observe the introductoryinformation and safety warnings
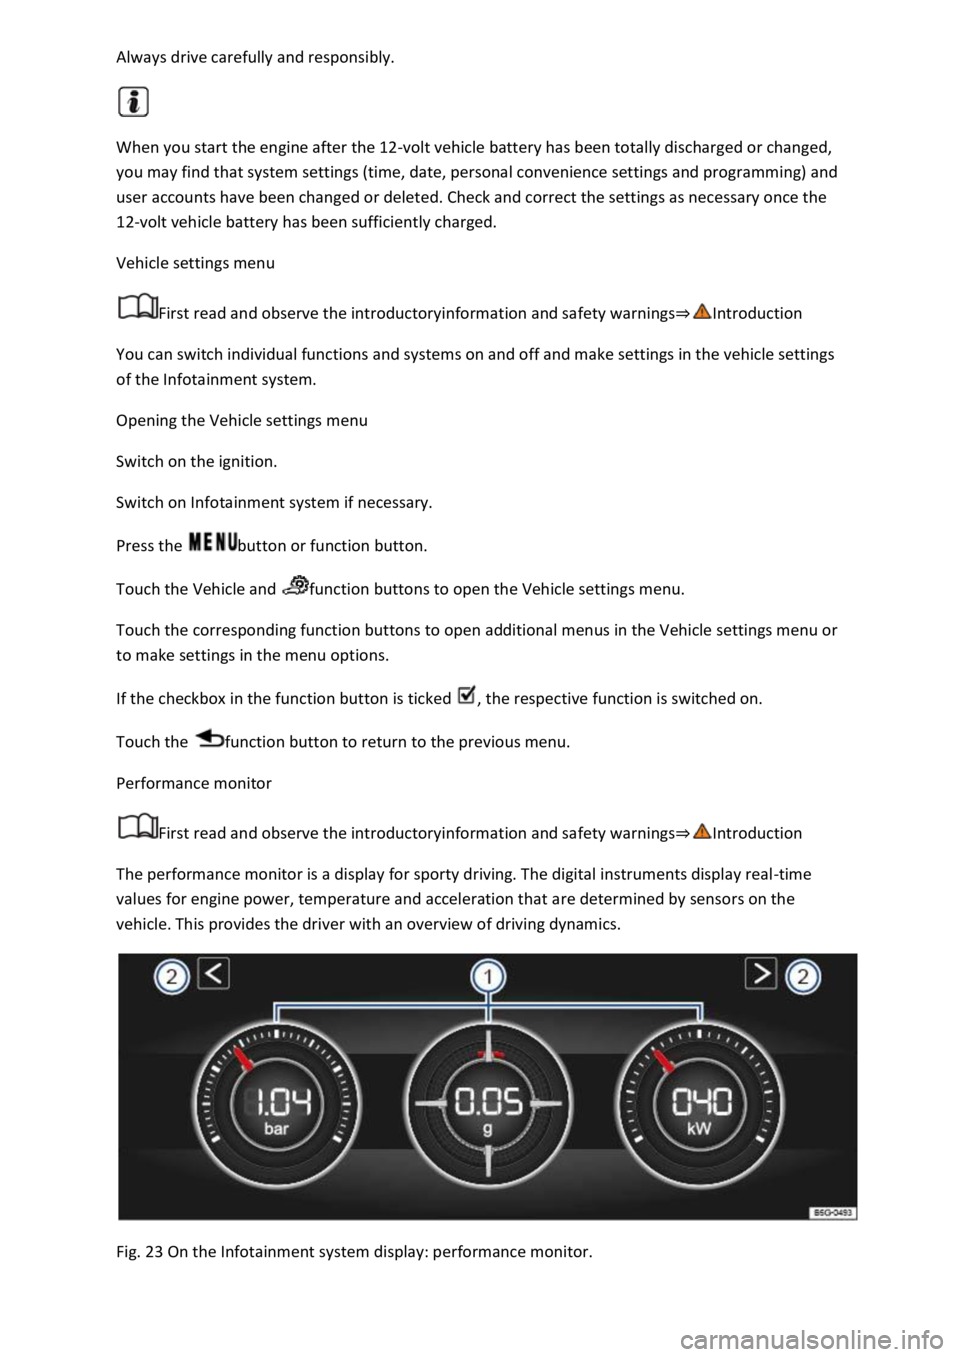
The performance monitor is a display for sporty driving. The digital instruments display real-time
values for engine power, temperature and acceleration that are determined by sensors on the
vehicle. This provides the driver with an overview of driving dynamics.
Fig. 23 On the Infotainment system display: performance monitor.
Page 43 of 502

needle may move further in a clockwise direction under high engine
loads and at high outside temperatures. This is no cause for concern unless the indicator lamp
in the instrument cluster display is lit up or flashing Engine oil
Adapting the display areas to the driving situation
Choose the three possible instruments corresponding to your individual driving style and the driving
situation.
WARNING
Accidents and injuries can occur if the driver is distracted. Operating the Infotainment system can
distract you from the road.
Always drive carefully and responsibly.
NOTICE
When starting from cold, avoid high engine speeds, driving at full throttle and over-loading the
engine.
Due to the principle of performance determination used in the vehicle, the physical accuracy of the
displayed values is not guaranteed.
Lap timer
First read and observe the introductoryinformation and safety warnings
The lap timer provides you with the option of timing your own laps manually in the vehicle on a race
track, storing the times and comparing them with previously measured best times.
Fig. 24 On the Infotainment system display: lap timer with stopwatch, function button and lap times.
Page 44 of 502

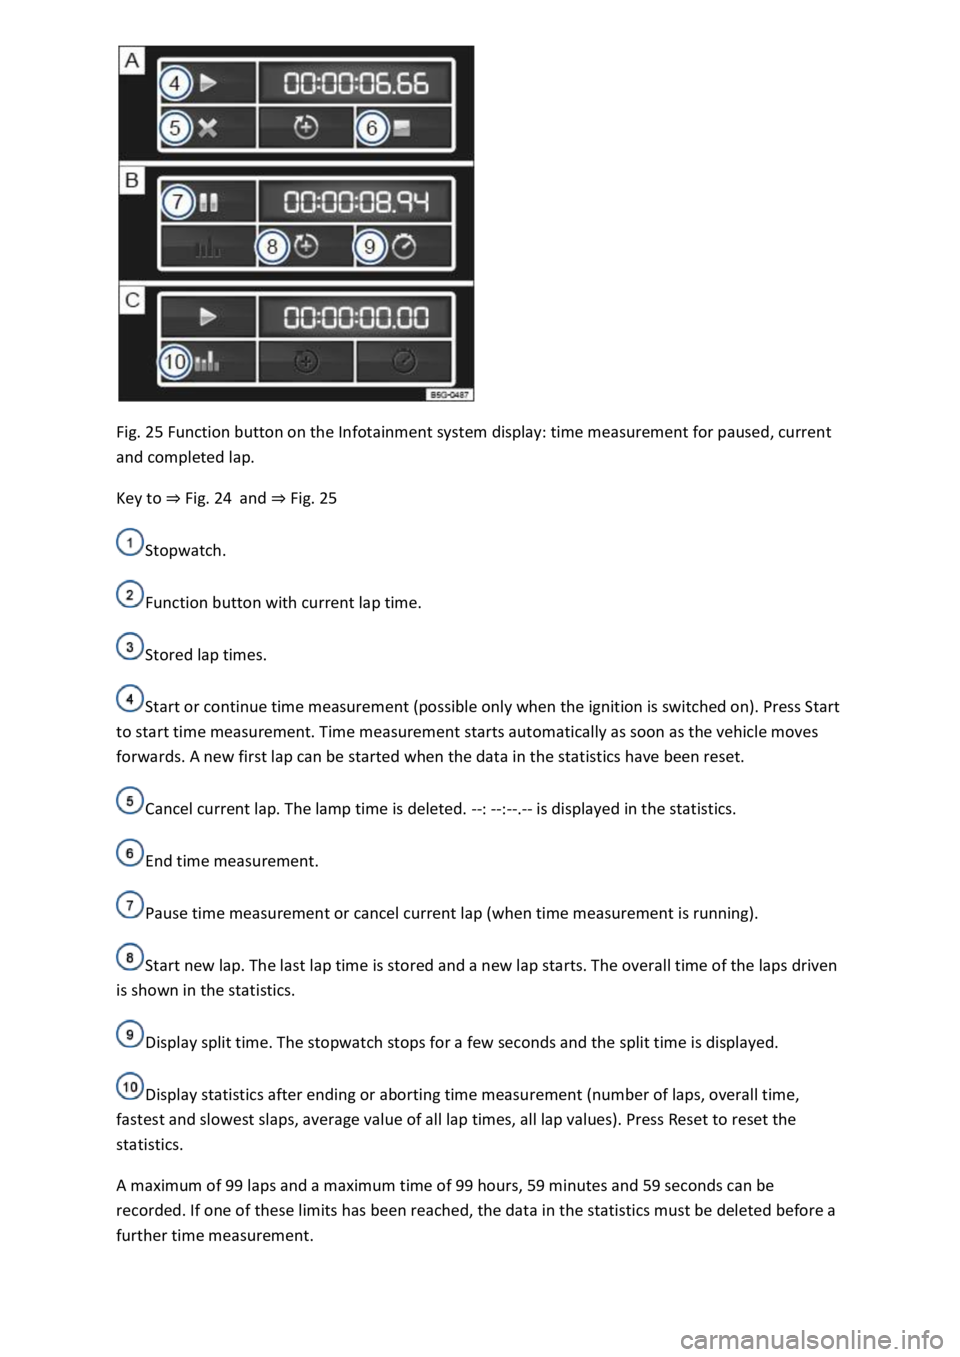
Fig. 25 Function button on the Infotainment system display: time measurement for paused, current
and completed lap.
Key to Fig. 24and Fig. 25
Stopwatch.
Function button with current lap time.
Stored lap times.
Start or continue time measurement (possible only when the ignition is switched on). Press Start
to start time measurement. Time measurement starts automatically as soon as the vehicle moves
forwards. A new first lap can be started when the data in the statistics have been reset.
Cancel current lap. The lamp time is deleted. --: --:--.-- is displayed in the statistics.
End time measurement.
Pause time measurement or cancel current lap (when time measurement is running).
Start new lap. The last lap time is stored and a new lap starts. The overall time of the laps driven
is shown in the statistics.
Display split time. The stopwatch stops for a few seconds and the split time is displayed.
Display statistics after ending or aborting time measurement (number of laps, overall time,
fastest and slowest slaps, average value of all lap times, all lap values). Press Reset to reset the
statistics.
A maximum of 99 laps and a maximum time of 99 hours, 59 minutes and 59 seconds can be
recorded. If one of these limits has been reached, the data in the statistics must be deleted before a
further time measurement.