Parking assist VOLKSWAGEN TIGUAN 2017 Owner´s Manual
[x] Cancel search | Manufacturer: VOLKSWAGEN, Model Year: 2017, Model line: TIGUAN, Model: VOLKSWAGEN TIGUAN 2017Pages: 341, PDF Size: 9.14 MB
Page 8 of 341
Stowage compartment ⇒ Stowage areas
Release lever for the bonnet ⇒ In the engine compartment
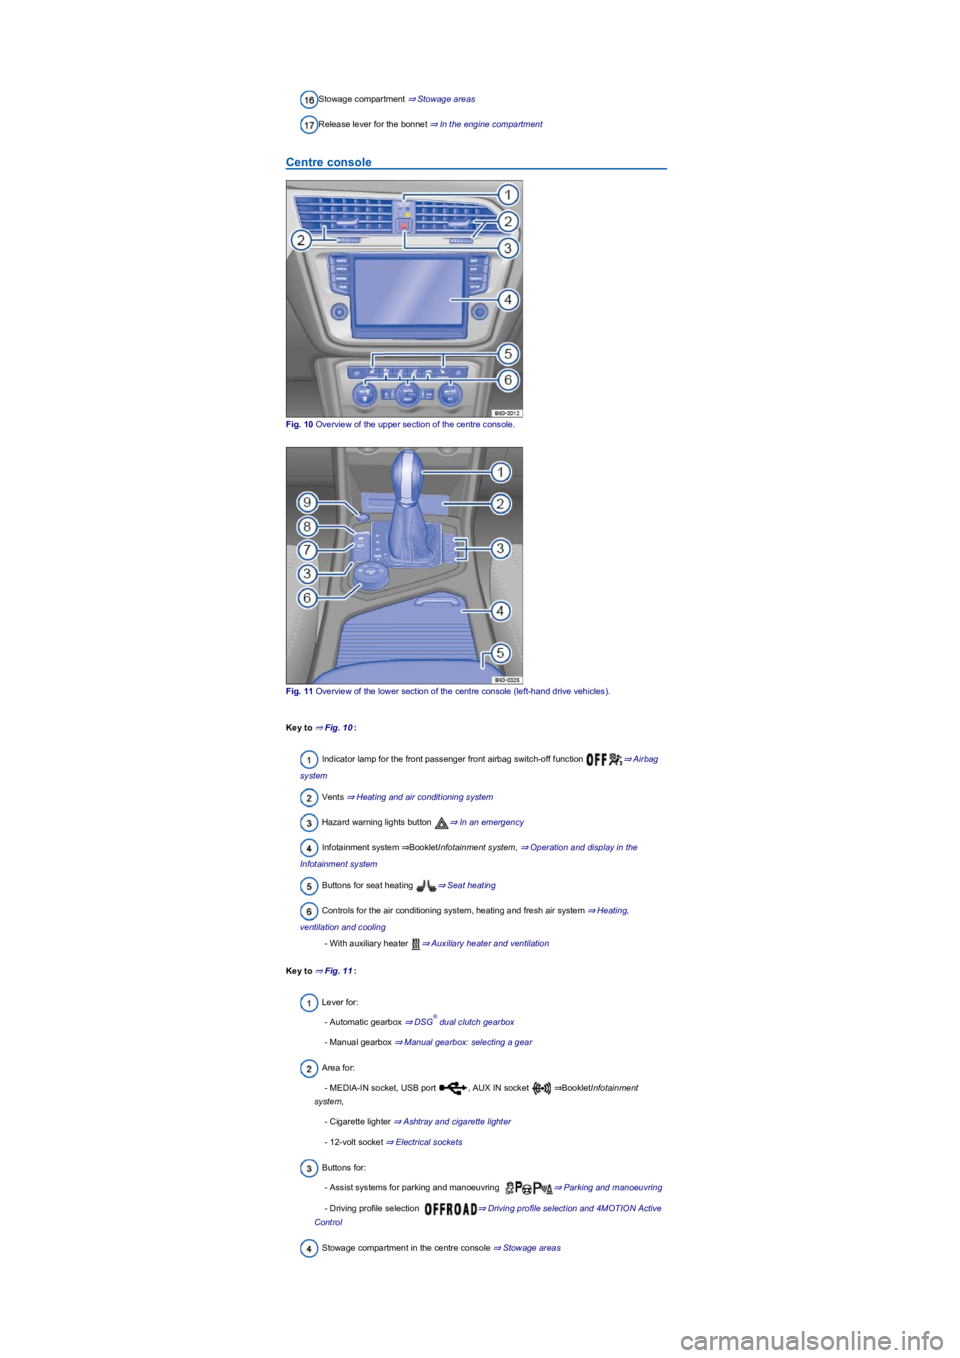
Centre console
Fig. 10 Overview of the upper section of the centre console.
Fig. 11 Overview of the lower section of the centre console (left-hand drive vehicles).
Key to ⇒ Fig. 10:
Indicator lamp for the front passenger front airbag switch-off function ⇒ Airbag
system
Vents ⇒ Heating and air conditioning system
Hazard warning lights button ⇒ In an emergency
Infotainment system ⇒BookletInfotainment system, ⇒ Operation and display in the
Infotainment system
Buttons for seat heating ⇒ Seat heating
Controls for the air conditioning system, heating and fresh air system ⇒ Heating,
ventilation and cooling
- With auxiliary heater ⇒ Auxiliary heater and ventilation
Key to ⇒ Fig. 11:
Lever for:
- Automatic gearbox ⇒ DSG dual clutch gearbox
- Manual gearbox ⇒ Manual gearbox: selecting a gear
Area for:
- MEDIA-IN socket, USB port , AUX IN socket ⇒BookletInfotainment
system,
- Cigarette lighter ⇒ Ashtray and cigarette lighter
- 12-volt socket ⇒ Electrical sockets
Buttons for:
- Assist systems for parking and manoeuvring ⇒ Parking and manoeuvring
- Driving profile selection ⇒ Driving profile selection and 4MOTION Active
Control
Stowage compartment in the centre console ⇒ Stowage areas
®
Page 10 of 341
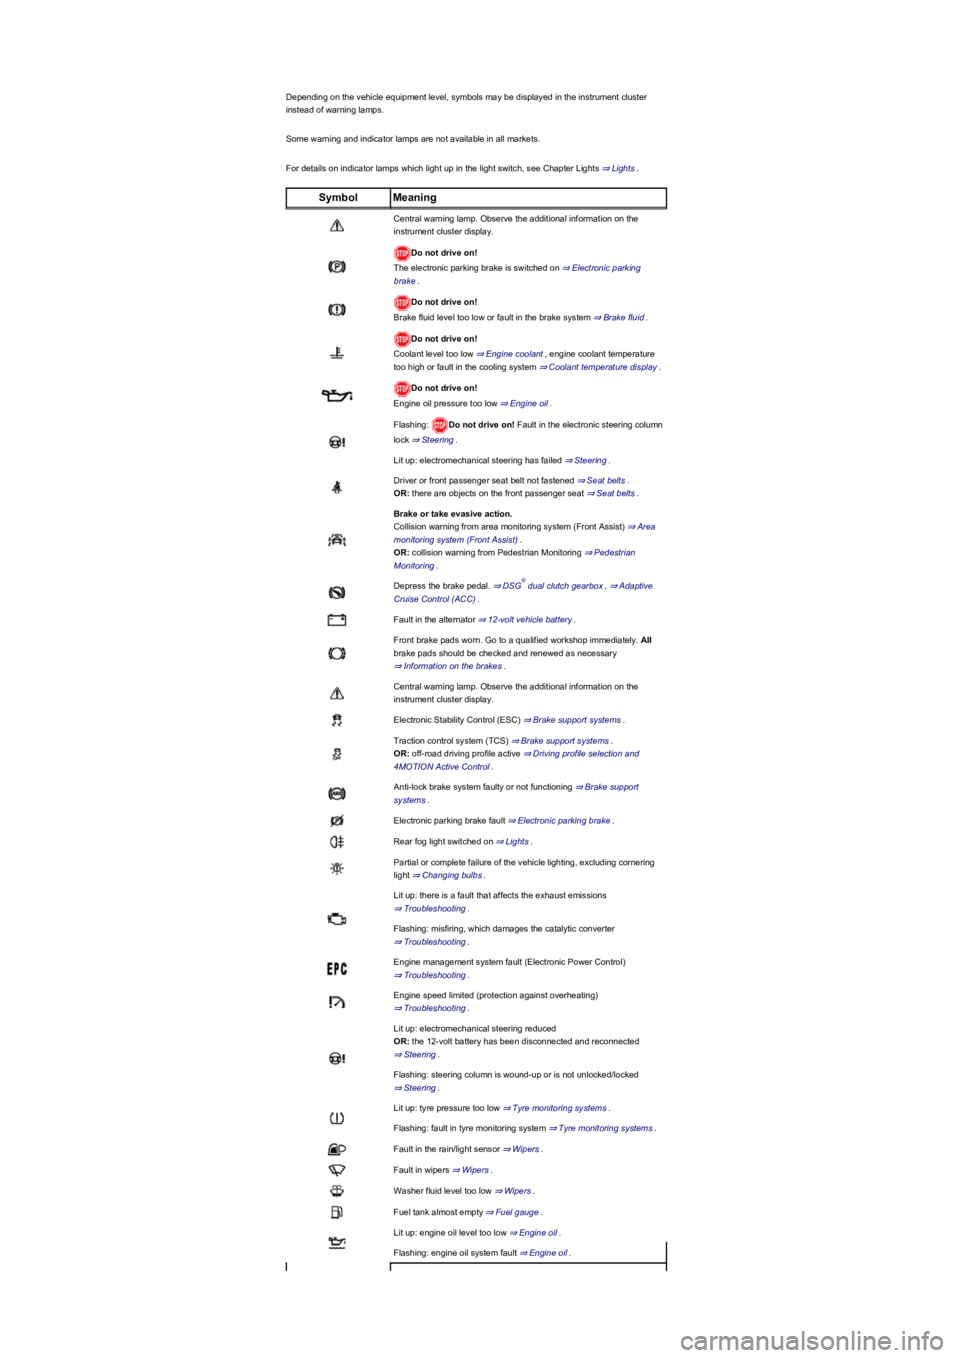
Depending on the vehicle equipment level, symbols may be displayed in the instrument cluster
instead of warning lamps.
Some warning and indicator lamps are not available in all markets.
For details on indicator lamps which light up in the light switch, see Chapter Lights ⇒ Lights.
SymbolMeaning
Central warning lamp. Observe the additional information on the
instrument cluster display.
Do not drive on!
The electronic parking brake is switched on ⇒ Electronic parking
brake.
Do not drive on!
Brake fluid level too low or fault in the brake system ⇒ Brake fluid.
Do not drive on!
Coolant level too low ⇒ Engine coolant, engine coolant temperature
too high or fault in the cooling system ⇒ Coolant temperature display.
Do not drive on!
Engine oil pressure too low ⇒ Engine oil.
Flashing: Do not drive on! Fault in the electronic steering column
lock ⇒ Steering.
Lit up: electromechanical steering has failed ⇒ Steering.
Driver or front passenger seat belt not fastened ⇒ Seat belts.
OR: there are objects on the front passenger seat ⇒ Seat belts.
Brake or take evasive action.
Collision warning from area monitoring system (Front Assist) ⇒ Area
monitoring system (Front Assist).
OR: collision warning from Pedestrian Monitoring ⇒ Pedestrian
Monitoring.
Depress the brake pedal. ⇒ DSG dual clutch gearbox, ⇒ Adaptive
Cruise Control (ACC).
Fault in the alternator ⇒ 12-volt vehicle battery.
Front brake pads worn. Go to a qualified workshop immediately. All
brake pads should be checked and renewed as necessary
⇒ Information on the brakes.
Central warning lamp. Observe the additional information on the
instrument cluster display.
Electronic Stability Control (ESC) ⇒ Brake support systems.
Traction control system (TCS) ⇒ Brake support systems.
OR: off-road driving profile active ⇒ Driving profile selection and
4MOTION Active Control.
Anti-lock brake system faulty or not functioning ⇒ Brake support
systems.
Electronic parking brake fault ⇒ Electronic parking brake.
Rear fog light switched on ⇒ Lights.
Partial or complete failure of the vehicle lighting, excluding cornering
light ⇒ Changing bulbs.
Lit up: there is a fault that affects the exhaust emissions
⇒ Troubleshooting.
Flashing: misfiring, which damages the catalytic converter
⇒ Troubleshooting.
Engine management system fault (Electronic Power Control)
⇒ Troubleshooting.
Engine speed limited (protection against overheating)
⇒ Troubleshooting.
Lit up: electromechanical steering reduced
OR: the 12-volt battery has been disconnected and reconnected
⇒ Steering.
Flashing: steering column is wound-up or is not unlocked/locked
⇒ Steering.
Lit up: tyre pressure too low ⇒ Tyre monitoring systems.
Flashing: fault in tyre monitoring system ⇒ Tyre monitoring systems.
Fault in the rain/light sensor ⇒ Wipers.
Fault in wipers ⇒ Wipers.
Washer fluid level too low ⇒ Wipers.
Fuel tank almost empty ⇒ Fuel gauge.
Lit up: engine oil level too low ⇒ Engine oil.
Flashing: engine oil system fault ⇒ Engine oil.
®
Page 11 of 341
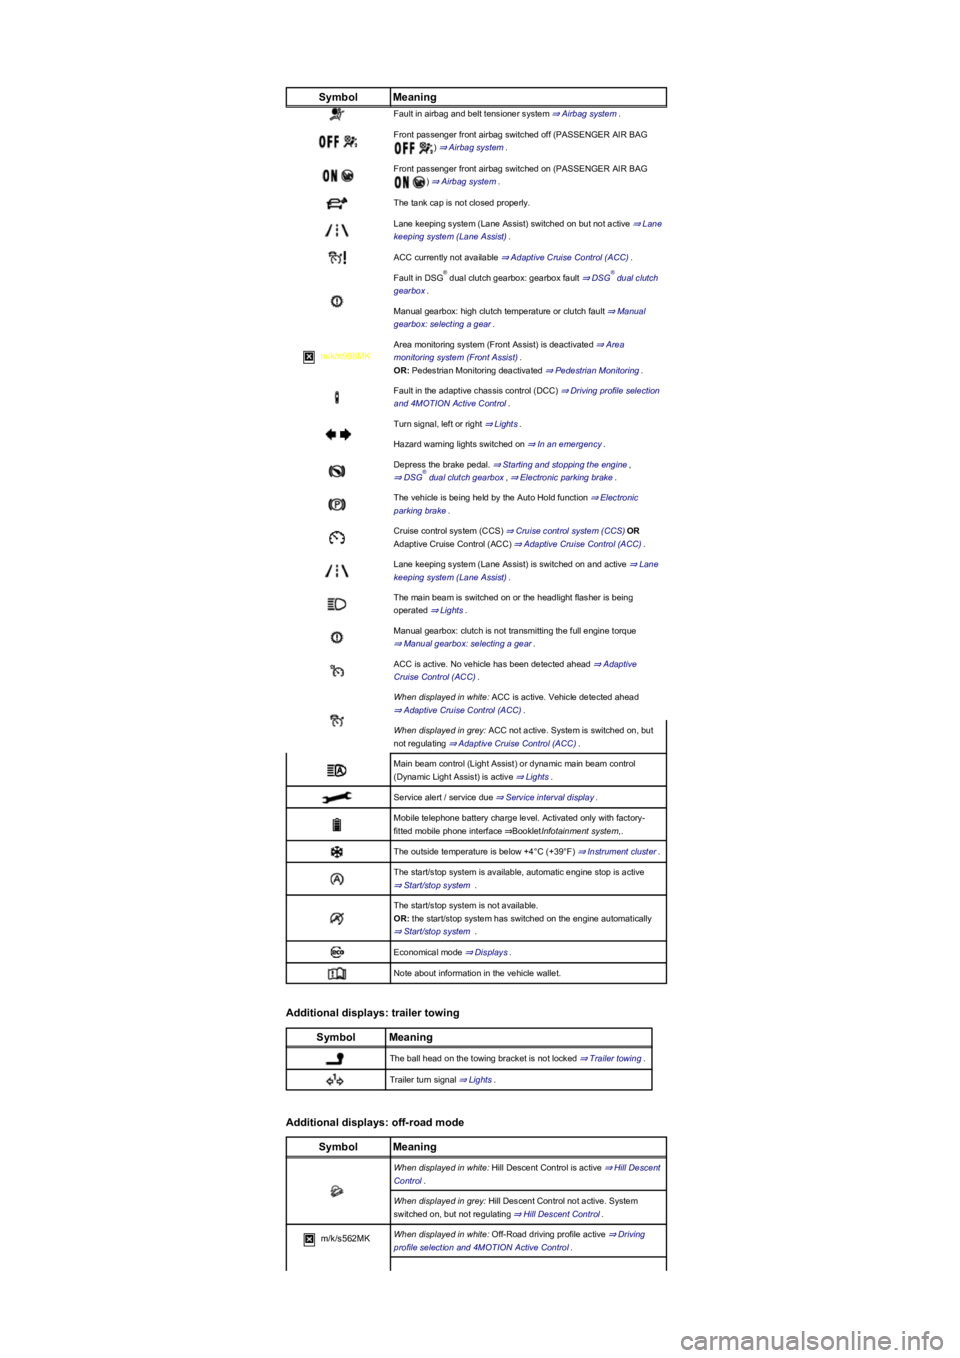
SymbolMeaning
Fault in airbag and belt tensioner system ⇒ Airbag system.
Front passenger front airbag switched off (PASSENGER AIR BAG
) ⇒ Airbag system.
Front passenger front airbag switched on (PASSENGER AIR BAG
) ⇒ Airbag system.
The tank cap is not closed properly.
Lane keeping system (Lane Assist) switched on but not active ⇒ Lane
keeping system (Lane Assist).
ACC currently not available ⇒ Adaptive Cruise Control (ACC).
Fault in DSG dual clutch gearbox: gearbox fault ⇒ DSG dual clutch
gearbox.
Manual gearbox: high clutch temperature or clutch fault ⇒ Manual
gearbox: selecting a gear.
m/k/n998MK
Area monitoring system (Front Assist) is deactivated ⇒ Area
monitoring system (Front Assist).
OR: Pedestrian Monitoring deactivated ⇒ Pedestrian Monitoring.
Fault in the adaptive chassis control (DCC) ⇒ Driving profile selection
and 4MOTION Active Control.
Turn signal, left or right ⇒ Lights.
Hazard warning lights switched on ⇒ In an emergency.
Depress the brake pedal. ⇒ Starting and stopping the engine,
⇒ DSG dual clutch gearbox, ⇒ Electronic parking brake.
The vehicle is being held by the Auto Hold function ⇒ Electronic
parking brake.
Cruise control system (CCS) ⇒ Cruise control system (CCS)OR
Adaptive Cruise Control (ACC) ⇒ Adaptive Cruise Control (ACC).
Lane keeping system (Lane Assist) is switched on and active ⇒ Lane
keeping system (Lane Assist).
The main beam is switched on or the headlight flasher is being
operated ⇒ Lights.
Manual gearbox: clutch is not transmitting the full engine torque
⇒ Manual gearbox: selecting a gear.
ACC is active. No vehicle has been detected ahead ⇒ Adaptive
Cruise Control (ACC).
When displayed in white: ACC is active. Vehicle detected ahead
⇒ Adaptive Cruise Control (ACC).
When displayed in grey: ACC not active. System is switched on, but
not regulating ⇒ Adaptive Cruise Control (ACC).
Main beam control (Light Assist) or dynamic main beam control
(Dynamic Light Assist) is active ⇒ Lights.
Service alert / service due ⇒ Service interval display.
Mobile telephone battery charge level. Activated only with factory-
fitted mobile phone interface ⇒BookletInfotainment system,.
The outside temperature is below +4°C (+39°F) ⇒ Instrument cluster.
The start/stop system is available, automatic engine stop is active
⇒ Start/stop system .
The start/stop system is not available.
OR: the start/stop system has switched on the engine automatically
⇒ Start/stop system .
Economical mode ⇒ Displays.
Note about information in the vehicle wallet.
Additional displays: trailer towing
SymbolMeaning
The ball head on the towing bracket is not locked ⇒ Trailer towing.
Trailer turn signal ⇒ Lights.
Additional displays: off-road mode
SymbolMeaning
When displayed in white: Hill Descent Control is active ⇒ Hill Descent
Control.
When displayed in grey: Hill Descent Control not active. System
switched on, but not regulating ⇒ Hill Descent Control.
m/k/s562MKWhen displayed in white: Off-Road driving profile active ⇒ Driving
profile selection and 4MOTION Active Control.
®®
®
Page 29 of 341
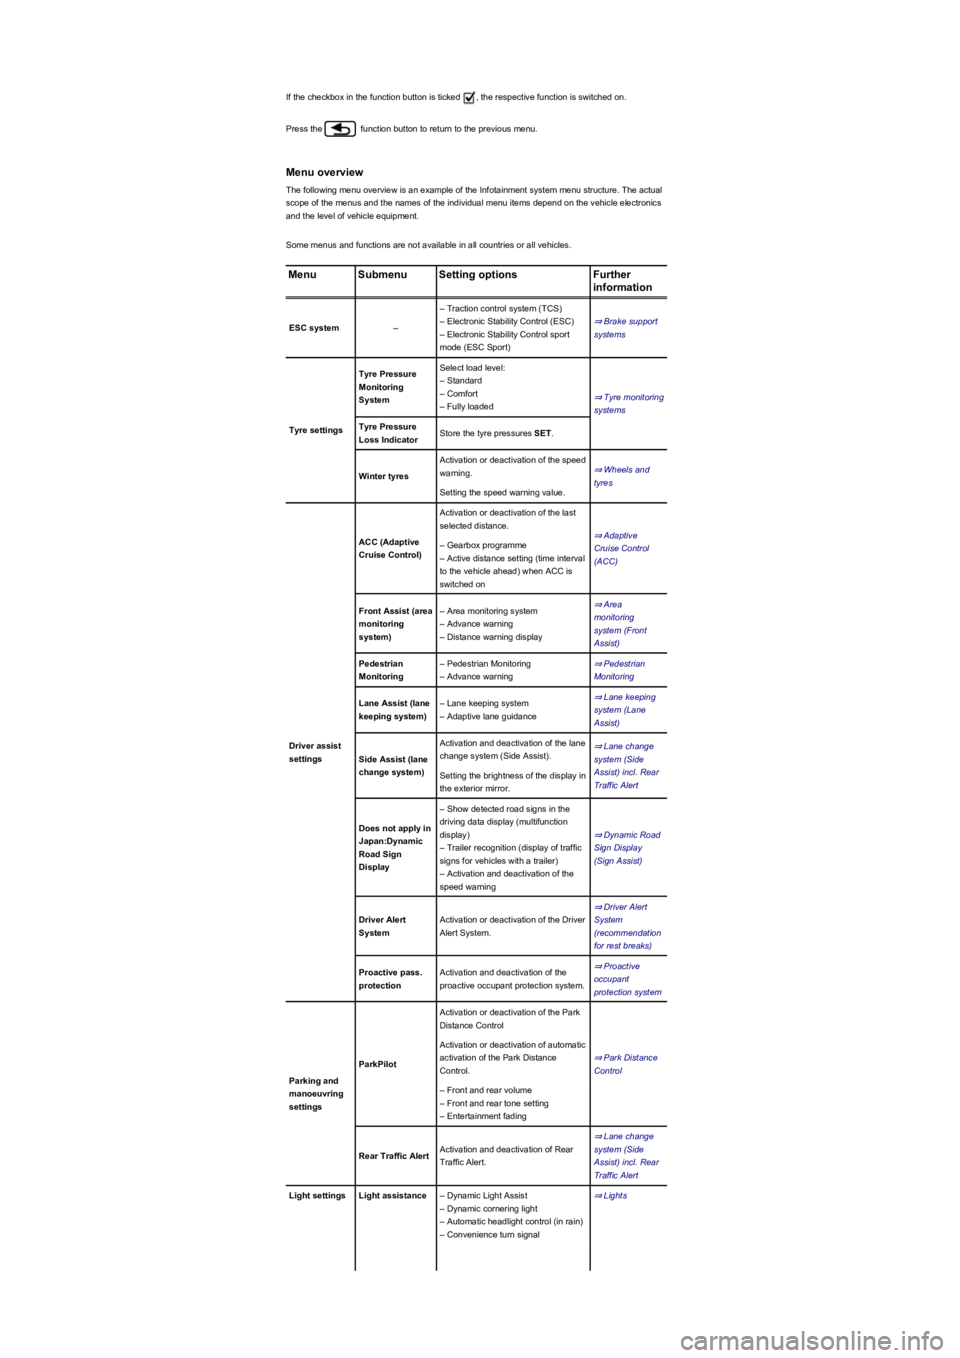
If the checkbox in the function button is ticked , the respective function is switched on.
Press the function button to return to the previous menu.
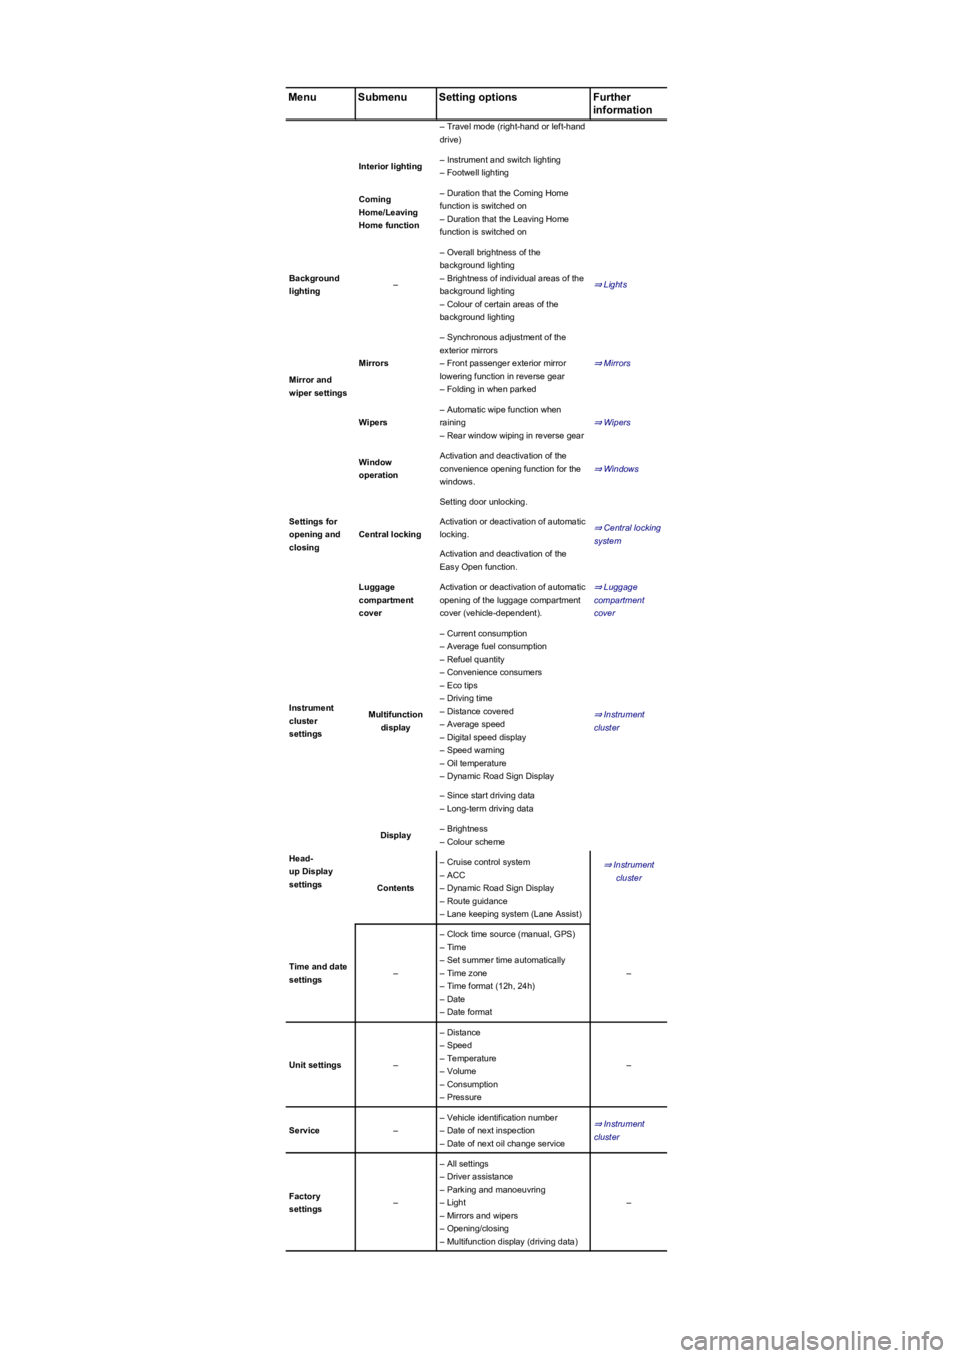
Menu overview
The following menu overview is an example of the Infotainment system menu structure. The actual
scope of the menus and the names of the individual menu items depend on the vehicle electronics
and the level of vehicle equipment.
Some menus and functions are not available in all countries or all vehicles.
MenuSubmenuSetting optionsFurther
information
ESC system–
– Traction control system (TCS)
– Electronic Stability Control (ESC)
– Electronic Stability Control sport
mode (ESC Sport)
⇒ Brake support
systems
Tyre settings
Tyre Pressure
Monitoring
System
Select load level:
– Standard
– Comfort
– Fully loaded
⇒ Tyre monitoring
systems
Tyre Pressure
Loss IndicatorStore the tyre pressures SET.
Winter tyres
Activation or deactivation of the speed
warning.⇒ Wheels and
tyres
Setting the speed warning value.
Driver assist
settings
ACC (Adaptive
Cruise Control)
Activation or deactivation of the last
selected distance.
⇒ Adaptive
Cruise Control
(ACC)
– Gearbox programme
– Active distance setting (time interval
to the vehicle ahead) when ACC is
switched on
Front Assist (area
monitoring
system)
– Area monitoring system
– Advance warning
– Distance warning display
⇒ Area
monitoring
system (Front
Assist)
Pedestrian
Monitoring
– Pedestrian Monitoring
– Advance warning
⇒ Pedestrian
Monitoring
Lane Assist (lane
keeping system)
– Lane keeping system
– Adaptive lane guidance
⇒ Lane keeping
system (Lane
Assist)
Side Assist (lane
change system)
Activation and deactivation of the lane
change system (Side Assist).
⇒ Lane change
system (Side
Assist) incl. Rear
Traffic Alert
Setting the brightness of the display in
the exterior mirror.
Does not apply in
Japan:Dynamic
Road Sign
Display
– Show detected road signs in the
driving data display (multifunction
display)
– Trailer recognition (display of traffic
signs for vehicles with a trailer)
– Activation and deactivation of the
speed warning
⇒ Dynamic Road
Sign Display
(Sign Assist)
Driver Alert
System
Activation or deactivation of the Driver
Alert System.
⇒ Driver Alert
System
(recommendation
for rest breaks)
Proactive pass.
protection
Activation and deactivation of the
proactive occupant protection system.
⇒ Proactive
occupant
protection system
Parking and
manoeuvring
settings
ParkPilot
Activation or deactivation of the Park
Distance Control
⇒ Park Distance
Control
Activation or deactivation of automatic
activation of the Park Distance
Control.
– Front and rear volume
– Front and rear tone setting
– Entertainment fading
Rear Traffic AlertActivation and deactivation of Rear
Traffic Alert.
⇒ Lane change
system (Side
Assist) incl. Rear
Traffic Alert
Light settingsLight assistance– Dynamic Light Assist
– Dynamic cornering light
– Automatic headlight control (in rain)
– Convenience turn signal
⇒ Lights
Page 30 of 341
MenuSubmenuSetting optionsFurther
information
– Travel mode (right-hand or left-hand
drive)
Interior lighting– Instrument and switch lighting
– Footwell lighting
Coming
Home/Leaving
Home function
– Duration that the Coming Home
function is switched on
– Duration that the Leaving Home
function is switched on
Background
lighting–
– Overall brightness of the
background lighting
– Brightness of individual areas of the
background lighting
– Colour of certain areas of the
background lighting
⇒ Lights
Mirror and
wiper settings
Mirrors
– Synchronous adjustment of the
exterior mirrors
– Front passenger exterior mirror
lowering function in reverse gear
– Folding in when parked
⇒ Mirrors
Wipers
– Automatic wipe function when
raining
– Rear window wiping in reverse gear
⇒ Wipers
Settings for
opening and
closing
Window
operation
Activation and deactivation of the
convenience opening function for the
windows.
⇒ Windows
Central locking
Setting door unlocking.
⇒ Central locking
system
Activation or deactivation of automatic
locking.
Activation and deactivation of the
Easy Open function.
Luggage
compartment
cover
Activation or deactivation of automatic
opening of the luggage compartment
cover (vehicle-dependent).
⇒ Luggage
compartment
cover
Instrument
cluster
settings
Multifunction
display
– Current consumption
– Average fuel consumption
– Refuel quantity
– Convenience consumers
– Eco tips
– Driving time
– Distance covered
– Average speed
– Digital speed display
– Speed warning
– Oil temperature
– Dynamic Road Sign Display
⇒ Instrument
cluster
– Since start driving data
– Long-term driving data
Head-
up Display
settings
Display– Brightness
– Colour scheme
⇒ Instrument
cluster
Contents
– Cruise control system
– ACC
– Dynamic Road Sign Display
– Route guidance
– Lane keeping system (Lane Assist)
Time and date
settings–
– Clock time source (manual, GPS)
– Time
– Set summer time automatically
– Time zone
– Time format (12h, 24h)
– Date
– Date format
–
Unit settings–
– Distance
– Speed
– Temperature
– Volume
– Consumption
– Pressure
–
Service–
– Vehicle identification number
– Date of next inspection
– Date of next oil change service
⇒ Instrument
cluster
Factory
settings–
– All settings
– Driver assistance
– Parking and manoeuvring
– Light
– Mirrors and wipers
– Opening/closing
– Multifunction display (driving data)
–
Page 62 of 341
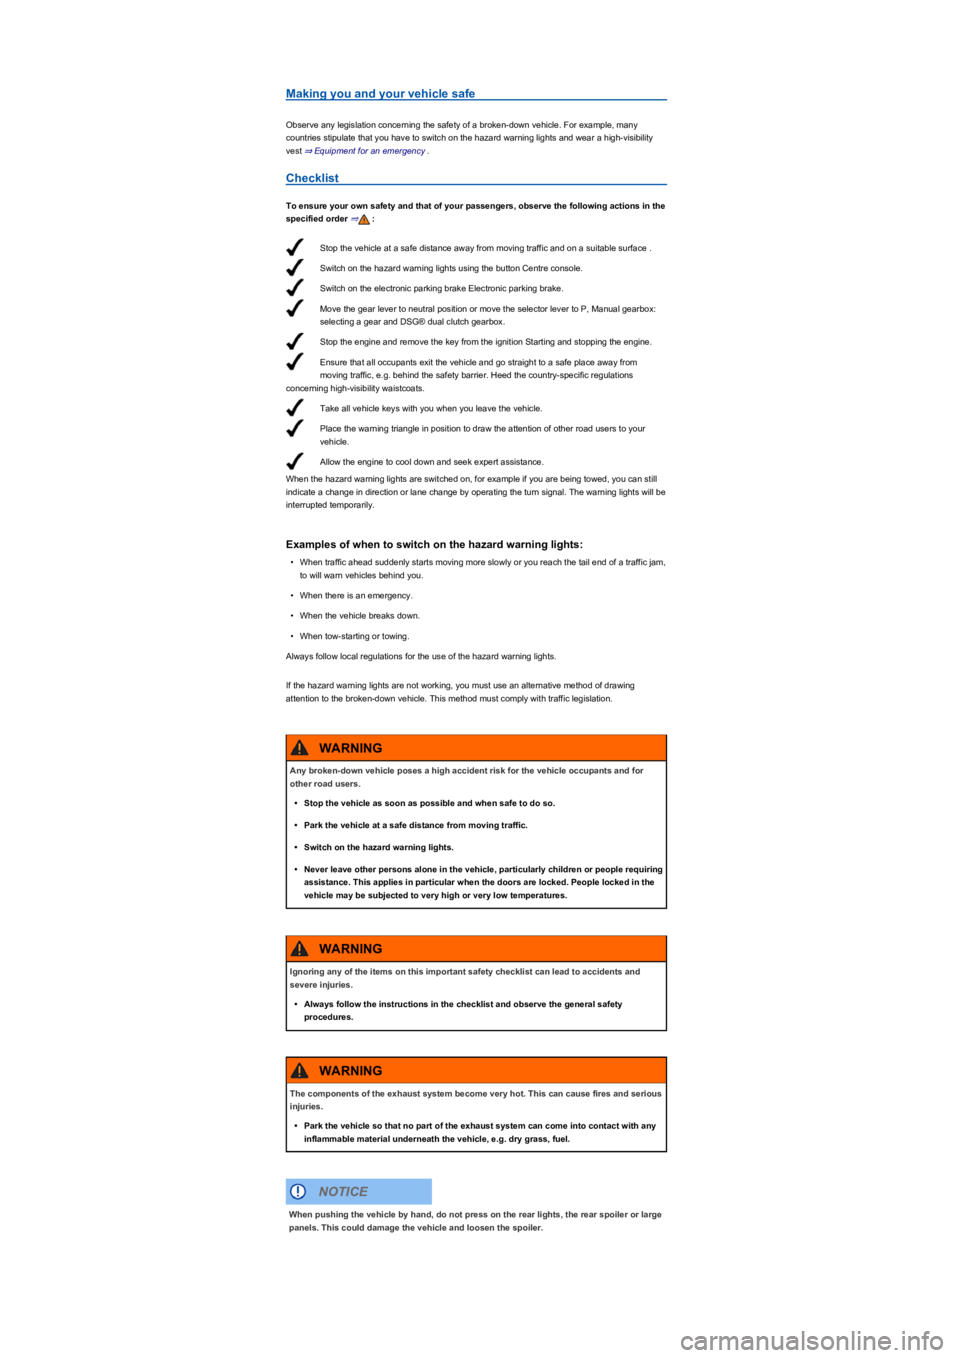
Stop the vehicle at a safe distance away from moving traffic and on a suitable surface .
Switch on the hazard warning lights using the button Centre console.
Switch on the electronic parking brake Electronic parking brake.
Move the gear lever to neutral position or move the selector lever to P, Manual gearbox:
selecting a gear and DSG® dual clutch gearbox.
Stop the engine and remove the key from the ignition Starting and stopping the engine.
Ensure that all occupants exit the vehicle and go straight to a safe place away from
moving traffic, e.g. behind the safety barrier. Heed the country-specific regulations
concerning high-visibility waistcoats.
Take all vehicle keys with you when you leave the vehicle.
Place the warning triangle in position to draw the attention of other road users to your
vehicle.
Allow the engine to cool down and seek expert assistance.
Making you and your vehicle safe
Observe any legislation concerning the safety of a broken-down vehicle. For example, many
countries stipulate that you have to switch on the hazard warning lights and wear a high-visibility
vest ⇒ Equipment for an emergency.
Checklist
To ensure your own safety and that of your passengers, observe the following actions in the
specified order ⇒:
When the hazard warning lights are switched on, for example if you are being towed, you can still
indicate a change in direction or lane change by operating the turn signal. The warning lights will be
interrupted temporarily.
Examples of when to switch on the hazard warning lights:
•When traffic ahead suddenly starts moving more slowly or you reach the tail end of a traffic jam,
to will warn vehicles behind you.
•When there is an emergency.
•When the vehicle breaks down.
•When tow-starting or towing.
Always follow local regulations for the use of the hazard warning lights.
If the hazard warning lights are not working, you must use an alternative method of drawing
attention to the broken-down vehicle. This method must comply with traffic legislation.
Any broken-down vehicle poses a high accident risk for the vehicle occupants and for
other road users.
•Stop the vehicle as soon as possible and when safe to do so.
•Park the vehicle at a safe distance from moving traffic.
•Switch on the hazard warning lights.
•Never leave other persons alone in the vehicle, particularly children or people requiring
assistance. This applies in particular when the doors are locked. People locked in the
vehicle may be subjected to very high or very low temperatures.
WARNING
Ignoring any of the items on this important safety checklist can lead to accidents and
severe injuries.
•Always follow the instructions in the checklist and observe the general safety
procedures.
WARNING
The components of the exhaust system become very hot. This can cause fires and serious
injuries.
•Park the vehicle so that no part of the exhaust system can come into contact with any
inflammable material underneath the vehicle, e.g. dry grass, fuel.
WARNING
When pushing the vehicle by hand, do not press on the rear lights, the rear spoiler or large
panels. This could damage the vehicle and loosen the spoiler.
NOTICE
Page 102 of 341
When reverse gear is engaged, the cornering light on both sides of the vehicle switches on
to provide better illumination of the area when manoeuvring.
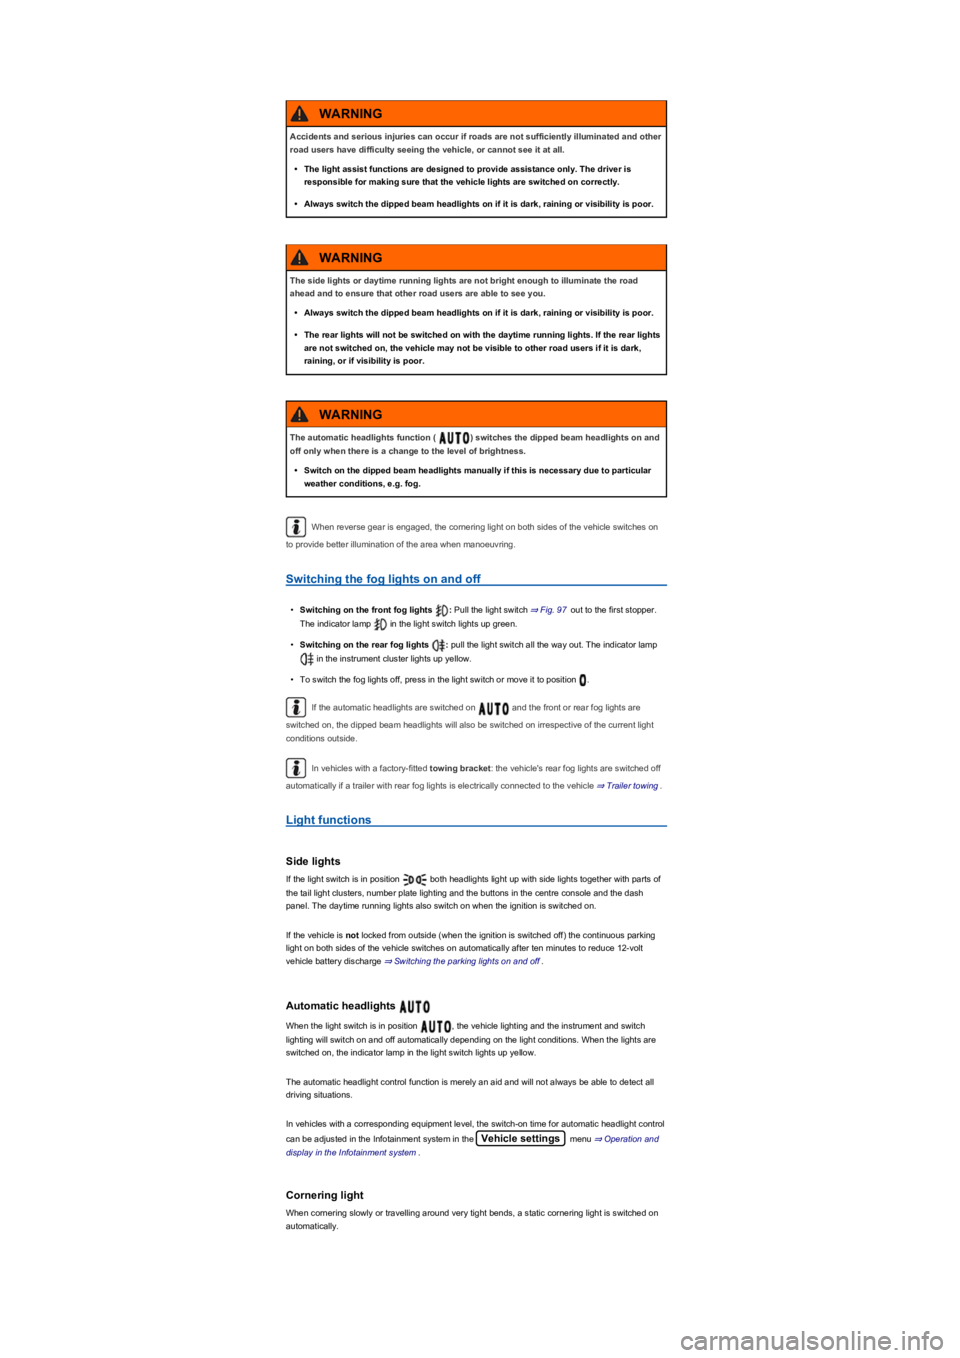
Switching the fog lights on and off
•Switching on the front fog lights : Pull the light switch ⇒ Fig. 97 out to the first stopper.
The indicator lamp in the light switch lights up green.
•Switching on the rear fog lights : pull the light switch all the way out. The indicator lamp
in the instrument cluster lights up yellow.
•To switch the fog lights off, press in the light switch or move it to position .
If the automatic headlights are switched on and the front or rear fog lights are
switched on, the dipped beam headlights will also be switched on irrespective of the current light
conditions outside.
In vehicles with a factory-fitted towing bracket: the vehicle's rear fog lights are switched off
automatically if a trailer with rear fog lights is electrically connected to the vehicle ⇒ Trailer towing.
Light functions
Side lights
If the light switch is in position both headlights light up with side lights together with parts of
the tail light clusters, number plate lighting and the buttons in the centre console and the dash
panel. The daytime running lights also switch on when the ignition is switched on.
If the vehicle is not locked from outside (when the ignition is switched off) the continuous parking
light on both sides of the vehicle switches on automatically after ten minutes to reduce 12-volt
vehicle battery discharge ⇒ Switching the parking lights on and off.
Automatic headlights
When the light switch is in position , the vehicle lighting and the instrument and switch
lighting will switch on and off automatically depending on the light conditions. When the lights are
switched on, the indicator lamp in the light switch lights up yellow.
The automatic headlight control function is merely an aid and will not always be able to detect all
driving situations.
In vehicles with a corresponding equipment level, the switch-on time for automatic headlight control
can be adjusted in the Infotainment system in the Vehicle settings menu ⇒ Operation and
display in the Infotainment system.
Cornering light
When cornering slowly or travelling around very tight bends, a static cornering light is switched on
automatically.
Accidents and serious injuries can occur if roads are not sufficiently illuminated and other
road users have difficulty seeing the vehicle, or cannot see it at all.
•The light assist functions are designed to provide assistance only. The driver is
responsible for making sure that the vehicle lights are switched on correctly.
•Always switch the dipped beam headlights on if it is dark, raining or visibility is poor.
WARNING
The side lights or daytime running lights are not bright enough to illuminate the road
ahead and to ensure that other road users are able to see you.
•Always switch the dipped beam headlights on if it is dark, raining or visibility is poor.
•The rear lights will not be switched on with the daytime running lights. If the rear lights
are not switched on, the vehicle may not be visible to other road users if it is dark,
raining, or if visibility is poor.
WARNING
The automatic headlights function ( ) switches the dipped beam headlights on and
off only when there is a change to the level of brightness.
•Switch on the dipped beam headlights manually if this is necessary due to particular
weather conditions, e.g. fog.
WARNING
Page 103 of 341
Dynamic cornering light (AFS)
Swivelling lamps automatically improve the lighting of the road when cornering, and even when you
are not driving round a corner. The dynamic cornering light only works at speeds above
approximately 10 km/h (6 mph) and when the dipped beam headlights are switched on.
In vehicles with a corresponding equipment level, the dynamic cornering light can be activated and
deactivated in the Infotainment system in the Vehicle settings menu ⇒ Operation and
display in the Infotainment system:
Signal tones if lights are not switched off
If the key is removed from the ignition lock and the driver door is opened, a signal tone will sound in
the following situations:
•If the parking light is switched on.
•The light switch is in position or .
When the Coming Home function is switched on, no signal tone will be given as a reminder that a
light is still switched on when leaving the vehicle.
Some settings can be stored in the user accounts of the personalisation function and
therefore change automatically when the user account changes ⇒ Personalisation.
Main beam
Switching main beam on and off
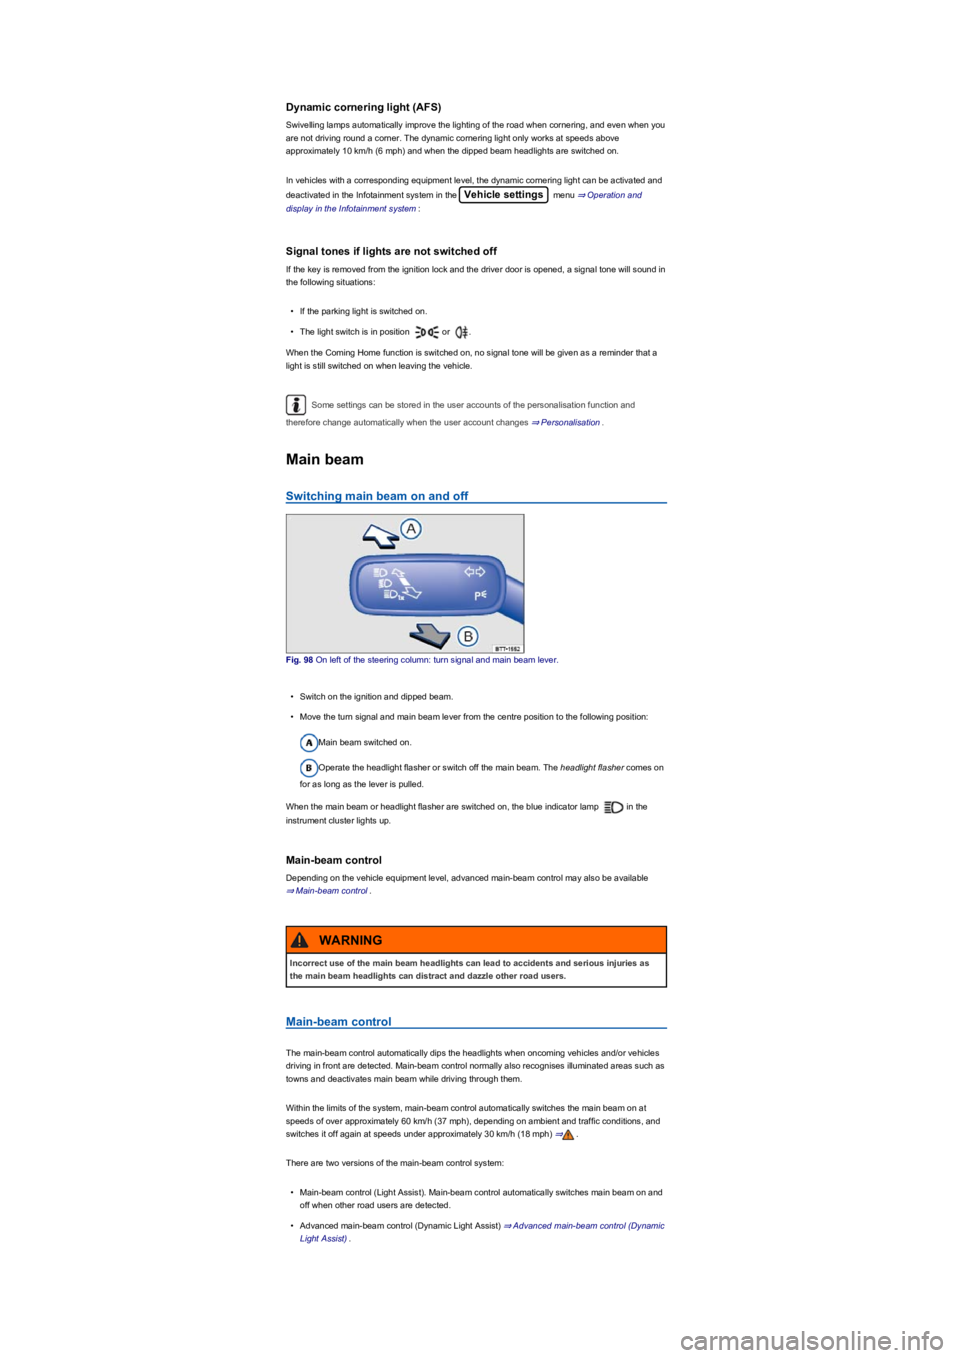
Fig. 98 On left of the steering column: turn signal and main beam lever.
•Switch on the ignition and dipped beam.
•Move the turn signal and main beam lever from the centre position to the following position:
Main beam switched on.
Operate the headlight flasher or switch off the main beam. The headlight flasher comes on
for as long as the lever is pulled.
When the main beam or headlight flasher are switched on, the blue indicator lamp in the
instrument cluster lights up.
Main-beam control
Depending on the vehicle equipment level, advanced main-beam control may also be available
⇒ Main-beam control.
Main-beam control
The main-beam control automatically dips the headlights when oncoming vehicles and/or vehicles
driving in front are detected. Main-beam control normally also recognises illuminated areas such as
towns and deactivates main beam while driving through them.
Within the limits of the system, main-beam control automatically switches the main beam on at
speeds of over approximately 60 km/h (37 mph), depending on ambient and traffic conditions, and
switches it off again at speeds under approximately 30 km/h (18 mph) ⇒.
There are two versions of the main-beam control system:
•Main-beam control (Light Assist). Main-beam control automatically switches main beam on and
off when other road users are detected.
•Advanced main-beam control (Dynamic Light Assist) ⇒ Advanced main-beam control (Dynamic
Light Assist).
Incorrect use of the main beam headlights can lead to accidents and serious injuries as
the main beam headlights can distract and dazzle other road users.
WARNING
Page 104 of 341
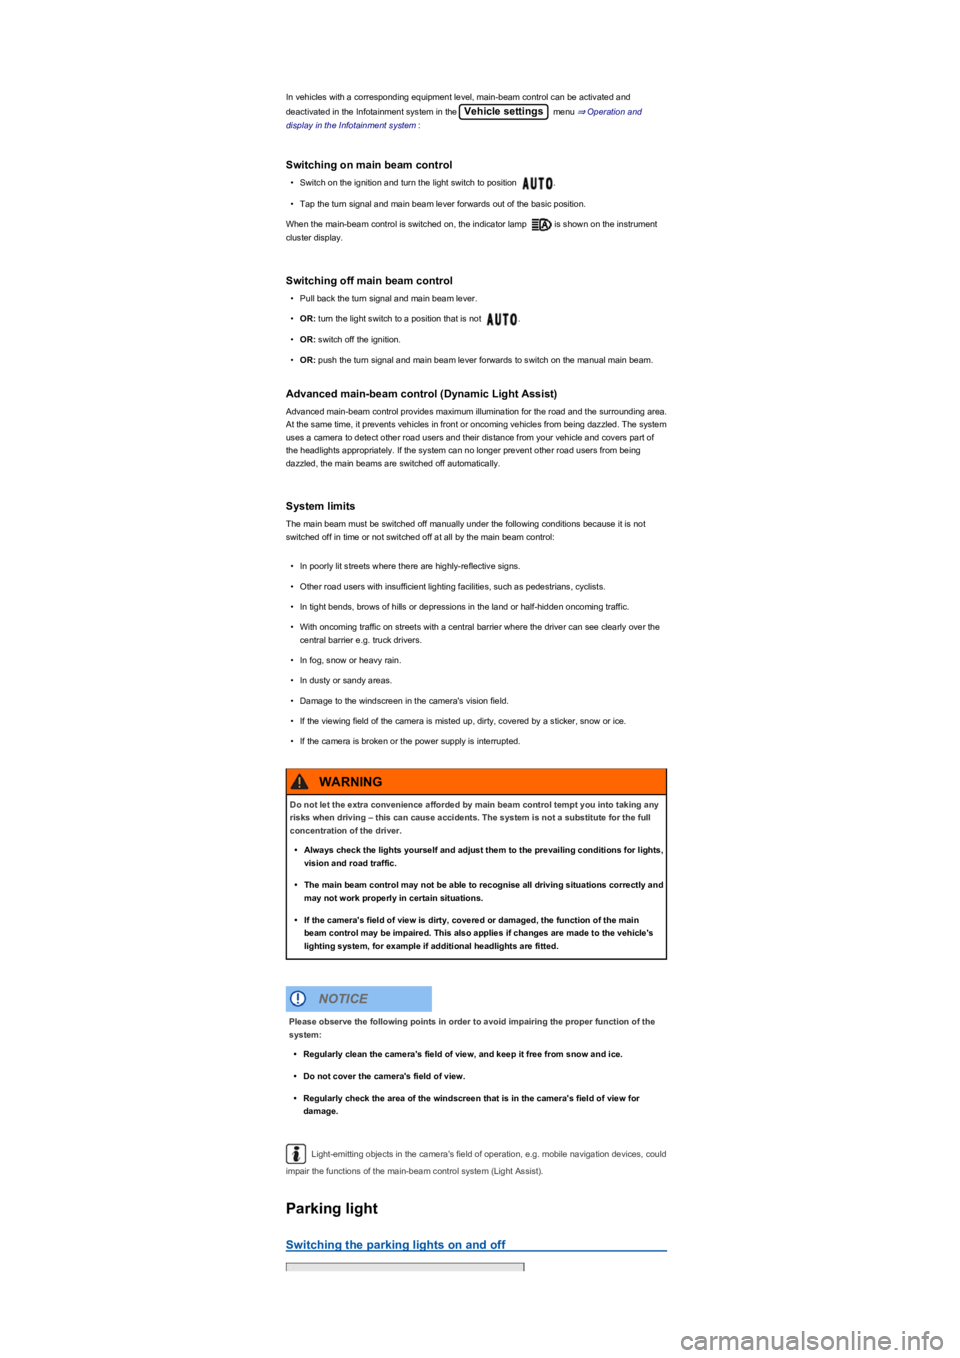
In vehicles with a corresponding equipment level, main-beam control can be activated and
deactivated in the Infotainment system in the Vehicle settings menu ⇒ Operation and
display in the Infotainment system:
Switching on main beam control
•Switch on the ignition and turn the light switch to position .
•Tap the turn signal and main beam lever forwards out of the basic position.
When the main-beam control is switched on, the indicator lamp is shown on the instrument
cluster display.
Switching off main beam control
•Pull back the turn signal and main beam lever.
•OR: turn the light switch to a position that is not .
•OR: switch off the ignition.
•OR: push the turn signal and main beam lever forwards to switch on the manual main beam.
Advanced main-beam control (Dynamic Light Assist)
Advanced main-beam control provides maximum illumination for the road and the surrounding area.
At the same time, it prevents vehicles in front or oncoming vehicles from being dazzled. The system
uses a camera to detect other road users and their distance from your vehicle and covers part of
the headlights appropriately. If the system can no longer prevent other road users from being
dazzled, the main beams are switched off automatically.
System limits
The main beam must be switched off manually under the following conditions because it is not
switched off in time or not switched off at all by the main beam control:
•In poorly lit streets where there are highly-reflective signs.
•Other road users with insufficient lighting facilities, such as pedestrians, cyclists.
•In tight bends, brows of hills or depressions in the land or half-hidden oncoming traffic.
•With oncoming traffic on streets with a central barrier where the driver can see clearly over the
central barrier e.g. truck drivers.
•In fog, snow or heavy rain.
•In dusty or sandy areas.
•Damage to the windscreen in the camera's vision field.
•If the viewing field of the camera is misted up, dirty, covered by a sticker, snow or ice.
•If the camera is broken or the power supply is interrupted.
Light-emitting objects in the camera's field of operation, e.g. mobile navigation devices, could
impair the functions of the main-beam control system (Light Assist).
Parking light
Switching the parking lights on and off
Do not let the extra convenience afforded by main beam control tempt you into taking any
risks when driving – this can cause accidents. The system is not a substitute for the full
concentration of the driver.
•Always check the lights yourself and adjust them to the prevailing conditions for lights,
vision and road traffic.
•The main beam control may not be able to recognise all driving situations correctly and
may not work properly in certain situations.
•If the camera's field of view is dirty, covered or damaged, the function of the main
beam control may be impaired. This also applies if changes are made to the vehicle's
lighting system, for example if additional headlights are fitted.
WARNING
Please observe the following points in order to avoid impairing the proper function of the
system:
•Regularly clean the camera's field of view, and keep it free from snow and ice.
•Do not cover the camera's field of view.
•Regularly check the area of the windscreen that is in the camera's field of view for
damage.
NOTICE
Page 111 of 341
Troubleshooting
Washer fluid level too low. Fill up the washer fluid reservoir as soon as possible ⇒ Washer
fluid.Fault in the rain/light sensor. Switch the ignition on and off. If the indicator lamp still lights
up permanently after you switch the ignition back on, seek expert assistance.Fault in
windscreen wipers. Switch the ignition on and off. If the indicator lamp still lights up permanently
after you switch the ignition back on, seek expert assistance.
Changes in the response of the rain/light sensor
Possible causes for faults and misinterpretations relating to the sensitive surface of the rain/light
sensor ⇒ Vehicle overviews include:
•Damaged wiper blades: a film of water or smears caused by damaged wiper blades can
increase the time the wipers are switched on, can shorten the length of the intervals between
wipes or cause the wipers to run quickly and continuously.
•Insects: insects hitting the windscreen surface can cause the wipers to be activated.
•Salt deposits: in winter, salt deposits on the windscreen can cause the wipers to continue to
wipe the windscreen when it is almost dry.
•Soiling: dry dust, wax, windscreen coatings (lotus effect), or detergent deposits (from an
automatic car wash) can cause the rain/light sensor to become less sensitive and react too
slowly, or prevent it from reacting at all. Clean the sensitive surface of the rain/light sensor
⇒ Caring for and cleaning the vehicle exterior at regular intervals and inspect the wiper blades
for damage.
•Crack in the windscreen: a wipe cycle will be triggered if the rain/light sensor is on when the
windscreen is impacted by a stone. The rain/light sensor will then register the reduction in
sensitivity of the surfaces and adjust accordingly. The size of the crack can affect the way in
which the rain/light sensor activates the wipers.
We recommend that you use an alcohol-based glass cleaner to remove wax and polish.
The wipers will try to wipe away any obstacles that are on the windscreen. The wipers will
stop moving if the obstacle blocks their path. Remove the obstacle and switch the wipers back on
again.
Mirrors
Introduction
This chapter contains information on the followingsubjects:
⇒ Interior mirror
⇒ Exterior mirrors
You can use the exterior mirrors and the interior mirror to observe traffic behind you and adjust
driving style accordingly.
For safety reasons it is important that the driver positions the exterior and interior mirrors correctly
before starting a journey ⇒.
Looking in the exterior mirrors and the interior mirror does not allow the driver to see the entire side
and rear area of the vehicle. The area that cannot be seen is known as the blind spot. There may
be objects and other road users in the blind spot.
Adjusting the exterior and interior mirrors while driving may cause the driver to become
distracted. This can lead to accidents and serious injuries.
•Exterior and interior mirrors should only be adjusted when the vehicle is stationary.
•When parking, changing lane, or performing an overtaking or turning manoeuvre,
always pay careful attention to the area around the vehicle as objects and other road
users may be located in the blind spot.
•Always ensure that the mirrors are positioned correctly and that the rear view is not
restricted by ice, snow, condensation or any other objects.
WARNING
If you estimate the distance from traffic behind you incorrectly, you can cause accidents
and serious injuries.
•Curved mirrors (convex or aspheric) enlarge the field of vision and can make objects in
the mirror seem smaller and further away than they actually are.
•Using curved mirrors to estimate the distance from other vehicles behind you when
changing lanes can provide inaccurate results and can lead to accidents and severe
injuries.
•Whenever possible, use the interior mirror to check the exact distance between your
vehicle and following traffic or other objects.
•Ensure that you have a good view to the rear of the vehicle.
WARNING