air conditioning VOLKSWAGEN TIGUAN 2017 Owner´s Manual
[x] Cancel search | Manufacturer: VOLKSWAGEN, Model Year: 2017, Model line: TIGUAN, Model: VOLKSWAGEN TIGUAN 2017Pages: 341, PDF Size: 9.14 MB
Page 5 of 341
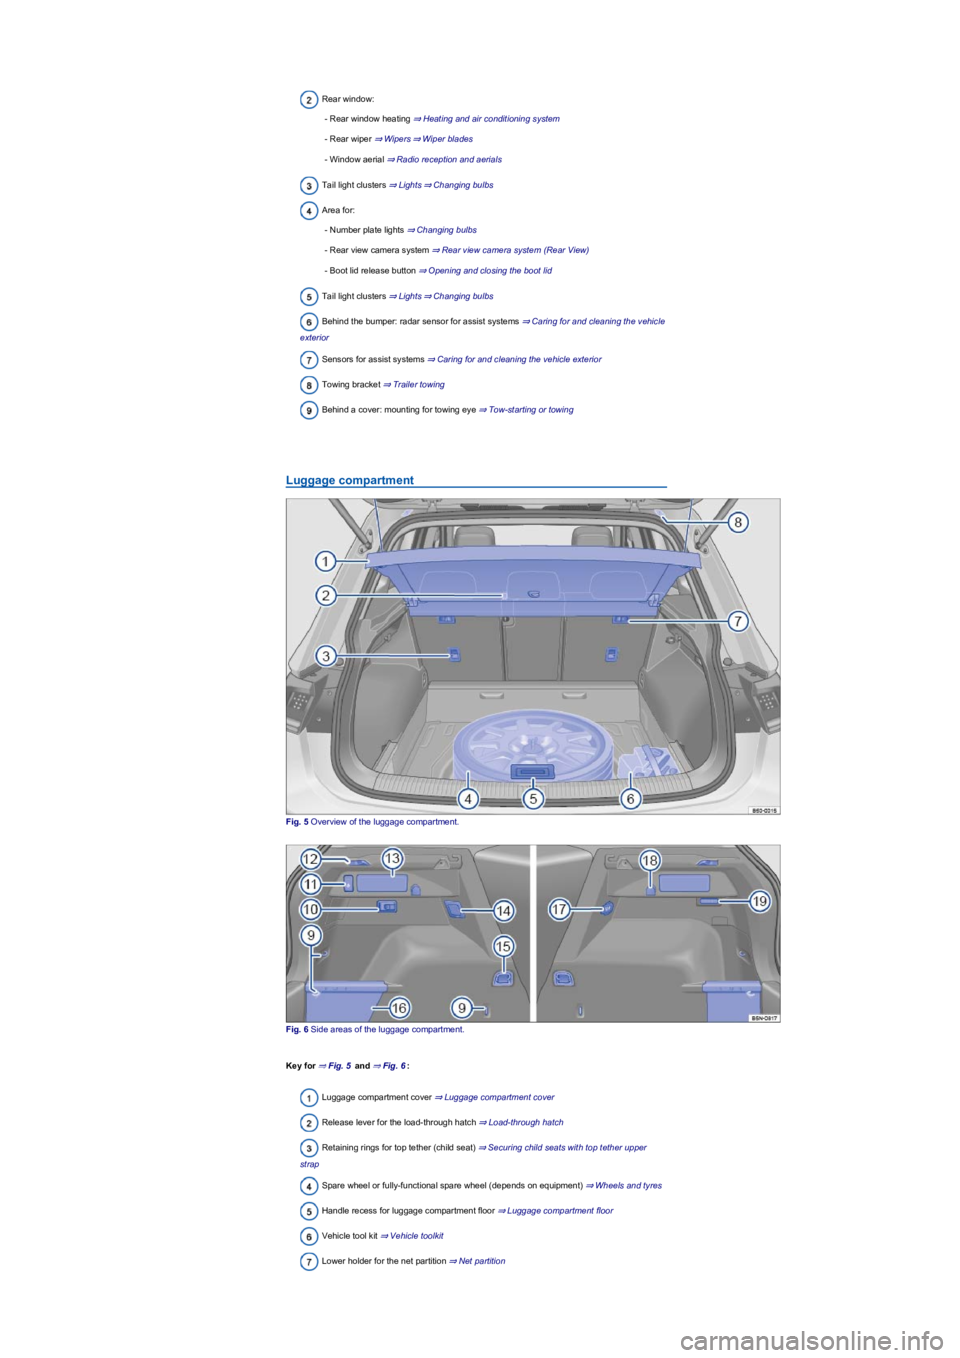
Rear window:
- Rear window heating ⇒ Heating and air conditioning system
- Rear wiper ⇒ Wipers⇒ Wiper blades
- Window aerial ⇒ Radio reception and aerials
Tail light clusters ⇒ Lights⇒ Changing bulbs
Area for:
- Number plate lights ⇒ Changing bulbs
- Rear view camera system ⇒ Rear view camera system (Rear View)
- Boot lid release button ⇒ Opening and closing the boot lid
Tail light clusters ⇒ Lights⇒ Changing bulbs
Behind the bumper: radar sensor for assist systems ⇒ Caring for and cleaning the vehicle
exterior
Sensors for assist systems ⇒ Caring for and cleaning the vehicle exterior
Towing bracket ⇒ Trailer towing
Behind a cover: mounting for towing eye ⇒ Tow-starting or towing
Luggage compartment
Fig. 5 Overview of the luggage compartment.
Fig. 6 Side areas of the luggage compartment.
Key for ⇒ Fig. 5 and ⇒ Fig. 6:
Luggage compartment cover ⇒ Luggage compartment cover
Release lever for the load-through hatch ⇒ Load-through hatch
Retaining rings for top tether (child seat) ⇒ Securing child seats with top tether upper
strap
Spare wheel or fully-functional spare wheel (depends on equipment) ⇒ Wheels and tyres
Handle recess for luggage compartment floor ⇒ Luggage compartment floor
Vehicle tool kit ⇒ Vehicle toolkit
Lower holder for the net partition ⇒ Net partition
Page 7 of 341
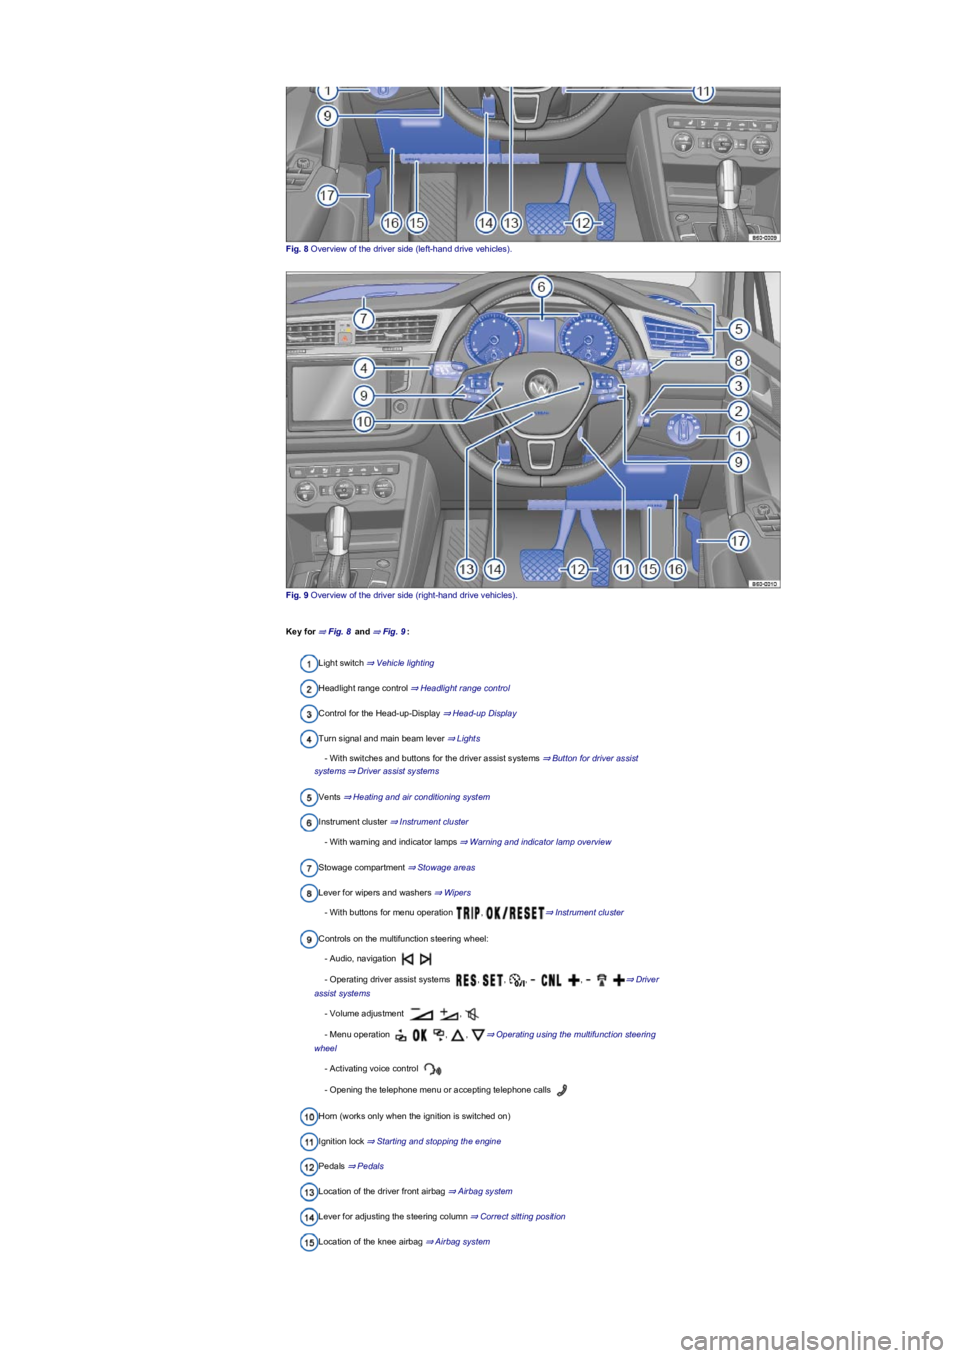
Fig. 8 Overview of the driver side (left-hand drive vehicles).
Fig. 9 Overview of the driver side (right-hand drive vehicles).
Key for ⇒ Fig. 8 and ⇒ Fig. 9:
Light switch ⇒ Vehicle lighting
Headlight range control ⇒ Headlight range control
Control for the Head-up-Display ⇒ Head-up Display
Turn signal and main beam lever ⇒ Lights
- With switches and buttons for the driver assist systems ⇒ Button for driver assist
systems⇒ Driver assist systems
Vents ⇒ Heating and air conditioning system
Instrument cluster ⇒ Instrument cluster
- With warning and indicator lamps ⇒ Warning and indicator lamp overview
Stowage compartment ⇒ Stowage areas
Lever for wipers and washers ⇒ Wipers
- With buttons for menu operation , ⇒ Instrument cluster
Controls on the multifunction steering wheel:
- Audio, navigation
- Operating driver assist systems , , , , ⇒ Driver
assist systems
- Volume adjustment ,
- Menu operation , , ⇒ Operating using the multifunction steering
wheel
- Activating voice control
- Opening the telephone menu or accepting telephone calls
Horn (works only when the ignition is switched on)
Ignition lock ⇒ Starting and stopping the engine
Pedals ⇒ Pedals
Location of the driver front airbag ⇒ Airbag system
Lever for adjusting the steering column ⇒ Correct sitting position
Location of the knee airbag ⇒ Airbag system
Page 8 of 341
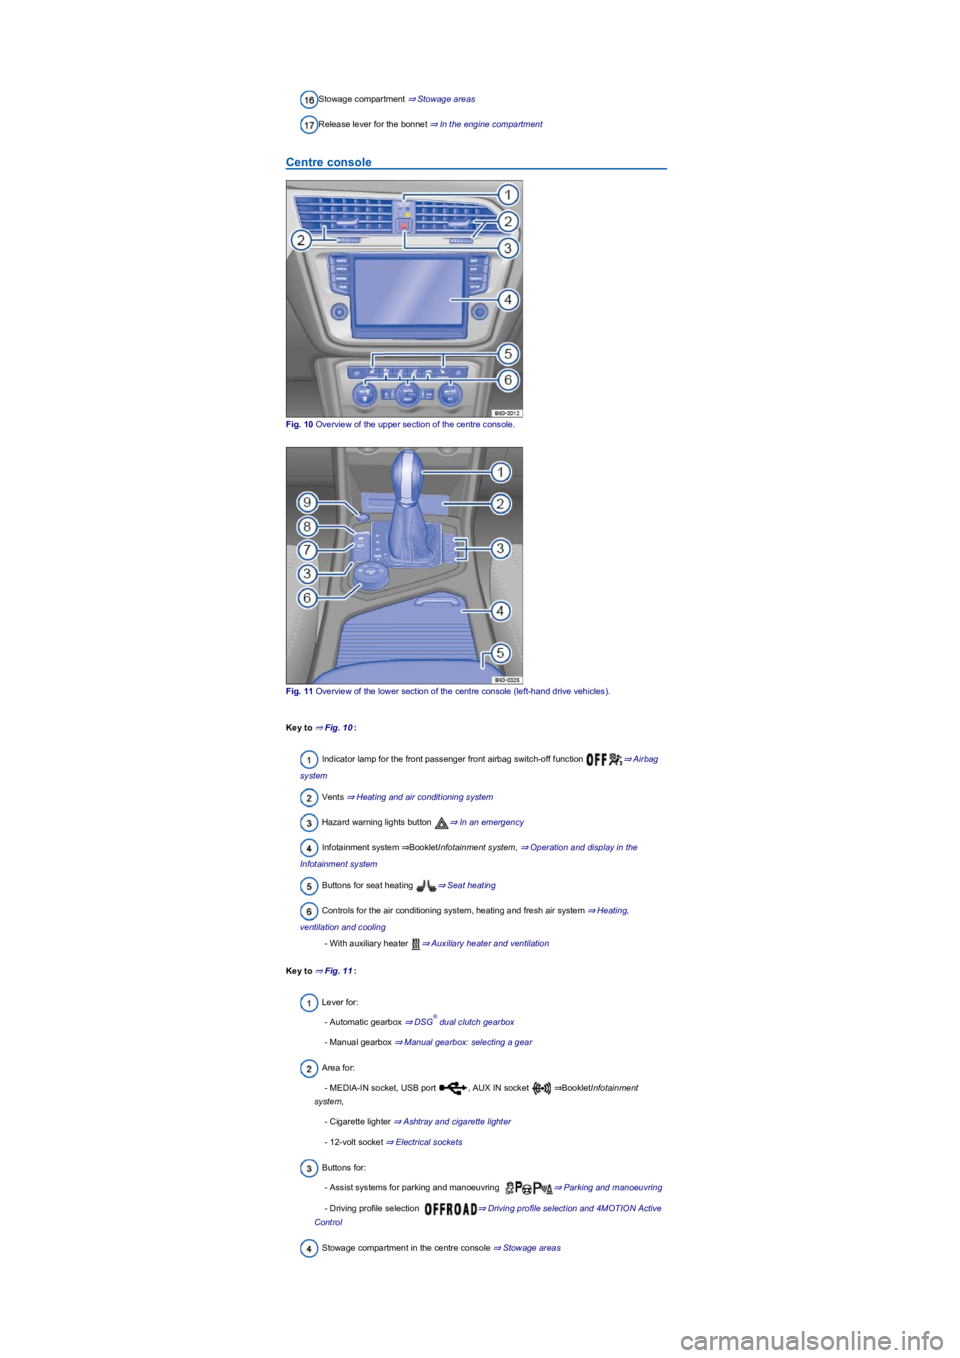
Stowage compartment ⇒ Stowage areas
Release lever for the bonnet ⇒ In the engine compartment
Centre console
Fig. 10 Overview of the upper section of the centre console.
Fig. 11 Overview of the lower section of the centre console (left-hand drive vehicles).
Key to ⇒ Fig. 10:
Indicator lamp for the front passenger front airbag switch-off function ⇒ Airbag
system
Vents ⇒ Heating and air conditioning system
Hazard warning lights button ⇒ In an emergency
Infotainment system ⇒BookletInfotainment system, ⇒ Operation and display in the
Infotainment system
Buttons for seat heating ⇒ Seat heating
Controls for the air conditioning system, heating and fresh air system ⇒ Heating,
ventilation and cooling
- With auxiliary heater ⇒ Auxiliary heater and ventilation
Key to ⇒ Fig. 11:
Lever for:
- Automatic gearbox ⇒ DSG dual clutch gearbox
- Manual gearbox ⇒ Manual gearbox: selecting a gear
Area for:
- MEDIA-IN socket, USB port , AUX IN socket ⇒BookletInfotainment
system,
- Cigarette lighter ⇒ Ashtray and cigarette lighter
- 12-volt socket ⇒ Electrical sockets
Buttons for:
- Assist systems for parking and manoeuvring ⇒ Parking and manoeuvring
- Driving profile selection ⇒ Driving profile selection and 4MOTION Active
Control
Stowage compartment in the centre console ⇒ Stowage areas
®
Page 9 of 341
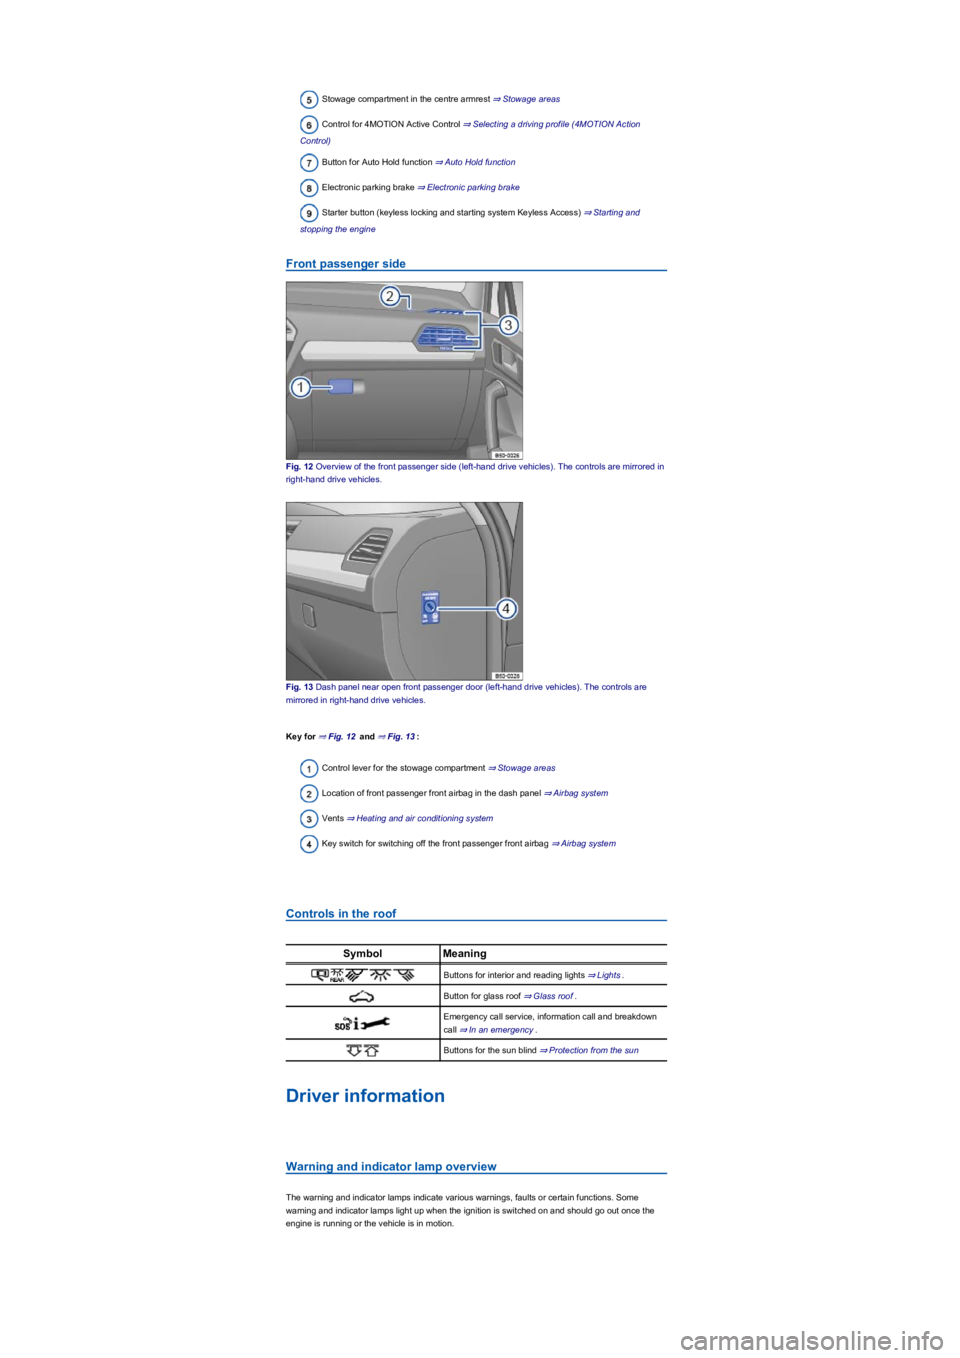
Stowage compartment in the centre armrest ⇒ Stowage areas
Control for 4MOTION Active Control ⇒ Selecting a driving profile (4MOTION Action
Control)
Button for Auto Hold function ⇒ Auto Hold function
Electronic parking brake ⇒ Electronic parking brake
Starter button (keyless locking and starting system Keyless Access) ⇒ Starting and
stopping the engine
Front passenger side
Fig. 12 Overview of the front passenger side (left-hand drive vehicles). The controls are mirrored in
right-hand drive vehicles.
Fig. 13 Dash panel near open front passenger door (left-hand drive vehicles). The controls are
mirrored in right-hand drive vehicles.
Key for ⇒ Fig. 12 and ⇒ Fig. 13:
Control lever for the stowage compartment ⇒ Stowage areas
Location of front passenger front airbag in the dash panel ⇒ Airbag system
Vents ⇒ Heating and air conditioning system
Key switch for switching off the front passenger front airbag ⇒ Airbag system
Controls in the roof
SymbolMeaning
Buttons for interior and reading lights ⇒ Lights.
Button for glass roof ⇒ Glass roof.
Emergency call service, information call and breakdown
call ⇒ In an emergency.
Buttons for the sun blind ⇒ Protection from the sun
Driver information
Warning and indicator lamp overview
The warning and indicator lamps indicate various warnings, faults or certain functions. Some
warning and indicator lamps light up when the ignition is switched on and should go out once the
engine is running or the vehicle is in motion.
Page 34 of 341
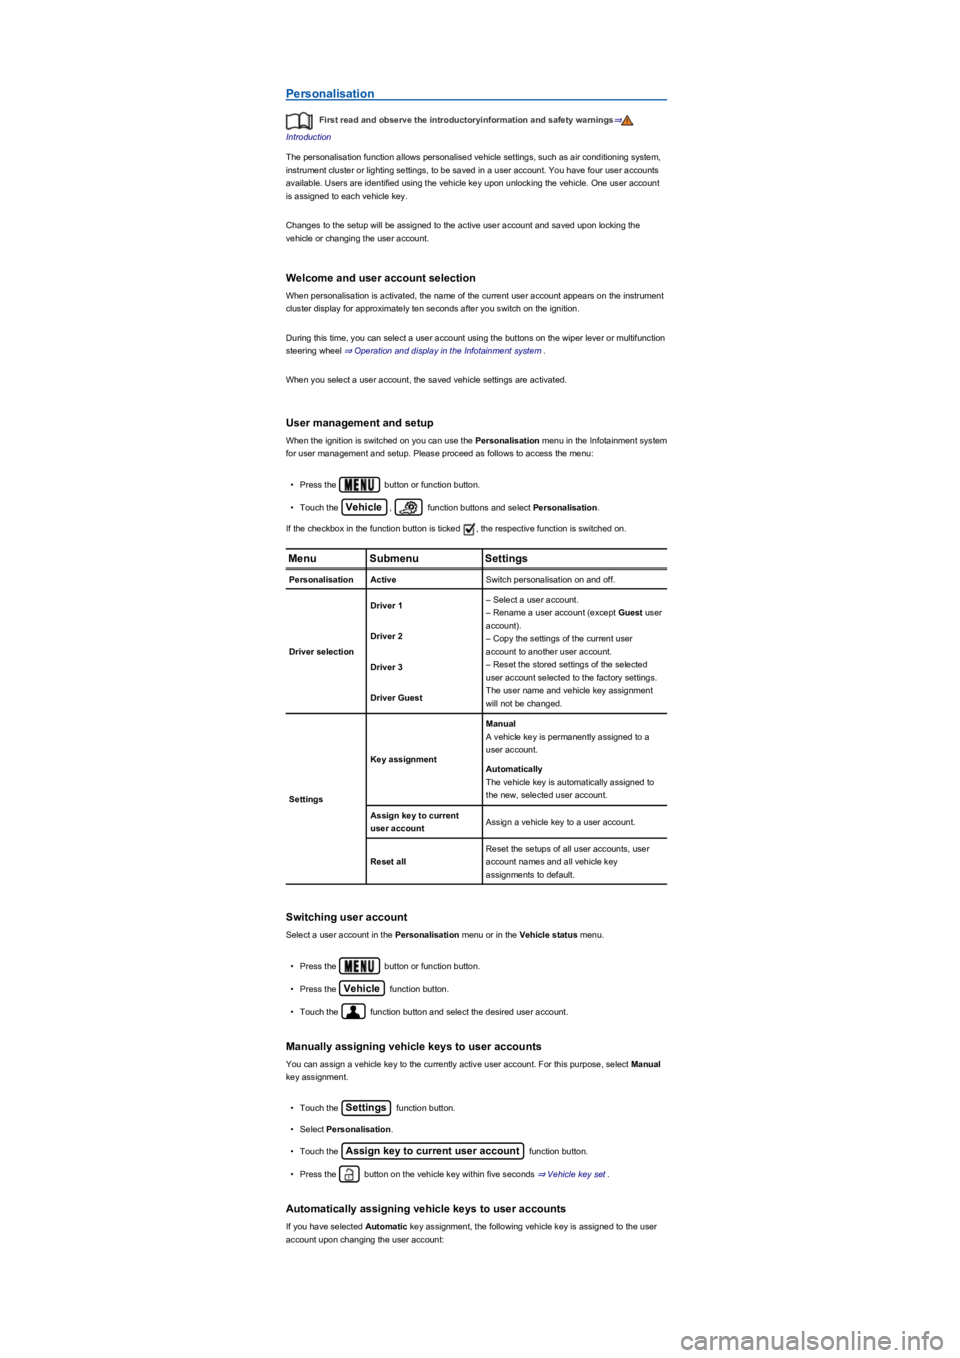
Personalisation
First read and observe the introductoryinformation and safety warnings⇒
Introduction
The personalisation function allows personalised vehicle settings, such as air conditioning system,
instrument cluster or lighting settings, to be saved in a user account. You have four user accounts
available. Users are identified using the vehicle key upon unlocking the vehicle. One user account
is assigned to each vehicle key.
Changes to the setup will be assigned to the active user account and saved upon locking the
vehicle or changing the user account.
Welcome and user account selection
When personalisation is activated, the name of the current user account appears on the instrument
cluster display for approximately ten seconds after you switch on the ignition.
During this time, you can select a user account using the buttons on the wiper lever or multifunction
steering wheel ⇒ Operation and display in the Infotainment system.
When you select a user account, the saved vehicle settings are activated.
User management and setup
When the ignition is switched on you can use the Personalisation menu in the Infotainment system
for user management and setup. Please proceed as follows to access the menu:
•Press the button or function button.
•Touch the Vehicle, function buttons and select Personalisation.
If the checkbox in the function button is ticked , the respective function is switched on.
MenuSubmenuSettings
PersonalisationActiveSwitch personalisation on and off.
Driver selection
Driver 1– Select a user account.
– Rename a user account (except Guest user
account).
– Copy the settings of the current user
account to another user account.
– Reset the stored settings of the selected
user account selected to the factory settings.
The user name and vehicle key assignment
will not be changed.
Driver 2
Driver 3
Driver Guest
Settings
Key assignment
Manual
A vehicle key is permanently assigned to a
user account.
Automatically
The vehicle key is automatically assigned to
the new, selected user account.
Assign key to current
user accountAssign a vehicle key to a user account.
Reset all
Reset the setups of all user accounts, user
account names and all vehicle key
assignments to default.
Switching user account
Select a user account in the Personalisation menu or in the Vehicle status menu.
•Press the button or function button.
•Press the Vehicle function button.
•Touch the function button and select the desired user account.
Manually assigning vehicle keys to user accounts
You can assign a vehicle key to the currently active user account. For this purpose, select Manual
key assignment.
•Touch the Settings function button.
•Select Personalisation.
•Touch the Assign key to current user account function button.
•Press the button on the vehicle key within five seconds ⇒ Vehicle key set.
Automatically assigning vehicle keys to user accounts
If you have selected Automatic key assignment, the following vehicle key is assigned to the user
account upon changing the user account:
Page 35 of 341
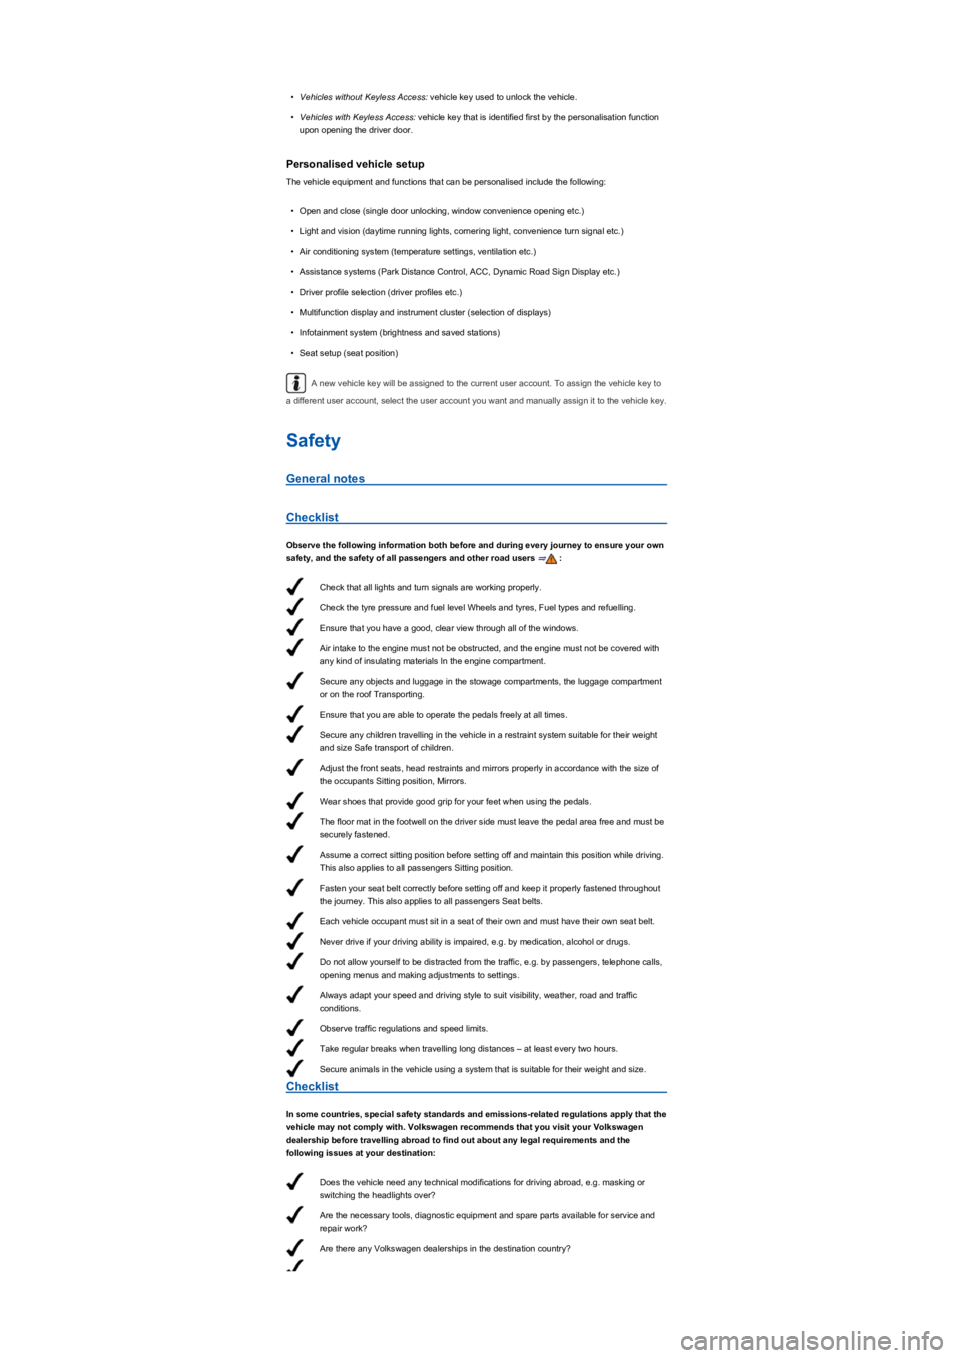
Check that all lights and turn signals are working properly.
Check the tyre pressure and fuel level Wheels and tyres, Fuel types and refuelling.
Ensure that you have a good, clear view through all of the windows.
Air intake to the engine must not be obstructed, and the engine must not be covered with
any kind of insulating materials In the engine compartment.
Secure any objects and luggage in the stowage compartments, the luggage compartment
or on the roof Transporting.
Ensure that you are able to operate the pedals freely at all times.
Secure any children travelling in the vehicle in a restraint system suitable for their weight
and size Safe transport of children.
Adjust the front seats, head restraints and mirrors properly in accordance with the size of
the occupants Sitting position, Mirrors.
Wear shoes that provide good grip for your feet when using the pedals.
The floor mat in the footwell on the driver side must leave the pedal area free and must be
securely fastened.
Assume a correct sitting position before setting off and maintain this position while driving.
This also applies to all passengers Sitting position.
Fasten your seat belt correctly before setting off and keep it properly fastened throughout
the journey. This also applies to all passengers Seat belts.
Each vehicle occupant must sit in a seat of their own and must have their own seat belt.
Never drive if your driving ability is impaired, e.g. by medication, alcohol or drugs.
Do not allow yourself to be distracted from the traffic, e.g. by passengers, telephone calls,
opening menus and making adjustments to settings.
Always adapt your speed and driving style to suit visibility, weather, road and traffic
conditions.
Observe traffic regulations and speed limits.
Take regular breaks when travelling long distances – at least every two hours.
Secure animals in the vehicle using a system that is suitable for their weight and size.
Does the vehicle need any technical modifications for driving abroad, e.g. masking or
switching the headlights over?
Are the necessary tools, diagnostic equipment and spare parts available for service and
repair work?
Are there any Volkswagen dealerships in the destination country?
•Vehicles without Keyless Access: vehicle key used to unlock the vehicle.
•Vehicles with Keyless Access: vehicle key that is identified first by the personalisation function
upon opening the driver door.
Personalised vehicle setup
The vehicle equipment and functions that can be personalised include the following:
•Open and close (single door unlocking, window convenience opening etc.)
•Light and vision (daytime running lights, cornering light, convenience turn signal etc.)
•Air conditioning system (temperature settings, ventilation etc.)
•Assistance systems (Park Distance Control, ACC, Dynamic Road Sign Display etc.)
•Driver profile selection (driver profiles etc.)
•Multifunction display and instrument cluster (selection of displays)
•Infotainment system (brightness and saved stations)
•Seat setup (seat position)
A new vehicle key will be assigned to the current user account. To assign the vehicle key to
a different user account, select the user account you want and manually assign it to the vehicle key.
Safety
General notes
Checklist
Observe the following information both before and during every journey to ensure your own
safety, and the safety of all passengers and other road users ⇒:
Checklist
In some countries, special safety standards and emissions-related regulations apply that the
vehicle may not comply with. Volkswagen recommends that you visit your Volkswagen
dealership before travelling abroad to find out about any legal requirements and the
following issues at your destination:
Page 115 of 341
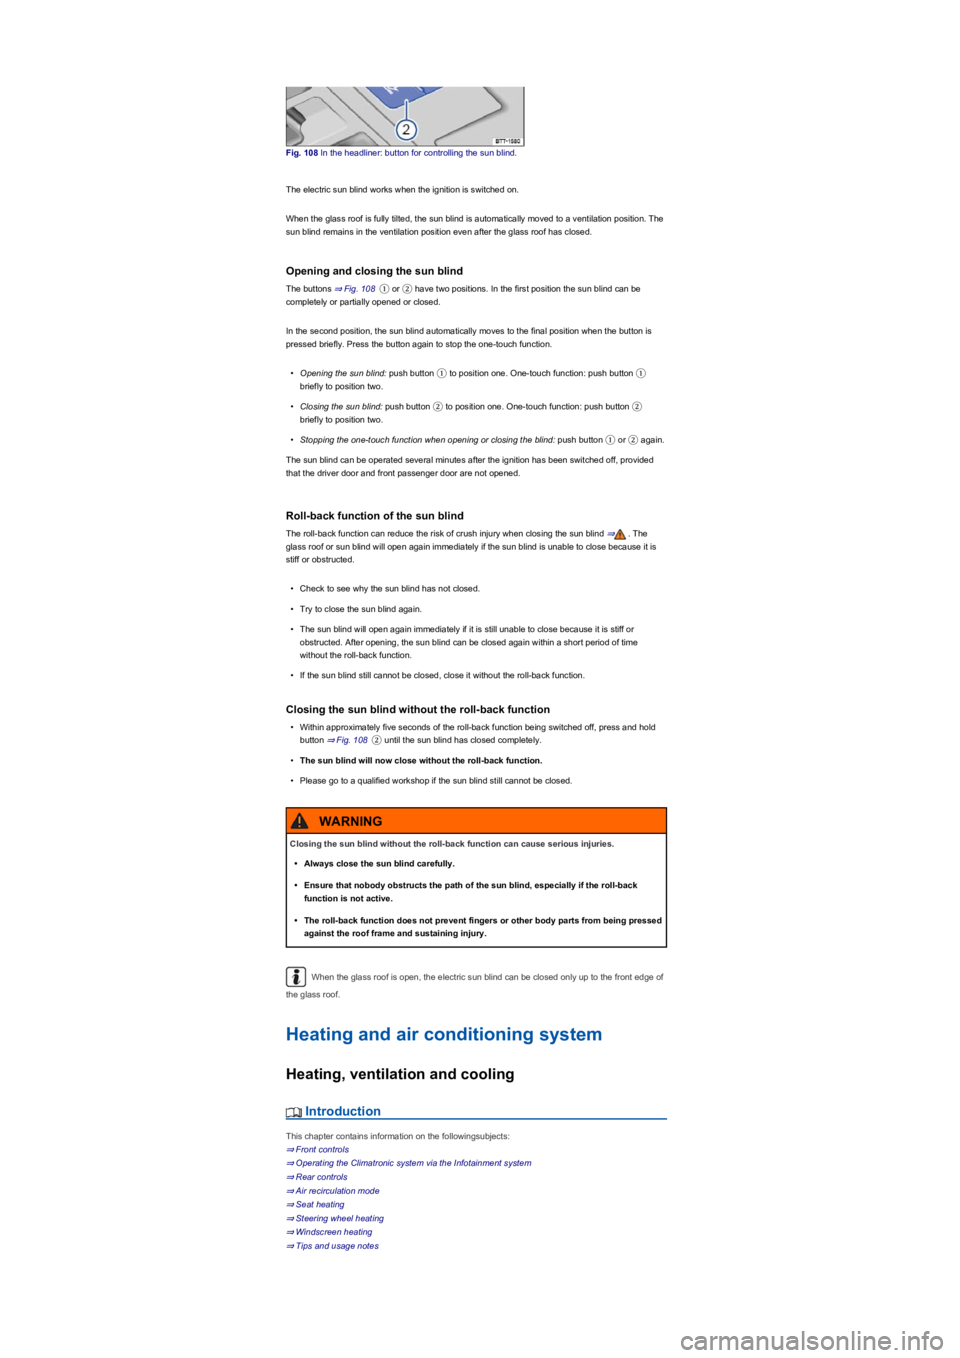
Fig. 108 In the headliner: button for controlling the sun blind.
The electric sun blind works when the ignition is switched on.
When the glass roof is fully tilted, the sun blind is automatically moved to a ventilation position. The
sun blind remains in the ventilation position even after the glass roof has closed.
Opening and closing the sun blind
The buttons ⇒ Fig. 108① or ② have two positions. In the first position the sun blind can be
completely or partially opened or closed.
In the second position, the sun blind automatically moves to the final position when the button is
pressed briefly. Press the button again to stop the one-touch function.
•Opening the sun blind: push button ① to position one. One-touch function: push button ①
briefly to position two.
•Closing the sun blind: push button ② to position one. One-touch function: push button ②
briefly to position two.
•Stopping the one-touch function when opening or closing the blind: push button ① or ② again.
The sun blind can be operated several minutes after the ignition has been switched off, provided
that the driver door and front passenger door are not opened.
Roll-back function of the sun blind
The roll-back function can reduce the risk of crush injury when closing the sun blind ⇒. The
glass roof or sun blind will open again immediately if the sun blind is unable to close because it is
stiff or obstructed.
•Check to see why the sun blind has not closed.
•Try to close the sun blind again.
•The sun blind will open again immediately if it is still unable to close because it is stiff or
obstructed. After opening, the sun blind can be closed again within a short period of time
without the roll-back function.
•If the sun blind still cannot be closed, close it without the roll-back function.
Closing the sun blind without the roll-back function
•Within approximately five seconds of the roll-back function being switched off, press and hold
button ⇒ Fig. 108② until the sun blind has closed completely.
•The sun blind will now close without the roll-back function.
•Please go to a qualified workshop if the sun blind still cannot be closed.
When the glass roof is open, the electric sun blind can be closed only up to the front edge of
the glass roof.
Heating and air conditioning system
Heating, ventilation and cooling
Introduction
This chapter contains information on the followingsubjects:
⇒ Front controls
⇒ Operating the Climatronic system via the Infotainment system
⇒ Rear controls
⇒ Air recirculation mode
⇒ Seat heating
⇒ Steering wheel heating
⇒ Windscreen heating
⇒ Tips and usage notes
Closing the sun blind without the roll-back function can cause serious injuries.
•Always close the sun blind carefully.
•Ensure that nobody obstructs the path of the sun blind, especially if the roll-back
function is not active.
•The roll-back function does not prevent fingers or other body parts from being pressed
against the roof frame and sustaining injury.
WARNING
Page 116 of 341
The following systems may be installed in the vehicle
The heating and fresh air system warms up and supplies fresh air to the vehicle interior. The
heating and fresh air system does not cool down the vehicle interior.
The manual air conditioning system or Climatronic cools down and dehumidifies the air. It
works most effectively when the windows and the glass roof are closed. If heat has built up in the
vehicle interior, opening the doors and windows can speed up the cooling process.
How the vehicle displays active functions
Lit up LEDs on rotary knobs and buttons indicate that a function has been switched on.
Some settings can be stored in the user accounts of the personalisation function and
therefore change when the user account changes ⇒ Personalisation.
Front controls
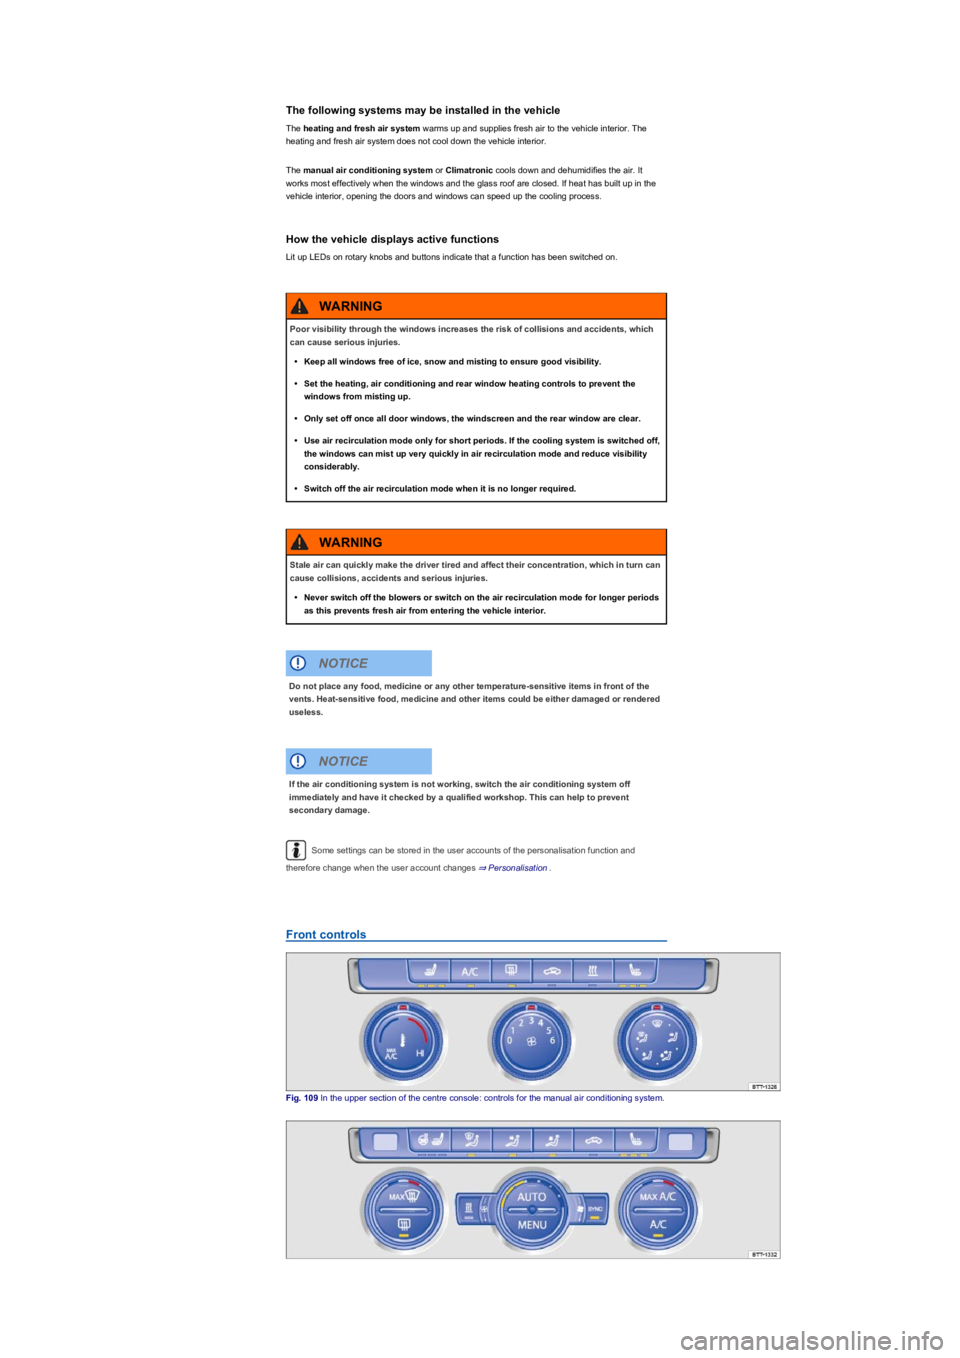
Fig. 109 In the upper section of the centre console: controls for the manual air conditioning system.
Poor visibility through the windows increases the risk of collisions and accidents, which
can cause serious injuries.
•Keep all windows free of ice, snow and misting to ensure good visibility.
•Set the heating, air conditioning and rear window heating controls to prevent the
windows from misting up.
•Only set off once all door windows, the windscreen and the rear window are clear.
•Use air recirculation mode only for short periods. If the cooling system is switched off,
the windows can mist up very quickly in air recirculation mode and reduce visibility
considerably.
•Switch off the air recirculation mode when it is no longer required.
WARNING
Stale air can quickly make the driver tired and affect their concentration, which in turn can
cause collisions, accidents and serious injuries.
•Never switch off the blowers or switch on the air recirculation mode for longer periods
as this prevents fresh air from entering the vehicle interior.
WARNING
Do not place any food, medicine or any other temperature-sensitive items in front of the
vents. Heat-sensitive food, medicine and other items could be either damaged or rendered
useless.
NOTICE
If the air conditioning system is not working, switch the air conditioning system off
immediately and have it checked by a qualified workshop. This can help to prevent
secondary damage.
NOTICE
Page 117 of 341
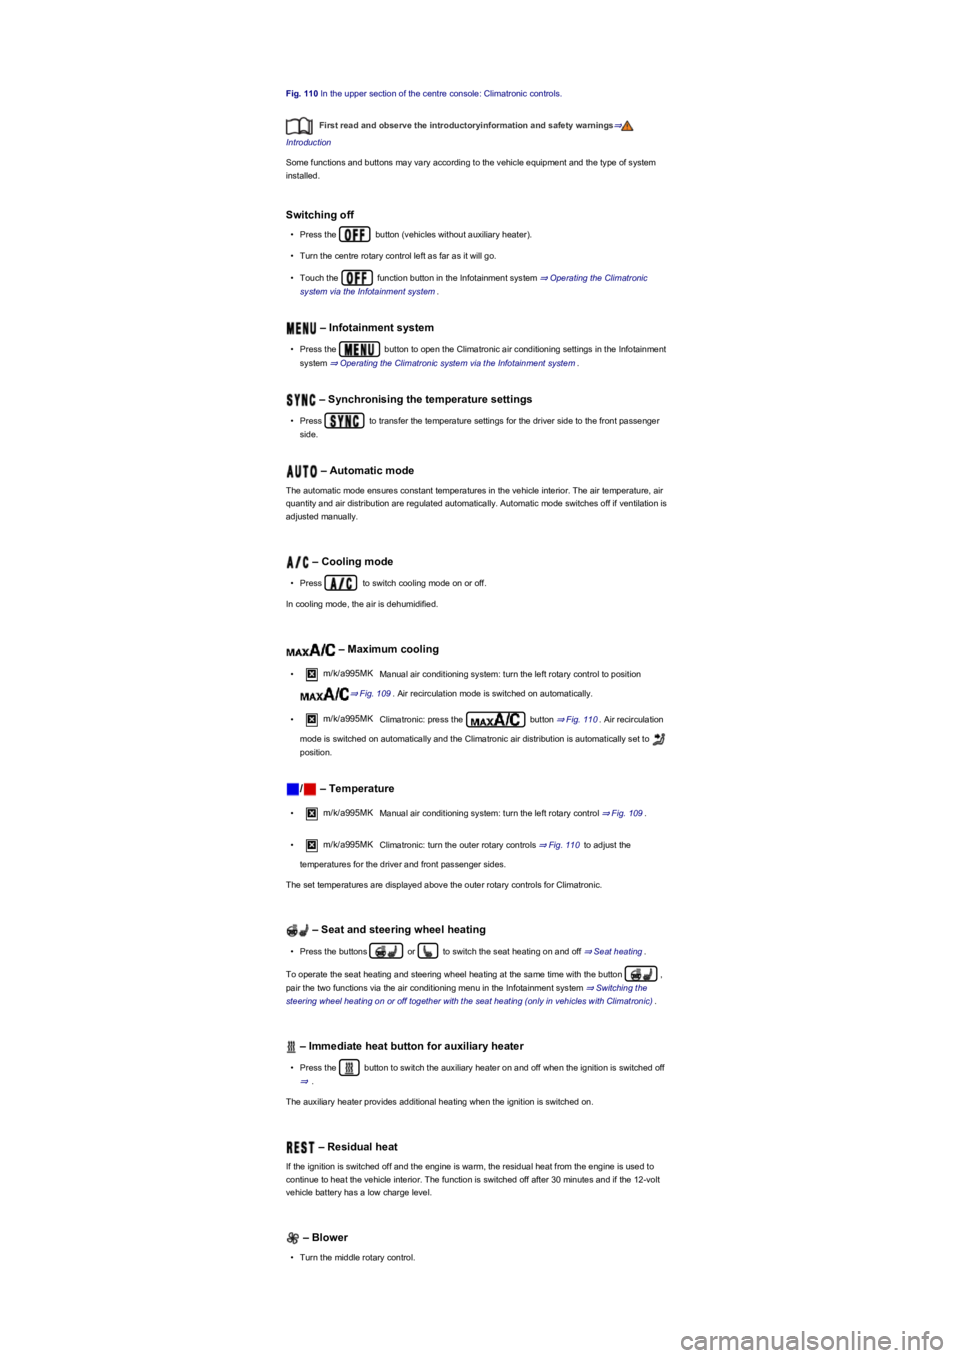
Fig. 110 In the upper section of the centre console: Climatronic controls.
First read and observe the introductoryinformation and safety warnings⇒
Introduction
Some functions and buttons may vary according to the vehicle equipment and the type of system
installed.
Switching off
•Press the button (vehicles without auxiliary heater).
•Turn the centre rotary control left as far as it will go.
•Touch the function button in the Infotainment system ⇒ Operating the Climatronic
system via the Infotainment system.
– Infotainment system
•Press the button to open the Climatronic air conditioning settings in the Infotainment
system ⇒ Operating the Climatronic system via the Infotainment system.
– Synchronising the temperature settings
•Press to transfer the temperature settings for the driver side to the front passenger
side.
– Automatic mode
The automatic mode ensures constant temperatures in the vehicle interior. The air temperature, air
quantity and air distribution are regulated automatically. Automatic mode switches off if ventilation is
adjusted manually.
– Cooling mode
•Press to switch cooling mode on or off.
In cooling mode, the air is dehumidified.
– Maximum cooling
•m/k/a995MK Manual air conditioning system: turn the left rotary control to position
⇒ Fig. 109. Air recirculation mode is switched on automatically.
•m/k/a995MK Climatronic: press the button ⇒ Fig. 110. Air recirculation
mode is switched on automatically and the Climatronic air distribution is automatically set to
position.
/ – Temperature
•m/k/a995MK Manual air conditioning system: turn the left rotary control ⇒ Fig. 109.
•m/k/a995MK Climatronic: turn the outer rotary controls ⇒ Fig. 110 to adjust the
temperatures for the driver and front passenger sides.
The set temperatures are displayed above the outer rotary controls for Climatronic.
– Seat and steering wheel heating
•Press the buttons or to switch the seat heating on and off ⇒ Seat heating.
To operate the seat heating and steering wheel heating at the same time with the button ,
pair the two functions via the air conditioning menu in the Infotainment system ⇒ Switching the
steering wheel heating on or off together with the seat heating (only in vehicles with Climatronic).
– Immediate heat button for auxiliary heater
•Press the button to switch the auxiliary heater on and off when the ignition is switched off
⇒.
The auxiliary heater provides additional heating when the ignition is switched on.
– Residual heat
If the ignition is switched off and the engine is warm, the residual heat from the engine is used to
continue to heat the vehicle interior. The function is switched off after 30 minutes and if the 12-volt
vehicle battery has a low charge level.
– Blower
•Turn the middle rotary control.
Page 118 of 341
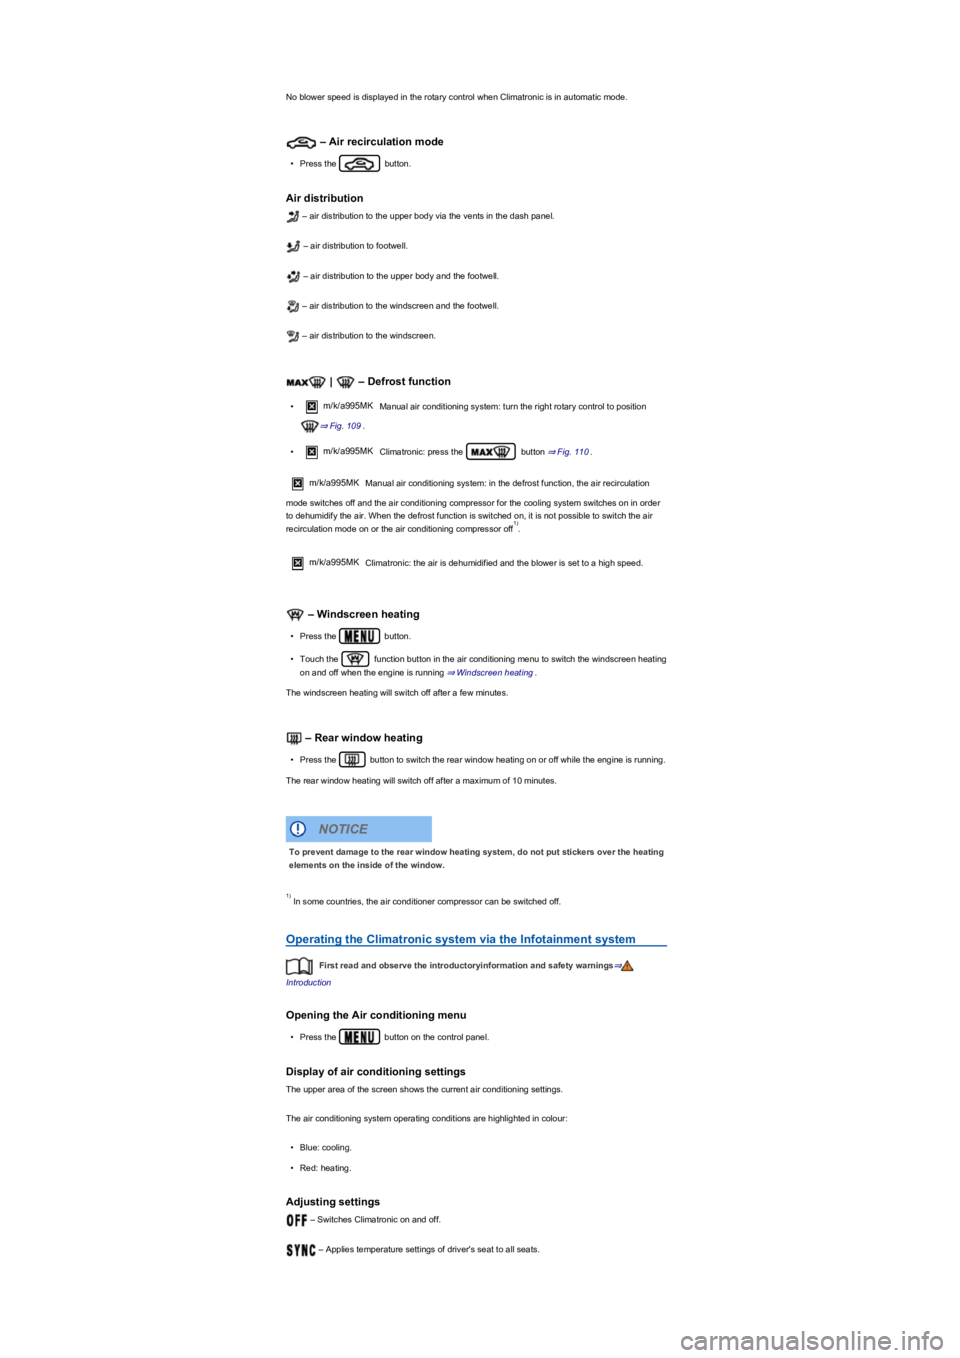
No blower speed is displayed in the rotary control when Climatronic is in automatic mode.
– Air recirculation mode
•Press the button.
Air distribution
– air distribution to the upper body via the vents in the dash panel.
– air distribution to footwell.
– air distribution to the upper body and the footwell.
– air distribution to the windscreen and the footwell.
– air distribution to the windscreen.
| – Defrost function
•m/k/a995MK Manual air conditioning system: turn the right rotary control to position
⇒ Fig. 109.
•m/k/a995MK Climatronic: press the button ⇒ Fig. 110.
m/k/a995MKManual air conditioning system: in the defrost function, the air recirculation
mode switches off and the air conditioning compressor for the cooling system switches on in order
to dehumidify the air. When the defrost function is switched on, it is not possible to switch the air
recirculation mode on or the air conditioning compressor off.
m/k/a995MK Climatronic: the air is dehumidified and the blower is set to a high speed.
– Windscreen heating
•Press the button.
•Touch the function button in the air conditioning menu to switch the windscreen heating
on and off when the engine is running ⇒ Windscreen heating.
The windscreen heating will switch off after a few minutes.
– Rear window heating
•Press the button to switch the rear window heating on or off while the engine is running.
The rear window heating will switch off after a maximum of 10 minutes.
In some countries, the air conditioner compressor can be switched off.
Operating the Climatronic system via the Infotainment system
First read and observe the introductoryinformation and safety warnings⇒
Introduction
Opening the Air conditioning menu
•Press the button on the control panel.
Display of air conditioning settings
The upper area of the screen shows the current air conditioning settings.
The air conditioning system operating conditions are highlighted in colour:
•Blue: cooling.
•Red: heating.
Adjusting settings
– Switches Climatronic on and off.
– Applies temperature settings of driver's seat to all seats.
1)
To prevent damage to the rear window heating system, do not put stickers over the heating
elements on the inside of the window.
NOTICE
1)