rims VOLKSWAGEN TIGUAN 2017 Owner´s Manual
[x] Cancel search | Manufacturer: VOLKSWAGEN, Model Year: 2017, Model line: TIGUAN, Model: VOLKSWAGEN TIGUAN 2017Pages: 341, PDF Size: 9.14 MB
Page 133 of 341
If the front brake pads are tested, the rear brake pads should be tested at the same time.
Regularly check the thickness of the brake pads through the openings in the rims or from the
underside of the vehicle. If necessary, remove the wheels to carry out a comprehensive check.
Volkswagen recommends using a Volkswagen dealership for this purpose.
Driving with a loaded vehicle
First read and observe the introductoryinformation and safety warnings⇒
Introduction
For good vehicle handling when driving a loaded vehicle, please observe the following:
•Stow all items of luggage securely ⇒ Stowing luggage and loads.
•Accelerate particularly cautiously and carefully.
•Avoid sudden braking and driving manoeuvres.
•Brake earlier than in normal driving.
•If applicable, observe the information concerning the roof carrier ⇒ Roof carrier.
•If applicable, observe the information about driving with a trailer ⇒ Trailer towing.
Driving with an open boot lid
First read and observe the introductoryinformation and safety warnings⇒
Introduction
Driving with an open boot lid is particularly dangerous. All objects and the open boot lid must be
secured properly. Take the appropriate measures to reduce the amount of poisonous exhaust
fumes that could enter into the vehicle.
Wet brakes or brakes coated with ice or road salt react more slowly and require longer
braking distances.
•Carefully apply the brakes to test them.
•Always dry brakes and clean off any coating of ice and salt with a few cautious
applications of the brake when visibility, weather, road and traffic conditions permit.
WARNING
Driving without the brake servo can considerably increase the braking distance and thus
cause accidents and serious injuries.
•Never switch the engine or ignition off while the vehicle is in motion.
•If the brake servo does not function or the vehicle is being towed, the brake pedal will
have to be depressed more forcefully as the braking distance will be increased due to
the lack of assistance for the brake system.
WARNING
Moving loads can severely impair the vehicle's stability and driving safety which could
cause accidents and severe injuries.
•Secure objects properly to prevent them from sliding.
•Use suitable straps when securing heavy objects.
•Engage the rear seat backrests and the adjustable rear bench seat securely.
WARNING
Page 227 of 341
•If necessary, unclip the luggage net ⇒ Luggage net and remove the securing straps.
•Lift the luggage compartment floor and pull it rearwards out of the guides on the sides of the
luggage compartment ⇒ Fig. 183.
•Insert the luggage compartment floor into the guides at the required height and push it forwards
as far as it will go ⇒ Fig. 183, .
Depending on the vehicle equipment, there may be compartments for stowing small items
under the luggage compartment floor.
Volkswagen recommends that you secure items to the fastening rings with the aid of fixing or
securing straps.
Net partition
Folding the net partition in and out
Fig. 184 Folding out the net partition.
Fig. 185 Folding in the net partition.
The net partition must be folded out before being fitted in the vehicle.
Folding out the net partition
Remove the net partition from the bag and roll out.
Fold out the net partition side rods ⇒ Fig. 184① and ② as shown by the arrow until it audibly
clicks.
Folding in the net partition
•Press the release button ⇒ Fig. 185①. With the release button pressed down, fold in the rod
in the direction of the arrow.
•Press the release button ⇒ Fig. 185②. With the release button pressed down, fold in the rod
in the direction of the arrow.
•Roll up the net partition and store in the bag.
•Stow the bag securely in the vehicle.
Using the net partition
Never drop the luggage compartment floor; guide it slowly back down. The trims or the
luggage compartment floor could otherwise be damaged.
NOTICE
Page 294 of 341
Useful information about wheels and tyres
Introduction
This chapter contains information on the followingsubjects:
⇒ Handling wheels and tyres
⇒ Wheel rims and wheel bolts
⇒ Tyre pressure
⇒ Tread depth and wear indicators
⇒ Tyre damage
⇒ Spare wheel or temporary spare wheel
⇒ Tyre lettering and tyre type
⇒ Maximum load and speed range for tyres
⇒ Winter tyres
⇒ Snow chains
The tyres are the most used and most underestimated parts of a vehicle. Tyres are very important
as the narrow tyre surfaces are the only contact between the vehicle and the road.
The service life of tyres is dependent on tyre pressure, driving style, handling and correct fitting.
Differing tyre pressures or tyre pressures that are too low can cause tyre damage, tyre
failure, loss of vehicle control, accidents, serious injury and death.
•If the indicator lamp lights up, stop the vehicle as soon as possible and check all
the tyres ⇒ Useful information about wheels and tyres.
•Different tyre pressures or tyre pressures that are too low can increase wear on the
tyres, reduce vehicle stability and increase the braking distance.
•Differing tyre pressures or tyre pressures that are too low can cause sudden tyre
failure and lead to a tyre bursting and the loss of control over the vehicle.
•The driver is responsible for the correct tyre pressure of all tyres on the vehicle. The
recommended tyre pressure can be found on a sticker ⇒ Tyre pressure.
•The tyre monitoring system cannot function correctly until all cold tyres have the
correct tyre pressure.
•The pressure in all tyres must always be appropriate to the vehicle load ⇒ Tyre
pressure.
•Always inflate all tyres to the correct tyre pressure before every journey ⇒ Tyre
pressure.
•If the vehicle is driven with insufficient tyre pressure, this results in greater tyre flexing.
This could warm up the tyre to such an extent that the tread may separate and the tyre
could burst. This could cause the driver to lose control of the vehicle.
•High speeds and overloading of the vehicle may cause the tyres to heat up to such an
extent that the tyre bursts, leading you to lose control of the vehicle.
•If the tyre pressure is too low or too high, the tyres will wear prematurely and the
vehicle will not handle well.
•If the tyre is not flat and it is not necessary to change the wheel immediately, drive at
low speed to the nearest qualified workshop and check and correct the tyre pressure
⇒ Tyre pressure.
WARNING
Page 295 of 341
Handling wheels and tyres
Fig. 235 Diagram showing how to swap wheels.
First read and observe the introductoryinformation and safety warnings⇒
Introduction
The wheels and tyres approved by Volkswagen have been carefully selected.
Rotating wheels front to rear
Regularly rotating the wheels as shown in the illustration ⇒ Fig. 235 is recommended to help
ensure that tyres wear evenly. All the tyres will then last for about the same time.
Volkswagen recommends having the wheels changed by a qualified workshop.
Avoiding damage to the rims and tyres
•Always drive over kerbs slowly and at a right angle.
•Check the tyre pressure regularly.
•Never exceed the top speed and load permitted for the tyres that are fitted ⇒ Tyre lettering and
tyre type.
•Damaged or worn tyres must be replaced immediately ⇒ Tyre damage.
•Protect the wheels from contact with corrosive substances, including oils, lubricants, fuel and
brake fluid ⇒.
•Replace missing dust caps immediately.
Tyres that are older than 6 years
Tyres age through physical and chemical processes that can impair their function. Tyres that have
been stored unused for an extended period of time age quicker than tyres that are used all the time.
New tyres or tyres which are old, worn down or damaged cannot provide full levels of
vehicle control and braking power.
•Incorrect handling of wheels and tyres can reduce vehicle safety and cause accidents
and serious injuries.
•All four wheels must be fitted with radial tyres of the same type, size (rolling
circumference) and the same tread.
•New tyres will have to be run in as they will initially have reduced grip and braking
effect. Drive particularly carefully for the first 600 km in order to prevent accidents and
serious injury.
•Check tyre pressures regularly when the tyres are cold, and always keep to the
specified value. If the tyre pressure is too low, it is possible that the tyre temperature
will increase to such an extent when driving that the tread peels off and the tyre bursts.
•Never drive with worn tyres or tyres that are damaged (cuts, cracks or blisters). Driving
with tyres in this condition can result in blown tyres, accidents and serious injuries.
Worn or damaged tyres must be replaced as soon as possible.
•Never exceed the top speed and load permitted for the fitted tyres.
•The effectiveness of the driver assist systems and brake support systems depends on
the tyre grip.
•If you notice unusual vibrations or if the vehicle pulls to one side when driving, stop
the car immediately and check the wheels and tyres for damage.
•In order to reduce the risk of losing control of the vehicle, and the risk of accident and
serious injury, never loosen the bolts on wheel rims with bolted on wheel rim rings.
•Do not use wheels or tyres if you do not know their history. Used wheels and tyres
could be damaged, even if the damage is not visible.
•Even if they have not been used, old tyres can suddenly lose pressure or burst,
especially at high speeds, and thus cause accidents and serious injuries. Avoid using
tyres that are more than six years old. If you have no alternative, drive slowly and with
extra care at all times.
WARNING
Page 296 of 341
Volkswagen recommends replacing tyres that are older than 6 years with new tyres. This also
applies for tyres which appear to still be in good condition and whose tread depth has not yet
reached the minimum value stipulated by legislation ⇒.
Winter and all-year tyres also largely lose their effectiveness through ageing – regardless of the
remaining tread depth ⇒ Winter tyres.
The age of each tyre can be determined using the manufacturing date ⇒ Tyre lettering and tyre
type.
Storing tyres
Always store tyres in a cool, dry and preferably dark place. Do not store tyres mounted on the rim
vertically.
Any tyres not fitted on rims should be kept in suitable sleeves to protect against dirt and should be
stored vertically (standing on the tread).
New tyres
•Drive particularly carefully for the first 600 km with new tyres as the tyres have to be run in.
Tyres that have not been run in have reduced grip ⇒ and braking effect ⇒.
•All four wheels must be fitted with tyres of the same type, size, and the same tread pattern.
Replacing tyres
•Always replace tyres at least on an axle-by-axle basis ⇒.
•Old tyres should only be replaced by tyres that have been approved by Volkswagen for the
vehicle type.
•Never use tyres with an effective size that is larger than Volkswagen-approved tyres.
Re-adapting the Tyre Pressure Loss Indicator
The Tyre Pressure Loss Indicator must be recalibrated each time one or more wheels are replaced.
This also applies for changing the wheels round, e.g. from the front to the rear ⇒ Tyre monitoring
systems.
Vehicles fitted with a Tyre Pressure Monitoring System
If you wish to replace factory-fitted wheels, make sure that the new wheels are equipped with
sensors that are compatible with the Tyre Pressure Monitoring System ⇒ Tyre Pressure Monitoring
System. The vehicle must be driven at a speed of over 25 km/h (15 mph) for an extended period so
that the new wheels can be recognised.
Volkswagen recommends that a new valve set and set of seals is used every time the sensors are
replaced or modified.
Further information on the Tyre Pressure Monitoring System ⇒ Tyre monitoring systems.
Corrosive liquids and other substances can cause visible and invisible damage to the
tyres, which can cause the tyre to burst.
•Always keep chemicals, oils, lubricants, fuel, brake fluid and other corrosive
substances away from the tyres.
WARNING
Even if they have not been used, old tyres can suddenly lose pressure or burst, especially
at high speeds, and thus cause accidents and serious injuries.
•Avoid using tyres that are more than six years old. If you have no alternative, drive
slowly and with extra care at all times.
WARNING
New tyres will have to be run in as they will initially have reduced grip and braking effect.
•Drive particularly carefully for the first 600 km in order to prevent accidents and
serious injury.
WARNING
Page 297 of 341
Old tyres should be disposed of as required by legislation.
Volkswagen-approved tyres are guaranteed to have the dimensions that are suitable for the
vehicle. In the case of other tyres, the tyre seller must provide a certificate from the tyre
manufacturer stating that the tyre is also suitable for the vehicle. This certificate must be stored in a
safe place in the vehicle.
Wheel rims and wheel bolts
First read and observe the introductoryinformation and safety warnings⇒
Introduction
Wheel rims, tyres and wheel bolts are matched to the vehicle type. If different rims are fitted, the
correct wheel bolts with the correct length and correctly shaped bolt heads must be used
⇒ Changing a wheel.
For technical reasons, it is not generally possible to use the wheels from other vehicles. This can
also apply to wheels of the same vehicle type.
Wheel bolts
The correct wheel bolts must be used for all vehicle types; these bolts must always be tightened
with the correct tightening torque ⇒ Wheel bolts.
Wheel rims with bolted rim rings or trim elements
Wheel rims with bolted-on rings or trim elements consist of several components. These
components are joined together using special bolts. Damaged wheel rims must be replaced and
must always be repaired by a qualified workshop. Volkswagen recommends using a Volkswagen
dealership for this purpose ⇒.
Rim identification
In some countries, new wheel rims must contain information on certain properties. The following
information may be provided on the wheel rim:
•Seal of conformity
•Rim size
•Name of manufacturer or brand name
•Date manufactured (month/year)
•Country of origin
•Production number
•Raw materials batch number
•Product code
Wheels must have the necessary freedom of operation. If the wheels do not have the
necessary freedom of operation, the tyre could rub on parts of the running gear, the
vehicle body and the brake lines. This can lead to a fault in the brake system and to tread
separation and thus to a tyre bursting.
•The actual tyre size must not exceed the tyre dimensions of manufacturers approved
by Volkswagen and must not rub on any vehicle body parts.
WARNING
Avoid heavy impacts and drive round obstacles whenever possible. Tyres can be
deformed by potholes and kerb edges especially. This can cause damage to the tyres and
wheel rims.
NOTICE
Page 298 of 341
Tyre pressure
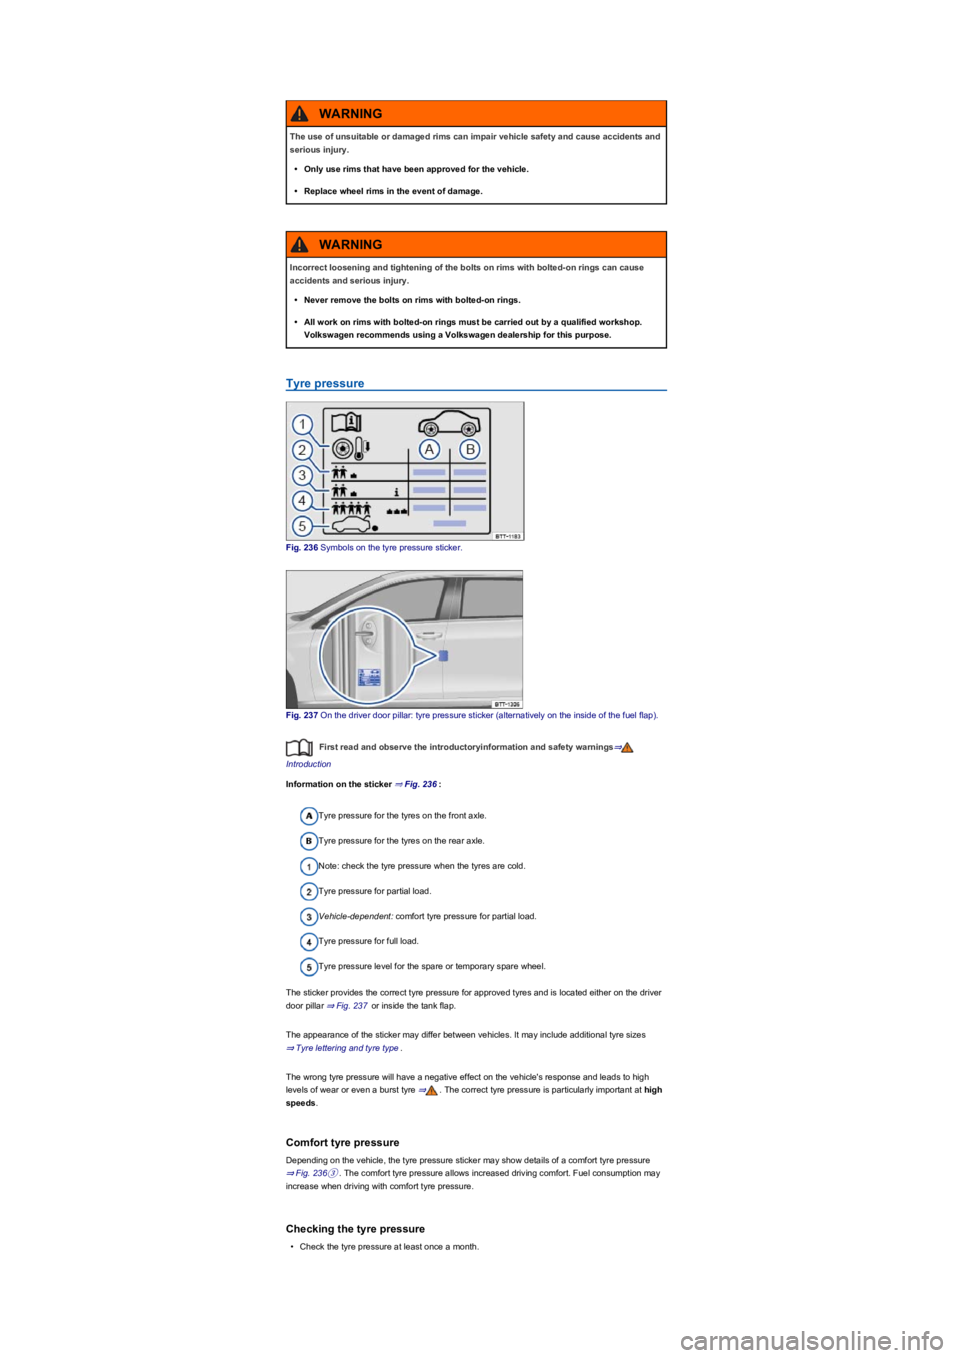
Fig. 236 Symbols on the tyre pressure sticker.
Fig. 237 On the driver door pillar: tyre pressure sticker (alternatively on the inside of the fuel flap).
First read and observe the introductoryinformation and safety warnings⇒
Introduction
Information on the sticker ⇒ Fig. 236:
Tyre pressure for the tyres on the front axle.
Tyre pressure for the tyres on the rear axle.
Note: check the tyre pressure when the tyres are cold.
Tyre pressure for partial load.
Vehicle-dependent: comfort tyre pressure for partial load.
Tyre pressure for full load.
Tyre pressure level for the spare or temporary spare wheel.
The sticker provides the correct tyre pressure for approved tyres and is located either on the driver
door pillar ⇒ Fig. 237 or inside the tank flap.
The appearance of the sticker may differ between vehicles. It may include additional tyre sizes
⇒ Tyre lettering and tyre type.
The wrong tyre pressure will have a negative effect on the vehicle's response and leads to high
levels of wear or even a burst tyre ⇒. The correct tyre pressure is particularly important at high
speeds.
Comfort tyre pressure
Depending on the vehicle, the tyre pressure sticker may show details of a comfort tyre pressure
⇒ Fig. 236③. The comfort tyre pressure allows increased driving comfort. Fuel consumption may
increase when driving with comfort tyre pressure.
Checking the tyre pressure
•Check the tyre pressure at least once a month.
The use of unsuitable or damaged rims can impair vehicle safety and cause accidents and
serious injury.
•Only use rims that have been approved for the vehicle.
•Replace wheel rims in the event of damage.
WARNING
Incorrect loosening and tightening of the bolts on rims with bolted-on rings can cause
accidents and serious injury.
•Never remove the bolts on rims with bolted-on rings.
•All work on rims with bolted-on rings must be carried out by a qualified workshop.
Volkswagen recommends using a Volkswagen dealership for this purpose.
WARNING
Page 300 of 341
Tyre damage
First read and observe the introductoryinformation and safety warnings⇒
Introduction
Damage to tyres and wheel rims is often hidden ⇒.
•If you suspect that a wheel is damaged, stop the vehicle as soon as it is safe to do so.
•Check the tyres and rims for damage.
•If a tyre is damaged, do not drive on. Seek expert assistance.
•If there is no visible damage, drive slowly and cautiously to the next qualified workshop in order
to have the vehicle checked.
Foreign bodies in the tyre
•Leave the foreign body in the tyre if it has entered the inner tyre. Foreign bodies that are stuck
between the tyre tread blocks can be removed.
•Replace the damaged wheel ⇒ Changing a wheel or seal the tyre with the breakdown set and
inflate it ⇒ Breakdown set. Seek professional assistance for this if necessary.
•Check and adjust the tyre pressure.
•Go to a qualified workshop. Volkswagen recommends using a Volkswagen dealership for this
purpose.
Tyre wear
Fast cornering, heavy acceleration and hard braking all increase tyre wear.
Wheel imbalance may develop when the vehicle is driven; you will notice this by nervous steering
response. Unbalanced wheels will affect the level of tyre wear. In this case the wheels should be
balanced again.
Incorrect wheel alignment causes excessive tyre wear, impairing the safety of the vehicle. The
wheel alignment should be checked by a qualified workshop if tyres show excessive wear.
Spare wheel or temporary spare wheel
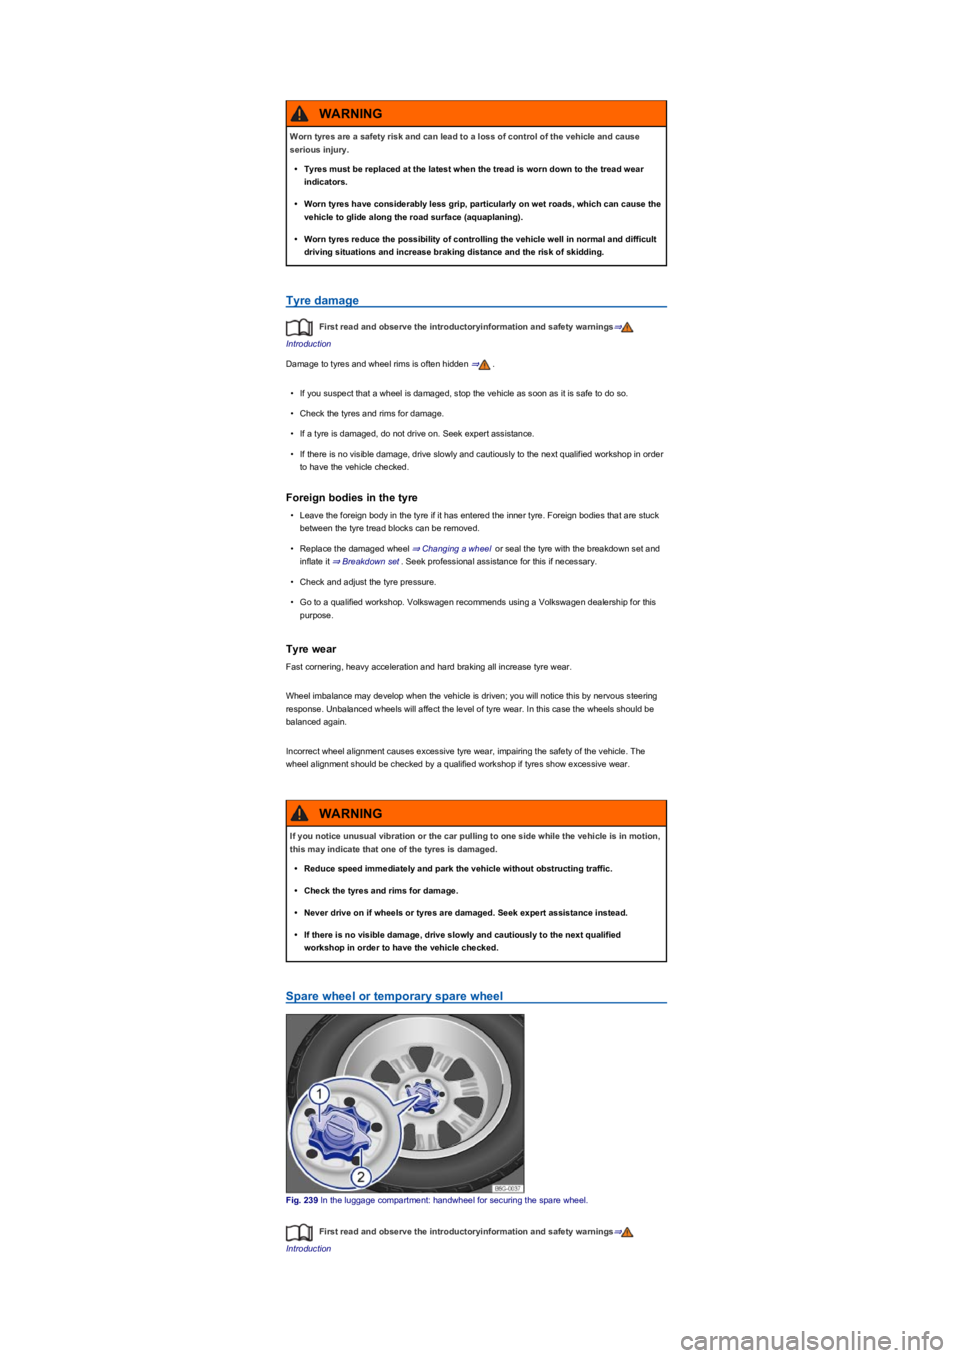
Fig. 239 In the luggage compartment: handwheel for securing the spare wheel.
First read and observe the introductoryinformation and safety warnings⇒
Introduction
Worn tyres are a safety risk and can lead to a loss of control of the vehicle and cause
serious injury.
•Tyres must be replaced at the latest when the tread is worn down to the tread wear
indicators.
•Worn tyres have considerably less grip, particularly on wet roads, which can cause the
vehicle to glide along the road surface (aquaplaning).
•Worn tyres reduce the possibility of controlling the vehicle well in normal and difficult
driving situations and increase braking distance and the risk of skidding.
WARNING
If you notice unusual vibration or the car pulling to one side while the vehicle is in motion,
this may indicate that one of the tyres is damaged.
•Reduce speed immediately and park the vehicle without obstructing traffic.
•Check the tyres and rims for damage.
•Never drive on if wheels or tyres are damaged. Seek expert assistance instead.
•If there is no visible damage, drive slowly and cautiously to the next qualified
workshop in order to have the vehicle checked.
WARNING
Page 309 of 341
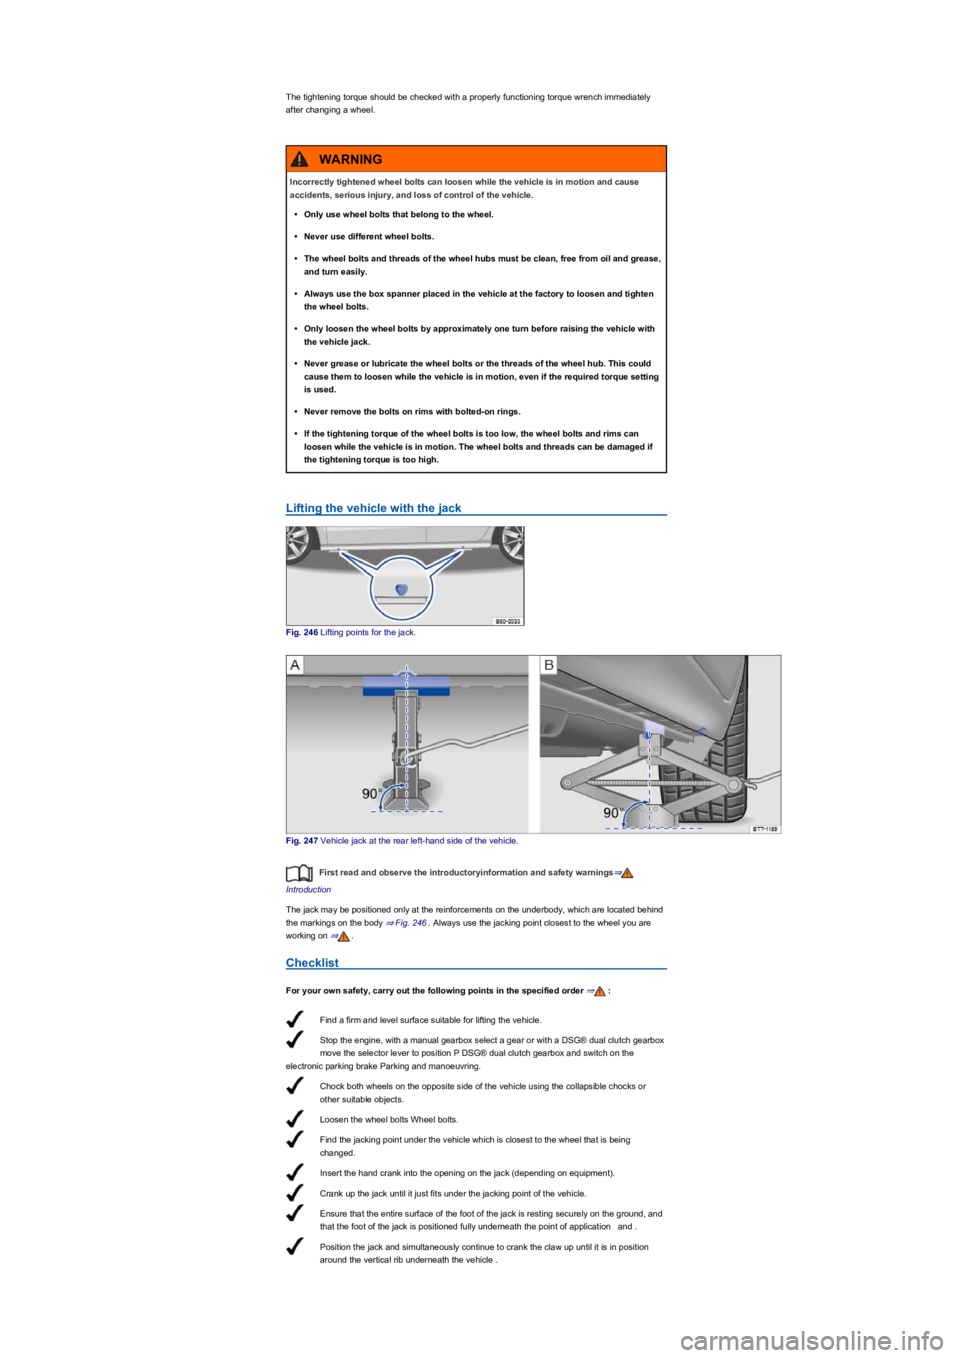
Find a firm and level surface suitable for lifting the vehicle.
Stop the engine, with a manual gearbox select a gear or with a DSG® dual clutch gearbox
move the selector lever to position P DSG® dual clutch gearbox and switch on the
electronic parking brake Parking and manoeuvring.
Chock both wheels on the opposite side of the vehicle using the collapsible chocks or
other suitable objects.
Loosen the wheel bolts Wheel bolts.
Find the jacking point under the vehicle which is closest to the wheel that is being
changed.
Insert the hand crank into the opening on the jack (depending on equipment).
Crank up the jack until it just fits under the jacking point of the vehicle.
Ensure that the entire surface of the foot of the jack is resting securely on the ground, and
that the foot of the jack is positioned fully underneath the point of application and .
Position the jack and simultaneously continue to crank the claw up until it is in position
around the vertical rib underneath the vehicle .
The tightening torque should be checked with a properly functioning torque wrench immediately
after changing a wheel.
Lifting the vehicle with the jack
Fig. 246 Lifting points for the jack.
Fig. 247 Vehicle jack at the rear left-hand side of the vehicle.
First read and observe the introductoryinformation and safety warnings⇒
Introduction
The jack may be positioned only at the reinforcements on the underbody, which are located behind
the markings on the body ⇒ Fig. 246. Always use the jacking point closest to the wheel you are
working on ⇒.
Checklist
For your own safety, carry out the following points in the specified order ⇒:
Incorrectly tightened wheel bolts can loosen while the vehicle is in motion and cause
accidents, serious injury, and loss of control of the vehicle.
•Only use wheel bolts that belong to the wheel.
•Never use different wheel bolts.
•The wheel bolts and threads of the wheel hubs must be clean, free from oil and grease,
and turn easily.
•Always use the box spanner placed in the vehicle at the factory to loosen and tighten
the wheel bolts.
•Only loosen the wheel bolts by approximately one turn before raising the vehicle with
the vehicle jack.
•Never grease or lubricate the wheel bolts or the threads of the wheel hub. This could
cause them to loosen while the vehicle is in motion, even if the required torque setting
is used.
•Never remove the bolts on rims with bolted-on rings.
•If the tightening torque of the wheel bolts is too low, the wheel bolts and rims can
loosen while the vehicle is in motion. The wheel bolts and threads can be damaged if
the tightening torque is too high.
WARNING
Page 321 of 341
Use the Volkswagen Genuine de-icing agent (- 000 096 322 -) to remove ice.
Wiper blades:⇒ Wiper blades.
Paintwork: always treat surfaces carefully in order to prevent damage to the paint coat. Use a
clean, soft cloth and a mild soap solution or cleaning clay to remove any light dirt immediately, e.g.
deposits, insect residue, or cosmetics.
Repair minor paint damage with a touch-up pen. Refer to the vehicle data sticker for the paint code
⇒ Technical data. Consult a qualified workshop in the event of damage to surfaces with matt paint.
•Overflowing fuel or service fluids: clean immediately.
•Flash rust deposits: moisten deposits with a soap solution. Then remove any deposits with
cleaning clay.
•Corrosion: have removed by a qualified workshop.
•Water no longer forms beads on clean paint: preserve paintwork at least twice a year using
Volkswagen Genuine hard wax (- 000 096 317 -).
•No gloss in spite of preservation/paint unattractive: treat the vehicle with suitable polish after
cleaning to remove dirt and dust.
Plenum chamber, engine compartment: remove leaves and other loose objects with a vacuum
cleaner or by hand ⇒ Fig. 251⇒. Cleaning of the engine compartment should always be
performed by a qualified workshop ⇒.
Water that has entered the plenum chamber via a manual process (e.g. from a high-pressure
cleaner) can cause considerable damage to the vehicle.
Sensors, camera lenses: clean the area in front of the sensors or camera with a soft cloth and
solvent-free cleaning agent. Observe the installation locations ⇒ Vehicle overviews.
•Switch on the ignition.
•Move the selector lever to position R.
•Clean the camera lens.
Clean sensitive surfaces on the rain/light sensor and the camera window on the windscreen in the
same way as windows and glass surfaces (depending on vehicle equipment).
Remove snow with a brush. Do not use warm or hot water.
Use the Volkswagen Genuine de-icing agent (- 000 096 322 -) to remove ice.
Decorative films, protective films: remove soiling in the same way as for paint. Always use
Volkswagen Genuine plastic cleaner (- 000 096 314 -) for matt decorative films.
Treat the vehicle with liquid hard wax every three months after washing and removing dust. Only
use clean, soft microfibre clothes to apply it. Do not use hot wax, also not in car washes!
•Stubborn dirt: remove carefully using white spirits, and then rinse using warm water.
Trim parts, trim strips, exhaust pipes made of chrome, aluminium or stainless steel: clean
only in a dust-free environment using a clean, soft cloth and a mild soap solution.
Chrome parts can be protected using Volkswagen Genuine hard wax (- 000 096 317 -).
Anodised surfaces: do not use chrome cleaning products.
Headlights, tail light clusters: use a soft sponge soaked with a mild soap solution. Do not use
any cleaning agents that contain alcohol or solvents.
•Stubborn dirt: remove with Volkswagen Genuine chrome and aluminium care product (-
000 096 319 D -).
Wheels: remove dirt and gritting salt deposits with plenty of water.
Alloy wheels: treat dirty aluminium wheels with Volkswagen Genuine wheel cleaner (- 000 096 304
-). Volkswagen recommends treating the wheel rims with Volkswagen Genuine hard wax (-
000 096 317 -) every three months.
•Damage protective paint coating: repair immediately with a touch-up pen. Go to a qualified
workshop if necessary.
•Brake dust: use Volkswagen Genuine wheel rim cleaner (- 000 096 304 -).
Door lock cylinders: Volkswagen recommends using Volkswagen Genuine de-icing agent (-
000 096 322 -) for de-icing. Do not use door lock de-icers containing substances that dissolve
grease.
1)
1)
1)