wheel VOLKSWAGEN TRANSPORTER 1990 T4 / 4.G Service Manual
[x] Cancel search | Manufacturer: VOLKSWAGEN, Model Year: 1990, Model line: TRANSPORTER, Model: VOLKSWAGEN TRANSPORTER 1990 T4 / 4.GPages: 165, PDF Size: 24.87 MB
Page 128 of 165
Downloaded from www.Manualslib.com manuals search engine JACK AND
TOOLS
DO-IT-YOURSELF-SERVICE
The jack and the tools necessary to
Bange
a wheel are in a bag stored under
re driver's seat.
Zn vehicles
with
swivel seats they are
stored under the rear seat bench.
~ne
screwdriver has a reversible blade.
WARNING
• Use
the
jack only
for
changing
a
wheel.
Never
use the jack
to
lift other vehicles or other loads
as
this may lead
to accidents and personal
injury.
• The jack must
never
be
used
as a
support
to
work underneath
the
vehicle.
If
the jack
is
accidentally dis lodged, you could be seriously injured.
• Do not
raise
the vehicle using
a
bum
per
jack.
The bumper system would be
damaged.
Also, the jack may
slip
which
could cause personal
injury.
•
Do not
support
your
car on cinder
blocks,
bricks or other props that may
crumble under continuous
load.
• Do not start
or
run the engine while
the vehicle is supported by the jack.
• When working under
the
vehicle,
always
use
safety stands specifically
designed for this purpose.
123
www.westfaliaT3.info - a useful website for owners and enthusiasts of VW Westfalia T25 / T3 Campervans
Page 129 of 165
Downloaded from www.Manualslib.com manuals search engine
DO-IT-YOURSELF-SERVICE
SPARE
WHEEL
The
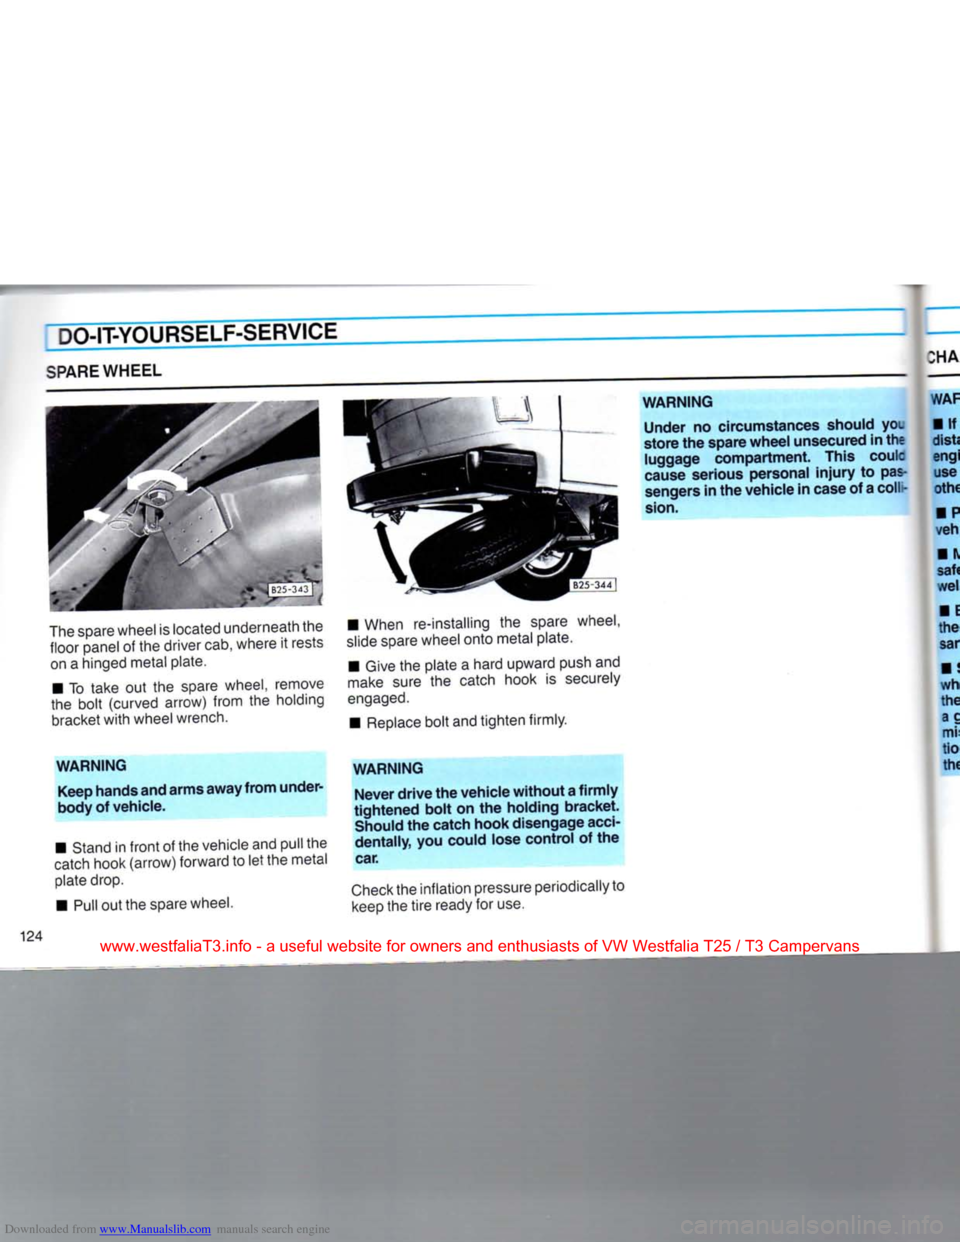
spare wheel is located underneath the floor panel of the driver cab, where it rests on a hinged metal plate.
• To take out the spare wheel, remove
the bolt (curved arrow) from the holding bracket
with
wheel wrench,
WARNING
Keep hands and
arms
away
from
under-
body of vehicle.
• Stand in
front
of the vehicle and pull the
catch
hook (arrow) forward to let the metal
plate drop.
•
Pull
out the spare wheel. • When re-installing the spare wheel,
slide
spare wheel onto metal plate.
•
Give
the plate a hard upward push and
make
sure the catch hook is securely
engaged.
•
Replace
bolt and tighten firmly.
WARNING
Never
drive
the
vehicle
without
a
firmly
tightened
bolt
on the holding
bracket.
Should the catch
hook
disengage acci
dentally,
you could lose
control
of the
car.
Check
the inflation pressure periodically to
keep
the
tire
ready for use.
WARNING
Under
no circumstances should you
store
the spare
wheel
unsecured in the
luggage
compartment.
This coulc
cause serious personal
injury
to pas
sengers in the
vehicle
in case of a coll -
sion.
www.westfaliaT3.info - a useful website for owners and enthusiasts of VW Westfalia T25 / T3 Campervans
Page 130 of 165
Downloaded from www.Manualslib.com manuals search engine
HANGING
AWHEEL
DO-IT-YOURSELF-SERVICE
WARNING
•
If you have a flat tire, move a safe
distance
off the road.
Turn
off the
engine, the emergency flasher on and use other warning devices to alert
other motorists.
•
Passengers must not remain in the
vehicle when it is
jacked
up.
•
Make
sure that passengers wait in a
safe
place away from the vehicle and
well
away
from
the roadway
and
traffic.
•
Before you change a wheel, be sure
the ground is level and
firm.
If neces
sary, use
a
board under the jack.
•
Set the parking brake and block the
wheel opposite the defective wheel on
the other side of the vehicle. Engaging
a
gear or placing the Automatic trans
mission
selector lever in P (Park)
posi
tion is not a substitute for fully setting
the parking brake.
Stepl
•
Take out the bag with jack and tools
from under the driver's seat.
Step 2
•
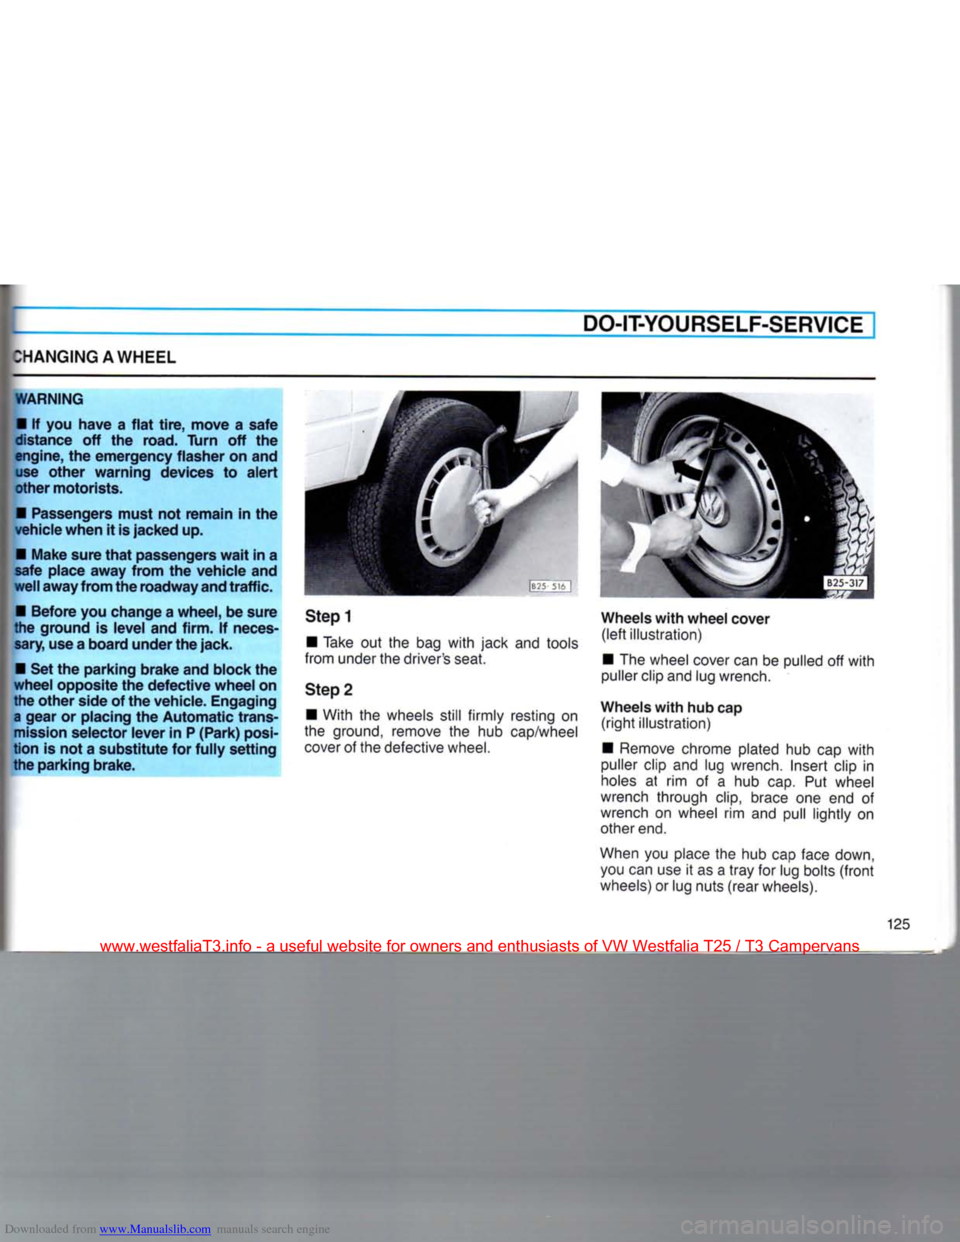
With the wheels
still
firmly resting on
the ground, remove the hub cap/wheel
cover of the defective wheel. Wheels with wheel cover
(left
illustration)
•
The wheel cover can be pulled off with
puller clip and lug wrench.
Wheels with hub cap
(right
illustration)
•
Remove chrome plated hub cap with
puller clip and lug wrench.
Insert
clip in
holes at rim of a hub cap. Put wheel
wrench through
clip,
brace one end of
wrench on wheel rim and pull lightly on
other end.
When you place the hub cap face down, you can use it as a
tray
for lug bolts
(front
wheels) or lug nuts
(rear
wheels).
125
www.westfaliaT3.info - a useful website for owners and enthusiasts of VW Westfalia T25 / T3 Campervans
Page 131 of 165
Downloaded from www.Manualslib.com manuals search engine
DO-IT-YOURSELF-SERVICE
Step
3
•
Loosen
wheel
nuts or bolts counter
clockwise
about one turn with the lug
wrench.
Do not yet remove the nuts or
bolts.
To
loosen
- turn
counterclockwise
To
tighten - turn
clockwise
Step
4
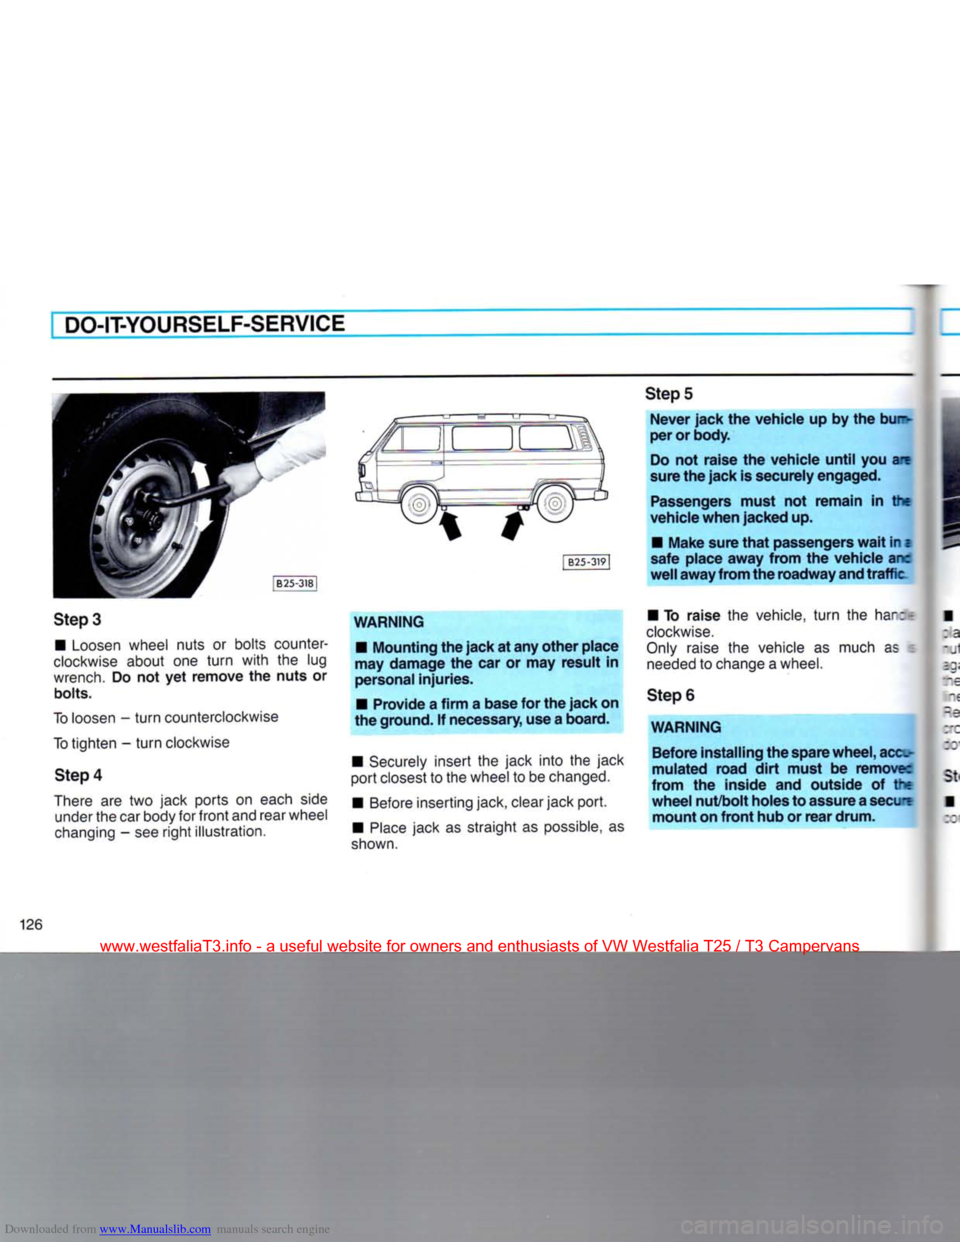
There
are two jack ports on
each
side
under
the car
body
for front and
rear
wheel
changing
- see right illustration. [
B25-3)9|
WARNING
•
Mounting the jack at any other place
may damage the car or may result in
personal
injuries.
•
Provide a firm a base for the jack on
the ground. If
necessary,
use a board.
•
Securely
insert the jack into the jack
port
closest
to the
wheel
to be
changed.
•
Before
inserting jack,
clear
jack port.
•
Place
jack as straight as
possible,
as
shown.
Step
5
Never jack the vehicle up by the bu~
per or body.
Do
not raise the vehicle until you are
sure
the jack is securely engaged.
Passengers
must not remain in the
vehicle when jacked up.
•
Make sure
that
passengers
wait
in z
safe place away from the vehicle arc
well
away from the roadway and traffic
•
To raise the
vehicle,
turn the
har:T
clockwise.
Only
raise
the
vehicle
as
much
as
needed
to
change
a
wheel.
Step
6
WARNING Before installing the spare wheel, acc-
mulated road
dirt
must be remove:
from the inside and outside of the
wheel nut/bolt holes to assure a secure mount on front hub or rear drum.
126
www.westfaliaT3.info - a useful website for owners and enthusiasts of VW Westfalia T25 / T3 Campervans
Page 132 of 165
Downloaded from www.Manualslib.com manuals search engine
DO-IT-YOURSELF-SERVICE
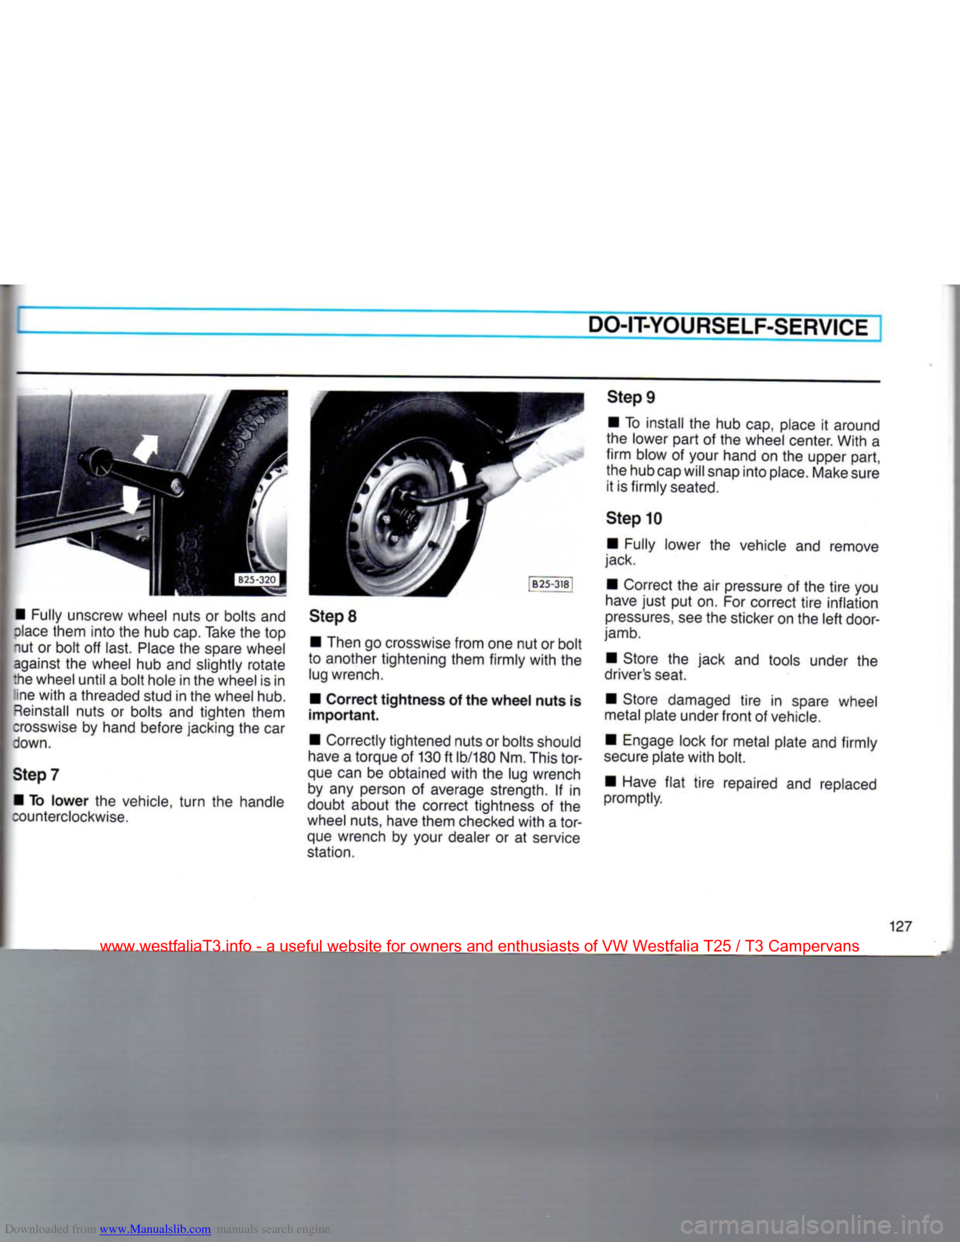
• Fully unscrew wheel nuts or bolts and
dace
them into the hub cap. Take the top
nut or bolt off last.
Place
the spare wheel against the wheel hub and slightly rotate
:he wheel until a bolt hole in the wheel is in ine
with
a threaded stud in the wheel hub.
Reinstall
nuts or bolts and tighten them
crosswise
by hand before jacking the car
down.
Step
7 • To
lower
the vehicle,
turn
the handle
counterclockwise.
Step
8
• Then go crosswise from one nut or bolt
to another tightening them firmly
with
the lug wrench.
• Correct
tightness
of the
wheel
nuts
is
important.
• Correctly tightened nuts or bolts should
have
a torque of 130 ft lb/180 Nm. This
tor
que can be obtained
with
the lug wrench by any person of average strength. If in
doubt about the correct tightness of the
wheel nuts, have them checked
with
a
tor
que wrench by your dealer or at service
station.
Step
9
• To install the hub cap, place it around
the lower part of the wheel center. With a
firm
blow of your hand on the upper part,
the hub cap will snap into place. Make sure it is firmly seated.
Step
10 • Fully lower the vehicle and remove
jack.
• Correct the air pressure of the
tire
you
have
just
put on. For correct
tire
inflation
pressures,
see the sticker on the
left
door-
jamb.
• Store the jack and tools under the
driver's seat.
• Store damaged
tire
in spare wheel
metal plate under
front
of vehicle.
• Engage lock for metal plate and firmly
secure
plate
with
bolt.
• Have
flat
tire
repaired and replaced
promptly.
127
www.westfaliaT3.info - a useful website for owners and enthusiasts of VW Westfalia T25 / T3 Campervans
Page 143 of 165
Downloaded from www.Manualslib.com manuals search engine
EMERGENCY
TOWING
WITH
COMMERCIAL TOWTRUCK
The
following information is to be used by
commercial
tow truck operators who know how to operate their equipment safely.
General
hints
•
Whenever possible, tow
with
front
wheels
off ground.
•
Vehicle may be
lifted
in rear and moved
to position for
front
hook-up.
•
The
Vanagon
cannot be towed
with
con
ventional sling-type equipment. Towing
with
this type of equipment will cause bumper
and
body panel damage.
Vanagon
with
Automatic
Transmission
Tow
with
dollies under rear wheels or on
flat
bed truck to avoid damage to automatic transmission.
WARNING
Never
allow
passengers to
ride
in a
towed
vehicle
for any reason.
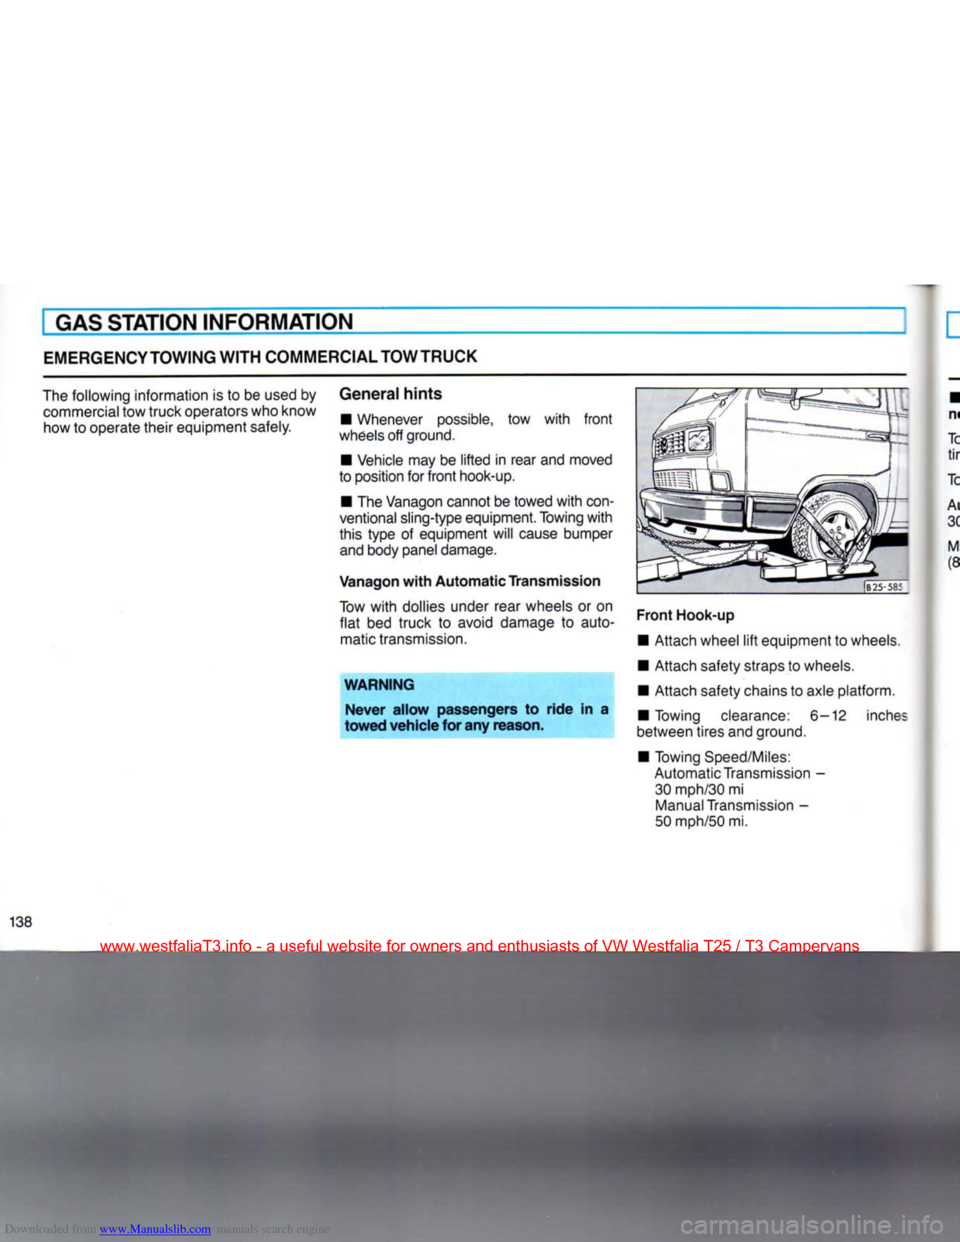
Front
Hook-up
•
Attach wheel
lift
equipment to wheels.
•
Attach safety straps to wheels.
•
Attach safety chains to axle platform.
•
Towing clearance: 6-12 inches
between tires and ground.
•
Towing
Speed/Miles:
Automatic
Transmission
-30 mph/30 mi
Manual
Transmission
-
50 mph/50 mi.
138
www.westfaliaT3.info - a useful website for owners and enthusiasts of VW Westfalia T25 / T3 Campervans
Page 144 of 165
Downloaded from www.Manualslib.com manuals search engine
GAS
STATION
INFORMATION!
• Attach safety chains on axle platform -
not
around
brake
lines.
Towing clearance: four inches between
tires and road.
Towing speed/distance:
Automatic Transmission - 30 mph/ 30 miles (48 kmh/48 km).
Manual
Transmission - 50 mph/50 miles
(80 kmh/80 km).
|
B25-586
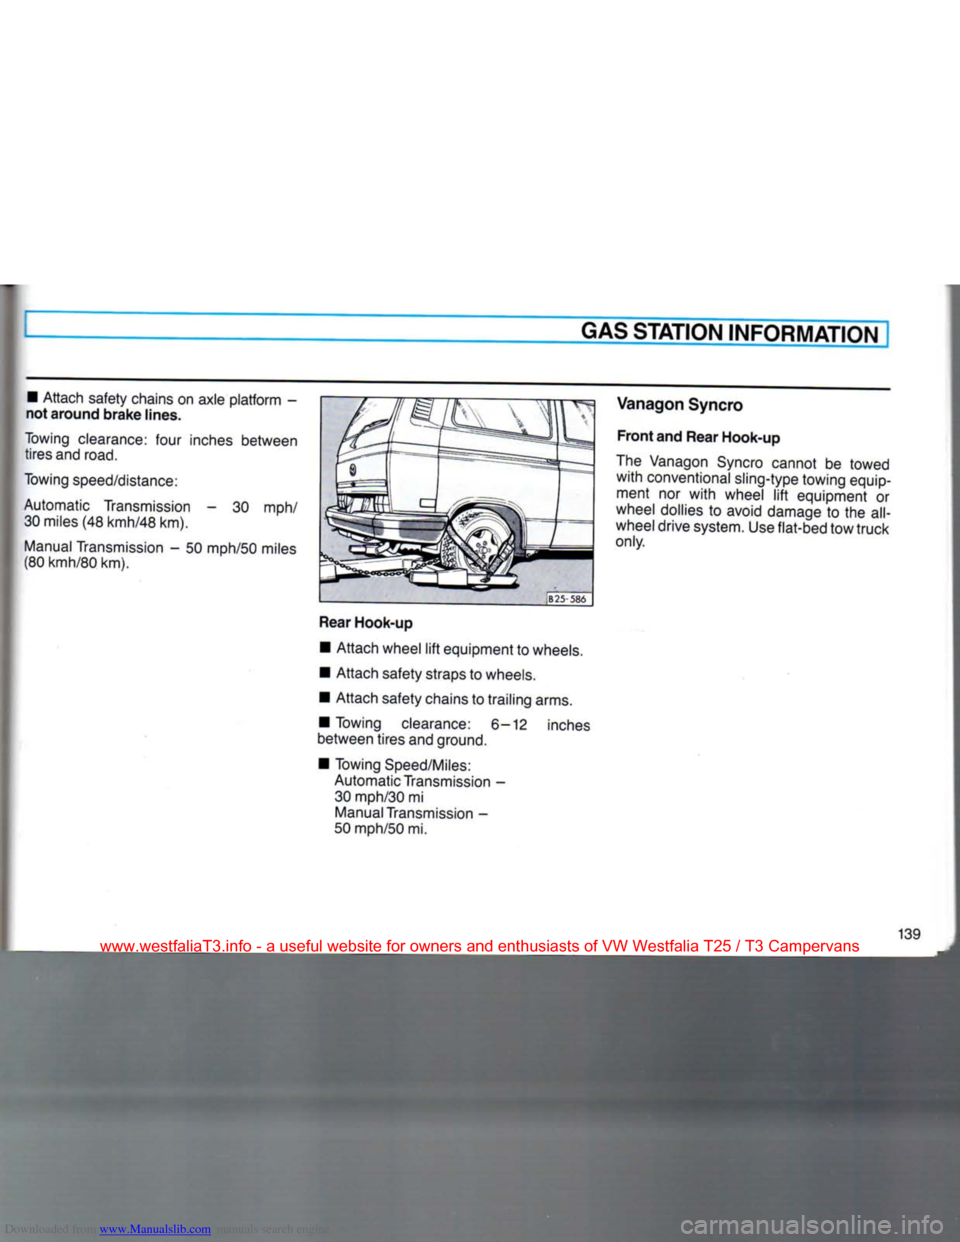
Rear
Hook-up
• Attach wheel
lift
equipment to wheels.
• Attach safety straps to wheels.
• Attach safety chains to trailing arms.
• Towing clearance: 6-12 inches
between tires and ground.
• Towing Speed/Miles: Automatic Transmission -30 mph/30 mi
Manual
Transmission -
50 mph/50 mi.
Vanagon
Syncro
Front
and
Rear
Hook-up
The Vanagon Syncro cannot be towed
with
conventional sling-type towing equipment nor
with
wheel
lift
equipment or
wheel dollies to avoid damage to the all-
wheel drive system. Use flat-bed tow truck
only.
139
www.westfaliaT3.info - a useful website for owners and enthusiasts of VW Westfalia T25 / T3 Campervans
Page 145 of 165
Downloaded from www.Manualslib.com manuals search engine
DO-IT-YOURSELF-SERVICE
LIFTING
VEHICLE
The vehicle should
never
be lifted or
jacked
up from underneath the engine
oil
pan, the transmission housing, or the
front
or rear axle.
This
could lead to serious damage.
The same lifting points as illustrated for the hoist also apply when using a floor jack. To
avoid damage to the underbody or chassis
frame,
it is necessary to insert a rubber pad between the floor jack and the lift
points.
Lifting
with workshop hoist
and with floor jack
Make
sure there is sufficient clearance
between pads and vehicle before driving
vehicle on to hoist.
WARNING
When removing components such as engine block, transmission housing,
fuel
tank, wheels,
front
or rear axle, anchor vehicle to hoist or add corre
sponding weights to maintain the cen
ter of
gravity.
Otherwise the vehicle
might tilt or slip off the hoist, causing
serious damage or personal
injury.
•
To reduce the risk of serious perso
nal
injury
and vehicle damage, lift
vehicle only at the special workshop hoist and floor jack lift points illustra
ted.
Failure to lift vehicle at these points could cause the vehicle to tilt or
fall
from a lift when, for example,
heavy
components such as the engine block
or transmission are removed result
ing
in a change in vehicle weight and
balance.
•
If you must lift
your
vehicle with a
floor jack to work underneath, be sure
the vehicle is safely supported on
stands
intended for this purpose.
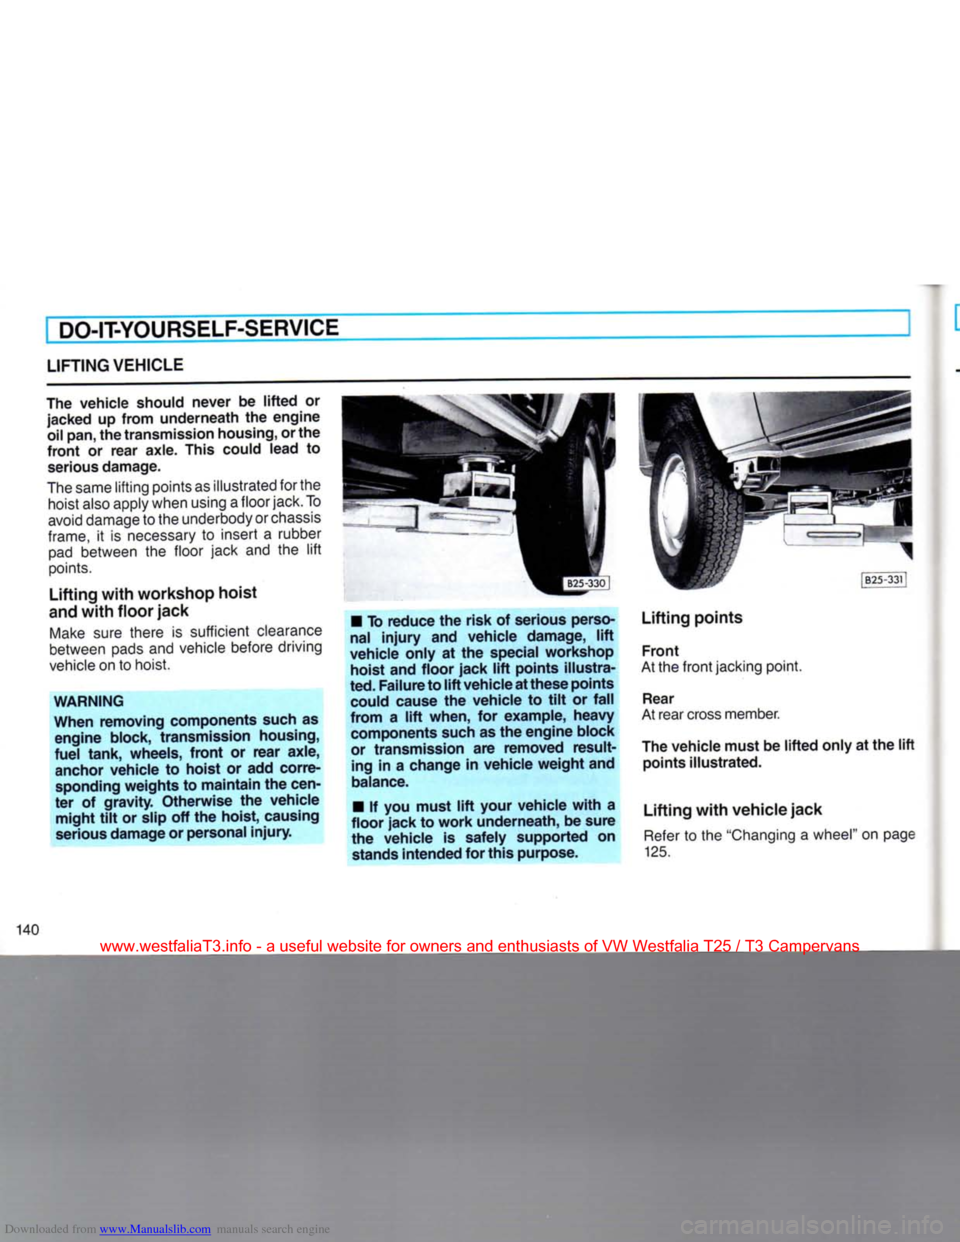
Lifting
points
Front
At the
front
jacking point.
Rear
At rear cross member.
The vehicle must be lifted only at the lift
points illustrated.
Lifting
with vehicle jack Refer to the "Changing a wheel" on page
125.
140
www.westfaliaT3.info - a useful website for owners and enthusiasts of VW Westfalia T25 / T3 Campervans
Page 147 of 165
Downloaded from www.Manualslib.com manuals search engine
I TECHNICAL
DESCRIPTION
ENGINE
MANUAL
TRANSMISSION
AUTOMATIC
TRANSMISSION
• Four stroke gasoline engine in rear.
• Four cylinder horizontally opposed.
• Crankshaft
with
four main bearings.
• Liquid cooling system, thermostatically
controlled.
• Thermoswitch operated electric fan. • Pressure oil feed
with
gear - type
pump and
full
flow
filter.
• Self-adjusting hydraulic valve filters.
• AFC (Airflow controlled) fuel injection.
•
Paper
element air cleaner.
• Exhaust emission control system
with
activated charcoal
filter
in the fuel system.
• Breakerless electronic ignition. • Single plate, dry clutch.
• Synchronized four speed transmission
and'
differential in one housing
with
com
mon lubrication.
•
Rear
wheel drive,
with
two constant
velocity joints per drive shaft.
Syncro • Hydraulically operated single plate
clutch.
• Baulk synchronised 4-speed manual
transmission
with
additional Low-speed
traction gear (4+L transmission).
• Permanent four-wheel drive through
viscous
coupling.
• Manually operated differential lock for
rear final drive available as optional extra. • Hydrodynamic torque converter an:
planetary gearing
with
three forward an:
one reverse gear.
• Final drive in separate housing.
•
Rear
wheel drive,
with
two constar:
velocity joints per drive shaft.
www.westfaliaT3.info - a useful website for owners and enthusiasts of VW Westfalia T25 / T3 Campervans
Page 148 of 165
Downloaded from www.Manualslib.com manuals search engine
TECHNICAL
DESCRIPTION
FRONTWHEEL SUSPENSION
• Independent upper and lower control
arm
• Stabilizer
•
Coil
springs • Shock absorbers
Syncro • Independent wheel suspension by
means
of double wishbones
with
coil
springs and telescopic shock absorbers.
• Double
jointed
shafts
• Stabilizer bar
•
Viscous
coupling
Steering
•
Rack
and pinion
• Safety steering column REAR WHEEL SUSPENSION
• Independent semi-trailing arms
with
integrated axle support
•
Coil
springs
• Shock absorbers
Syncro • Independent wheel suspension by way
of diagonal arm axle
with
coil springs and
telescopic
dampers.
• Double
jointed
drive shafts
• Differential lock as optional extra.
BRAKES
• Hydraulic dual-circuit power-assisted
brake system
with
pressure regulator for rear wheel circuit. Front wheels
with
disc
brakes,
rear wheels
with
self-adjusting
drum brakes.
• Parking brake for rear wheels.
Body/Chassis • All steel unitized body
• Frame plates reinforced
with
side and
cross
members.
143
www.westfaliaT3.info - a useful website for owners and enthusiasts of VW Westfalia T25 / T3 Campervans