Flat VOLKSWAGEN TRANSPORTER 1992 T4 / 4.G Owners Manual
[x] Cancel search | Manufacturer: VOLKSWAGEN, Model Year: 1992, Model line: TRANSPORTER, Model: VOLKSWAGEN TRANSPORTER 1992 T4 / 4.GPages: 164, PDF Size: 25 MB
Page 20 of 164

Downloaded from www.Manualslib.com manuals search engine
CONTROLS AND
EQUIPMENT
Safety
for
children
Children
under
12
years
of age
should
normally
travel
on the
rear
seat1>(Caravelle,
Kombi,
Double-
cab).
Depending
upon
their
age,
height
and
weight,
they
must
be pro
tected
with
either
a child
restraint
system
or the
seat
belt
provided.
A
child may also occupy the
front
passenger
seat
if the restraint system used has been
expressly
approved for this purpose by the
manufacturer. One should bear in mind however
that
they are generally safer on the
rear seat.
On no
account
should
children
- or
babies
travel
on an
adult's
lap.
• Babies up to about 9 months old/10 kg are best protected, in an accident,
with
a
safety seat or a special safety carrier.
• Experience has shown
that
babies and
small
children up to about 3 years/18 kg are
best protected in child seats or safety
carriers where they can lie or sit facing the rear of the car.
• Children up to about 7 years of age/25 kg, depending on their height, are safest when
secured
in a child seat or by a safety seat
cushion.
• Children over about 7 years of age may
use
the three point belts or two point belts
provided on the rear seats. It is important to
ensure
that
the diagonal part of the belt
fits
over the centre of the shoulder - and does not
make
contact
with
the
neck.
The
lap part of the belt must pass across the
pel
vis
and not
over
the child's stomach. If this is not so a safety cushion must be
used
to raise the seating position.
When using the belt the section "Seat belts" should also be noted.
Note the following points when purchasing,
installing and using a child restraint system:
• For safety reasons always use a restraint system which conforms to the international
safety standard ECE R 44. Restraint
sys
tems
that
can be connected to the seat belts provided in the car are recommended.
• Only use child seats or safety carriers of the type which have a large,
flat
area in
con
tact
with
the car's seat upholstery. Child
seats
which have feet or tubular frames and no
flat
base can easily penetrate
into
the
car's
upholstery, and are therefore not so
safe.
• We recommend
that
child restraint
sys
tems from the genuine accessory programme of the Volkswagen dealers are
used.
Here under the name "Bobsy" re
straint systems for all age groups are of
fered21.
These systems
fulfil
all the require ments mentioned and over and above this, have been developed and tested by us for
use
in Volkswagen vehicles.
• Special care must be taken if child re straint systems are used which are bolted
on at the same point as the belts provided in the vehicle. One must ensure
that
the bolt
is
long enough so
that
the
full
length of the
threaded hole is utilized and tightened to a
torque of 30 Nm
Furthermore, one should ensure
that
the
belt itself cannot become damaged by
sharp edged buckles etc.
• For the
installation
and use, at
tention
must
be
paid
to the
legal
regulations
and the
instructions
of
the
restraint
system
manufacturer.
Not in all export markets
Observe
any statutory regulations to the
con
trary.
18
www.vwT4camper.info - a useful website for owners and enthusiasts of VW T4 Transporter Campervans
Page 37 of 164

Downloaded from www.Manualslib.com manuals search engine
CONTROLS
AND EQUIPMENT
Notes on driving Starting
\
e
engine
can only be started when
selec-
pr
ever
is at
"N"
or
"P".
See
also
"Starting
Br:
re" on
page
37.
Selecting
a driving range When the vehicle is stationary and
the engine is running always de
press
the foot brake when selecting
i gear.
When the vehicle is stationary do
•ot depress the accelerator when
•electing a gear. f the lever is moved accidentally nto "IM" when driving, release ac
celerator and let the engine speed
trop to idling before selecting a for
ward
gear again.
•
Attention
•
When the engine is running it
is
necessary to hold the vehicle
with
the foot brake in all gears.
Because
with
an automatic gear
box the transfer of power is not
fully interrupted even at idling
speed
- and the vehicle tends to
"creep".
When the vehicle is stationary
and a gear is engaged, the
throttle
must not be opened inad
vertently
on any account (for in
stance
by hand from the engine
compartment). Otherwise the vehicle
will
move immediately -
even if the handbrake has been
fully applied.
Before working on the vehicle
with
the engine running, apply
the handbrake and put the selec
tor lever in "P".
Moving off
Select
driving
range
(R, D, 3, 2, 1).
Wait
until
the gearbox has
shifted
and the
power
flow
is made to the
driving
wheels
(light
selection
jerk
perceptible).
Then
one can accelerate.
Stopping
To
stop
vehicle
temporarily
such
as at traffic
lights,
it is only
necessary
to
apply
the
brakes.
It is not
necessary
to
move
selector
lever
to
"N".
The
engine
should
however
only
be running at idling
speed.
Parking
On
level
ground all you
need
do is
engage
the
parking
lock.
On a gradient the
hand
brake
should
be
applied
firmly first
and
then
the
parking
lock
engaged.
This
will
ensure
that the
locking
mechanism
is not too
heav
ily
loaded
and
makes
the
lock
easier
to
dis
engage.
Tow starting
On
vehicles
with
automatic
gearbox
the en
gine
cannot
be started by towing or
pushing
the
vehicle.
See
page
133.
When
the battery is flat, the
engine
can be
started
from the battery of another
vehicle
by
using
jumper
cables.
See
"Emergency
starting",
page
130.
Towing If the
vehicle
has to be towed at any time,
you
must
read
the instructions in the
sec
tion
"Towing/tow
starting on
page
132.
www.vwT4camper.info - a useful website for owners and enthusiasts of VW T4 Transporter Campervans
Page 112 of 164

Downloaded from www.Manualslib.com manuals search engine
GENERAL
MAINTENANCE
Wheels
General
notes
• New tyres do not give maximum grip straight away and should therefore be run in
at moderate speeds and a careful style of
driving for about the
first
100 km. This will help to make the tyres last longer.
• Check tyres for damage from time to time (cuts, splits, cracks and lumps) and remove any foreign bodies embedded in the
treads.
• To avoid damage to tyres and wheels crive over curbs and similar obstacles very
slowly and as nearly at
right
angles as
poss
ible.
Damage
to wheels and tyres is not always
easy
to see, so if you
think
that
a wheel is
damaged,
it must be checked by a Volks
wagen dealer.
• Keep grease, oil and fuel off the tyres.
• Replace missing dust caps as soon as
possible.
• Mark wheels before taking them off so
that
they rotate in the same direction when put back on again. • When taken off, the tyres should be
stored in a
cool,
dry and preferably dark
place.
Tyres
which are not on wheels should be stored in a vertical position.
Tyre
life
Tyre life depends to a considerable extent on the following factors:
Inflation
pressure
The inflation pressure is very important par
ticularly at high
speeds.
Therefore, the pres
sures
should be checked at least once a month and before every long journey.
At this opportunity do not forget the spare
wheel:
• The spare wheel should always be in flated to the highest pressure required on
the vehicle.
Always
check the pressures when the tyres are cold.
When
warm,
the pressure is
higher
but do not
reduce.
The pressur
es
are given on page 147 and on a sticker on
the driver's door lock pillar.
Pressures
which are too high or too low
shorten
tyre
life - quite apart from the detri mental influence on vehicle handling.
Attention
At
continuous
high
speeds a
tyre
in
which
the pressure is too low
flexes
more
and
heats
up excess
ively.
This can cause
tread
separ
ation
and
tyre
blow
out.
pCU
A
pressure
which
is too low in- oo
creases
the
fuel
consumption
and
this
burdens
the
environment
unnecessarily.
Mode
of
driving
Fast
cornering, hard acceleration and viol
ent braking also increase
tyre
wear.
'0
www.vwT4camper.info - a useful website for owners and enthusiasts of VW T4 Transporter Campervans
Page 114 of 164

Downloaded from www.Manualslib.com manuals search engine
GENERAL
MAINTENANCE
*
^
v
J
l B43
-
155~|
Changing
the wheels round If
the
front
tyres are worn more than the rear
it
is
advisable
to
change
the
wheels round
as
shown.
All
tyres will then have approxi mately
the
same length
of
service life.
With certain types
of
tread wear
it
can be an advantage
to
change the wheels diagonally.
Volkswagen
dealers have
the
necessary
in
formation.
Renewing wheels/tyres
Wheels
and tyres are important design
fea
tures. The wheels and tyres approved by us should be
used.
They are specially matched
to
the
model concerned
and
contribute largely
to the
excellent road holding
and
safe
driving characteristics.
Volkswagen
dealers have the up-to-date in
formation
on
which brands
of
tyres are ap proved
by us.
• Fitting
and
repairing tyres requires
ex
pert knowledge and special tools. This work
may only be carried out by specialist person
nel.
djn
Because
of the
problem
of dis-
<^>
posing
of the old
tyres,
the
special
tools
necessary
and the
specialist
knowledge
required,
tyre
changing
should
preferably
be
done
by
a
Volkswagen
dealer.
Furthermore, many Volkswagen dealers
stock
an
attractive range
of
wheels
and
tyres.
•
For
safety reasons
the
tyres should
be
renewed
in
pairs and
not
singly. The tyres
with
the deepest tread should always be on
the
front
wheels. • Only combine radial
ply
tyres
of the
same
type,
size
(rolling circumference) anc if possible
the
same tread pattern
on all 4
wheels.
•
If the
spare wheel differs from
the
ver
sion
fitted
on the
vehicle (e.g. winter tyres
or wide tyres)
the
spare may only
be
usee briefly
to
replace
a
flat
tyre
and
with
an
appropriately careful style
of
driving.
It
mus:
be replaced
with
the
normal wheel as soor
as
possible.
• Never
fit
used tyres where their previous history
is not
known.
112
www.vwT4camper.info - a useful website for owners and enthusiasts of VW T4 Transporter Campervans
Page 116 of 164

Downloaded from www.Manualslib.com manuals search engine
GENERAL
MAINTENANCE
Winter
tyres
In winter conditions winter tyres will dis
tinctly improve the vehicle's handling. This
applies
in particular to vehicles that are
equipped
with wide tyres.
Because
of their
construction (width, rubber mixture, tread
formation etc.) these tyres provide
less
trac
tion on ice and snow.
When
fitting
winter tyres note the follow
ing:
• Only radial ply winter tyres may be fitted.
The
factory recommended tyre
sizes
are
givenonpagel
46.
• To obtain the best possible handling
characteristics,
winter tyres must be
fitted
on all four wheels. • Winter tyres are no longer fully effective
when the tread has worn down to a depth
of 4 mm.
• All-weather tyres can also be used in
stead
of winter tyres.
• If you have a
flat
tyre the remarks on
using
the spare wheel on page 112 should
be
noted.
• Do not leave winter tyres
fitted
for an un
necessary
long period because when the
roads
are free of snow and ice the handling
with summer tyres is better.
For
environmental
reasons
summer
tyres
should
be
fitted
again
as soon as possible
because
normally
they
are
quieter
in
running,
tyre
wear
is
reduced
and the
fuel
consumption is
lower.
Snow chains
Snow chains may only be
fitted
on
the
front
wheels.
Snow
chains must not be
fitted
on 215/65 F
16
tyres. When
necessary
the vehicle mus:
be
equipped with smaller tyres - see
Wheels,page146.
Only
use thin chains which do not stanc
clear
more than 15 mm (including ten-
sioner).
When
using snow chains wheel
trim
plates
and
trim
rings must be taken off. For safet
reasons
the wheel bolts must then be f ittec
with caps which are available from
Volks
wagen
dealers.
When
driving over roads which are free of
snowyou
must remove the
chains.
On such
roads
they are detrimental to vehicle handl
ing,
damage the tyres and wear out quickly.
In Germany, the maximum permissible
speed
with snow chains is 50 km/h.
114
www.vwT4camper.info - a useful website for owners and enthusiasts of VW T4 Transporter Campervans
Page 127 of 164

Downloaded from www.Manualslib.com manuals search engine
DO-IT-YOURSELF
Front
turn
signals
To
change a bulb the
turn
signal housing must be taken out to the
front.
•
Insert
the
flat
blade of a screwdriver be tween headlight and
turn
signal
with
bonnet
open.
This presses the securing tabs which hold the
turn
signal housing to the
side.
• Swing screwdriver to
front
as shown in illustration so
that
the
turn
signal housing is
pressed
out forward. • Turn bulb holder out to the
left.
• Turn bulb out and renew.
•
Insert
bulb holder. •
Insert
turn
signal housing in the grooves provided (top and
bottom)
and press it in
until
the securing tabs engage.
Fog
lights*
The foglight bulbs can betaken out from un
derneath the bumper.
• Turn cap on rear of fog
light
to the
left
to remove it.
• Unhook spring clip of bulb holder and swing it away.
• Take bulb out.
•
Insert
new bulb so
that
the locating lug on bulb plate engages
recess
in the reflec
tor.
• Swing spring clip over bulb plate,
squeeze
it together and engage it in the re
taining lugs.
• Fit cap again.
• Have beam alignment
checked.
Rear
lights
Renewal
of the bulbs for the rear lights is
done from the luggage compartment
through the rear panel trim.
•
Reach
into
the hole in the rear panel
trim
with
one hand and squeeze the two retaining tabs of bulb carrier together.
• Take bulb carrier out (illustration). •
Press
defective bulb
into
holder slightly,
turn
it to the
left
and take it out.
•
Insert
new bulb and
turn
fully to the
right
• Install bulb carrier.
125
www.vwT4camper.info - a useful website for owners and enthusiasts of VW T4 Transporter Campervans
Page 129 of 164

Downloaded from www.Manualslib.com manuals search engine
DO-IT-YOURSELF
Reading
light
(B)
• Remove
light
as described under "In terior
light
large version".
• Turn white bulb holder on back of
light
to the
left
and take it out.
• Pull defective glass based bulb out of holder.
•
Insert
new bulb.
• Install holder in housing again and
turn
fully to the
right.
•
Press
interior
light
into
opening in head lining again.
Interior
light
without
reading
light
Small
version
•
Press
retaining lug on opposite side to switch towards centre of
light
and remove
light.
• Renew bulb.
•
Insert
switch side of
light
first
and press in
until
the retaining lug locates.
Large
version
• Take
light
off by inserting
flat
screw driver blade between
light
and headlining
and turning screwdriver.
•
Insert
a screwdriver on the
right
hand
side,
between the reflector and housing,
and by twisting the screwdriver, pivot the reflector out (see illustration).
• Change the bulb.
• Swing the reflector back
into
position, ensuring
that
it engages properly.
•
Press
the interior
light
into
the opening in the roof
trim
again.
127
www.vwT4camper.info - a useful website for owners and enthusiasts of VW T4 Transporter Campervans
Page 130 of 164

Downloaded from www.Manualslib.com manuals search engine
DO-IT-YOURSELF
Adjusting
headlights
I he setting of the headlights is very import
ant to traffic safety. The adjustment should
tnerefore only be done
with
a special
appliance.
Note official regulations when
setting headlights.
On vehicles
with
beam
control* the
knurled disc on the instrument panel must
be
in the
basic
position (-).
Both illustrations show the adjustment on
the
right
hand headlight. On the
left
hand headlight the adjustment is symmetrically
opposite.
Main
headlights
The
headlights are adjusted from the
front
with
a suitable Phillips screwdriver
(from
ve
hicle
tools). The bonnet must be released or
open..
A
- Vertical adjustment
Turning clockwise lowers the headlights.
B
- Lateral adjustment
PIPS
|B7Q-
)55|
Fog
lights*
The
front
foglights are adjusted by a knurled
wheel mounted on the foglight behind the bumper. To adjust, push the
flat
end of a
screwdriver through the opening adjacent
to the foglight (see Fig.) and rotate knurled
wheel.
On
vehicles without a spoiler the knurled
wheel can also be turned by hand.
To
reduce the beam range,
turn
screwtothe
left.
128
www.vwT4camper.info - a useful website for owners and enthusiasts of VW T4 Transporter Campervans
Page 132 of 164
Downloaded from www.Manualslib.com manuals search engine
DO-IT-YOURSELF
• The radios from the Genuine Volks wagen Accessory Programme11 are similar
to those used in the factory and ensure
trouble-free installation. These sets are in keeping
with
the advanced technology and
well-planned easy-to-operate design. In
Germany
there is also an Exchange Service
for these radios so
that
even after years of
use
a set requiring repair can be exchanged
cheaply
for a completely reconditioned,
good-as-new
set by a Volkswagen dealer.
• Loudspeakers,
fitting
parts, aerials and
suppression
kits should also be taken from
the Genuine Volkswagen Accessory
Pro
gramme11. These parts have all been
specially
developed for each vehicle model. • When installing the aerial it is essential to
ensure
that
the hole provided by the factory
where the aerial enters the body is sealed
very carefully. In addition the aerial cable,
the connecting wires and the loudspeaker
wires must be routed so
that
they cannot
chafe,
rattle
or get tangled up
with
moving parts (e.g. pedals, steering, heating controls
etc.). Otherwise the operation of the
con
trols may be affected or vehicle safety im
paired.
In
cases
of doubt, exact information can be
obtained from Volkswagen dealers.
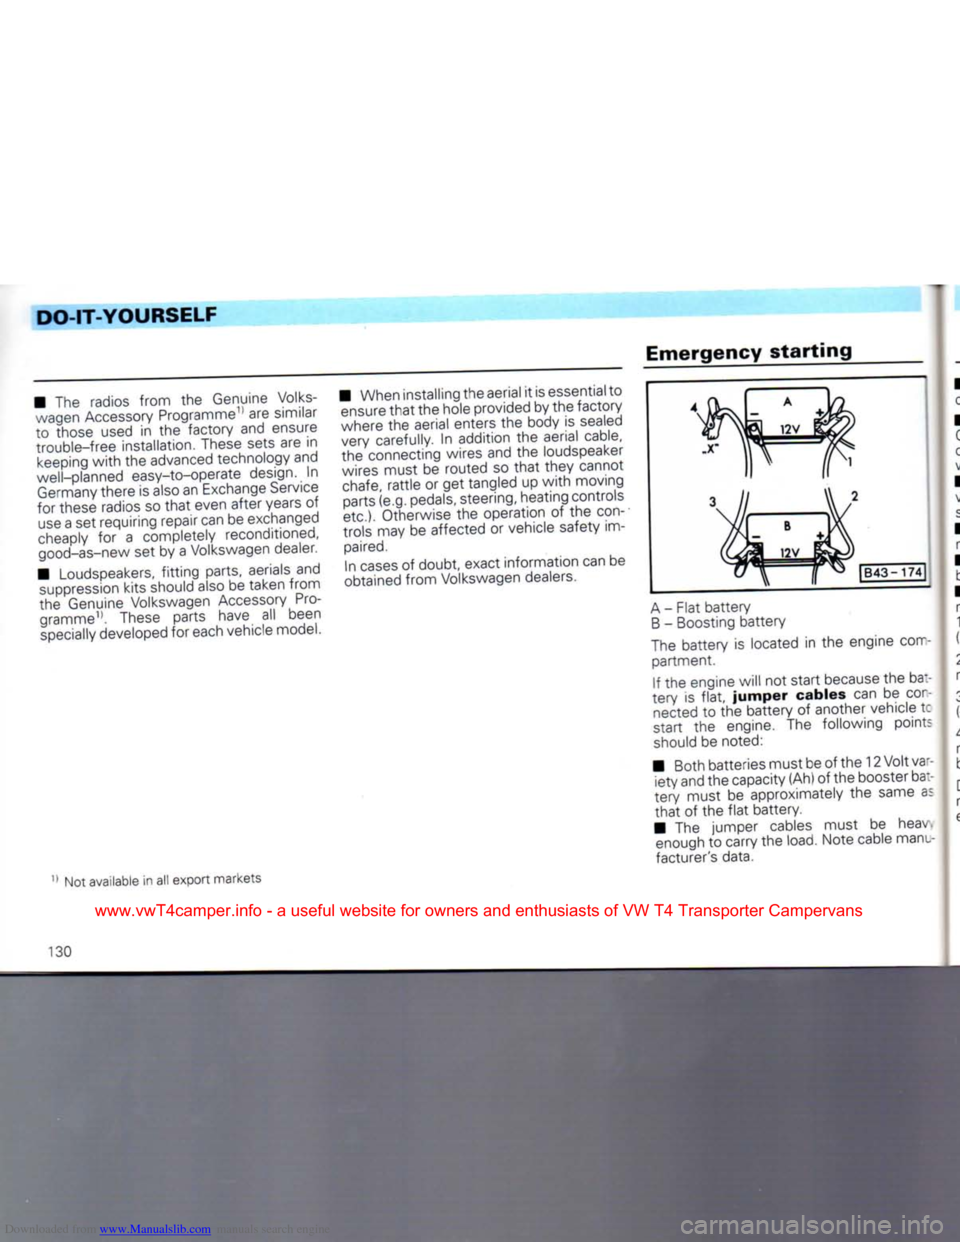
Emergency
starting
|B43-
174[
A
- Flat battery
B
- Boosting battery
The battery is located in the engine com partment.
If the engine will not start because the ba:-
tery is
flat,
jumper
cables can be
con
nected to the battery of another vehicle tc
start the engine. The following points
should be noted:
• Both batteries must be of the 12 Volt var iety and the capacity (Ah) of the booster bat
tery must be approximately the same as
that
of the
flat
battery.
• The jumper cables must be heav enough to carry the load. Note cable manu
facturer's data.
Not available in all export markets
130
www.vwT4camper.info - a useful website for owners and enthusiasts of VW T4 Transporter Campervans
Page 133 of 164
Downloaded from www.Manualslib.com manuals search engine
DO-IT-YOURSELF
• Only
use
jumper cables
with
insulated
clips.
•
A
flat
battery can freeze
at
-10 degrees
C
and
if
a battery is frozen
it
must be thawed
out before connecting jumper
cables,
other
wise
it
could explode.
• There must
be no
contact between
the
vehicles,
otherwise current
can
flow
as
soon
as
the
plus terminals are connected.
•
The
flat
battery must
be
properly
con
nected
to the
electrical system.
• The engine
of
the boosting vehicle must be running.
•
The
jumper cables must only
be
con
nected as follows:
1. One end
of (+)
cable (usually red)
to the
(+)
terminal
of
the
flat
battery.
2.
Other end
of
the red cable
to the (+)
ter
minal
of
boosting battery.
3.
One end
of (-)
cable (usually black)
to the (-)
terminal
of
boosting battery.
4.
Other
end of
black cable
(X) to a
solid metal part bolted
to
the block
or to
cylinder
block itself.
Do
not
connect the cable
to
the
flat
battery
minus terminal. The sparks could ignite
the
explosive
gas flowing
out of the
battery.
Attention
•
The non-insulated parts of the
cable clips must not touch one
another on any account. Further more the jumper cable attached
to the
battery
positive terminal must not come into contact
with
electrically conductive vehicle parts - Short circuit danger!
•
Route the jumper cables so
that
they cannot come into
con
tact
with
rotating parts in the en gine compartment.
•
Do not stand
with
your face
over the
battery
- danger of acid
burns!
•
Keep sources of ignition (naked flames, burning
ciga
rettes
etc.)
well
away from the
battery
- Explosion danger!
• Start
the
engine
as
described
in the
"Starting engine" section.
•
If
the engine does not start
at
once, stop using starter after
10
seconds, wait about
half
a
minute and then
try
again.
• With engine running, disconnect cables in reverse sequence.
-.3'
www.vwT4camper.info - a useful website for owners and enthusiasts of VW T4 Transporter Campervans