tyre pressure VOLKSWAGEN TRANSPORTER 2013 Owner's Manual
[x] Cancel search | Manufacturer: VOLKSWAGEN, Model Year: 2013, Model line: TRANSPORTER, Model: VOLKSWAGEN TRANSPORTER 2013Pages: 486, PDF Size: 69.28 MB
Page 382 of 486
Washing the vehicle with a high-pressure cleaner
I""""'T'n First read and observe the Introductory L.-lo:oJ.I information and safety warnings & on page 380.
Follow the instructions provided by the manufactur-er when cleaning your vehicle using a high-pres-sure cleaner. This applies in particular to the pres-sure and the spraying distance=>&.
Maintain sufficient distance to soft materials such as rubber hoses, insulation, and the ParkPilot sen-sors. The ParkPilot sensors are located in the front bumper, and in some cases also in the rear bump-er =>
A WARNING
The incorrect use of a high-pressure cleaner can cause visible and invisible long-term damage to tyres and other materials. This can cause accidents and serious injuries.
• Maintain sufficient distance between the washer jet and the tyres.
• Never clean the tyres with concentrated jet nozzles (dirt blasters). The tyres may incur visible and invisible damage even if cleaned briefly with the spray at a distance.
A WARNING
After the car has been washed, the braking effect could set in later than normal and ex-tend the braking distance as the brake discs and brake pads will be wet, or iced up in win-ter.
• You can "dry and de-ice" the brakes by performing careful braking manoeuvres. Make sure that you do not endanger any oth-er road users or violate any legal regulations when doing so.
CD
• The water may be no warmer than +so·c (+140.FJ.
• Do not wash the vehicle In direct sunlight In order to avoid damage to the vehicle palntwork.
• The ParkPilot sensors In the bumpers must be kept clean and free of Ice. When cleaning with pressure hoses or steam cleaners, the sensors should only be sprayed briefly and the steam/hose nozzle must be kept more than 10 cm away.
• Do not clean windows that are iced over or covered In snow with a high-pressure cleaner.
• Washing the vehicle in cold weather: If the vehicle is rinsed with a hose, do not direct the water Into the lock cylinders or the gaps round the doors, boot, or bonnet. The locks and seals could freeze.
I""""'T'n First read and observe the introductory L.-lo:oJ.I information and safety warnings & on page 380.
Cleaning windows and exterior mirrors
Moisten the windows and exterior mirrors with commercially available, alcohol-based glass clean-er.
382 Cleaning and maintenance
Dry the glass surfaces with a clean chamois leath-er or a lint-free cloth. Chamois leathers that have been used on painted surfaces are not suitable for use on glass surfaces. They will be soiled with wax deposits which could smear the surfaces.
Use window cleaner or a silicone remover to clean off rubber, oil, grease and silicone deposits =>
Page 411 of 486
To note Some possible causes Possible solution
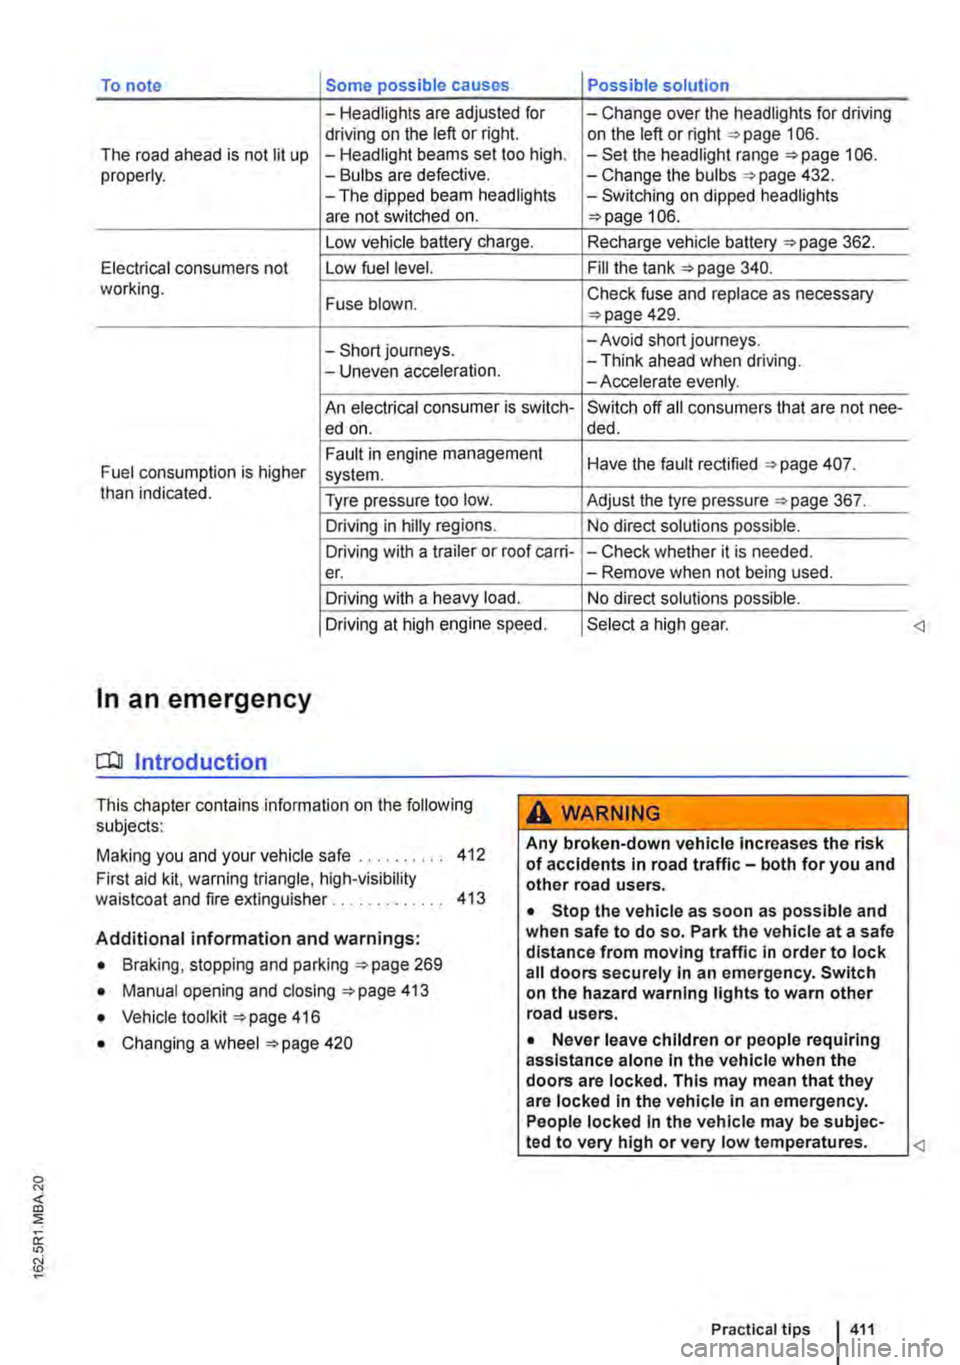
-Headlights are adjusted for -Change over the headlights for driving driving on the left or right. on the left or right 106. The road ahead is not lit up -Headlight beams set too high. -Set the headlight range 106. properly. -Bulbs are defective. -Change the bulbs 432. -The dipped beam headlights -Switching on dipped headlights are not switched on. 106.
Low vehicle battery charge. Recharge vehicle battery 362.
Electrical consumers not Low fuel level. Fill the tank 340. working. Fuse blown. Check fuse and replace as necessary 429.
-Short journeys. -Avoid short journeys.
-Uneven acceleration. -Think ahead when driving. -Accelerate evenly.
An electrical consumer is switch-Switch off all consumers that are not nee-ed on. de d.
Fault in engine management Have the fault rectified 407. Fuel consumption is higher system. than indicated. Tyre pressure too low. Adjust the tyre pressure 367.
Driving in hilly regions. No direct solutions possible.
Driving with a trailer or roof carri--Check whether it is needed. er. -Remove when not being used.
Driving with a heavy load. No direct solutions possible.
Driving at high engine speed. Select a high gear.
In an emergency
COl Introduction
This chapter contains information on the following subjects:
Making you and your vehicle safe . . 412
First aid kit. warning triangle, high-visibility waistcoat and fire extinguisher . . . . . . . . . . . . . 413
Additional information and warnings:
• Braking, stopping and parking 269
• Manual opening and closing 413
• Vehicle toolkit 416
• Changing a wheel 420
A WARNING
Any broken-down vehicle Increases the risk of accidents in road traffic-both for you and other road users.
• Stop the vehicle as soon as possible and when safe to do so. Park the vehicle at a safe distance from moving traffic In order to lock all doors securely In an emergency. Switch on the hazard warning lights to warn other road users.
• Never leave children or people requiring assistance alone In the vehicle when the doors are locked. This may mean that they are locked In the vehicle in an emergency. People locked In the vehicle may be subjec-
Page 425 of 486
• Clean the area around the fastening holes of the spare wheel.
• Position the spare wheel.
• Insert the anti-theft wheel bolt using the adapter at position 298 @or® and tighten it slight-ly.
• Screw in all the other wheel bolts in a clockwise direction and use the box spanner to tighten them gently.
• Lower the vehicle with the jack.
• Use the box spanner to tighten all the wheel bolts securely in a clockwise direction &. Do not tighten the bolts in clockwise or anticlockwise se-quence. Tighten them in diagonal sequence.
• Fit the cover caps, centre covers or wheel cov-ers 417.
After changing a wheel
rl'l1 First read and observe the Introductory L-.lo:.ll Information and safety warnings & on page 420.
• If necessary, clean the vehicle tools and stow them safely in the vehicle 416.
• Stow the spare wheel or the removed wheel safely under the vehicle.
Breakdown set
CQJ Introduction
This chapter contains information on the following subjects:
Storing . . . . . . . . . . . . . . . . . . . . 426
Contents of the breakdown set . . . . . . . . . . . . 427 Preparation . . . . . . . . . . . . . . . . . . . . . . . . . . . 427
Sealing and inflating tyres . . . . • . . . . . . . 428
Test after driving for 10 minutes . . . . 429
You can use the breakdown set (tyre mobility set) to safely seal any tyre damage caused by foreign bodies or punctures (up to 4 mm (0.16 Inches) in diameter). Do not remove foreign objects (e.g. screws or nails) from the tyrel
Once the sealant has been added to the tyre, the tyre pressure must be checked again after approxi-mately 10 minutes of driving.
,A WARNING
Incorrect torque or incorrect use of wheel bolts can lead to a loss of control of the vehi-cle, cause accidents and serious Injuries.
• Always keep all wheel bolts and threads In the wheel hubs clean and free from oil and grease. The wheel bolts must be easy to turn and be tightened to the specified torque.
• The hexagonal socket In the screwdriver handle should only be used for turning wheel bolts, not use for loosening or tightening them.
• The damaged wheel should be replaced as soon as possible.
m In vehicles with a tyre monitoring system, the L!..J system may have to "re-learn" if new tyres are fitted 318.
Only use the breakdown set if the car is parked in a safe place, you are familiar with the required ac-tions and safety procedures, and you have access to the correct breakdown set. Seek expert assis-tance if this is not the case.
The tyre sealant must not be used:
• If the rim is damaged.
• If the outside temperature is below -2o•c (-4 ·F).
• If there are cuts or punctures in the tyre that are larger than 4 mm. .,.
Practical tips 425
Page 426 of 486
• If the tyre pressure is very low or the tyres are flat.
• If the use-by date on the tyre filler bottle has ex-pired.
Additional information and warnings:
• Vehicle key set 36
• Seat functions, front 69
• Stowage 150
• Braking, stopping and parking =>page 269
• Wheels and tyres 367
• In an emergency 411
• Hubcaps 417
A WARNING
Using the breakdown set can be dangerous, especially if the tyres are inflated at the road-side. Please note the following points In or-der to reduce the risk of serious injuries:
• Stop the vehicle as soon as possible and when safe to do so. Park the vehicle at a safe distance from moving traffic in order to fill the tyre.
• Check that the surface the vehicle is parked on is level and firm.
• All passengers, and children in particular, must be at a safe distance and away from your area of work.
• Switch on the hazard warning lights to warn other road users.
• The breakdown set should only be used if you feel confident with carrying out the pro-cedure. If not, seek expert assistance.
Storing
rT'n First read and observe the introductory L-W.I information and safety warnings & on page 425.
Model
Multivan
California
426 I If and when
A WARNING (Continued)
• Tyres repaired with the breakdown set are intended for temporary, emergency use only. They should only be used until you can reach the nearest qualified workshop.
• Tyres that have been repaired using the breakdown set should be replaced as soon as possible.
• Sealant Is hazardous to health and must be washed off Immediately if it gets onto the skin.
• The breakdown set must be stored out of the reach of children.
• Never use a vehicle jack, even If it Is ap-proved for the vehicle.
• Always switch off the engine, apply the handbrake and move the selector lever to the position P or select a gear on a manual gear-box In order to reduce the risk of unintended vehicle movement.
A WARNING
Tyres that have been filled with sealant will not handle In the same way as a standard tyre.
• Never drive faster than 80 km/h (50 mph).
• Avoid full acceleration, sudden braking and fast driving through bends In the road.
• Drive for just 10 minutes at no more than 80 km/h (50 m ph) and then check the tyre.
Dispose of used or out-of-date sealant in ac-W cordance with legal requirements.
m You can get a new tyre filler bottle from a L!:J Volkswagen Commercial Vehicles dealership.
m Observe the separate instructions from the l!:J manufacturer of the breakdown set. <1
The breakdown set can be located in different pla-ces depending on the model.
Stowage
In the drawer in the 3-seat bench or in the drawer of the rear left single seat.
Behind the load-through hatch cover on the side of the bench seat/bed. <1
Page 427 of 486
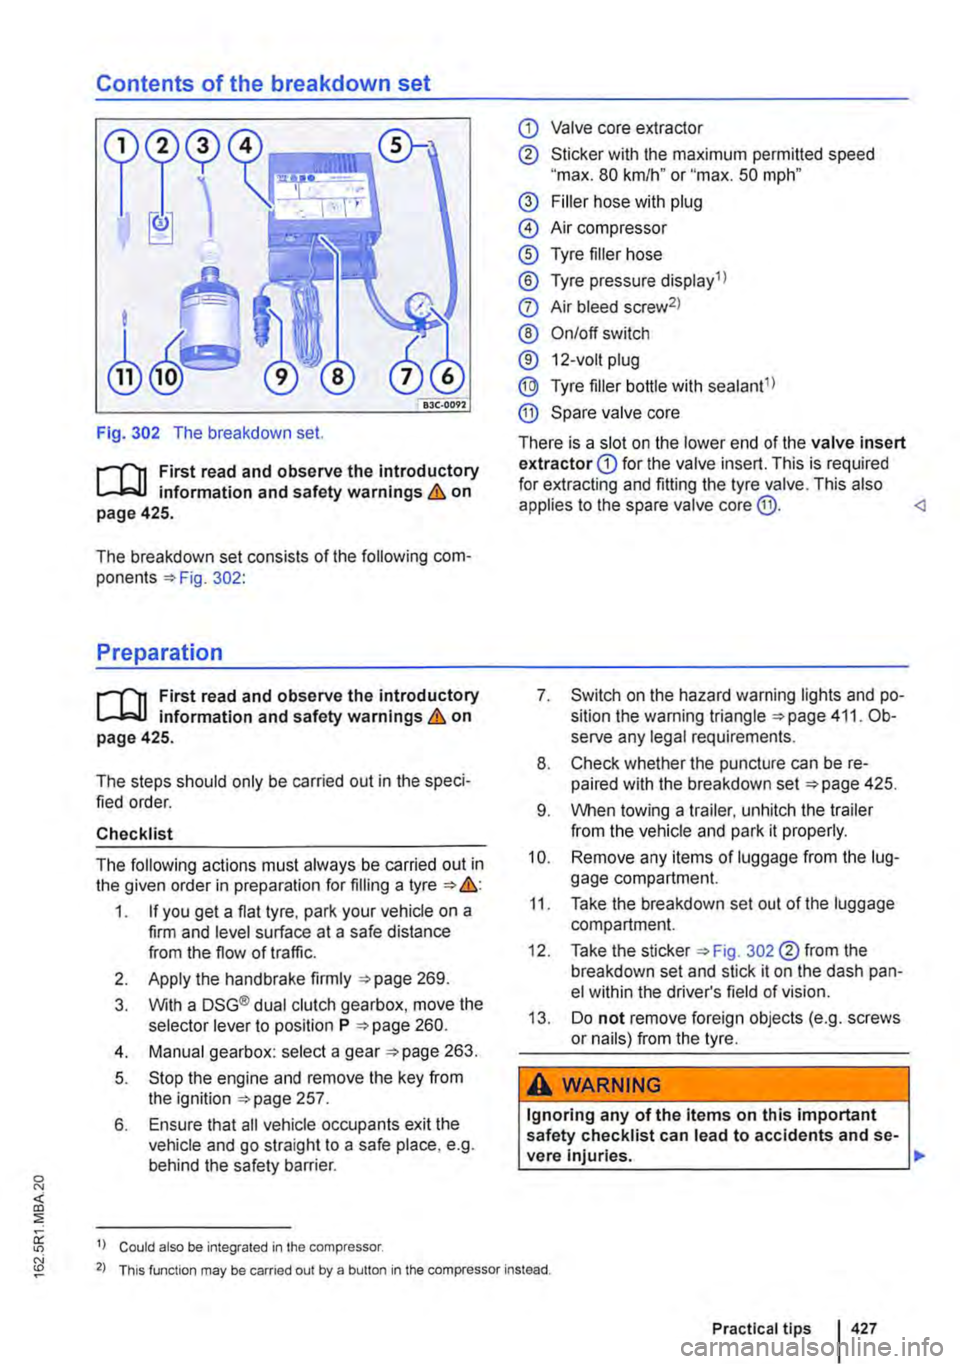
Contents of the breakdown set
Fig. 302 The breakdown set.
r--T'n First read and observe the introductory L-L::.U information and safety warnings & on page 425.
The breakdown set consists of the following com-ponents 302:
Preparation
r--T'n First read and observe the introductory L-L::.U information and safety warnings & on page 425.
The steps should only be carried out in the speci-fied order.
Checklist
The following actions must always be carried out in the given order in preparation for filling a tyre &:
1. If you get a flat tyre, park your vehicle on a firm and level surface at a safe distance from the flow of traffic.
2. Apply the handbrake firmly 269.
3. With a DSG® dual clutch gearbox, move the selector lever to position P 260.
4. Manual gearbox: select a gear 263.
5. Stop the engine and remove the key from the ignition 257.
6. Ensure that all vehicle occupants exit the vehicle and go straight to a safe place, e.g. behind the safety barrier.
1) Could also be integrated in the compressor.
CD Valve core extractor
® Sticker with the maximum permitted speed "max. 80 km/h" or "max. 50 mph"
@ Filler hose with plug
@ Air compressor
® Tyre filler hose
® Tyre pressure display 1 l
0 Air bleed screw2l
® On/off switch
® 12-volt plug
@ Tyre filler bottle with sealant1l
® Spare valve core
There is a slot on the lower end of the valve insert extractor CD for the valve insert. This is required for extracting and fitting the tyre valve. This also applies to the spare valve core @.
8. Check whether the puncture can be re-paired with the breakdown set 425.
9. When towing a trailer, unhitch the trailer from the vehicle and park it properly.
10. Remove any items of luggage from the lug-gage compartment.
11. Take the breakdown set out of the luggage compartment.
12. Take the sticker 302 ®from the breakdown set and stick it on the dash pan-el within the driver's field of vision.
13. Do not remove foreign objects (e.g. screws or nails) from the tyre.
A WARNING
Ignoring any of the items on this important safety checklist can lead to accidents and se-vere Injuries. ,..
2) This function may be carried out by a button in the compressor instead.
Practical tips 427
Page 428 of 486
A WARNING (Continued)
• Always follow the instructions In the checklist and observe the general safety pro-
Sealing and inflating tyres
r-"'('n First read and observe the Introductory L-J,.:.U Information and safety warnings & on page 425.
Sealing a tyre
• Unscrew the cap from the tyre valve.
• Use the valve core extractor 302 CD to screw the valve core out of the tyre valve. Place the core on a clean surface.
• Shake the tyre filler bottle 302 ® vigo-rously up and down several times.
• Screw the filler hose 302 @tightly onto the tyre filler bottle in a clockwise direction. The plastic foil on the plug is pierced automatically.
• Remove the plug from the filler hose 302@ and place the open end fully on the tyre valve.
• Hold the bottle upside down and inject the en-tire contents of the tyre filler bottle into the tyre.
• Remove the empty tyre filler bottle from the valve.
• Use the valve core extractor 302 CD to screw the valve core back onto the tyre valve.
Inflating the tyre
• Screw the tyre filler hose 302 ® of the air compressor tightly onto the tyre valve.
• Check that the bleed screw 302 (?) is closed.
• Start the engine and let it run.
• Insert the plug 302 ®into one of the ve-hicle's 12-volt sockets 163.
• Use the on/off switch 302 ®to switch on the air compressor.
• Run the compressor until the tyre pressure has reached 2.0-2.5 bar (29-36 psi I 200-250 kPa) maximum running time is 6 minutes
• Switch off the air compressor.
• If a pressure level of 2.0-2.5 bar (29-36 psi I 200 -250 kPa) cannot be achieved unscrew the tyre filler hose from the tyre valve.
428 I If and when
• Drive (or reverse) the vehicle approximately 1 0 metres so that the sealing compound is more evenly distributed in the tyre.
• Screw the tyre filler hose for the air compressor firmly back onto the tyre valve and inflate the tyre again.
• If the required pressure still cannot be reached, the tyre is too badly damaged. The tyre cannot be sealed with the breakdown set. Do not drive on. Seek expert assistance &.
• Disconnect the air compressor and unscrew the tyre filler hose from the tyre valve.
• Drive the vehicle no faster than 80 km/h (50 mph) once a tyre pressure of 2.0-2.5 bar (29-36 psi I 200-250 kPa) has been reached.
• Check the tyre pressure after driving for 10 mi-nutes 429.
A WARNING
The tyre filler hose and the air compressor can get hot during Inflation.
• Protect your hands and skin from the hot components.
• Do not place the hot tyre filler hose or the hot air compressor on any Inflammable mate-rials.
• Allow the device to cool down fully before stowing.
• If the tyre will not Inflate to at least 2.0 bar (29 psi/ 200 kPa), the tyre Is too damaged. The sealant Is unable to seal the tyre. Do not drive on. Seek expert assistance.
CD
Switch the air compressor off after a maximum of 6 minutes to avoid overheating. Let the air compressor cool down for a few minutes be-fore switching it back on.
Page 429 of 486
Test after driving for 10 minutes
r-'('n First read and observe the Introductory L-J,:.LI Information and safety warnings & on page 425.
Reconnect the tyre filler hose =>Fig. 302 ®and check the tyre pressure on the Tyre Pressure Loss Indicator®.
1.3 bar (19 psi /130 kPa) and lower:
• Do not drive on I The tyre cannot be sealed adequately with the breakdown set.
• Seek expert assistance => &.
1.4 bar (20 psi /140 kPa) and higher:
• Set the tyre pressure back to the correct value =>page 367.
• Resume your journey to the nearest qualified workshop. Do not exceed a maximum speed of 80 km/h (50 mph).
• The damaged tyre should be replaced at the qualified workshop.
Fuses
i:llJ Introduction
This chapter contains information on the following subjects:
Fuse box in the dash panel . . . . . . . . . . . . . . . 430
Fuses in the engine compartment . . . . . . . . . . 431 Changing a blown fuse ................... 431
At the time of print we are unable to provide an up-to-date overview of the locations of the fuses for the electrical consumers. This is because the vehi-cle is under constant development, because fuses are assigned differently depending on the vehicle equipment level and because several consumers may use a single fuse. You can get more informa-tion about the fuse layout from a Volkswagen Com-mercial Vehicles dealership.
Several electrical consumers could share a single fuse. Conversely, a single consumer could have more than one fuse.
Therefore fuses should only be replaced when the cause of the fault has been rectified. If a new fuse blows shortly after insertion, have the electrical system checked by a qualified workshop as soon as possible.
A WARNING
Driving with an unsealed tyre is dangerous as it can cause accidents and serious Injuries.
• Do not carry on driving if the tyre pressure Is 1.3 bar (19 psi /130 kPa) or lower.
• Seek expert assistance.
• Drink holder =>page 153
• Preparation for working in the engine compart-ment =>page 350
• Battery =>page 362
A WARNING
High voltages in the electrical system can cause electric shocks, serious burns and death.
• Never touch the electrical wiring of the ig-nition system.
• Avoid causing short circuits in the electri-cal system.
A WARNING
Using unsuitable or repaired fuses and bridg-ing an electrical circuit without fuses can cause a fire and serious injuries.
Practical tips I 429
Page 473 of 486
Gear-change Indicator . . . . . . . . . . • . . . . . 268
Glasses compartent . . . . . . . . . . . . . . . . . . 152
Glove compartment Lights ............................. 114 see Stowage areas . . . . . . . . . . . . . . . . . 151
Gross vehicle weight rating . . . . . . . . . . . . 450
Guide rail system In the rear vehicle floor Business . . . . . . . . . . . . . . . . . . . . . . . . . 133 California . . . . . . . . . . . . . . . . . . . . . . . . . 133 Multivan . . . . . . . . . . . . . . . . . . . . . . . . . . 133
H
Handbrake
Hands-free system in the passenger com· partment
271
See Rear-seat telephony . . . . . . . . . . . . . 187 Hazard warning lights . . . . . . . . . . . . . . . . . 412
Headlight range control ............. 11,113 Dynamic headlight range control . . . . . . . . 113
Headlights . . . . . . . . . . . . . . . . . . . . . . . . . . 108 Cleaning system . . • . . . . . . . . . . . . . . . . . 118 Driving abroad . . . . . . . . . . . . . . . . . . . . . . 111 Headlight (LED) . . . . . . . . . . . . . . . . . . . . . . 434
Head restraints . . . . . . . . . . . . . . . . . . . . . . . 67
Heat-insulating glass windscreen . . . . . . . . . . . . . . . . . . . . . . . . . 116
Heated seats . . . . . . . . . . . . . . . . . . . . . . . . . 69
Heating and fresh air system Controls . . . . . . . . . . . . . . . . . . . . . . . . . . 327
High-pressure cleaner . . . . . . . . . . . . . . . . 382
High-visibility waistcoat . . . . . . . . . . . . . . . 413
Hill Descent Assist . . . . . . . . . . • . . • . . . . . 285
Hill Hold Assist . . . . . . . . . . . . . . . . . . . . . . 284
Horn ................•................ 11
Hubcaps . . . . . . . . . . . . . . . . . . . . . . . . 417, 420 Centre cover . . . . . . . . . . . . . . . . . . . . . . 418 Wheel bolt caps . . . . . . . . . . . . . . • . . . . . 419 Wheel cover . . . . . . . . . . . . . . . . . . . . . . . 419
ICC 173
Identification number . . . . . . . . . . . . . . . . . 451
If and when.......................... 410
Ignition see Engine and ignition . . . . . . . . . . . . . . 257
Ignition key see Key . . . . . . . . . . . . . . . . . . . . . . . . . . . 37
Ignition lock . . . . . . . . . . . . . . . . . . . . 258 Non-authorised vehicle key . . . . . . . . . . . 258 Withdrawal lock . . . . . . . . . . . . . . . . . . . . 258
Immobilizer . . . . . . . . . . . . . . . . . . . . . . . . . . 260 Fault ............................. 257 In-car communication system . . . . . 173
Indicator lamp Adaptive chassis control (DCC) 317 Adaptive cruise control (ACC) . . . . • . . . . 300 AdBiue . . . . . . ............. 347 Airbag system . . . . . . . . . . . . . . . . . . . . . . 89 Brake pad wear indicator . . . . . . . . . . . . . 270 Brake system . . . . . . . . . . . . . . . . . . . . . . 270 Catalytic converter . . . . . . . . . . . . . . . . . . 407 Changing bulbs . . . . . . . . . . . . . . . . . . . . 433 Changing gear . . . . . . . . . . . . . . . . . . . . . 261 Checking the oil level . . . . . . • . . . . . . . . . 354 Coolant . . . . . . . . . . . . . . . . . • . . . . . . . . . 359 Cruise control system . . . . . . . . . . . . . . . 296 Depress brake . . . . . . . . . . . . . . . . . . . . . 270 Diesel particulate filter . . . . . . . . . . . . . . . 407 Engine management system . . . . . . . . . . 407 Engine oil sensor . . . . . . . . . . . . . . . . . . . 354 ESC . . . . . . . . . . . . . . . . . . . . . . . . . . . . . 270 Exhaust purification system . . . . . . . . . . . 407 Filling the tank . . . . . . . . . . . . . . . . . . . . . 341 Fuel level . . . . . . . . . . . . . . . . . . . . . . . . . 341 In the driver door . . . . . . . . . . . . . . . . . . . . 43 Lane change assist system . . . . . . . . . . . 313 Lights . . . . . . . . . . . . . . . . . . . . . . . . . . . . 106 Overview . . . . . . . . . . . . . . . . . . . . . . . . . . 16 Remote control key . . . . . . . . . . . . . . . . . . 38 Seat belt . . . . . . . . . . . . . . . . . . . . . . . . . . . 80 Tyre monitoring system . . . . . . . . . . . . . . 319 Windscreen washer fluid level . . . . . . . . . . 117
Indirect ventilation . . . . . . . . . . . . . . . . . . . . 329
Information stored in the control units . . . 398 Infrared-reflecting windscreen . . . . . . . . . . . 116
Instrument cluster . . . . . . . . . . . . . . . . . . . . . 16 Displays . . . . . . . . . . . . . . . . . . . . . 20, 21, 25 Indicator lamps . . . . . . . . . . . . . . . . . . . . . . 16 Instruments . . . . . . . . . . . . . . . . . . . . . . . . 20 Menu structure . . . . . . . . . . . . . . . . . . . . . . 25 Service interval display . . . . . . . . . . . . . . . 22 Symbols ........................... 16 Using menus . . . . . . . . . . . . . . . . . . . . . . . 27 Warning lamps . . . . . . . . . . . . . . . . . . . . . . 16 Instruments . . . . . . . . . . . . . . . . . • . . . . . . . . 20
Integrated child seat . . . . . . . . . . . . . . . . . . 102 Seat belt routing . . . . . . . . . . . . . . . . . . . . 1 05
Interior lights ................ , ........ 114
Interior lights, California . . . . . . . . . . . . . . . 208 Living area . . . . . . . . . . . . . . . . . . . . . . . . 209 Pop-up roof . . . . . . . . . . . • . . . . . . . . • . . 21 0 Interior mirror . . . . . . . . . . . . . . . . . . . . . . . . 122
Interior monitoring system . . . . . . . . . . . . . . 44 ISOFIX.............................. 100 see Child seat . . . . . . . . . . . . . . . . . . • . . . 96
Index 473
Page 480 of 486
Sun visors ........................... 115
Supplementary heater . . . . . . • . . . . . . 332, 345 Automatic switch-off . . . . . .. . . . . . . . . . . 341
Supplementary heaters Remote control: range . . . . . . . . . . . . . . . 337
Supplementary heater, California . . . . . . . 251 Programming . . . . . . . . . . . . . . . . . . . . . . 251
Supplementary heating system Activating . . . . . . . . . . . . . . . . . . . . . . • . . 338 Automatic switch-off . . . • . . . . . . . . . . . . . 341 Child proof lock . . . . . . . . . . . . . . . . . . . . . 339 Controls . . . . . . . . . . . . . . . . . . . . . . . . . . 333 Operation . . . . . . . . . . . . . . . . . . . . . . . . . 339 Programming . . . . . . . . . . • • . . . . . . . • . . 338 Remote control . . . . . . . . . . . . . . . . . . . . . 335 Switching off . . . . . . . . . . . . . . . . . . . . . . . 334 Switching on . . . . . . . . . . . • • . . . . . . 333, 334 Things to note . . . . . . . . . . . . . . . . . . . . . 334
Supposed faults...................... 410
Switch-off of electrical consumers . . . . . . 366
Switching off consumers . . . . . . . . . . . . . . 365
Symbols see Warning and indicator lamps . . . . . . . . 16
Systems
T
ASS ............................. 275 Anti-lock brake system (ABS) . . . . . . . . . 275 Automatic headlight control . . . . . . . . . . . . 11 0 BAS ............................. 275 Brake Assist system (BAS) . . . • . . . . . . . 275 ccs ............................. 295 Cruise control system . . . . . . . . . . . . . . . 295 EDL . . . . . . . . . . . . . . . . . . . . . . 275 Electronic differential lock (EDL) . . . . . . . 275 Electronic stability control (ESC) . . . . . . . 274 ESC ............................. 274 Hill Hold Assist . . . . . . . . . . . . . . . . . . . . . 284 Lane change assist system . . . . . . . . . . . 312 Parking aid (front and rear) . . . • . . . . . . . 289 Parking aid (only at rear) . . . . . . . . . . . . . 288 ParkPilot . . . . . . . . . . . . . . . . • . • . . . . . . . 287 ParkPilot (front and rear) . . . . . . . . . . . . . 289 ParkPilot (only at rear) . . . . . . . . . . . . . . . 288 Rear Assist (reversing camera) . . . . . . . . 291 Reversing camera . . . . . . . . . . . . . . . . . . 291 Side Assist (lane change assist system) . 312 Start/stop . . . . . . . . . . . . . . . . . . . . . . . . . 283 TCS . . . . . . . . . . . . . . . . . . . . . . . . . 275, 276 Traction control system (TCS) . . . . . 275, 276 Tyre monitoring system . . . . . . . . . . 318, 321
T-shaped fastening ring . . . . . . . . . . . . . . . 135
Tables . . . . . . . . . . . . . . . . . . . . . . . . . • . . . . 155 California . . . . . . . . . . . . . . . . . . . . . . . . . 229 Central table . . . . . . . . . . . . . . . . . . . . . . . 155
480 I Index
Folding table in the side panel . . . . . . . . . 155 Folding table in the sliding door . . . . . . . . 229
Tachograph . . . . . . . . . . . . . . . . . . . . • . . . . 172
Tallgate . . . . . . . . . . . . • . . . . . . . . . . • . . . . . . 49 Child proof lock . . . . . . . . . . . . . . . . • . . . . . 52 Closing . . . . . . . . . . . . . . . . . . . . . • • . . . . . 50 Drivlng with an open tallgate . . . . . . . . . . 129 Locking............................ 40 Locking from the inside . . . . . . . . . . . . 50, 51 Manual opening and closing . . . . . . . . . . 414 Opening ........................... 50 Power closing . . . . . . . . . . . . . . • . . . . . . . . 50 see Tailgate . . . . . . . . . . . . . . . . . . • . . . . . 40 Unlocking . . . . . . . . . . . . . . . . . . . . . . . . . . 40 Unlocking from the inside . . . . . . . . . . . . . . 51 Warning lamp . . . . . . . . . . . . . . . . . • . . . . . 50
Tall lights (LED) . . . . . . . . . . . . . . . . . . . . . . 434
Tank cap Closing . . . . . . . . . . • . . . . . . . . . . . . . . . . 342 Diesel . . . . . . . . . . . . . . . . . . . . . . . . . . . . 342 Opening . . . . . . . . . . . . . . . . . . . . . . . . . . 342 Petrol . . . . . . . . . . . . . . . . . . . . . . . . . . . . 342
TCS see Brake assist system . . . . . . . . . . . . . 276 see Brake support systems . . . • . . . . . . . 275 Switching on and off . . . . . . . . . . . . . . . . . 276
Technical data Axle weight rating . . . . . . . . • . . • . . . . . . . 450 Capacities . . . . . . . . . . . • . . . . . . . . 121. 343 Capacity . . . . . . . . . . . . . . . . . . . . . . . . . . 450 Dimensions . . . . . . . . . . . . . . . . . . . . . . . 452 Drawbar load . . . . . . . . . . . . . . . . . . . . . . 140 Engine oil specification . . . • . . . . . . . . . . 354 Engine specifications . . . . . . . . . . . . • . . . 450 Factory plate . . . . . . . . . . . . . . • . . . . . . . 451 Gross vehicle weight rating . . . . . . . . . . . 450 Kerb weight . . . . . . . . . . . . . . . . . . . . . . . 450 Living area . . . . . . . . . . . . . . . . . . . . . . . . 255 Maximum speed . . . . . . . . . . . . . . . . . . . . 450 Output ........................... 450 Performance figures . . . . . . . . . . . . . . . . . 450 Roof load . . . . . . . . . . . . . . . . . . . . . . . . . 139 Trailer weight . . . . . . . . . . . . . . . . . . . . . . 450 Type plate . . . . . . . . . . . . . . . . . . . . . . . . 451 Tyre pressure . . . . . . . . . . . . . . . . . . . . . . 371 Vehicle data sticker . . . . . . . . . . . . . . . . . 451 Weights . . . . . . . . . . . . . . . . . . . . . . . . . . 450
Technical modifications . . . . . . . . . . . . . . . 396 Lifting platform . . . . . . . . . . . . . . . . . . . . . 401 Plates ............•............... 405 Stickers . . . . . . . . . . . . . . . . . . . . . . . . . . 405
Telematlc services see Volkswagen Car-Net . . . . . . . . . . . . . 402
Telephone handset, rear-seat telephony, Business . . . . . . . . . . . . . . . . . . . . . . . . . . 191
Page 482 of 486
Turning Single seats in the passenger compartment .7.3
Turn signal lever . . . . . . . . . . . . . . . . . . . . . 107
Two-way radio . . . . . . . . . . . . . . . . . . . . . . . 398
Type plate . . . . . . . . . . • . . . . . . . . • . . . . . . . 451
Tyre damage . . . . . . . . . . . . . . . . . . . . . . . . . 373
Tyre load . . . . . . . . . . . . . . . . . . . . . . . . 376, 377 Tyre mobility set see Breakdown set . . . . . . . . . • . . . . . . . 425
Tyre monitoring indicator . . . . . . . . . . . . . . 321
Tyre monitoring system . . . . . . . . . . . . . . . 318 Function . . . . . . . . . . . . . . . . . . . . . . . . . . 321 Indicator lamp . . . . . . . . . . . . . . . . . . . . . 319 Malfunction . . . . . . . . . . . . . . . . . . . . . • . . 319 Replacing tyres . . . . . . . . . . . . . . . . . . . . 370 Teaching in new tyre pressures . . . . . . . . 321 Tyre pressure . . . . . . . . . . . . . . . . . . . . . . 371
Tyre pressure . . . . . . . . . . . . . . . . • . . . . . . . 371 Checking . . . . . . . . . . . . . • . . . . . . . . • . . 371 Spare wheel . . . . . . . . . . . . . . . . . . . . . . . 371
Tyre pressure label . . . . . . . . . . . . . . . . . . . 371
Tyre repair kit see Breakdown set . . . . . . . . . . . . . . . . . 425 Tyres see Wheels and tyres . . . . . . . . . . . . . . . 367 Tyres with directional tread pattern . . . . . . 377
Tyre wear . . . . . . . . . . . . . . . . . . . . . . . 286, 373
u
Undersea! . . . • . . . . . . . . . . . . . . . . . . . . . . . 387 Unlocking Vehicle ............•............... 40
USB ................................. 14
User pairing Rear-seat telephony . . . . . . . . . . . . . . . . . 190
V
V-Fiip .............................. . 171 372 Valve caps Vehicle Lending . . . . . . . . . . . . . . . . . . . . . . . . . . 403 Loaded . . . . . . . . . . . . . . . . . . . . . . . . . . . 125 Locking from outside . . . . . . . . . . . . . . . . . 40 Locking or unlocking from inside . . . . . . . . 42 Parking on a downward incline . . . . . . . . 272 Recycling . . . . . . . . . . . . . . . . . . . . . . . . . 407 Safety in the event of a breakdown . . . . . 412 Selling ........................... 403 Stopping on an upward incline . . . . . . . . . 272 Unlocking from outside . . . . . . . . . . . . . . . 40 Vehicle battery . . . . . . . . . . . . . . . . . . . . . . . 362 Automatic switch-off for electrical consum-ers . . . . . . . . . . . . . . . . . . . . . . . . . . . . . 366 Charging . . . . . . . . . . . . . . . . . . . . . . . . . 365
482 Index
Checking the electrolyte level . . . . . . . . . 364 Connecting . . . . . . . . . . . . . . . . . . . . . . . . 365 Discharged . . . . . . . . . . . . . . . . 266, 366,412 Discharges . . . . . . . . . . . . . . . . . . . . . . . . . 39 Disconnecting . . . . . . . . . . . . . . . . . . . . . 365 Disconnecting from onboard power supply .365 Electrolyte . . . . . . . . . . . . . . . . . . . . . . . . 365 Jump starting . . . . . . . . . . . . . . . . . . . . . . 444 Location . . . . . . . . . . . . . . . . . . . . . . . . . . 362 Preparation . . . • . . . . . . . . . . . • . . . . . . . 364 Replacing . . . . . . . . . . . . . . . . . . . . . . . . . 365 Symbols . . . . . . . . . . . . . . . . . . . . . . . . . . 362 Warning lamp . . . . . . . . . . . . . . • . . . . . . . 364 Vehicle care Airbag (dash panel) . . . . . . . . . . . . . . . . . 392 Alcantara . . . . . . . . . . . . . . . . . . . . . . . . . 389 Aluminium trim parts . . . . . . . . . . . . . . . . 385 Anodised surfaces . . . . . . . . . . . . . . . . . . 385 Automatic car wash . . . . . . . . . . . . . . . . . 381 Camera's field of view .......•........ 111 Changing wiper blades . . . . . . . . . . . . . . 383 Chrome trim parts . . . . . . . . . . . . . . . . . . 385 Cleaning cool box . . . . . . . . . . . . . . . . . . 393 Cleaning cupboards, cooker and sink, Cali-fornia ........................... 253 Cleaning fresh water tank, California . . . . 239 Cleaning opaque shades . . . . . . . . . . . . . 393 Cleaning refrigerator box, Business . . . . . 187 Cleaning seat belts . . . . . . . . . . . . . . . . . 392 Cleaning seat rails . . . . . . . . . . . . . . . . . . 393 Cleaning stowage areas . . . . . . . . . . . . . 392 Cleaning the display of the central control panel, California . . . . . . . . . . . . . . . . . . 254 Cleaning the drain, California . . . . . • . . . . 241 Cleaning wheels . . . . . . . . . . . . . . . • . . . . 386 Cleaning wiper blades . . . . . . . . . . . . . . . 383 Cloth seat covers . . . . . . . . . . . . . . • . . . . 389 Dash panel . . . . . . . . . . . . . . . . . . . . . . . . 392 De-icing door lock cylinders . . . . . . . . . . . 387 Electrically adjustable seats . . . . . . • . . . . 389 Engine compartment . . . . . . . . . . . . . . . . 387 Exterior . . . . . . . . . . . . . . . . . . . . . . . . . . . 380 Exterior mirrors . . . . . . . . . . . . . . . • . . . . 382 Fabric trim . . . . . . . . . . . . . . . . . . . • . . . . 389 Handling seat covers . . . . . . . . . . . . . . . . 389 High-pressure cleaner . . . . . . . . . . • . . . . 382 Interior . . . . . . . . . . . . . . . . . . . . . . . . . . . 388 Leatherette . . . . . . . . . . . . . . . . . . . . . . . . 392 Natural leather . . . . . . . . . . . . . . . . . . . . . 391 Paintwork . . . . . . . . . . . . . . . . . . . . . . . . . 384 Plastic parts . . . . . . . . . . . . . . . . . . . . . . . 392 Rubber seals . . . . . . . . . . . . . . . . . . . . . . 386 Seat cushions without seat heating . . . . . 389 Seat cushions with seat heating . . . . . . . 389 Seats that are not electrically adjustable . 389 Seats with airbag components . . . . . . . . . 389 Seats with no airbag components . . . . . . 389