buttons VOLKSWAGEN TRANSPORTER 2020 Owners Manual
[x] Cancel search | Manufacturer: VOLKSWAGEN, Model Year: 2020, Model line: TRANSPORTER, Model: VOLKSWAGEN TRANSPORTER 2020Pages: 486, PDF Size: 69.28 MB
Page 9 of 486
Vehicle interior
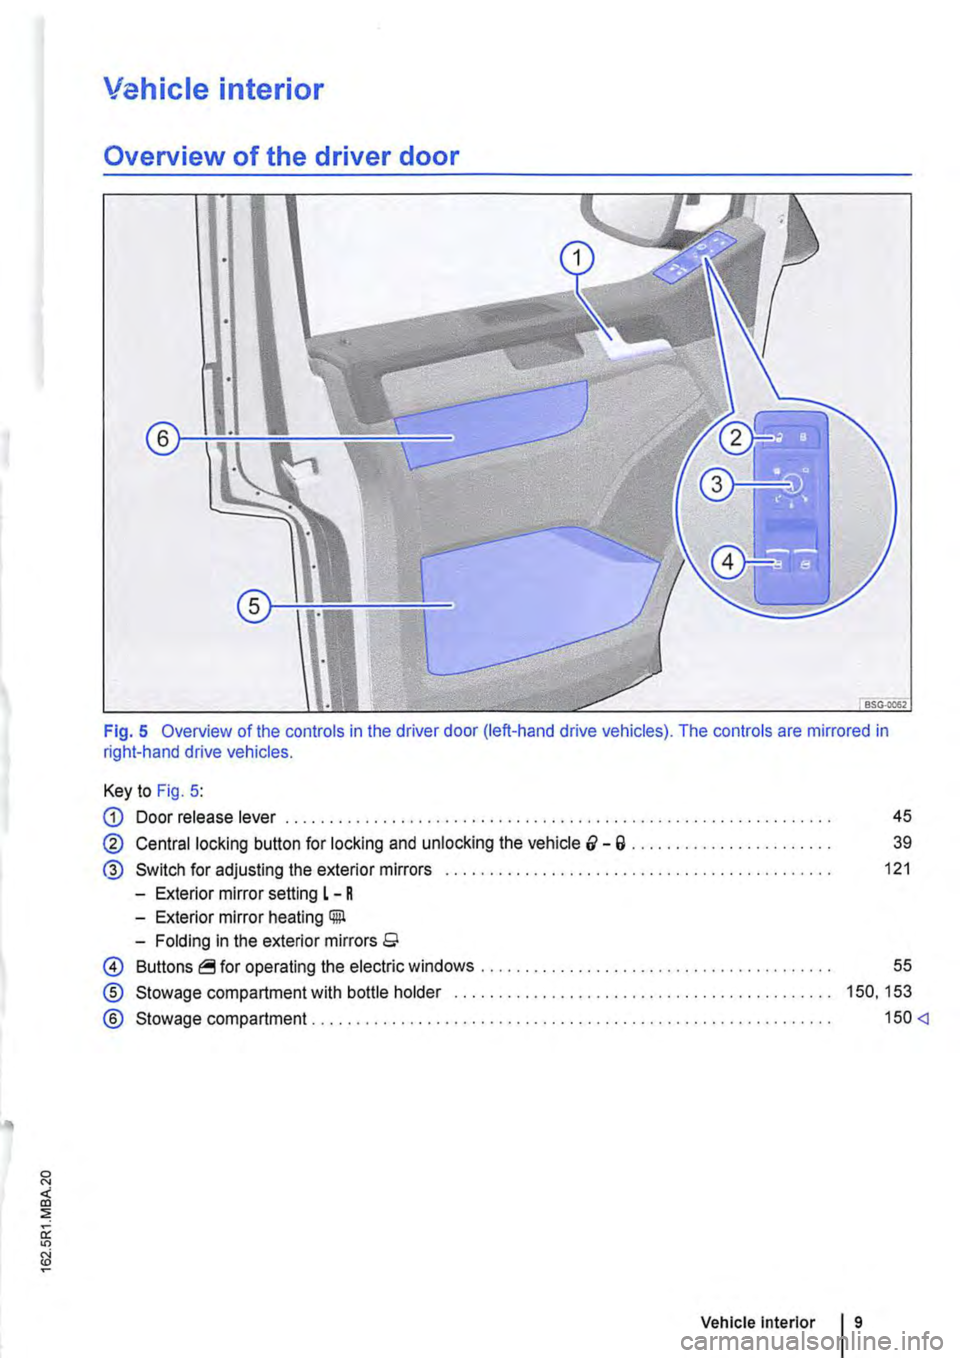
Overview of the driver door
Fig. 5 Overview of the controls in the driver door (left-hand drive vehicles). The controls are mirrored in right-hand drive vehicles.
Key to Fig. 5:
G) Door release lever . . . . . . . . . . . . . . . . . . . . . . . . . . . . . . . . . . . . . . . . . . . . . . . . . 45
@ Central locking button for locking and unlocking the vehicle &-a . . . . . . . . . . . . . . . . . . . . . 39
® Switch for adjusting the exterior mirrors . . . . . . . . . . . . . . . . . . . . . . . . . . . . . . . . . . . . . 121
-Exterior mirror setting L - R
-Exterior mirror heating Gill
-Folding in the exterior mirrors 9
0 Buttons operating the electric windows ..
® Stowage compartment with bottle holder
® Stowage compartment ..................... .
55
150, 153
150
Page 11 of 486
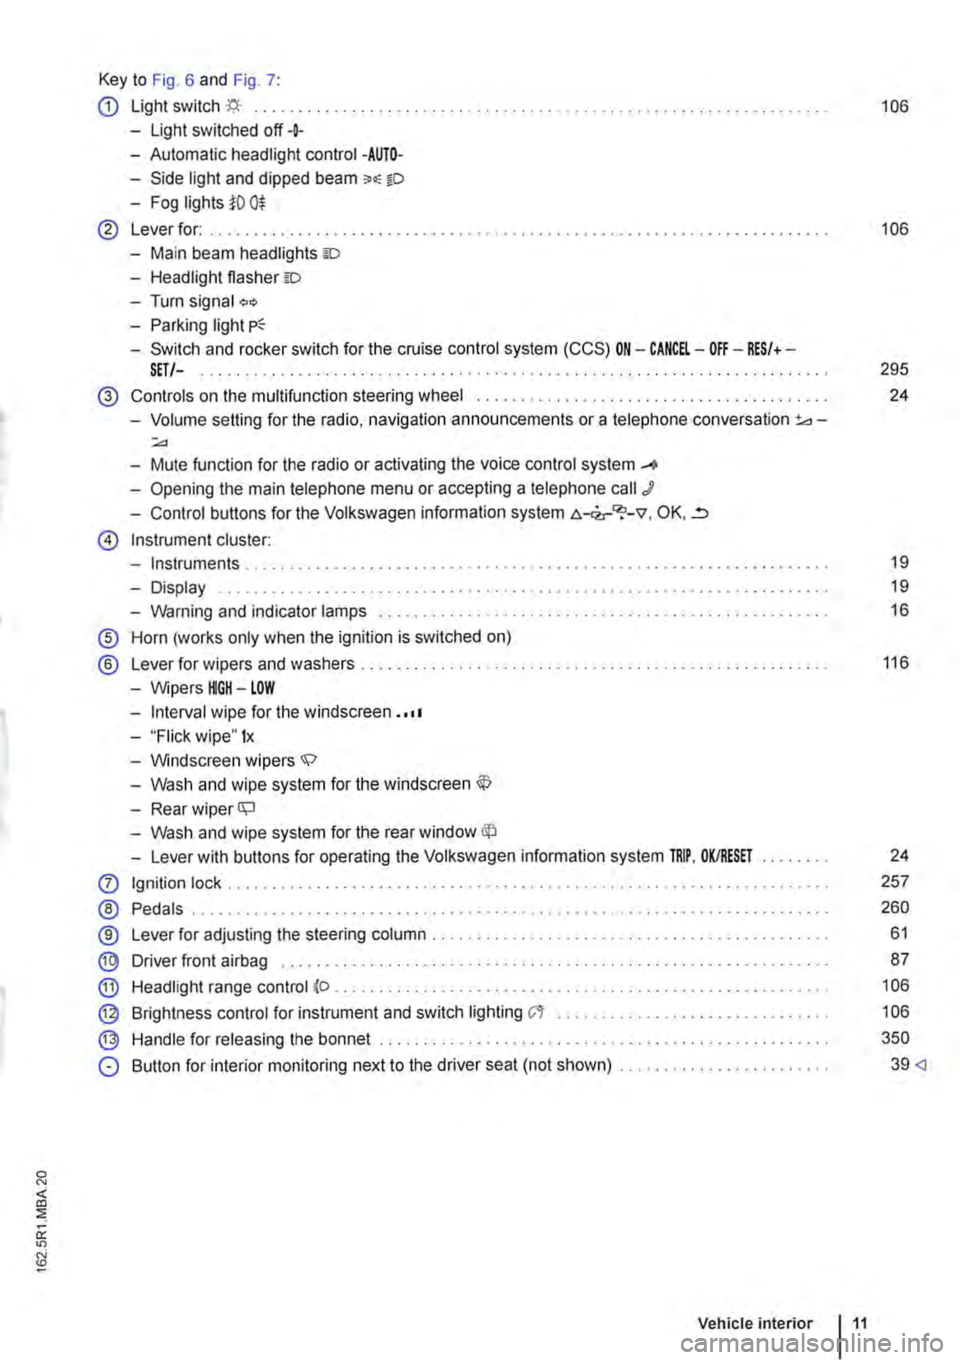
Key to Fig. 6 and Fig. 7:
CD Light switch ·'f;i.· ... 106
-Light switched off+
-Automatic headlight control -AUTO-
-Side light and dipped beam o.-o
-Fog lights i'O 0$
@ Lever for: .......... . 106
-Main beam headlights ID
-Headlight flasher =:o
-Turn signal "'" -Parking light
-Switch and rocker switch for the cruise control system (CCS) ON-CANCEL-OFF-RES/+-SET/-. . . . . . . . . . . . . . . . . . . . . . . . . . . . . . . . . . . . . . . . . . . . . . . . . . . . 295
@ Controls on the multifunction steering wheel ....... .
-Volume setting for the radio, navigation announcements or a telephone conversation 3d-:;.,
-Mute function for the radio or activating the voice control system _...
-Opening the main telephone menu or accepting a telephone call J
-Control buttons for the Volkswagen information system c.-<2,-"?-v, OK, ..=,
@ Instrument cluster:
-Instruments ..
-Display
-Warning and indicator lamps ..... .
® Horn (works only when the ignition is switched on)
® Lever for wipers and washers . . . . . .....................................•
-Wipers HGH-LOW
-Interval wipe for the windscreen . ·••
-"Flick wipe" 1x
-Windscreen wipers.;;:>
-Wash and wipe system for the windscreen
-Rear wiper ll;J
-Wash and wipe system for the rear window
-Lever with buttons for operating the Volkswagen information system TRIP, OK/RESET
0 Ignition lock .......... .
® Pedals .................. .
®
® @
Lever for adjusting the steering column ..................•.....
Driver front airbag ........ .
Headlight range control (o .
Brightness control for instrument and switch lighting C't ...••.•...
Handle for releasing the bonnet ...
@
®
0 Button for interior monitoring next to the driver seat (not shown) ....................... .
Vehicle interior 11
24
19
19
16
116
24
257
260
61
87
106
106
350
39
Page 19 of 486
A WARNING (Continued)
• Any broken-down vehicle poses an in-creased accident risk both for you and for other road users. If the situation requires, switch on the hazard warning lights and set up the warning triangle as a warning to other road users.
• Before opening the bonnet, switch off the engine and allow it to cool down sufficiently.
Instruments
o::n Introduction
This chapter contains information on the following subjects:
Instrument overview ......... .
Displays . . . . . . . ........ . Service interval display ..
Additional information and warnings:
• Warning and indicator lamps =>page 16
• Volkswagen information system =>page 24
20 21
22
• Display of current gear (DSG® dual clutch gear-box) =>page 260
• Information on service intervals =>Booklet Serv-ice schedule
A WARNING (Continued)
• The engine compartment of any motor ve-hicle Is a dangerous area. Serious injuries can be sustained here =>page 350.
CD
Failure to observe illuminated indicator lamps and text messages can lead to your vehicle be-Ing damaged.
Accidents and injuries can occur if the driver is distracted.
• Never press the buttons on the instrument cluster while the vehicle is in motion.
Page 24 of 486
Vehicles with text messages:
Switch off the ignition.
Switch on the hazard warning lights.
Press and hold down the [o.o/S!T) button in the in-strument cluster.
Restart the ignition.
Release the (o.o/S!Tl button.
Confirm the selection on the instrument cluster by pressing lhe (OK/RES!!) button on lhe wiper lever or the @ button on the multifunclion steering wheel.
Switch off the hazard warning lights.
Vehicles without text messages:
Switch off the ignition.
Switch on the hazard warning lights.
Press and hold down the (o.oJS!l) button in the In-strument cluster.
Restart the ignition.
Release lhe [o.O/S!T) button and press the (:cJeJ) but-ton within approximately 20 seconds.
Switch off the hazard warning lights.
Volkswagen information system
COl Introduction
This chapter contains information on the following subjects:
Overview of the menu structure . . . . 25
Using the menus in the instrument cluster . . . 27
Main menu . . . . . . . . . . . . . . . . . . . . . . . 28
MFD (mullifunction display) menu . . . . . . . . . . . 28 Settings menu . . . . . . . . . . . . . . . . 30
Assist systems submenu.. . . . . . . . . . . . 30
Convenience submenu ... Lights & Vision submenu ..
The Volkswagen information system al-
lows you to access various functions and
information in the instrument cluster dis-
play when the ignition is switched on.
31
31
There are no buttons on the wiper lever in vehicles equipped with a multifunction steering wheel. The mullifunction display is controlled using the buttons on the multifunction steering wheel only.
Overview of the V!!hiclc
m The service message will disappear after a W few seconds, when the engine is running, or when the (OKIRES!T) button on the wiper lever or the@ button on the mullifunction steering wheel is press-ed.
m If the vehicle battery is disconnected for long W periods in a vehicle with flexible oil change service, the system will not be able to calculate the lime when the next service is due. The service dis-plays could then display incorrect information. If this is the case then please observe the maximum service Intervals shown in =:o Booklet Service schedule.
Qualified workshops can programme and modify other functions depending on the vehicle equip-ment level. Volkswagen Commercial Vehicles rec-ommends using a Volkswagen Commercial Vehi-cles dealership for this purpose.
Some menu options can only be opened when the vehicle is stationary.
If any priority 1 warning reports are being dis-played, you will be unable to open any menus. Some warnings can be confirmed and switched off with the@ button.
Additional information and warnings:
• Driver assist systems =:o page 282
• Radio or navigation system =:o Booklet Radio, provision for mobile telephone, infotainment sys-tem, navigation system
• Provision mobile telephone =:o Booklet Radio, provision for mobile telephone, infotainment sys-tem, navigation system 111>
Page 27 of 486
Using the menus in the instrument cluster
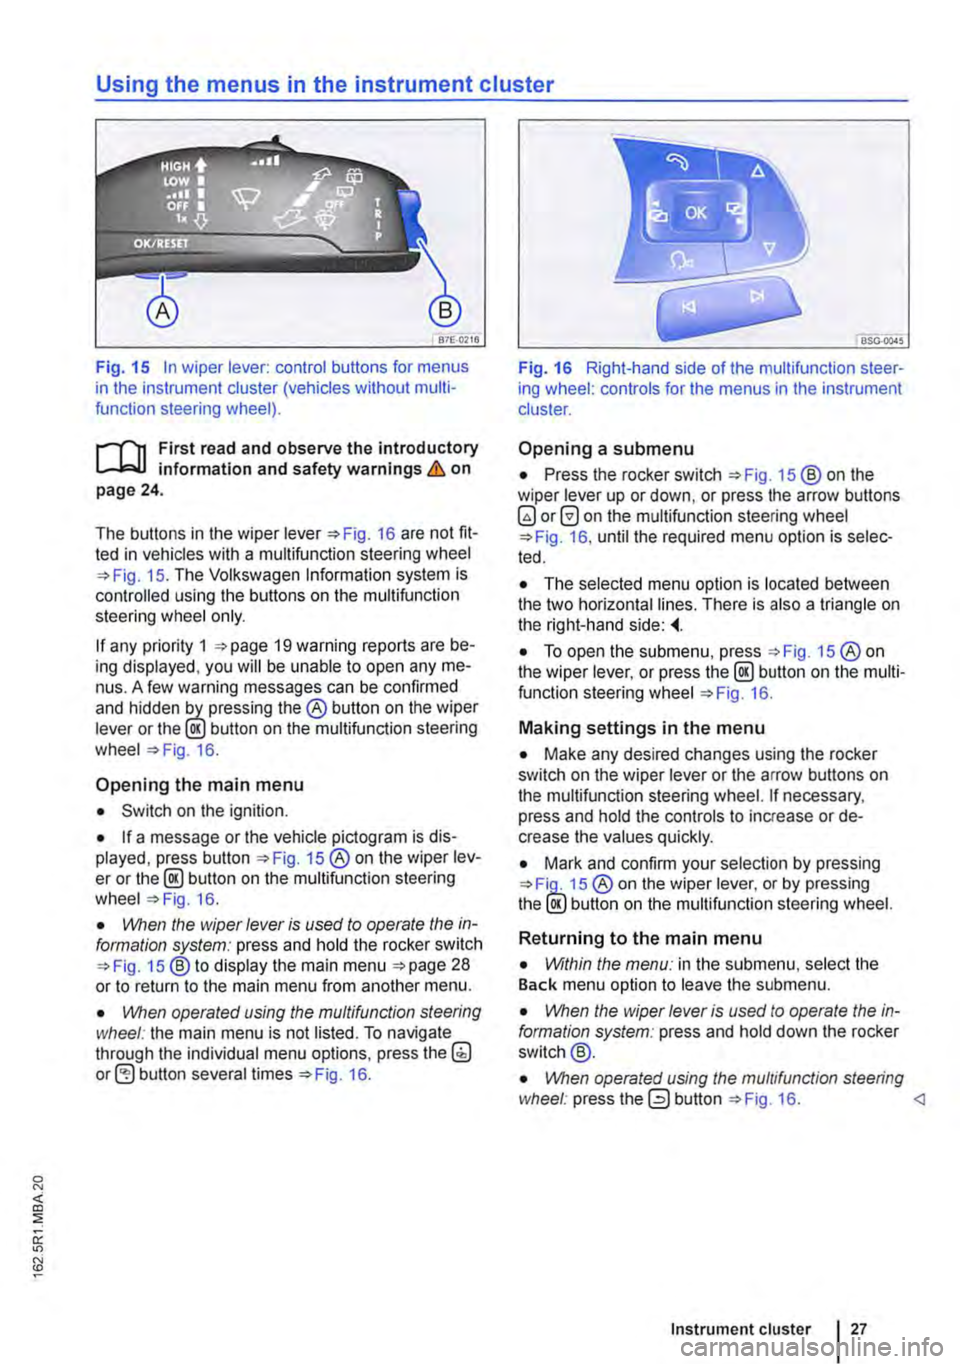
Fig. 15 In wiper lever: control buttons for menus in the instrument cluster (vehicles without multi-function steering wheel).
r--f"n First read and observe the introductory L-J,:.lJ information and safety warnings & on page 24.
The buttons in the wiper Fig. 16 are not fit-ted in vehicles with a multifunction steering wheel 15. The Volkswagen Information system is controlled using the buttons on the multifunction steering wheel only.
If any priority 1 19 warning reports are be-ing displayed, you will be unable to open any me-nus. A few warning messages can be confirmed and hidden the® button on the wiper lever or the lE!.) button on the multifunction steering wheel 16.
Opening the main menu
• Switch on the ignition.
• If a message or the vehicle pictogram is dis-played, press button 15 ®on the wiper lev-er or the@ button on the multifunction steering wheel 16.
• VVhen the wiper lever is vsed to operate the in-formation system: press and hold the rocker switch 15 ®to display the main menu 28 or to return to the main menu from another menu.
• \!Vhen operated vsing the mvltifvnction steering wheel: the main menu is not listed. To navigate through the individual menu options, press the(;) button several times 16.
Fig. 16 Right-hand side of the multifunction steer-ing wheel: controls for the menus in the instrument cluster.
Opening a submenu
• Press the rocker switch 15 ®on the wiper lever up or down, or press the arrow buttons 0 on the multifunction steering wheel 16, until the required menu option is selec-ted.
• The selected menu option is located between the two horizontal lines. There is also a triangle on the right-hand side:
• To open the submenu, press 15 ®on the wiper lever, or press the @ button on the multi-function steering wheel 16.
Making settings in the menu
• Make any desired changes using the rocker switch on the wiper lever or the arrow buttons on the multifunction steering wheel. If necessary, press and hold the controls to increase or de-crease the values quickly.
• Mark and confirm your selection by pressing 15 ® on the wiper lever, or by pressing the lE!.) button on the multifunction steering wheel.
Returning to the main menu
• Within the menv: in the submenu, select the Back menu option to leave the submenu.
• \!Vhen the wiper lever is vsed to operate the in-formation system: press and hold down the rocker switch@.
• \!Vhen operated vsing the mvltifvnc/ion steering wheel: press the 0 button 16.
Page 29 of 486
Possible displays
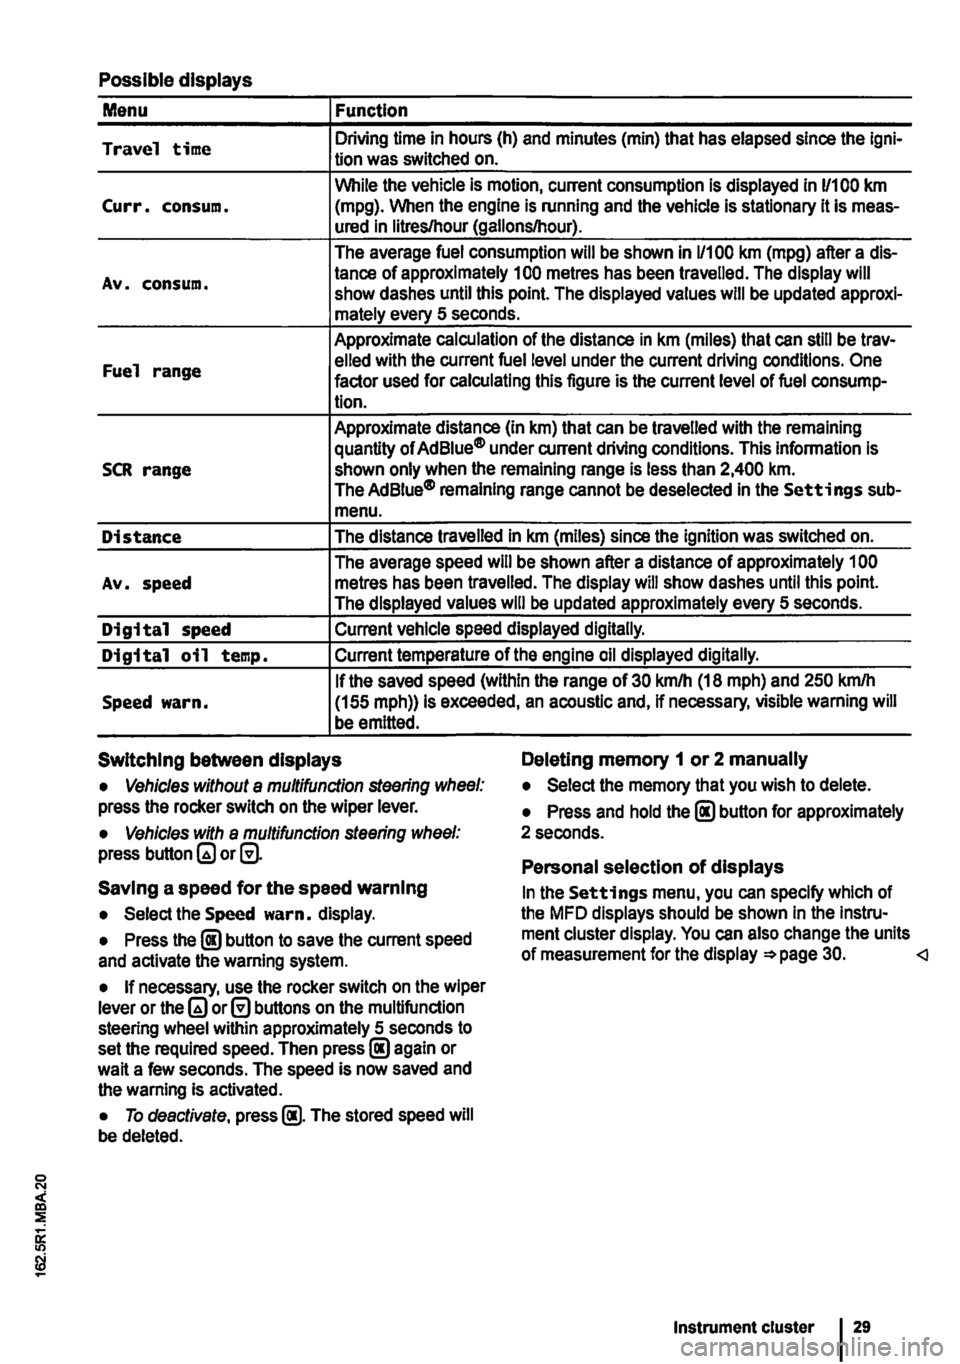
Menu Function
Travel time Driving time in hours (h) and minutes (min) that has elapsed since the lgni-tion was switched on.
While the vehicle is motion, current consumption is displayed in 11100 km Curr. consum. (mpg). When the engine is running and the vehicle is stationary it is meas-ured in litres/hour (gallons/hour).
The average fuel consumption will be shown in 1/100 km (mpg) after a dis-
Av. consum. tance of approximately 100 metres has been travelled. The display will show dashes until this point. The displayed values will be updated approxi-mately every 5 seconds.
Approximate calculation of the distance in km (miles) that can still be trav-
Fuel range elled with the current fuel level under the current driving conditions. One factor used for calculating this figure is the current level of fuel consump-tion.
Approximate distance (In km) that can be travelled with the remaining quantity of Ad Blue® under current driving conditions. This information is SCR range shown only when the remaining range is less than 2,400 km. The AdBiue® remaining range cannot be deselected in the Settings sub-menu.
Distance The distance travelled in km (miles) since the ignition was switched on.
The average speed will be shown after a distance of approximately 1 00 Av. speed metres has been travelled. The display will show dashes until this point. The displayed values will be updated approximately every 5 seconds.
Digital speed Current vehicle speed displayed digitally.
Digital oil temp. Current temperature of the engine oil displayed digitally.
If the saved speed (within the range of 30 km/h (18 mph) and 250 kmlh Speed warn. (155 mph)) is exceeded, an acoustic and, if necessary, visible warning will be emitted.
Switching between displays Deleting memory 1 or 2 manually
• Vehicles without a multifunction steering wheel: press the rocker switch on the wiper lever.
• Vehicles with a multifunction steering wheel: press button or@.
Saving a speed for the speed warning
• Select the Speed warn. display.
• Press the @ button to save the current speed and activate the warning system.
• If necessary, use the rocker switch on the wiper lever or the or@ buttons on the multifunction steering wheel within approximately 5 seconds to set the required speed. Then press@ again or wait a few seconds. The speed is now saved and the warning Is activated.
• To deactivate, press @. The stored speed will be deleted.
• Select the memory that you wish to delete.
• Press and hold the @ button for approximately 2 seconds.
Personal selection of displays
In the Settings menu, you can specify which of the MFD displays should be shown In the Instru-ment cluster display. You can also change the units of measurement for the display =*page 30.
Page 38 of 486
New keys or replacement keys are available from Volkswagen Commercial Vehicle dealerships or from qualified workshops and authorised key serv-ices which are qualified to manufacture these vehi-cle keys.
New and replacement keys need to be synchron-ised before use =:-page 39.
CD
Every vehicle key contains electronic compo-nents. Protect the key from damage, moisture and excessive vibration.
m Press the buttons on the remote control key W only if the corresponding function is actually needed. Pressing a button when the function is not
required could lead to the vehicle being unlocked unintentionally or the alarm going off. This also ap-plies even when you are not within the effective range.
m The function of the remote control key can be W affected temporarily if there is more than one transmitter in the direct vicinity working on the same frequency (e.g. a mo-way radio or mobile telephone).
m Obstacles bemeen the remote control and W the vehicle, bad weather conditions and weak batteries can reduce the range of the remote con-trol.
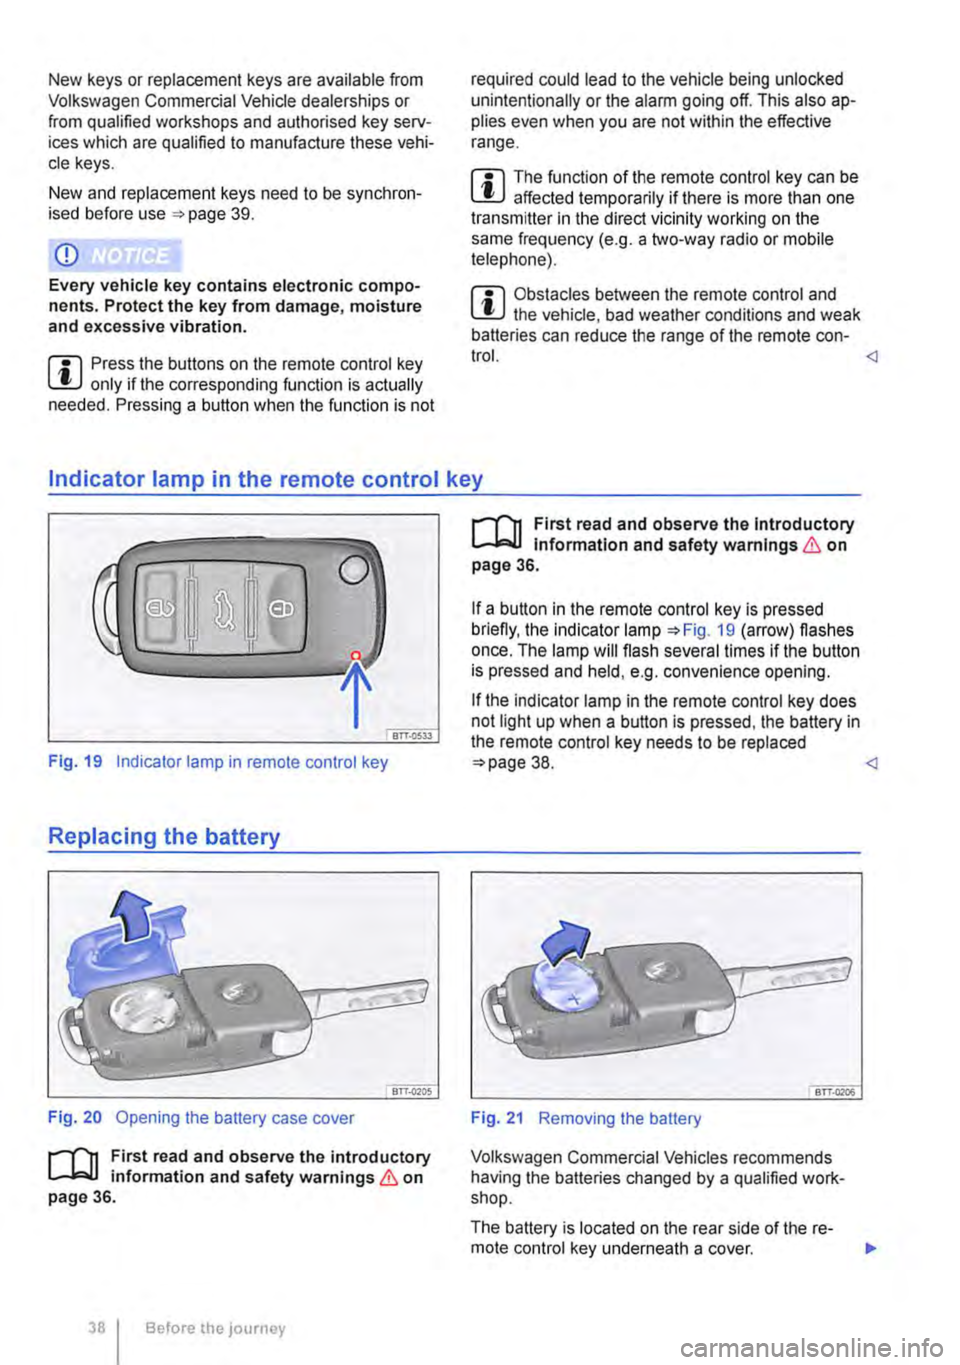
Fig. 19 Indicator lamp in remote control key
Replacing the battery
Fig. 20 Opening the battery case cover
r--('n First read and observe the introductory 1..-J=.U information and safety warnings & on page 36.
38 I Before the JOUrney
r--('n First read and observe the Introductory 1..-J=.U Information and safety warnings & on page 36.
If a button in the remote control key is pressed briefly, the indicator lamp =:-Fig. 19 (arrow) flashes once. The lamp will flash several times if the button is pressed and held, e.g. convenience opening.
If the indicator lamp in the remote control key does not light up when a button is pressed, the battery in the remote control key needs to be replaced =:>page 38.
Volkswagen Commercial Vehicles recommends having the batteries changed by a qualified work-shop.
The battery is located on the rear side of the re-mote control key underneath a cover. ..,.
Page 40 of 486
• Cleaning and caring for the vehide exterior 380
• Manual opening and dosing 413
A WARNING
Improper use of the central locking system could lead to serious injury.
• The central locking system locks all doors. Locking the vehicle from the inside can prevent accidental opening of the doors and unauthorised persons from entering the vehicle. However, locked doors can delay as-sistance to passengers inside the vehicle in the event of an accident or emergency.
• Never leave children or people requiring assistance alone in the vehicle. All doors can be locked from the Inside using the central
6 WARNING (Continued)
locking button. This may mean that people lock themselves In the vehicle. People locked In the vehicle may be subjected to very high or very low temperatures.
• Temperatures Inside a locked vehicle may reach extremes of heat or cold, according to season. This can cause serious Injuries and Illness or fatalities, especially to small chil-dren.
• Never leave anyone Inside a locked vehi-cle. People In the vehicle could become trap-ped In an emergency and may not be able to get themselves to safety.
• Doors and the tailgate should therefore only be opened or closed when you are sure that nobody Is in their path.
Description of the central locking system
r"'f"n First read and observe the Introductory L-Jc.l.l Information and safety warnings & on page 39.
The central locking system enables you to lock and unlock all the doors and the tailgate or wing doors from one point.
• From outside the vehicle with the remote con-trol key.
• From inside the vehicle with the central locking button 42.
• Mechanically with the key in the driver door lock cylinder.
The doors and the tailgate can be locked or un-locked manually if the remote control key or central locking system fails. <1
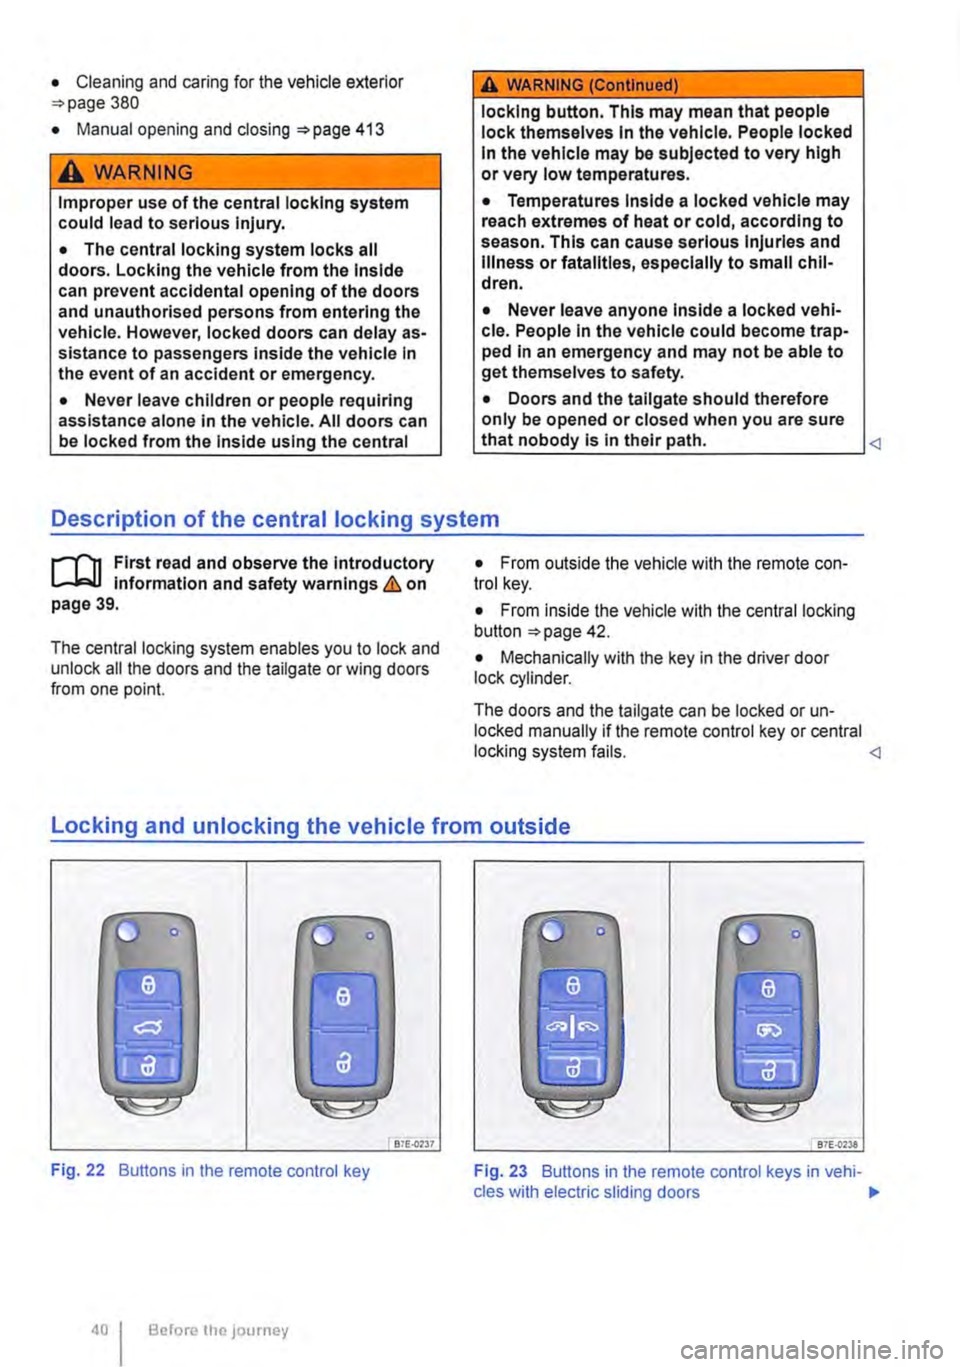
locking and unlocking the vehicle from outside
liJ
Fig. 22 Buttons in the remote control key
Before the JOurney
Bi£..0237 87E-{)'238
Fig. 23 Buttons in the remote control keys in vehi-cles with electric sliding doors .,.
Page 56 of 486
A WARNING
Always take care when using the mechanical or electric windows otherwise you could cause serious accidents or injuries.
• Windows should only be opened or closed when you are sure that nobody is In their op-erating area.
• Never leave children or people requiring assistance alone in the vehicle when the ve-hicle is locked. Electric windows can no lon-ger be opened in an emergency.
A WARNING (Continued)
• Always take all vehicle keys with you ev-ery time you leave the vehicle. The electric windows can still be operated using the but-tons several minutes after the ignition has been switched off, provided the driver door and the front passenger door are not opened.
CD
During sudden rain showers, water can enter the vehicle interior via open windows and cause damage to the vehicle.
'----------------: BSG-0031
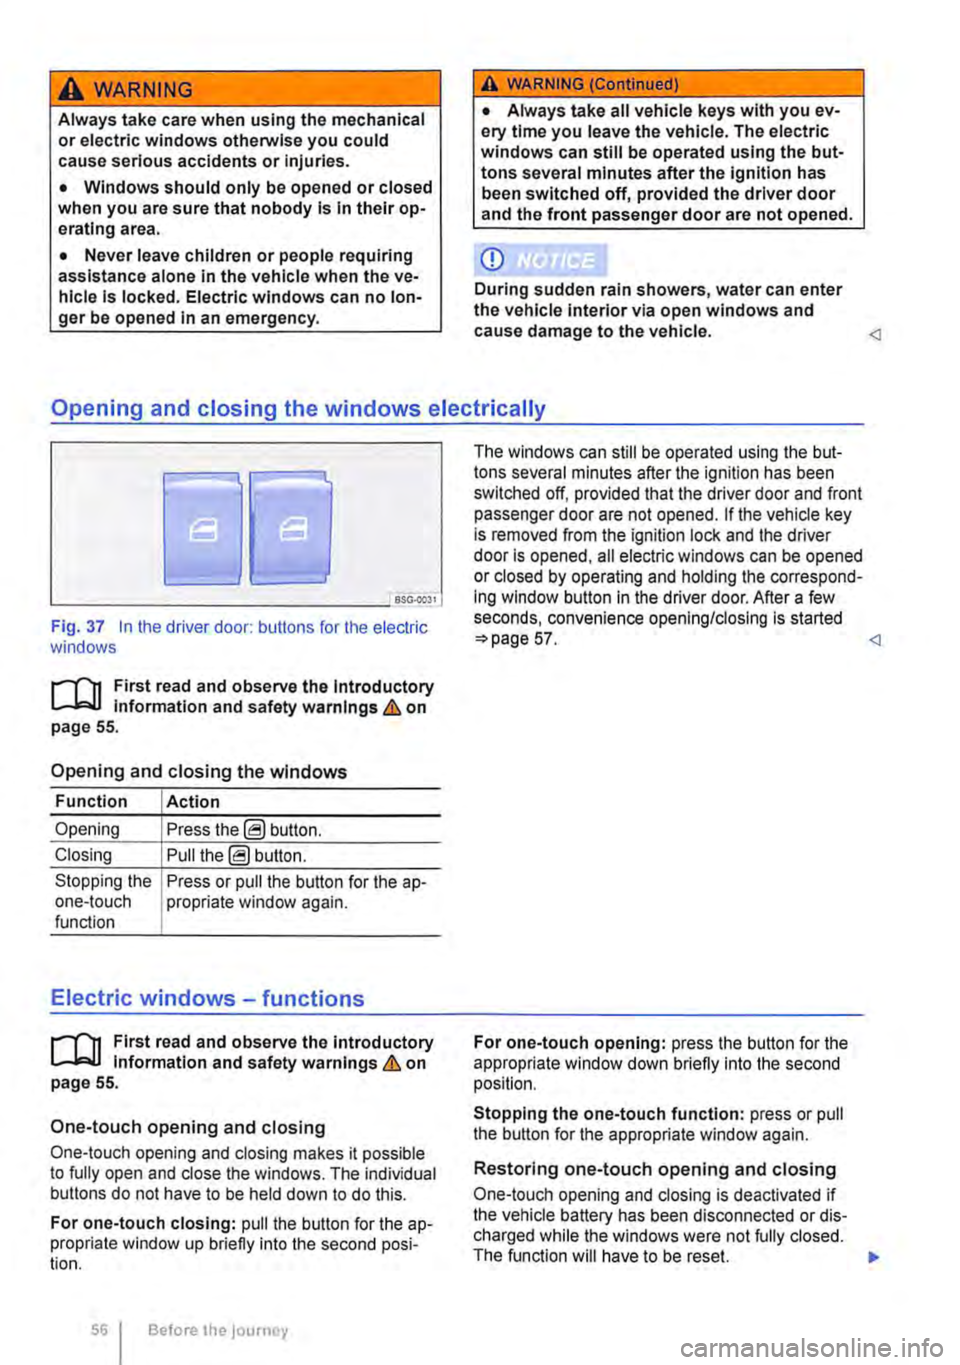
Fig. 37 In the driver door: butlons for the electric windows
r-111 First read and observe the Introductory L-J,::.JJ information and safety warnings & on page 55.
Opening and closing the windows
Function Action
Opening Press the@ button.
Closing Pull the@ button.
Stopping the Press or pull the button for the a p-one-touch propriate window again. function
Electric windows -functions
r-111 First read and observe the introductory L-J,::.JJ information and safety warnings & on page 55.
One-touch opening and closing
One-touch opening and closing makes it possible to fully open and close the windows. The individual buttons do not have to be held down to do this.
For one-touch closing: pull the butlon for the ap-propriate window up briefly into the second posi-tion.
56 Before the journey
The windows can still be operated using lhe but-tons several minutes after the ignition has been switched off, provided that the driver door and front passenger door are not opened. If the vehicle key is removed from the ignition lock and lhe driver door Is opened, all electric windows can be opened or closed by operating and holding lhe correspond-ing window button in the driver door. After a few seconds, convenience opening/closing is started 57.
Stopping the one-touch function: press or pull the button for the appropriate window again.
Restoring one-touch opening and closing
One-touch opening and closing is deactivated if the vehicle battery has been disconnected or dis-charged while the windows were not fully closed. The function will have to be reset.
Page 57 of 486
• Close all windows and doors.
• Pull up the button for the window and hold it in this position for at least one second.
• Let go of the button then pull it up again and hold it in this position. One-touch opening and closing is now ready for operation.
The one-touch function can be restored for individ-ual windows or for several windows at the same time.
Convenience opening and closing
There are three different ways of opening and clos-ing all electric windows simultaneously when the ignition is switched off:
• Press and hold the locking or unlocking button in the remote control key.
• To interrupt this function, let go of the locking or unlocking button.
• OR: hold the vehicle key in the driver door lock cylinder in either the locking or the unlocking posi-tion until all windows are either opened or closed.
• To interrupt this function, turn the vehicle key in the opposite direction.
• OR: after switching the ignition off and opening the driver and front passenger doors, push or pull the@ button in the required direction for at least two seconds.
During convenience closing, first the windows and then the sliding/tilting roof will be closed.
A WARNING
Careless or unsupervised use of the electric windows can cause serious Injuries.
• The electric windows should only be opened or closed when you are sure that no-body is in their operating area.
• Never leave children or people requiring assistance alone In the vehicle when the ve-hicle is locked. The windows can no longer be opened In an emergency.
• Always take all vehicle keys with you ev-ery time you leave the vehicle. The windows can still be operated using the buttons sever-al minutes after the Ignition has been switch-ed off, provided that the driver door and front passenger door are not opened.
m One-touch opening and closing and the roii-L!J back function will not work if there is a fault in the electric windows. Go to a qualified workshop.
l"""l'l1 First read and observe the Introductory l-J,a,IJ Information and safety warnings & on page 55.
The roll-back function for the electric windows can reduce the risk of Injuries when the windows are closing :) &. If the one-touch closing function for a window does not work because it is stiff or is being obstructed, the window will automatically open again.
• Check to see why the window has not closed.
• Try to close the window again.
• If the window is again prevented from closing within approximately 10 seconds of the first at-tempt because it is stiff or obstructed, the automat-ic closing function is switched off for approximately 10 seconds.
• If the window is still obstructed, the window stops at this point. To close the window without the roll-back function, press the button again within 1 0 seconds :) &.
Closing the window without the roll-back function
• Try to close the window again within approxi-mately 10 seconds by holding the button. The roll-back function will be deactivated for a small section of the path of the closing window.
• If the closing procedure takes longer than ap-proximately 10 seconds, the roll-back function will be reactivated. The window will then stop again if it is stiff or meets another obstacle.
• Please go to a qualified workshop if the window still cannot be closed.
A WARNING
Closing the electric windows without the roll-back function could lead to severe Injuries.
• Always take care when closing electric windows. 11>
Opening and closing