check engine VOLVO 240 1990 Owner's Manual
[x] Cancel search | Manufacturer: VOLVO, Model Year: 1990, Model line: 240, Model: VOLVO 240 1990Pages: 143, PDF Size: 2.32 MB
Page 91 of 143
Volvo 1990 240 Model
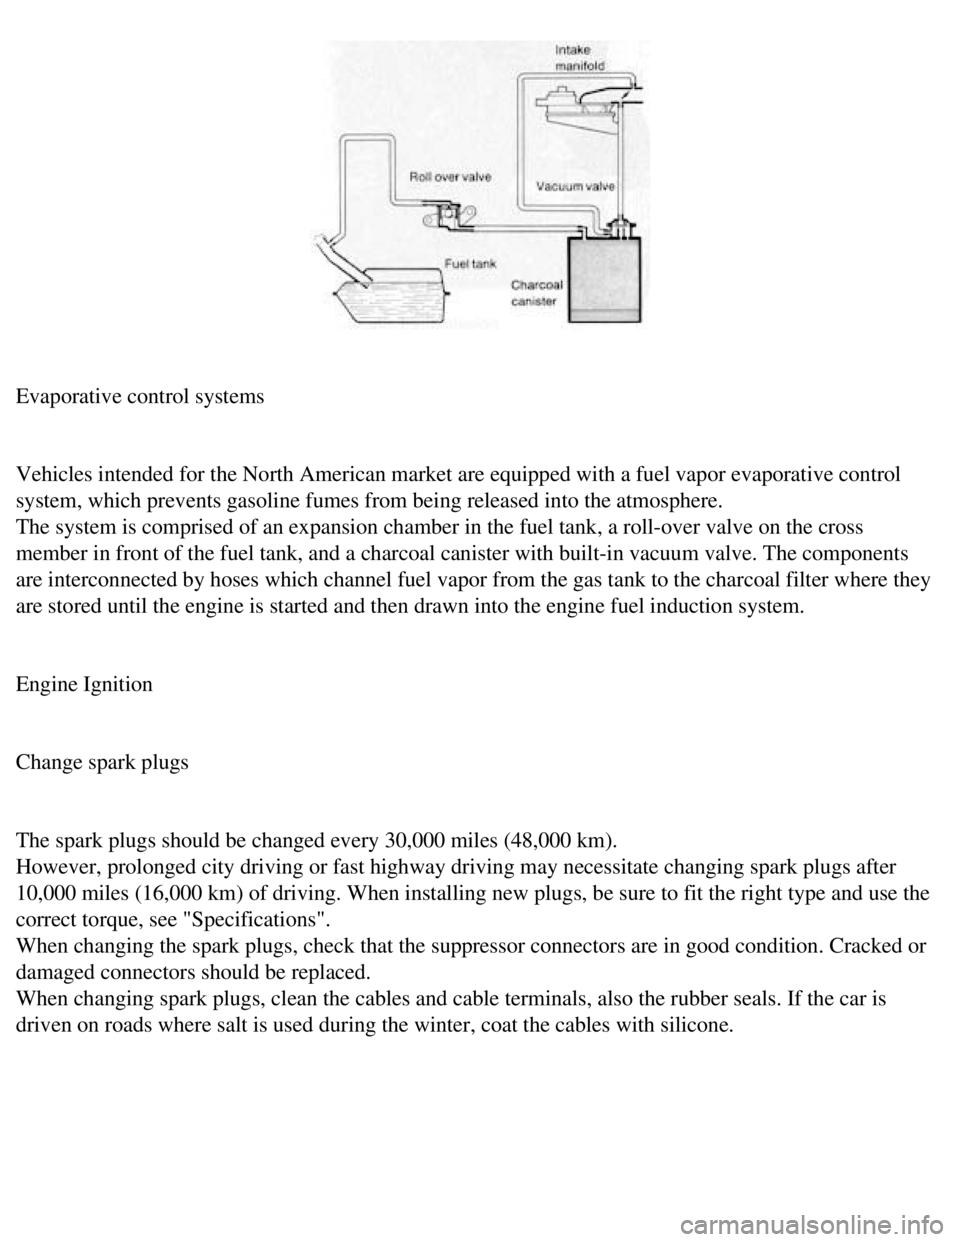
Evaporative control systems
Vehicles intended for the North American market are equipped with a fuel\
vapor evaporative control
system, which prevents gasoline fumes from being released into the atmos\
phere.
The system is comprised of an expansion chamber in the fuel tank, a roll\
-over valve on the cross
member in front of the fuel tank, and a charcoal canister with built-in \
vacuum valve. The components
are interconnected by hoses which channel fuel vapor from the gas tank t\
o the charcoal filter where they
are stored until the engine is started and then drawn into the engine fu\
el induction system.
Engine Ignition
Change spark plugs
The spark plugs should be changed every 30,000 miles (48,000 km).
However, prolonged city driving or fast highway driving may necessitate \
changing spark plugs after
10,000 miles (16,000 km) of driving. When installing new plugs, be sur\
e to fit the right type and use the
correct torque, see "Specifications".
When changing the spark plugs, check that the suppressor connectors are \
in good condition. Cracked or
damaged connectors should be replaced.
When changing spark plugs, clean the cables and cable terminals, also th\
e rubber seals. If the car is
driven on roads where salt is used during the winter, coat the cables wi\
th silicone.
file:///K|/ownersdocs/1990/1990_240/90240_14.htm (6 of 7)12/30/2006 8:\
25:08 AM
Page 94 of 143
Volvo 1990 240 Model
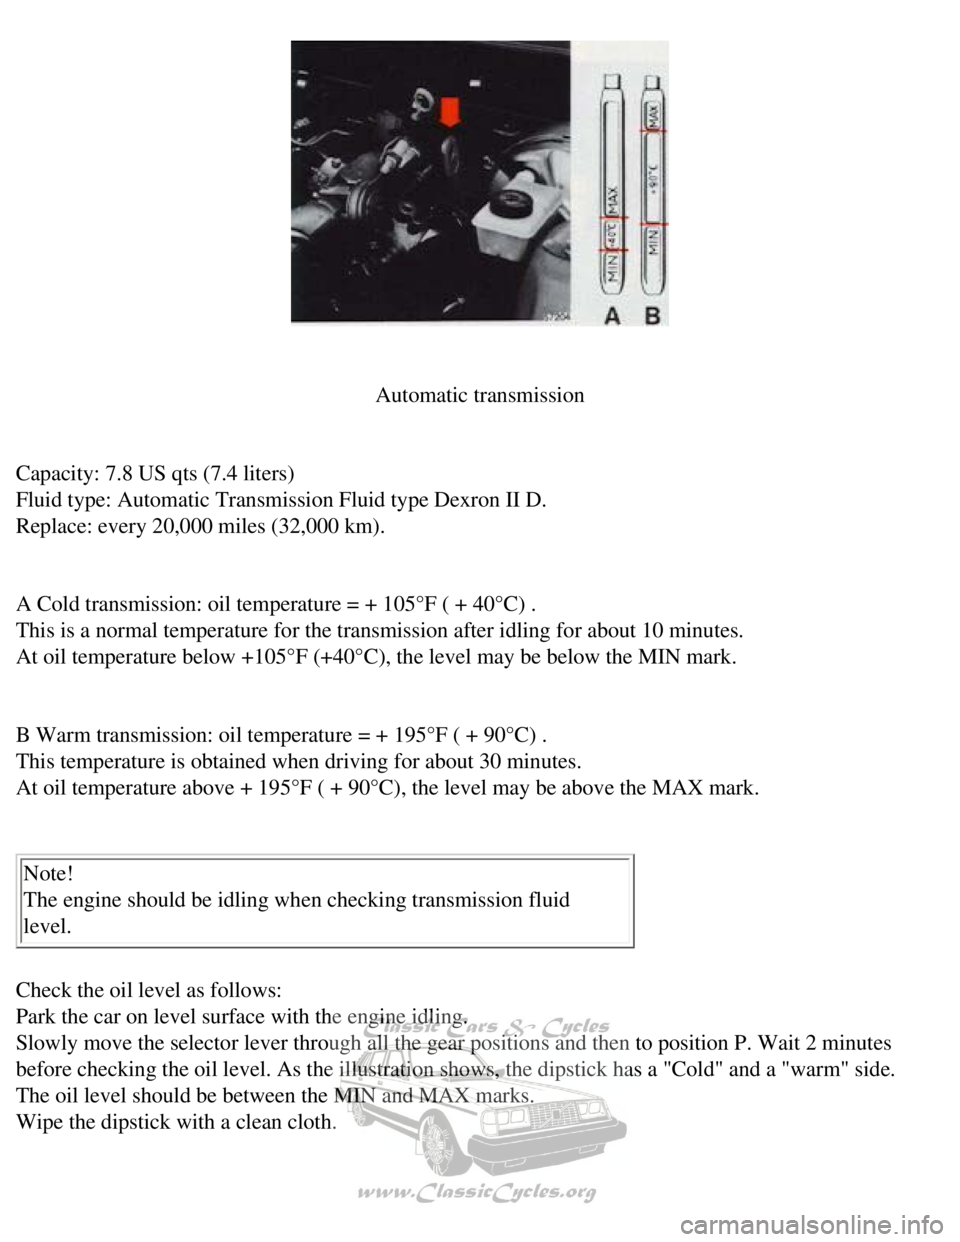
Automatic transmission
Capacity: 7.8 US qts (7.4 liters)
Fluid type: Automatic Transmission Fluid type Dexron II D.
Replace: every 20,000 miles (32,000 km).
A Cold transmission: oil temperature = + 105°F ( + 40°C) .
This is a normal temperature for the transmission after idling for about\
10 minutes.
At oil temperature below +105°F (+40°C), the level may be below \
the MIN mark.
B Warm transmission: oil temperature = + 195°F ( + 90°C) .
This temperature is obtained when driving for about 30 minutes.
At oil temperature above + 195°F ( + 90°C), the level may be abo\
ve the MAX mark.
Note!
The engine should be idling when checking transmission fluid
level.
Check the oil level as follows:
Park the car on level surface with the engine idling.
Slowly move the selector lever through all the gear positions and then t\
o position P. Wait 2 minutes
before checking the oil level. As the illustration shows, the dipstick h\
as a "Cold" and a "warm" side.
The oil level should be between the MIN and MAX marks.
Wipe the dipstick with a clean cloth.
file:///K|/ownersdocs/1990/1990_240/90240_15.htm (2 of 10)12/30/2006 8\
:25:09 AM
Page 99 of 143
Volvo 1990 240 Model
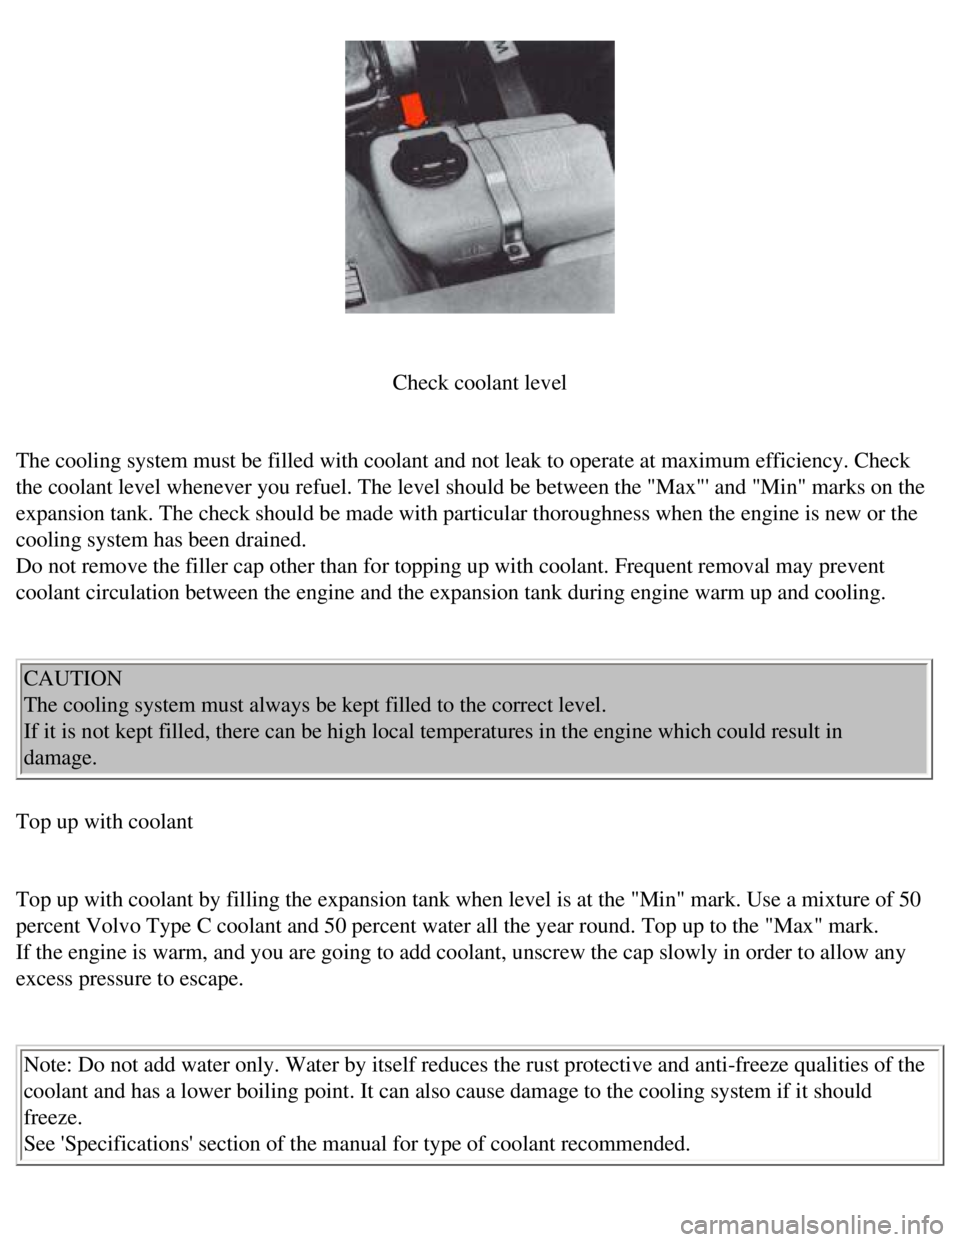
Check coolant level
The cooling system must be filled with coolant and not leak to operate a\
t maximum efficiency. Check
the coolant level whenever you refuel. The level should be between the "\
Max"' and "Min" marks on the
expansion tank. The check should be made with particular thoroughness wh\
en the engine is new or the
cooling system has been drained.
Do not remove the filler cap other than for topping up with coolant. Fre\
quent removal may prevent
coolant circulation between the engine and the expansion tank during eng\
ine warm up and cooling.
CAUTION
The cooling system must always be kept filled to the correct level.
If it is not kept filled, there can be high local temperatures in the en\
gine which could result in
damage.
Top up with coolant
Top up with coolant by filling the expansion tank when level is at the "\
Min" mark. Use a mixture of 50
percent Volvo Type C coolant and 50 percent water all the year round. To\
p up to the "Max" mark.
If the engine is warm, and you are going to add coolant, unscrew the cap\
slowly in order to allow any
excess pressure to escape.
Note: Do not add water only. Water by itself reduces the rust protective\
and anti-freeze qualities of the
coolant and has a lower boiling point. It can also cause damage to the c\
ooling system if it should
freeze.
See 'Specifications' section of the manual for type of coolant recommend\
ed.
file:///K|/ownersdocs/1990/1990_240/90240_15.htm (7 of 10)12/30/2006 8\
:25:09 AM
Page 100 of 143
Volvo 1990 240 Model
Cooling system
The risk of overheating is greatest, especially in hot weather, when:
- towing a trailer up steep inclines for prolonged periods at full throt\
tle, and at low engine rpm.
- idling for prolonged periods while the air conditioning system is in o\
peration.
- stopping the engine suddenly after high speed driving, so called after\
-boiling.
To avoid overheating. the following rules should be followed.
l Reduce speed and downshift when towing a trailer up long steep inclines.\
The risk of over heating can
be reduced by switching off the air conditioning system for a short whil\
e.
l Do not let the engine idle unnecessarily.
l Do not stop the engine immediately after high-speed driving, but allow t\
he engine to idle for 1/2 - 1
minute before switching off.
When the risk of overheating is imminent, or in the event of overheating\
, (the temperature gauge goes
repeatedly into, or stays continually in, the red section) the followin\
g precautions should be taken:
l Switch off the air conditioning system and switch the heater to full (m\
aximum) position.
l Stop the car and put the gear lever into neutral position-position N. Do\
not stop the engine!
l Increase the engine speed to approx. 2000 rpm (twice idling speed).
l Check the level of coolant in the expansion tank. Top-up, if necessary
pg. 75 Alternator, Jump starting
Electrical System cautions
When changing the battery or when carrying out work involving the electr\
ical system, the following
should be observed:
1 A battery connection to the wrong terminal will damage the diodes. Bef\
ore connections are made,
check the polarity of the battery with a voltmeter.
2 If booster batteries are used for starting, they must be properly conn\
ected to prevent the diodes from
being damaged. For correct connection, see "Jump starting".
3 The battery leads should be disconnected any time the battery is being\
charged.
file:///K|/ownersdocs/1990/1990_240/90240_15.htm (8 of 10)12/30/2006 8\
:25:09 AM
Page 101 of 143
Volvo 1990 240 Model
4 Never disconnect the battery circuit (for example, to change the batt\
ery) while the engine is running,
as this will immediately ruin the alternator. Always make sure that all \
the battery connections are
cleaned and properly tightened.
5 If any electrical welding work is performed on the vehicle, the ground\
lead and all the connecting
cables of the alternator must be disconnected and the welder wires place\
d as near the welding point as
possible.
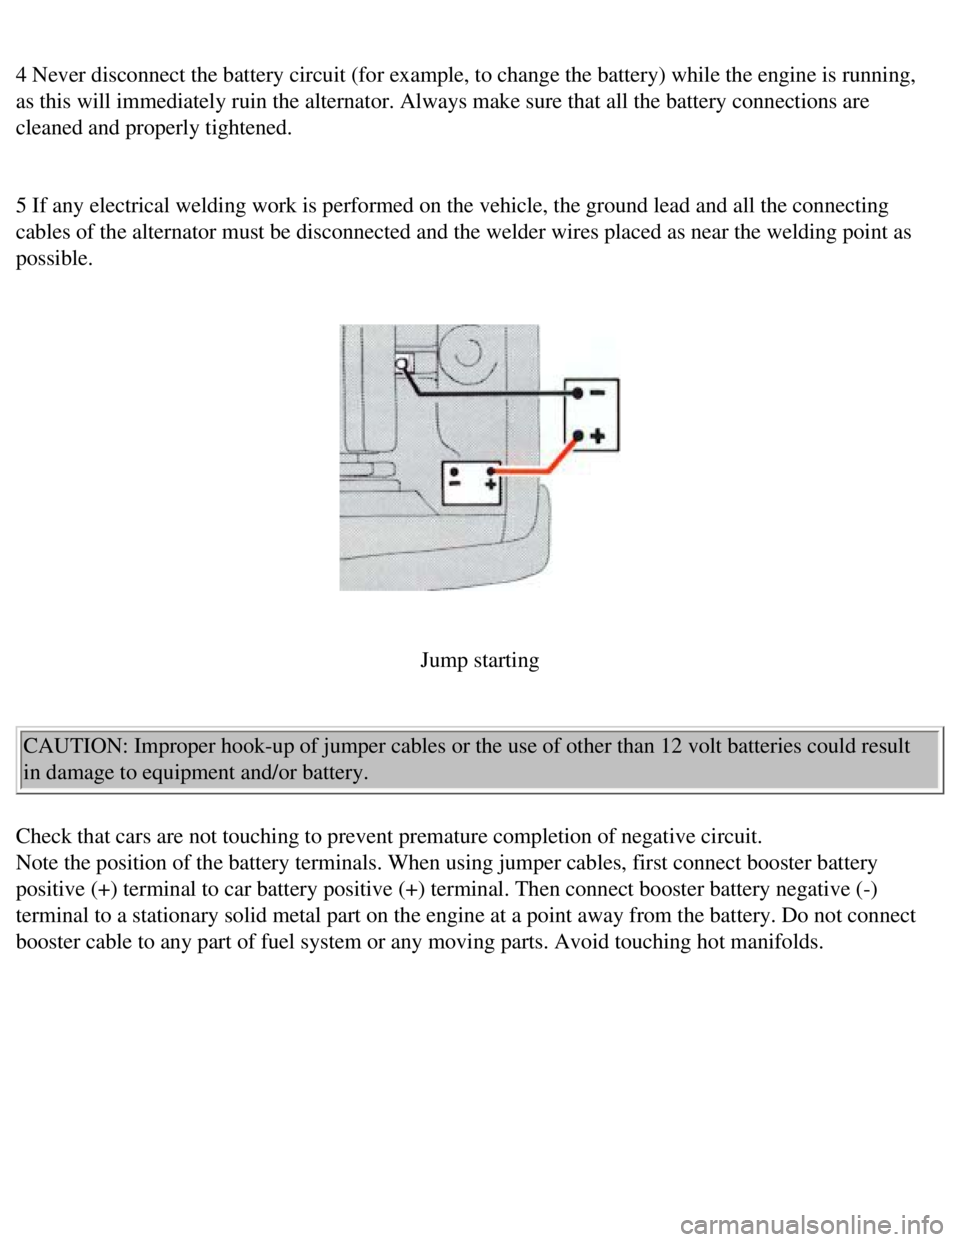
Jump starting
CAUTION: Improper hook-up of jumper cables or the use of other than 12 v\
olt batteries could result
in damage to equipment and/or battery.
Check that cars are not touching to prevent premature completion of nega\
tive circuit.
Note the position of the battery terminals. When using jumper cables, fi\
rst connect booster battery
positive (+) terminal to car battery positive (+) terminal. Then con\
nect booster battery negative (-)
terminal to a stationary solid metal part on the engine at a point away \
from the battery. Do not connect
booster cable to any part of fuel system or any moving parts. Avoid touc\
hing hot manifolds.
file:///K|/ownersdocs/1990/1990_240/90240_15.htm (9 of 10)12/30/2006 8\
:25:09 AM
Page 103 of 143
Volvo 1990 240 Model
pg. 76 Replacing bulbs
Replacing bulbs
The replacement of bulbs in the various lighting units is shown on the f\
ollowing pages. Make sure when
installing bulbs, that the guide pin on the socket fits into its corresp\
onding recess.
When installing bulbs, do not touch the glass with your fingers. The rea\
son for this is that grease, oil or
any other impurities can be carbonized onto the bulb and damage the refl\
ector.
Use bulbs of correct type and voltage. Failure to do so could activate t\
he bulb failure warning light.
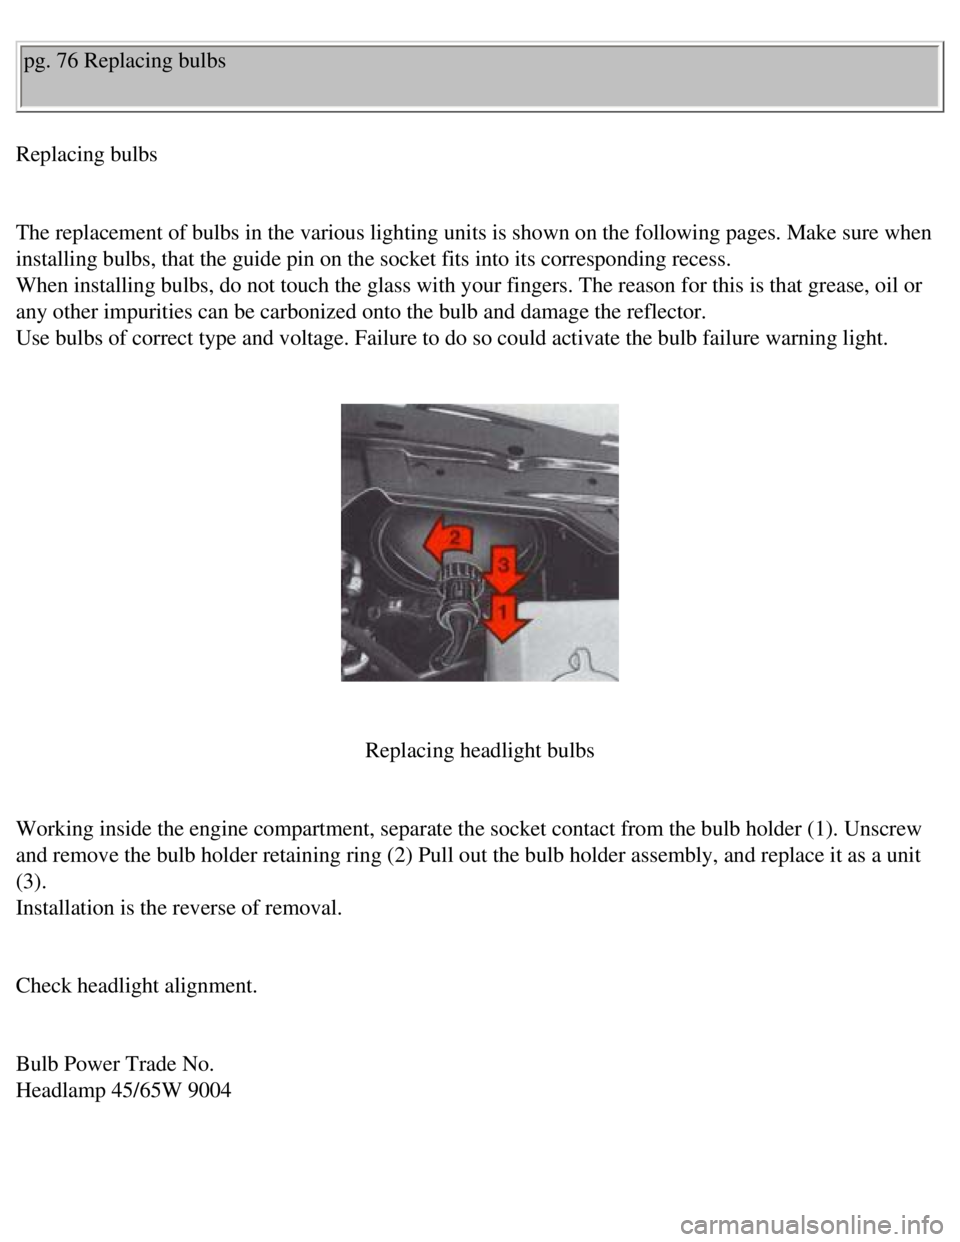
Replacing headlight bulbs
Working inside the engine compartment, separate the socket contact from \
the bulb holder (1). Unscrew
and remove the bulb holder retaining ring (2) Pull out the bulb holder\
assembly, and replace it as a unit
(3).
Installation is the reverse of removal.
Check headlight alignment.
Bulb Power Trade No.
Headlamp 45/65W 9004
file:///K|/ownersdocs/1990/1990_240/90240_16.htm (1 of 10)12/30/2006 8\
:25:10 AM
Page 111 of 143
Volvo 1990 240 Model
Remove screw holding the light assembly Lift it out to remove.
Replace the bulb.
Reinstall by first inserting the guides into one side, then press ir, th\
e light assembly and install the screw.
Bulb Power Socket
Engine compartment light 15 W S 8.5 - 8
Trunk light 15 W S 8.5 - 8
Instrument and heater control lighting
Due to the location of these bulbs their replacement should be carried o\
ut by a Volvo dealer. pg. 81 Fuses
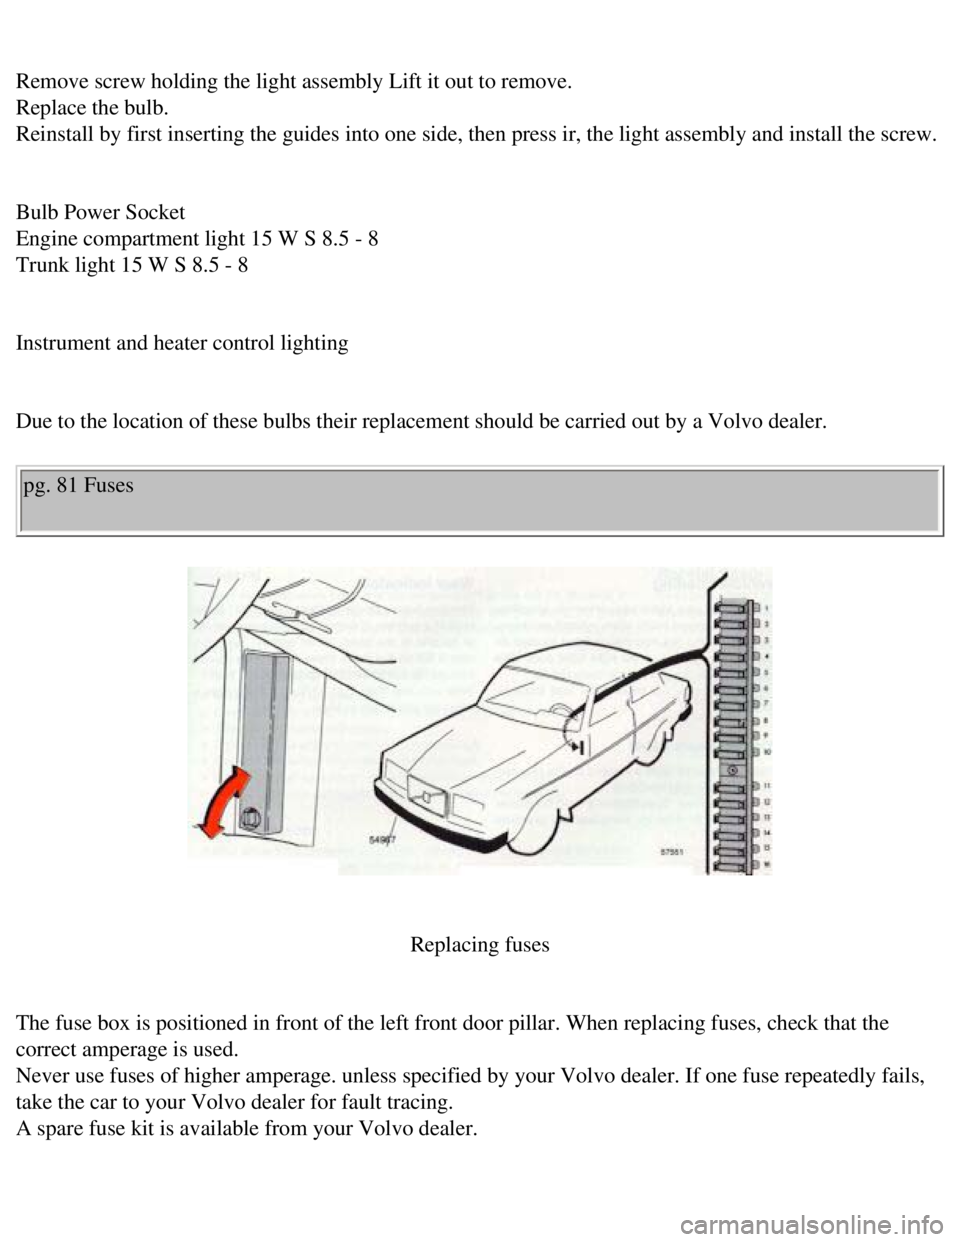
Replacing fuses
The fuse box is positioned in front of the left front door pillar. When \
replacing fuses, check that the
correct amperage is used.
Never use fuses of higher amperage. unless specified by your Volvo deale\
r. If one fuse repeatedly fails,
take the car to your Volvo dealer for fault tracing.
A spare fuse kit is available from your Volvo dealer.
file:///K|/ownersdocs/1990/1990_240/90240_16.htm (9 of 10)12/30/2006 8\
:25:10 AM
Page 118 of 143
Volvo 1990 240 Model
The floor mats should be vacuumed or brushed clean regularly, especially\
during the winter when they
should be taken out for drying.
Spots on textile mats can be removed with a mild detergent.
Anti-rust treatment
Your Volvo has been rust protected at the factory. On external surfaces \
a heavy coat of wear resistant
material has been used, while on the internal surfaces a lighter rust in\
hibitor is used.
The rust protection should be inspected regularly by your authorized Vol\
vo dealer. Consult the Volvo
Protection Limited Warranty found in your Warranty Information Booklet f\
or additional terms and
conditions.
For further information, see section titled "What causes rust" or see yo\
ur Volvo dealer. pg. 88 Paint touch-up
Paint touch-up
Paint damage requires immediate attention to avoid rusting. Make it a ha\
bit to check the finish regularly,
for instance when washing the car. Touch-up if necessary.
Paint repairs require special equipment and skill. Contact your Volvo de\
aler for any extensive damages.
Minor scratches can be repaired by using Volvo touch-up paint.
Note: When ordering touch-up paint from your Volvo dealer, use the paint\
code indicated on the
service label. The label is located on the wheel housing in the engine c\
ompartment.
Minor stone chips and scratches
Material:
Primer-can
Paint-can or touch-up bottle
file:///K|/ownersdocs/1990/1990_240/90240_18.htm (4 of 8)12/30/2006 8:\
25:11 AM
Page 123 of 143

Volvo 1990 240 Model
pg. 91 Long distance trips, Cold weather
Prior to a long distance trip
Have your car checked at a Volvo dealer. Preventive maintenance will hel\
p to ensure a trouble free trip.
Remember to take along a Volvo dealer directory.
The main items to check are listed below:
1. Brakes, front wheel alignment and steering gear.
2. Engine running condition.
3. Fuel system operation.
4. Oil leaks: engine, transmission, rear axle.
5. Cooling system for leaks or worn hoses.
6. Examine tires carefully, replace worn tires.
7. Battery and terminals.
8. Tool equipment.
9. Lighting.
10. Drive belts, for tightness and wear.
11. All fluid levels.
Cold weather/Engine fuel system
During the winter, large variations in temperature cause condensation to\
form in the fuel tank and can
impair the running of the engine. This can be reduced by adding dry gas \
to the fuel. There is less risk of
condensation forming in the fuel tank if it is kept full or nearly full.\
Engine cooling system
Volvo type C (blue-green) coolant should be used all year round. The c\
ooling system should always
contain water plus anti-freeze and rust inhibitor, even during the summe\
r. Experience has also shown
that extremely weak anti-freeze solutions (10-25 percent) are ineffect\
ive for rust protection. For this
reason, the quantity of antifreeze/summer coolant should be about 50 per\
cent of the solution. This
lowers the freezing point to - 30 ° F (-35 ° C).
Engine lubricating system
file:///K|/ownersdocs/1990/1990_240/90240_19.htm (1 of 7)12/30/2006 8:\
25:13 AM
Page 124 of 143
Volvo 1990 240 Model
During the winter, multigrade oil 10W-30 should be used in the engine. \
The viscosity of the engine oil is important. Oil with low viscosity (t\
hinner oil) improves cold-weather
starting as well as decreasing fuel consumption while the engine is warm\
ing up. To avoid difficult cold
start conditions (during extreme winter weather), use of 5W-30 oil, pa\
rticularly the synthetic type, is
recommended.
Be sure to use good quality oil but do not use this cold-weather oil for\
hard driving or in warm weather.
See section "Engine oil" for more information.
Electrical system
The electrical system is subject to greater stresses during the winter. \
Lighting and starter motor are used
more often. The battery capacity is reduced at low air temperature. The \
state of charge must be checked
more frequently, and if necessary the battery should be recharged. The b\
attery can freeze if the state of
charge is too low.
Windshield washers
Anti-freeze washer fluid should also be added to the washer fluid contai\
ner for the windshield and rear
window (tailgate, wagon model) washer.
This is particularly important during the winter because the windshield \
frequently becomes dirty and is
often splashed with water which freezes rapidly. This may necessitate th\
e frequent use of the windshield
washer and wipers. Your Volvo dealer can supply you with suitable anti-f\
reeze for this purpose. Suitable
mixtures of anti-freeze and water are:
Down to +14 ° F (-10 ° C) 1 part anti-freeze 4 parts water.
Down to + 7 ° F (-14 ° C) 1 part anti-freeze 3 parts water.
Down to 0 ° F (-18 ° C) 1 part anti-freeze 2 parts water.
Down to -18 ° F (-28 ° C) 1 part anti-freeze 1 part water.
Use Volvo Teflon lock spray or grease in the locks. They can be purchase\
d from your Volvo dealer
Note: Avoid the use of de-icing sprays as they can cause damage to the
locks.
pg. 92 Service diagnosis
The diagnoses outlined below are intended to serve only as a guide to lo\
cate and temporarily correct
minor faults. Causes of unsatisfactory performance should be investigate\
d and corrected by your Volvo
file:///K|/ownersdocs/1990/1990_240/90240_19.htm (2 of 7)12/30/2006 8:\
25:13 AM