sensor VOLVO C30 2008 User Guide
[x] Cancel search | Manufacturer: VOLVO, Model Year: 2008, Model line: C30, Model: VOLVO C30 2008Pages: 234, PDF Size: 4.8 MB
Page 21 of 234
National Customer Service
175 Gordon Baker Road
North York, Ontario M2H 2N7
1-800-663-8255
WARNING
No objects that add to the total weight on the seat should be placed on the front passenger's seat. If a child is
seated in the front passenger's seat with any additional weight, this extra weight could cause the OWS system to
enable the airbag, which might cause it to deploy in the event of a collision, thereby injuring the child.
The seat belt should never be wrapped around an object on the front passenger's seat. This could interfere with the
OWS system's function.
The front passenger's seat belt should never be used in a way that exerts more pressure on the passenger than
normal. This could increase the pressure exerted on the weight sensor by a child, and could result in the airbag being
enabled, which might cause it to deploy in the event of a collision, thereby injuring the child.
WARNING
Keep the following points in mind with respect to the OWS system. Failure to follow these instructions could
adversely affect the system's function and result in serious injury to the occupant of the front passenger's seat:
The full weight of the front seat passenger should always be on the seat cushion. The passenger should never lift
him/herself off the seat cushion using the armrest in the door or the center console, by pressing the feet on the floor,
by sitting on the edge of the seat cushion, or by pressing against the backrest in a way that reduces pressure on the
seat cushion. This could cause OWS to disable the passenger's side front airbag.
Do not place any type of object on the front passenger's seat in such a way that jamming, pressing, or squeezing
occurs between the object and the front seat, other than as a direct result of the correct use of the Automatic Locking
Retractor/Emergency Locking Retractor (ALR/ELR) seat belt (see page 32
).
No objects should be placed under the front passenger's seat. This could interfere with the OWS system's function.
25 01 Safety
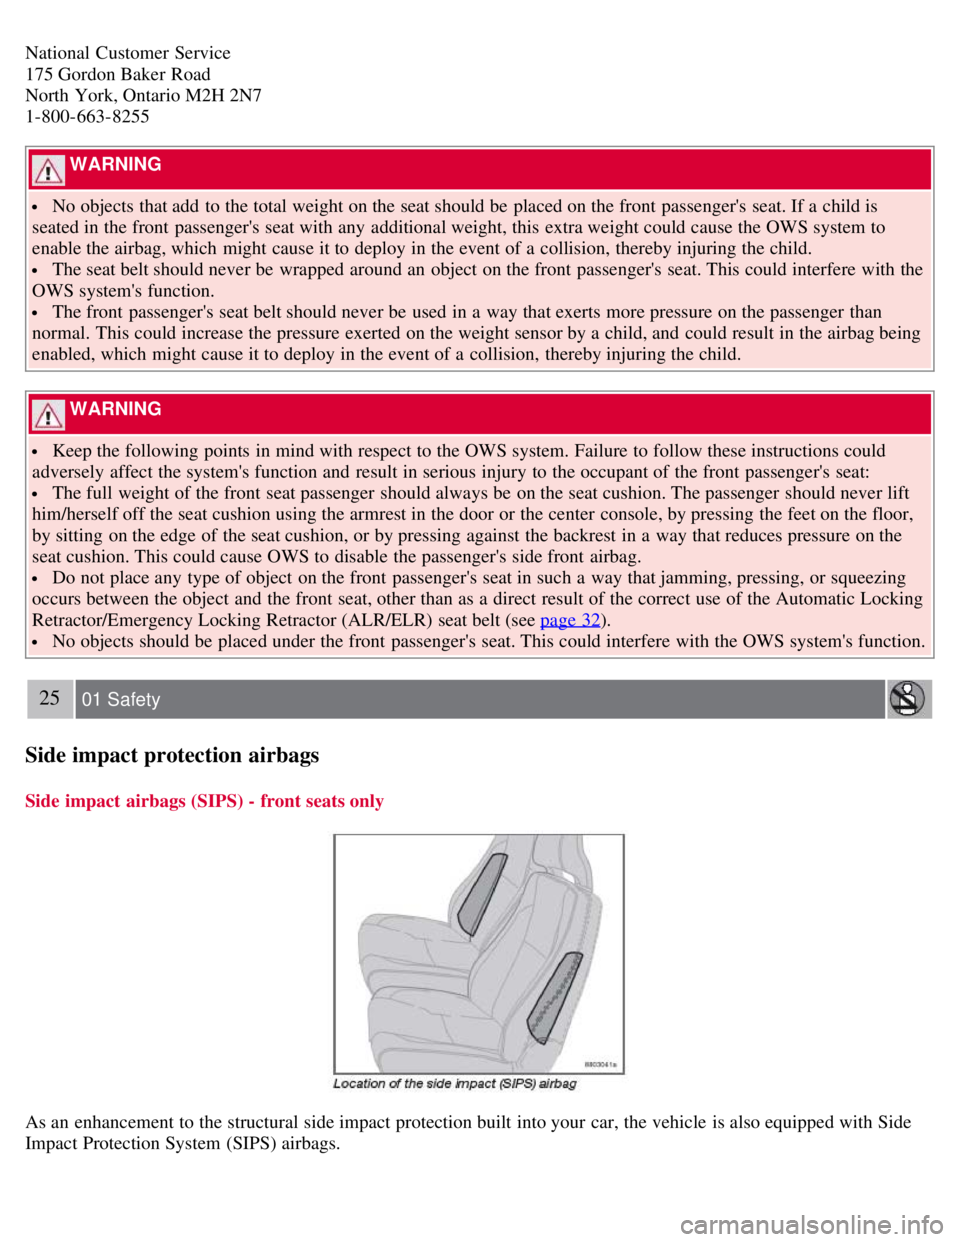
Side impact protection airbags
Side impact airbags (SIPS) - front seats only
As an enhancement to the structural side impact protection built into your car, the vehicle is also equipped with Side
Impact Protection System (SIPS) airbags.
Page 26 of 234
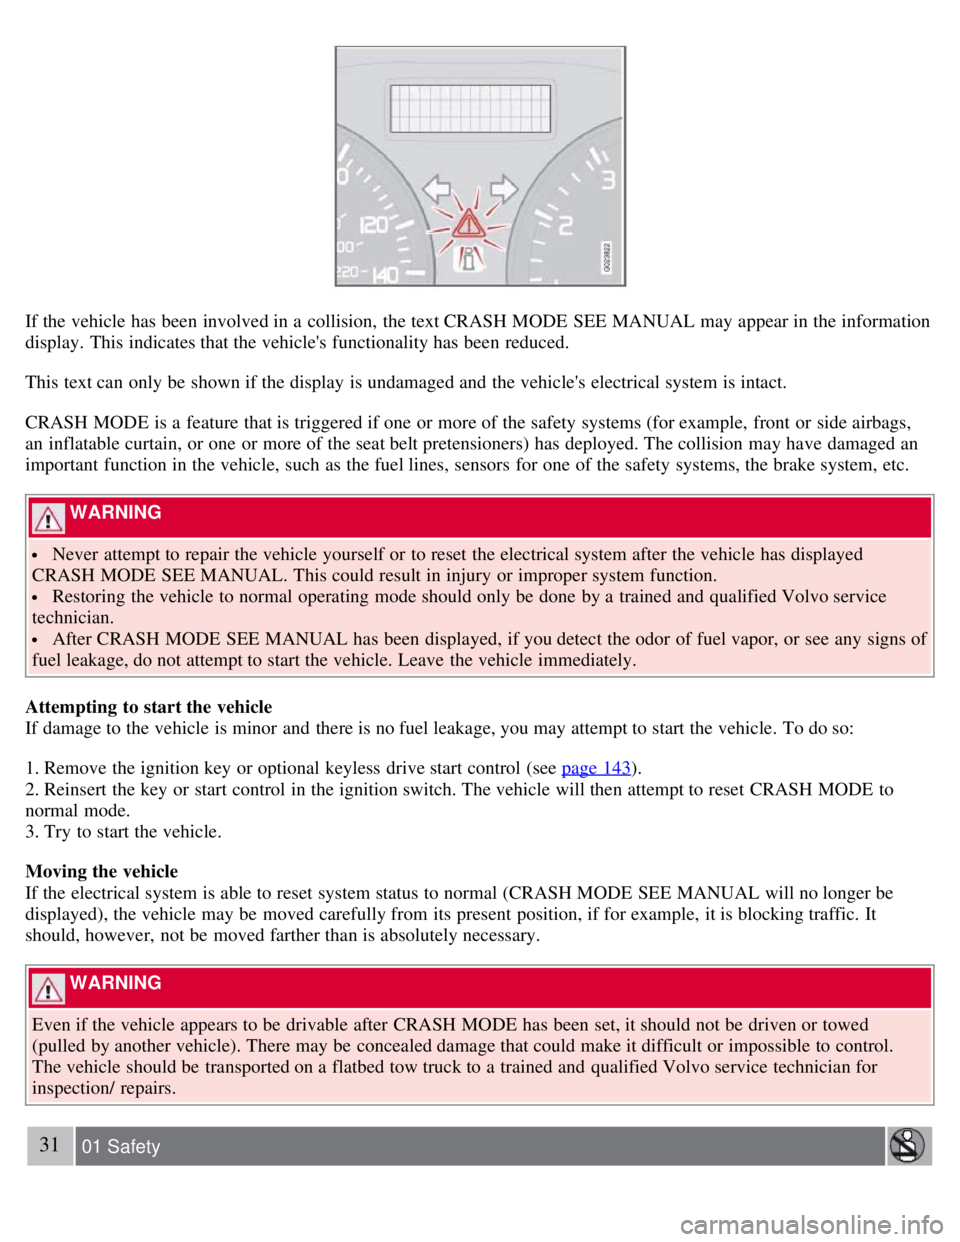
If the vehicle has been involved in a collision, the text CRASH MODE SEE MANUAL may appear in the information
display. This indicates that the vehicle's functionality has been reduced.
This text can only be shown if the display is undamaged and the vehicle's electrical system is intact.
CRASH MODE is a feature that is triggered if one or more of the safety systems (for example, front or side airbags,
an inflatable curtain, or one or more of the seat belt pretensioners) has deployed. The collision may have damaged an
important function in the vehicle, such as the fuel lines, sensors for one of the safety systems, the brake system, etc.
WARNING
Never attempt to repair the vehicle yourself or to reset the electrical system after the vehicle has displayed
CRASH MODE SEE MANUAL. This could result in injury or improper system function.
Restoring the vehicle to normal operating mode should only be done by a trained and qualified Volvo service
technician.
After CRASH MODE SEE MANUAL has been displayed, if you detect the odor of fuel vapor, or see any signs of
fuel leakage, do not attempt to start the vehicle. Leave the vehicle immediately.
Attempting to start the vehicle
If damage to the vehicle is minor and there is no fuel leakage, you may attempt to start the vehicle. To do so:
1. Remove the ignition key or optional keyless drive start control (see page 143
).
2. Reinsert the key or start control in the ignition switch. The vehicle will then attempt to reset CRASH MODE to
normal mode.
3. Try to start the vehicle.
Moving the vehicle
If the electrical system is able to reset system status to normal (CRASH MODE SEE MANUAL will no longer be
displayed), the vehicle may be moved carefully from its present position, if for example, it is blocking traffic. It
should, however, not be moved farther than is absolutely necessary.
WARNING
Even if the vehicle appears to be drivable after CRASH MODE has been set, it should not be driven or towed
(pulled by another vehicle). There may be concealed damage that could make it difficult or impossible to control.
The vehicle should be transported on a flatbed tow truck to a trained and qualified Volvo service technician for
inspection/ repairs.
31 01 Safety
Page 29 of 234
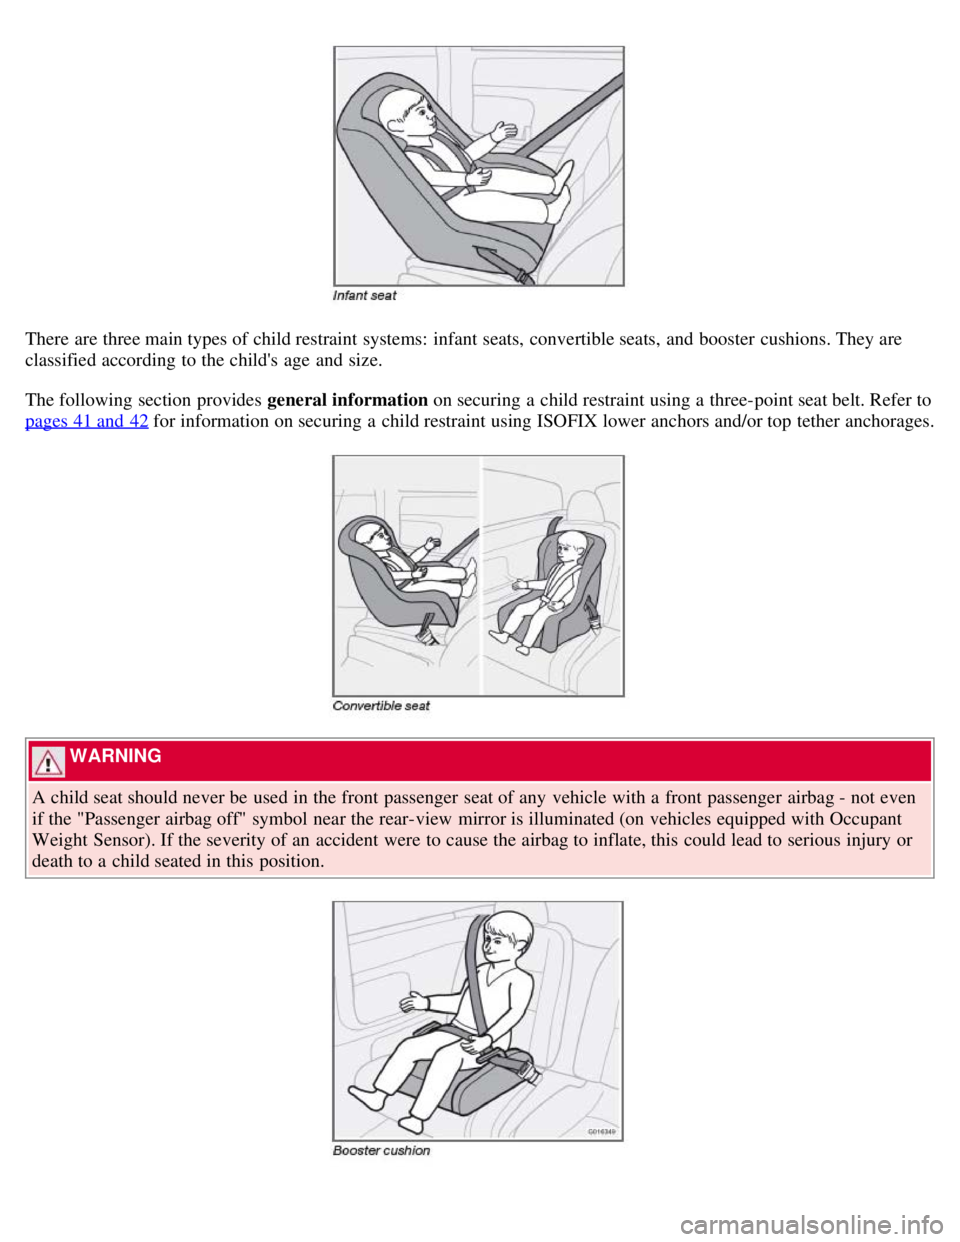
There are three main types of child restraint systems: infant seats, convertible seats, and booster cushions. They are
classified according to the child's age and size.
The following section provides general information on securing a child restraint using a three-point seat belt. Refer to
pages 41 and 42
for information on securing a child restraint using ISOFIX lower anchors and/or top tether anchorages.
WARNING
A child seat should never be used in the front passenger seat of any vehicle with a front passenger airbag - not even
if the "Passenger airbag off" symbol near the rear-view mirror is illuminated (on vehicles equipped with Occupant
Weight Sensor). If the severity of an accident were to cause the airbag to inflate, this could lead to serious injury or
death to a child seated in this position.
Page 31 of 234
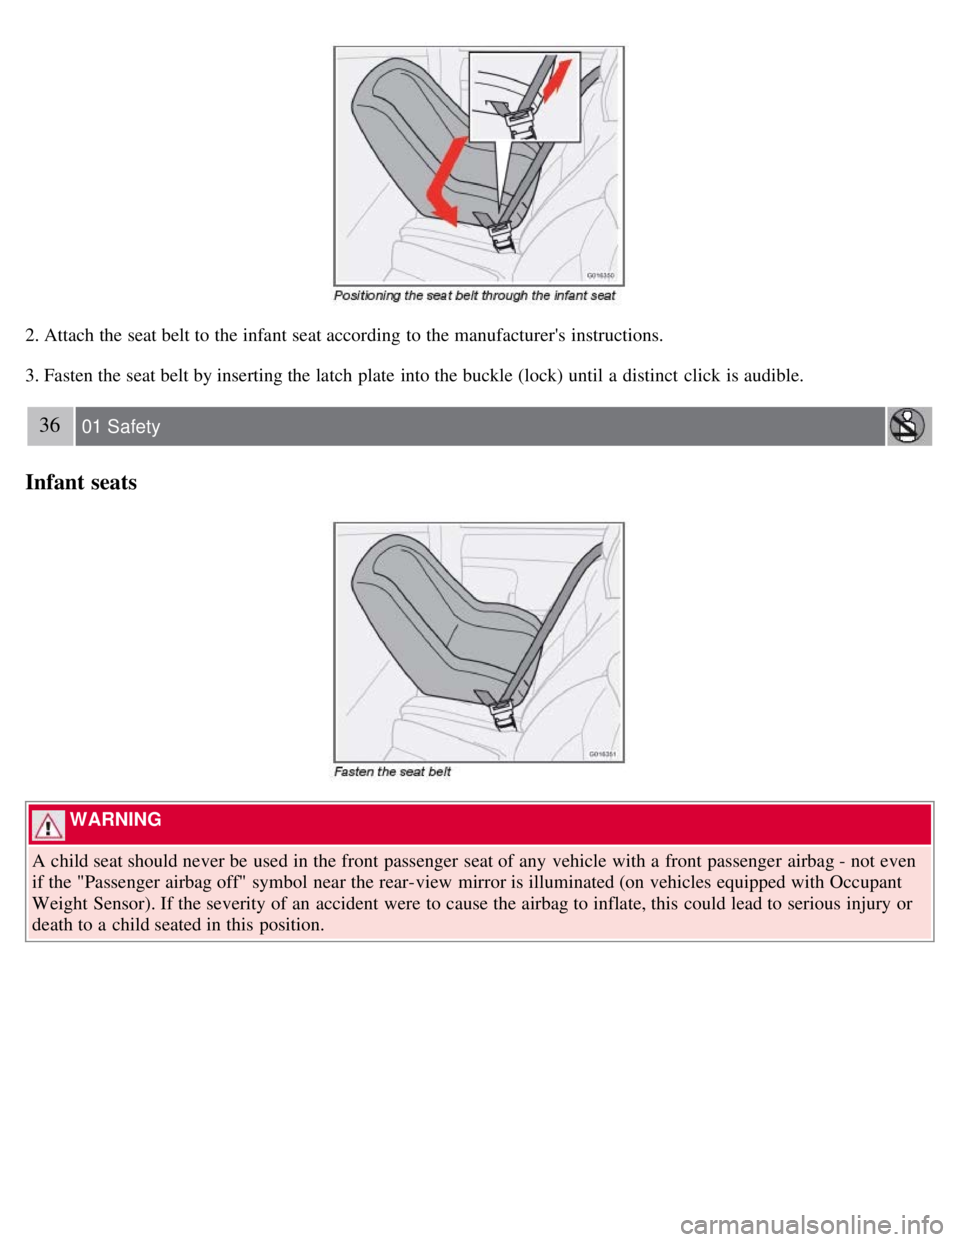
2. Attach the seat belt to the infant seat according to the manufacturer's instructions.
3. Fasten the seat belt by inserting the latch plate into the buckle (lock) until a distinct click is audible.
36 01 Safety
Infant seats
WARNING
A child seat should never be used in the front passenger seat of any vehicle with a front passenger airbag - not even
if the "Passenger airbag off" symbol near the rear-view mirror is illuminated (on vehicles equipped with Occupant
Weight Sensor). If the severity of an accident were to cause the airbag to inflate, this could lead to serious injury or
death to a child seated in this position.
Page 35 of 234
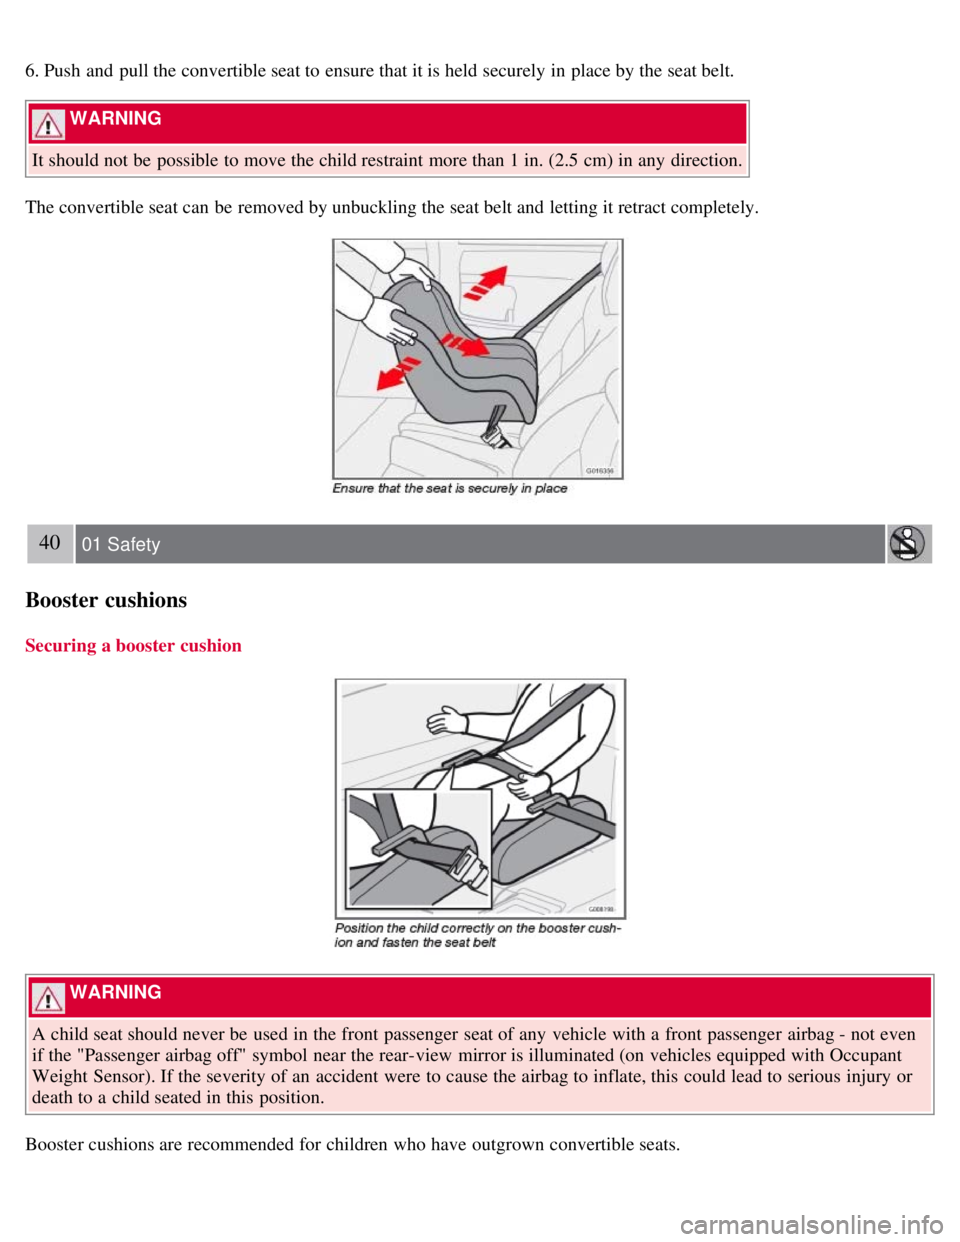
6. Push and pull the convertible seat to ensure that it is held securely in place by the seat belt.
WARNING
It should not be possible to move the child restraint more than 1 in. (2.5 cm) in any direction.
The convertible seat can be removed by unbuckling the seat belt and letting it retract completely.
40 01 Safety
Booster cushions
Securing a booster cushion
WARNING
A child seat should never be used in the front passenger seat of any vehicle with a front passenger airbag - not even
if the "Passenger airbag off" symbol near the rear-view mirror is illuminated (on vehicles equipped with Occupant
Weight Sensor). If the severity of an accident were to cause the airbag to inflate, this could lead to serious injury or
death to a child seated in this position.
Booster cushions are recommended for children who have outgrown convertible seats.
Page 41 of 234
47 02 Instruments and controls
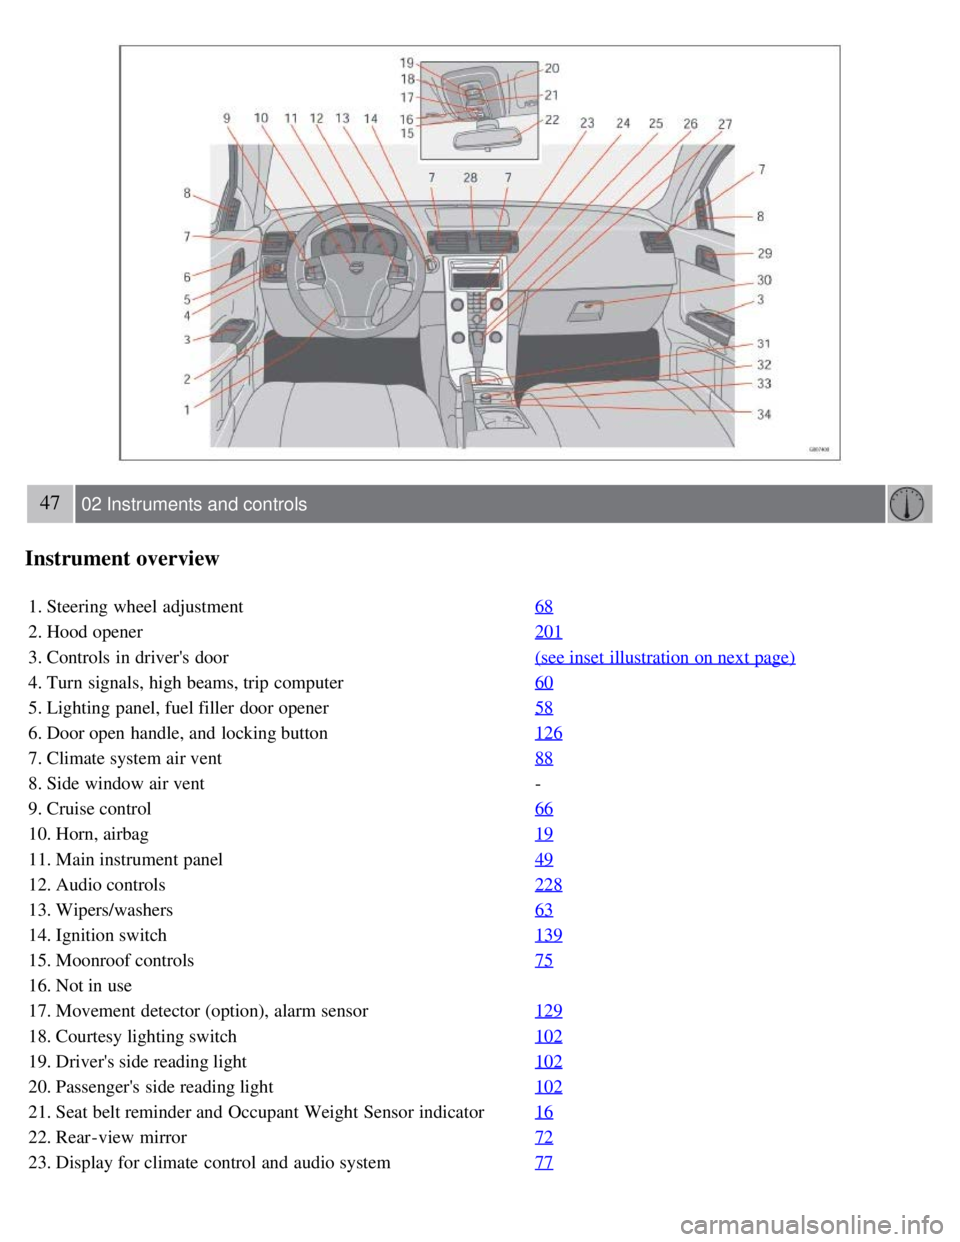
Instrument overview
1. Steering wheel adjustment68
2. Hood opener201
3. Controls in driver's door(see inset illustration on next page)
4. Turn signals, high beams, trip computer60
5. Lighting panel, fuel filler door opener58
6. Door open handle, and locking button126
7. Climate system air vent88
8. Side window air vent-
9. Cruise control 66
10. Horn, airbag19
11. Main instrument panel49
12. Audio controls228
13. Wipers/washers63
14. Ignition switch139
15. Moonroof controls75
16. Not in use
17. Movement detector (option), alarm sensor129
18. Courtesy lighting switch102
19. Driver's side reading light102
20. Passenger's side reading light102
21. Seat belt reminder and Occupant Weight Sensor indicator16
22. Rear-view mirror72
23. Display for climate control and audio system77
Page 43 of 234
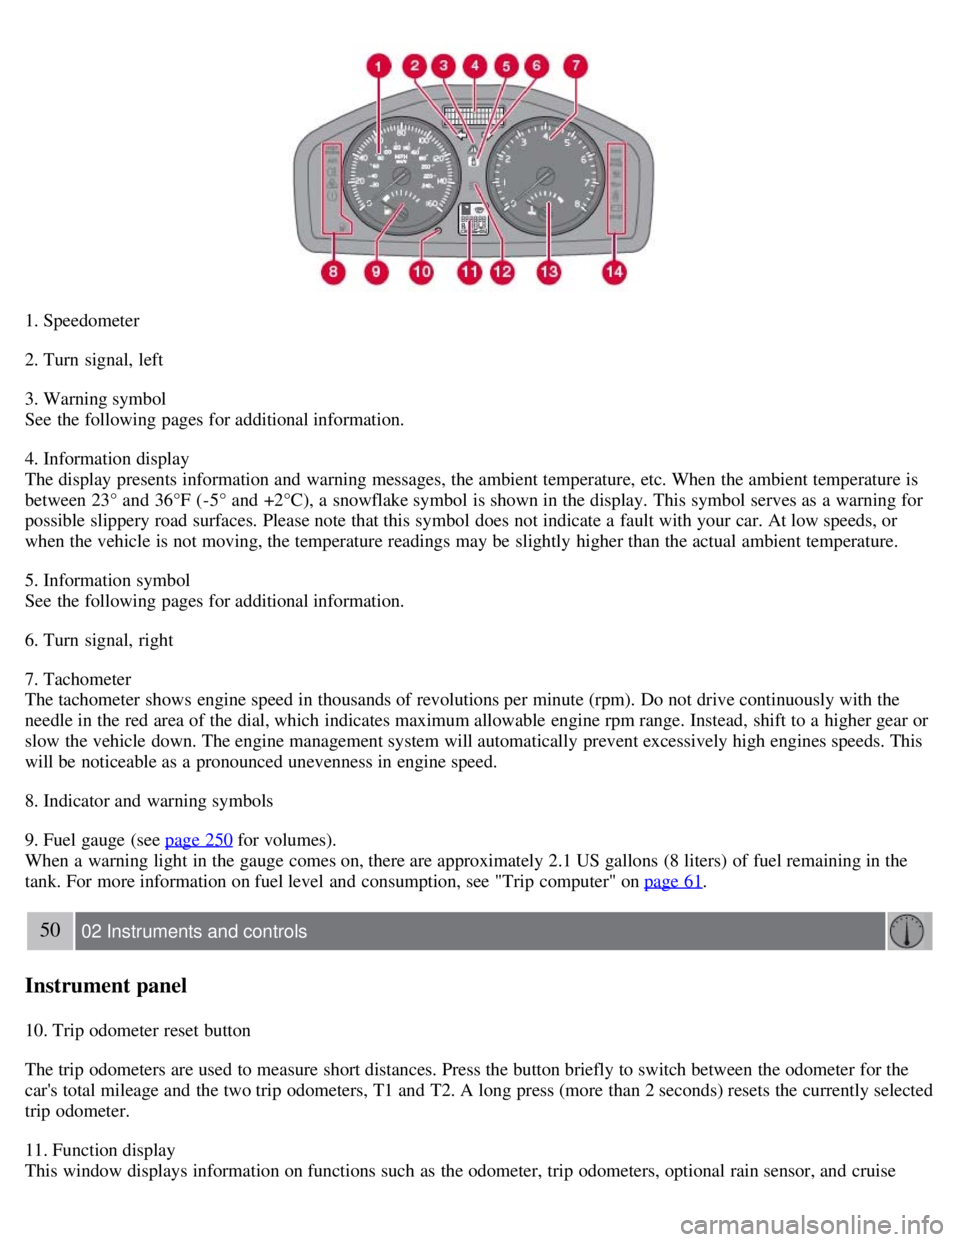
1. Speedometer
2. Turn signal, left
3. Warning symbol
See the following pages for additional information.
4. Information display
The display presents information and warning messages, the ambient temperature, etc. When the ambient temperature is
between 23° and 36°F (-5° and +2°C), a snowflake symbol is shown in the display. This symbol serves as a warning for
possible slippery road surfaces. Please note that this symbol does not indicate a fault with your car. At low speeds, or
when the vehicle is not moving, the temperature readings may be slightly higher than the actual ambient temperature.
5. Information symbol
See the following pages for additional information.
6. Turn signal, right
7. Tachometer
The tachometer shows engine speed in thousands of revolutions per minute (rpm). Do not drive continuously with the
needle in the red area of the dial, which indicates maximum allowable engine rpm range. Instead, shift to a higher gear or
slow the vehicle down. The engine management system will automatically prevent excessively high engines speeds. This
will be noticeable as a pronounced unevenness in engine speed.
8. Indicator and warning symbols
9. Fuel gauge (see page 250
for volumes).
When a warning light in the gauge comes on, there are approximately 2.1 US gallons (8 liters) of fuel remaining in the
tank. For more information on fuel level and consumption, see "Trip computer" on page 61
.
50 02 Instruments and controls
Instrument panel
10. Trip odometer reset button
The trip odometers are used to measure short distances. Press the button briefly to switch between the odometer for the
car's total mileage and the two trip odometers, T1 and T2. A long press (more than 2 seconds) resets the currently selected
trip odometer.
11. Function display
This window displays information on functions such as the odometer, trip odometers, optional rain sensor, and cruise
Page 56 of 234
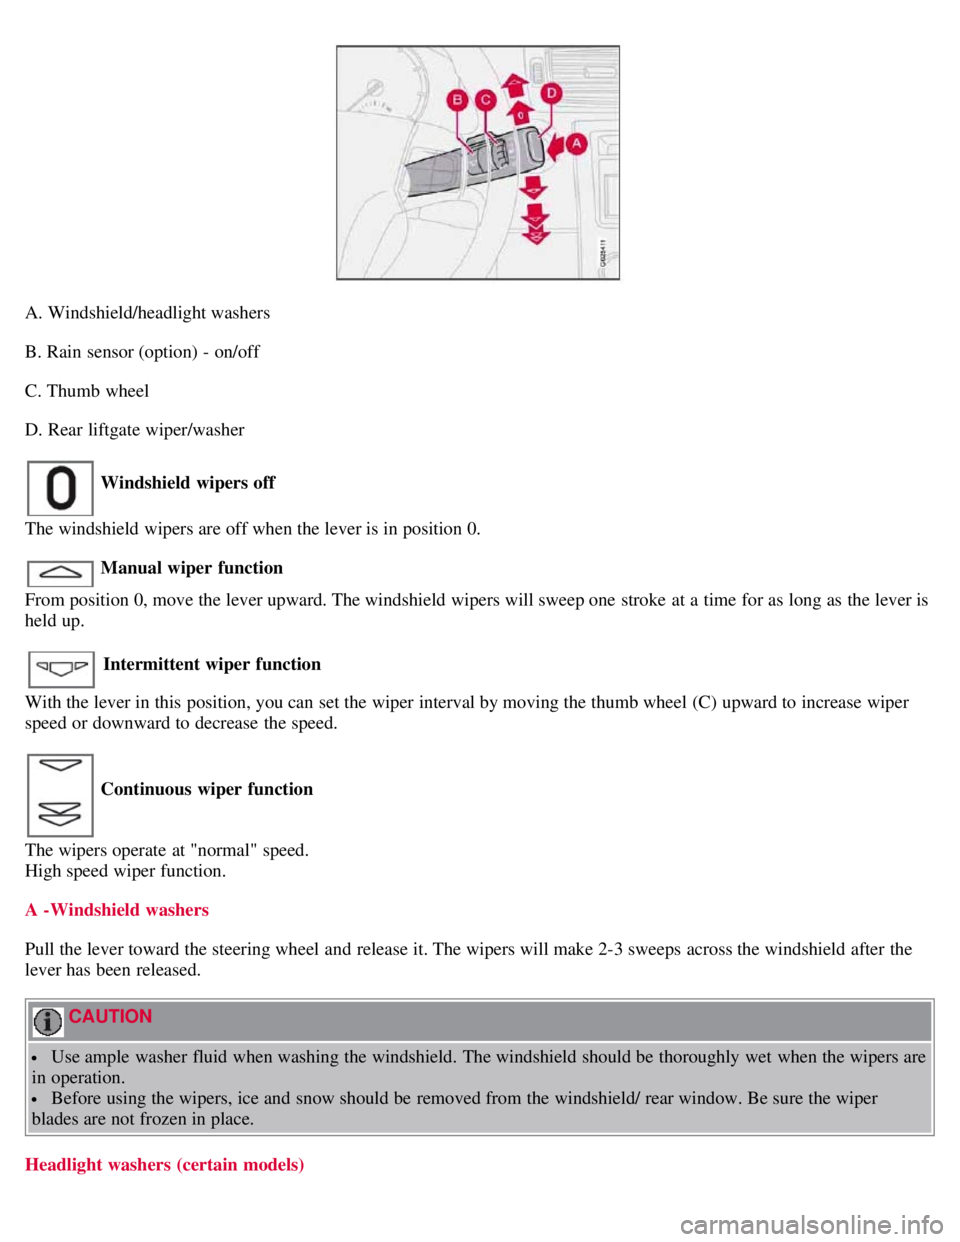
A. Windshield/headlight washers
B. Rain sensor (option) - on/off
C. Thumb wheel
D. Rear liftgate wiper/washer
Windshield wipers off
The windshield wipers are off when the lever is in position 0.
Manual wiper function
From position 0, move the lever upward. The windshield wipers will sweep one stroke at a time for as long as the lever is
held up.
Intermittent wiper function
With the lever in this position, you can set the wiper interval by moving the thumb wheel (C) upward to increase wiper
speed or downward to decrease the speed.
Continuous wiper function
The wipers operate at "normal" speed.
High speed wiper function.
A -Windshield washers
Pull the lever toward the steering wheel and release it. The wipers will make 2-3 sweeps across the windshield after the
lever has been released.
CAUTION
Use ample washer fluid when washing the windshield. The windshield should be thoroughly wet when the wipers are
in operation.
Before using the wipers, ice and snow should be removed from the windshield/ rear window. Be sure the wiper
blades are not frozen in place.
Headlight washers (certain models)
Page 57 of 234
When the lever has been pulled, high pressure jets mounted in the bumper will spray the headlights.
The following applies to conserve washer fluid (see page 58
for information on the light switch positions):
Low/high beam headlights on
The headlights will be washed the first time the windshield is washed. Thereafter, the headlights will only be washed once
for every five times the windshield is washed within a 10-minute period.
64 02 Instruments and controls
Right-side steering wheel lever
Parking lights on
Optional Bi -Xenon® headlights will be washed once for every five times the windshield is washed.
Normal halogen headlights will not be washed.
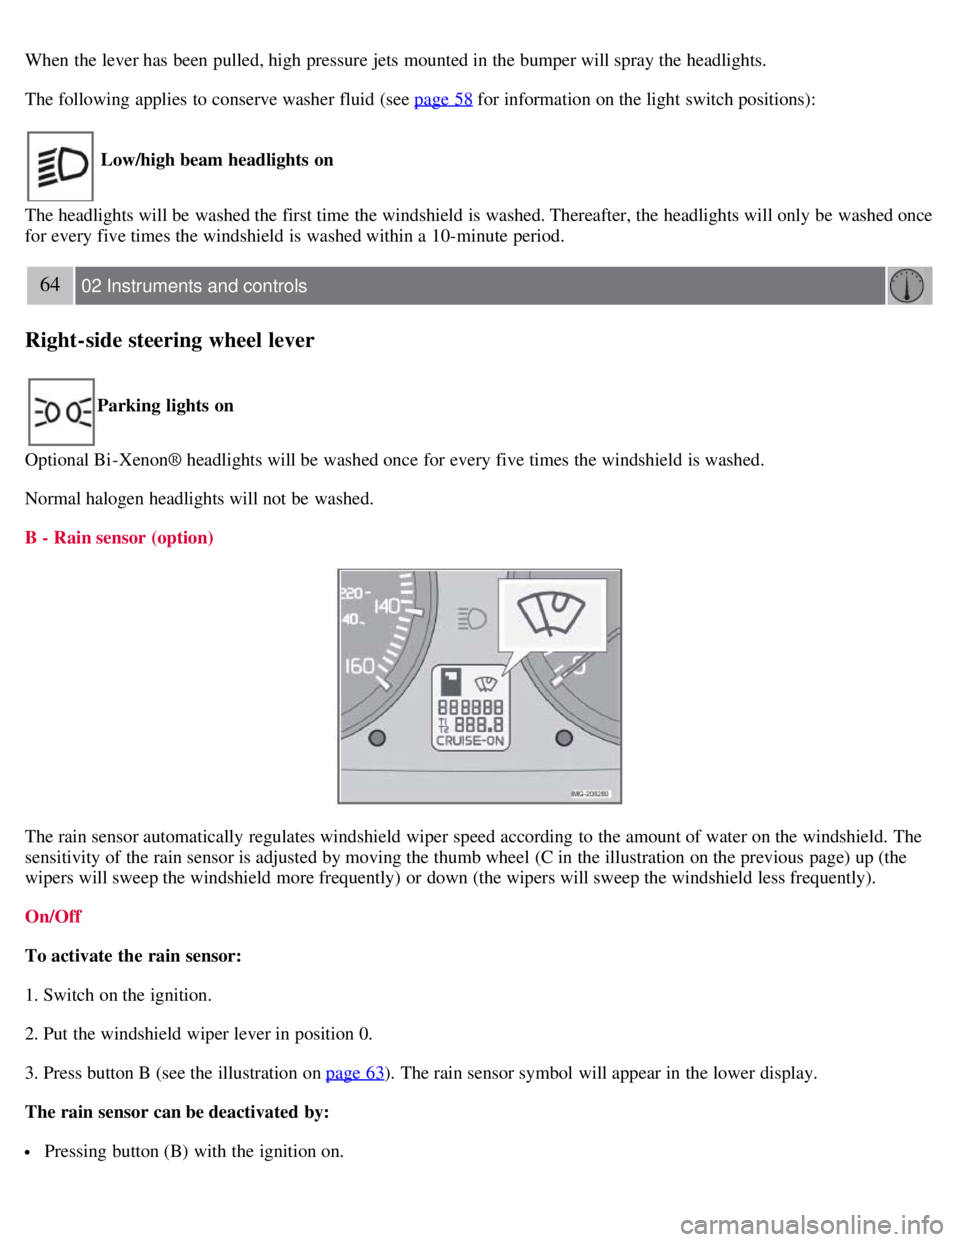
B - Rain sensor (option)
The rain sensor automatically regulates windshield wiper speed according to the amount of water on the windshield. The
sensitivity of the rain sensor is adjusted by moving the thumb wheel (C in the illustration on the previous page) up (the
wipers will sweep the windshield more frequently) or down (the wipers will sweep the windshield less frequently).
On/Off
To activate the rain sensor:
1. Switch on the ignition.
2. Put the windshield wiper lever in position 0.
3. Press button B (see the illustration on page 63
). The rain sensor symbol will appear in the lower display.
The rain sensor can be deactivated by:
Pressing button (B) with the ignition on.
Page 58 of 234
or
Moving the windshield wiper lever down. If the lever is moved up, the rain sensor function will remain activated
CAUTION
The rain sensor should be deactivated when washing the vehicle in an automatic car wash, etc. If the rain sensor
function is left on, the wipers will start inadvertently in the car wash and could be damaged.
The rain sensor is automatically deactivated:
When the key is removed from the ignition.
Five minutes after the ignition is switched off if the key is left in the ignition.
C - Thumb wheel
The thumb wheel is used to set the wiper interval when intermittent wiping is selected, or the sensitivity to the amount of
rain on the windshield when the rain sensor is selected. Move the wheel upward or downward to increase/decrease wiper
speed when the intermittent function is selected, or to increase/decrease the optional rain sensor's sensitivity when this
function is activated.
D - Rear liftgate wiper/washer
Press the lever forward to wipe and wash the liftgate window. The wiper will sweep the window several times after the
lever has been released.
The button at the end of the lever has three positions:
Intermittent wiping
Press in the upper section of the button.
Normal wiper speed
Press in the lower section of the button.
Neutral position
The wiper function is switched off.
65 02 Instruments and controls
Right-side steering wheel lever
Rear liftgate wiper and reverse gear
If the front wipers are on and the transmission is put into reverse gear, the liftgate wiper will be activated.
If the transmission is in reverse and the manual windshield wiper function is used (the lever is pushed upward), the
liftgate wiper will also be activated for as long the lever is held up.
If the liftgate wiper is already in normal wiping function, the normal wiping function will continue.
66 02 Instruments and controls
Cruise control (option)
Engaging the cruise control function