belt VOLVO C30 2008 Owner's Guide
[x] Cancel search | Manufacturer: VOLVO, Model Year: 2008, Model line: C30, Model: VOLVO C30 2008Pages: 234, PDF Size: 4.8 MB
Page 47 of 234
stabilize the car. See page 150 for more detailed information.
5. Not in use
6. Fuel level warning light
When this light comes on, there are approximately 2.1 US gallons (8 liters) of fuel remaining in the tank.
54 02 Instruments and controls
Instrument and warning symbols
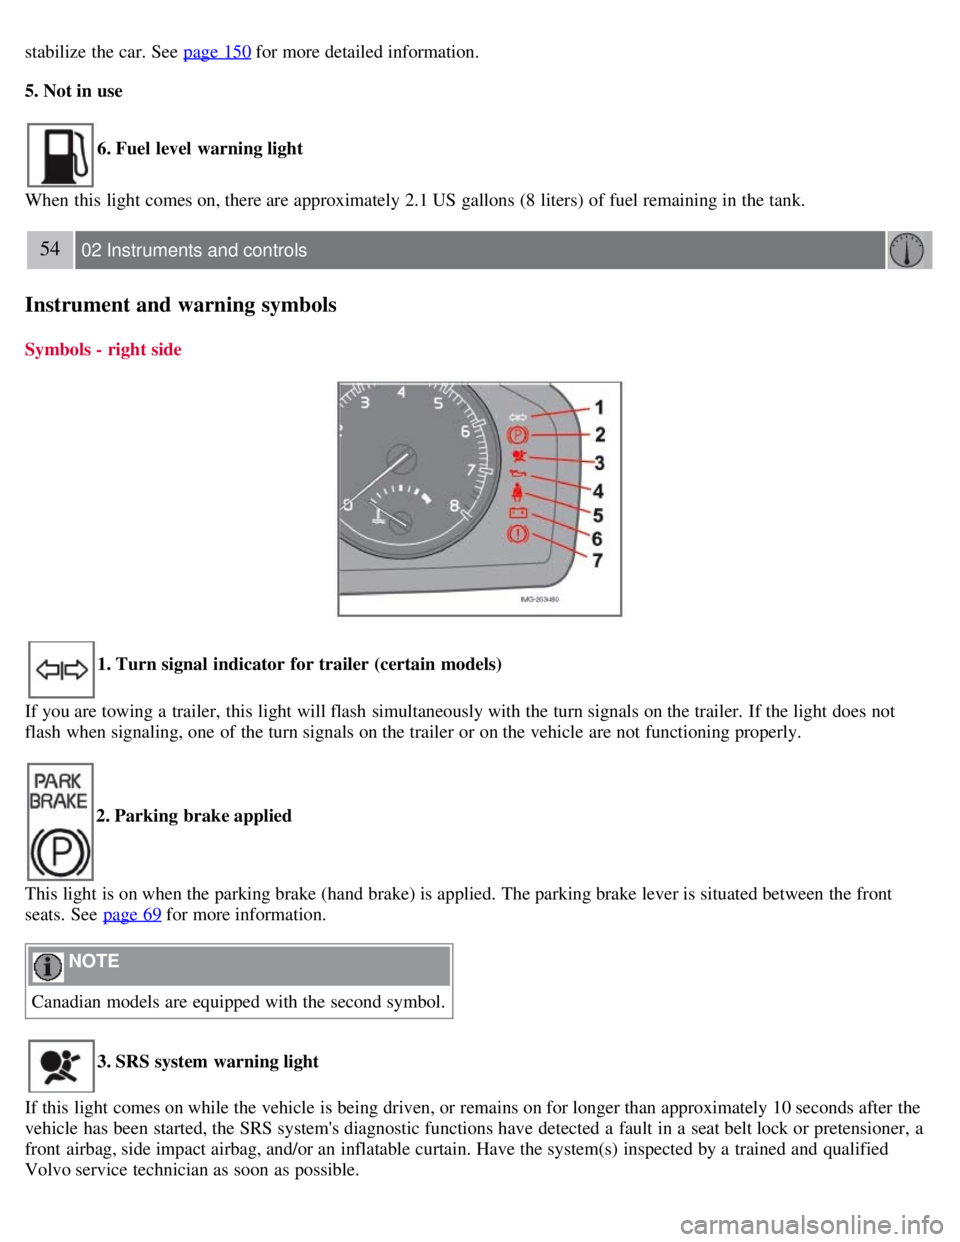
Symbols - right side
1. Turn signal indicator for trailer (certain models)
If you are towing a trailer, this light will flash simultaneously with the turn signals on the trailer. If the light does not
flash when signaling, one of the turn signals on the trailer or on the vehicle are not functioning properly.
2. Parking brake applied
This light is on when the parking brake (hand brake) is applied. The parking brake lever is situated between the front
seats. See page 69
for more information.
NOTE
Canadian models are equipped with the second symbol.
3. SRS system warning light
If this light comes on while the vehicle is being driven, or remains on for longer than approximately 10 seconds after the
vehicle has been started, the SRS system's diagnostic functions have detected a fault in a seat belt lock or pretensioner, a
front airbag, side impact airbag, and/or an inflatable curtain. Have the system(s) inspected by a trained and qualified
Volvo service technician as soon as possible.
Page 48 of 234
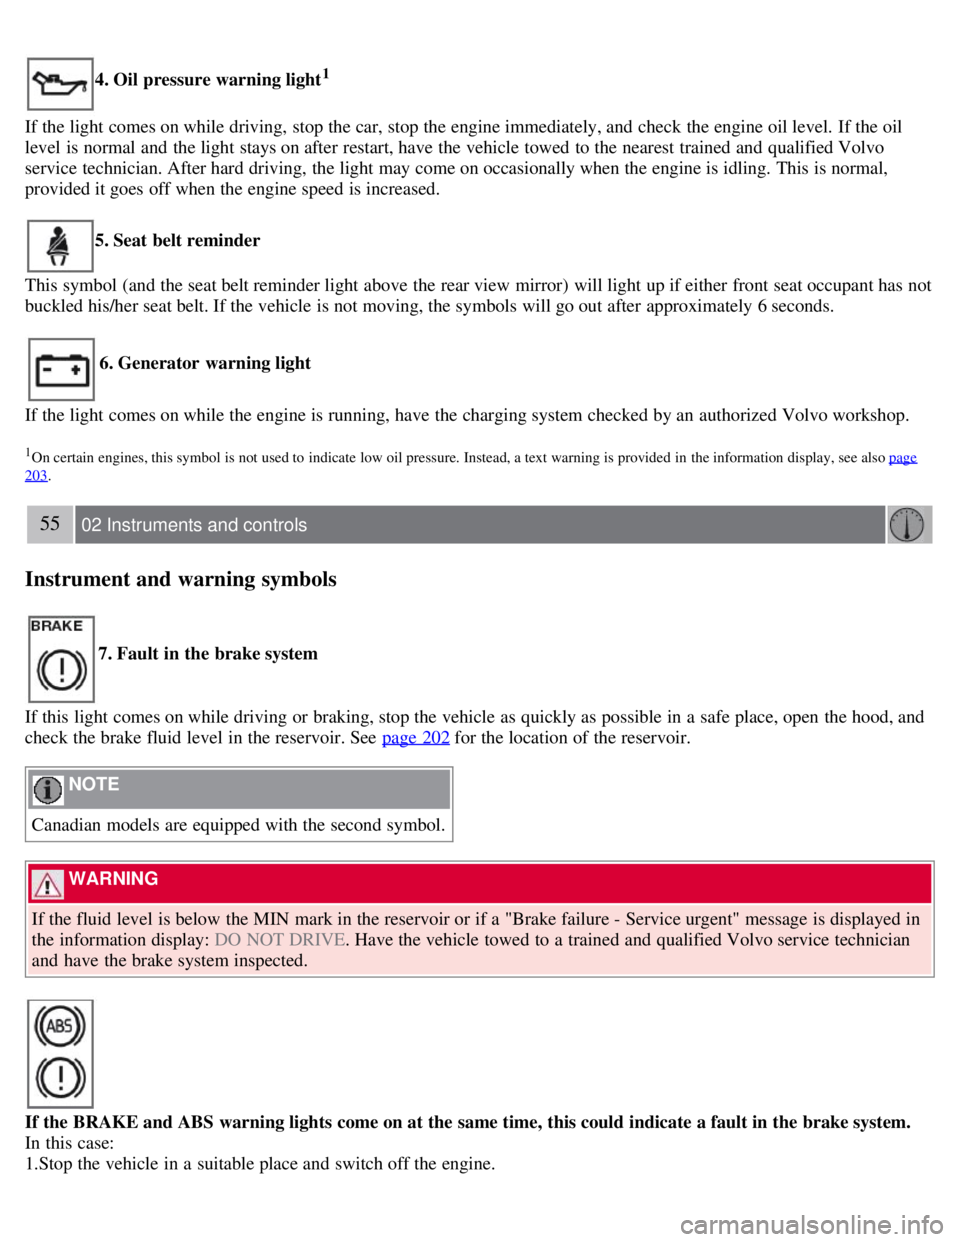
4. Oil pressure warning light1
If the light comes on while driving, stop the car, stop the engine immediately, and check the engine oil level. If the oil
level is normal and the light stays on after restart, have the vehicle towed to the nearest trained and qualified Volvo
service technician. After hard driving, the light may come on occasionally when the engine is idling. This is normal,
provided it goes off when the engine speed is increased.
5. Seat belt reminder
This symbol (and the seat belt reminder light above the rear view mirror) will light up if either front seat occupant has not
buckled his/her seat belt. If the vehicle is not moving, the symbols will go out after approximately 6 seconds.
6. Generator warning light
If the light comes on while the engine is running, have the charging system checked by an authorized Volvo workshop.
1On certain engines, this symbol is not used to indicate low oil pressure. Instead, a text warning is provided in the information display, see also page
203.
55 02 Instruments and controls
Instrument and warning symbols
7. Fault in the brake system
If this light comes on while driving or braking, stop the vehicle as quickly as possible in a safe place, open the hood, and
check the brake fluid level in the reservoir. See page 202
for the location of the reservoir.
NOTE
Canadian models are equipped with the second symbol.
WARNING
If the fluid level is below the MIN mark in the reservoir or if a "Brake failure - Service urgent" message is displayed in
the information display: DO NOT DRIVE . Have the vehicle towed to a trained and qualified Volvo service technician
and have the brake system inspected.
If the BRAKE and ABS warning lights come on at the same time, this could indicate a fault in the brake system.
In this case:
1.Stop the vehicle in a suitable place and switch off the engine.
Page 89 of 234
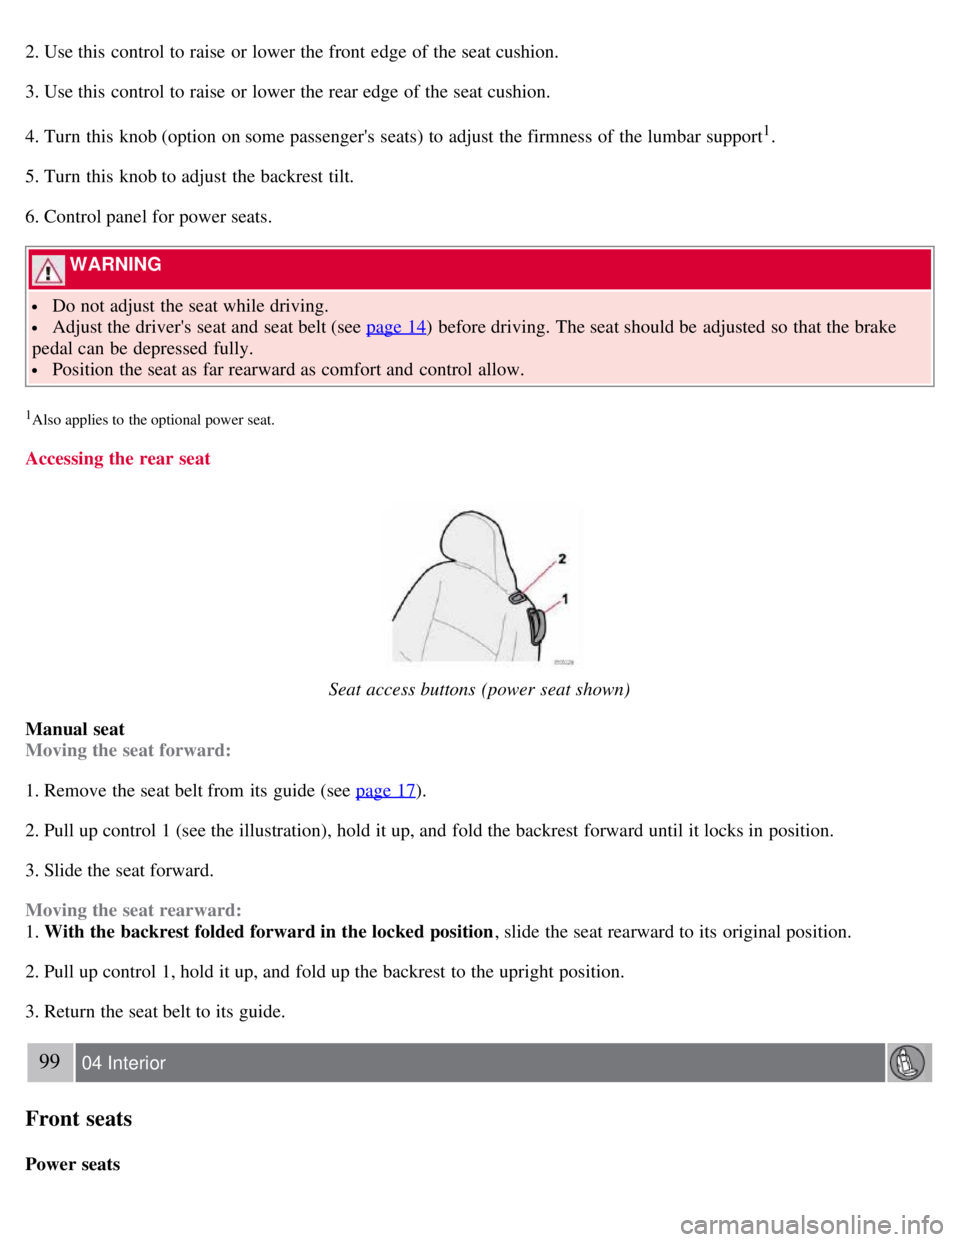
2. Use this control to raise or lower the front edge of the seat cushion.
3. Use this control to raise or lower the rear edge of the seat cushion.
4. Turn this knob (option on some passenger's seats) to adjust the firmness of the lumbar support
1.
5. Turn this knob to adjust the backrest tilt.
6. Control panel for power seats.
WARNING
Do not adjust the seat while driving.
Adjust the driver's seat and seat belt (see page 14) before driving. The seat should be adjusted so that the brake
pedal can be depressed fully.
Position the seat as far rearward as comfort and control allow.
1Also applies to the optional power seat.
Accessing the rear seat
Seat access buttons (power seat shown)
Manual seat
Moving the seat forward:
1. Remove the seat belt from its guide (see page 17
).
2. Pull up control 1 (see the illustration), hold it up, and fold the backrest forward until it locks in position.
3. Slide the seat forward.
Moving the seat rearward:
1. With the backrest folded forward in the locked position , slide the seat rearward to its original position.
2. Pull up control 1, hold it up, and fold up the backrest to the upright position.
3. Return the seat belt to its guide.
99 04 Interior
Front seats
Power seats
Page 90 of 234
Easy entry is only intended to be used when the front seat in unoccupied.
Moving the seat forward:
1. Remove the seat belt from its guide (see page 17
).
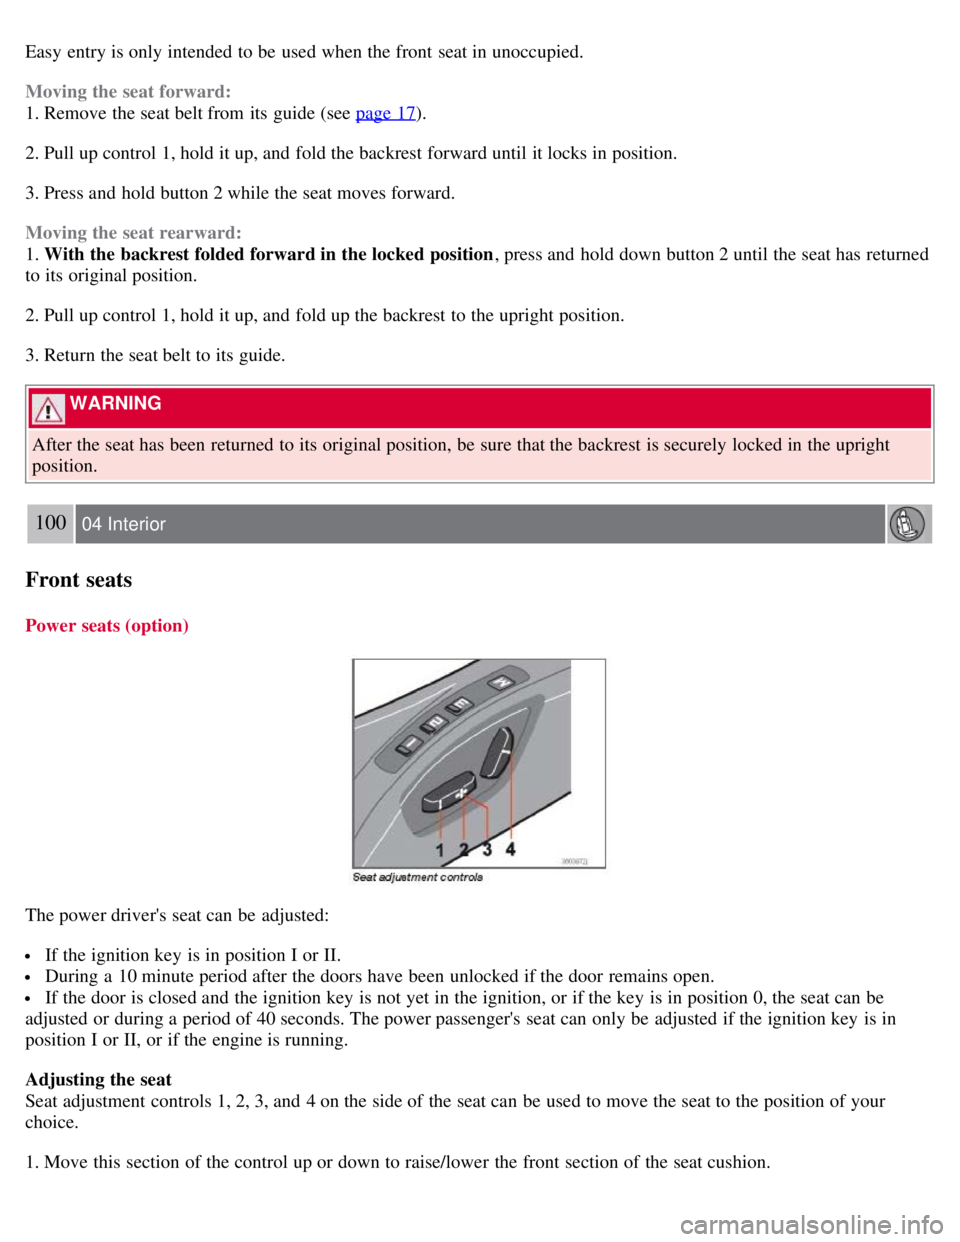
2. Pull up control 1, hold it up, and fold the backrest forward until it locks in position.
3. Press and hold button 2 while the seat moves forward.
Moving the seat rearward:
1. With the backrest folded forward in the locked position , press and hold down button 2 until the seat has returned
to its original position.
2. Pull up control 1, hold it up, and fold up the backrest to the upright position.
3. Return the seat belt to its guide.
WARNING
After the seat has been returned to its original position, be sure that the backrest is securely locked in the upright
position.
100 04 Interior
Front seats
Power seats (option)
The power driver's seat can be adjusted:
If the ignition key is in position I or II.
During a 10 minute period after the doors have been unlocked if the door remains open.
If the door is closed and the ignition key is not yet in the ignition, or if the key is in position 0, the seat can be
adjusted or during a period of 40 seconds. The power passenger's seat can only be adjusted if the ignition key is in
position I or II, or if the engine is running.
Adjusting the seat
Seat adjustment controls 1, 2, 3, and 4 on the side of the seat can be used to move the seat to the position of your
choice.
1. Move this section of the control up or down to raise/lower the front section of the seat cushion.
Page 101 of 234
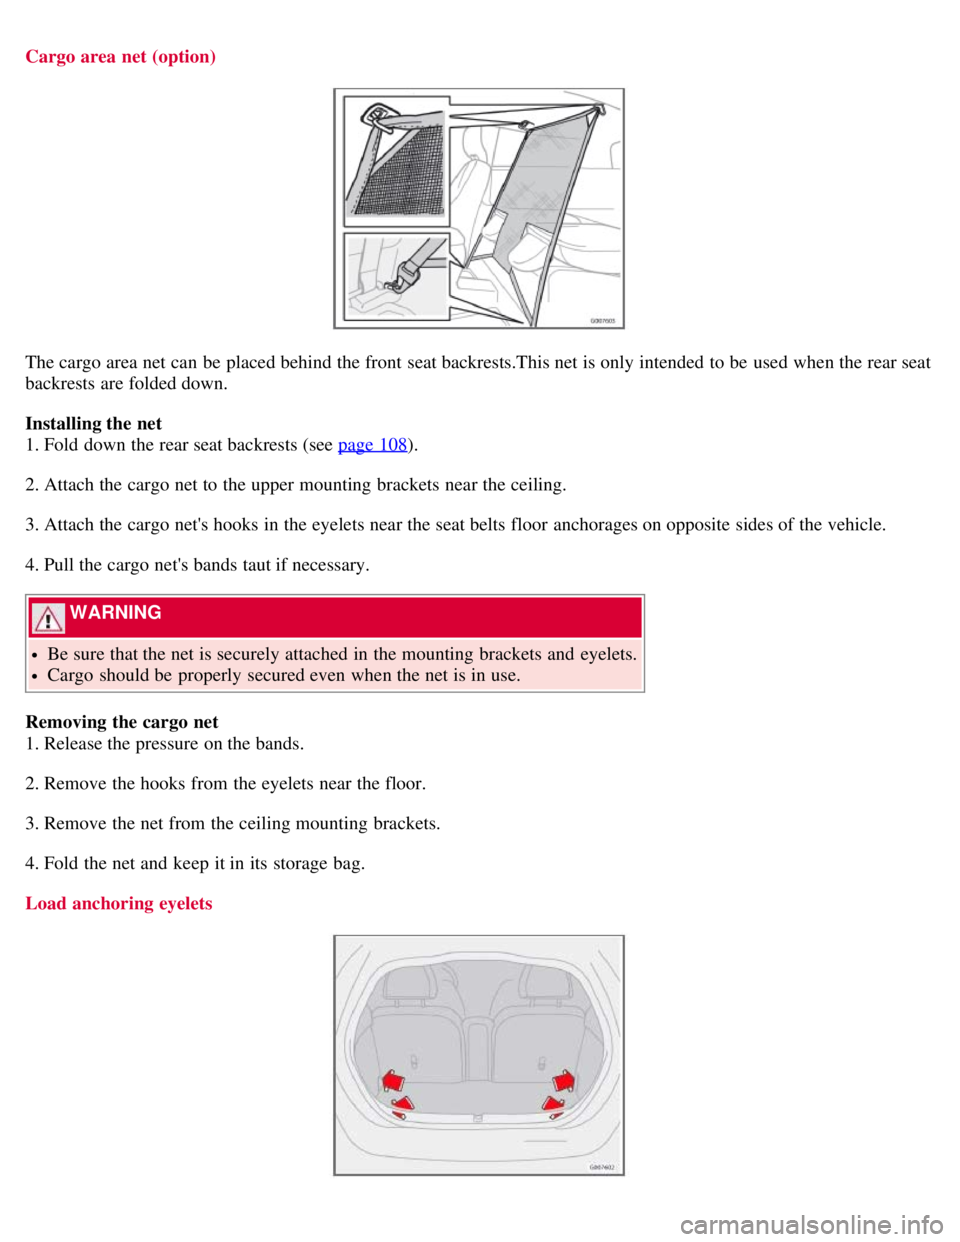
Cargo area net (option)
The cargo area net can be placed behind the front seat backrests.This net is only intended to be used when the rear seat
backrests are folded down.
Installing the net
1. Fold down the rear seat backrests (see page 108
).
2. Attach the cargo net to the upper mounting brackets near the ceiling.
3. Attach the cargo net's hooks in the eyelets near the seat belts floor anchorages on opposite sides of the vehicle.
4. Pull the cargo net's bands taut if necessary.
WARNING
Be sure that the net is securely attached in the mounting brackets and eyelets.
Cargo should be properly secured even when the net is in use.
Removing the cargo net
1. Release the pressure on the bands.
2. Remove the hooks from the eyelets near the floor.
3. Remove the net from the ceiling mounting brackets.
4. Fold the net and keep it in its storage bag.
Load anchoring eyelets
Page 120 of 234
driving, requiring the frequent use of the washers and wipers. Volvo Washer Solvent should be diluted as follows:
Down to 14° F (-10° C): 1 part washer solvent and 4 parts water Down to 5° F (-15° C): 1 part washer solvent and 3
parts water Down to 0° F (-18° C): 1 part washer solvent and 2 parts water Down to -18° F (-28° C): 1 part washer
solvent and 1 part water.
Use Volvo Teflon Lock Spray in the locks.
NOTE
Avoid using de -icing sprays as they can cause damage to the locks.
Conserving electrical current
Keep the following in mind to help minimize battery drain:
When the engine is not running, avoid turning the ignition key to position II. Many electrical systems (the audio
system, the optional navigation system, power windows, etc) will function with the ignition key in position I. This
position reduces drain on the battery.
Please keep in mind that using systems, accessories, etc that consume a great deal of current when the engine is not
running could result in the battery being completely drained.
The optional 12 volt socket in the cargo area provides electrical current even with the ignition switched off, which
drains the battery.
NOTE
If the ignition is switched on, a warning message will be displayed in the text window in the instrument panel
when the battery charge is low.
An energy conserving function designed into the vehicle's electrical system will switch off certain functions or
reduce the load on the battery by, e.g., reducing the audio system's volume.
135 06 Starting and driving
General information
Before a long distance trip
It is always worthwhile to have your vehicle checked by a trained and qualified Volvo service technician before
driving long distances. An authorized Volvo retailer will also be able to supply you with bulbs, fuses, spark plugs and
wiper blades for your use in the event that problems occur.
As a minimum, the following items should be checked before any long trip:
Check that the engine runs smoothly and that fuel consumption is normal.
Check for fuel, oil, and fluid leakage.
Have the transmission oil level checked1.
Check condition of drive belts.
Check state of the battery's charge.
Examine tires carefully (the spare tire as well), and replace those that are worn. Check tire pressures.
The brakes, front wheel alignment, and steering gear should be checked by a trained and qualified Volvo service
technician only.
Check all lights, including high beams.
Reflective warning triangles are legally required in some states/provinces.
Have a word with a trained and qualified Volvo service technician if you intend to drive in countries where it may
Page 126 of 234
141 06 Starting and driving
Starting the vehicle
To start the engine
1. Fasten the seat belt.
WARNING
Before starting, check that the seat, steering wheel and mirrors are adjusted properly. Make sure the brake pedal can
be depressed completely. Adjust the seat if necessary.
2. Apply the parking brake if not already set. The gear selector should be locked in the (P)ark position (Shiftlock). See
also page 147
.
Manual transmission : the clutch must be fully depressed.
3. The vehicle is equipped with an autostart feature. Without touching the throttle pedal, turn the key to position III
and release it. The starter motor will then operate automatically (for up to ten seconds) until the engine starts. If the
engine fails to start, repeat this step.
NOTE
After a cold start, idle speed may be noticeably higher than normal for a short period. This is done to help bring
components in the emission control system to their normal operating temperature as quickly as possible, which
enables them to control emissions and help reduce the vehicle's impact on the environment.
4. To release the gear selector from the (P)ark position, the engine must be running (or the ignition key must be in
position II) and the brake pedal must be depressed.
5. Select the desired gear. On models with an automatic transmission, the gear engages after a very slight delay which
is especially noticeable when selecting R.
NOTE
Immobilizer : If two of the keys to your vehicle are close together, e.g., on the same key ring when you try to start
the vehicle, this could cause interference in the immobilizer system and result in the vehicle not starting. If this
should occur, remove one of the keys from the key ring before trying to start the vehicle again.
Keylock: Models equipped an automatic transmission have a keylock system. When the engine is switched off, the
gear selector must be in the ( P)ark position before the key can be removed from the ignition switch
1.
When starting in cold weather, the transmission may shift up at slightly higher engine speeds than normal until the
automatic transmission fluid reaches normal operating temperature.
Do not race a cold engine immediately after starting. Oil flow may not reach some lubrication points fast enough
to prevent engine damage.
1The optional keyless drive start control does not need to be removed from the ignition switch.
142 06 Starting and driving
Starting the vehicle
Page 171 of 234
Volvo also offers a special leather softener that should be applied after the cleaner and protectant. It leaves leather soft
and smooth, and reduces friction between leather and other finishes in the vehicle.
Volvo recommends cleaning, protecting and conditioning your vehicle's leather two to four times a year. Ask your
Volvo retailer about Leather Care Kit 951 0251 and Leather Softener 943 7429.
Cleaning leather upholstery
1. Pour leather cleaner on a damp sponge and squeeze it until the cleaner foams.
2. Apply the foam to the stain by moving the sponge with circular movements.
3. Dampen the stain thoroughly with the sponge. Let the sponge absorb the stain, do not rub.
4. Dry the stain with soft paper towels or a towel, and allow the leather to dry completely.
Protecting leather upholstery
1. Put a small amount of protectant cream on a cloth and apply a thin coating of cream to the upholstery with light
circular movements.
2. Allow the leather to dry for 20 minutes.
191 08 Vehicle care
Washing and cleaning the car
This will help the leather resist staining and protect against sunlight's harmful UV rays.
CAUTION
Under no circumstances should gasoline, naphtha or similar cleaning agents be used on the plastic or the leather
since these can cause damage.
Take extra care when removing stains such as ink or lipstick since the coloring can spread.
Use solvents sparingly. Too much solvent can damage the seat padding.
Start from the outside of the stain and work toward the center.
Sharp objects (e.g. pencils or pens in a pocket) or Velcro fasteners on clothing may damage the textile upholstery.
Clothing that is not colorfast, such as new jeans or suede garments, may stain the upholstery.
192 08 Vehicle care
Washing and cleaning the car
Cleaning the seat belts
Clean only with lukewarm water and a mild soap solution.
Cleaning floor mats
The floor mats should be vacuumed or brushed clean regularly, especially during winter when they should be taken out
for drying. Spots on textile mats can be removed with a mild detergent. For best protection in winter, Volvo
recommends the use of Volvo rubber floor mats. Consult your Volvo retailer.
Page 175 of 234
assure the proper servicing and function of the components that control emissions. These services, which are listed in
the "Warranty and Service Records Information" booklet, are not covered by the warranty. You will be required to pay
for labor and material used.
Maintenance
Your Volvo passed several major inspections before it was delivered to you, in accordance with Volvo specifications.
The maintenance procedures outlined in the Warranty and Service Records Information booklet, many of which will
positively affect your vehicle's emissions, should be performed as indicated. It is recommended that receipts for
vehicle emission maintenance be retained in case questions arise concerning maintenance. Inspection and maintenance
should also be performed anytime a malfunction is observed or suspected.
Applicable warranties - U.S/Canada
In accordance with applicable U.S. and Canadian regulations, the following list of warranties is provided.
New Vehicle Limited Warranty
Parts and Accessories Limited Warranty
Corrosion Protection Limited Warranty
Seat Belt and Supplemental Restraint Systems Limited Warranty
Emission Design and Defect Warranty
Emission Performance Warranty
These are the federal warranties; other warranties are provided as required by state/provincial law. Refer to your
separate Warranty and Service Records Information booklet for detailed information concerning each of the warranties.
Periodic maintenance helps minimize emissions
Periodic maintenance will help keep your vehicle running well. Your Warranty and Service Records Information
booklet provides a comprehensive periodic maintenance schedule up to 150,000 miles (240,000 km) of vehicle
maintenance. The schedule includes components that affect vehicle emissions. This page describes some of the
emission-related components.
Vehicle Event Data (Black Box)
Your vehicle's driving and safety systems employ computers that monitor, and share with each other, information
about your vehicle's operation. One or more of these computers may store what they monitor, either during normal
vehicle operation or in a crash or near-crash event. Stored information may be read and used by:
Volvo Car Corporation
service and repair facilities
law enforcement or government agencies
others who may assert a legal right to know, or who obtain your consent to know such information.
199 09 Maintenance and servicing
Maintaining your car
Owner maintenance
Periodic maintenance requirements and intervals are described in your vehicle's Warranty and Service Records
Information booklet.
The following points can be carried out between the normally scheduled maintenance services.
Page 232 of 234
folding backrests108
Rearview mirror72
compass72, 73
Recalls, child restraints43
Refueling136, 138
fuel filler door137
Registering child restraints43
Remote control
central locking system116
key blade119, 120
replacing batteries118
Reporting safety defects in Canada13
Reporting safety defects in the U.S.12
Roadside assistance258
Rotating tires180
S
Safety defects in Canada, reporting13
Safety defects in the U.S., reporting12
Satellite radio235
Seat belts
Automatic Locking Retractor/Emergency Locking Retractor32
buckling/unbuckling14
cleaning192
guides17
maintenance16
pretensioners14
reminder16
reminder light54
use during pregnancy15
use with child seats15
using14
Seats front98, 99, 100, 101
Shiftlock6, 141
override147
Side impact protection airbags25
Sirius satellite radio235
Snow chains177
Snow tires177
Spare tire178, 181
Stability system indicator light53
Start inhibitor116
Starting the engine141
with keyless drive143
Steering wheel