ignition VOLVO C30 2013 Owner´s Manual
[x] Cancel search | Manufacturer: VOLVO, Model Year: 2013, Model line: C30, Model: VOLVO C30 2013Pages: 300, PDF Size: 6.58 MB
Page 103 of 300
03 Climate
Electronic Climate Control (ECC)*
03
* Option/accessory, for more information, see Introduction.101
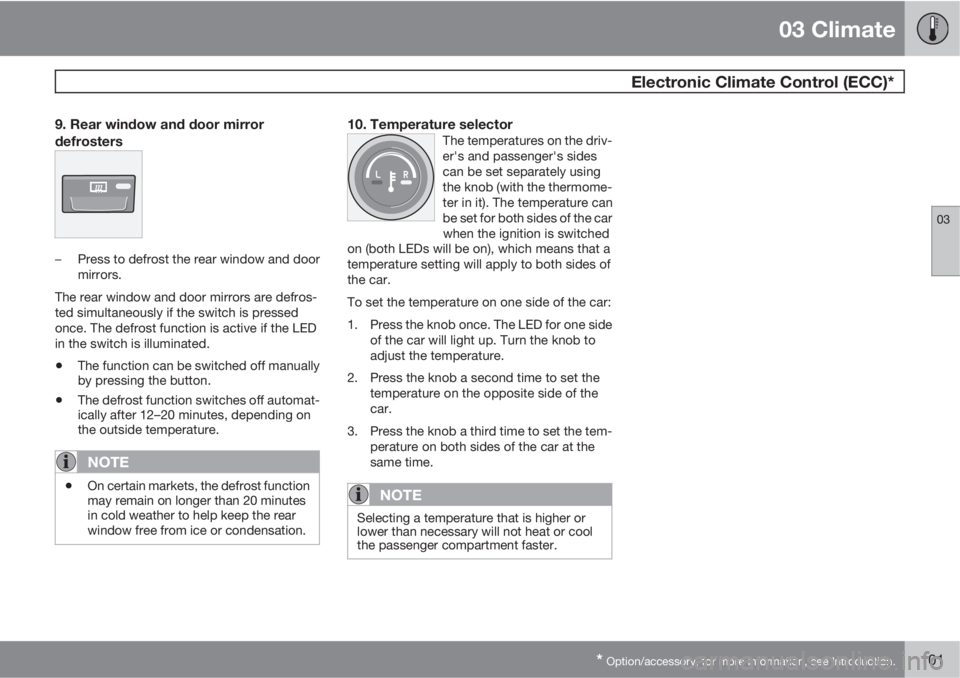
9. Rear window and door mirror
defrosters
–Press to defrost the rear window and door
mirrors.
The rear window and door mirrors are defros-
ted simultaneously if the switch is pressed
once. The defrost function is active if the LED
in the switch is illuminated.
•The function can be switched off manually
by pressing the button.
•The defrost function switches off automat-
ically after 12–20 minutes, depending on
the outside temperature.
NOTE
•On certain markets, the defrost function
may remain on longer than 20 minutes
in cold weather to help keep the rear
window free from ice or condensation.
10. Temperature selectorThe temperatures on the driv-
er's and passenger's sides
can be set separately using
the knob (with the thermome-
ter in it). The temperature can
be set for both sides of the car
when the ignition is switched
on (both LEDs will be on), which means that a
temperature setting will apply to both sides of
the car.
To set the temperature on one side of the car:
1. Press the knob once. The LED for one side
of the car will light up. Turn the knob to
adjust the temperature.
2. Press the knob a second time to set the
temperature on the opposite side of the
car.
3. Press the knob a third time to set the tem-
perature on both sides of the car at the
same time.
NOTE
Selecting a temperature that is higher or
lower than necessary will not heat or cool
the passenger compartment faster.
Page 111 of 300
04 Interior
Front seats
04
* Option/accessory, for more information, see Introduction.109
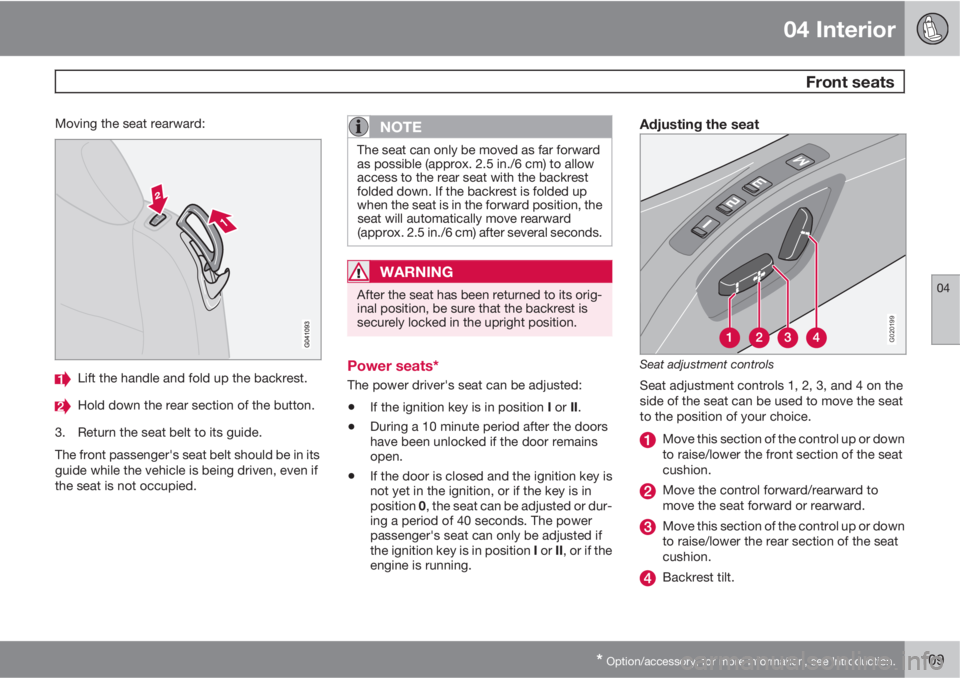
Moving the seat rearward:
Lift the handle and fold up the backrest.
Hold down the rear section of the button.
3. Return the seat belt to its guide.
The front passenger's seat belt should be in its
guide while the vehicle is being driven, even if
the seat is not occupied.
NOTE
The seat can only be moved as far forward
as possible (approx. 2.5 in./6 cm) to allow
access to the rear seat with the backrest
folded down. If the backrest is folded up
when the seat is in the forward position, the
seat will automatically move rearward
(approx. 2.5 in./6 cm) after several seconds.
WARNING
After the seat has been returned to its orig-
inal position, be sure that the backrest is
securely locked in the upright position.
Power seats*
The power driver's seat can be adjusted:
•If the ignition key is in position I or II.
•During a 10 minute period after the doors
have been unlocked if the door remains
open.
•If the door is closed and the ignition key is
not yet in the ignition, or if the key is in
position 0, the seat can be adjusted or dur-
ing a period of 40 seconds. The power
passenger's seat can only be adjusted if
the ignition key is in position I or II, or if the
engine is running.
Adjusting the seat
G020199
Seat adjustment controls
Seat adjustment controls 1, 2, 3, and 4 on the
side of the seat can be used to move the seat
to the position of your choice.
Move this section of the control up or down
to raise/lower the front section of the seat
cushion.
Move the control forward/rearward to
move the seat forward or rearward.
Move this section of the control up or down
to raise/lower the rear section of the seat
cushion.
Backrest tilt.
Page 112 of 300
04 Interior
Front seats
04
110* Option/accessory, for more information, see Introduction.
NOTE
Both front seats are equipped with head
restraints that can be adjusted vertically to
suit the height of the passenger. The upper
edge of the head restraint should be at least
on a level with the upper-most point of the
seat occupant's ear (see the section
"Adjusting the front seat head restraints" on
page 111).
NOTE
The power seats have an overload protector
that activates if a seat is blocked by any
object. If this occurs, switch off the ignition
(key in position 0) and wait for approxi-
mately 20 seconds before operating the
seat again.
Emergency stopIf the seat inadvertently begins to move, press
any of the buttons to stop the seat.
Programming the seat memory, driver's
seat only*
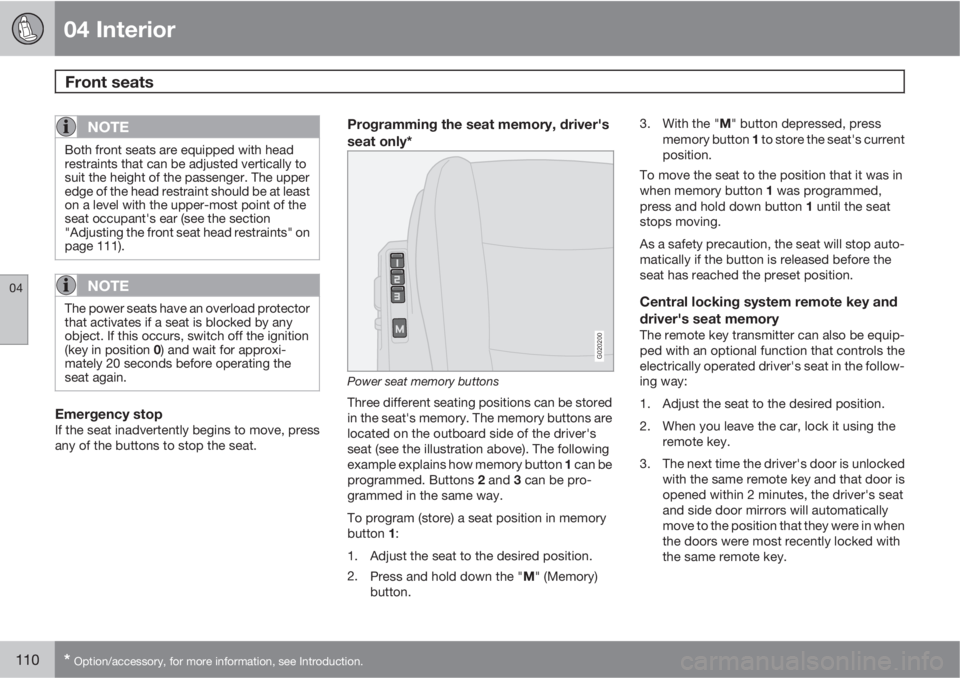
G020200
Power seat memory buttons
Three different seating positions can be stored
in the seat's memory. The memory buttons are
located on the outboard side of the driver's
seat (see the illustration above). The following
example explains how memory button 1 can be
programmed. Buttons 2 and 3 can be pro-
grammed in the same way.
To program (store) a seat position in memory
button 1:
1. Adjust the seat to the desired position.
2.
Press and hold down the "M" (Memory)
button.3.
With the "M" button depressed, press
memory button 1 to store the seat's current
position.
To move the seat to the position that it was in
when memory button 1 was programmed,
press and hold down button 1 until the seat
stops moving.
As a safety precaution, the seat will stop auto-
matically if the button is released before the
seat has reached the preset position.
Central locking system remote key and
driver's seat memory
The remote key transmitter can also be equip-
ped with an optional function that controls the
electrically operated driver's seat in the follow-
ing way:
1. Adjust the seat to the desired position.
2. When you leave the car, lock it using the
remote key.
3. The next time the driver's door is unlocked
with the same remote key and that door is
opened within 2 minutes, the driver's seat
and side door mirrors will automatically
move to the position that they were in when
the doors were most recently locked with
the same remote key.
Page 113 of 300
04 Interior
Front seats
04
111
NOTE
The memory function in the remote key
operates independently the memory func-
tion in the seat.
WARNING
•Because the driver's seat can be
adjusted with the ignition off, children
should never be left unattended in the
car.
•Movement of the seat can be STOPPED
at any time by pressing any button on
the power seat control panel.
•Do not adjust the seat while driving. The
seat should be adjusted so that the
brake pedal can be depressed fully. In
addition, position the seat as far rear-
ward as comfort and control allow.
•The seat rails on the floor must not be
obstructed in any way when the seat is
in motion.
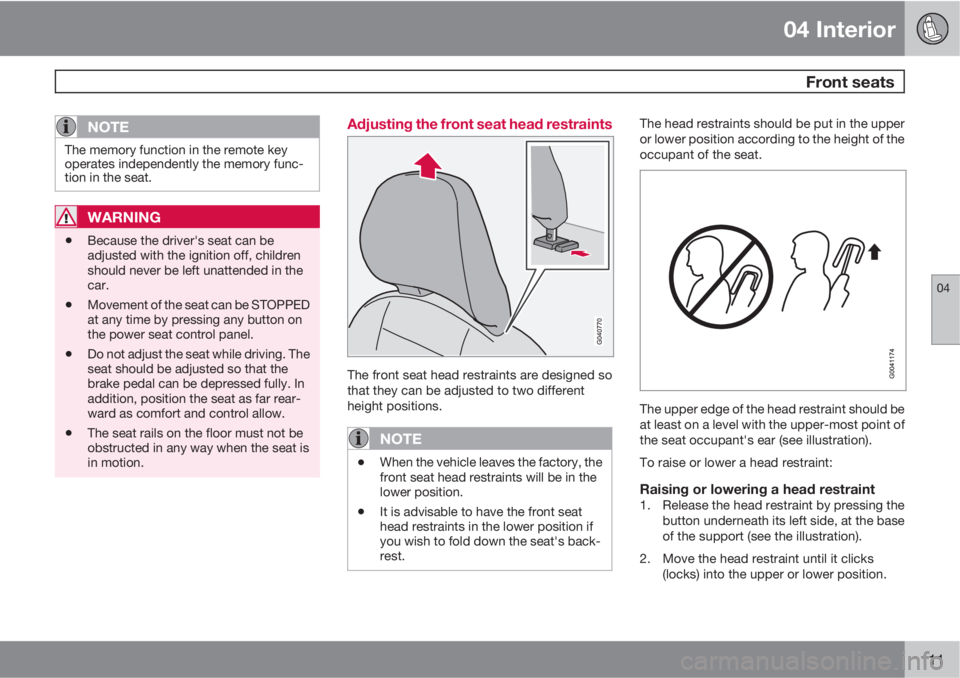
Adjusting the front seat head restraints
The front seat head restraints are designed so
that they can be adjusted to two different
height positions.
NOTE
•When the vehicle leaves the factory, the
front seat head restraints will be in the
lower position.
•It is advisable to have the front seat
head restraints in the lower position if
you wish to fold down the seat's back-
rest.
The head restraints should be put in the upper
or lower position according to the height of the
occupant of the seat.
The upper edge of the head restraint should be
at least on a level with the upper-most point of
the seat occupant's ear (see illustration).
To raise or lower a head restraint:
Raising or lowering a head restraint1. Release the head restraint by pressing the
button underneath its left side, at the base
of the support (see the illustration).
2. Move the head restraint until it clicks
(locks) into the upper or lower position.
Page 115 of 300

04 Interior
Interior lighting
04
113 Interior lighting
G020201
Front courtesy lights and reading lights
Front driver's side reading light, on/off
Courtesy lighting
Front passenger's side reading light, on/off
The front seat reading lights can be switched
on and off by pressing buttons (1) or (3) when
the ignition key is in position I or II, or when the
engine is running.
The courtesy lighting (2) can be set to three
positions:
–Press the left side of the button: the interior
courtesy lighting turns on.–Neutral position: the interior courtesy light-
ing comes on when a door is opened, and
is switched off 10 seconds after the door is
closed.
–Press the right side of the button: the inte-
rior courtesy lighting stays off.
Courtesy lighting – automatic function
The interior lighting has a built-in automatic
function that switches on the courtesy lighting
for 30 seconds when:
•the car is unlocked from the outside using
the key blade or remote key
•the engine is switched off and the ignition
key is turned to the 0 position.
The courtesy lighting lights up or remains on
for 5 minutes when:
•one of the doors is opened and left open.
•the courtesy lighting has not been
switched off (the right side of button 2
depressed).
The automatic lighting goes out when:
•the engine is started
•the car is locked from the outside using the
key blade or remote key.
If the courtesy lighting is not switched off man-
ually, it will be turned off automatically5 minutes after the engine has been switched
off.
Footwell lightingThe footwell (and courtesy lighting) comes on
or goes off when one of the side doors is
opened or closed.
Vanity mirror
G020210
Raise the cover to switch on the light.
Page 128 of 300

05 Locks and alarm
Remote key and key blade
05
126
Remote keys
Two remote keys that also function as ignition
keys are provided with your car. The remote
keys contain detachable metal key blades for
manually locking or unlocking the driver's door
and the glove compartment.
USA – FCC ID: LTQVO315TXThis device complies with part 15 of the FCC
rules. Operation is subject to the following con-
ditions: (1) This device may not cause harmful
interference, and (2) this device must accept
any interference received, including interfer-
ence that may cause undesired operation.
Canada – IC: 3659AVO315TXOperation is subject to the following condi-
tions: (1) this device may not cause interfer-
ence, and (2) this device must accept any inter-
ference, including interference that may cause
undesired operation of the device.
Loss of a remote key
If either of the remote keys is lost, the other
should be taken with the car to a Volvo retailer.
As an anti-theft measure, the code of the lost
remote key must be erased from the system.
NOTE
Additional or duplicate remote control keys
can be obtained from any Authorized Volvo
Retailer.
You can also obtain additional or duplicate
remote control keys from certain independ-
ent repair facilities and locksmiths that are
qualified to make remote control keys. Each
key must be programmed to work with your
vehicle.
California Only:
A list of independent repair facilities and/or
locksmiths known to Volvo that can cut and
code replacement keys can be found:
•on the Volvo website at
http://www.volvocars.com/us/keys
•by calling Volvo Customer Care at
1-800-458-1552
Each key blade has a unique code, which is
used if new key blades are required. A maxi-
mum of six remote keys/key blades can be
programmed and used for one car.
Immobilizer (start inhibitor)
Each of the keys supplied with your car con-
tains a coded transponder. The code in the key
is transmitted to an antenna in the ignition
switch where it is compared to the code stored
in the start inhibitor module. The car will start
only with a properly coded key. If you misplace
a key, take the other keys to an authorized
Volvo retailer for reprogramming as an antitheft
measure.
CAUTION
Never use force on the narrow section of the
remote key – this is where the transponder
is located. The car cannot be started if the
transponder is damaged.
USA – FCC ID: LTQWFS 125VOThis device complies with part 15 of the FCC
rules. Operation is subject to the following con-
dition: (1) This device may not cause harmful
interference, and (2) this device must accept
any interference received, including interfer-
ence that may cause undesired operation.
Canada – IC: 3659A-WFS125VOOperation is subject to the following condi-
tions: (1) this device may not cause interfer-
ence, and (2) this device must accept any inter-
ference, including interference that may cause
undesired operation of the device.
Page 131 of 300
05 Locks and alarm
Remote key and key blade
05
129
While holding the catch, pull the key blade
out of the remote key.
Reinserting the key blade in the remote
key
1. Hold the remote key with the pointed end
down.
2. Carefully slide the key blade into its groove.
3. Gently press the key blade in the groove
until it clicks into place.
Unlocking the doors with the detached
key blade
1. Insert the key blade as far as possible in the
driver's door lock.
2. Turn the key blade clockwise approxi-
mately one-quarter turn to unlock the driv-
er's door only.
NOTE
After unlocking the driver's door with the
key blade, opening the door will trigger the
alarm.
To disable the alarmPress the Unlock button on the remote key, or
insert the key in the ignition switch.
Locking the doors with the detached key
blade
1. Lock the other door(s) by pressing the lock
button on each door. Please note that this
does not arm the alarm or lock the liftgate.
2. Turn the key blade one-quarter turn coun-
ter-clockwise to lock the driver's door.
Locking points
By utilizing the remote key with the key blade
removed, you can block access to the glove
compartment for e.g. valet parking or when the
car is brought to the retailer for service.
Page 133 of 300

05 Locks and alarm
Keyless drive*
05
* Option/accessory, for more information, see Introduction.131 Keyless locking and unlocking
G007577
Range of the keyless drive remote key–5 ft
(1.5 meters)
This system makes it possible to unlock and
lock the vehicle without having to use the
remote key. It is only necessary to have a key-
less drive remote key in your possession to
operate the central locking system.
NOTE
The buttons on the keyless drive remote key
can also be used to lock and unlock the
vehicle, see page 127 for more information.
Both of the remote keys provided with the vehi-
cle have the keyless function, and additional
remotes can be ordered. The system can
accommodate up to six keyless drive remote
keys.
NOTE
The number of doors that are unlocked at
the same time can be set in the Personal
settings menu, see page 84 for additional
information.
Unlocking the vehicle
•A keyless drive remote key must be on the
same side of the vehicle as the door to be
opened, and be within 5 feet (1.5 meters)
of the lock or the liftgate opening control
(see the shaded areas in the illustration).
•Pull a door handle to unlock and open the
door or press the liftgate opening control
on the liftgate.
•See page 152 for information on starting a
vehicle equipped with keyless drive.
Locking the vehicle
G020033
Keyless drive lock button
The doors and the liftgate can be locked by
pressing the lock button in any of the outside
door handles.
NOTE
•If one or more doors and/or the liftgate
is not fully closed when the lock button
is pressed, the door(s) or liftgate will not
be locked.
•On keyless drive vehicles with an auto-
matic transmission, the gear selector
must be in the Park (P) position and the
ignition must be switched off before the
doors/liftgate can be locked.
Page 134 of 300

05 Locks and alarm
Keyless drive*
05
132* Option/accessory, for more information, see Introduction.
Locking or unlocking the vehicle with the
key blade
G020225
Keyless drive keyhole cover
The driver's door on vehicles equipped with
keyless drive can be locked or unlocked with
the remote key's detachable key blade if nec-
essary, see page 128 for information on remov-
ing the key blade from the remote key. To
access the keyhole in the driver's door:
•Pry off the keyhole cover by inserting the
key blade or a small screwdriver in the hole
on the underside of the cover (indicated by
the arrow in the inset illustration).
•Insert the key blade as far as possible in the
driver's door lock. Turn the key blade
clockwise approximately one-quarter turnto unlock the driver's door only. This will
trigger the alarm.
•To disable the alarm: Press the Unlock
button on the keyless drive remote key. If
the batteries in the remote are weak,
remove the keyless drive start control from
the ignition switch by pressing the catch
(see the illustration on page 152) and pull-
ing the control out of the ignition switch.
Insert the ignition key section of a keyless
drive remote key in the ignition switch.
Keyless drive remote key and driver's
seat memory
This function is only available on vehicles
equipped with the optional power driver's seat.
•When you leave the car with a keyless drive
remote key in your possession and lock
any door, the position of the driver's seat
will be stored in the seat's memory.
•The next time a door is opened by a person
with the same remote key in his/her pos-
session, the driver's seat will automatically
move to the position that it was in when the
door was most recently locked.
NOTE
If several people carrying keyless drive
remote keys approach the vehicle at the
same time, the driver's seat will assume the
position it was in for the person who opens
a door first.
Keyless drive information messagesIf anyone leaves the vehicle with the only key-
less drive remote key in his or her possession
while the ignition is switched on, a message will
be shown in the information display and an
audible signal will sound.
NOTE
This message will only be displayed if the
start control is in position I or II.
The message will be erased from the display
and the audible signal will stop when the
remote key has been returned to the vehicle
and one of the following has occurred:
•A door has been opened and closed
•The start control has been turned to posi-
tion 0
•The READ button (see page 61 for the
location of this button) has been pressed.
Page 137 of 300
05 Locks and alarm
Locking and unlocking
05
135 Locking/unlocking the vehicle from the
inside
G007451
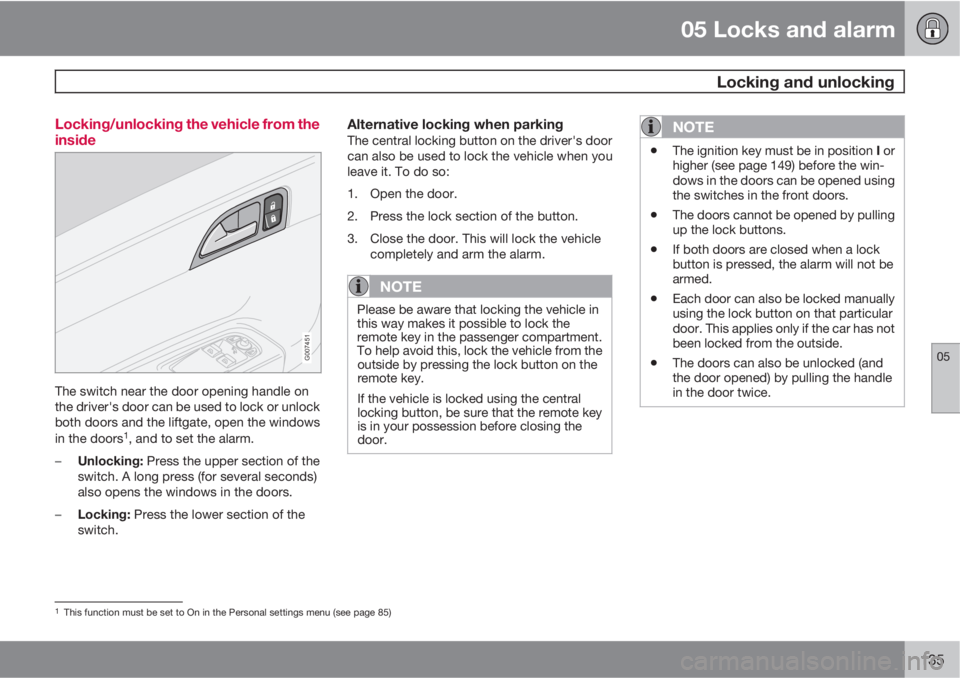
The switch near the door opening handle on
the driver's door can be used to lock or unlock
both doors and the liftgate, open the windows
in the doors
1, and to set the alarm.
–
Unlocking: Press the upper section of the
switch. A long press (for several seconds)
also opens the windows in the doors.
–
Locking: Press the lower section of the
switch.
Alternative locking when parkingThe central locking button on the driver's door
can also be used to lock the vehicle when you
leave it. To do so:
1. Open the door.
2. Press the lock section of the button.
3. Close the door. This will lock the vehicle
completely and arm the alarm.
NOTE
Please be aware that locking the vehicle in
this way makes it possible to lock the
remote key in the passenger compartment.
To help avoid this, lock the vehicle from the
outside by pressing the lock button on the
remote key.
If the vehicle is locked using the central
locking button, be sure that the remote key
is in your possession before closing the
door.
NOTE
•The ignition key must be in position I or
higher (see page 149) before the win-
dows in the doors can be opened using
the switches in the front doors.
•The doors cannot be opened by pulling
up the lock buttons.
•If both doors are closed when a lock
button is pressed, the alarm will not be
armed.
•Each door can also be locked manually
using the lock button on that particular
door. This applies only if the car has not
been locked from the outside.
•The doors can also be unlocked (and
the door opened) by pulling the handle
in the door twice.
1This function must be set to On in the Personal settings menu (see page 85)