light VOLVO C70 2002 Owner's Manual
[x] Cancel search | Manufacturer: VOLVO, Model Year: 2002, Model line: C70, Model: VOLVO C70 2002Pages: 99, PDF Size: 2.56 MB
Page 41 of 99

system.
Do not race a cold engine immediately after starting. Oil flow may not reach some lubrication points fast enough to
prevent engine damage.
NOTE: (Automatic transmission only)
Your car is equipped with a KEYLOCK system. When the engine is switched off, the gear selector must be in the
(P )ark position before the starting key can be removed from the ignition switch.
5. Select the desired gear. The gear engages after a slight delay (automatic transmission) which is especially noticeable
when selecting R.
CAUTION : (Automatic transmission only)
The engine should be idling; never accelerate until after you feel the gear engage! Toorapid acceleration immediately
after selecting a gear will cause harsh engagement and premature transmission wear.
NOTE : Selecting P or N (automatic transmission) when idling at a standstill for prolonged periods of time will help
prevent overheating of transmission oil.
WARNING!
Always place the gear selector (automatic transmission) in Park and apply the parking brake before leaving the
vehicle. Never leave the car unattended with the engine running.
Always open the garage doors fully before starting the engine inside a garage to ensure adequate ventilation. The
exhaust gases contain carbon monoxide, which is invisible and odorless but very poisonous.
CAUTION:
Never race the engine immediately after starting. Oil flow may not reach some lubricating points fast enough to
prevent engine damage.
Do not race the engine just prior to switching off!
* If the key is left in the Drive position (position II) for more than 30 seconds, it must be turned to position 0 and then
turned to the Start position (position III) again in order to start the car. See page 23
for ignition key positions.
pg. 69 Manual transmission
Shift positions
ProCarManuals.com
Page 46 of 99

tire damage.
Wear indicator
The tires have a socalled "wear indicator" in the form of a number of narrow strips running across or parallel to the
tread. When approx. 1/16" (1.6 mm) is left on the tread, these strips become visible and indicate that the tire should be
replaced.
Tires with less than 1/16" (1.6 mm) tread have a very poor grip in rain or snow.
When replacing worn tires, it is recommended that the tire be identical in type (radial) and size as the one being
replaced. Using a tire of the same make (manufacturer) will prevent alteration of the driving characteristics of the
vehicle.
To improve tire economy:
Maintain correct tire pressure.
Drive smoothly: avoid fast starts, hard braking and tire screeching.
Tire wear increases with speed.
Correct front wheel alignment is very important.
Unbalanced wheels impair tire economy and driving comfort.
If the wheels are rotated, they should be kept on the same side of the car so that they revolve in the same direction
as prior to rotation.
Hitting curbs or potholes can damage the tires and/or wheels permanently.
Flat spots
All tires become warm during use. After cooling, when the vehicle is parked, the tires have a tendency to distort
slightly, forming flat spots. These flat spots can cause vibrations similar to the vibrations caused by unbalanced wheels.
They do, however, disappear when the tire warms up. The degree to which flat spots form depends on the type of cord
used in the tire. Remember that, in cold weather, it takes longer for the tire to warm up and consequently longer for the
flat spot to disappear.
pg. 85 Wheels and tires
Snow chains
Snow chains can be used on your Volvo with the following restrictions:
Snow chains should be installed on front wheels only. Use only Volvo approved snow chains.
Snow chains may be mounted on tire dimension 195/65R15. Tire dimension 205/55R16 requires a special type of
snow chain. Consult your Volvo retailer.
If accessory, aftermarket or "custom" tires and wheels are installed and are of a size different than the original tires
and wheels, chains in some cases CANNOT be used. Snow chains cannot be used on those models fitted with all-
season tires 225/50 R16 or 225/45 R17 or 225/40R18. Sufficient clearances between chains and brakes, suspension
and body components must be maintained.
Some strapon type chains will interfere with brake components and therefore CANNOT be used.
ProCarManuals.com
Page 51 of 99

illustration on the following page.
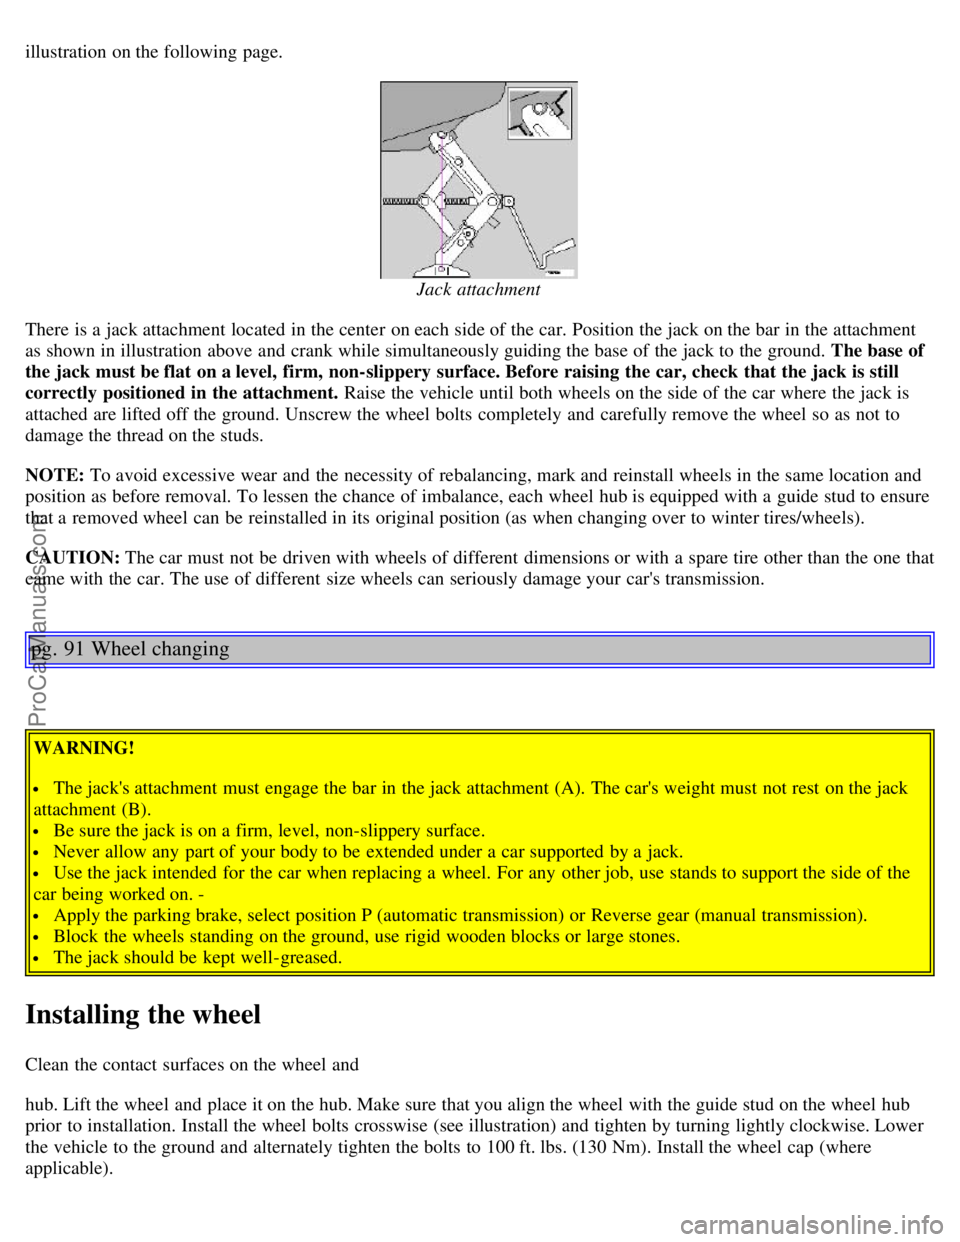
Jack attachment
There is a jack attachment located in the center on each side of the car. Position the jack on the bar in the attachment
as shown in illustration above and crank while simultaneously guiding the base of the jack to the ground. The base of
the jack must be flat on a level, firm, non-slippery surface. Before raising the car, check that the jack is still
correctly positioned in the attachment. Raise the vehicle until both wheels on the side of the car where the jack is
attached are lifted off the ground. Unscrew the wheel bolts completely and carefully remove the wheel so as not to
damage the thread on the studs.
NOTE: To avoid excessive wear and the necessity of rebalancing, mark and reinstall wheels in the same location and
position as before removal. To lessen the chance of imbalance, each wheel hub is equipped with a guide stud to ensure
that a removed wheel can be reinstalled in its original position (as when changing over to winter tires/wheels).
CAUTION: The car must not be driven with wheels of different dimensions or with a spare tire other than the one that
came with the car. The use of different size wheels can seriously damage your car's transmission.
pg. 91 Wheel changing
WARNING!
The jack's attachment must engage the bar in the jack attachment (A). The car's weight must not rest on the jack
attachment (B).
Be sure the jack is on a firm, level, non-slippery surface.
Never allow any part of your body to be extended under a car supported by a jack.
Use the jack intended for the car when replacing a wheel. For any other job, use stands to support the side of the
car being worked on. -
Apply the parking brake, select position P (automatic transmission) or Reverse gear (manual transmission).
Block the wheels standing on the ground, use rigid wooden blocks or large stones.
The jack should be kept well-greased.
Installing the wheel
Clean the contact surfaces on the wheel and
hub. Lift the wheel and place it on the hub. Make sure that you align the wheel with the guide stud on the wheel hub
prior to installation. Install the wheel bolts crosswise (see illustration) and tighten by turning lightly clockwise. Lower
the vehicle to the ground and alternately tighten the bolts to 100 ft. lbs. (130 Nm). Install the wheel cap (where
applicable).
ProCarManuals.com
Page 53 of 99

Parking light/direction indicator
1. From the front of the car, use a screwdriver to press down on the silver catch (located in the space between the
inside of the fender and the headlight unit) to release the lamp housing from the front fender.
2. Turn the bulb holder 1/4 turn clockwise (viewed from the front) and withdraw it from the from the lamp housing.
Leave the connector with its wires in the bulb holder.
4. Remove the bulb from the holder by pulling it straight out.
5. Press a new bulb into the holder and reinstall the unit in the reverse order.
Side direction indicator
1. Slide the lens forward and pull out the rear edge.
2. Pull out the entire lens/bulb unit.
3. With the lens toward you, turn the bulb holder 1/4 turn (the wires should not be disconnected from the holder) and
pull out the bulb holder from the lens unit.
4. Pull the old bulb straight out and press a new one into place.
5. Replace the entire unit in the reverse order.
pg. 94 Replacing bulbs
ProCarManuals.com
Page 54 of 99

A - Low beam Bulbs (high and low beams) - H7 B - High beam
Low beam headlight bulb (A) replacement
1. Turn the plastic cover counterclockwise and remove it.
2. Press the wire catches on the retaining clamp (1 in inset illustration above) together and push out (2) to release the
bulb and connector from the headlight housing.
3. Pull the bulb out of the connector.
4. Insert a new bulb into the connector.
5. Reinsert the bulb and connector into the headlight housing. The guide lug must be up to ensure proper positioning.
6. Press the retaining clamp back into position.
7. Reinstall the plastic cover. The marking "Top" on the cover should be up when the cover is reinstalled.
High beam headlight bulb (B) replacement
1. Pull the catch on the lower edge of the cover upward and remove the plastic cover.
2. Press the wire catches on the retaining clamp (1 in inset illustration above) together and push out (2) to release the
bulb and connector from the headlight housing.
3. Pull the bulb out of the connector.
4. Insert a new bulb into the connector.
5. Reinsert the bulb and connector into the headlight housing. The guide lug must be up to ensure proper positioning.
6. Press the retaining clamp back into position.
7. Reinstall the plastic cover. Catch B should snap into position.
Caution! Do not touch the glass on halogen bulbs with your fingers. Grease, oil or any other impurities can be
carbonized onto the bulb and cause damage to the reflector.
Be sure to use bulbs of the correct type and voltage
pg.95 Replacing bulbs
ProCarManuals.com
Page 55 of 99

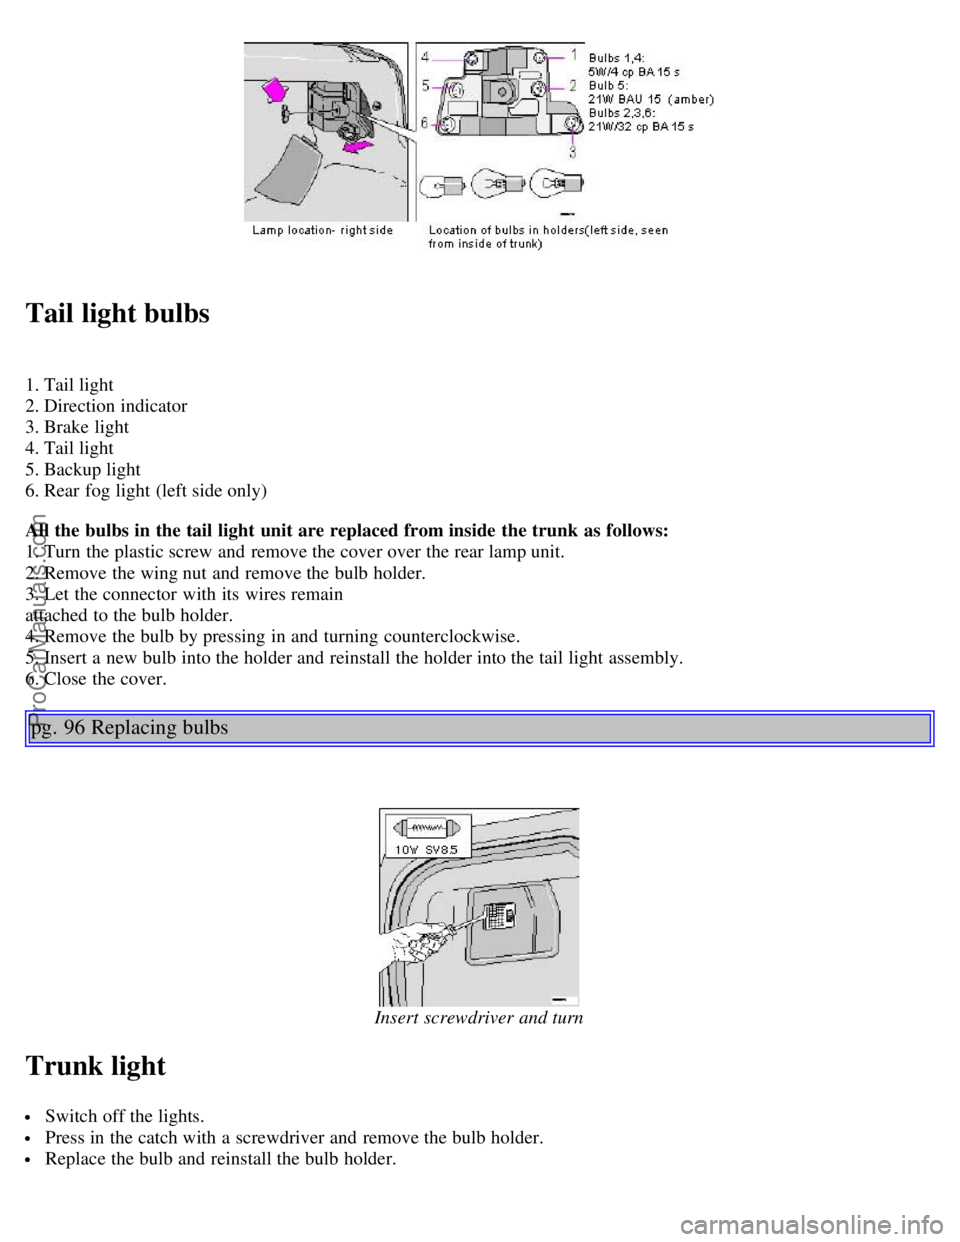
Tail light bulbs
1. Tail light
2. Direction indicator
3. Brake light
4. Tail light
5. Backup light
6. Rear fog light (left side only)
All the bulbs in the tail light unit are replaced from inside the trunk as follows:
1. Turn the plastic screw and remove the cover over the rear lamp unit.
2. Remove the wing nut and remove the bulb holder.
3. Let the connector with its wires remain
attached to the bulb holder.
4. Remove the bulb by pressing in and turning counterclockwise.
5. Insert a new bulb into the holder and reinstall the holder into the tail light assembly.
6. Close the cover.
pg. 96 Replacing bulbs
Insert screwdriver and turn
Trunk light
Switch off the lights.
Press in the catch with a screwdriver and remove the bulb holder.
Replace the bulb and reinstall the bulb holder.
ProCarManuals.com
Page 56 of 99

License plate lights
Switch off the lights.
Unscrew the screw.
Insert the screwdriver and turn gently to loosen the glass lens.
Replace the bulb and reinstall the glass lens.
Front courtesy lights - C70 Coupe
Switch off the ignition.
Insert a screwdriver and turn carefully to loosen the glass lens.
Replace the bulb and press the glass lens back into place.
pg. 97 Replacing bulbs
Insert screwdriver and turn
Front courtesy lights - C70 Convertible
ProCarManuals.com
Page 57 of 99

Switch off the ignition.
Insert a screwdriver and turn carefully to loosen the glass lens.
Replace the bulb and press the glass lens back into place.
Rear reading lights - C70 Coupe only
· Switch off the ignition.
· Insert a screwdriver and turn to loosen the lamp unit.
· Replace the bulb and press the lamp unit back into place.
Insert a screwdriver and turn
Vanity mirror
Switch off the ignition.
Insert the screwdriver and turn gently to loosen the glass lens.
Replace the bulb.
Press the glass lens into place.
Contents | Top of Page
ProCarManuals.com
Page 60 of 99

damage.
It is particularly important to wash the car frequently in the wintertime to prevent corrosion, when salt has been used
on the roads.
When washing the car, do not expose it to direct sunlight. Use lukewarm water to soften the dirt before you wash
with a sponge, and plenty of water, to avoid scratching.
Bird droppings: Remove from paintwork and the convertible top as soon as possible. Otherwise the finish may be
permanently damaged.
A detergent can be used to facilitate the softening of dirt and oil.
A water-soluble grease solvent may be used in cases of sticky dirt. However, use a wash place equipped with a
drainage separator.
Dry the car with a clean chamois and remember to clean the drain holes in the doors and rocker panels *.
The power radio antenna must be dried after washing.
Tar spots can be removed with kerosene or tar remover after the car has been washed.
A stiff-bristle brush and lukewarm soapy water can be used to clean the wiper blades. Frequent cleaning improves
visibility considerably.
Wash off the dirt from the underside (wheel housings, fenders, etc.).
In areas of high industrial fallout, more frequent washing is recommended.
CAUTION: During high pressure washing, the spray mouthpiece must never be closer to the painted surfaces of the
vehicle than 13" (30 cm). Do not spray directly into the locks, around the edges of the convertible top or the edges of
the top's storage cover.
When washing or steam cleaning the engine, avoid spraying water or steam directly on the electrical components or
toward the rear side of the engine.
After cleaning the engine, the spark plug wells should be inspected for water and blown dry if necessary.
Suitable detergents
Special car washing detergents should be used. A suitable mixture is about 2.5 fl. oz. (8.5 cl) of detergent to 2.6 US
gal. (10 liters) of warm water. After washing with a detergent the car should be well rinsed with clean water.
WARNING!
When the car is driven immediately after being washed, apply the brakes several times in order to remove any
moisture from the brake linings.
Engine cleaning agents should not be used when the engine is warm. This constitutes a fire risk.
Volvo offers an environmentally friendly Car Care Kit, containing waxing, washing, and degreasing agents.
NOTE: When washing the car, remember to remove dirt from the drain holes in the doors and sills.
Bumpers: Wash the bumpers with the same cleaning agent used on the rest of the car. Never clean the bumpers with
ProCarManuals.com
Page 61 of 99

gasoline or paint thinner. Difficult spots can be removed with denatured alcohol. To avoid scratches, do not dry the
bumpers with paper.
See your local Volvo retailer for a complete line of genuine Volvo environmental car care products.
* Pay special attention to the drain holes near the base of the windshield in the cowl under the rear edge of the hood.
pg. 111 Automatic car washing, Polishing and waxing
Automatic washing simple and quick
An automatic wash is a simple and quick way to clean your car, but it is worth remembering that it may not be as
thorough as when you yourself go over the car with sponge and water. Keeping the underbody clean is most important,
especially in the winter. Some automatic washers do not have facilities for washing the underbody.
Before driving into an automatic wash, make sure that side view mirrors, auxiliary lamps, etc., are secure, otherwise
there is risk of the machine dislodging them. You should also lower the antenna by turning off the radio.
We do NOT recommend washing your car in an automatic wash during the first six months (because the paint
will not have hardened sufficiently).
Cleaning the convertible top - C70 Convertible
CAUTION:
Some automatic car washes can damage the convertible top. For this reason, we recommend washing the car by
hand only.
Remember that the windows are lowered slightly when the convertible top is raised. Be sure the windows are closed
and the convertible top is completely raised and properly in place at the upper edge of the windshield before washing
the car. A chime indicates when the top has been fully raised (see page 44
).
Wash the convertible top with a mild detergent, wiping from the front towards the rear. Rinse thoroughly with clean
water.
Do not wash the convertible top with a high pressure spray.
After washing, the convertible top should be completely dry before it is folded down.
Remove bird droppings from the convertible top as soon as possible. Otherwise the top may be permanently stained.
A soft brush can be used to clean the convertible top between washings.
Winter: remove any residue of road salt from the convertible top as soon as possible.
Do not use solvents, tar remover or other all-purpose stain removers to clean the convertible top. Use Volvo
approved cleaning agents only - consult your Volvo retailer.
Polishing and waxing
Normally, polishing is not required during the first year after delivery, however, waxing may be beneficial.
Before applying polish or wax the car must be washed and dried. Tar spots can be removed with kerosene or tar
remover. Difficult spots may require a fine rubbing compound.
After polishing use liquid or paste wax.
Several commercially available products contain both polish and wax.
Waxing alone does not substitute for polishing a dull surface.
ProCarManuals.com