light VOLVO C70 2002 Owner's Guide
[x] Cancel search | Manufacturer: VOLVO, Model Year: 2002, Model line: C70, Model: VOLVO C70 2002Pages: 99, PDF Size: 2.56 MB
Page 66 of 99

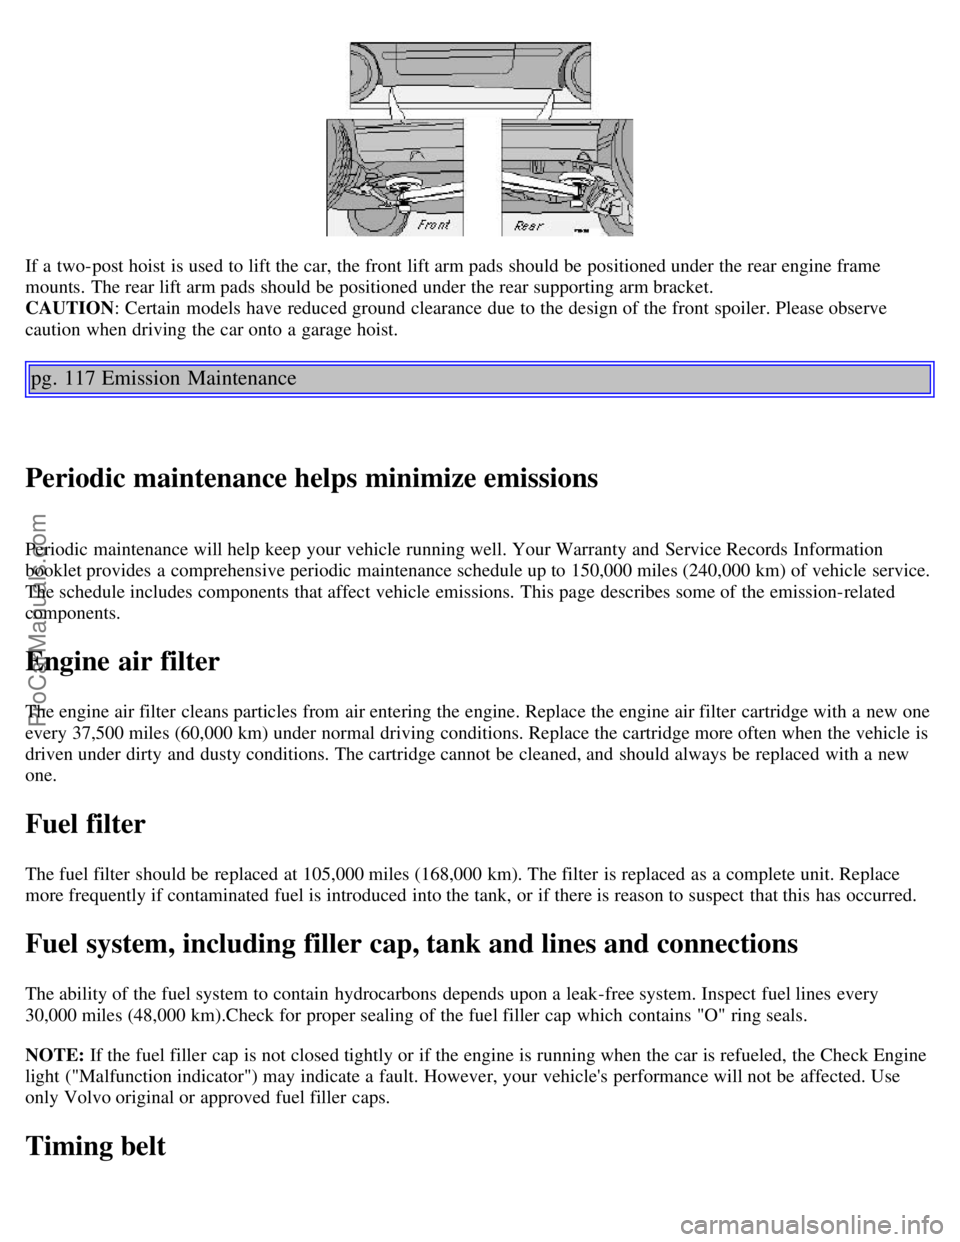
If a two-post hoist is used to lift the car, the front lift arm pads should be positioned under the rear engine frame
mounts. The rear lift arm pads should be positioned under the rear supporting arm bracket.
CAUTION: Certain models have reduced ground clearance due to the design of the front spoiler. Please observe
caution when driving the car onto a garage hoist.
pg. 117 Emission Maintenance
Periodic maintenance helps minimize emissions
Periodic maintenance will help keep your vehicle running well. Your Warranty and Service Records Information
booklet provides a comprehensive periodic maintenance schedule up to 150,000 miles (240,000 km) of vehicle service.
The schedule includes components that affect vehicle emissions. This page describes some of the emission-related
components.
Engine air filter
The engine air filter cleans particles from air entering the engine. Replace the engine air filter cartridge with a new one
every 37,500 miles (60,000 km) under normal driving conditions. Replace the cartridge more often when the vehicle is
driven under dirty and dusty conditions. The cartridge cannot be cleaned, and should always be replaced with a new
one.
Fuel filter
The fuel filter should be replaced at 105,000 miles (168,000 km). The filter is replaced as a complete unit. Replace
more frequently if contaminated fuel is introduced into the tank, or if there is reason to suspect that this has occurred.
Fuel system, including filler cap, tank and lines and connections
The ability of the fuel system to contain hydrocarbons depends upon a leak-free system. Inspect fuel lines every
30,000 miles (48,000 km).Check for proper sealing of the fuel filler cap which contains "O" ring seals.
NOTE: If the fuel filler cap is not closed tightly or if the engine is running when the car is refueled, the Check Engine
light ("Malfunction indicator") may indicate a fault. However, your vehicle's performance will not be affected. Use
only Volvo original or approved fuel filler caps.
Timing belt
ProCarManuals.com
Page 73 of 99

Vehicle loading
The tires on your Volvo should perform to specifications at all normal loads when inflated as recommended on the tire
information label. The label is located on the inside of the fuel filler flap. The label lists both tire and vehicle design
limits. Do not load your car beyond the load limits indicated.WARNING!
Improperly inflated tires will reduce tire life, adversely affect vehicle handling and can possibly lead to failure
resulting in loss of vehicle control without prior warning.
All specifications are subject to change without notice.
pg. 134 Specifications
Electrical system
12 Volt, negative ground.
Voltagecontrolled generator. Singlewire system with chassis and engine used as conductors.
Battery
Voltage 12 Volt
Capacity 520 A/100 min
(certain markets) 420 A/75 min
The battery contains corrosive and poisonous acids. It is of the utmost importance that old batteries are disposed of
correctly. Your Volvo retailer can assist you in this matter.
Generator
Rated output 1400 W
Max. current 100 A
Bulbs
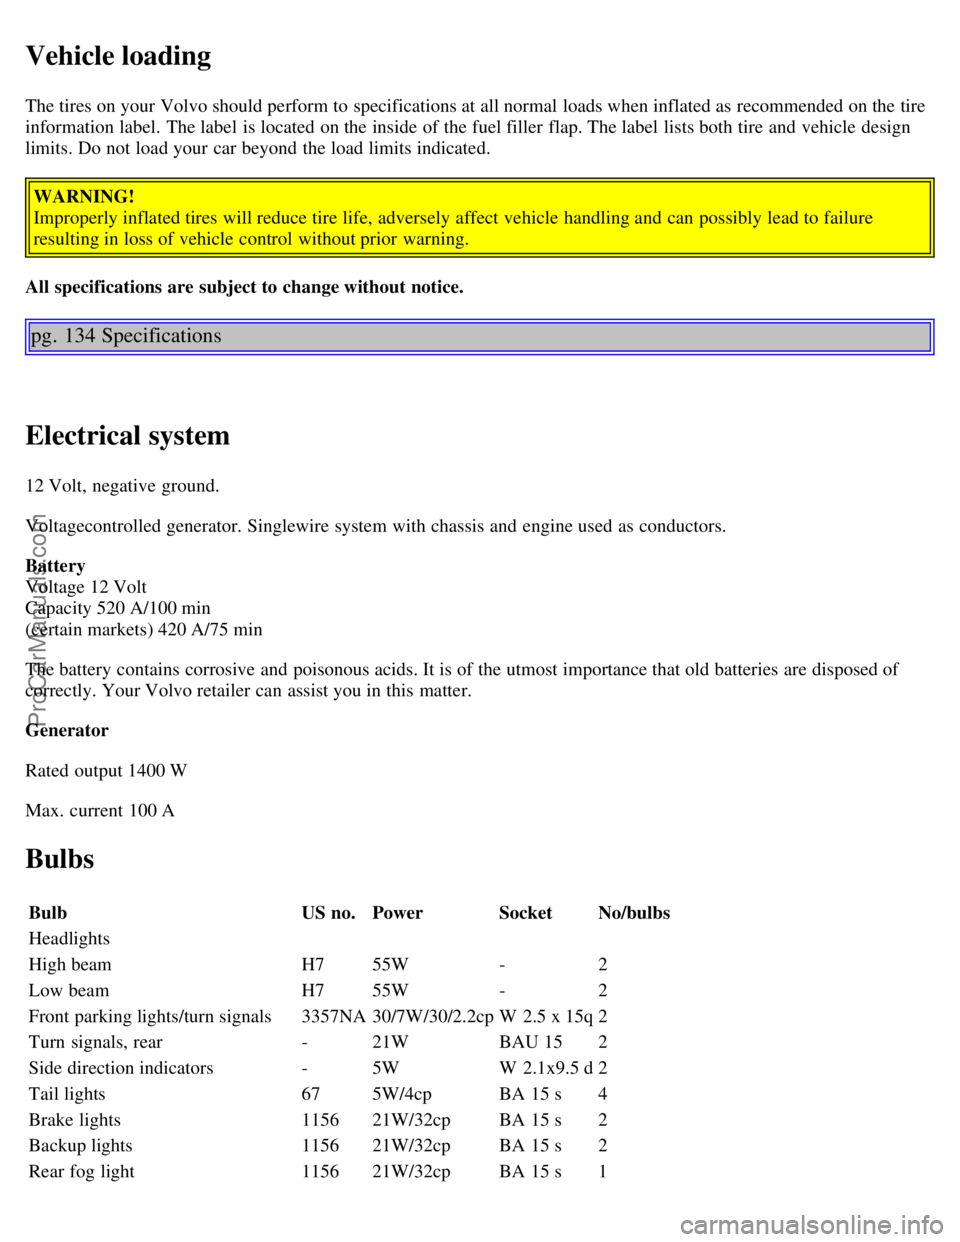
Bulb US no.Power SocketNo/bulbs
Headlights
High beam H755W -2
Low beam H755W -2
Front parking lights/turn signals 3357NA30/7W/30/2.2cp W 2.5 x 15q2
Turn signals, rear -21W BAU 152
Side direction indicators -5W W 2.1x9.5 d2
Tail lights 675W/4cp BA 15 s4
Brake lights 115621W/32cp BA 15 s2
Backup lights 115621W/32cp BA 15 s2
Rear fog light 115621W/32cp BA 15 s1
ProCarManuals.com
Page 74 of 99

Front fog lightsH155 W P14.5s2
License plate light -5 W W 2.1x9.5d2
Door open warning light -3 W W 2.1x9.5d4
Door step courtesy lights -5W W 2.1x9.5d2
Trunk light -10 W SV 8.51
Glove compartment light -2 W BA 9s1
Vanity mirror lights -1.2 W -2
Instrument lighting -3 W W 2.1x9.5d3
Illumination, control panel -1.2 W W 2x4.6 d-
gear selector (automatic trans.) -1.2 W W 2x4.6d1
rear ashtray -1.2 W W 2x4.6d1
Instrument warning/indicator lights -1.2 W W 2x4.6d-
Front courtesy lights -5 W BA 9s2
Rear reading lights -5 W BA 9s2
All specifications are subject to change without notice.
pg. 135 Specifications
Dimensions
Length185.8 in. (472 cm)
Width 71.7 in. (182 cm)
Height C70 Coupe 55.7 in. (141 cm)
Height C70 Convertible 56.3 in. (143 cm)
Wheelbase 105 in. (266 cm)
Track, front 59.9 in. (151.8 cm)
Track, rear 59.8 in. (151.6 cm)
Turning circle (between curbs) 38.4 ft. (11.7 m)
Cargo capacity 7.9 cu. ft. (0.22 m
3)
Weights -
USACanada
Gross vehicle weight (GVW)
C70 Coupe
(Aut.) 4190 lbs (1900 kg)1900 kg
(Man.) 4140 lbs (1878 kg)1880 kg
C70 Convertible
(Aut.) 4450 lbs (2018 kg)2020 kg
(Man.) 4410 lbs (2000 kg)2000 kg
Capacity weight *
C70 Coupe 785 lbs (356 kg)355 kg
ProCarManuals.com
Page 80 of 99

· the unit must be turned on
Make sure the headlights are turned off to help prevent battery drain (please refer to page 22
for information on turning
the headlights off).
Enter the code again once this time has elapsed.
pg. 140 Radio SC -813
A - On/off switch
Push the button to switch on the radio. Press the button slightly longer to turn the radio off.
B - Volume control
Turn the button clockwise to increase the volume. The volume control is electronic and has no end stop.
C - Waveband selector
The desired waveband is set by pressing one of the waveband selector buttons. The frequency and waveband is shown
on the display.
NOTE: There are two FM wavebands and one
AM waveband. This makes it possible to store 2 x 6 FM stations and 6 AM stations in memory.
D - Setting frequency selection
The radio can be used in most parts of the world by changing the frequency selection intervals as follows:
Depress and hold preset button 5 and turn the radio ON. "USA" will flash on the display.
Each time button 5 is pressed, the frequency selection will change from "USA" to "AUS", etc. When the correct
country name is displayed, wait 5 seconds and the radio will be ready for use.
E - Manual tuning
ProCarManuals.com
Page 86 of 99

2 0 0 2
VOLVO
C70 Coupe & Convertible
INDEX
pg. 194 HomeLink® Universal Transceiver (option)
HomeLink® Universal Transceiver
HomeLink® is an advanced system that can be programmed to learn the codes of three different remote controlled-
devices (e.g., garage door openers, remote lighting, entry door lock). HomeLink®'s sun visor-mounted transceiver,
powered by your car's electrical system, may then be used in place of your hand -held remote controls.
NOTE: For your security, the HomeLink® Universal Transceiver is designed to not function if you lock your car
from the outside.
Programming the transceiver
1. The ignition switch must be turned to the "accessory" position (II) before programming the HomeLink® Universal
Transceiver.
Release the buttons.
2. Begin by erasing all 3 factory default channels. Hold down the two outside buttons (buttons 1 and 3 in the
illustration) on the HomeLink® Universal Transceiver for about 20 seconds, until HomeLink® 's indicator light begins
to flash. Then release the buttons.
3. Hold your hand -held transmitter (garage door opener, for example) 2 to 5 in. (5 to 12 cm) away from the
HomeLink® surface, keeping the indicator light in view. For placement questions, contact HomeLink® toll-free 1-
800-355-3515 (Internet: www.HomeLink.com
).
4. Using two hands, push and hold both your hand -held transmitter's button and the transceiver button you wish to
program. The indicator light will flash first slowly, then rapidly. Rapid flashing tells you the HomeLink® button has
ProCarManuals.com
Page 87 of 99

been successfully programmed. Release both buttons.
5. If you are programming a rolling code-equipped device (e.g., garage door opener or entry door lock), refer to
"Programming rolling codes" on the next page to complete the programming process.
Repeat steps 3 and 4 to program the other two transceiver buttons. If, after several attempts, you are unable to
successfully train the HomeLink® Universal Transceiver to learn your hand -held transmitter's signal, contact
HomeLink® toll-free 1-800-355-3515 (Internet: www.HomeLink.com
).
WARNING!
· If you use HomeLink® to open a garage door or gate, be sure no one is near the gate or door while it is in motion.
· Do not use the HomeLink® Universal Transceiver with any garage door opener that lacks safety "stop" and "reverse"
features as required by federal safety standards. (This includes any garage door opener model manufactured before
April 1, 1982) A garage door opener that cannot "detect" an object, signalling the door to "stop" and "reverse" does
not meet current federal safety standards. Using a garage door opener without these features increases the risk of
serious injury or death. For more information on this matter, call toll-free 1-800-355- 3515 (Internet:
www.HomeLink.com
).
pg. 195 HomeLink® Universal Transceiver (option)
NOTE - Canadian residents:
During programming, your hand -held transmitter may automatically stop transmitting. To successfully train
HomeLink® , continue to hold the HomeLink® button. At the same time, repeatedly press and hold your hand -held
transmitter's button at two-second intervals until HomeLink® has learned your transmitter's code. The HomeLink®
indicator light will flash first slowly, and then rapidly to indicate that the button has been successfully programmed.
Determining if your garage door uses a rolling code
Determining if your garage door uses a rolling code Determine, in one of the following ways, if your garage door uses
a rolling code system and is manufactured after 1996:
Refer to the garage door opener owner's manual for verification.
If your hand -held transmitter appears to program the HomeLink® Universal Transceiver but the programmed button
does not activate the garage door, your garage door opener may have a rolling code.
Press the programmed HomeLink® button. If the garage door opener has the rolling code feature, the HomeLink®
indicator light flashes rapidly and then glows steadily after approximately 2 seconds.
To train a rolling code garage door opener , follow these instructions after programming the desired transceiver
button according to "Programming the transceiver." The help of a second person may make training easier.
1. Locate the training button on the garage door opener motor head unit. The location and color of the training button
may vary. If you encounter difficulty, refer to the garage door opener owner's manual or call toll-free 1-800-355-3515
(Internet: www.HomeLink.com
).
2. Press the "training" button on the garage door opener motor head unit until the "training" light comes on.
3. Press and release the programmed HomeLink® button. Press and release the programmed HomeLink® button a
second time to complete the training process. Some garage door openers may require you to do this procedure a third
time to complete the training.
ProCarManuals.com
Page 88 of 99

The programmed button on your HomeLink® Universal Transceiver should now operate your garage door opener. The
original hand -held transmitter can also be used, as desired, to operate the garage door.www.HomeLink.com).
Operating the HomeLink® Universal Transceiver Once programmed, the HomeLink® Universal Transceiver can
be used in place of your hand -held transmitters.
To operate, the key must be turned to the "accessory" position (II) or the engine must be running. Press the
programmed HomeLink® button to activate the garage door, driveway gate, security lighting, home security system,
etc.
Your original hand -held transmitters may, of course, be used at any time.
Erasing programmed buttons
Individual buttons cannot be erased. To erase all three programmed buttons:
1. 1. Turn the ignition key to the "accessory" position (II).
2. Hold down the two outside buttons on the HomeLink® Universal Transceiver for about 20 seconds, until
HomeLink® 's indicator light begins to flash.
3. Release both buttons.
The HomeLink® buttons can be reprogrammed using the procedures described on the previous page.
(HomeLink® information is continued on the next page)
pg. 196 HomeLink® Universal Transceiver (option)
Reprogramming a single HomeLink® button
1. Press and hold the desired HomeLink® button. Do not release the button until step 3 has been completed.
2. When the indicator light begins to flash slowly (after approximately 20 seconds), position the hand -held transmitter
2 to 5 in. (5 to 12 cm) away from the HomeLink® surface.
3. Press and hold the hand -held transmitter button.
The HomeLink® indicator light will begin to flash, first slowly then rapidly. When the indicator light flashes rapidly,
release both buttons.
The previously programmed device has now been erased and the new device can be activated by pressing the
HomeLink® button that has just been programmed. This procedure will not affect any other programmed HomeLink®
buttons.
NOTE:
· Retain the original transmitter(s) for future programming procedures (i.e., if you purchase a new car).
· It is also suggested that if you sell your car, the programmed channels on the HomeLink® Universal Transceiver be
erased for security purposes.
ProCarManuals.com
Page 90 of 99

2 0 0 2
VOLVO
C70 Coupe & Convertible
INDEX
pg. 197 - 199 Index
A
ABS 19
Air conditioning37
Air filter - engine117
Air mix35
Air vents35
Airbag (SIPS)8
Airbag (SRS)4
Alarm48
Ambient temperature sensor27
Anti-lock Brake System (ABS)19,78
Antifreeze81
Ashtrays33
Audio systems
-General information190
-SC-813138
-SC-816151
-SC-901167
Automatic car washing111
Automatic daytime running26
Automatic transmission70,133
Driving mode selector71
Automatic transmission fluid130
B
Battery81
,134
Battery drain - avoiding61
Battery maintenance126
Booster cushion13
Brake failure warning light19, 20
Brake fluid122,130
Brake fluid warning light20
Brake system78, 79
ProCarManuals.com
Page 91 of 99

Brake warning light19
Bulb failure warning19,21
Bulbs134
C
Capacities133
Catalytic converter127
Central locking button38
Central locking system47
Chains (snow)85
Changing a wheel90
Child booster cushion11
Child Restraint Anchorages11
Child safety13
Cleaning the convertible top111
Climate control systems36
Clock18
Clock - resetting27
Clutch fluid122
Clutch interlock69
Convertible top - cleaning111
Convertible top - electrically operated44
Convertible top - manually raising106
Coolant - checking/changing124
Coolant level sensor21
Coolant level warning light19
Cooling system73,132
Courtesy lights - exterior22
Courtesy lights - front54
Cruise control31
D
Daytime running lights26
Demister - rear window25
Dimensions135
Distributor ignition system132
Diversity antenna193
Doors and locks46
Driving economy67
Driving mode W71, 81
E
EBD (Electronic Brake-force Distribution)79
ECC - Electronic Climate Control36, 37
Electrical system73,134
Electrically heated front seats32
Electrically operated convertible top44
ProCarManuals.com
Page 92 of 99

Electrically operated front seats50
Electrically operated sun roof43
Electrically operated windows38, 39
Electronic Brake Distribution (EBD)79
Electronic Brake-force Distribution (EBD)79
Emergency towing75, 76
Emergency warning flashers25
Engine131
Engine air filter117
Engine compartment125
Engine oil120, 121,130
Engine oil - checking/changing120
Engine oil pressure19
Exterior courtesy lights22
F
Fog light - rear19
,24
Fog lights - front24
Front courtesy lights54
Front fog lights24
Front seats50
Front seats - heated32
Front seats - memory function50
Fuel filter117
Fuel gauge18
Fuel level19
Fuel requirements64, 65
Fuel system117, 132
Fuel tank cover - opening40, 66
opening manually105, 106
Fuses99, 101, 102
Fuses - replacing99
G
Gas tank cover - opening40
, 66
opening manually105, 106
Generator19, 134
H
Hand brake32
Handling72
Hazard warning flashers25
Headlight wiper blades - replacing104
Headlights22
Heated front seats32
Heated side-view mirrors25
Heating37
ProCarManuals.com