warning VOLVO C70 2004 Owner's Guide
[x] Cancel search | Manufacturer: VOLVO, Model Year: 2004, Model line: C70, Model: VOLVO C70 2004Pages: 99, PDF Size: 1.79 MB
Page 52 of 99

Clean the contact surfaces on the wheel and hub. Lift the wheel and place it on the hub. Make sure that you align the
wheel with the guide stud on the wheel hub prior to installation. Install the wheel bolts crosswise (see illustration) and
tighten by turning lightly clockwise. Lower the vehicle to the ground and alternately tighten the bolts to 100 ft. lbs.
(130 Nm). Install the wheel cap (where applicable).
CAUTION: Correct tightening torque on wheel bolts must be observed. The wheel bolts should never be greased or
lubricated. The extended, chromed wheel bolts must not be used with steel rims, as they make it impossible to fit the
hub caps.
Correct tightening order for wheel bolts
pg. 88 Spare tire
Temporary Spare (certain models)
The spare tire in your car is called a "Temporary Spare". It has the following designation: T125/90 R15.
Recommended tire pressure (see decal on fuel filler flap) should be maintained irrespective of which position on the
car the Temporary Spare tire is used on.
In the event of damage to this tire, a new one can be purchased from your Volvo retailer.
CAUTION: The car must not be driven with wheels of different dimensions or with a spare tire other than the one that
came with the car. The use of different size wheels can seriously damage your car's transmission.
WARNING!
Current legislation prohibits the use of the "Temporary Spare" tire other than as a temporary replacement for a
punctured tire. In other words, it must be replaced as soon as possible by a standard tire. Roadholding, etc., may be
affected with the "Temporary Spare" in use. Do not, therefore, exceed 50 mph (80 km/h).
pg. 89 Replacing bulbs
ProCarManuals.com
Page 57 of 99
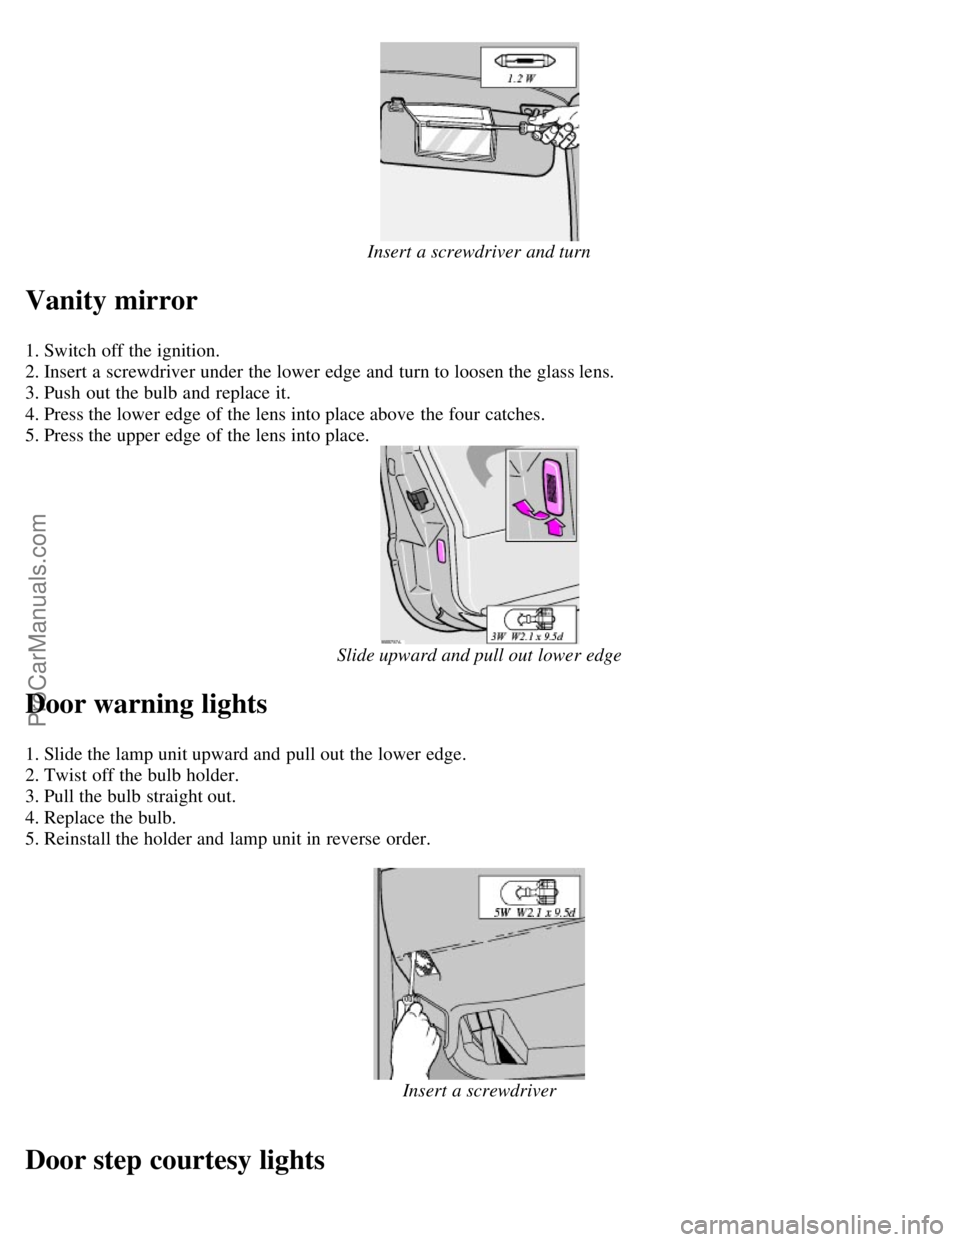
Insert a screwdriver and turn
Vanity mirror
1. Switch off the ignition.
2. Insert a screwdriver under the lower edge and turn to loosen the glass lens.
3. Push out the bulb and replace it.
4. Press the lower edge of the lens into place above the four catches.
5. Press the upper edge of the lens into place.
Slide upward and pull out lower edge
Door warning lights
1. Slide the lamp unit upward and pull out the lower edge.
2. Twist off the bulb holder.
3. Pull the bulb straight out.
4. Replace the bulb.
5. Reinstall the holder and lamp unit in reverse order.
Insert a screwdriver
Door step courtesy lights
ProCarManuals.com
Page 61 of 99
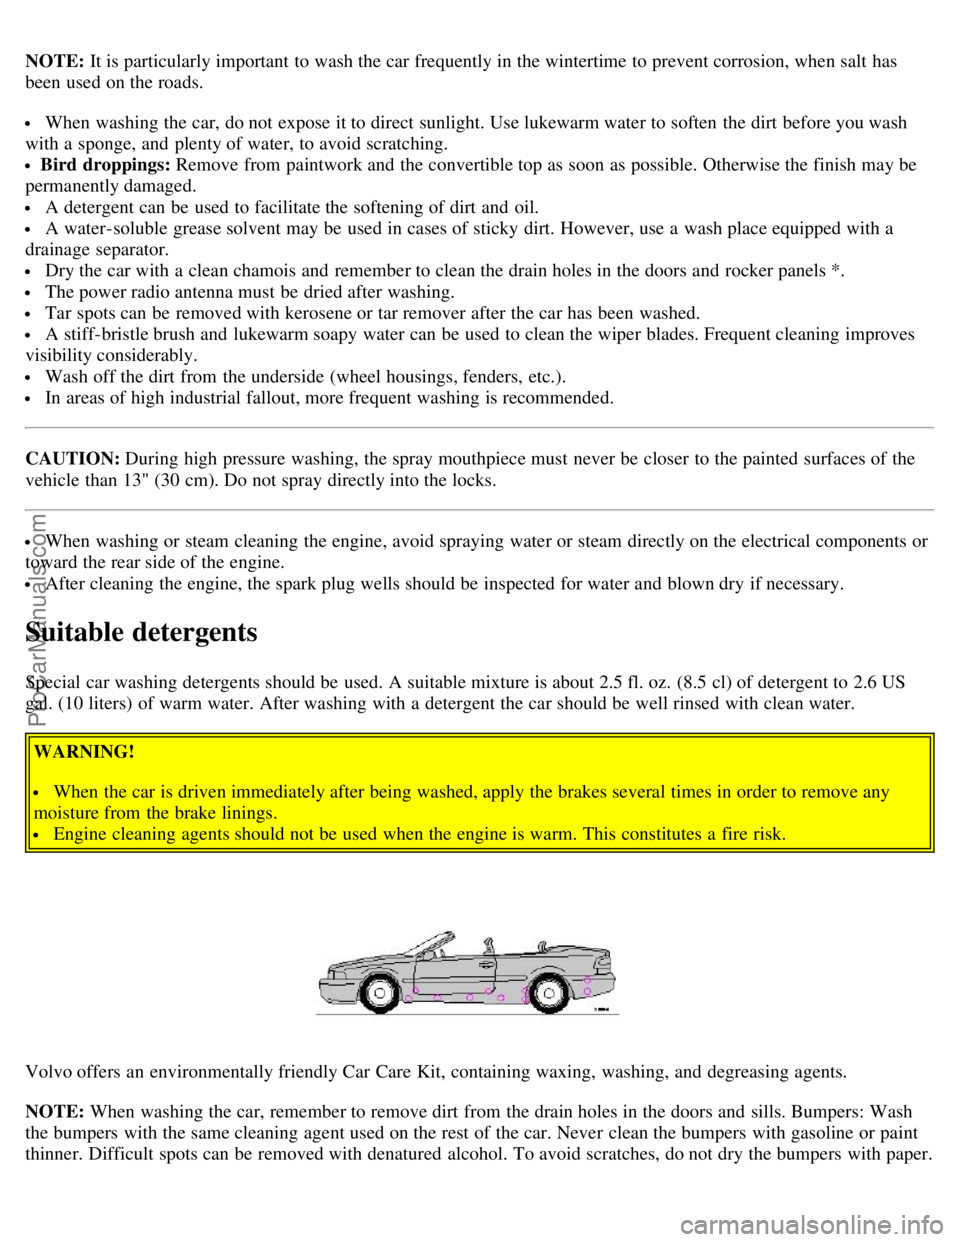
NOTE: It is particularly important to wash the car frequently in the wintertime to prevent corrosion, when salt has
been used on the roads.
When washing the car, do not expose it to direct sunlight. Use lukewarm water to soften the dirt before you wash
with a sponge, and plenty of water, to avoid scratching.
Bird droppings: Remove from paintwork and the convertible top as soon as possible. Otherwise the finish may be
permanently damaged.
A detergent can be used to facilitate the softening of dirt and oil.
A water-soluble grease solvent may be used in cases of sticky dirt. However, use a wash place equipped with a
drainage separator.
Dry the car with a clean chamois and remember to clean the drain holes in the doors and rocker panels *.
The power radio antenna must be dried after washing.
Tar spots can be removed with kerosene or tar remover after the car has been washed.
A stiff-bristle brush and lukewarm soapy water can be used to clean the wiper blades. Frequent cleaning improves
visibility considerably.
Wash off the dirt from the underside (wheel housings, fenders, etc.).
In areas of high industrial fallout, more frequent washing is recommended.
CAUTION: During high pressure washing, the spray mouthpiece must never be closer to the painted surfaces of the
vehicle than 13" (30 cm). Do not spray directly into the locks.
When washing or steam cleaning the engine, avoid spraying water or steam directly on the electrical components or
toward the rear side of the engine.
After cleaning the engine, the spark plug wells should be inspected for water and blown dry if necessary.
Suitable detergents
Special car washing detergents should be used. A suitable mixture is about 2.5 fl. oz. (8.5 cl) of detergent to 2.6 US
gal. (10 liters) of warm water. After washing with a detergent the car should be well rinsed with clean water.
WARNING!
When the car is driven immediately after being washed, apply the brakes several times in order to remove any
moisture from the brake linings.
Engine cleaning agents should not be used when the engine is warm. This constitutes a fire risk.
Volvo offers an environmentally friendly Car Care Kit, containing waxing, washing, and degreasing agents.
NOTE: When washing the car, remember to remove dirt from the drain holes in the doors and sills. Bumpers: Wash
the bumpers with the same cleaning agent used on the rest of the car. Never clean the bumpers with gasoline or paint
thinner. Difficult spots can be removed with denatured alcohol. To avoid scratches, do not dry the bumpers with paper.
ProCarManuals.com
Page 64 of 99

2 0 0 4
VOLVO C70
Chapter 8 - Volvo Service
pg. 109 Volvo Service
Page
Label information 110
Maintenance service, Warranty111
Servicing112
Emissions maintenance113
Fuel/emissions systems114
Lubrication115
Engine oil116
Power steering fluid, Brake/clutch system fluid reservoir118
Washer fluid reservoir119
Coolant120
Engine compartment121
Battery maintenance/ Proposition 65 Warning122
Three-way catalytic converter123
pg. 110 Label information
1 Vehicle Emission Control Information
Your Volvo is designed to meet all applicable emission standards, as evidenced by the certification label on the
underside of the hood. For further information regarding these regulations, please consult your Volvo retailer.
2 Vacuum hose routing
(underside of hood)
3 Loads and Tire Pressures
(on rear edge of passenger's door)
4 Model plate
Vehicle Identification Number (VIN). Codes for color and upholstery, etc. This plate is located in the engine
compartment, on the inside of the left front fender.
5 Vehicle Identification Number (VIN) *
ProCarManuals.com
Page 72 of 99

Cooling system
Type: Positive pressure, closed system
Thermostat begins to open at 180° F (87° C)
Coolant: Volvo original coolant/antifreeze
Capacity: 7.4 US qts. (7.0 liters)
Fuel system
The engine is equipped with a multiport fuel injection system.
Distributor ignition system
Firing order: 1-2-4-5-3
Distributor ignition setting: Not adjustable
Spark plugs: Champion RC87PYP (or equivalent)
Spark plug gap: 0.03" (0.75 mm)
Tightening torque: 18.4 ft. lbs. +/- 3.7 ft. lbs. (25 Nm +/- 5 Nm)WARNING!
The distributor ignition system operates at very high voltages. Special safety precautions must be followed to
prevent injury. Always turn the ignition off when:
Replacing distributor ignition components e.g. plugs, coil, etc.
Do not touch any part of the distributor ignition system while the engine is running. This may result in unintended
movements and body injury.
All specifications are subject to change without notice.
Front suspension
Spring strut suspension with integrated shock absorbers and control arms linked to the support frame. Power-assisted
rack and pinion steering. Safety type steering column.
The alignment specifications apply to an unladen car but include fuel, coolant and spare wheel.
Toe-in measured on the wheel rims: 2.4 mm +/- 0.7 mm
Toe-in measured on tire sides: 2.9 +/- 0.9 mm
Rear suspension
Delta-link individual rear wheel suspension with longitudinal support arms, double link arms and track rods.
Toe-in measured on the tire sides: 4° +/- 10°
ProCarManuals.com
Page 74 of 99
Vehicle loading
The tires on your Volvo should perform to specifications at all normal loads when inflated as recommended on the tire
information label. The label is located on the inside of the fuel filler flap. The label lists vehicle load limits. Do not
load your car beyond the indicated limits.WARNING!
Improperly inflated tires will reduce tire life, adversely affect vehicle handling and can possibly lead to failure
resulting in loss of vehicle control without prior warning.
All specifications are subject to change without notice.
pg. 130 Specifications
Electrical system
12 Volt, negative ground.
Voltage-controlled generator. Single-wire system with chassis and engine used as conductors.
Battery Voltage 12,6 Volt
Capacity 520 A/100 min
(certain markets) 420 A/75 min
The battery contains corrosive and poisonous acids. It is of the utmost importance that old batteries are disposed of
correctly. Your Volvo retailer can assist you in this matter.
Generator Rated output 1400 W
Max. current 120 A
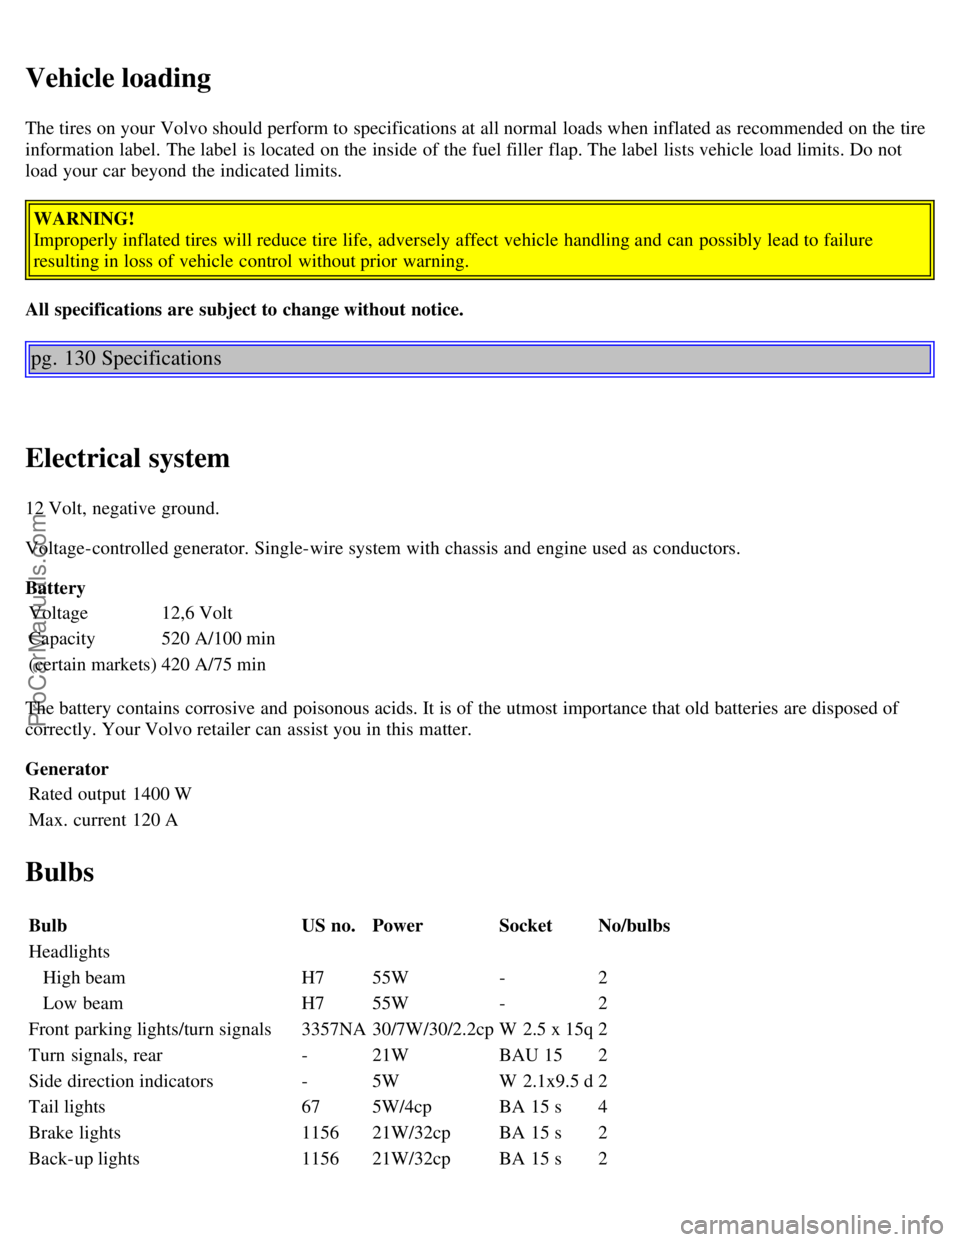
Bulbs
Bulb US no.Power SocketNo/bulbs
Headlights
ProCarManuals.com
Page 75 of 99

Rear fog light115621W/32cp BA 15 s1
Front fog lights H155 W P14.5s2
License plate light -5 W W 2.1x9.5d2
Door open warning light -3 W W 2.1x9.5d4
Door step courtesy lights -5W W 2.1x9.5d2
Trunk light -10 W SV 8.51
Glove compartment light -2 W BA 9s1
Vanity mirror lights -1.2 W -2
Instrument lighting -3 W W 2.1x9.5d3
Illumination, control panel -1.2 W W 2x4.6 d-
gear selector (automatic trans.) -1.2 W W 2x4.6d1
rear ashtray -1.2 W W 2x4.6d1
Instrument warning/indicator lights -1.2 W W 2x4.6d-
Front courtesy lights -5 W BA 9s2
Rear reading lights -5 W BA 9s2
All specifications are subject to change without notice.
pg. 131 Specifications
Dimensions
Length186 in. (472 cm)
Width 71.5 in. (182 cm)
Height C70 Convertible 56.3 in. (143 cm)
Wheelbase 105 in. (266 cm)
Track, front 59.9 in. (151.8 cm)
Track, rear 59.8 in. (151.6 cm)
Turning circle (between curbs) 38.4 ft. (11.7 m)
Cargo capacity C70 Convertible 8.1 cu. ft. (223 liters)
USA Canada
Max trunk -mounted luggage rack load
C70 Convertible 110 lbs (50 kg)50 kg
Max trailer weight(w/o brakes) 1100 lbs (500 kg)500 kg
Max trailer weight(with brakes)
2" ball 3300 lbs (1500 kg)1500 kg
1 7/8" ball 2000 lbs (908 kg)900 kg
Max tongue weight ** 165 lbs (75 kg)75 kg
Weights
USA Canada
ProCarManuals.com
Page 76 of 99
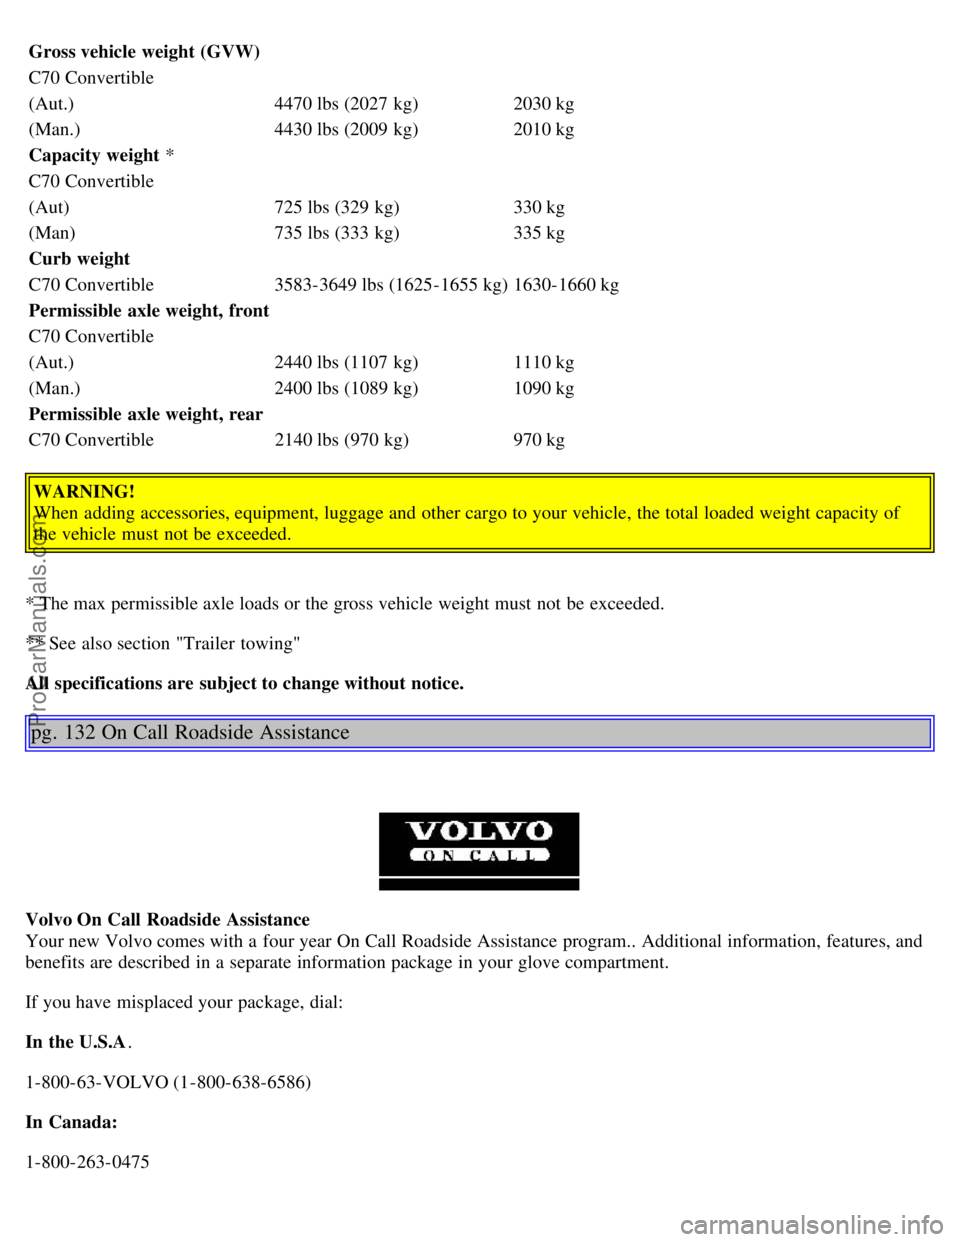
Gross vehicle weight (GVW)
C70 Convertible
(Aut.)4470 lbs (2027 kg)2030 kg
(Man.) 4430 lbs (2009 kg)2010 kg
Capacity weight *
C70 Convertible
(Aut) 725 lbs (329 kg)330 kg
(Man) 735 lbs (333 kg)335 kg
Curb weight
C70 Convertible 3583-3649 lbs (1625-1655 kg)1630-1660 kg
Permissible axle weight, front
C70 Convertible
(Aut.) 2440 lbs (1107 kg)1110 kg
(Man.) 2400 lbs (1089 kg)1090 kg
Permissible axle weight, rear
C70 Convertible 2140 lbs (970 kg)970 kg
WARNING!
When adding accessories, equipment, luggage and other cargo to your vehicle, the total loaded weight capacity of
the vehicle must not be exceeded.
* The max permissible axle loads or the gross vehicle weight must not be exceeded.
** See also section "Trailer towing"
All specifications are subject to change without notice.
pg. 132 On Call Roadside Assistance
Volvo On Call Roadside Assistance
Your new Volvo comes with a four year On Call Roadside Assistance program.. Additional information, features, and
benefits are described in a separate information package in your glove compartment.
If you have misplaced your package, dial:
In the U.S.A.
1-800-63-VOLVO (1-800-638-6586)
In Canada:
1-800-263-0475
ProCarManuals.com
Page 87 of 99
5. If you are programming a rolling code-equipped device (e.g., garage door opener or entry door lock), refer to
"Programming rolling codes" on the next page to complete the programming process.
Repeat steps 3 and 4 to program the other two transceiver buttons.
If, after several attempts, you are unable to successfully train the HomeLink® Universal Transceiver to learn your
hand -held transmitter's signal, contact HomeLink® toll-free 1-800-355-3515 (Internet: www.HomeLink.com
).
WARNING!
If you use HomeLink® to open a garage door or gate, be sure no one is near the gate or door while it is in motion.
Do not use the HomeLink® Universal Transceiver with any garage door opener that lacks safety "stop" and
"reverse" features as required by federal safety standards. (This includes any garage door opener model manufactured
before April 1, 1982) A garage door opener that cannot "detect" an object, signalling the door to "stop" and "reverse"
does not meet current federal safety standards. Using a garage door opener without these features increases the risk of
serious injury or death. For more information on this matter, call toll-free 1-800-355- 3515 (Internet:
www.HomeLink.com
).
pg. 191 HomeLink® Universal Transceiver (option)
NOTE - Canadian residents:
During programming, your hand -held transmitter may automatically stop transmitting. To successfully train
HomeLink® , continue to hold the HomeLink® button. At the same time, repeatedly press and hold your hand -held
transmitter's button at two -second intervals until HomeLink® has learned your transmitter's code. The HomeLink®
indicator light will flash first slowly, and then rapidly to indicate that the button has been successfully programmed.
Determining if your garage door uses a rolling code
Determining if your garage door uses a rolling code Determine, in one of the following ways, if your garage door uses
a rolling code system and is manufactured after 1996:
Refer to the garage door opener owner's manual for verification.
If your hand -held transmitter appears to program the HomeLink® Universal Transceiver but the programmed button
does not activate the garage door, your garage door opener may have a rolling code.
Press the programmed HomeLink® button. If the garage door opener has the rolling code feature, the HomeLink®
indicator light flashes rapidly and then glows steadily after approximately 2 seconds.
To train a rolling code garage door opener , follow these instructions after programming the desired transceiver
button according to "Programming the transceiver." The help of a second person may make training easier.
1. Locate the training button on the garage door opener motor head unit. The location and color of the training button
may vary. If you encounter difficulty, refer to the garage door opener owner's manual or call toll-free 1-800-355-3515
(Internet: www.HomeLink.com
).
2. Press the "training" button on the garage door opener motor head unit until the "training" light comes on.
3. Press and release the programmed HomeLink® button. Press and release the programmed HomeLink® button a
second time to complete the training process. Some garage door openers may require you to do this procedure a third
time to complete the training.
The programmed button on your HomeLink® Universal Transceiver should now operate your garage door opener. The
original hand -held transmitter can also be used, as desired, to operate the garage door.
ProCarManuals.com
Page 90 of 99
2 0 0 4
VOLVO C70
INDEX
pg. 193 - 195 Index
A
ABS 17
Air conditioning35
Air filter - engine113
Air mix33
Air vents33
Airbag (SIPS)8
Airbag (SRS)4
Alarm45
Ambient temperature sensor25
Anti-lock Brake System (ABS)17,74
Antifreeze77
Ashtrays31
Audio systems
-General information186
-SC-813134
-SC-816147
-SC-900/01163
Automatic daytime running24
Automatic transmission66,129
-Kickdown67
Automatic transmission fluid126
B
Battery77
,130
Battery drain - avoiding57
Battery maintenance122
Booster cushion12
Brake failure warning light17, 18
Brake fluid118,126
Brake fluid warning light28
Brake system74, 75
Brake warning light17
ProCarManuals.com