window VOLVO C70 2008 User Guide
[x] Cancel search | Manufacturer: VOLVO, Model Year: 2008, Model line: C70, Model: VOLVO C70 2008Pages: 246, PDF Size: 5.14 MB
Page 68 of 246
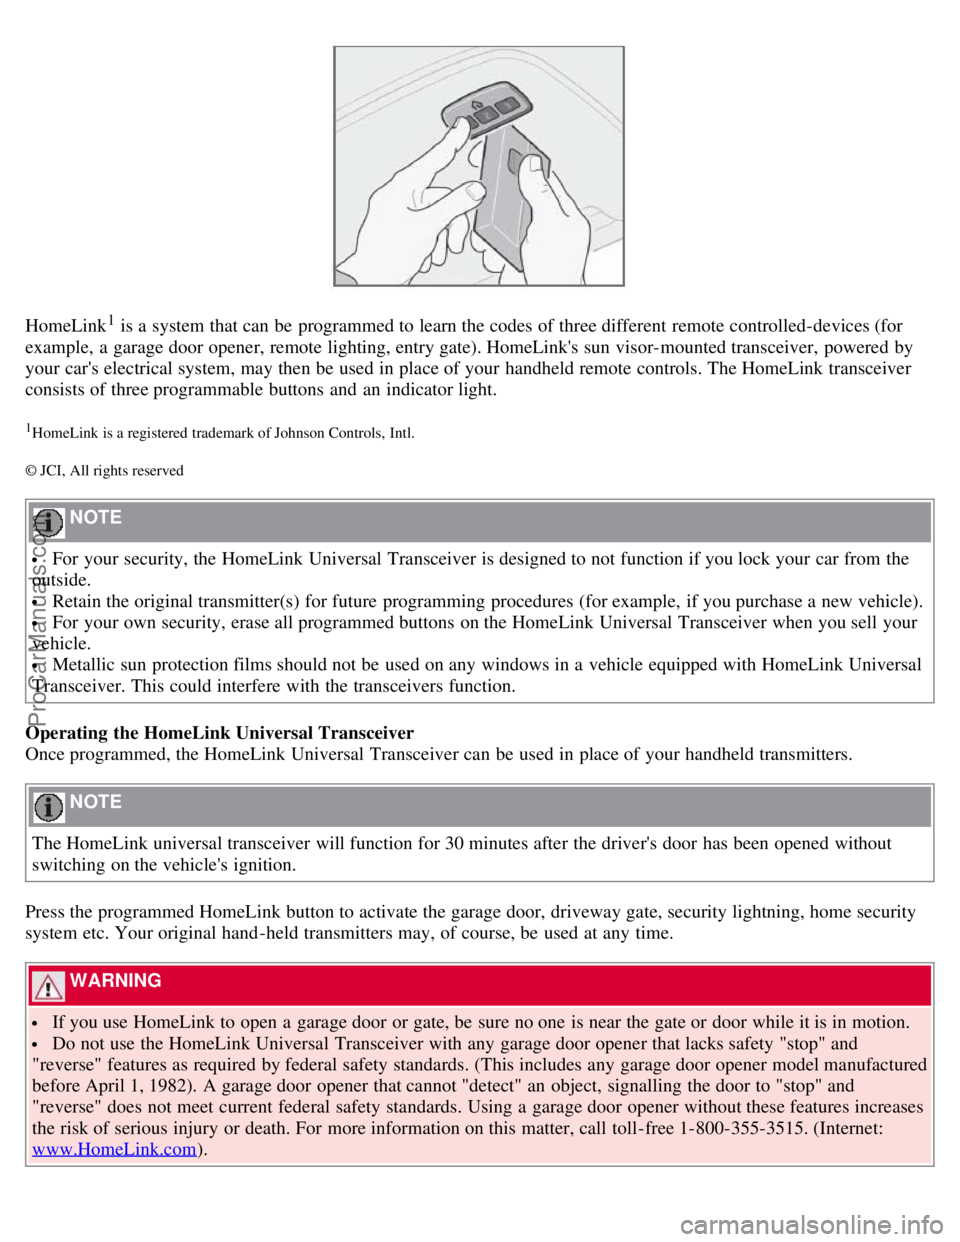
HomeLink1 is a system that can be programmed to learn the codes of three different remote controlled-devices (for
example, a garage door opener, remote lighting, entry gate). HomeLink's sun visor-mounted transceiver, powered by
your car's electrical system, may then be used in place of your handheld remote controls. The HomeLink transceiver
consists of three programmable buttons and an indicator light.
1HomeLink is a registered trademark of Johnson Controls, Intl.
© JCI, All rights reserved
NOTE
For your security, the HomeLink Universal Transceiver is designed to not function if you lock your car from the
outside.
Retain the original transmitter(s) for future programming procedures (for example, if you purchase a new vehicle).
For your own security, erase all programmed buttons on the HomeLink Universal Transceiver when you sell your
vehicle.
Metallic sun protection films should not be used on any windows in a vehicle equipped with HomeLink Universal
Transceiver. This could interfere with the transceivers function.
Operating the HomeLink Universal Transceiver
Once programmed, the HomeLink Universal Transceiver can be used in place of your handheld transmitters.
NOTE
The HomeLink universal transceiver will function for 30 minutes after the driver's door has been opened without
switching on the vehicle's ignition.
Press the programmed HomeLink button to activate the garage door, driveway gate, security lightning, home security
system etc. Your original hand -held transmitters may, of course, be used at any time.
WARNING
If you use HomeLink to open a garage door or gate, be sure no one is near the gate or door while it is in motion.
Do not use the HomeLink Universal Transceiver with any garage door opener that lacks safety "stop" and
"reverse" features as required by federal safety standards. (This includes any garage door opener model manufactured
before April 1, 1982). A garage door opener that cannot "detect" an object, signalling the door to "stop" and
"reverse" does not meet current federal safety standards. Using a garage door opener without these features increases
the risk of serious injury or death. For more information on this matter, call toll-free 1-800-355-3515. (Internet:
www.HomeLink.com
).
ProCarManuals.com
Page 73 of 246
2 0 0 8
VOLVO C70
78 03 Climate
General information 80
Air vents81
Electronic Climate Control (ECC)82
Air distribution86
79 03 Climate
80 03 Climate
General information
Air conditioning - A/C
Your car is equipped with an Electronic Climate Control (ECC).
The air conditioning system can be switched off, but for optimal air quality in the passenger compartment and to
prevent the windows from fogging, the air conditioning should be left on - even in cool weather.
NOTE
In warm weather, a small amount of water may accumulate under the car when it has been parked. This water is
condensation from the A/C system and is normal.
Ice and snow
Always keep the air intake grille at the base of the windshield free of snow.
Fog on the inside of the windows
The defroster function should be used to remove fog or mist from the inside of the windows. Keeping the windows
clean with a commercially available window washing spray will also help prevent fogging or misting.
ProCarManuals.com
Page 75 of 246
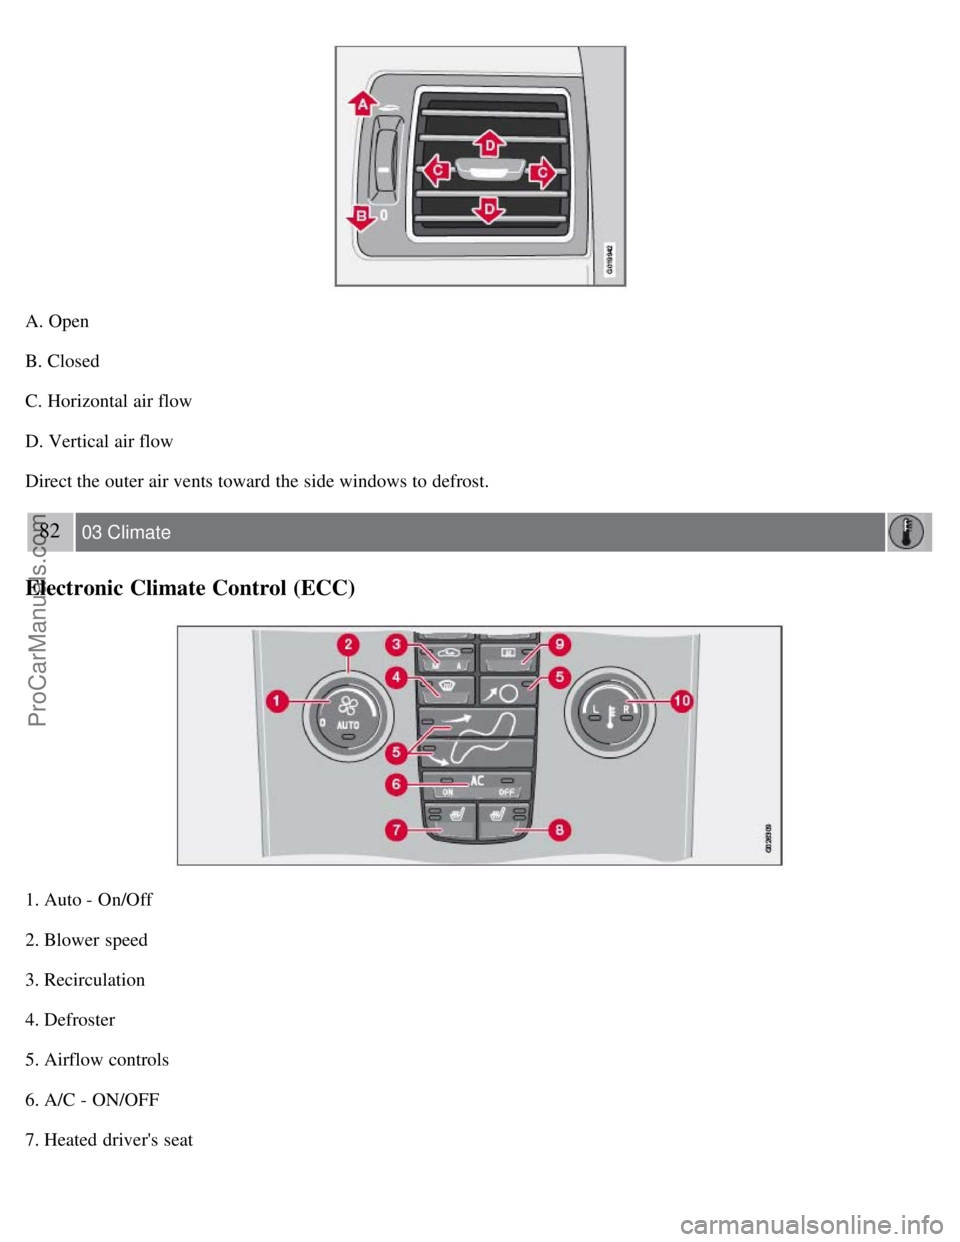
A. Open
B. Closed
C. Horizontal air flow
D. Vertical air flow
Direct the outer air vents toward the side windows to defrost.
82 03 Climate
Electronic Climate Control (ECC)
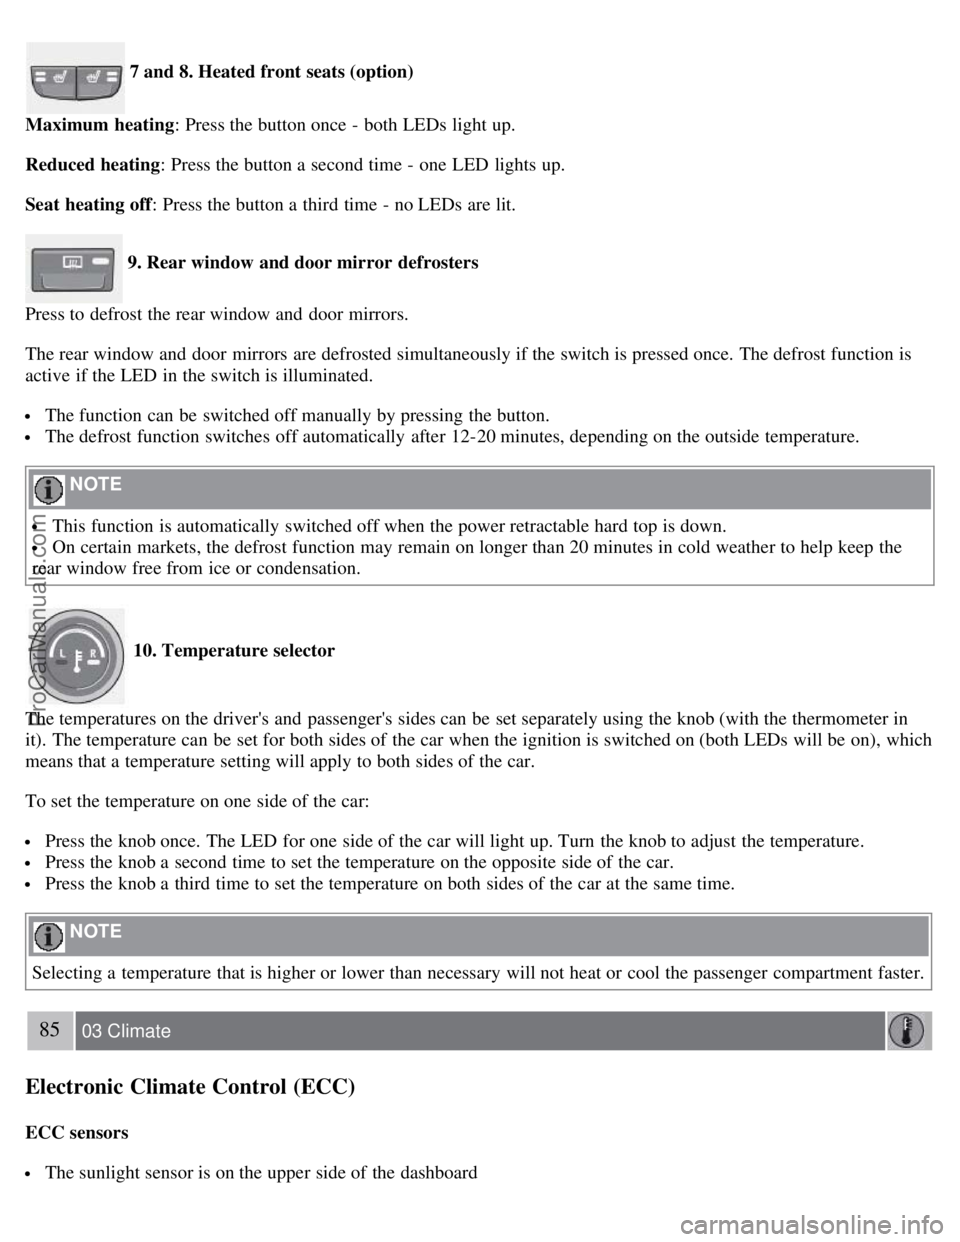
1. Auto - On/Off
2. Blower speed
3. Recirculation
4. Defroster
5. Airflow controls
6. A/C - ON/OFF
7. Heated driver's seat
ProCarManuals.com
Page 76 of 246

8. Heated front passenger's seat
9. Rear window and door mirror defrosters
10. Temperature selector
NOTE
The sunlight sensor on the upper side of the dashboard and the passenger compartment temperature sensor, located
behind the climate system control panel, should not be obstructed.
The air conditioning system is temporarily switched off during full throttle acceleration.
ECC functions
1. Auto - On/Off
The AUTO function automatically regulates climate control to maintain the desired temperature. The automatic
function controls heating, air conditioning, blower speed, recirculation, and air distribution.
If you select one or more manual functions, the remaining functions continue to be controlled automatically. All
manual settings are
83 03 Climate
Electronic Climate Control (ECC)
switched off when AUTO is switched on. AUTO CLIMATE is shown in the display.
2. Blower speed
The blower speed can be increased or decreased by turning the knob. The blower speed is regulated automatically if
AUTO is selected. The previously set blower speed is disconnected.
NOTE
If the knob is turned counterclockwise and the blower indication in the display goes out, the blower and the air
conditioning are switched off. The display shows the blower symbol and OFF.
3. Recirculation
This function can be used to shut out exhaust fumes, smoke, etc from the passenger compartment. The air in the
passenger compartment is then recirculated, i.e. no air from outside the car is taken into the car when this function is
activated.
If the air in the car recirculates for too long, there is a risk of condensation forming on the insides of the windows,
ProCarManuals.com
Page 77 of 246

especially in winter.
Timer
The timer function minimizes the risk of fogging, or stale air when the recirculation function is selected. See page 72
for information on setting the recirculation timer.
NOTE
Recirculation is always disengaged if the defroster button is engaged to clear ice or condensation from the side
windows.
4. Defroster
Directs airflow to the windshield and side windows and increases blower speed.
When the defroster is activated:
Air flows to the windows at high blower speed.
The LED in the defroster button lights up when this function is activated. The air conditioning system is controlled
to provide maximum air dehumidification.
The air conditioning is automatically switched on (can be switched off by pressing button 5).
The air is not recirculated.
5. Airflow controls
Press one of the three buttons in the illustration to activate the selected airflow. A symbol in the display above the
climate control panel and a lit LED in the selected button indicate that the manual function has been selected. With
manually selected airflow both warm and cool air can be selected. See also the table on page 86
.
6. Air conditioning On/Off
ON: The air conditioning system is engaged when the ON light is lit and is controlled automatically by the system to
maintain the selected temperature.
OFF: The system is disengaged when the OFF lights up
When OFF is selected and the OFF LED is lit, the air conditioning system is deactivated.
84 03 Climate
Electronic Climate Control (ECC)
Other functions are still controlled automatically.
When Defroster (4) is selected, the air conditioning system is activated for maximum dehumidifying.
ProCarManuals.com
Page 78 of 246
7 and 8. Heated front seats (option)
Maximum heating : Press the button once - both LEDs light up.
Reduced heating : Press the button a second time - one LED lights up.
Seat heating off : Press the button a third time - no LEDs are lit.
9. Rear window and door mirror defrosters
Press to defrost the rear window and door mirrors.
The rear window and door mirrors are defrosted simultaneously if the switch is pressed once. The defrost function is
active if the LED in the switch is illuminated.
The function can be switched off manually by pressing the button.
The defrost function switches off automatically after 12-20 minutes, depending on the outside temperature.
NOTE
This function is automatically switched off when the power retractable hard top is down.
On certain markets, the defrost function may remain on longer than 20 minutes in cold weather to help keep the
rear window free from ice or condensation.
10. Temperature selector
The temperatures on the driver's and passenger's sides can be set separately using the knob (with the thermometer in
it). The temperature can be set for both sides of the car when the ignition is switched on (both LEDs will be on), which
means that a temperature setting will apply to both sides of the car.
To set the temperature on one side of the car:
Press the knob once. The LED for one side of the car will light up. Turn the knob to adjust the temperature.
Press the knob a second time to set the temperature on the opposite side of the car.
Press the knob a third time to set the temperature on both sides of the car at the same time.
NOTE
Selecting a temperature that is higher or lower than necessary will not heat or cool the passenger compartment faster.
85 03 Climate
Electronic Climate Control (ECC)
ECC sensors
The sunlight sensor is on the upper side of the dashboard
ProCarManuals.com
Page 87 of 246

When lowered, the power retractable hard top is concealed by a cover, see the illustration above.
CAUTION
Do not sit or place heavy objects on the power retractable hard top cover.
96 04 Interior
Power retractable hard top
Raising or lowering the power retractable hard top
1. Turn the ignition key to position II, or start the engine if the vehicle is parked outdoors.
2. Press the brake pedal.
3. Press and hold down the left button (1) to raise the power retractable hard top or the right button (2) to lower it.
Hold down the respective button until the top is completely raised or lowered. Release the button when an audible
signal sounds. The message ROOF OPEN or ROOF CLOSED will be displayed.
CAUTION
Please heed any messages that may appear in the information display while the top is in operation.
Any windows that are closed will be opened approximately 4 inches (10 cm) while the power retractable hard top
is in operation. The windows will be automatically re-closed when the top is completely raised or lowered.
WARNING
See the section "Before raising or lowering the power retractable hard top" on page 94 before operating the power
retractable hard top.
Never pull the release wire for the power retractable hard top's hydraulic system that is located under the rear seat
cushion. This wire is only intended for use by qualified service personnel. Pulling this wire could lead to:
High risk of being injured by the power retractable hard top mechanism.
Unexpected movement of the hard top, or the hard top or the trunk could inadvertently open.
The retractable hard top can be damaged.
Power retractable hard top-related text messages
ProCarManuals.com
Page 89 of 246
NOTE
Movement of the top may stop briefly. However, the button should be held down throughout the entire operation. An
audible signal will sound during the entire operation.
WARNING
Never pull the release wire for the power retractable hard top's hydraulic system that is located under the rear seat
cushion. This wire is only intended for use by qualified service personnel. Pulling this wire could lead to:
High risk of being injured by the power retractable hard top's opening/closing mechanism.
Unexpected movement of the hard top/the hard top or the trunk could inadvertently open.
The retractable hard top can be damaged.
98 04 Interior
Power retractable hard top
Temporary cover
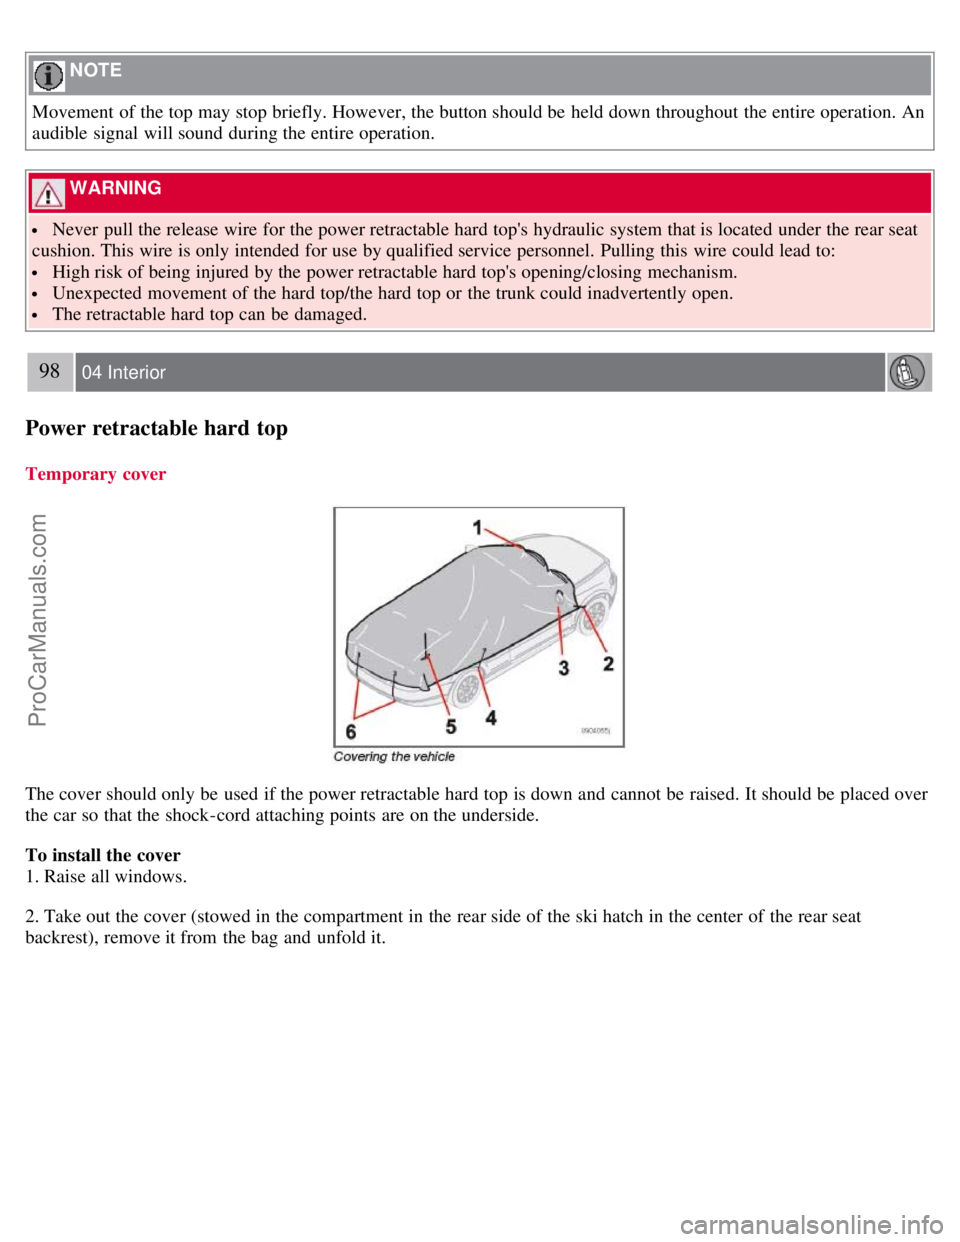
The cover should only be used if the power retractable hard top is down and cannot be raised. It should be placed over
the car so that the shock-cord attaching points are on the underside.
To install the cover
1. Raise all windows.
2. Take out the cover (stowed in the compartment in the rear side of the ski hatch in the center of the rear seat
backrest), remove it from the bag and unfold it.
ProCarManuals.com
Page 104 of 246

NOTE
The remote control will not lock or unlock the glove compartment.
Double locking
If the car is locked with the remote control while the power retractable hard top is down , the double locking feature
activates after approximately 30 seconds. This means that the doors cannot be unlocked or opened from inside the car.
NOTE
The double locking function can be temporarily disabled. See page 127
for instructions.
2. Unlock - Press the Unlock button on the remote once to unlock the driver's door. The turn signals will flash twice to
confirm unlocking. After a short pause, press the Unlock button a second time within 10 seconds to unlock the other
doors and the trunk.
A long press (for several seconds) opens the side windows.
NOTE
The turn signals flash to confirm that the vehicle has been correctly locked/unlocked with the remote control.
When locking the vehicle, the turn signals will flash a confirmation only if all the doors are securely closed and
locked. Flashing confirmation for locking and unlocking may be customized in the vehicle's Personal settings menu.
See page 71
for more information.
The two-step unlocking function can be changed so that one press of the Unlock button unlocks all of the doors
and the trunk. See Personal settings on page 71
for more information.
Automatic relocking: If the doors are unlocked, the locks will automatically reengage (re-lock) and the alarm will
rearm after 2 minutes unless a door or the trunk has been opened.
Automatic locking: When the car starts to move, the doors and trunk can be locked automatically. This feature
can be turned on or off, see Personal settings on page 72
for more information.
Airbag deployment will automatically attempt to unlock the doors.
3. Approach lighting - As you approach the car:
Press the button on the remote control to illuminate the area around the car in dark conditions.
114 05 Locks and alarm
Remote control and key blade
Pressing the button once lights up the interior lighting, parking lights, and license plate lighting. These lights will
switch off automatically after 30, 60 or 90 seconds. See the Personal settings on page 71
for information about
adjusting the time setting.
4. Unlock trunk - Press the button once to disarm the alarm system and unlock only the trunk. After closing, the trunk
will not automatically relock. Press Lock to relock it and rearm the alarm.
NOTE
This function will unlock, but not pop open, the trunk.
5. Panic alarm : - This button can be used to attract attention during emergency situations.
To activate the panic alarm, press and hold the red button for at least 3 seconds or press it twice within 3 seconds. The
ProCarManuals.com
Page 120 of 246

Observe the following rules:
Bring the engine to normal operating temperature as soon as possible by driving with a light foot on the accelerator
pedal for the first few minutes of operation. A cold engine uses more fuel and is subject to increased wear.
Whenever possible, avoid using the vehicle for driving short distances. This does not allow the engine to reach
normal operating temperature.
Drive carefully and avoid rapid acceleration and hard braking.
Use the transmission's Drive ( D) position as often as possible and avoid using kickdown.
Do not exceed posted speed limits.
Avoid carrying unnecessary items (extra load) in the vehicle.
Maintain correct tire pressure. Check tire pressure regularly (when tires are cold).
Remove snow tires when threat of snow or ice has ended.
At highway driving speeds, fuel consumption will be lower with the air conditioning on and the windows closed
than with the air conditioning off and the windows open.
Using the onboard trip computer's fuel consumption modes can help you learn how to drive more economically.
Other factors that decrease gas mileage are:
Dirty air cleaner
Dirty engine oil and clogged oil filter
Dragging brakes
Incorrect front end alignment Some of the above mentioned items and others are checked at the standard
maintenance intervals.
Avoid overheating the engine
Do not drive at engine speeds above 4,500 rpm if you tow a trailer in hilly areas. This could cause the engine oil to
overheat.
WARNING
Driving with the trunk open : Driving with the trunk open could lead to poisonous exhaust gases entering the
passenger compartment. If the trunk must be kept open for any reason, proceed as follows:
Close the windows
Set the ventilation system control to air flow to floor, windshield and side windows and the blower control to its
highest setting.
Weight distribution affects handling
At the specified curb weight your vehicle has a tendency to understeer, which means that the steering wheel has to be
turned more than might seem appropriate for the curvature of a bend. This ensures good stability and reduces the risk
of rear wheel skid. Remember that these properties can alter with the vehicle load. The heavier the load in the cargo
area, the less the tendency to understeer.
Handling, roadholding
Vehicle load, tire design and inflation pressure all affect vehicle handling. Therefore,
133 06 Starting and driving
General information
check that the tires are inflated to the recommended pressure according to the vehicle load. See the "Tire pressure"
ProCarManuals.com