CD player VOLVO C70 2008 Owners Manual
[x] Cancel search | Manufacturer: VOLVO, Model Year: 2008, Model line: C70, Model: VOLVO C70 2008Pages: 246, PDF Size: 5.14 MB
Page 4 of 246
09 Maintenance and servicing
Volvo maintenance204
Maintaining your vehicle205
Hood207
Engine compartment208
Engine oil209
Fluids211
Wiper blades213
Battery214
Bulbs216
Replacing bulbs217
Fuses224
10 Audio
Audio functions 234
Radio functions239
Sirius satellite radio (option)241
CD player/CD changer (option)245
Audio menu249
11 Specifications
Label information252
Dimensions and weights254
Fluids256
Engine oil257
Engine specifications259
Electrical system260
Three-way catalytic converter262
Volvo programs263
5 -
cont. Contents
12 Index
Index 264
6 Introduction
General information
Shiftlock (automatic transmission)
When your car is parked, the gear selector is locked in the Park ( P) position. To release the selector from this position,
turn the ignition key to position II (or start the engine), depress the brake pedal, press the button on the front side of the
gear selector and move the selector from Park ( P).
Keylock (automatic transmission)
When the ignition is switched off, the gear selector must be in the Park ( P) position before the key can be removed
from the ignition switch.
Anti-lock Brake System (ABS)
The ABS system in your car performs a self -diagnostic test when the vehicle first reaches the speed of approximately
12 mph (20 km/h). The brake pedal will pulsate several times and a sound may be audible from the ABS control
module. This is normal.
Fuel filler door
Press the button on the light switch panel when the car is at a standstill to open the fuel filler door.
Fuel filler cap
After refueling, close the fuel filler cap by turning it clockwise until it clicks into place. If this cap is not closed tightly
or if the engine is running when the car is refueled, the Malfunction Indicator Lamp ("Check Engine" light) may
indicate a fault.
ProCarManuals.com
Page 209 of 246
2 0 0 8
VOLVO C70
232 10 Audio
Audio functions 234
Radio functions239
Sirius satellite radio (option)241
CD player/CD changer (option)245
Audio menu249
233 10 Audio
234 10 Audio
Audio functions
Audio system controls
1. VOLUME dial
2. AM/FM - select a radio band
ProCarManuals.com
Page 210 of 246
3. MODE - select a sound source
4. TUNING dial
5. SOUND button
On/off
Press POWER (1) to switch the audio system off or on.
If the system is on when the ignition is turned to position 0 it will remain on until the key has been removed from the
ignition switch.
Selecting a sound source
Press AM/FM (2) repeatedly to toggle between FM1, FM2, and AM.
Press MODE (3) repeatedly to toggle between the CD player and the optional external sound source AUX or the
optional Sirius satellite radio.
The currently selected sound source will be shown in the display.
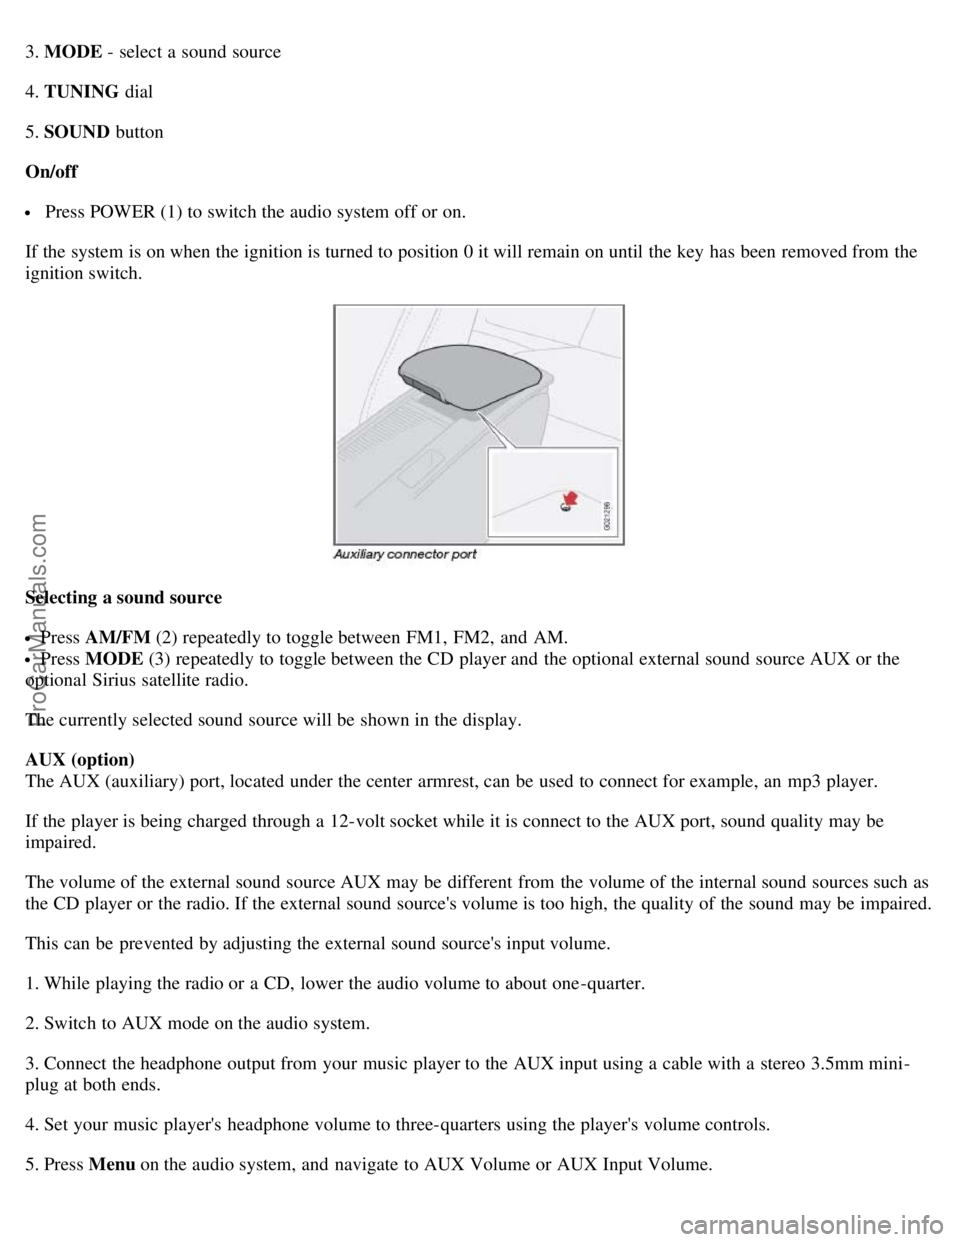
AUX (option)
The AUX (auxiliary) port, located under the center armrest, can be used to connect for example, an mp3 player.
If the player is being charged through a 12-volt socket while it is connect to the AUX port, sound quality may be
impaired.
The volume of the external sound source AUX may be different from the volume of the internal sound sources such as
the CD player or the radio. If the external sound source's volume is too high, the quality of the sound may be impaired.
This can be prevented by adjusting the external sound source's input volume.
1. While playing the radio or a CD, lower the audio volume to about one -quarter.
2. Switch to AUX mode on the audio system.
3. Connect the headphone output from your music player to the AUX input using a cable with a stereo 3.5mm mini-
plug at both ends.
4. Set your music player's headphone volume to three-quarters using the player's volume controls.
5. Press Menu on the audio system, and navigate to AUX Volume or AUX Input Volume.
ProCarManuals.com
Page 211 of 246
6. Turn the volume knob to raise or lower the AUX Input Volume until you hear music at a comfortable level.
235 10 Audio
Audio functions
7. If there is distortion, lower your music player's headphone volume until the distortion goes away.
8. Finally, exit the menu and adjust the audio volume to a comfortable level.
Volume
Use the volume dial (1) or the buttons in the optional steering wheel keypad to adjust the volume level. The volume
level is also adjusted automatically according to the vehicle's speed, see page 239
for more information on this
function.
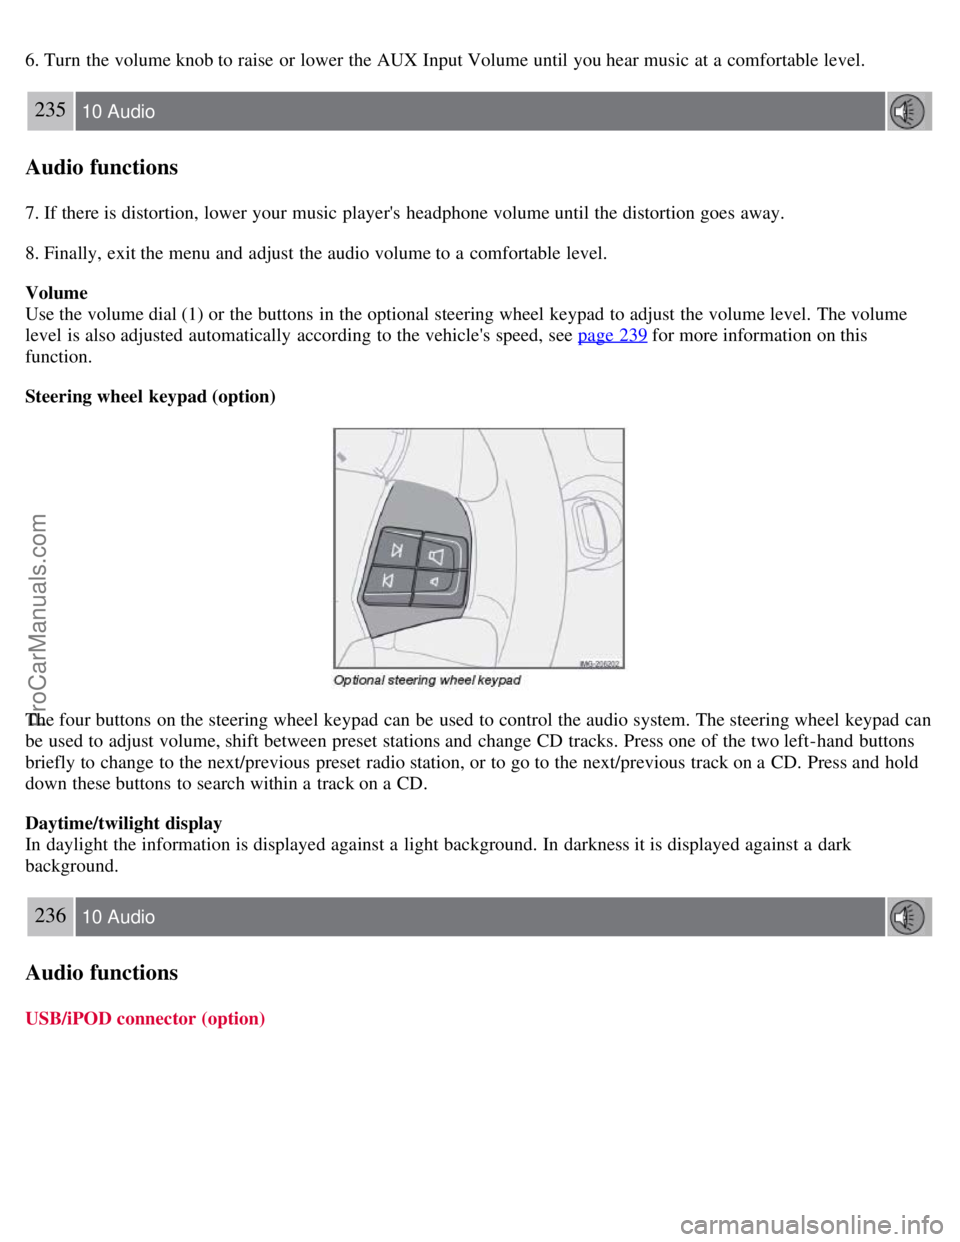
Steering wheel keypad (option)
The four buttons on the steering wheel keypad can be used to control the audio system. The steering wheel keypad can
be used to adjust volume, shift between preset stations and change CD tracks. Press one of the two left-hand buttons
briefly to change to the next/previous preset radio station, or to go to the next/previous track on a CD. Press and hold
down these buttons to search within a track on a CD.
Daytime/twilight display
In daylight the information is displayed against a light background. In darkness it is displayed against a dark
background.
236 10 Audio
Audio functions
USB/iPOD connector (option)
ProCarManuals.com
Page 212 of 246
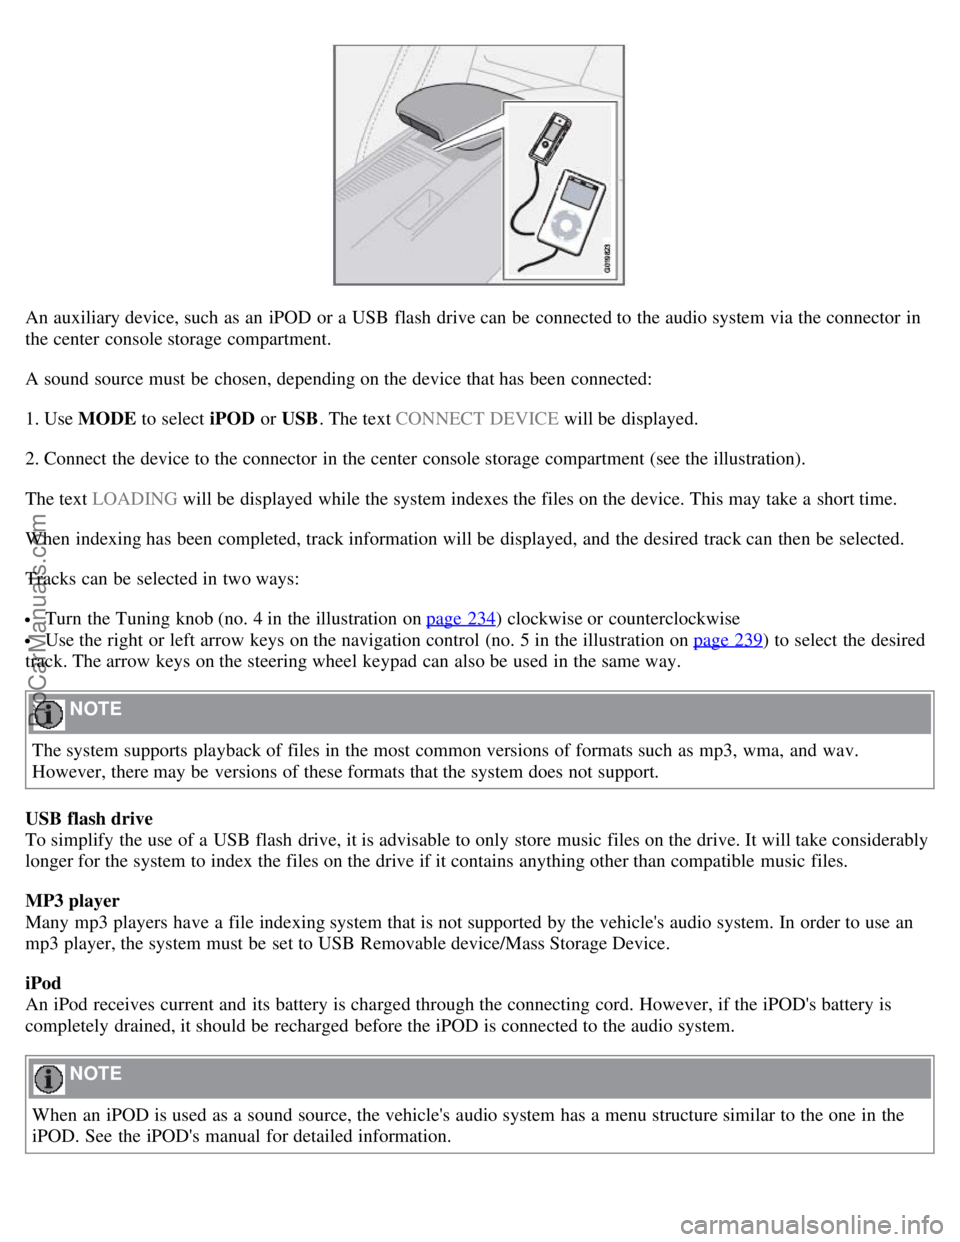
An auxiliary device, such as an iPOD or a USB flash drive can be connected to the audio system via the connector in
the center console storage compartment.
A sound source must be chosen, depending on the device that has been connected:
1. Use MODE to select iPOD or USB. The text CONNECT DEVICE will be displayed.
2. Connect the device to the connector in the center console storage compartment (see the illustration).
The text LOADING will be displayed while the system indexes the files on the device. This may take a short time.
When indexing has been completed, track information will be displayed, and the desired track can then be selected.
Tracks can be selected in two ways:
Turn the Tuning knob (no. 4 in the illustration on page 234) clockwise or counterclockwise
Use the right or left arrow keys on the navigation control (no. 5 in the illustration on page 239) to select the desired
track. The arrow keys on the steering wheel keypad can also be used in the same way.
NOTE
The system supports playback of files in the most common versions of formats such as mp3, wma, and wav.
However, there may be versions of these formats that the system does not support.
USB flash drive
To simplify the use of a USB flash drive, it is advisable to only store music files on the drive. It will take considerably
longer for the system to index the files on the drive if it contains anything other than compatible music files.
MP3 player
Many mp3 players have a file indexing system that is not supported by the vehicle's audio system. In order to use an
mp3 player, the system must be set to USB Removable device/Mass Storage Device.
iPod
An iPod receives current and its battery is charged through the connecting cord. However, if the iPOD's battery is
completely drained, it should be recharged before the iPOD is connected to the audio system.
NOTE
When an iPOD is used as a sound source, the vehicle's audio system has a menu structure similar to the one in the
iPOD. See the iPOD's manual for detailed information.
ProCarManuals.com
Page 222 of 246
If you have forgotten the access code:
1. Select "SIRIUS ID" in the Sirius settings menu and press ENTER.
2. Press and hold the ENTER button for 2 seconds.
3. The current code will be displayed.
Your Volvo retailer can also provide you with assistance.
SIRIUS ID
This function displays the 12-digit Sirius activation ID.
245 10 Audio
CD player/CD changer (option)
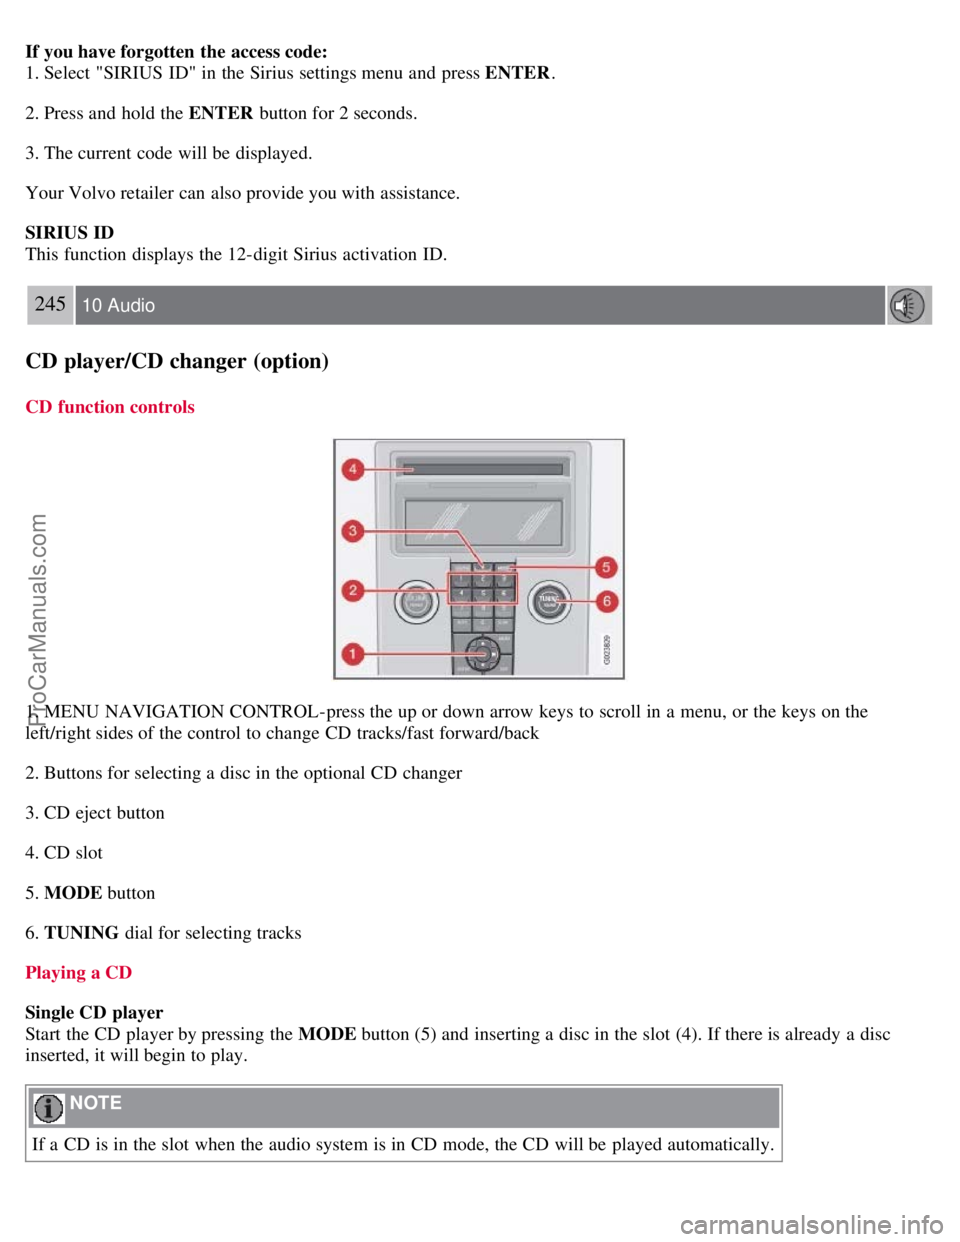
CD function controls
1. MENU NAVIGATION CONTROL-press the up or down arrow keys to scroll in a menu, or the keys on the
left/right sides of the control to change CD tracks/fast forward/back
2. Buttons for selecting a disc in the optional CD changer
3. CD eject button
4. CD slot
5. MODE button
6. TUNING dial for selecting tracks
Playing a CD
Single CD player
Start the CD player by pressing the MODE button (5) and inserting a disc in the slot (4). If there is already a disc
inserted, it will begin to play.
NOTE
If a CD is in the slot when the audio system is in CD mode, the CD will be played automatically.
ProCarManuals.com
Page 223 of 246
CD changer
The CD changer can hold up to six discs.
1. Start the CD changer by pressing the MODE button (5).
2. Select an empty position using the 1-6 buttons or the up/down keys on the MENU NAVIGATION control. The
display shows which positions are empty.
3. Insert a disc into the slot (4).
NOTE
Ensure that INSERT DISC is displayed before inserting a disc.
If a CD position in the changer containing a disc is selected, and the audio system is in CD mode when it is
switched on, the CD will play automatically.
CD eject
Single CD player
Press the eject button (3) to eject the disc.
CD changer
This function makes it possible to eject a single disc, or to eject all of the discs in the changer.
Press the eject button (3) briefly to eject the disc that is currently playing.
246 10 Audio
CD player/CD changer (option)
A longer press (more than two seconds) starts the process of ejecting all of the discs in the changer.
NOTE
The EJECT ALL function can only be used while the vehicle is at a standstill and will be cancelled if the vehicle
begins to move.
For reasons of traffic safety, the ejected CD must be removed within 12 seconds or it will be automatically drawn
back into the slot and the CD player will enter pause mode. Press the CD button to restart the disc.
CD Pause
When the audio system volume is turned off completely, the CD player will pause and will resume playing when the
volume is turned up again.
Audio files
In addition to playing normal music CDs, the CD player/changer can also play discs containing files in mp3 or wma
format.
NOTE
Certain discs that are copy protected cannot be read by the player.
When a disc with audio files is inserted in the player, the player scans the disc's folders before it begins playing the
ProCarManuals.com
Page 224 of 246
files. The length of time that this takes depends on the quality of the disc.
Navigating the disc and playing tracks
If a disc with audio files is in the CD player, press ENTER to display a list of folders on the disc.
Use the up and down arrows in the navigation control (see the illustration on page 234
) to move among the folders on
the disc. Audio files have the
symbol and folders containing these files have the symbol. Press ENTER to play a
selected folder or a file.
When the music file has been played, the player will continue to play the rest of the files in the current folder. When
all of the files in the folder have been played, the player will automatically go to the next folder and play the files in it.
Press the left or right arrow key on the navigation control if the entire name of the current track does not fit in the
display.
Changing tracks
Briefly press the left or right arrow keys on the MENU NAVIGATION control to skip to the previous or next
track/file.
NOTE
The TUNING dial (6) (turn clockwise to go to the next track/file, or counterclockwise to go to the previous
track/file) or the optional steering wheel keypad can also be used for this purpose.
Fast forward/back
Press and hold down the left or right arrows keys in the MENU NAVIGATION control (or the corresponding keys on
the optional steering wheel keypad) to search within a track/file or the whole disc. The search continues for as long as
the buttons are held down.
Random play
This function plays the tracks/files on a CD (or on all of the CDs if the vehicle is equipped with the optional CD
changer) in random order (shuffle).
247 10 Audio
CD player/CD changer (option)
Activating/deactivating the random function-CD player
If a normal CD is being played:
1. Press MENU followed by ENTER .
2. Select Random and press ENTER .
If a CD with audio files is being played:
1. Press MENU followed by ENTER .
2. Select Random and press ENTER .
3. Select Disc or Folder and press ENTER .
Activating/deactivating the random function-CD changer
If a normal CD is being played:
ProCarManuals.com
Page 225 of 246
1. Press MENU followed by ENTER .
2. Select Random and press ENTER .
3. Select Single disc or All discs and press ENTER .
If a CD with audio files is being played:
1. Press MENU followed by ENTER .
2. Select Random and press ENTER .
3. Select Single disc or Folder and press ENTER .
NOTE
CD changer only: you can only select the next random track/file on the current disc.
Press the EXIT button to stop random play.
The random function is automatically deactivated when another disc is selected.
Disc text (CD changer only)
Certain CDs contain information about the disc, such as the titles of the tracks, etc. This information can be shown in
the display by activating the DISC TEXT function.
1. Press MENU . Select the menu for relevant sound source and press ENTER .
2. Select Disc text in the menu and press ENTER .
3. If information is stored on the disc, it will now appear in the display.
To deactivate this function, select DISC TEXT in the menu and press ENTER.
Scan
This function plays the first 10 seconds of each track/file on the CD.
1. Press SCAN .
2. Press EXIT or SCAN to stop the scan function and listen to an entire track/file.
CD eject
Single CD player
Press the eject button (3) to eject the disc.
CD changer
This function makes it possible to eject a single disc, or to eject all of the discs in the changer.
Press the eject button (3) briefly to eject the disc that is currently playing.
A longer press (more than two seconds) starts the process of ejecting all of the discs in the changer.
NOTE
The Eject all function can only be used while the vehicle is at a standstill and will be cancelled if the vehicle
begins to move.
ProCarManuals.com
Page 226 of 246
For reasons of traffic safety, the ejected CD must be removed within 12 seconds or it will be automatically drawn
back into the slot and the CD player will enter pause mode. Press the CD button to restart the disc.
248 10 Audio
CD player/CD changer (option)
Compact disc care
Keep the following in mind when playing/handling compact discs
Do not put tape or labels on the disc itself. They could become stuck in the player.
CDR discs can cause listening problems due to the quality of the disc or recording equipment used.
DualDisc: The audio side of a DualDisc (combined CD/DVD) does not meet CD specifications and may not play in
your audio system.
Keep the discs clean. Wipe them with a soft, clean, lint-free cloth, working from the center outward. If necessary,
dampen the cloth with a neutral soap solution. Dry thoroughly before using.
Never use cleaning spray or antistatic liquid. Use only cleaners specifically made for CDs.
Use discs of the correct size only (3.5" discs should never be used).
Volvo does not recommend the use of plastic outer rings on the disc.
Condensation may occur on discs/optical components of the changer in cold winter weather. The disc can be dried
with a clean, lint-free cloth. Optical components in the CD changer may, however, take up to one hour to dry off.
Never attempt to play a damaged CD.
When not in use, the discs should be stored in their covers. Avoid storing discs in excessive heat, direct sunlight or
in dusty locations.
249 10 Audio
Audio menu
FM1/FM2 menu
1. RADIOTEXT ON/OFF
2. ADVANCED RADIO SETTINGS
3. AUDIO SETTINGS
AM menu
1. 1. AUDIO SETTINGS
CD menu
1. RANDOM
2. AUDIO SETTINGS
CD changer menu
1. RANDOM
2. DISC TEXT ON/OFF
3. AUDIO SETTINGS
AUX menu
ProCarManuals.com