key VOLVO S40 2005 Owner's Guide
[x] Cancel search | Manufacturer: VOLVO, Model Year: 2005, Model line: S40, Model: VOLVO S40 2005Pages: 127, PDF Size: 2.32 MB
Page 99 of 127
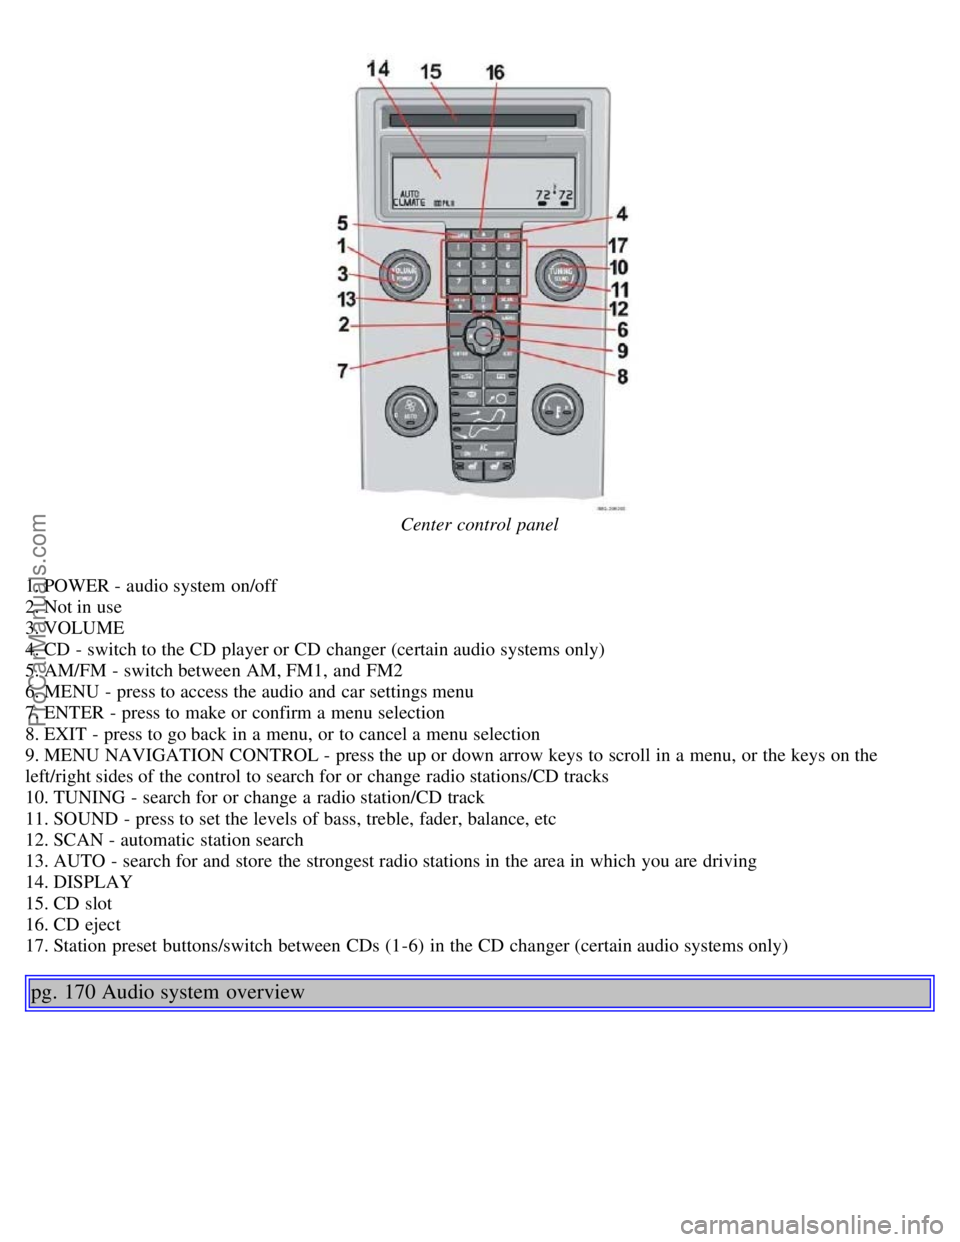
Center control panel
1. POWER - audio system on/off
2. Not in use
3. VOLUME
4. CD - switch to the CD player or CD changer (certain audio systems only)
5. AM/FM - switch between AM, FM1, and FM2
6. MENU - press to access the audio and car settings menu
7. ENTER - press to make or confirm a menu selection
8. EXIT - press to go back in a menu, or to cancel a menu selection
9. MENU NAVIGATION CONTROL - press the up or down arrow keys to scroll in a menu, or the keys on the
left/right sides of the control to search for or change radio stations/CD tracks
10. TUNING - search for or change a radio station/CD track
11. SOUND - press to set the levels of bass, treble, fader, balance, etc
12. SCAN - automatic station search
13. AUTO - search for and store the strongest radio stations in the area in which you are driving
14. DISPLAY
15. CD slot
16. CD eject
17. Station preset buttons/switch between CDs (1-6) in the CD changer (certain audio systems only)
pg. 170 Audio system overview
ProCarManuals.com
Page 100 of 127
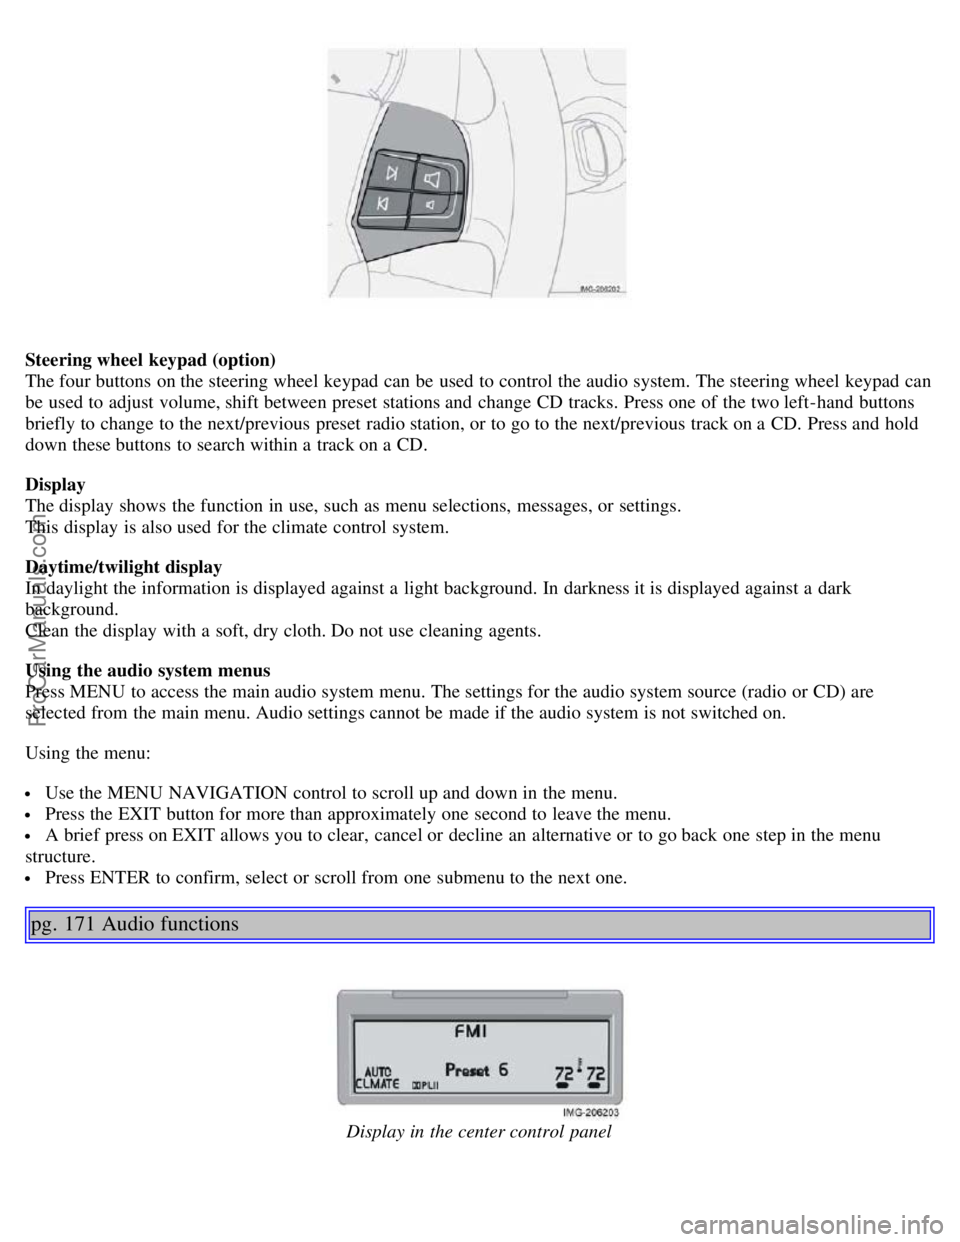
Steering wheel keypad (option)
The four buttons on the steering wheel keypad can be used to control the audio system. The steering wheel keypad can
be used to adjust volume, shift between preset stations and change CD tracks. Press one of the two left-hand buttons
briefly to change to the next/previous preset radio station, or to go to the next/previous track on a CD. Press and hold
down these buttons to search within a track on a CD.
Display
The display shows the function in use, such as menu selections, messages, or settings.
This display is also used for the climate control system.
Daytime/twilight display
In daylight the information is displayed against a light background. In darkness it is displayed against a dark
background.
Clean the display with a soft, dry cloth. Do not use cleaning agents.
Using the audio system menus
Press MENU to access the main audio system menu. The settings for the audio system source (radio or CD) are
selected from the main menu. Audio settings cannot be made if the audio system is not switched on.
Using the menu:
Use the MENU NAVIGATION control to scroll up and down in the menu.
Press the EXIT button for more than approximately one second to leave the menu.
A brief press on EXIT allows you to clear, cancel or decline an alternative or to go back one step in the menu
structure.
Press ENTER to confirm, select or scroll from one submenu to the next one.
pg. 171 Audio functions
Display in the center control panel
ProCarManuals.com
Page 101 of 127

Audio system On/Off
With the ignition key in position I or higher, press the POWER button to switch the audio system on or off.
If the audio system is active when the ignition is switched off, it will reactivate automatically when the car is restarted.
Selecting a sound source
Use the CD and AM/FM buttons to select the sound source of your choice.
Press the AM/FM button repeatedly to switch between FM1, FM2 and AM.
The selected sound source is shown in the display.
Volume control
Turn the volume knob clockwise or counterclockwise to increase or lower the volume. The volume can also be
increased (+) or lowered (-) using the optional steering wheel keypad.
Pause mode
When the volume is turned all the way down, the CD player switches to pause mode. Reactivate the player by turning
up the volume.
Volume control - ALARM
If a CD is playing when the radio receives an alarm bulletin (available in certain areas only), the CD player enters
pause mode. The bulletin is broadcast at the volume selected for this type of message.
After the bulletin has been completed, the audio system reverts to the originally selected sound source (radio or CD),
which is played at the volume that was selected for that source.
If the bulletin volume is adjusted while the bulletin is being broadcast, this new volume is saved and used for
subsequent bulletins.
Sound settings
1. Press SOUND.
2. Press the SOUND button repeatedly until you come to the setting that you wish to change. Choose BASS, TREBLE,
FADER, BALANCE, SUBWOOFER (option), CENTER or SURROUND
1.
3. Use the TUNING knob to adjust the level. The display will show a scale from the min. to max. settings. The center
of this scale is the default setting.
Display text Sound setting
BASS Bass
TREBLE Treble
BALANCE Balance between the speakers on the left and right sides of the car
FADER Balance between the front and rear speakers
SUBWOOFER Level for the optional subwoofer (bass speaker)
CENTER Setting for the center speaker (Premium sound system only)
SURROUND Setting for surround sound (Premium sound system only)
1. The Center and Surround functions are only available on the Premium sound system.
pg. 172 Audio functions
NOTE:
The settings for the center speaker can only be adjusted if Dolby Pro Logic II (DPL II) or 3-channel stereo (3CH) is
selected in the menu.
The level for the subwoofer can only be set if SUBWOOFER is activated in the menu.
3-channel mode is recommended for AM/FM radio broadcasts.
ProCarManuals.com
Page 103 of 127
8. Press EXIT to leave the menu without saving any changes.
ASC - speed compensated volume
The audio system's volume is adjusted automatically according to the speed of the vehicle. There are three settings
available (see e.g. menu point 4.6), which determine the level of volume compensation:
Low
Medium*
High
* Default setting.
pg. 174 Radio functions
Station search
Select radio mode AM/FM1/FM2 using the AM/FM button.
Briefly press the left or right arrow on the MENU NAVIGATION control to search for the next strong station.
Press one of the arrows again to start a new search.
Manual station search
There are two ways to manually tune a radio station:
Turn the TUNING knob to obtain the desired frequency.
Press the left or right arrow key on the MENU NAVIGATION control and hold it down. The radio scans slowly in
the selected direction and will increase the scanning speed after a few seconds. Release the button when the desired
frequency appears in the display. The frequency can be fine-tuned by short presses on the left/right arrow keys.
Storing stations
To store a selected station under one of the station setting buttons 0-9:
1. Tune to the desired station.
2. Press the button under which the station is to be stored and keep it depressed. The audio system sound will be
interrupted for a few seconds and STATION STORED will appear in the display. The station is now stored.
A total of 30 stations can be stored; 10 stations each in AM, FM1 and FM2.
Storing stations automatically - AUTOSTORE
This function automatically searches for and stores up to ten strong AM or FM stations in a separate memory. If more
than ten stations are found, the ten strongest ones are stored. This function is especially useful in areas in which you
are not familiar with radio stations or their frequencies.
To use the AUTO function:
1. Select radio mode using the AM/FM button.
2. Start the search by pressing AUTO for more than 2 seconds.
3. AUTO STORING appears in the display and a number of stations with strong signals (max. 10) from the selected
frequency band will be stored in the auto-store memory. If there are no stations with sufficient signal strength, NO
AST FOUND is displayed.
ProCarManuals.com
Page 104 of 127
The stored stations can be found using the buttons 0-9.
When the radio is in auto-store mode, AUTO is shown in the display. AUTO disappears when you return to the
normal radio mode. Return to the normal radio mode by pressing the AM/FM button, EXIT, or by briefly pressing the
AUTO button (for less than approx. 0.5 seconds).
To return to the Auto-store mode, press the AUTO button briefly and select a stored station by pressing one of the
number keys (0-9)
Scanning - SCAN
This function automatically searches for the next strong AM or FM station signal. When the radio finds a station,
scanning is interrupted for approximately 8 seconds, after which it will continue scanning.
pg. 175 Radio functions
1. Select radio mode using the AM/FM button.
2. Press SCAN (SCAN is shown in the display).
3. Press the SCAN or EXIT button to stop the scan function and listen to the selected station.
To start a new station scanning, repeat steps 1-3.
Radio Broadcast Data System - RBDS
This feature, which may not be available in your area, functions only with FM broadcasts. The radio in your car is
equipped with an advanced system allowing information from broadcasters to be transmitted visually, as text, together
with the audio signal. This information is then decoded by the radio and made available for several new and unique
features.
The RBDS or Radio Broadcast Data System operates in the FM band only, and the information transmitted is
supplied exclusively by participating broadcasters. Volvo has no control over the accuracy of the data or
information.
Coverage by local broadcasters may be limited at this time, but as the technology and benefits grow, you will find the
radio in your car is equipped to take advantage of this system.
PI (Program Information) seek
When an FM station has been stored as a preset, the radio also stores RBDS program information if it is available.
When the preset is selected at a later time, the radio tries to access updated program information. In weak signal areas,
there may be a delay before the station becomes audible. During this delay, there will be no sound.
PI seek can be interrupted by pressing EXIT.
Radio text
Certain RBDS stations broadcast program information, which can be shown in the display.
To start this function:
1. Select FM1 or FM2 and press the MENU button.
2. Press ENTER.
3. Select RADIOTEXT in the menu and press ENTER.
To deactivate this function, select RADIOTEXT again and press ENTER.
Alarm
Alarms bulletins are transmitted automatically by certain RBDS stations. The function cannot be deactivated.
"Alarm!" is shown in the radio display when an alarm message is sent. The function is used to warn motorists of
serious accidents, etc.
Program type/station format - PTY
The PTY function allows you to find stations whose programs suit your taste. Use the PTY function to select among
the different station formats shown in the list.
To show the format of the current station:
1. Select FM1 or FM2 and press the MENU button.
ProCarManuals.com
Page 106 of 127
3. Select ADVANCED RADIO SETTINGS in the menu and press ENTER.
4. Select AF and press ENTER.
To deactivate this function, select AF and press ENTER.
Resetting RBDS functions
This function restores all radio settings to the original factory settings.
1. Select FM1 or FM2 and press the MENU button.
2. Press ENTER.
3. Select ADVANCED RADIO SETTINGS in the menu and press ENTER.
4. Select RESET ALL in the menu and press ENTER.
5. Press ENTER again to confirm your selection.
pg. 177 CD player
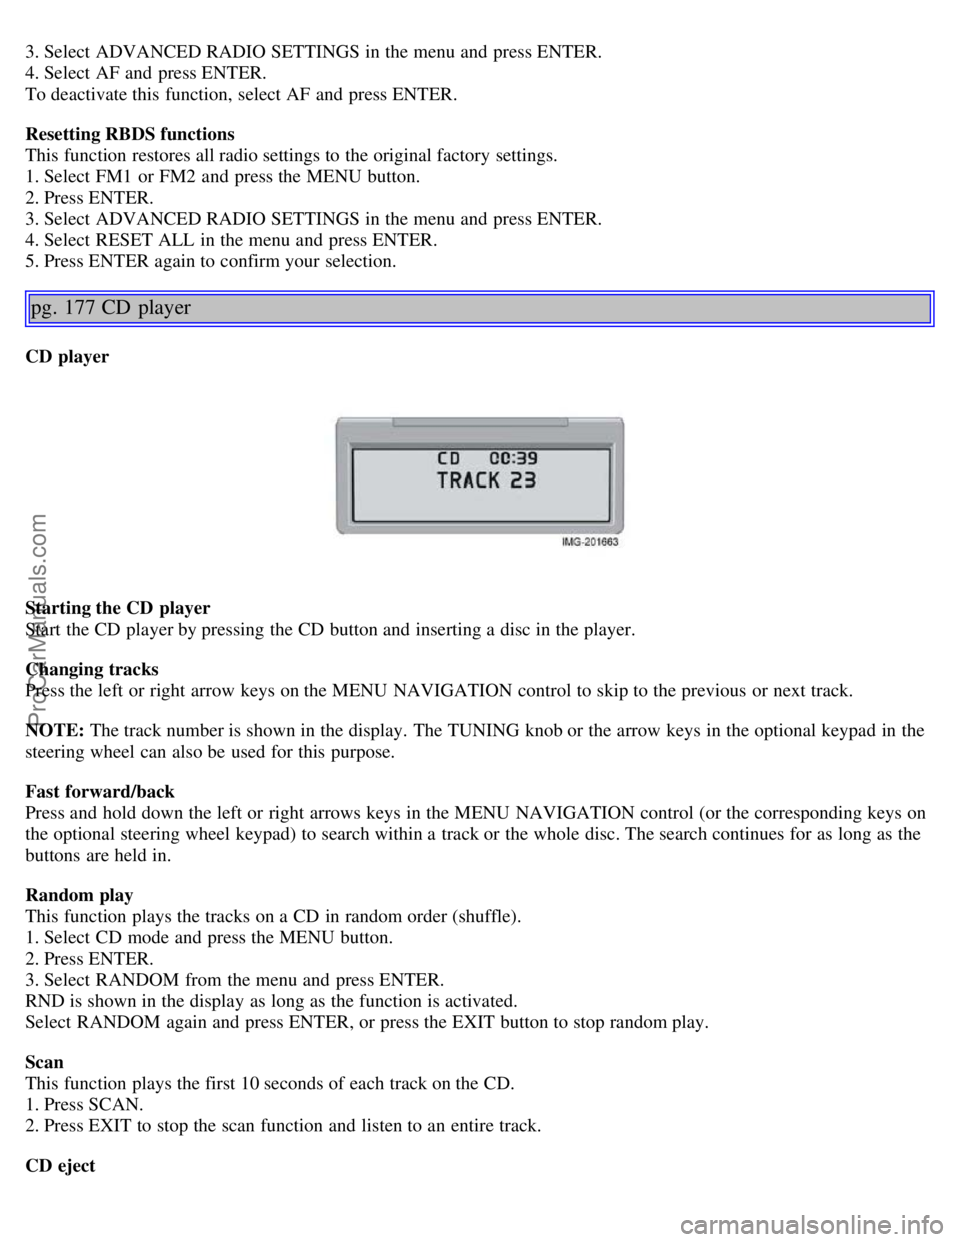
CD player
Starting the CD player
Start the CD player by pressing the CD button and inserting a disc in the player.
Changing tracks
Press the left or right arrow keys on the MENU NAVIGATION control to skip to the previous or next track.
NOTE: The track number is shown in the display. The TUNING knob or the arrow keys in the optional keypad in the
steering wheel can also be used for this purpose.
Fast forward/back
Press and hold down the left or right arrows keys in the MENU NAVIGATION control (or the corresponding keys on
the optional steering wheel keypad) to search within a track or the whole disc. The search continues for as long as the
buttons are held in.
Random play
This function plays the tracks on a CD in random order (shuffle).
1. Select CD mode and press the MENU button.
2. Press ENTER.
3. Select RANDOM from the menu and press ENTER.
RND is shown in the display as long as the function is activated.
Select RANDOM again and press ENTER, or press the EXIT button to stop random play.
Scan
This function plays the first 10 seconds of each track on the CD.
1. Press SCAN.
2. Press EXIT to stop the scan function and listen to an entire track.
CD eject
ProCarManuals.com
Page 107 of 127

Press the button (no. 16 in the illustration on page 169) to eject the disc.
NOTE: For reasons of traffic safety, the ejected CD must be removed within 12 seconds or it will be automatically
drawn back into the slot and the CD player will enter pause mode. Press the CD button to restart the disc.
Compact disc care
Before using a new CD for the first time, remove any burrs in the center/outer edge by running the stem of a pen or
similar object around the hole/edge of the disc.
Use CD standard EN 60908 discs only. Discs not meeting this standard may cause problems with system (poor
sound). CDR discs can cause listening problems due to the quality of the disc or recording equipment used.
Keep the discs clean. Wipe them with a soft, clean, lint-free cloth, working from the center outward. If necessary,
dampen the cloth with a neutral soap solution. Dry thoroughly before using.
Never use cleaning spray or antistatic liquid. Use only cleaners specifically made for CDs.
Use discs of the correct size only (3.5" discs should never be used).
pg. 178 CD player
Do not put tape or labels on the disc itself. They could become stuck in the player.
Volvo does not recommend the use of plastic outer rings on the disc.
Condensation may occur on discs/optical components of the changer in cold winter weather. The disc can be dried
with a clean, lint-free cloth. Optical components in the CD changer may, however, take up to one hour to dry off.
Never attempt to play a disc which is damaged in any way.
When not in use, the discs should be stored in their covers. Avoid storing discs in excessive heat, direct sunlight or
dusty locations.
pg. 179 CD changer (certain audio systems only)
Starting the CD changer
The CD changer can hold up to six discs.
To use the CD changer:
1. Press the CD button.
2. Select an empty position using the 1-6 buttons or the up/down keys on the MENU NAVIGATION control. The
display shows which positions are empty.
3. Insert a disc into the changer.
Ensure that INSERT DISC is displayed before inserting a new disc.
Selecting a disc position (number)
Use the station setting buttons 1-6 to select the disc to be played, or use the up/down arrow keys on the MENU
NAVIGATION control. The number of the disc and the track being played are shown in the display.
Changing tracks
Press the right/left arrow keys on the MENU NAVIGATION control to skip to the next or previous track.
ProCarManuals.com
Page 108 of 127
NOTE: The TUNING knob (turn clockwise to go to the next track, or counterclockwise to go to the previous track) or
the optional keypad in the steering wheel can also be used for this purpose.
Fast forward/back
Press and hold down the left or right arrows keys in the MENU NAVIGATION control (or the corresponding keys on
the optional steering wheel keypad) to search within a track or the whole disc. The search continues for as long as the
buttons are held in.
Random play
This function makes it possible to play the tracks on a single disc or on all of the discs in the CD changer in random
order (shuffle).
1. Select CD mode and press the MENU button.
2. Press ENTER.
3. Select RANDOM from the menu and press ENTER.
4. Select SINGLE DISC or ALL DISCS for the player to randomly choose from one or all discs in the CD changer.
RND or RND ALL is shown in the display while the function is active. Press EXIT to deactivate this function. Press
the right arrow key on the MENU NAVIGATION control to select the next random track.
NOTE: You can only select the next random track on the current disc.
Scan
This function plays the first ten seconds of each track on the CD.
1. Press SCAN.
2. Press EXIT to stop the scan function and listen to an entire track.
Scan only works on the selected disc.
Disc text
Certain CDs contain information about the disc, such as the titles of the tracks, etc. This information can be shown in
the display by activating the DISCTEXT function.
1. Press MENU. Select the menu for relevant sound source and press ENTER.
2. Select DISCTEXT in the menu and press ENTER.
3. If information is stored on the disc, it will now appear in the display.
pg. 180 CD changer (certain audio systems only)
To deactivate this function, select DISCTEXT in the menu and press ENTER.
CD eject
This function makes it possible to eject a single disc, or to eject all of the discs in the changer.
Press the button (no. 16 in the illustration on page 169) briefly to eject the disc that is currently playing.
A longer press (more than two seconds) starts the process of ejecting all of the discs in the changer.
NOTE:
The EJECT ALL function can only be used while the vehicle is at a standstill and will be cancelled if the vehicle
begins to move.
For reasons of traffic safety, you have 12 seconds in which to remove the ejected disc. After that, the disc
automatically reinserts into the player.
Compact disc care
Before using a new CD for the first time, remove any burrs in the center/outer edge by running the stem of a pen or
similar object around the hole/edge of the disc.
ProCarManuals.com
Page 122 of 127
Inflation pressure tables127
Information display38
Information display, messages in43
Information symbol38, 39
Instrument overview8
Instrument panel38
Instrument panel lighting45
Interior lighting81
ISOFIX/LATCH anchors32
J
Jack, positioning correctly136
Jump starting118
K
Key blade90
Key blade, locking and unlocking the car90
Keylock2, 104
Kickdown109
L
Label information184
LATCH anchors33
License plate lighting, replacing159
Lighting panel45
Loading the vehicle130
Long distance trips100
Low beam bulb, replacing156
M
Maintenance146
Malfunction indicator light40
Manual front seat adjustment78
Manual shifting (Geartronic)108
Manual transmission107
Mirror, rearview57
Mirrors, door-mounted58
Moonroof59
O
Occupant safety12
Occupant Weight Sensor (OWS), disabling front passenger's side airbag19
Octane rating101
Oil pressure warning light41
Oil, changing149
On Call Roadside Assistance191
Opening the hood148
P
Paint touch up143
ProCarManuals.com
Page 124 of 127
Safety system warning light22, 41
Seat belt maintenance16
Seat belt reminder16, 41
Seat belts14
SEE MANUAL43
SERVICE REQUIRED43
Shiftlock2
Side impact protection (SIPS) airbags25
Side marker light, replacing158
Speedometer38
Spin control - SC113
SRS warning light22
Stability44
Stability system113
Stability system STC or DSTC44
Start inhibitor (immobilizer)88
Starting the vehicle104
Station formats176
STC44, 113
Steering wheel adjustment53
Steering wheel keypad, audio system170
Steering wheel lock106
Stone chips, paint touch-up143
STOP ENGINE43
STOP SAFELY43
Storage compartments82
Subwoofer172
Sunroof (moonroof)59
Supplemental Restraint System - SRS17
T
Tachometer38
Tail light bulb holder, removing159
Technician certification191
Temperature gauge38
Three-way catalytic converter190
TIME FOR REGULAR SERVICE43
Tire inflation pressure tables127
Tires, changing135
Tires, general information124
Traction control - TC113
Transmission, automatic108
Tread wear indicator124
Trip computer47
Trip odometer38
ProCarManuals.com