Brake park VOLVO S40 2005 Owners Manual
[x] Cancel search | Manufacturer: VOLVO, Model Year: 2005, Model line: S40, Model: VOLVO S40 2005Pages: 127, PDF Size: 2.32 MB
Page 2 of 127
Your Volvo is designed to meet all applicable safety and emission standards, as indicated by the certification labels
attached to the driver's door opening, and on the underside of the hood.
For further information please contact your retailer, or:
In the USA: Volvo Cars of North America
Customer Care Center
P.O. Box 914 Rockleigh, New Jersey 07647-0914
1-800-458-1552
http://www.volvocars.us
In Canada:Volvo Cars of Canada Ltd.
Customer Care Center
175 Gordon Baker Road
North York, Ontario M2H 2N7
1-800-663-8255
http://www.volvocanada.com
2005 © Volvo Cars of North America, LLC
Introduction
General information
Shiftlock
When your car is parked, the gear selector is locked in the (P)ark position. To release the selector from this position,
turn the ignition key to position II (or start the engine), depress the brake pedal, press the button on the front side of the
gear selector and move the selector from (P)ark.
Keylock
When the ignition is switched off, the gear selector must be in the (P)ark position before the key can be removed from
the ignition switch.
Anti-lock Brake System (ABS)
The ABS system in your car performs a self -diagnostic test when the vehicle first reaches the speed of approximately
12 mph (20 km/h). The brake pedal will pulsate several times and a sound may be audible from the ABS control
module. This is normal.
Fuel filler door
Press the button on the light switch panel when the car is at a standstill to unlock the fuel filler door.
Fuel filler cap
After refueling, close the fuel filler cap by turning it clockwise until it clicks into place. If this cap is not closed tightly
or if the engine is running when the car is refueled, the Malfunction Indicator Lamp ("Check Engine" light) may
indicate a fault.
Points to keep in mind
Before you operate your vehicle for the first time, please familiarize yourself with the new-engine oil consumption
information on page 187
. You should also be familiar with the information found in the chapters "Instruments and
controls", and "Starting and driving".
Information contained in the balance of the manual is extremely useful and should be read after operating the vehicle
for the first time.
The manual is structured so that it can be used for reference. For this reason, it should be kept in the vehicle for
ProCarManuals.com
Page 7 of 127
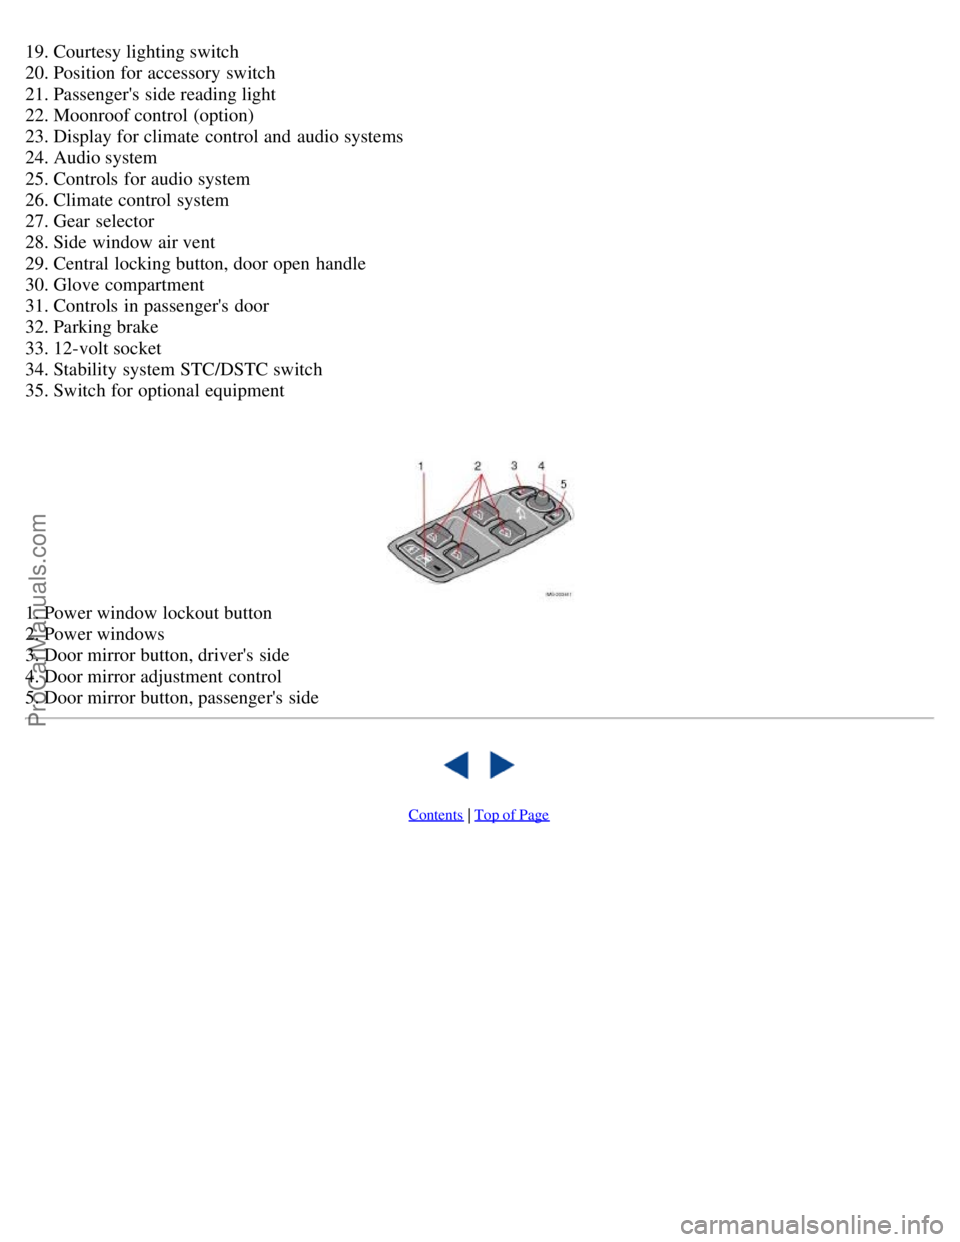
19. Courtesy lighting switch
20. Position for accessory switch
21. Passenger's side reading light
22. Moonroof control (option)
23. Display for climate control and audio systems
24. Audio system
25. Controls for audio system
26. Climate control system
27. Gear selector
28. Side window air vent
29. Central locking button, door open handle
30. Glove compartment
31. Controls in passenger's door
32. Parking brake
33. 12-volt socket
34. Stability system STC/DSTC switch
35. Switch for optional equipment
1. Power window lockout button
2. Power windows
3. Door mirror button, driver's side
4. Door mirror adjustment control
5. Door mirror button, passenger's side
Contents | Top of Page
ProCarManuals.com
Page 18 of 127
2 0 0 5
VOLVO S40
Chapter 3 - Instruments and controls
pg. 37 Instruments and controls
Instrument panel38
Indicator and warning symbols39
Symbols on the left side of the instrument panel40
Symbols on the right side of the instrument panel41
Information display43
Center console controls44
Lighting panel45
Left-side steering wheel lever47
Cruise control (option)49
Right-side steering wheel lever51
Steering wheel adjustment, Hazard warning flashers53
Parking brake, 12 volt socket54
Power windows55
Mirrors57
Power moonroof (option)59
Personal settings61
Home Link® Universal Transceiver (option)63
pg. 38 Instrument panel
ProCarManuals.com
Page 20 of 127
14. Temperature gauge
The gauge indicates the temperature of the engine cooling system. If the temperature is abnormally high and the needle
enters the red zone, a message is shown in the display. Bear in mind that extra lamps in front of the air intake reduce
the cooling capacity at high outside temperatures and high engine loads.
15. Indicator and warning symbols
1. Models with All Wheel Drive have a tank volume of 15 US gallons (57 liters).
Models with engine code 39 have a fuel tank capacity of 14.5 US gallons (55 liters). This code is the 6th and 7th digits
from the left in your vehicle's VIN number. See page 184
for the location of the VIN plate.
pg. 39 Indicator and warning symbols
Function check
The indicator and warning symbols light up when you turn the ignition key to the driving position (position II) before
starting. This shows that the symbols are functioning. When the engine starts, all symbols go out. If the engine is not
started within 5 seconds, all of the symbols except CHECK ENGINE and
will go out. Certain symbols may not
have their functions illustrated, depending on the car's equipment. The PARK BRAKE symbol will not go out until the
parking brake has been released.
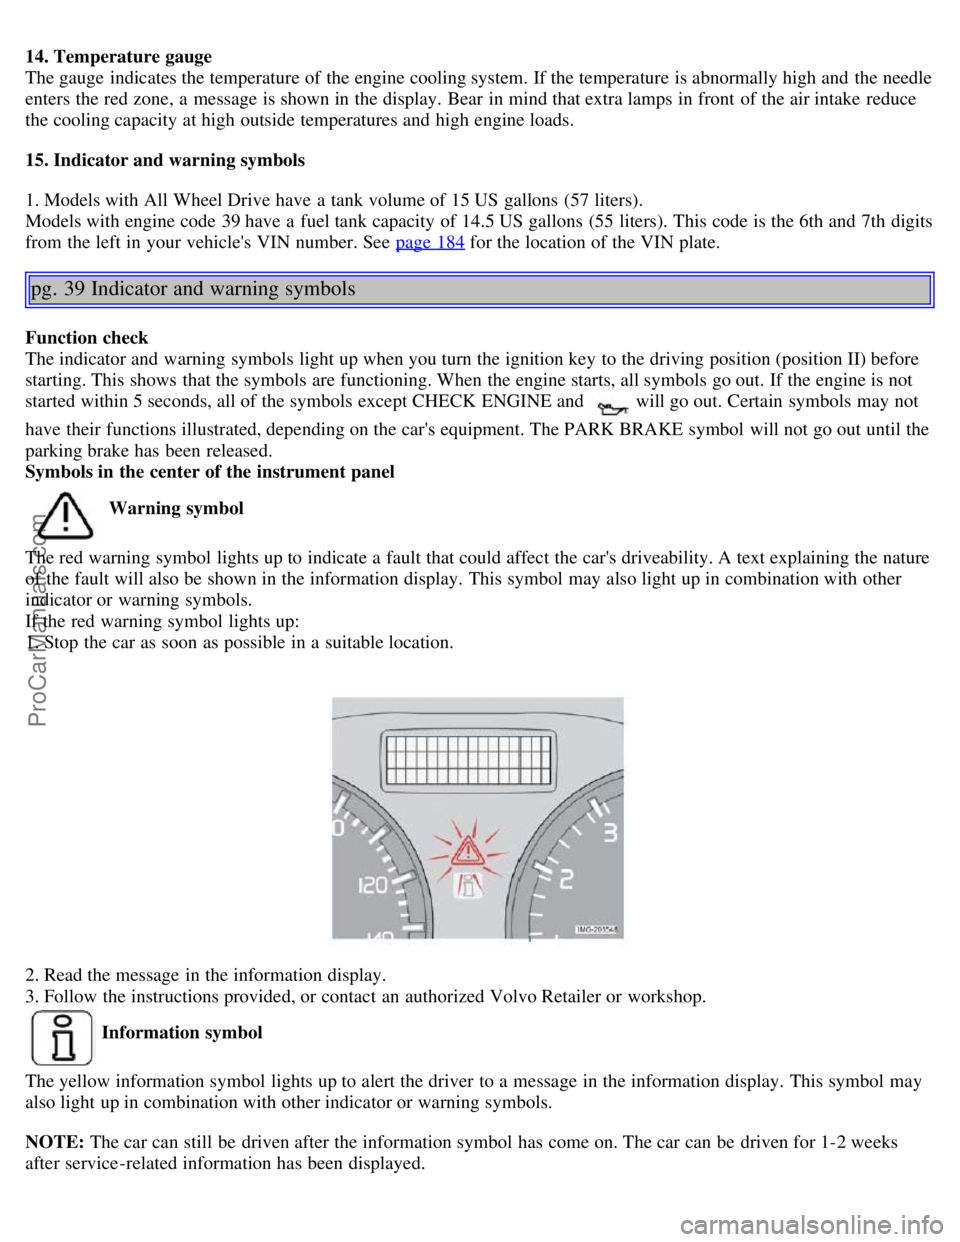
Symbols in the center of the instrument panel
Warning symbol
The red warning symbol lights up to indicate a fault that could affect the car's driveability. A text explaining the nature
of the fault will also be shown in the information display. This symbol may also light up in combination with other
indicator or warning symbols.
If the red warning symbol lights up:
1. Stop the car as soon as possible in a suitable location.
2. Read the message in the information display.
3. Follow the instructions provided, or contact an authorized Volvo Retailer or workshop.
Information symbol
The yellow information symbol lights up to alert the driver to a message in the information display. This symbol may
also light up in combination with other indicator or warning symbols.
NOTE: The car can still be driven after the information symbol has come on. The car can be driven for 1-2 weeks
after service-related information has been displayed.
ProCarManuals.com
Page 22 of 127
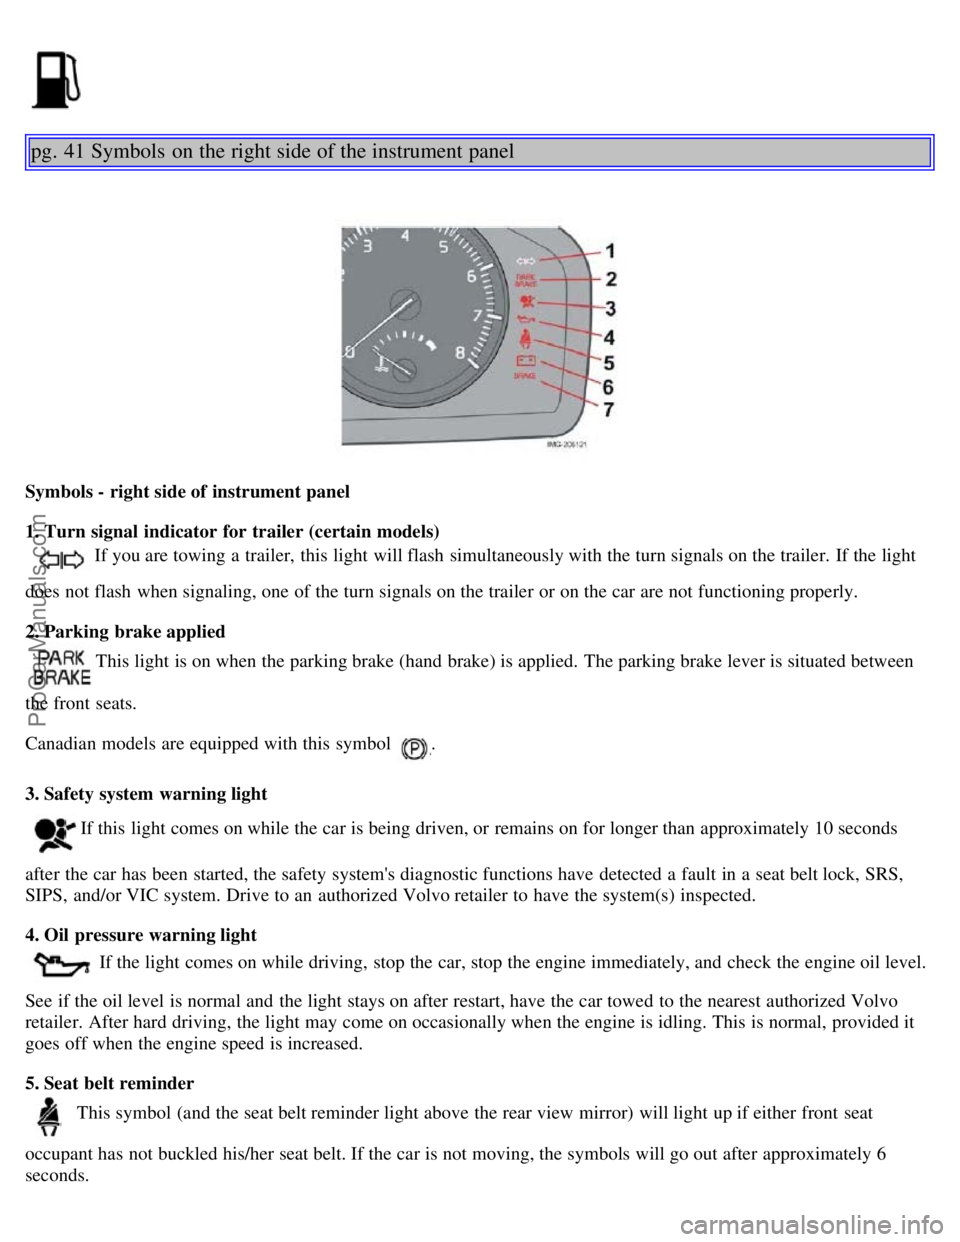
pg. 41 Symbols on the right side of the instrument panel
Symbols - right side of instrument panel
1. Turn signal indicator for trailer (certain models)
If you are towing a trailer, this light will flash simultaneously with the turn signals on the trailer. If the light
does not flash when signaling, one of the turn signals on the trailer or on the car are not functioning properly.
2. Parking brake applied
This light is on when the parking brake (hand brake) is applied. The parking brake lever is situated between
the front seats.
Canadian models are equipped with this symbol
.
3. Safety system warning light
If this light comes on while the car is being driven, or remains on for longer than approximately 10 seconds
after the car has been started, the safety system's diagnostic functions have detected a fault in a seat belt lock, SRS,
SIPS, and/or VIC system. Drive to an authorized Volvo retailer to have the system(s) inspected.
4. Oil pressure warning light
If the light comes on while driving, stop the car, stop the engine immediately, and check the engine oil level.
See if the oil level is normal and the light stays on after restart, have the car towed to the nearest authorized Volvo
retailer. After hard driving, the light may come on occasionally when the engine is idling. This is normal, provided it
goes off when the engine speed is increased.
5. Seat belt reminder
This symbol (and the seat belt reminder light above the rear view mirror) will light up if either front seat
occupant has not buckled his/her seat belt. If the car is not moving, the symbols will go out after approximately 6
seconds.
ProCarManuals.com
Page 59 of 127
2 0 0 5
VOLVO S40
Chapter 7 - Starting and driving
pg. 97 Starting and driving
General information98
Fuel requirements101
Starting the vehicle104
Manual transmission107
Automatic transmission - Geartronic108
All Wheel Drive (option)110
Brake system111
Stability system113
Rear park assist115
Towing116
Jump starting118
Towing a trailer119
Trailer towing120
Detachable trailer hitch121
Transporting loads122
pg. 98 General information
Economical driving conserves natural resources
Better driving economy may be obtained by thinking ahead, avoiding rapid starts and stops and adjusting the speed of
your vehicle to immediate traffic conditions.
Observe the following rules:
Bring the engine to normal operating temperature as soon as possible by driving with a light foot on the accelerator
pedal for the first few minutes of operation. A cold engine uses more fuel and is subject to increased wear.
Whenever possible, avoid using the vehicle for driving short distances. This does not allow the engine to reach
normal operating temperature.
ProCarManuals.com
Page 64 of 127
pg. 103 Fuel requirements
CAUTION!
Do not refuel with the engine running
a. Turn the ignition off or to position I. If the ignition is on, an incorrect
reading could occur in the fuel gauge
After refueling, close the fuel filler cap by turning it clockwise until it clicks into place.
Allow for fuel expansion by not overfilling the tank. Overfilling could also cause damage to the emission control
systems.
Avoid spilling gasoline during refueling. In addition to causing damage to the environment, gasolines containing
alcohol can cause damage to painted surfaces, which may not be covered under the New Vehicle Limited Warranty.
Do not use gasolines containing methanol (methyl alcohol, wood alcohol). This practice can result in vehicle
performance deterioration and can damage critical parts in the fuel system. Such damage may not be covered under
the New Vehicle Limited Warranty.
a. If the fuel filler cap is not closed tightly or if the engine is running when the vehicle is refueled, the Check Engine
Light (malfunction indicator lamp) may indicate a fault. However, your vehicle's performance will not be affected. Use
only Volvo original or approved fuel filler caps.
pg. 104 Starting the vehicle
Starting the vehicle
To start the engine:
1. Fasten the seat belt. WARNING!
Before starting, check that the seat, steering wheel and mirrors are adjusted properly. Make sure the brake pedal can
be depressed completely. Adjust the seat if necessary.
2. Apply the parking brake if not already set. The gear selector (automatic transmission) is locked in the (P)ark position
(SHIFTLOCK). See also page 109.
Manual transmission: the clutch must be fully depressed.
3. Without touching the accelerator pedal, turn the ignition key to the starting position. Allow the starter to operate for
up to 10 seconds. Release the key as soon as the engine starts. If the engine fails to start, repeat this step.
NOTE:
On certain models, when the vehicle is started, idle speed may be noticeably higher than normal for a short period,
depending on the temperature of the engine. This has been done to help bring components in the emission control
system to their normal operating temperature as quickly as possible, which enables them to function normally.
For cold starts at altitudes above 6000 ft. (1800 meters), depress the accelerator pedal halfway and turn the key to
the starting position. Release the pedal slowly when the engine starts.
4. To release the gear selector from the (P)ark position, the engine must be running (or the ignition key must be in
position II) and the brake pedal must be depressed.
5. Select the desired gear. On models with an automatic transmission, the gear engages after a very slight delay which
is especially noticeable when selecting R.
NOTE:
ProCarManuals.com
Page 65 of 127
Immobilizer: If two of the keys to your vehicle are close together, e.g., on the same key ring when you try to start
the vehicle, this could cause interference in the immobilizer system and result in the vehicle not starting. If this should
occur, remove one of the keys from the key ring before trying to start the vehicle again.
Keylock: Your vehicle is equipped with a keylock system. When the engine is switched off, the gear selector must
be in the (P)ark position before the key can be removed from the ignition switch.
When starting in cold weather, the automatic transmission may shift up at slightly higher engine speeds than normal
until the automatic transmission fluid reaches normal operating temperature.
Do not race a cold engine immediately after starting. Oil flow may not reach some lubrication points fast enough to
prevent engine damage.
WARNING!
Volvo's floor mats are specially manufactured for your car. They must be firmly secured in the clips on the floor so
that they cannot slide and become trapped under the pedals on the driver's side.
pg. 105 Starting the vehicle
CAUTION!
Automatic transmission: The engine should be idling when you move the gear selector. Never accelerate until after
you feel the transmission engage! Accelerating immediately after selecting a gear will cause harsh engagement and
premature transmission wear. Selecting P or N when idling at a standstill for prolonged periods of time will help
prevent overheating of the automatic transmission fluid.
WARNING!
Always place the gear selector in Park and apply the parking brake before leaving the vehicle. Never leave the
vehicle unattended with the engine running.
Always open garage doors fully before starting the engine inside a garage to ensure adequate ventilation. The
exhaust gases contain carbon monoxide, which is invisible and odorless but very poisonous.
pg. 106 Ignition switch and steering wheel lock
0 - Locked position
Remove the key to lock the steering wheel1. Never turn the key to position 0 while driving or when the vehicle is
being towed.
NOTE: A ticking sound may be audible if the key is turned to a position between 0 and I. To stop this sound, turn the
key to position II and back to position 0.
I - Intermediate position
2
Certain accessories, radio, etc. on, daytime running lights off
ProCarManuals.com
Page 68 of 127
Shift gate positions
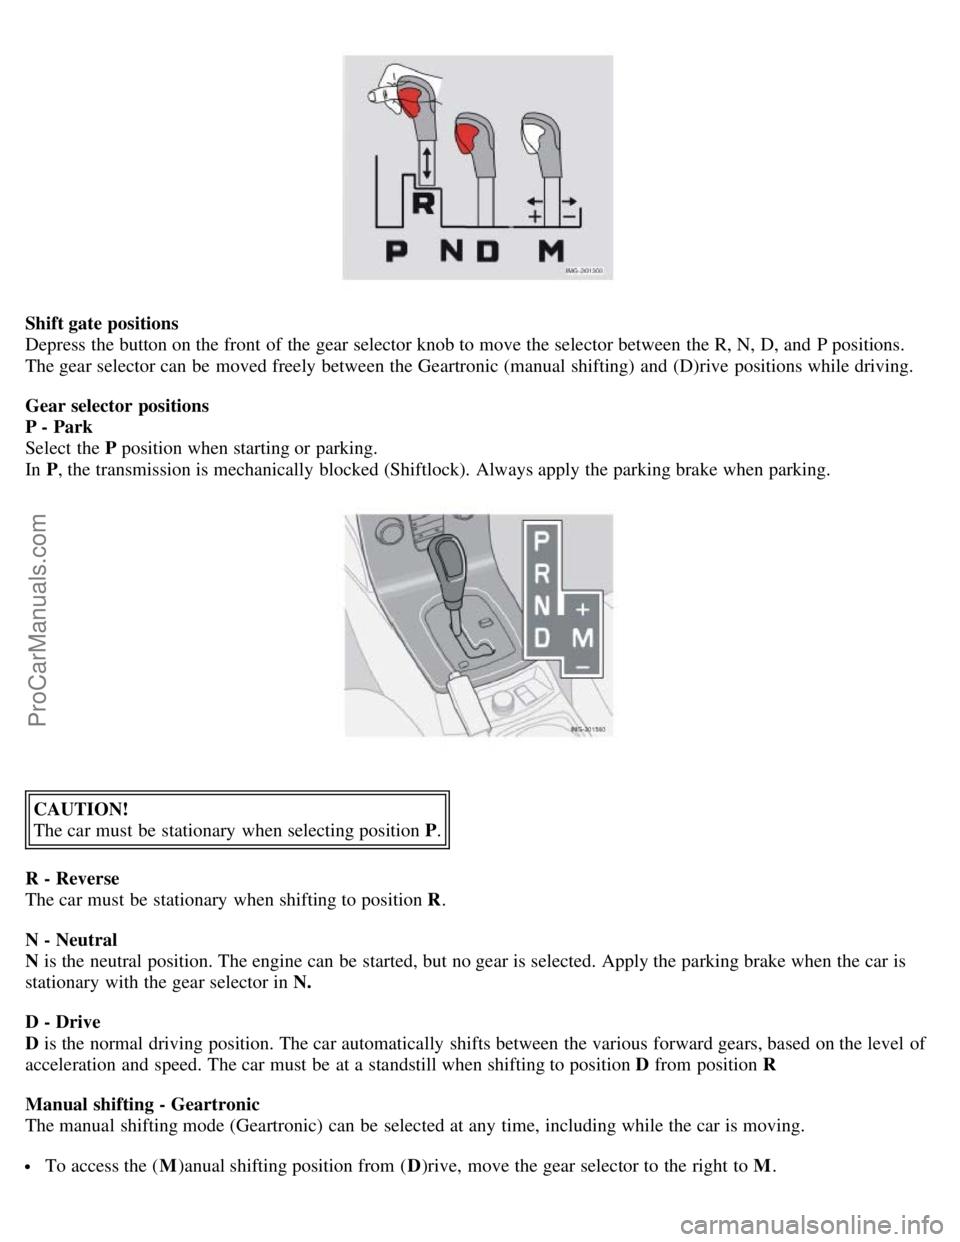
Depress the button on the front of the gear selector knob to move the selector between the R, N, D, and P positions.
The gear selector can be moved freely between the Geartronic (manual shifting) and (D)rive positions while driving.
Gear selector positions
P - Park
Select the P position when starting or parking.
In P , the transmission is mechanically blocked (Shiftlock). Always apply the parking brake when parking.
CAUTION!
The car must be stationary when selecting position P .
R - Reverse
The car must be stationary when shifting to position R .
N - Neutral
N is the neutral position. The engine can be started, but no gear is selected. Apply the parking brake when the car is
stationary with the gear selector in N.
D - Drive
D is the normal driving position. The car automatically shifts between the various forward gears, based on the level of
acceleration and speed. The car must be at a standstill when shifting to position D from position R
Manual shifting - Geartronic
The manual shifting mode (Geartronic) can be selected at any time, including while the car is moving.
To access the ( M)anual shifting position from ( D)rive, move the gear selector to the right to M .
ProCarManuals.com
Page 69 of 127
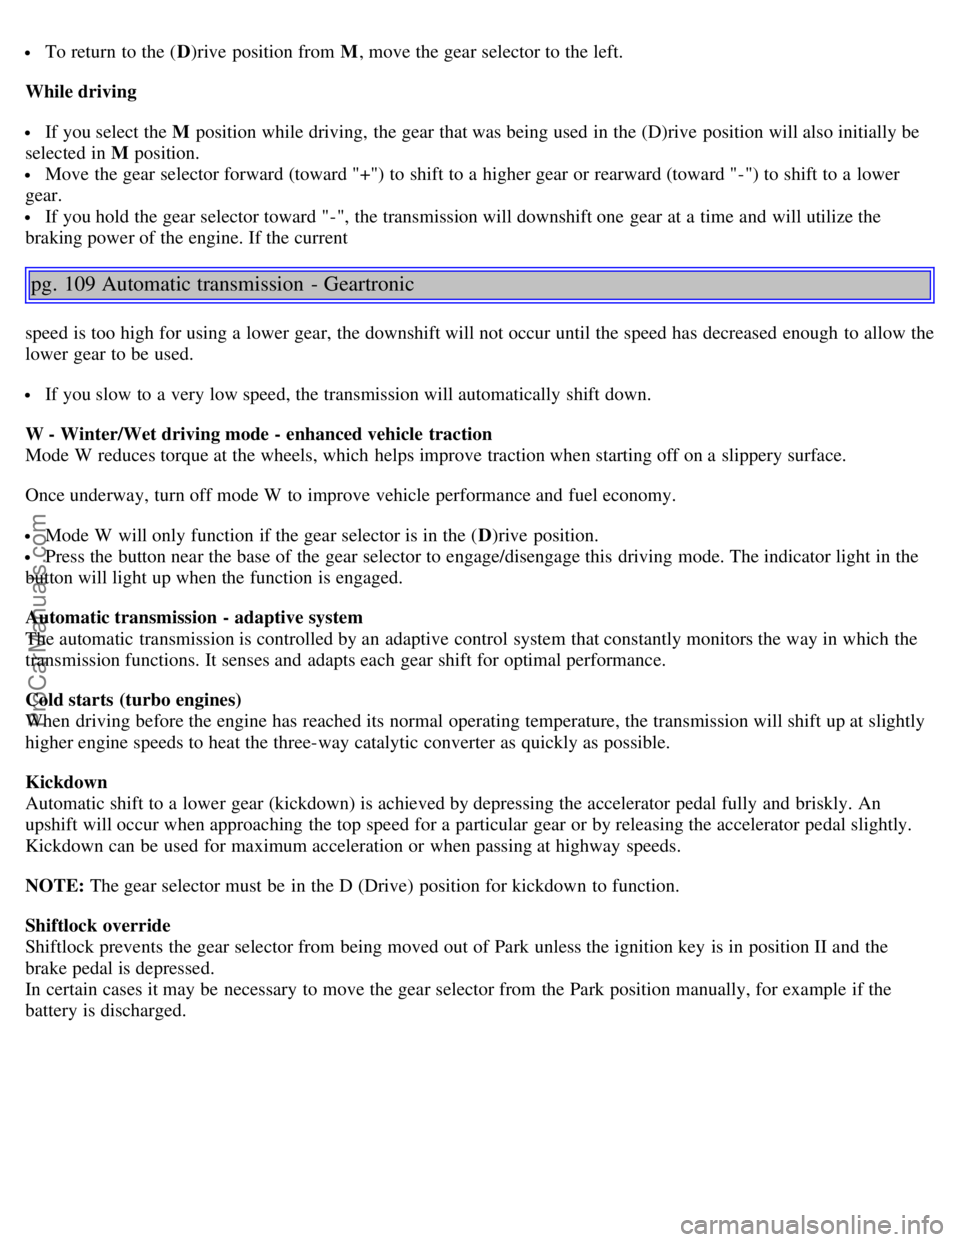
To return to the (D)rive position from M , move the gear selector to the left.
While driving
If you select the M position while driving, the gear that was being used in the (D)rive position will also initially be
selected in M position.
Move the gear selector forward (toward "+") to shift to a higher gear or rearward (toward "-") to shift to a lower
gear.
If you hold the gear selector toward "-", the transmission will downshift one gear at a time and will utilize the
braking power of the engine. If the current
pg. 109 Automatic transmission - Geartronic
speed is too high for using a lower gear, the downshift will not occur until the speed has decreased enough to allow the
lower gear to be used.
If you slow to a very low speed, the transmission will automatically shift down.
W - Winter/Wet driving mode - enhanced vehicle traction
Mode W reduces torque at the wheels, which helps improve traction when starting off on a slippery surface.
Once underway, turn off mode W to improve vehicle performance and fuel economy.
Mode W will only function if the gear selector is in the ( D)rive position.
Press the button near the base of the gear selector to engage/disengage this driving mode. The indicator light in the
button will light up when the function is engaged.
Automatic transmission - adaptive system
The automatic transmission is controlled by an adaptive control system that constantly monitors the way in which the
transmission functions. It senses and adapts each gear shift for optimal performance.
Cold starts (turbo engines)
When driving before the engine has reached its normal operating temperature, the transmission will shift up at slightly
higher engine speeds to heat the three-way catalytic converter as quickly as possible.
Kickdown
Automatic shift to a lower gear (kickdown) is achieved by depressing the accelerator pedal fully and briskly. An
upshift will occur when approaching the top speed for a particular gear or by releasing the accelerator pedal slightly.
Kickdown can be used for maximum acceleration or when passing at highway speeds.
NOTE: The gear selector must be in the D (Drive) position for kickdown to function.
Shiftlock override
Shiftlock prevents the gear selector from being moved out of Park unless the ignition key is in position II and the
brake pedal is depressed.
In certain cases it may be necessary to move the gear selector from the Park position manually, for example if the
battery is discharged.
ProCarManuals.com