VOLVO S40 2006 Workshop Manual
Manufacturer: VOLVO, Model Year: 2006, Model line: S40, Model: VOLVO S40 2006Pages: 127, PDF Size: 2.26 MB
Page 51 of 127
2 0 0 6
VOLVO S40
Chapter 6 - Locks and alarm
pg. 81 Locks and alarm
Remote control and key blade82
Valet locking85
Remote control battery86
Locking and unlocking87
Locking the glove compartment, Child safety locks88
Alarm89
pg. 82 Remote control and key blade
Remote controls
Two remote controls that also function as ignition keys are provided with your car. The remote controls contain
detachable metal key blades for manually locking or unlocking the driver's door and the glove compartment.
USA - FCC ID: LTQVO315TX
This device complies with part 15 of the FCC rules. Operation is subject to the following conditions: (1) This device
may not cause harmful interference, and (2) this device must accept any interference received, including interference
that may cause undesired operation.
Canada - IC: 3659AVO315TX
Operation is subject to the following conditions: (1) this device may not cause interference, and (2) this device must
accept any interference, including interference that may cause undesired operation of the device.
Loss of a remote control
If either of the remote controls is lost, the other must be taken with the car to a trained and qualified Volvo service
technician. As an anti-theft measure, the code of the lost remote control must be erased from the system.
Each key blade has a unique code, which is used if new key blades are required. A maximum of six remote
controls/key blades can be programmed and used for one car.
Immobilizer (start inhibitor)
Each of the keys supplied with your car contains a coded transponder. The code in the key is transmitted to an antenna
in the ignition switch where it is compared to the code stored in the start inhibitor module. The car will start only with
ProCarManuals.com
Page 52 of 127
a properly coded key. If you misplace a key, take the other keys to a trained and qualified Volvo service technician for
reprogramming as an antitheft measure.USA - FCC ID: LTQWFS 125VO
This device complies with part 15 of the FCC rules. Operation is subject to the following condition: (1) This device
may not cause harmful interference, and (2) this device must accept any interference received, including interference
that may cause undesired operation.
Canada - IC: 3659A-WFS125VO
Operation is subject to the following conditions: (1) this device may not cause interference, and (2) this device must
accept any interference, including interference that may cause undesired operation of the device.
CAUTION!
Never use force on the narrow section of the remote control - this is where the transponder is located. The car cannot
be started if the transponder is damaged.
pg. 83 Remote control and key blade
Remote control functions
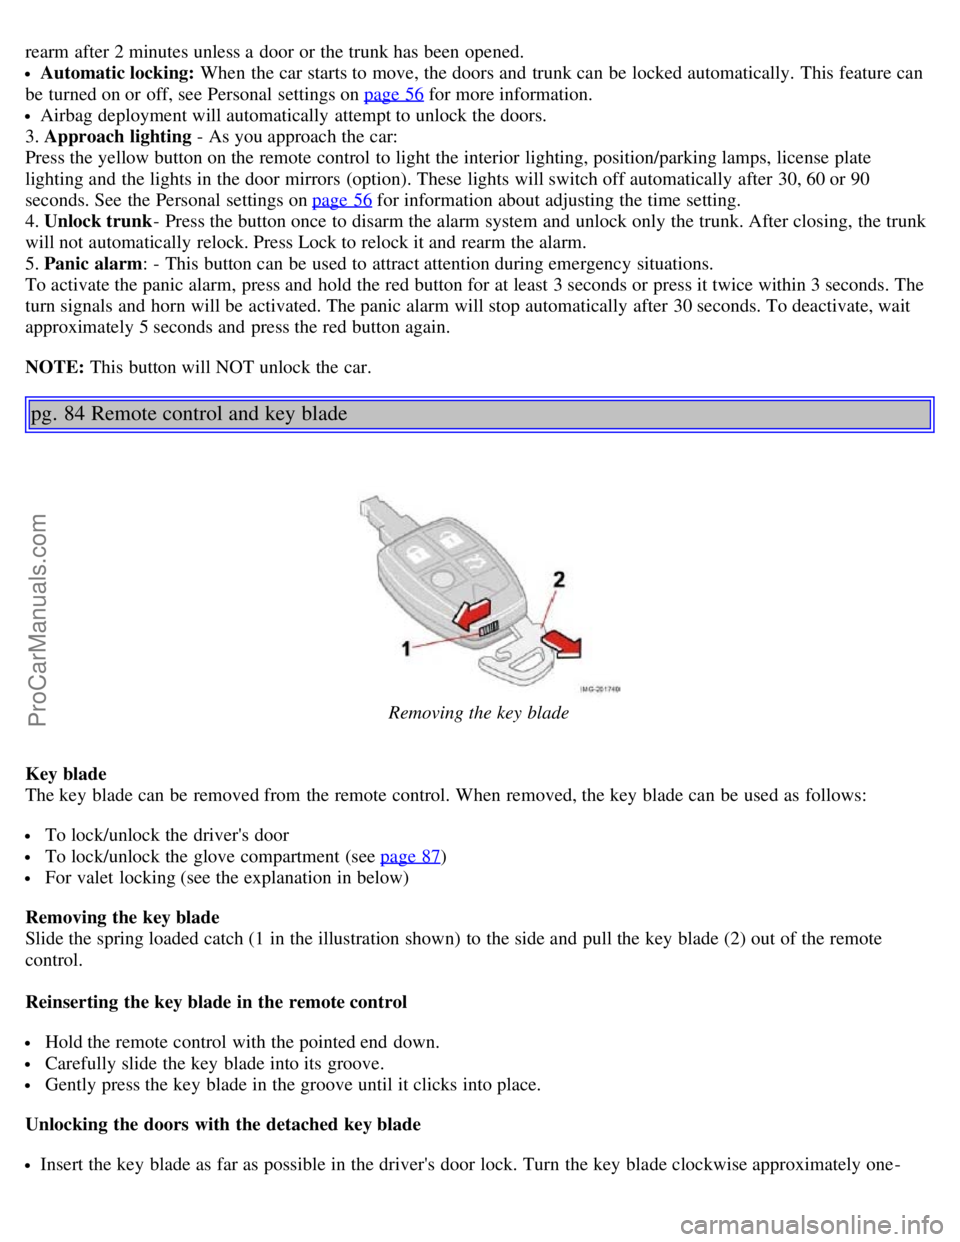
1. Lock - Press the Lock button on the remote once to lock all doors and the trunk. The turn signals will flash once to
confirm locking.
2. Unlock - Press the Unlock button on the remote once to unlock the driver's door. The turn signals will flash twice to
confirm unlocking.
After a short pause, press the Unlock button a second time within 10 seconds to unlock the other doors and the trunk.
A long press (at least two seconds) opens all side windows.
NOTE:
The turn signals flash to confirm that the vehicle has been correctly locked/ unlocked with the remote control. When
locking the vehicle, the turn signals will flash a confirmation only if all the doors are securely closed and locked.
Flashing confirmation for locking and unlocking may be customized in the vehicle's Personal settings menu. See page
56 for more information.
The two-step unlocking function can be changed so that one press of the Unlock button unlocks all of the doors and
the trunk. See Personal settings on page 56
for more information.
Automatic relocking: If the doors are unlocked, the locks will automatically reengage (re-lock) and the alarm will
ProCarManuals.com
Page 53 of 127
rearm after 2 minutes unless a door or the trunk has been opened.
Automatic locking: When the car starts to move, the doors and trunk can be locked automatically. This feature can
be turned on or off, see Personal settings on page 56
for more information.
Airbag deployment will automatically attempt to unlock the doors.
3. Approach lighting - As you approach the car:
Press the yellow button on the remote control to light the interior lighting, position/parking lamps, license plate
lighting and the lights in the door mirrors (option). These lights will switch off automatically after 30, 60 or 90
seconds. See the Personal settings on page 56
for information about adjusting the time setting.
4. Unlock trunk - Press the button once to disarm the alarm system and unlock only the trunk. After closing, the trunk
will not automatically relock. Press Lock to relock it and rearm the alarm.
5. Panic alarm : - This button can be used to attract attention during emergency situations.
To activate the panic alarm, press and hold the red button for at least 3 seconds or press it twice within 3 seconds. The
turn signals and horn will be activated. The panic alarm will stop automatically after 30 seconds. To deactivate, wait
approximately 5 seconds and press the red button again.
NOTE: This button will NOT unlock the car.
pg. 84 Remote control and key blade
Removing the key blade
Key blade
The key blade can be removed from the remote control. When removed, the key blade can be used as follows:
To lock/unlock the driver's door
To lock/unlock the glove compartment (see page 87)
For valet locking (see the explanation in below)
Removing the key blade
Slide the spring loaded catch (1 in the illustration shown) to the side and pull the key blade (2) out of the remote
control.
Reinserting the key blade in the remote control
Hold the remote control with the pointed end down.
Carefully slide the key blade into its groove.
Gently press the key blade in the groove until it clicks into place.
Unlocking the doors with the detached key blade
Insert the key blade as far as possible in the driver's door lock. Turn the key blade clockwise approximately one -
ProCarManuals.com
Page 54 of 127
quarter turn to unlock the driver's door only.
NOTE:
After unlocking the driver's door with the key blade, opening the door will trigger the alarm. To disable the alarm:
Press the Unlock button on the remote control, or insert the key in the ignition switch.
Locking the doors with the detached key blade
Lock the rear doors and the front passenger's door by pressing the lock button on each door.
Turn the key blade one -quarter turn counter-clockwise to lock the driver's door.
NOTE: This does not arm the alarm or lock the trunk.
pg. 85 Valet locking
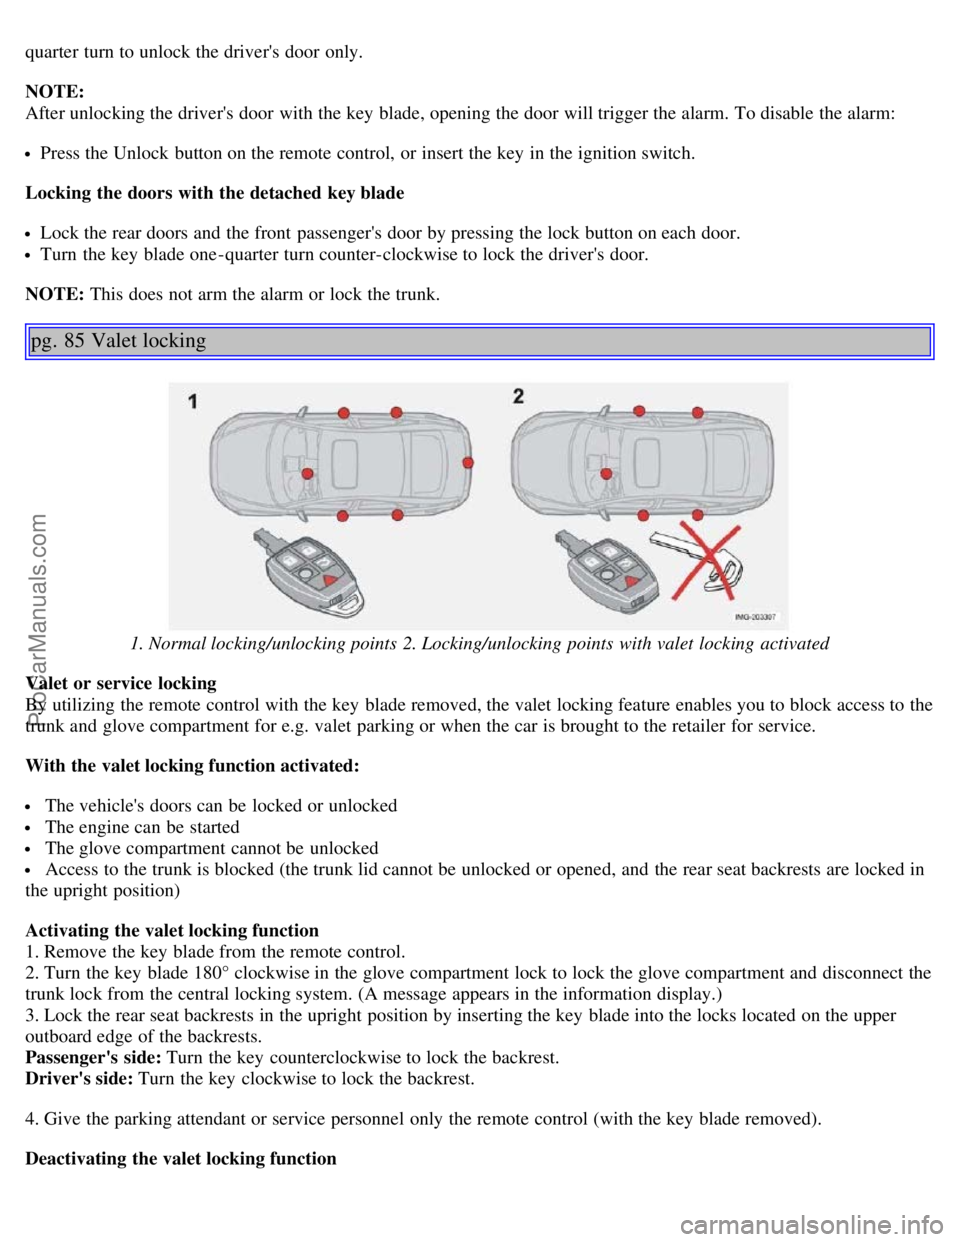
1. Normal locking/unlocking points 2. Locking/unlocking points with valet locking activated
Valet or service locking
By utilizing the remote control with the key blade removed, the valet locking feature enables you to block access to the
trunk and glove compartment for e.g. valet parking or when the car is brought to the retailer for service.
With the valet locking function activated:
The vehicle's doors can be locked or unlocked
The engine can be started
The glove compartment cannot be unlocked
Access to the trunk is blocked (the trunk lid cannot be unlocked or opened, and the rear seat backrests are locked in
the upright position)
Activating the valet locking function
1. Remove the key blade from the remote control.
2. Turn the key blade 180° clockwise in the glove compartment lock to lock the glove compartment and disconnect the
trunk lock from the central locking system. (A message appears in the information display.)
3. Lock the rear seat backrests in the upright position by inserting the key blade into the locks located on the upper
outboard edge of the backrests.
Passenger's side: Turn the key counterclockwise to lock the backrest.
Driver's side: Turn the key clockwise to lock the backrest.
4. Give the parking attendant or service personnel only the remote control (with the key blade removed).
Deactivating the valet locking function
ProCarManuals.com
Page 55 of 127
Turn the key blade 180° counterclockwise in the glove compartment lock to deactivate valet locking, and use the key
blade to unlock the rear seat backrests.
pg. 86 Remote control battery
Weak battery in the remote control
When the battery begins to lose its charge, the Information symbol in the instrument panel (see page 35
) lights up and
REMOTE BATTERY LOW VOLTAGE is shown in the information display.
Replacing the battery in the remote control
If the range of the transmitter is noticeably reduced, this indicates that the battery (type CR 2032, 3V) is weak and
should be replaced. To replace the battery:
1. Remove the key blade.
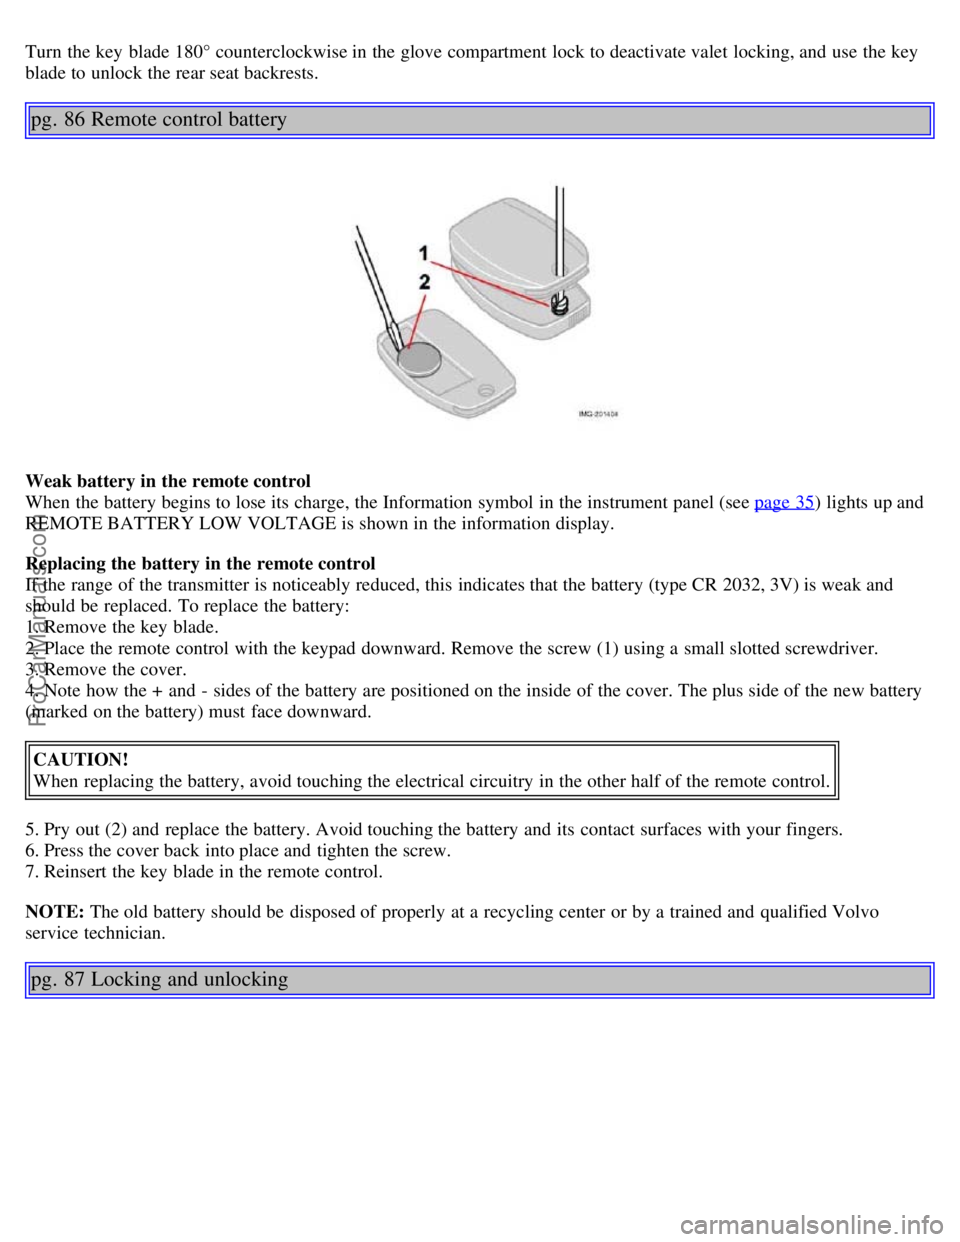
2. Place the remote control with the keypad downward. Remove the screw (1) using a small slotted screwdriver.
3. Remove the cover.
4. Note how the + and - sides of the battery are positioned on the inside of the cover. The plus side of the new battery
(marked on the battery) must face downward.
CAUTION!
When replacing the battery, avoid touching the electrical circuitry in the other half of the remote control.
5. Pry out (2) and replace the battery. Avoid touching the battery and its contact surfaces with your fingers.
6. Press the cover back into place and tighten the screw.
7. Reinsert the key blade in the remote control.
NOTE: The old battery should be disposed of properly at a recycling center or by a trained and qualified Volvo
service technician.
pg. 87 Locking and unlocking
ProCarManuals.com
Page 56 of 127
Locking/unlocking the car from the inside
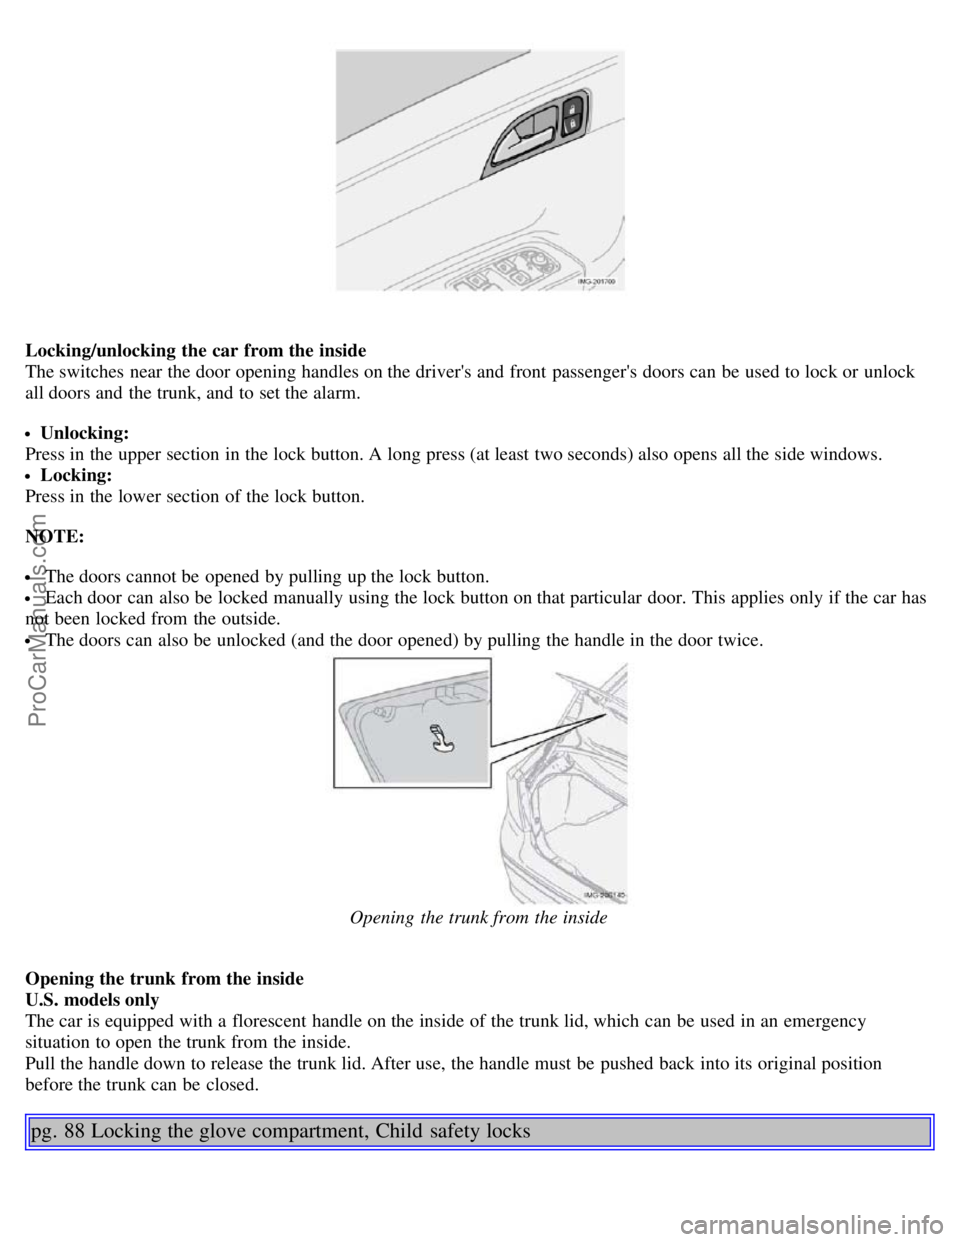
The switches near the door opening handles on the driver's and front passenger's doors can be used to lock or unlock
all doors and the trunk, and to set the alarm.
Unlocking:
Press in the upper section in the lock button. A long press (at least two seconds) also opens all the side windows.
Locking:
Press in the lower section of the lock button.
NOTE:
The doors cannot be opened by pulling up the lock button.
Each door can also be locked manually using the lock button on that particular door. This applies only if the car has
not been locked from the outside.
The doors can also be unlocked (and the door opened) by pulling the handle in the door twice.
Opening the trunk from the inside
Opening the trunk from the inside
U.S. models only
The car is equipped with a florescent handle on the inside of the trunk lid, which can be used in an emergency
situation to open the trunk from the inside.
Pull the handle down to release the trunk lid. After use, the handle must be pushed back into its original position
before the trunk can be closed.
pg. 88 Locking the glove compartment, Child safety locks
ProCarManuals.com
Page 57 of 127
Locking the glove compartment
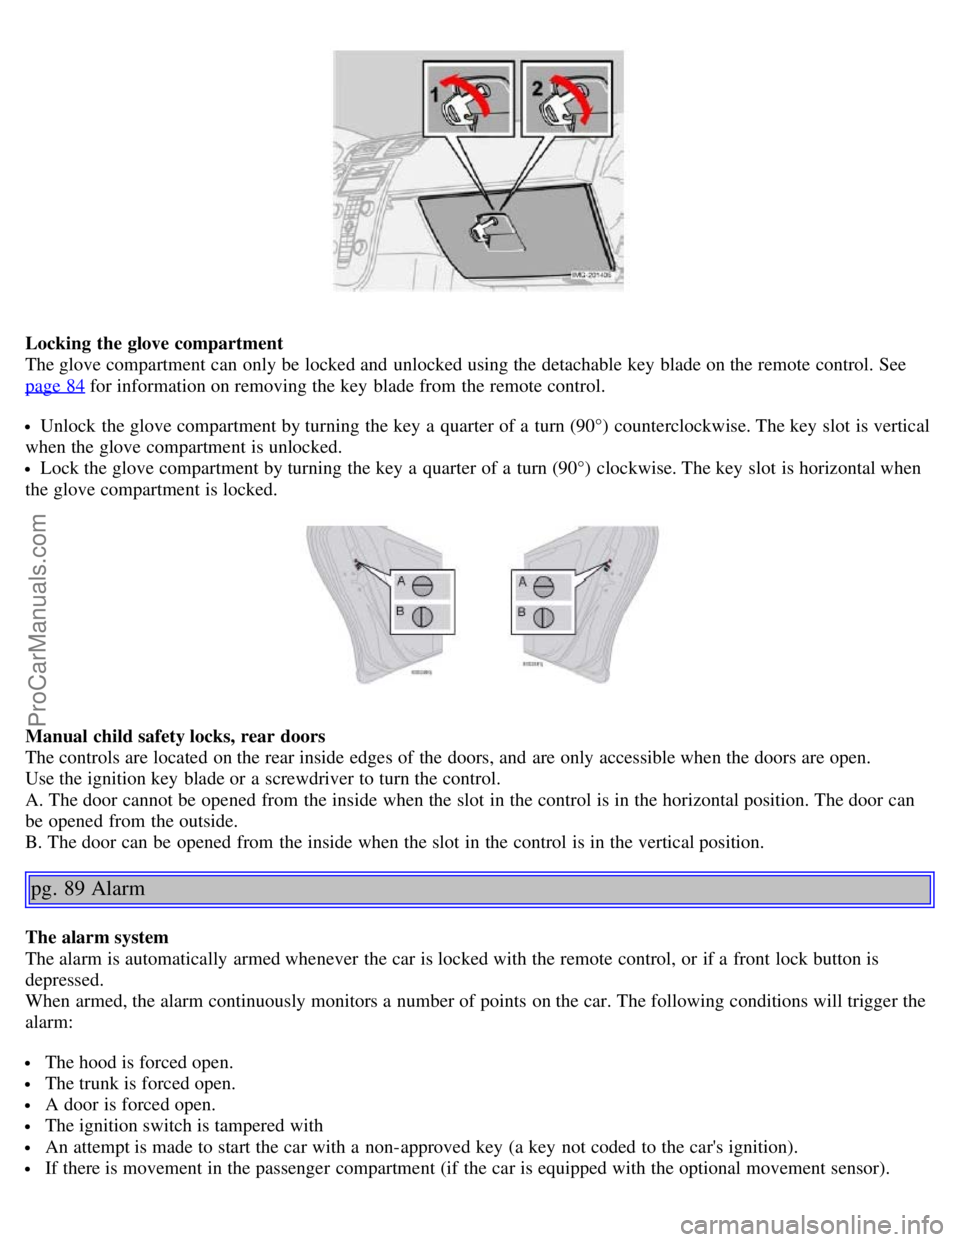
The glove compartment can only be locked and unlocked using the detachable key blade on the remote control. See
page 84
for information on removing the key blade from the remote control.
Unlock the glove compartment by turning the key a quarter of a turn (90°) counterclockwise. The key slot is vertical
when the glove compartment is unlocked.
Lock the glove compartment by turning the key a quarter of a turn (90°) clockwise. The key slot is horizontal when
the glove compartment is locked.
Manual child safety locks, rear doors
The controls are located on the rear inside edges of the doors, and are only accessible when the doors are open.
Use the ignition key blade or a screwdriver to turn the control.
A. The door cannot be opened from the inside when the slot in the control is in the horizontal position. The door can
be opened from the outside.
B. The door can be opened from the inside when the slot in the control is in the vertical position.
pg. 89 Alarm
The alarm system
The alarm is automatically armed whenever the car is locked with the remote control, or if a front lock button is
depressed.
When armed, the alarm continuously monitors a number of points on the car. The following conditions will trigger the
alarm:
The hood is forced open.
The trunk is forced open.
A door is forced open.
The ignition switch is tampered with
An attempt is made to start the car with a non-approved key (a key not coded to the car's ignition).
If there is movement in the passenger compartment (if the car is equipped with the optional movement sensor).
ProCarManuals.com
Page 58 of 127
The car is lifted or towed (if the car is equipped with the optional inclination sensor)
The battery is disconnected (while the alarm is armed).
The siren is disconnected when the alarm is disarmed.
Alarm indicator light
The alarm indicator light
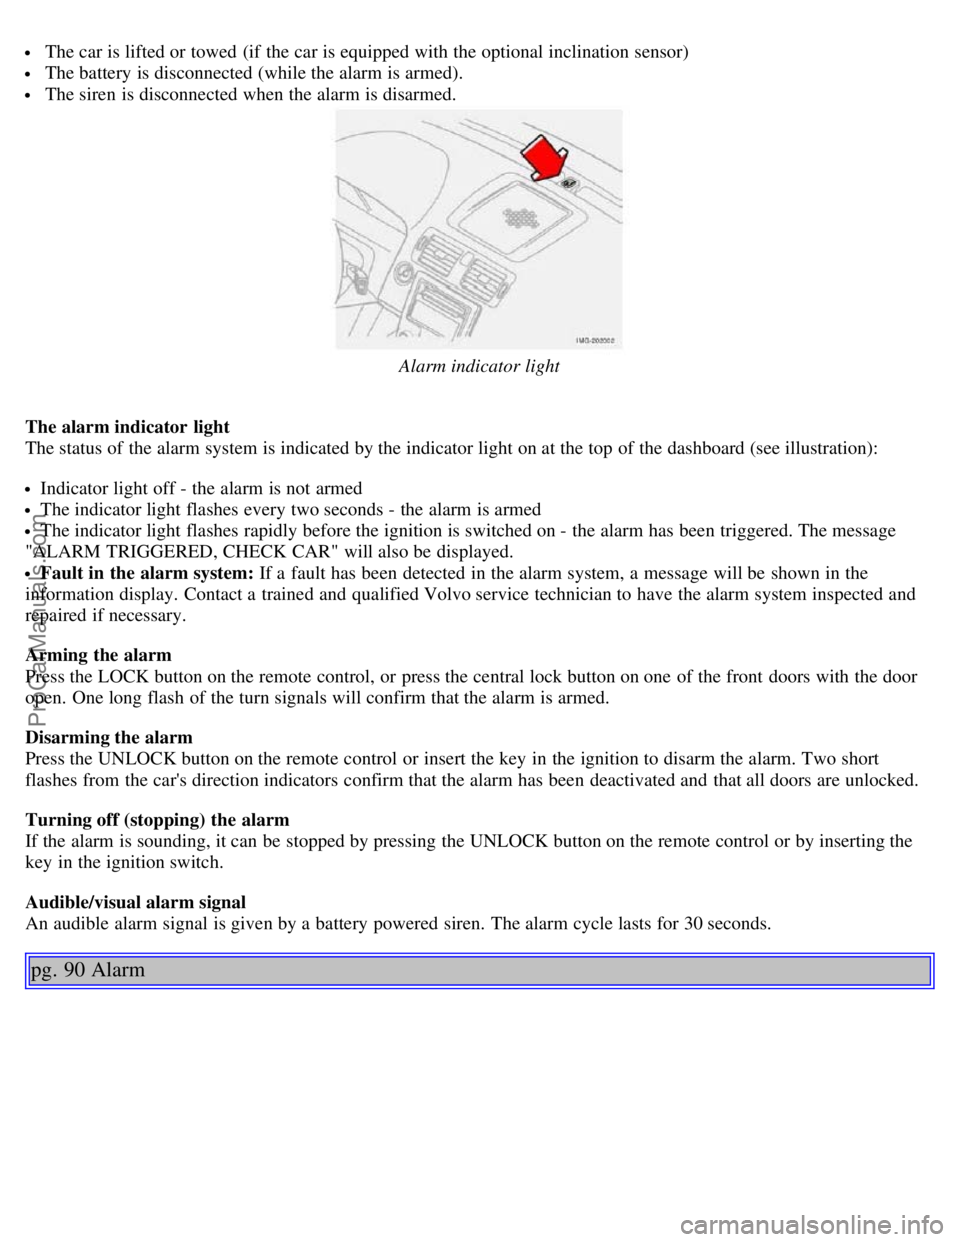
The status of the alarm system is indicated by the indicator light on at the top of the dashboard (see illustration):
Indicator light off - the alarm is not armed
The indicator light flashes every two seconds - the alarm is armed
The indicator light flashes rapidly before the ignition is switched on - the alarm has been triggered. The message
"ALARM TRIGGERED, CHECK CAR" will also be displayed.
Fault in the alarm system: If a fault has been detected in the alarm system, a message will be shown in the
information display. Contact a trained and qualified Volvo service technician to have the alarm system inspected and
repaired if necessary.
Arming the alarm
Press the LOCK button on the remote control, or press the central lock button on one of the front doors with the door
open. One long flash of the turn signals will confirm that the alarm is armed.
Disarming the alarm
Press the UNLOCK button on the remote control or insert the key in the ignition to disarm the alarm. Two short
flashes from the car's direction indicators confirm that the alarm has been deactivated and that all doors are unlocked.
Turning off (stopping) the alarm
If the alarm is sounding, it can be stopped by pressing the UNLOCK button on the remote control or by inserting the
key in the ignition switch.
Audible/visual alarm signal
An audible alarm signal is given by a battery powered siren. The alarm cycle lasts for 30 seconds.
pg. 90 Alarm
ProCarManuals.com
Page 59 of 127
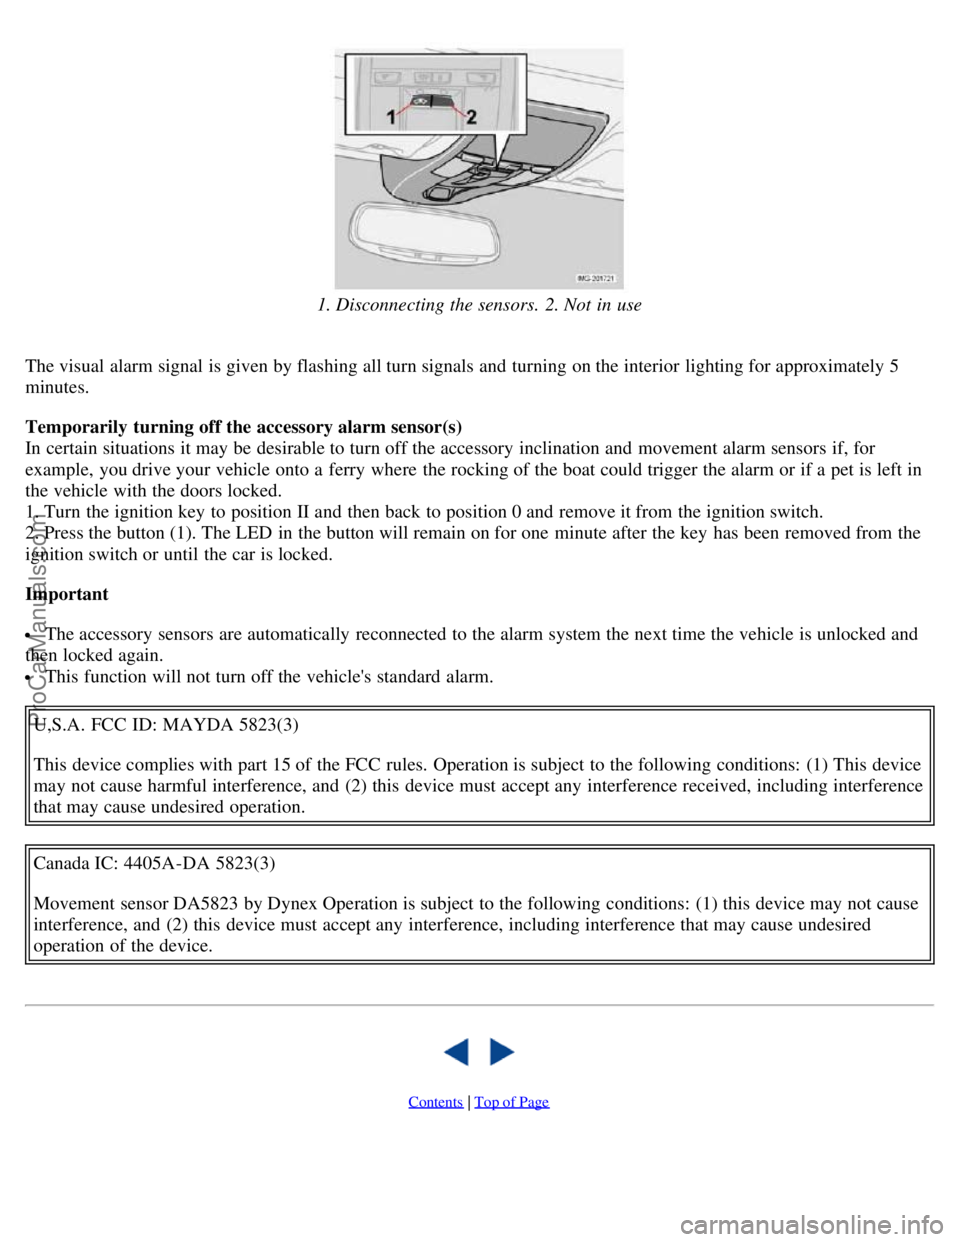
1. Disconnecting the sensors. 2. Not in use
The visual alarm signal is given by flashing all turn signals and turning on the interior lighting for approximately 5
minutes.
Temporarily turning off the accessory alarm sensor(s)
In certain situations it may be desirable to turn off the accessory inclination and movement alarm sensors if, for
example, you drive your vehicle onto a ferry where the rocking of the boat could trigger the alarm or if a pet is left in
the vehicle with the doors locked.
1. Turn the ignition key to position II and then back to position 0 and remove it from the ignition switch.
2. Press the button (1). The LED in the button will remain on for one minute after the key has been removed from the
ignition switch or until the car is locked.
Important
The accessory sensors are automatically reconnected to the alarm system the next time the vehicle is unlocked and
then locked again.
This function will not turn off the vehicle's standard alarm.
U,S.A. FCC ID: MAYDA 5823(3)
This device complies with part 15 of the FCC rules. Operation is subject to the following conditions: (1) This device
may not cause harmful interference, and (2) this device must accept any interference received, including interference
that may cause undesired operation.
Canada IC: 4405A-DA 5823(3)
Movement sensor DA5823 by Dynex Operation is subject to the following conditions: (1) this device may not cause
interference, and (2) this device must accept any interference, including interference that may cause undesired
operation of the device.
Contents | Top of Page
ProCarManuals.com
Page 60 of 127
2 0 0 6
VOLVO S40
Chapter 7 - Starting and driving
pg. 91 Starting and driving
General information92
Fuel requirements95
Ignition switch and steering wheel lock98
Starting the vehicle99
Manual transmission, 5-speed101
Manual transmission, 6-speed102
Automatic transmission - Geartronic103
Shiftlock override105
All Wheel Drive (option)106
Brake system107
Stability system109
Rear park assist (accessory)111
Towing112
Jump starting114
Towing a trailer115
Detachable trailer hitch117
Transporting loads118
pg. 92 General information
Economical driving conserves natural resources
Better driving economy may be obtained by thinking ahead, avoiding rapid starts and stops and adjusting the speed of
your vehicle to immediate traffic conditions.
Observe the following rules:
Bring the engine to normal operating temperature as soon as possible by driving with a light foot on the accelerator
ProCarManuals.com