door lock VOLVO S40 2008 User Guide
[x] Cancel search | Manufacturer: VOLVO, Model Year: 2008, Model line: S40, Model: VOLVO S40 2008Pages: 239, PDF Size: 5.94 MB
Page 73 of 239
80 02 Instruments and controls
HomeLink® Universal Transceiver (option)
Introduction
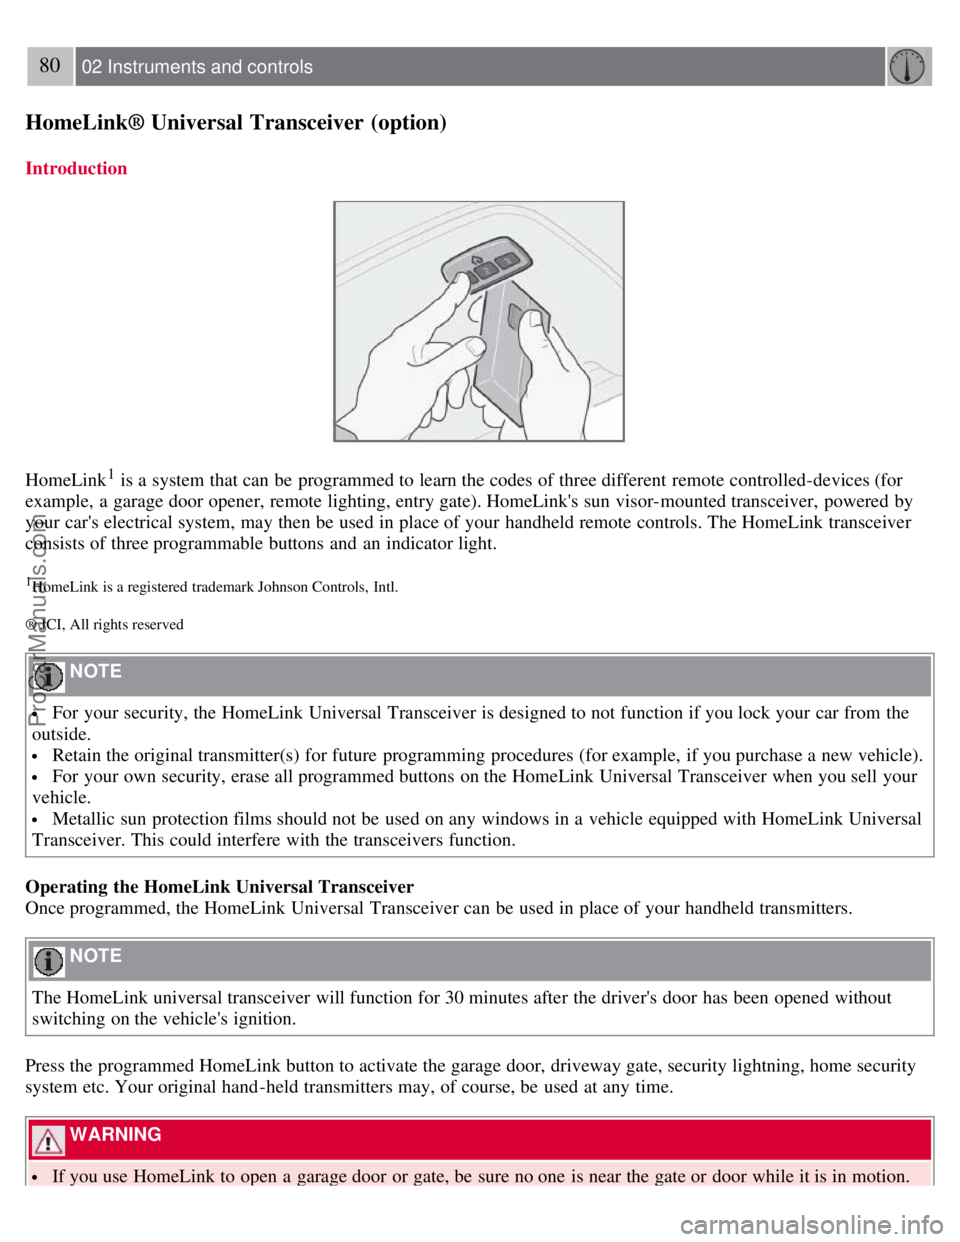
HomeLink1 is a system that can be programmed to learn the codes of three different remote controlled-devices (for
example, a garage door opener, remote lighting, entry gate). HomeLink's sun visor-mounted transceiver, powered by
your car's electrical system, may then be used in place of your handheld remote controls. The HomeLink transceiver
consists of three programmable buttons and an indicator light.
1HomeLink is a registered trademark Johnson Controls, Intl.
® JCI, All rights reserved
NOTE
For your security, the HomeLink Universal Transceiver is designed to not function if you lock your car from the
outside.
Retain the original transmitter(s) for future programming procedures (for example, if you purchase a new vehicle).
For your own security, erase all programmed buttons on the HomeLink Universal Transceiver when you sell your
vehicle.
Metallic sun protection films should not be used on any windows in a vehicle equipped with HomeLink Universal
Transceiver. This could interfere with the transceivers function.
Operating the HomeLink Universal Transceiver
Once programmed, the HomeLink Universal Transceiver can be used in place of your handheld transmitters.
NOTE
The HomeLink universal transceiver will function for 30 minutes after the driver's door has been opened without
switching on the vehicle's ignition.
Press the programmed HomeLink button to activate the garage door, driveway gate, security lightning, home security
system etc. Your original hand -held transmitters may, of course, be used at any time.
WARNING
If you use HomeLink to open a garage door or gate, be sure no one is near the gate or door while it is in motion.
ProCarManuals.com
Page 81 of 239
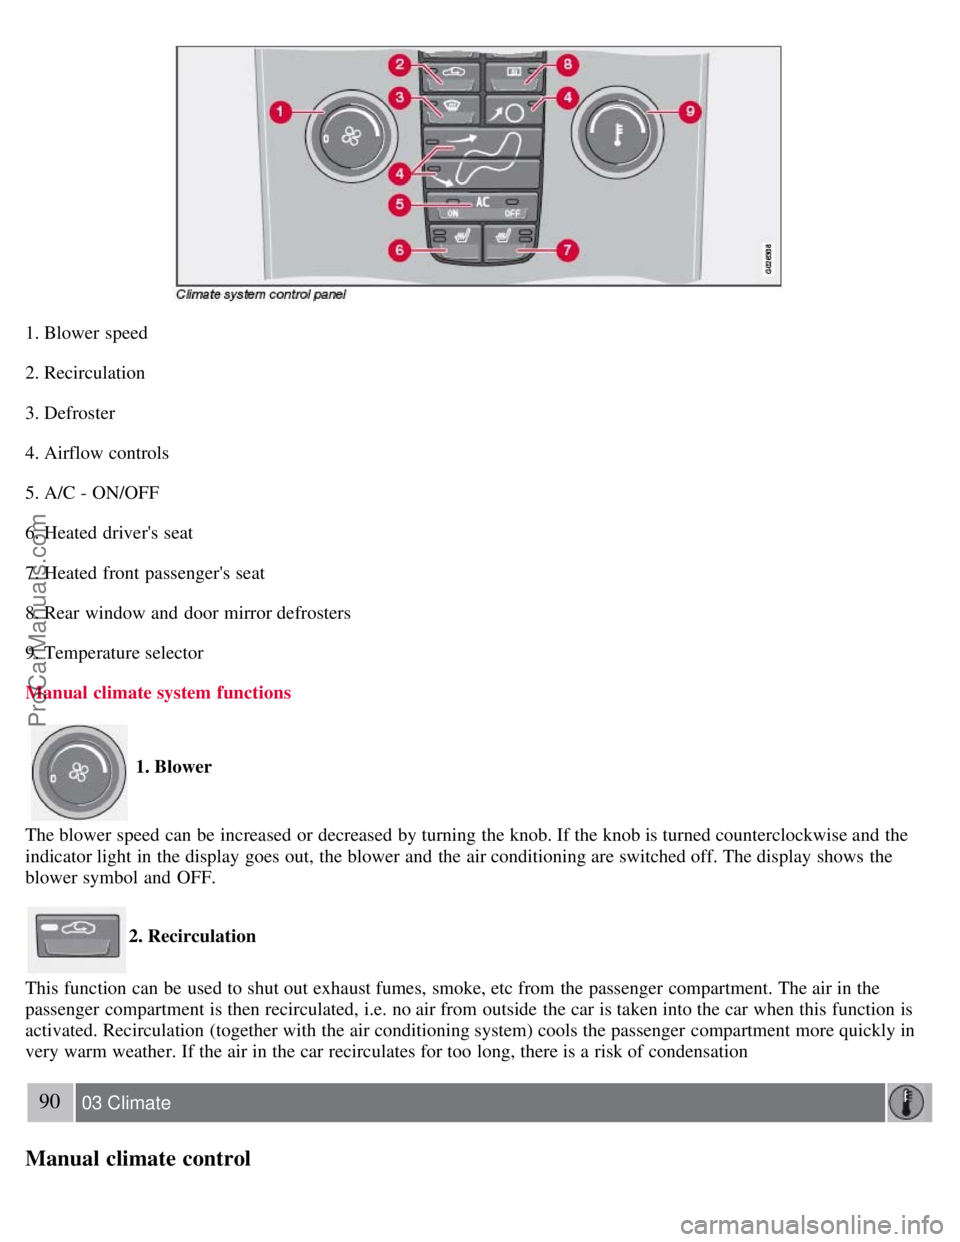
1. Blower speed
2. Recirculation
3. Defroster
4. Airflow controls
5. A/C - ON/OFF
6. Heated driver's seat
7. Heated front passenger's seat
8. Rear window and door mirror defrosters
9. Temperature selector
Manual climate system functions
1. Blower
The blower speed can be increased or decreased by turning the knob. If the knob is turned counterclockwise and the
indicator light in the display goes out, the blower and the air conditioning are switched off. The display shows the
blower symbol and OFF.
2. Recirculation
This function can be used to shut out exhaust fumes, smoke, etc from the passenger compartment. The air in the
passenger compartment is then recirculated, i.e. no air from outside the car is taken into the car when this function is
activated. Recirculation (together with the air conditioning system) cools the passenger compartment more quickly in
very warm weather. If the air in the car recirculates for too long, there is a risk of condensation
90 03 Climate
Manual climate control
ProCarManuals.com
Page 90 of 239
99 04 Interior
Front seats
Power seats (option)
The power driver's seat can be adjusted:
If the ignition key is in position I or II.
During a 10 minute period after the doors have been unlocked if the door remains open.
If the door is closed and the ignition key is not yet in the ignition, or if the key is in position 0, the seat can be
adjusted or during a period of 40 seconds. The power passenger's seat can only be adjusted if the ignition key is in
position I or II, or if the engine is running.
Adjusting the seat
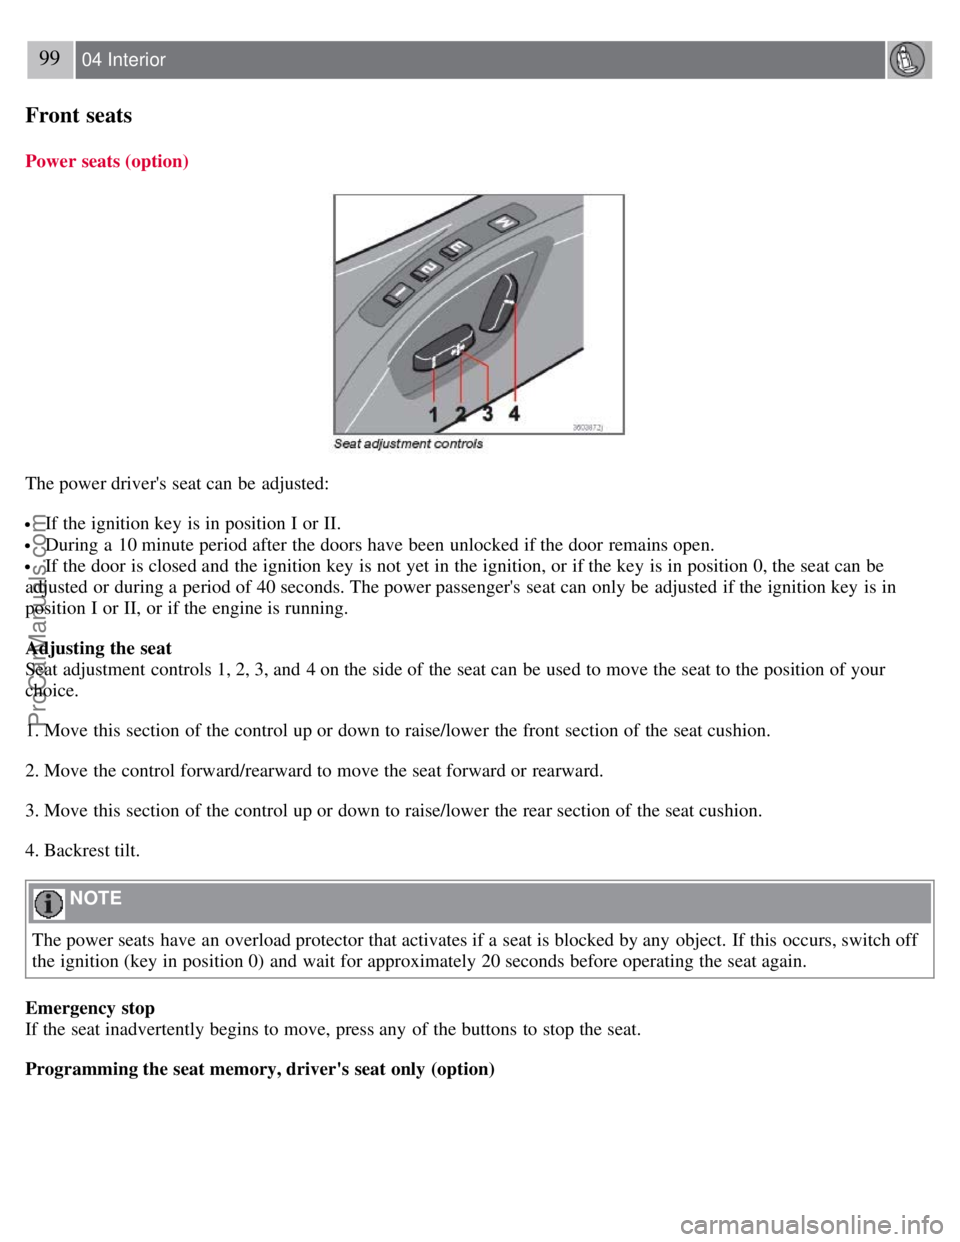
Seat adjustment controls 1, 2, 3, and 4 on the side of the seat can be used to move the seat to the position of your
choice.
1. Move this section of the control up or down to raise/lower the front section of the seat cushion.
2. Move the control forward/rearward to move the seat forward or rearward.
3. Move this section of the control up or down to raise/lower the rear section of the seat cushion.
4. Backrest tilt.
NOTE
The power seats have an overload protector that activates if a seat is blocked by any object. If this occurs, switch off
the ignition (key in position 0) and wait for approximately 20 seconds before operating the seat again.
Emergency stop
If the seat inadvertently begins to move, press any of the buttons to stop the seat.
Programming the seat memory, driver's seat only (option)
ProCarManuals.com
Page 91 of 239
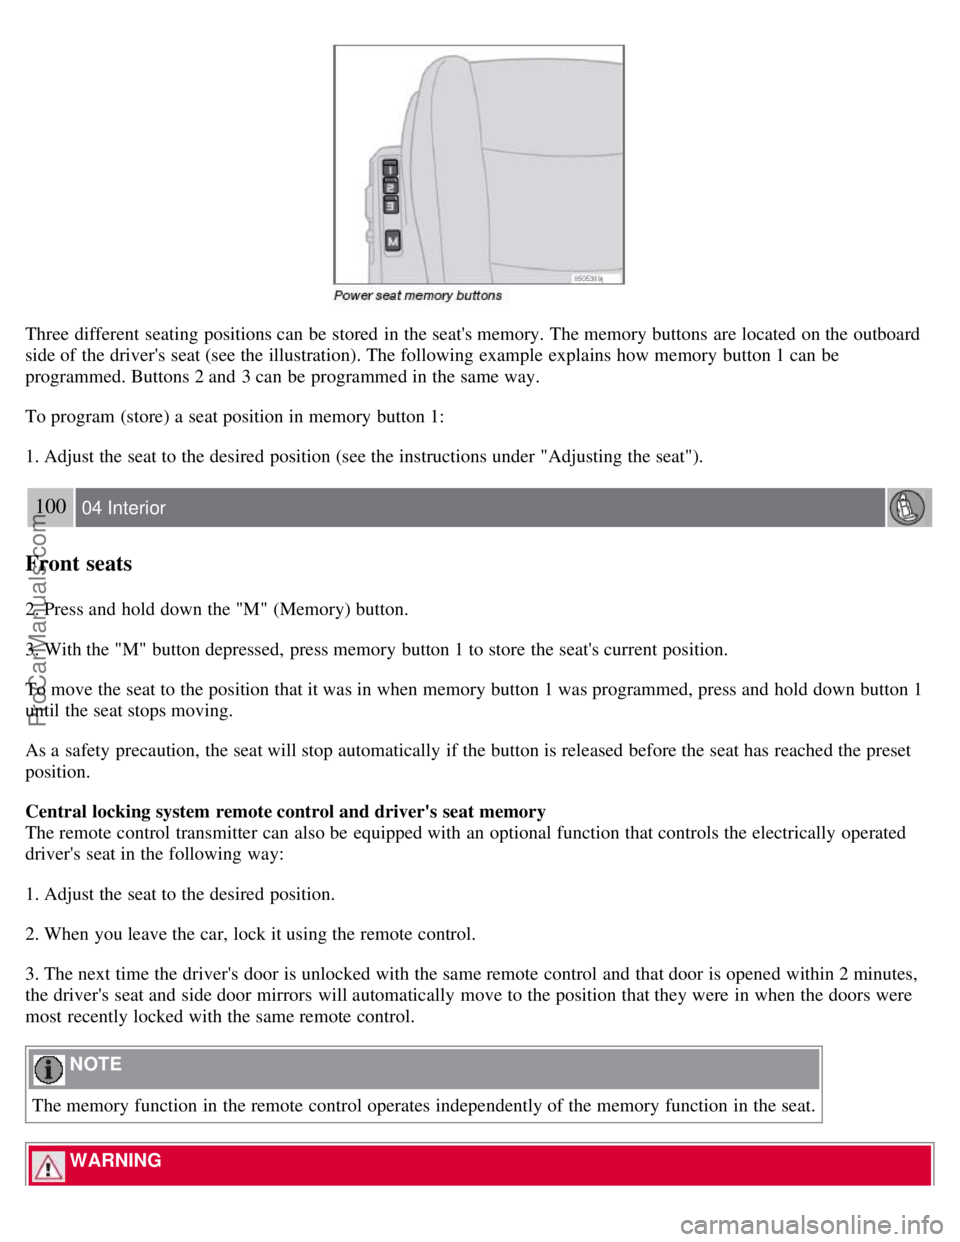
Three different seating positions can be stored in the seat's memory. The memory buttons are located on the outboard
side of the driver's seat (see the illustration). The following example explains how memory button 1 can be
programmed. Buttons 2 and 3 can be programmed in the same way.
To program (store) a seat position in memory button 1:
1. Adjust the seat to the desired position (see the instructions under "Adjusting the seat").
100 04 Interior
Front seats
2. Press and hold down the "M" (Memory) button.
3. With the "M" button depressed, press memory button 1 to store the seat's current position.
To move the seat to the position that it was in when memory button 1 was programmed, press and hold down button 1
until the seat stops moving.
As a safety precaution, the seat will stop automatically if the button is released before the seat has reached the preset
position.
Central locking system remote control and driver's seat memory
The remote control transmitter can also be equipped with an optional function that controls the electrically operated
driver's seat in the following way:
1. Adjust the seat to the desired position.
2. When you leave the car, lock it using the remote control.
3. The next time the driver's door is unlocked with the same remote control and that door is opened within 2 minutes,
the driver's seat and side door mirrors will automatically move to the position that they were in when the doors were
most recently locked with the same remote control.
NOTE
The memory function in the remote control operates independently of the memory function in the seat.
WARNING
ProCarManuals.com
Page 92 of 239
Because the driver's seat can be adjusted with the ignition off, children should never be left unattended in the car.
Movement of the seat can be STOPPED at any time by pressing any button on the power seat control panel.
Do not adjust the seat while driving. The seat should be adjusted so that the brake pedal can be depressed fully. In
addition, position the seat as far rearward as comfort and control allow.
The seat rails on the floor must not be obstructed in any way when the seat is in motion.
101 04 Interior
Interior lighting
Interior lighting
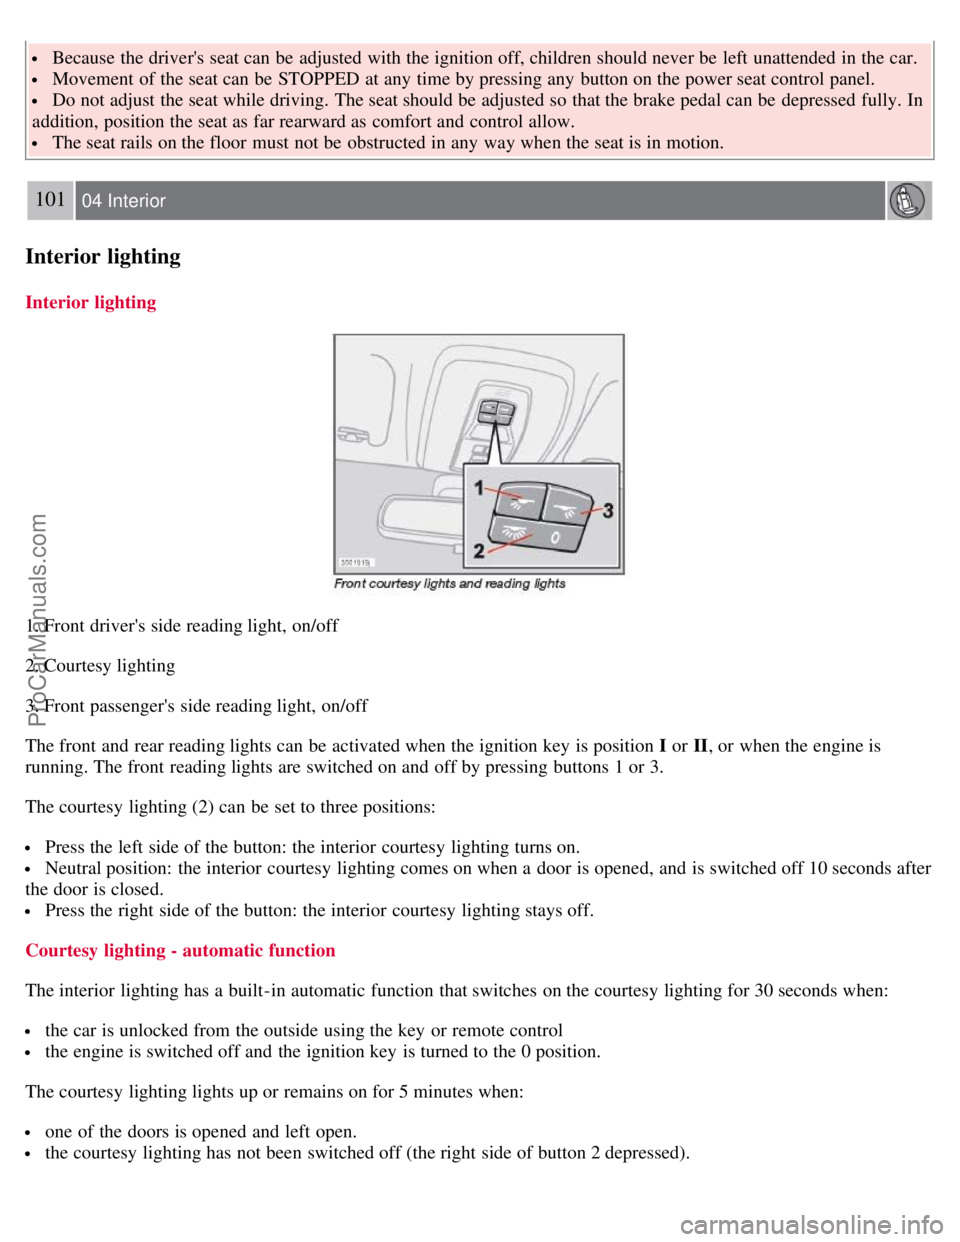
1. Front driver's side reading light, on/off
2. Courtesy lighting
3. Front passenger's side reading light, on/off
The front and rear reading lights can be activated when the ignition key is position I or II, or when the engine is
running. The front reading lights are switched on and off by pressing buttons 1 or 3.
The courtesy lighting (2) can be set to three positions:
Press the left side of the button: the interior courtesy lighting turns on.
Neutral position: the interior courtesy lighting comes on when a door is opened, and is switched off 10 seconds after
the door is closed.
Press the right side of the button: the interior courtesy lighting stays off.
Courtesy lighting - automatic function
The interior lighting has a built-in automatic function that switches on the courtesy lighting for 30 seconds when:
the car is unlocked from the outside using the key or remote control
the engine is switched off and the ignition key is turned to the 0 position.
The courtesy lighting lights up or remains on for 5 minutes when:
one of the doors is opened and left open.
the courtesy lighting has not been switched off (the right side of button 2 depressed).
ProCarManuals.com
Page 93 of 239
The automatic lighting goes out when:
the engine is started
the car is locked from the outside using the key or remote control.
If the courtesy lighting is not switched off manually, it will be turned off automatically 5 minutes after the engine has
been switched off.
Rear reading lights
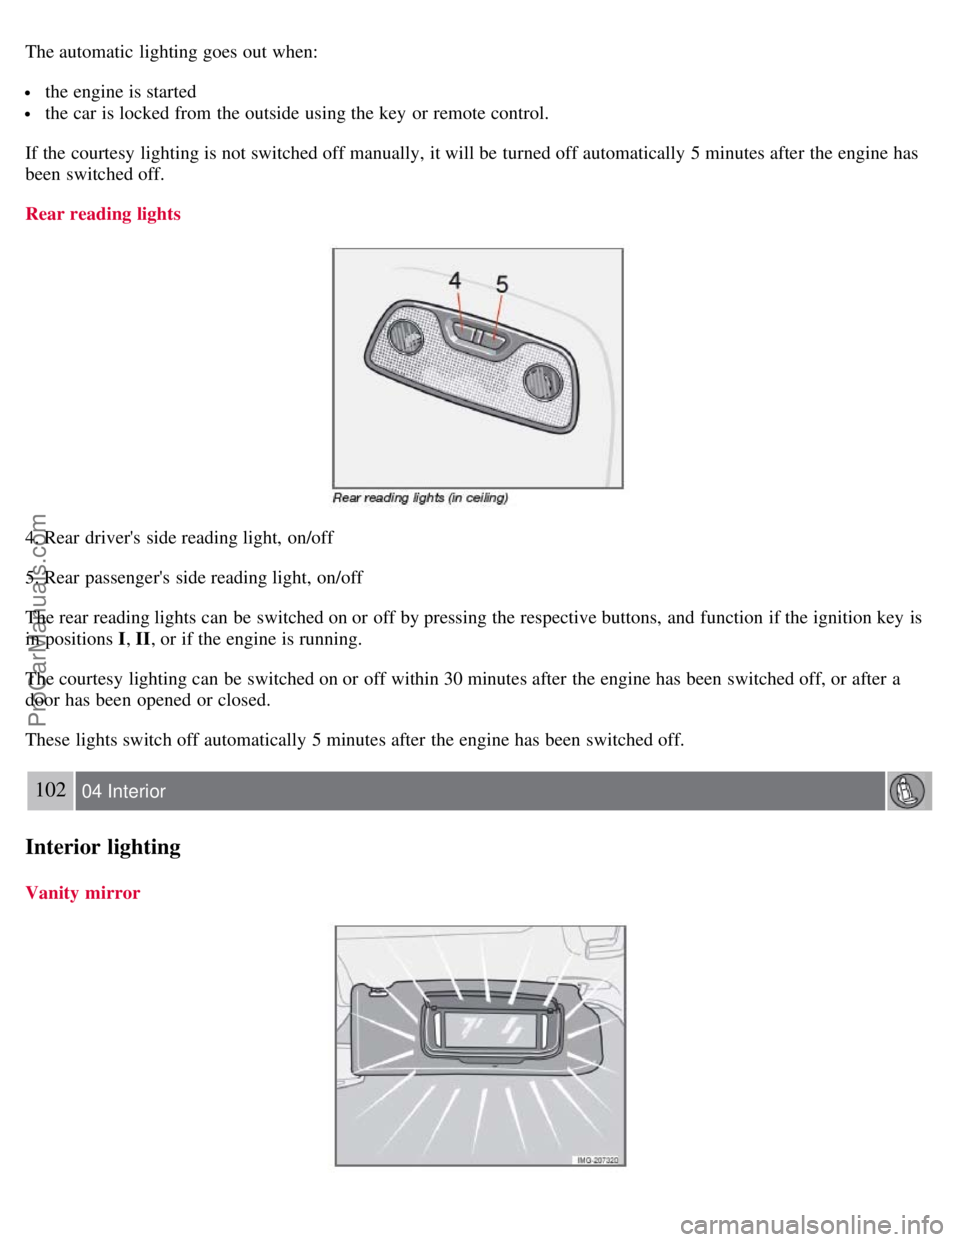
4. Rear driver's side reading light, on/off
5. Rear passenger's side reading light, on/off
The rear reading lights can be switched on or off by pressing the respective buttons, and function if the ignition key is
in positions I , II, or if the engine is running.
The courtesy lighting can be switched on or off within 30 minutes after the engine has been switched off, or after a
door has been opened or closed.
These lights switch off automatically 5 minutes after the engine has been switched off.
102 04 Interior
Interior lighting
Vanity mirror
ProCarManuals.com
Page 101 of 239
2 0 0 8
VOLVO S40
110 05 Locks and alarm
Remote control and key blade 112
Valet locking116
Keyless drive (option as available)118
Locking and unlocking122
Locking the glove compartment, Child safety locks123
Alarm124
111 05 Locks and alarm
112 05 Locks and alarm
Remote control and key blade
Remote controls
Two remote controls that also function as ignition keys are provided with your car. The remote controls contain
detachable metal key blades for manually locking or unlocking the driver's door and the glove compartment.
USA - FCC ID: LTQVO315TX
This device complies with part 15 of the FCC rules. Operation is subject to the following conditions: (1) This device
may not cause harmful interference, and (2) this device must accept any interference received, including interference
that may cause undesired operation.
Canada - IC: 3659AVO315TX
Operation is subject to the following conditions: (1) this device may not cause interference, and (2) this device must
accept any interference, including interference that may cause undesired operation of the device.
Loss of a remote control
ProCarManuals.com
Page 102 of 239
If either of the remote controls is lost, the other must be taken with the car to a Volvo retailer. As an anti-theft
measure, the code of the lost remote control must be erased from the system.
Each key blade has a unique code, which is used if new key blades are required. A maximum of six remote
controls/key blades can be programmed and used for one car.
Immobilizer (start inhibitor)
Each of the keys supplied with your car contains a coded transponder. The code in the key is transmitted to an antenna
in the ignition switch where it is compared to the code stored in the start inhibitor module. The car will start only with
a properly coded key. If you misplace a key, take the other keys to an authorized Volvo retailer for reprogramming as
an antitheft measure.USA - FCC ID: LTQWFS 125VO
This device complies with part 15 of the FCC rules. Operation is subject to the following condition: (1) This device
may not cause harmful interference, and (2) this device must accept any interference received, including interference
that may cause undesired operation.
Canada - IC: 3659A-WFS125VO
Operation is subject to the following conditions: (1) this device may not cause interference, and (2) this device must
accept any interference, including interference that may cause undesired operation of the device.
CAUTION
Never use force on the narrow section of the remote control - this is where the transponder is located. The car cannot
be started if the transponder is damaged.
113 05 Locks and alarm
Remote control and key blade
Remote control functions
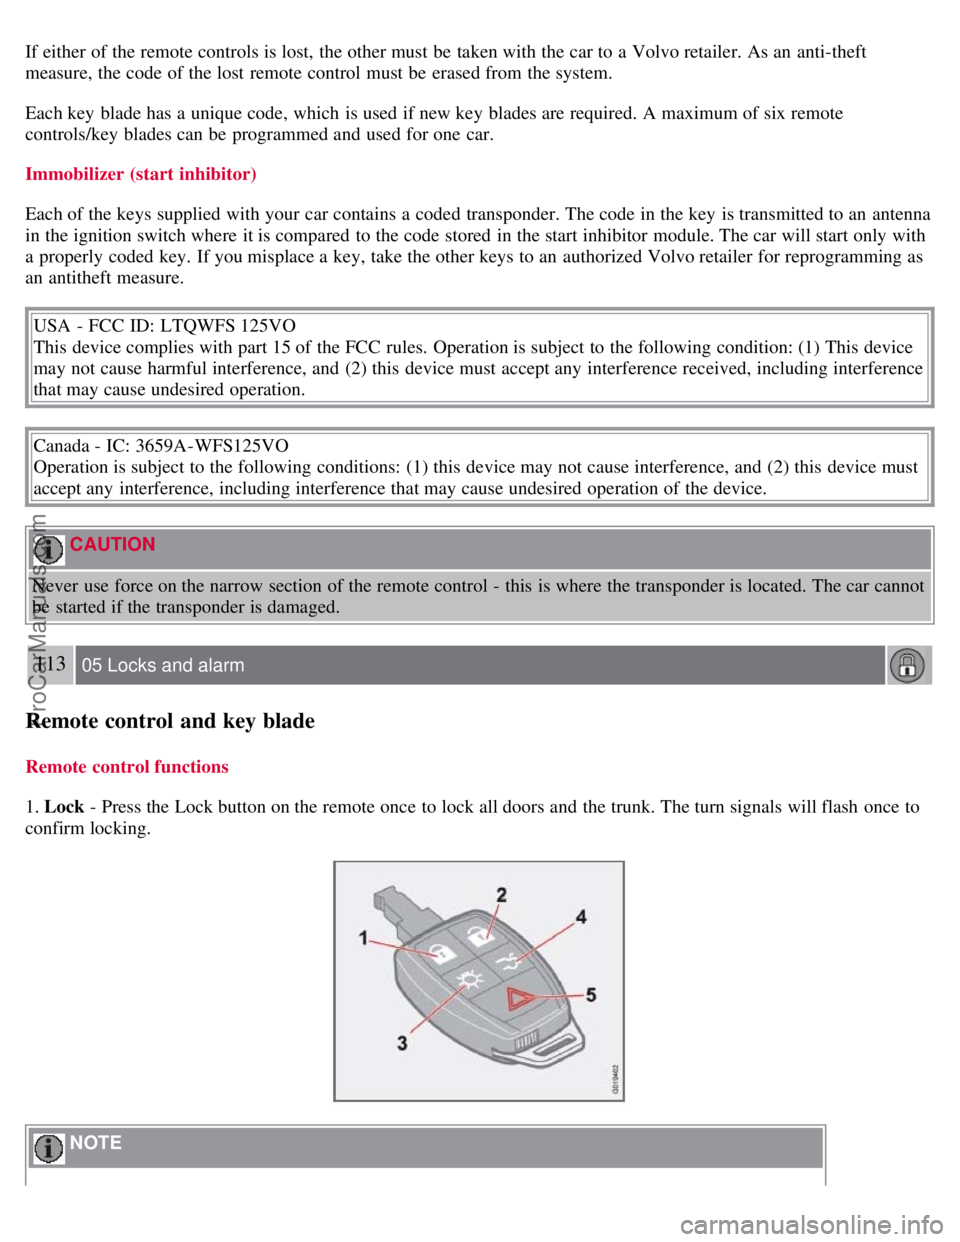
1. Lock - Press the Lock button on the remote once to lock all doors and the trunk. The turn signals will flash once to
confirm locking.
NOTE
ProCarManuals.com
Page 103 of 239
The car can also be locked if a door is open (does not apply to vehicles with the optional keyless drive.
2. Unlock - Press the Unlock button on the remote once to unlock the driver's door. The turn signals will flash twice to
confirm unlocking.
After a short pause, press the Unlock button a second time within 10 seconds to unlock the other doors and the trunk.
A long press (for several seconds) opens all side windows.
NOTE
The turn signals flash to confirm that the vehicle has been correctly locked/unlocked with the remote control or
the optional keyless drive. When locking the vehicle, the turn signals will flash a confirmation only if all the doors
are securely closed and locked. Flashing confirmation for locking and unlocking may be customized in the vehicle's
Personal settings menu. See page 77
for more information.
The two-step unlocking function can be changed so that one press of the Unlock button unlocks all of the doors
and the trunk. See Personal settings on page 77
for more information.
Automatic relocking: If the doors are unlocked, the locks will automatically reengage (re-lock) and the alarm will
rearm after 2 minutes unless a door or the trunk has been opened.
Automatic locking : When the car starts to move, the doors and trunk can be locked automatically. This feature can
be turned on or off, see Personal settings on page 77
for more information.
Airbag deployment will automatically attempt to unlock the doors.
3. Approach lighting - As you approach the car:
Press the button on the remote control to illuminate the area around the car in dark conditions.
Pressing the button once lights up the interior lighting, parking lights, and license plate lighting. These lights will
switch off automatically after 30, 60 or 90 seconds. See the Personal settings on page 78
for information about
adjusting the time setting.
4. Unlock trunk - Press the button once to disarm the alarm system and unlock only the trunk. After closing, the trunk
will not automatically relock. Press Lock to relock it and rearm the alarm.
NOTE
This function will unlock, but not pop open, the trunk.
5. Panic alarm : - This button can be used to attract attention during emergency situations.
To activate the panic alarm, press and hold the red button for at least 3 seconds or press it twice within 3 seconds. The
turn signals and horn will be activated.
The panic alarm will stop automatically after 30 seconds.
114 05 Locks and alarm
Remote control and key blade
To deactivate, wait approximately 5 seconds and press the red button again.
NOTE
This button will NOT unlock the car.
Weak battery in the remote control
ProCarManuals.com
Page 105 of 239
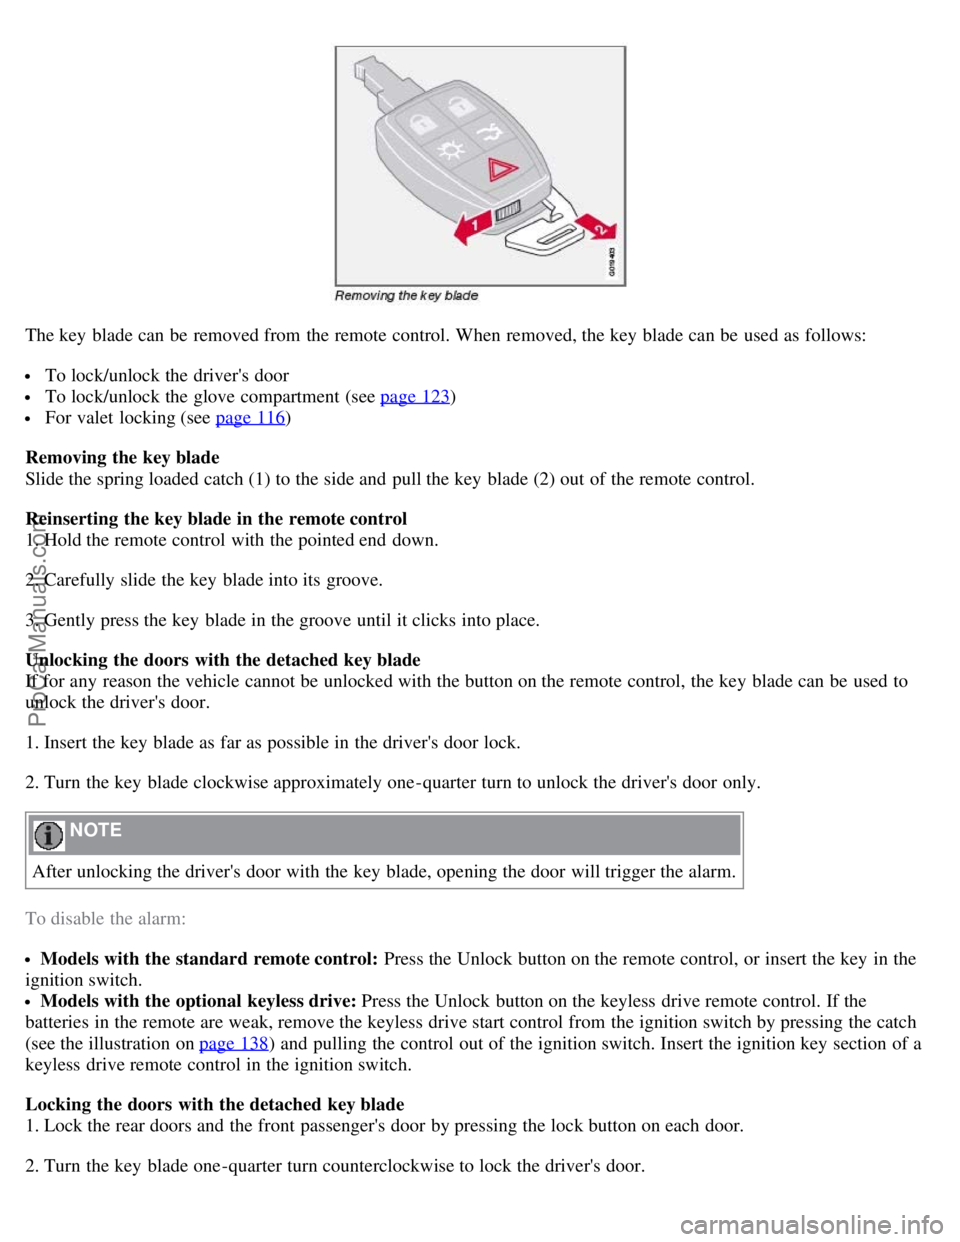
The key blade can be removed from the remote control. When removed, the key blade can be used as follows:
To lock/unlock the driver's door
To lock/unlock the glove compartment (see page 123)
For valet locking (see page 116)
Removing the key blade
Slide the spring loaded catch (1) to the side and pull the key blade (2) out of the remote control.
Reinserting the key blade in the remote control
1. Hold the remote control with the pointed end down.
2. Carefully slide the key blade into its groove.
3. Gently press the key blade in the groove until it clicks into place.
Unlocking the doors with the detached key blade
If for any reason the vehicle cannot be unlocked with the button on the remote control, the key blade can be used to
unlock the driver's door.
1. Insert the key blade as far as possible in the driver's door lock.
2. Turn the key blade clockwise approximately one -quarter turn to unlock the driver's door only.
NOTE
After unlocking the driver's door with the key blade, opening the door will trigger the alarm.
To disable the alarm:
Models with the standard remote control: Press the Unlock button on the remote control, or insert the key in the
ignition switch.
Models with the optional keyless drive: Press the Unlock button on the keyless drive remote control. If the
batteries in the remote are weak, remove the keyless drive start control from the ignition switch by pressing the catch
(see the illustration on page 138
) and pulling the control out of the ignition switch. Insert the ignition key section of a
keyless drive remote control in the ignition switch.
Locking the doors with the detached key blade
1. Lock the rear doors and the front passenger's door by pressing the lock button on each door.
2. Turn the key blade one -quarter turn counterclockwise to lock the driver's door.
ProCarManuals.com