warning light VOLVO S40 2008 User Guide
[x] Cancel search | Manufacturer: VOLVO, Model Year: 2008, Model line: S40, Model: VOLVO S40 2008Pages: 239, PDF Size: 5.94 MB
Page 45 of 239
without correcting the cause could even damage other components in your car.
NOTE
Canadian models are equipped with the second symbol.
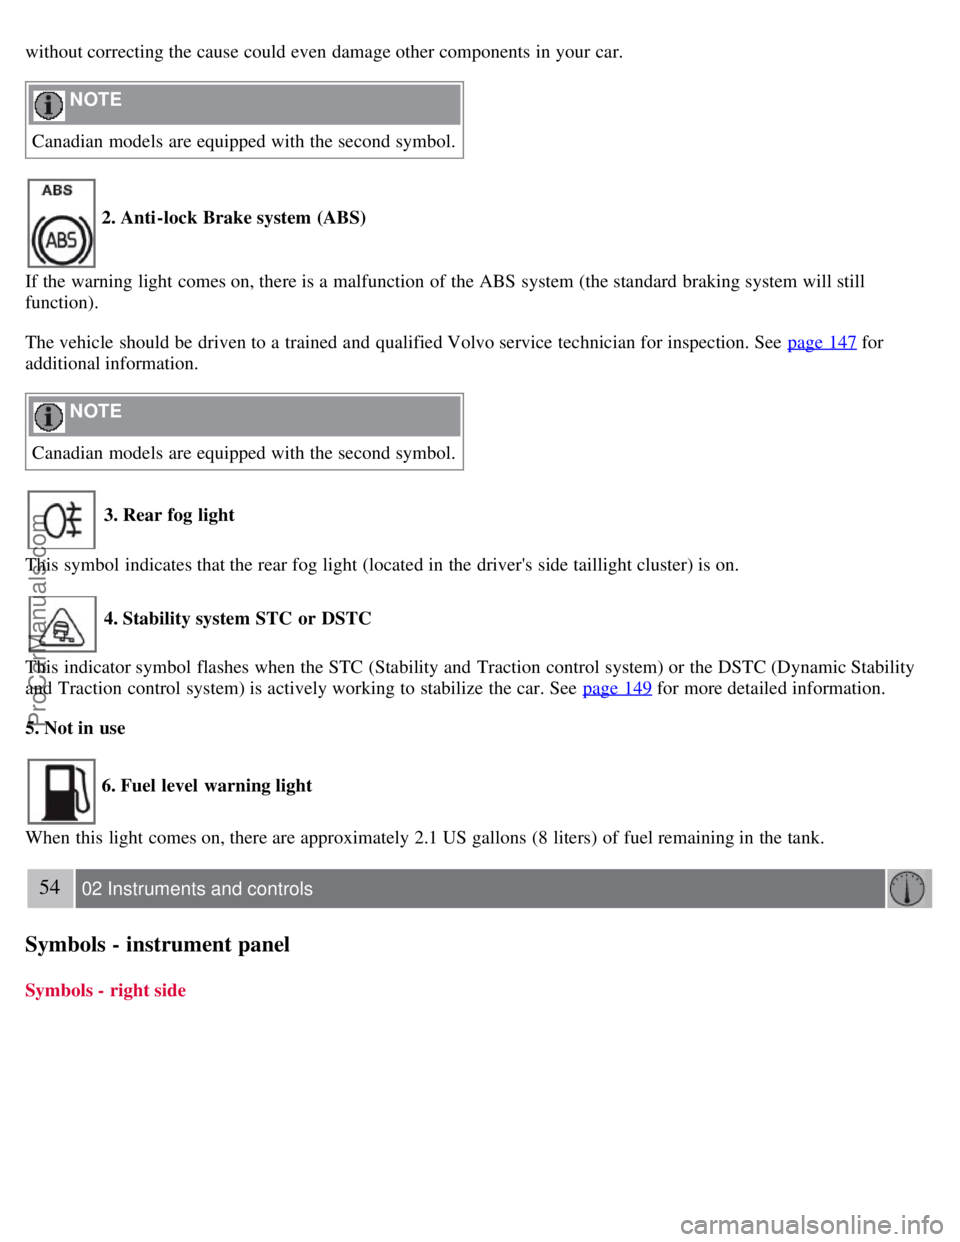
2. Anti-lock Brake system (ABS)
If the warning light comes on, there is a malfunction of the ABS system (the standard braking system will still
function).
The vehicle should be driven to a trained and qualified Volvo service technician for inspection. See page 147
for
additional information.
NOTE
Canadian models are equipped with the second symbol.
3. Rear fog light
This symbol indicates that the rear fog light (located in the driver's side taillight cluster) is on.
4. Stability system STC or DSTC
This indicator symbol flashes when the STC (Stability and Traction control system) or the DSTC (Dynamic Stability
and Traction control system) is actively working to stabilize the car. See page 149
for more detailed information.
5. Not in use
6. Fuel level warning light
When this light comes on, there are approximately 2.1 US gallons (8 liters) of fuel remaining in the tank.
54 02 Instruments and controls
Symbols - instrument panel
Symbols - right side
ProCarManuals.com
Page 46 of 239
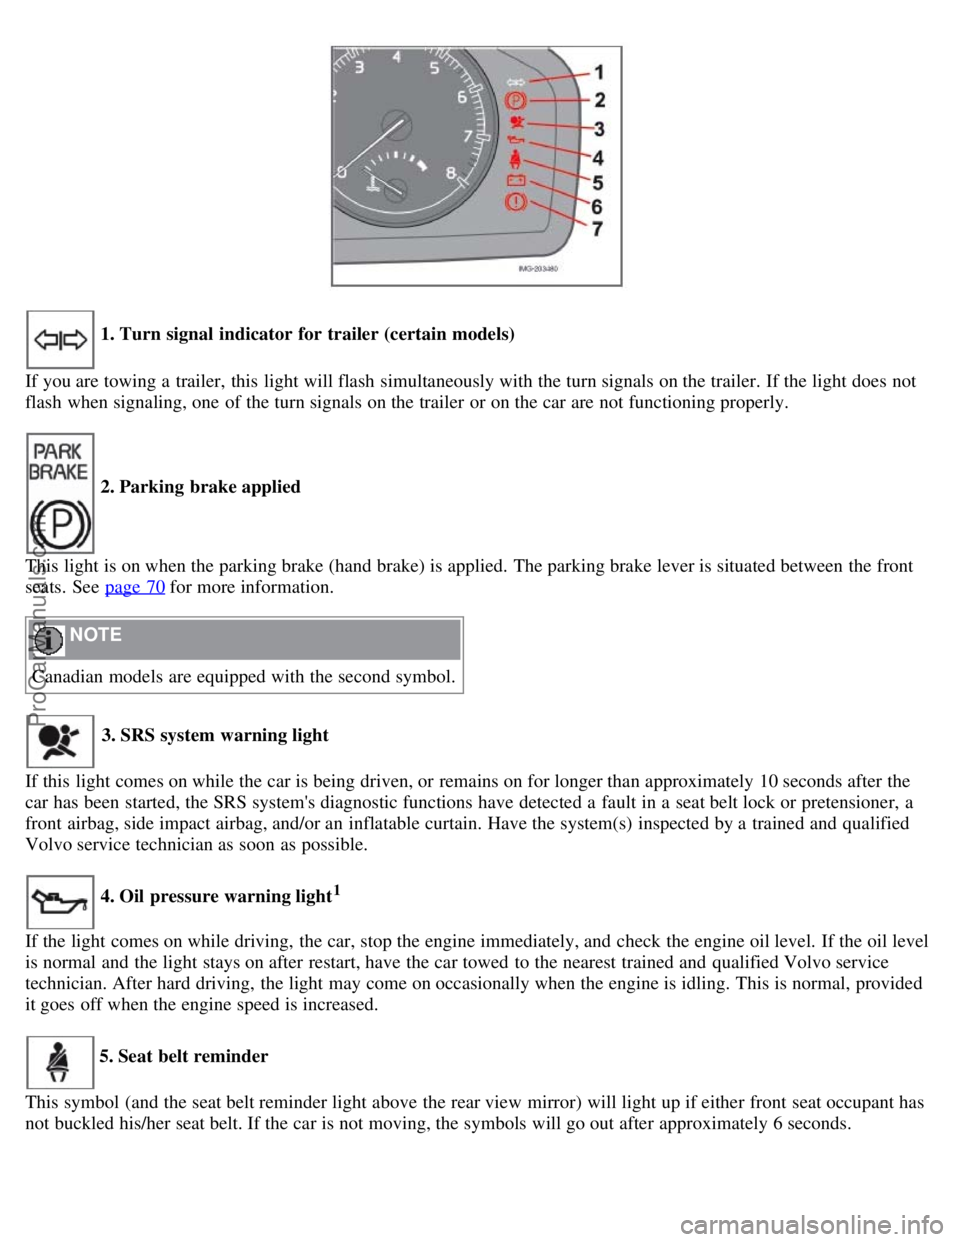
1. Turn signal indicator for trailer (certain models)
If you are towing a trailer, this light will flash simultaneously with the turn signals on the trailer. If the light does not
flash when signaling, one of the turn signals on the trailer or on the car are not functioning properly.
2. Parking brake applied
This light is on when the parking brake (hand brake) is applied. The parking brake lever is situated between the front
seats. See page 70
for more information.
NOTE
Canadian models are equipped with the second symbol.
3. SRS system warning light
If this light comes on while the car is being driven, or remains on for longer than approximately 10 seconds after the
car has been started, the SRS system's diagnostic functions have detected a fault in a seat belt lock or pretensioner, a
front airbag, side impact airbag, and/or an inflatable curtain. Have the system(s) inspected by a trained and qualified
Volvo service technician as soon as possible.
4. Oil pressure warning light1
If the light comes on while driving, the car, stop the engine immediately, and check the engine oil level. If the oil level
is normal and the light stays on after restart, have the car towed to the nearest trained and qualified Volvo service
technician. After hard driving, the light may come on occasionally when the engine is idling. This is normal, provided
it goes off when the engine speed is increased.
5. Seat belt reminder
This symbol (and the seat belt reminder light above the rear view mirror) will light up if either front seat occupant has
not buckled his/her seat belt. If the car is not moving, the symbols will go out after approximately 6 seconds.
ProCarManuals.com
Page 47 of 239
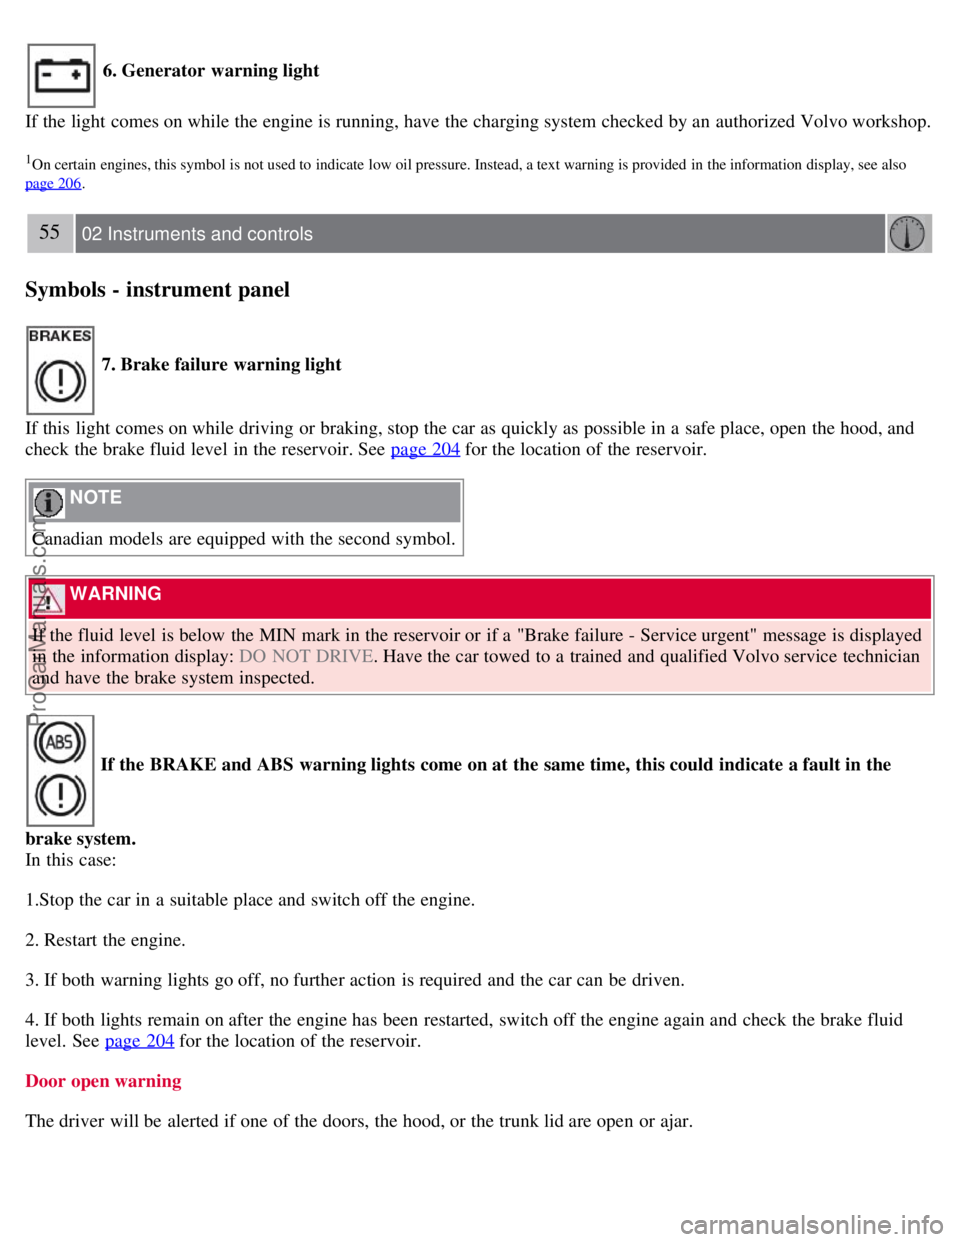
6. Generator warning light
If the light comes on while the engine is running, have the charging system checked by an authorized Volvo workshop.
1On certain engines, this symbol is not used to indicate low oil pressure. Instead, a text warning is provided in the information display, see also
page 206
.
55 02 Instruments and controls
Symbols - instrument panel
7. Brake failure warning light
If this light comes on while driving or braking, stop the car as quickly as possible in a safe place, open the hood, and
check the brake fluid level in the reservoir. See page 204
for the location of the reservoir.
NOTE
Canadian models are equipped with the second symbol.
WARNING
If the fluid level is below the MIN mark in the reservoir or if a "Brake failure - Service urgent" message is displayed
in the information display: DO NOT DRIVE . Have the car towed to a trained and qualified Volvo service technician
and have the brake system inspected.
If the BRAKE and ABS warning lights come on at the same time, this could indicate a fault in the
brake system.
In this case:
1.Stop the car in a suitable place and switch off the engine.
2. Restart the engine.
3. If both warning lights go off, no further action is required and the car can be driven.
4. If both lights remain on after the engine has been restarted, switch off the engine again and check the brake fluid
level. See page 204
for the location of the reservoir.
Door open warning
The driver will be alerted if one of the doors, the hood, or the trunk lid are open or ajar.
ProCarManuals.com
Page 48 of 239
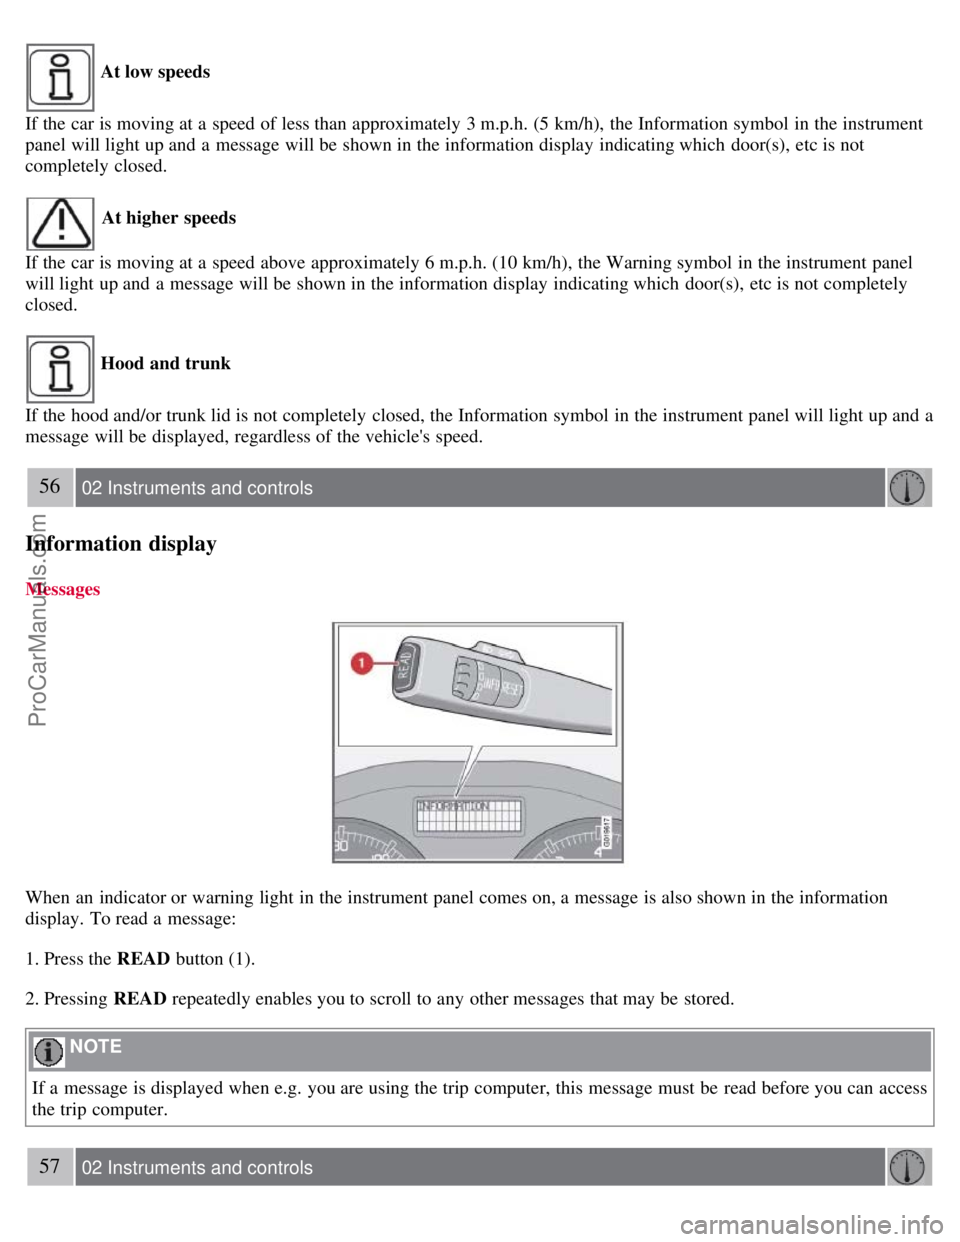
At low speeds
If the car is moving at a speed of less than approximately 3 m.p.h. (5 km/h), the Information symbol in the instrument
panel will light up and a message will be shown in the information display indicating which door(s), etc is not
completely closed.
At higher speeds
If the car is moving at a speed above approximately 6 m.p.h. (10 km/h), the Warning symbol in the instrument panel
will light up and a message will be shown in the information display indicating which door(s), etc is not completely
closed.
Hood and trunk
If the hood and/or trunk lid is not completely closed, the Information symbol in the instrument panel will light up and a
message will be displayed, regardless of the vehicle's speed.
56 02 Instruments and controls
Information display
Messages
When an indicator or warning light in the instrument panel comes on, a message is also shown in the information
display. To read a message:
1. Press the READ button (1).
2. Pressing READ repeatedly enables you to scroll to any other messages that may be stored.
NOTE
If a message is displayed when e.g. you are using the trip computer, this message must be read before you can access
the trip computer.
57 02 Instruments and controls
ProCarManuals.com
Page 61 of 239
2. Adjust the steering wheel to a suitable position
3. Press the lever back into place to lock the steering wheel in the new position. If necessary, press the steering wheel
slightly while pressing the lever into the locked position.
Check that the steering wheel is locked in the new position.
WARNING
Never adjust the steering wheel while driving.
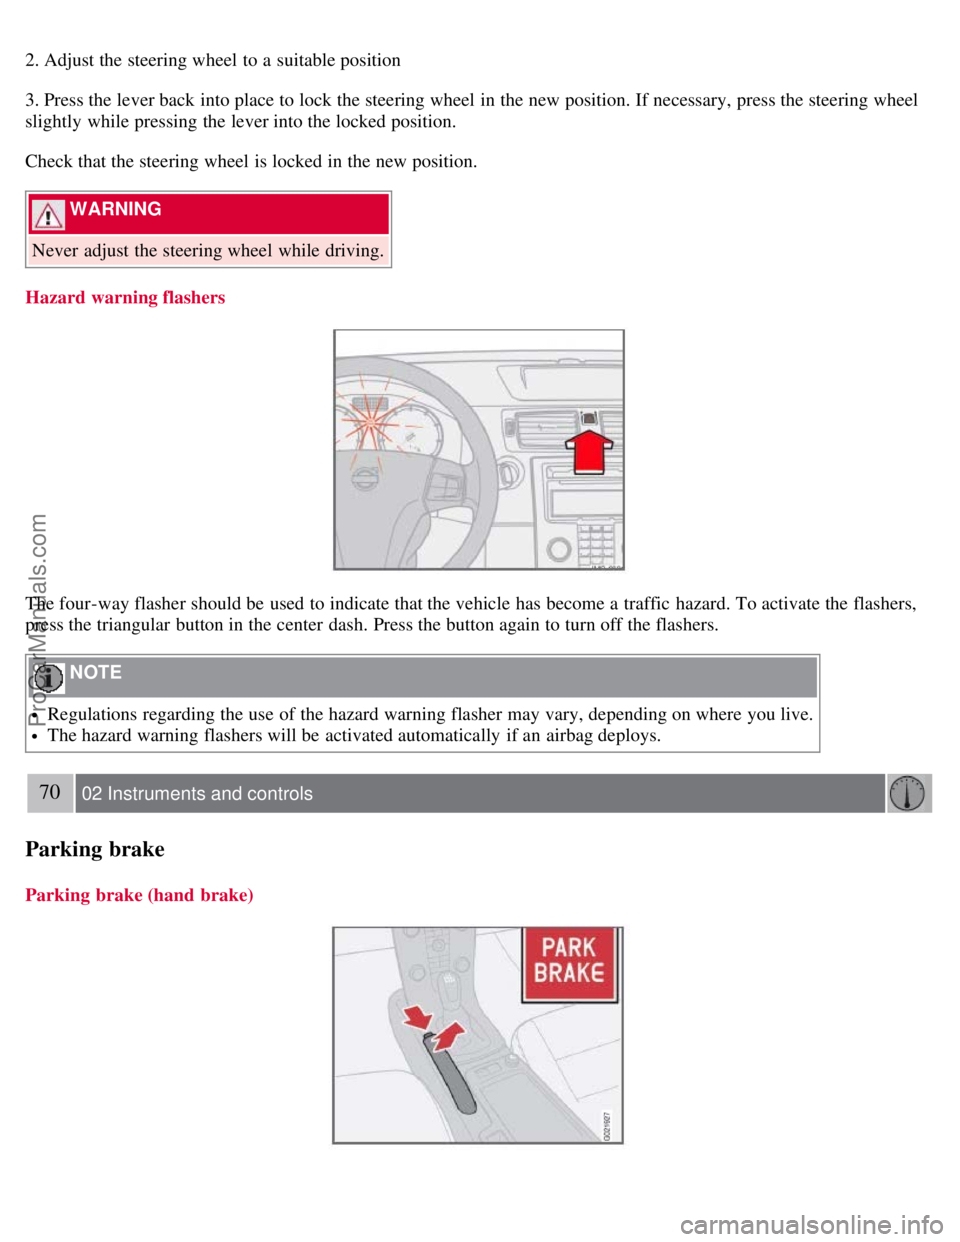
Hazard warning flashers
The four-way flasher should be used to indicate that the vehicle has become a traffic hazard. To activate the flashers,
press the triangular button in the center dash. Press the button again to turn off the flashers.
NOTE
Regulations regarding the use of the hazard warning flasher may vary, depending on where you live.
The hazard warning flashers will be activated automatically if an airbag deploys.
70 02 Instruments and controls
Parking brake
Parking brake (hand brake)
ProCarManuals.com
Page 62 of 239
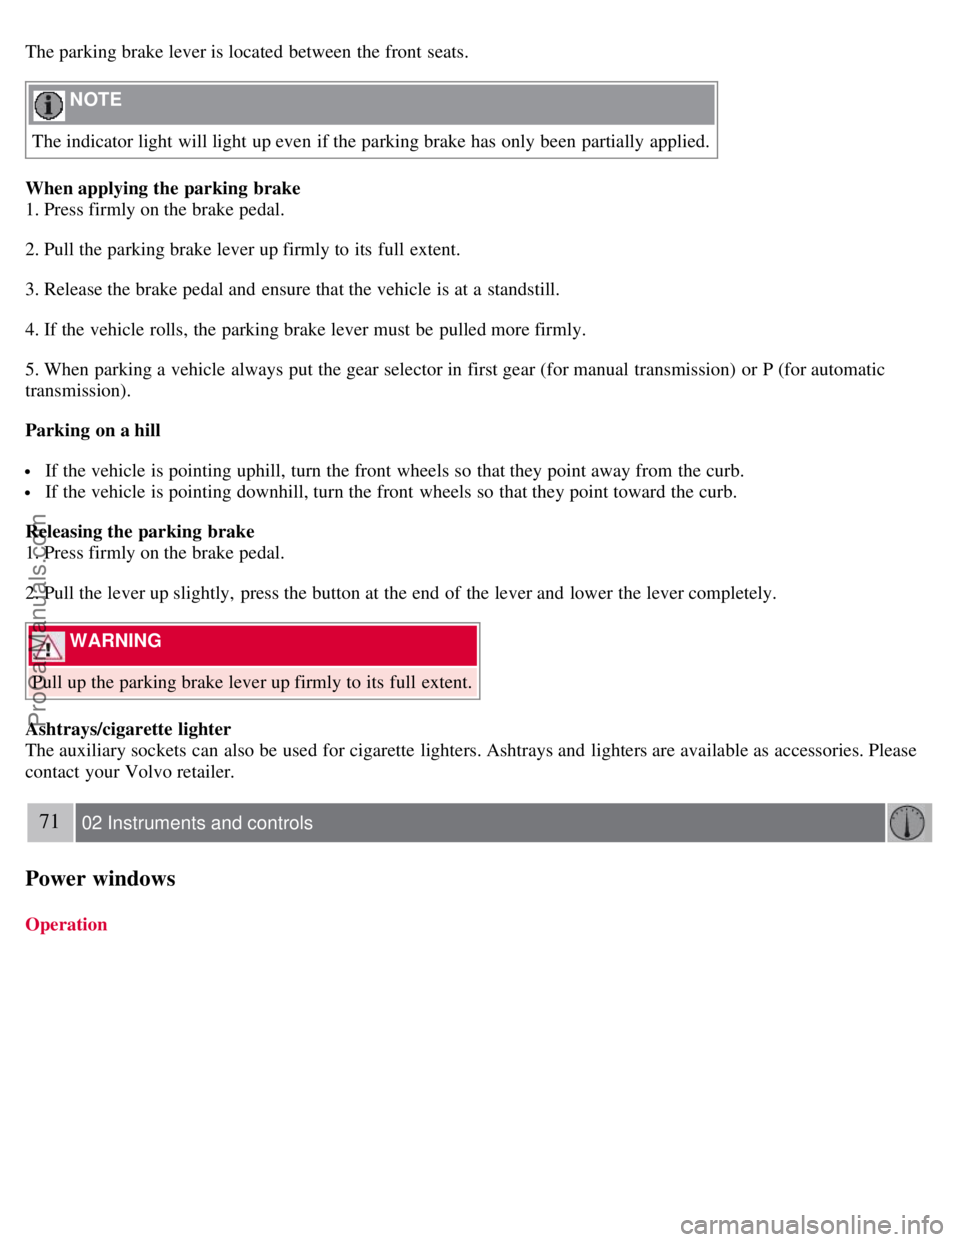
The parking brake lever is located between the front seats.
NOTE
The indicator light will light up even if the parking brake has only been partially applied.
When applying the parking brake
1. Press firmly on the brake pedal.
2. Pull the parking brake lever up firmly to its full extent.
3. Release the brake pedal and ensure that the vehicle is at a standstill.
4. If the vehicle rolls, the parking brake lever must be pulled more firmly.
5. When parking a vehicle always put the gear selector in first gear (for manual transmission) or P (for automatic
transmission).
Parking on a hill
If the vehicle is pointing uphill, turn the front wheels so that they point away from the curb.
If the vehicle is pointing downhill, turn the front wheels so that they point toward the curb.
Releasing the parking brake
1. Press firmly on the brake pedal.
2. Pull the lever up slightly, press the button at the end of the lever and lower the lever completely.
WARNING
Pull up the parking brake lever up firmly to its full extent.
Ashtrays/cigarette lighter
The auxiliary sockets can also be used for cigarette lighters. Ashtrays and lighters are available as accessories. Please
contact your Volvo retailer.
71 02 Instruments and controls
Power windows
Operation
ProCarManuals.com
Page 63 of 239
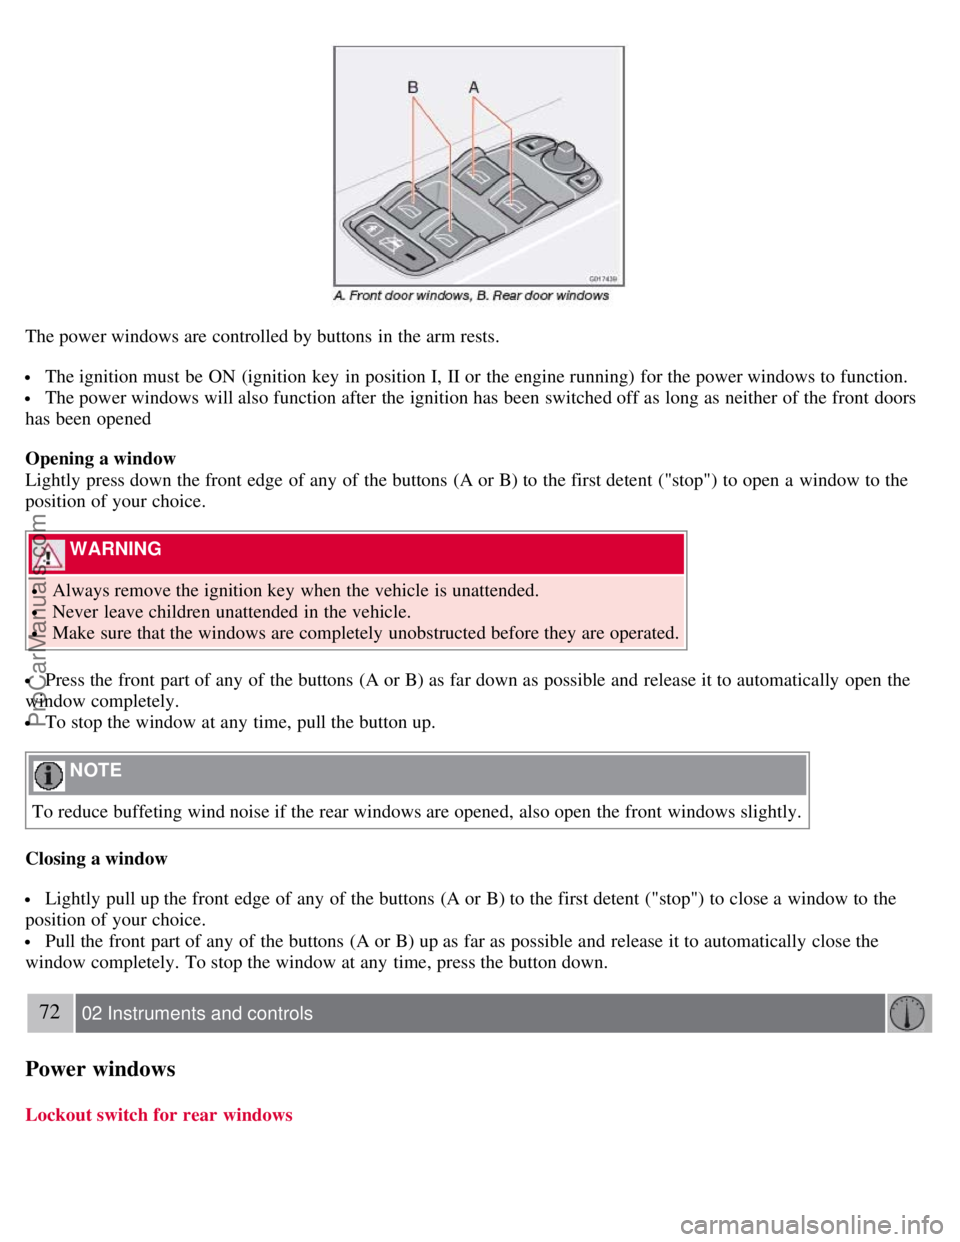
The power windows are controlled by buttons in the arm rests.
The ignition must be ON (ignition key in position I, II or the engine running) for the power windows to function.
The power windows will also function after the ignition has been switched off as long as neither of the front doors
has been opened
Opening a window
Lightly press down the front edge of any of the buttons (A or B) to the first detent ("stop") to open a window to the
position of your choice.
WARNING
Always remove the ignition key when the vehicle is unattended.
Never leave children unattended in the vehicle.
Make sure that the windows are completely unobstructed before they are operated.
Press the front part of any of the buttons (A or B) as far down as possible and release it to automatically open the
window completely.
To stop the window at any time, pull the button up.
NOTE
To reduce buffeting wind noise if the rear windows are opened, also open the front windows slightly.
Closing a window
Lightly pull up the front edge of any of the buttons (A or B) to the first detent ("stop") to close a window to the
position of your choice.
Pull the front part of any of the buttons (A or B) up as far as possible and release it to automatically close the
window completely. To stop the window at any time, press the button down.
72 02 Instruments and controls
Power windows
Lockout switch for rear windows
ProCarManuals.com
Page 67 of 239
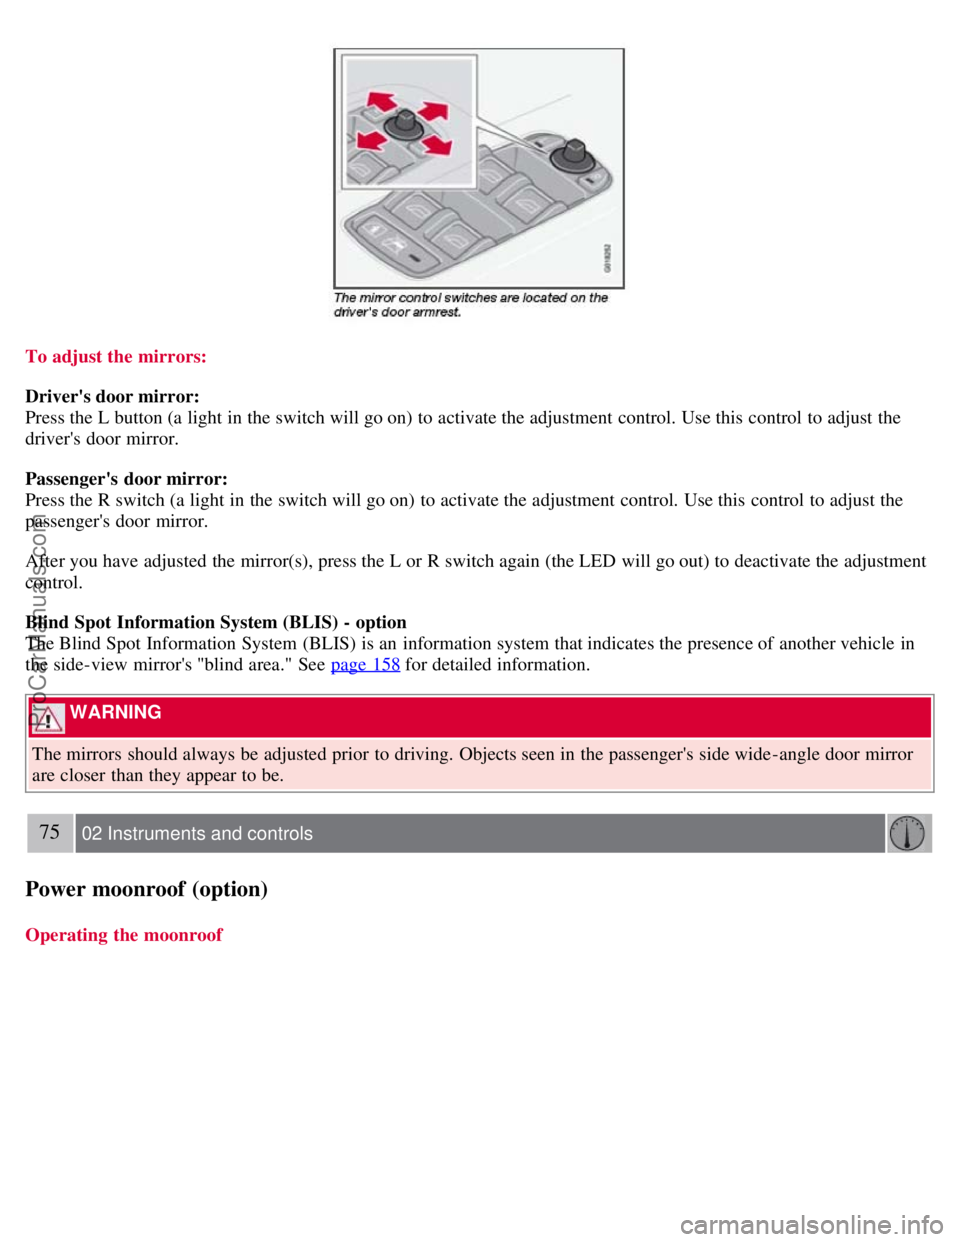
To adjust the mirrors:
Driver's door mirror:
Press the L button (a light in the switch will go on) to activate the adjustment control. Use this control to adjust the
driver's door mirror.
Passenger's door mirror:
Press the R switch (a light in the switch will go on) to activate the adjustment control. Use this control to adjust the
passenger's door mirror.
After you have adjusted the mirror(s), press the L or R switch again (the LED will go out) to deactivate the adjustment
control.
Blind Spot Information System (BLIS) - option
The Blind Spot Information System (BLIS) is an information system that indicates the presence of another vehicle in
the side-view mirror's "blind area." See page 158
for detailed information.
WARNING
The mirrors should always be adjusted prior to driving. Objects seen in the passenger's side wide -angle door mirror
are closer than they appear to be.
75 02 Instruments and controls
Power moonroof (option)
Operating the moonroof
ProCarManuals.com
Page 73 of 239
80 02 Instruments and controls
HomeLink® Universal Transceiver (option)
Introduction
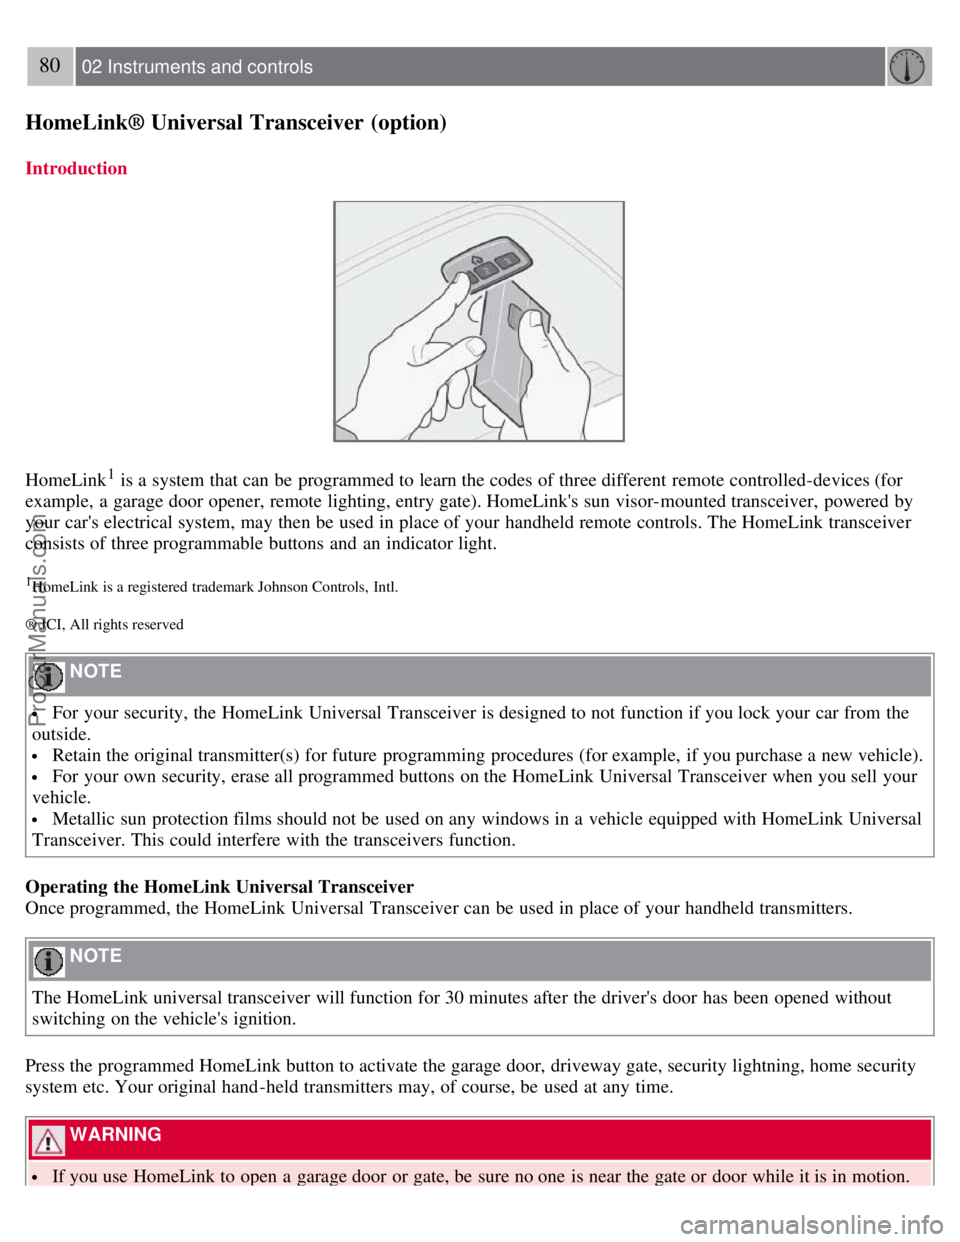
HomeLink1 is a system that can be programmed to learn the codes of three different remote controlled-devices (for
example, a garage door opener, remote lighting, entry gate). HomeLink's sun visor-mounted transceiver, powered by
your car's electrical system, may then be used in place of your handheld remote controls. The HomeLink transceiver
consists of three programmable buttons and an indicator light.
1HomeLink is a registered trademark Johnson Controls, Intl.
® JCI, All rights reserved
NOTE
For your security, the HomeLink Universal Transceiver is designed to not function if you lock your car from the
outside.
Retain the original transmitter(s) for future programming procedures (for example, if you purchase a new vehicle).
For your own security, erase all programmed buttons on the HomeLink Universal Transceiver when you sell your
vehicle.
Metallic sun protection films should not be used on any windows in a vehicle equipped with HomeLink Universal
Transceiver. This could interfere with the transceivers function.
Operating the HomeLink Universal Transceiver
Once programmed, the HomeLink Universal Transceiver can be used in place of your handheld transmitters.
NOTE
The HomeLink universal transceiver will function for 30 minutes after the driver's door has been opened without
switching on the vehicle's ignition.
Press the programmed HomeLink button to activate the garage door, driveway gate, security lightning, home security
system etc. Your original hand -held transmitters may, of course, be used at any time.
WARNING
If you use HomeLink to open a garage door or gate, be sure no one is near the gate or door while it is in motion.
ProCarManuals.com
Page 94 of 239
Raise the cover to switch on the light.
103 04 Interior
Storage compartments
104 04 Interior
Storage compartments
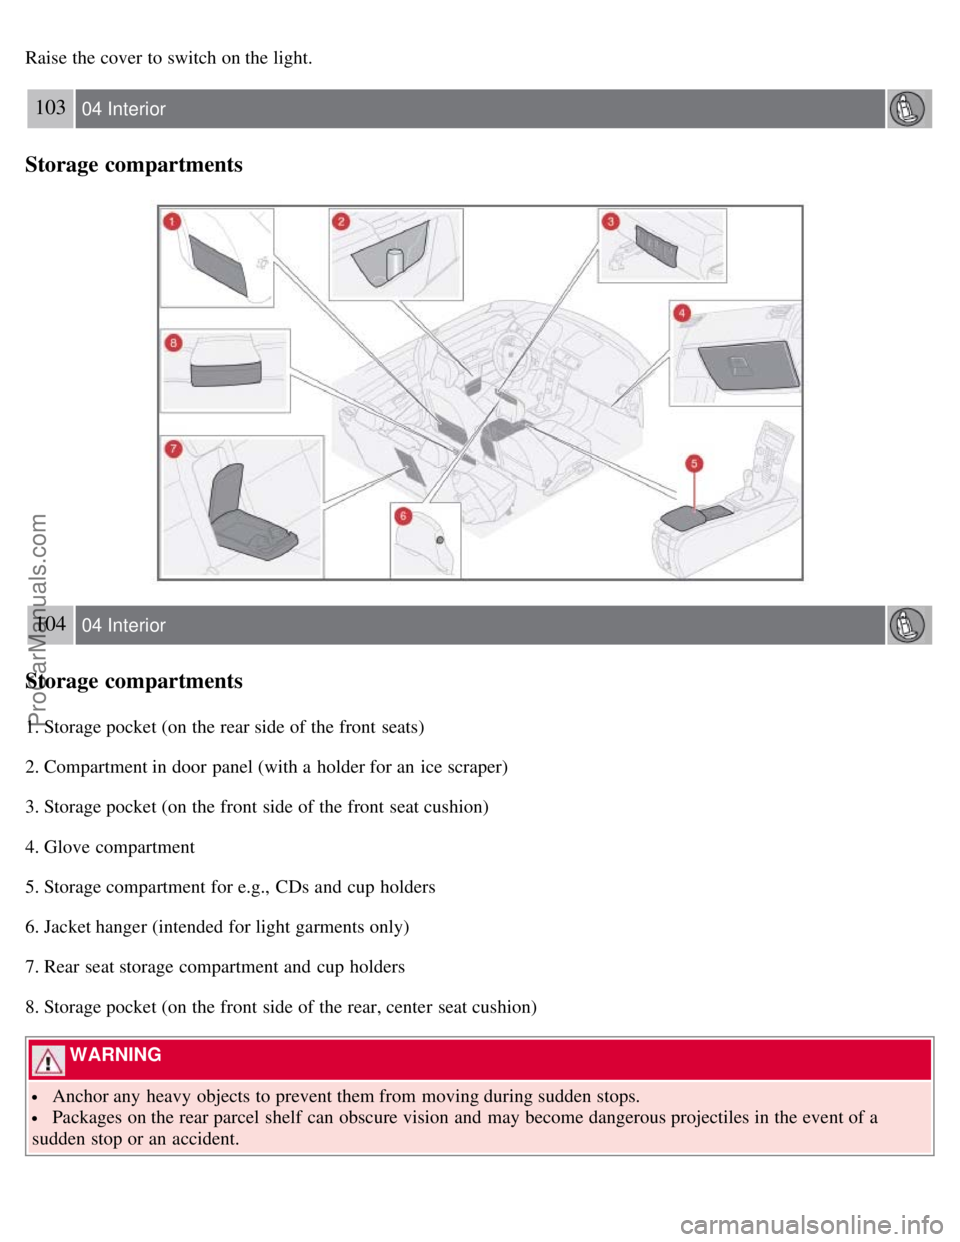
1. Storage pocket (on the rear side of the front seats)
2. Compartment in door panel (with a holder for an ice scraper)
3. Storage pocket (on the front side of the front seat cushion)
4. Glove compartment
5. Storage compartment for e.g., CDs and cup holders
6. Jacket hanger (intended for light garments only)
7. Rear seat storage compartment and cup holders
8. Storage pocket (on the front side of the rear, center seat cushion)
WARNING
Anchor any heavy objects to prevent them from moving during sudden stops.
Packages on the rear parcel shelf can obscure vision and may become dangerous projectiles in the event of a
sudden stop or an accident.
ProCarManuals.com