warning light VOLVO S40 2008 Owner's Guide
[x] Cancel search | Manufacturer: VOLVO, Model Year: 2008, Model line: S40, Model: VOLVO S40 2008Pages: 239, PDF Size: 5.94 MB
Page 138 of 239
Spin control (SC)
The spin control function is designed to help prevent the drive wheels from spinning while the vehicle is accelerating.
Under certain circumstances, such as when driving with snow chains, or driving in deep snow or loose sand, it may be
advisable to temporarily switch off this function for maximum tractive force
1.
1Models equipped with All Wheel Drive (AWD) have an integrated traction control function that cannot be disabled. DSTC is optional on AWD
models.
Temporarily switching off Spin control
1. Turn the thumbwheel (A) on the left-side steering wheel lever until the STC/DSTC menu is displayed.
2. Hold down the RESET button (B) to toggle between STC/DSTC SPIN CONTROL ON or OFF.
NOTE
The message STC/DSTC SPIN CONTROL OFF indicates that the stability system's spin control function has
temporarily been switched off.
The stability control indicator light will illuminate and remain on until spin control has been reactivated.
The spin control function is automatically enabled each time the engine is started.
STC/DSTC ON indicates that all system functions are active.
Active yaw control - AYC (DSTC only)
This function helps maintain directional stability, for example when cornering, by braking one or more of the wheels if
the vehicle shows a tendency to skid or slide laterally.
150 06 Starting and driving
Stability system
This is one of the stability system's permanent functions and cannot be switched off.
WARNING
The car's handling and stability characteristics will be altered if the STC/DSTC system functions have been disabled.
STC/DSTC-related messages in the text window
" TRACTION CONTROL TEMPORARILY OFF " - The system has been temporarily switched off due to high brake
temperature and will automatically switch on again when the brakes have cooled.
" ANTI SKID SERVICE REQUIRED " - the system has been automatically disengaged due to a fault. A trained and
qualified Volvo service technician should check the system.
Symbols in the instrument panel
The Stability Control indicator light
This light indicates different conditions, depending on how it illuminates.
The Stability Control indicator light illuminates for approximately 2 seconds
ProCarManuals.com
Page 139 of 239
This indicates that the system is performing a self -diagnostic test when the ignition is switched on.
The Stability Control indicator light flashes
This indicates that the stability system is actively functioning to help counteract wheel spin and/or a skid.
The Stability Control indicator light glows steadily
"ANTI SKID SERVICE REQUIRED " will be displayed in the text window at the same time.
A fault is indicated in the stability system.
1. Stop the vehicle in a safe place and switch off the engine.
2. Restart the engine.
3. If the indicator light goes out, the fault was temporary and no further action is required.
4. If the indicator light remains on, drive to an authorized Volvo workshop as soon as possible to have the system
checked.
The Stability Control indicator light glows steadily
If " STC/DSTC SPIN CONTROL OFF " is displayed in the text window at the same time, this is a reminder that spin
control has been disabled by the driver.
The warning symbol
The warning symbol glows steadily yellow
The system has been temporarily switched off due to high brake temperature. " TRACTION CONTROL
TEMPORARILY OFF " will be displayed. The system will automatically switch on again when the brakes have cooled.
WARNING
The stability system is intended to help improve driving safety. It supplements, but can never replace, the driver's
judgement and responsibility when operating the vehicle. Speed and driving style should always be adapted to traffic
and road conditions.
151 06 Starting and driving
Towing
Emergency towing
ProCarManuals.com
Page 141 of 239
Never tow farther than 50 miles (80 km).
Keep the tow rope taut at all times while the vehicle is in motion.
The disabled vehicle should be towed in the forward direction only.
152 06 Starting and driving
Towing
WARNING
Never allow a vehicle to be towed without a driver behind the wheel of the disabled vehicle.
Never remove the key from the ignition while the vehicle is moving. The steering wheel could lock, making it
impossible to steer the vehicle.
When the engine is not running, steering resistance and the effort needed to apply the brakes will be great.
Never attempt to tow a vehicle with a dead battery at night.
CAUTION
Check with state and local authorities before attempting this type of towing, as vehicles being towed are subject to
regulations regarding maximum towing speed, length and type of towing device, lighting, marker flags, etc.
Never attempt to push- or tow-start a vehicle with a dead battery. This would inject unburned fuel into the three-
way catalytic converter(s), causing overheating, backfiring, and damage. See page 153
for instructions on jump
starting the vehicle.
Towing vehicles with front wheel drive
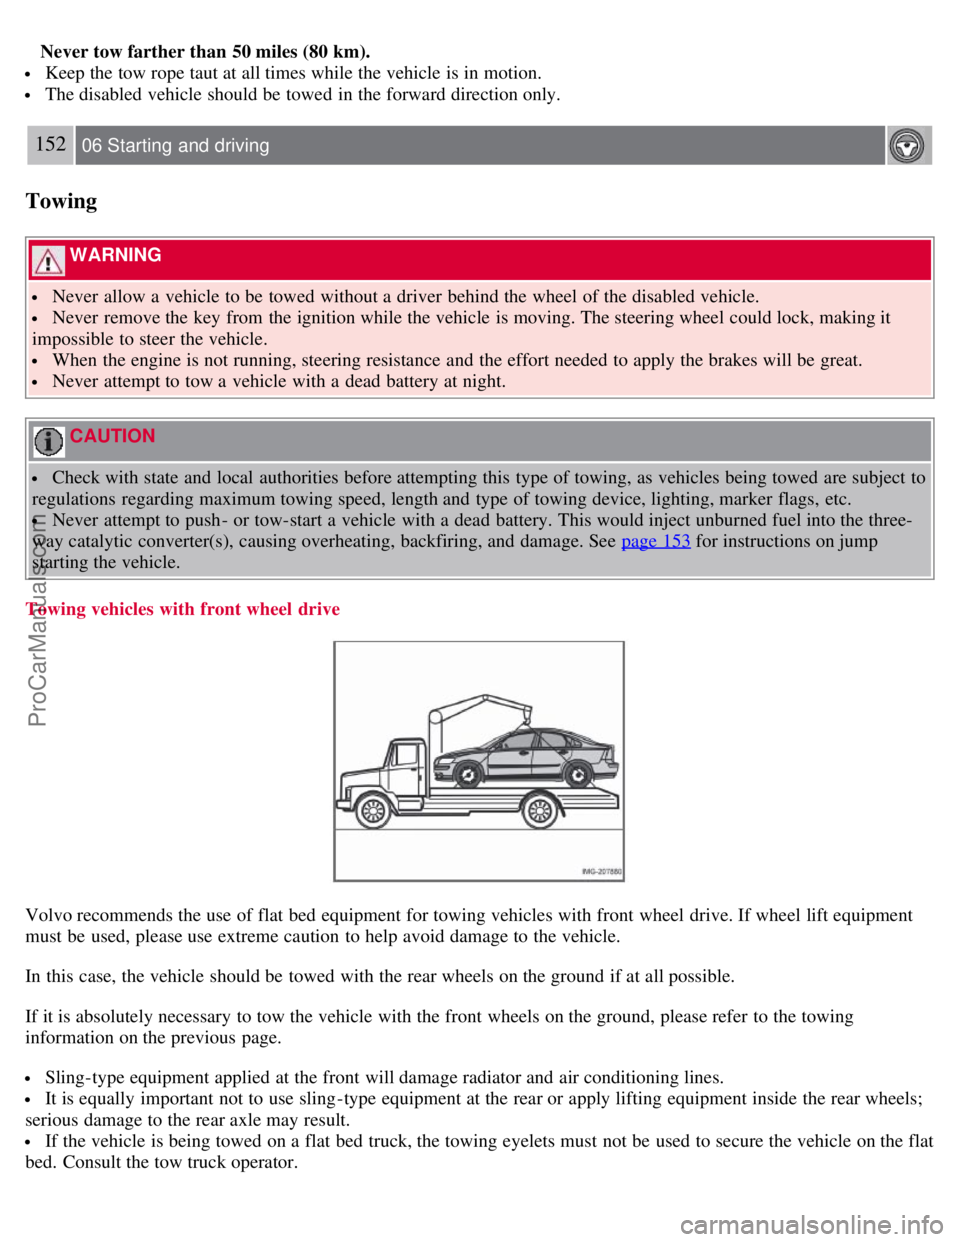
Volvo recommends the use of flat bed equipment for towing vehicles with front wheel drive. If wheel lift equipment
must be used, please use extreme caution to help avoid damage to the vehicle.
In this case, the vehicle should be towed with the rear wheels on the ground if at all possible.
If it is absolutely necessary to tow the vehicle with the front wheels on the ground, please refer to the towing
information on the previous page.
Sling-type equipment applied at the front will damage radiator and air conditioning lines.
It is equally important not to use sling -type equipment at the rear or apply lifting equipment inside the rear wheels;
serious damage to the rear axle may result.
If the vehicle is being towed on a flat bed truck, the towing eyelets must not be used to secure the vehicle on the flat
bed. Consult the tow truck operator.
ProCarManuals.com
Page 144 of 239
WARNING
Bumper-attached trailer hitches must not be used on Volvos, nor should safety chains be attached to the bumper.
Trailer hitches attaching to the vehicle's rear axle must not be used.
Never connect a trailer's hydraulic brake system directly to the vehicle brake system, nor a trailer's lighting system
directly to the vehicle lighting system. Consult your nearest trained and qualified Volvo service technician for correct
installation.
When towing a trailer, the trailer's safety wire must be correctly fastened to the hole or hook provided in the
trailer hitch on the vehicle. The safety wire should never be fastened to or wound around the drawbar ball.
155 06 Starting and driving
Towing a trailer
NOTE
When parking the vehicle with a trailer on a hill, apply the parking brake before putting the gear selector in Park
( P ) or in reverse on models with a manual transmission. Always follow the trailer manufacturer's recommendations
for wheel chocking.
If you use the manual (Geartronic) shift positions while towing a trailer, or if the vehicle is equipped with a
manual transmission, make sure the gear you select does not put too much strain on the engine (using too high a
gear).
The drawbar assembly/trailer hitch may be rated for trailers heavier than the vehicle is designed to tow. Please
adhere to Volvo's recommended trailer weights.
Avoid driving with a trailer on inclines exceeding 15%.
156 06 Starting and driving
Detachable trailer hitch
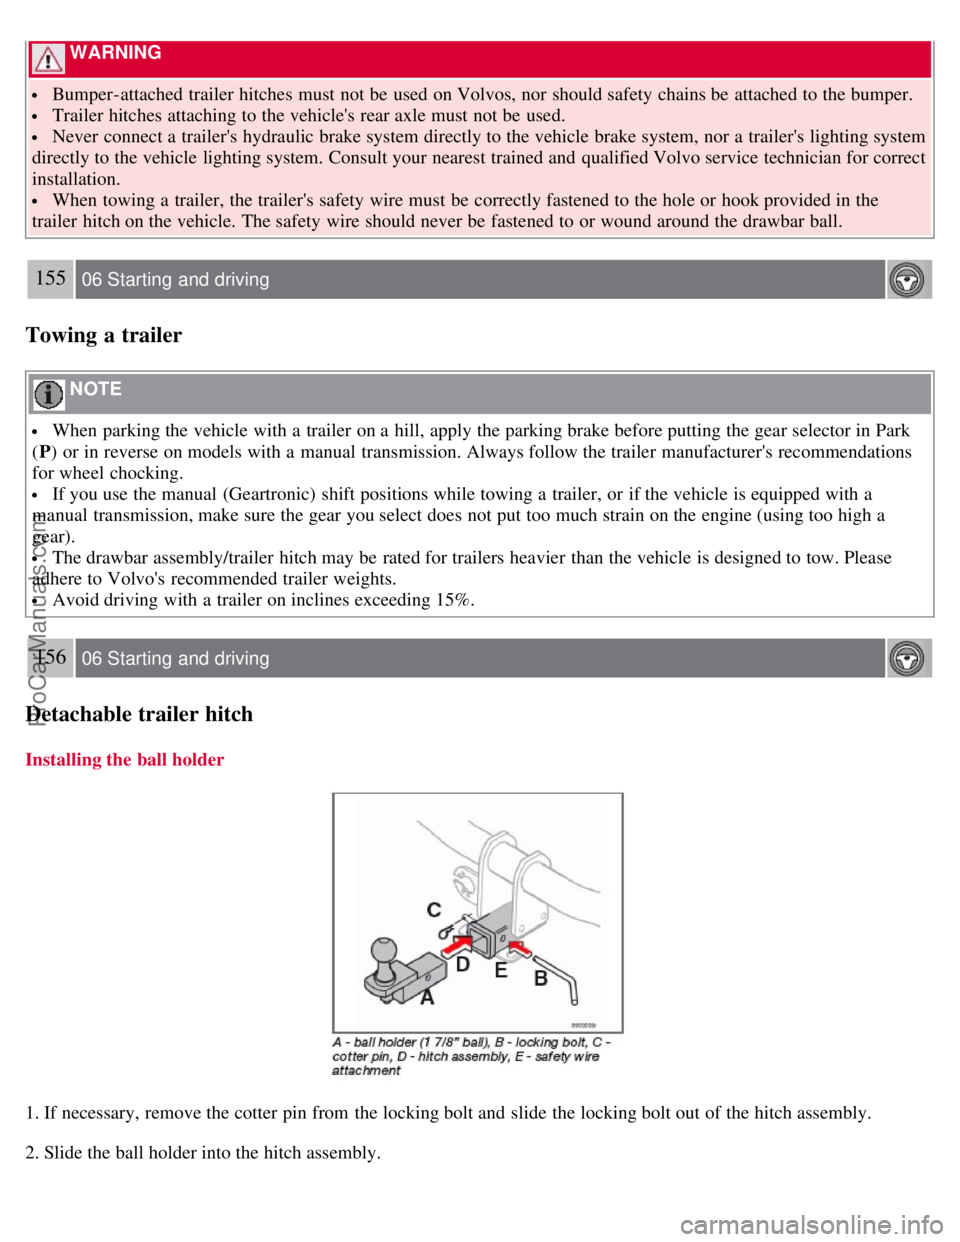
Installing the ball holder
1. If necessary, remove the cotter pin from the locking bolt and slide the locking bolt out of the hitch assembly.
2. Slide the ball holder into the hitch assembly.
ProCarManuals.com
Page 146 of 239
Load carriers are available as Volvo accessories. Follow the installation instructions supplied with the load carriers.
Observe the following points when using load carriers:
To avoid damaging your car and to achieve maximum safety when driving, we recommend using the load carriers
that Volvo has developed especially for your car.
Volvo-approved removable roof racks are designed to carry the maximum allowable roof load for this vehicle: 165
lbs (75 kg). For Non-Volvo roof racks, check the manufacturer's weight limits for the rack.
Never exceed the rack manufacturer's weigh limits and never exceed the maximum rated roof load of 165 lbs (75
kg).
Avoid single-point loads. Distribute loads evenly.
Place heavier cargo at the bottom of the load.
Secure the cargo correctly with appropriate tie-down equipment.
Check periodically that the load carriers and load are properly secured.
Remember that the car's center of gravity and handling change when you carry a load on the roof.
The car's wind resistance and fuel consumption will increase with the size of the load.
Drive smoothly. Avoid rapid starts, fast cornering and hard braking.
158 06 Starting and driving
Blind Spot Information System (BLIS)-option
Introduction
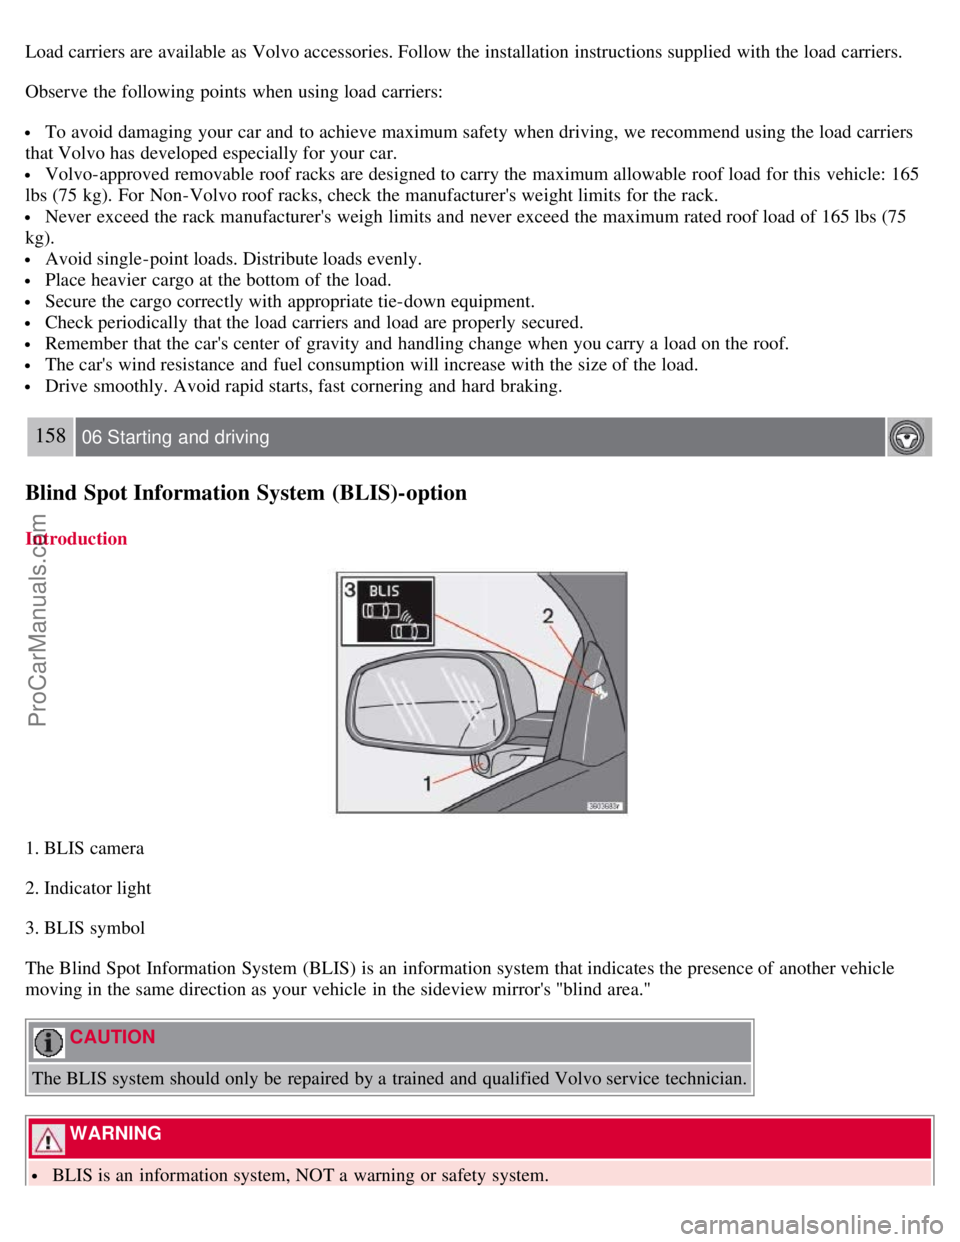
1. BLIS camera
2. Indicator light
3. BLIS symbol
The Blind Spot Information System (BLIS) is an information system that indicates the presence of another vehicle
moving in the same direction as your vehicle in the sideview mirror's "blind area."
CAUTION
The BLIS system should only be repaired by a trained and qualified Volvo service technician.
WARNING
BLIS is an information system, NOT a warning or safety system.
ProCarManuals.com
Page 147 of 239
BLIS does not eliminate the need for you to visually confirm the conditions around you, and the need for you to
turn your head and shoulders to make sure that you can safely change lanes.
As the driver, you have full responsibility for changing lanes in a safe manner.
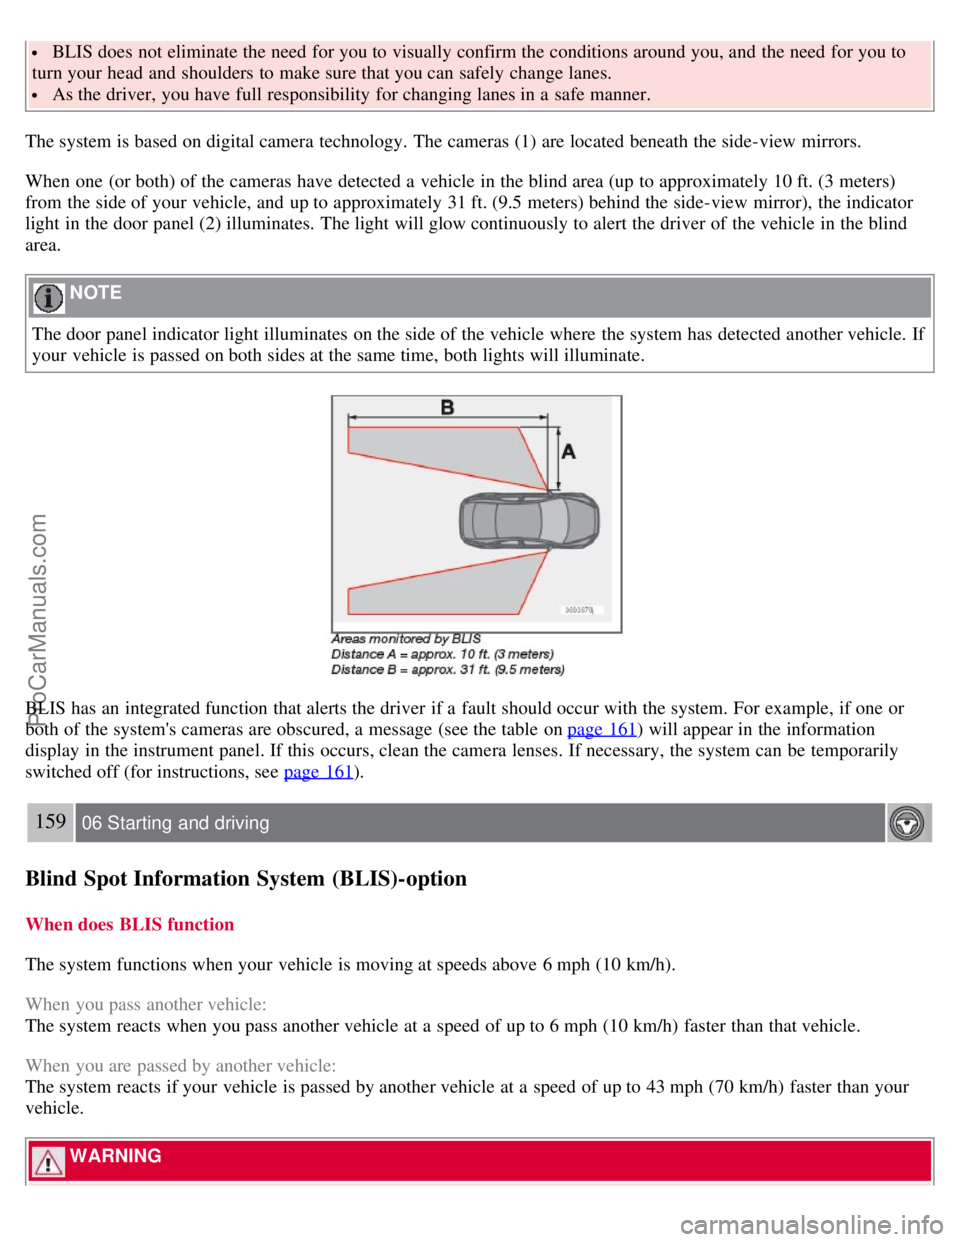
The system is based on digital camera technology. The cameras (1) are located beneath the side-view mirrors.
When one (or both) of the cameras have detected a vehicle in the blind area (up to approximately 10 ft. (3 meters)
from the side of your vehicle, and up to approximately 31 ft. (9.5 meters) behind the side-view mirror), the indicator
light in the door panel (2) illuminates. The light will glow continuously to alert the driver of the vehicle in the blind
area.
NOTE
The door panel indicator light illuminates on the side of the vehicle where the system has detected another vehicle. If
your vehicle is passed on both sides at the same time, both lights will illuminate.
BLIS has an integrated function that alerts the driver if a fault should occur with the system. For example, if one or
both of the system's cameras are obscured, a message (see the table on page 161
) will appear in the information
display in the instrument panel. If this occurs, clean the camera lenses. If necessary, the system can be temporarily
switched off (for instructions, see page 161
).
159 06 Starting and driving
Blind Spot Information System (BLIS)-option
When does BLIS function
The system functions when your vehicle is moving at speeds above 6 mph (10 km/h).
When you pass another vehicle:
The system reacts when you pass another vehicle at a speed of up to 6 mph (10 km/h) faster than that vehicle.
When you are passed by another vehicle:
The system reacts if your vehicle is passed by another vehicle at a speed of up to 43 mph (70 km/h) faster than your
vehicle.
WARNING
ProCarManuals.com
Page 148 of 239
BLIS does not function in sharp curves.
BLIS does not function when your vehicle is backing up.
If you are towing a wide trailer, this may prevent the BLIS cameras from detecting other vehicles in adjacent
lanes.
How BLIS functions in daylight and darkness
Daylight
BLIS reacts to the shape of surrounding vehicles. The system is designed to help detect motor vehicles such as cars,
trucks, buses, motorcycles, etc.
Darkness
BLIS reacts to the headlights of surrounding vehicles. In order to be detected by BLIS, a vehicle in the blind area
must have its headlights on. This means, for example, that the system will not detect a trailer without headlights that is
being towed behind a car or truck.
WARNING
BLIS does not react to cyclists or mopeds.
BLIS does not react to vehicles that are standing still.
The function of the BLIS cameras may be affected by intense light, or when driving at night in areas where there
are no external sources of light (e.g., street lights, other vehicles, etc.). In such cases, the system may react as if the
cameras were obscured.
In both of the above mentioned conditions, a message will appear in the information display.
When driving in such conditions, the system's function will be limited or it may be temporarily switched off. See
page 161
for instructions.
When the message is no longer displayed, BLIS will return to normal function.
The BLIS cameras have the same limitation as the human eye. In other words, their "vision is impaired" by
adverse weather conditions such as heavy snowfall, dense fog, etc.
160 06 Starting and driving
Blind Spot Information System (BLIS)-option
Limitations
In certain situations, the BLIS indicator light(s) may illuminate even when there are no other vehicles in the area
monitored by the system.
NOTE
If the BLIS indicator lights illuminate occasionally even when there are no other vehicles in the blind area, this does
not indicate a fault in the system.
In the event of a fault, Blind spot syst. service required will be displayed.
The following are several examples of situations in which the BLIS indicator light(s) may illuminate even when there
are no other vehicles in the area monitored by the system.
ProCarManuals.com
Page 170 of 239
data to a receiver located in the vehicle.
NOTE
USA - FCC ID: KR5S122780002
This device complies with part 15 of the FCC rules. Operation is subject to the following conditions: (1) This device
may not cause harmful interference, and (2) this device must accept any interference received, including interference
that may cause undesired operation.
When low inflation pressure is detected, TPMS will light up the tire pressure warning light (
) (also referred to as a
telltale) in the instrument panel, and will display a message in the text window. The wording of this message is
determined by the degree of inflation pressure loss.
NOTE
If a fault occurs in TPMS, the tire pressure warning light will flash for approximately 1 minute and TIRE PRESS
SYST SERVICE REQUIRED will be displayed.
Each tire, including the spare (if provided), should be checked monthly when cold and inflated to the inflation pressure
recommended by the vehicle manufacturer on the vehicle placard or tire inflation pressure label. (If your vehicle has
tires of a different size than the size indicated on the vehicle placard or tire inflation pressure label, you should
determine the proper tire inflation pressure for those tires.)
As an added safety feature, your vehicle has been equipped with a tire pressure monitoring system (TPMS) that
illuminates a low tire pressure telltale when one or more of your tires is significantly under-inflated. Accordingly,
when the low tire pressure telltale illuminates, you should stop and check your tires as soon as possible, and inflate
them to the proper pressure. Driving on a significantly under-inflated tire causes the tire to overheat and can lead to
tire failure. Under-inflation also reduces fuel efficiency and tire tread life, and may affect the vehicle's handling and
stopping ability.
Please note that the TPMS is not a substitute for proper tire maintenance, and it is the driver's responsibility to
maintain correct tire pressure, even if under-inflation has not reached the level to trigger illumination of the TPMS low
tire pressure telltale.
Your vehicle has also been equipped with a TPMS malfunction indicator to indicate when the system is not operating
properly. The TPMS malfunction indicator is combined with the low tire pressure telltale. When the system detects a
malfunction, the telltale will flash for approximately one minute and then remain continuously illuminated. This
sequence will continue upon subsequent vehicle start-ups as long as the malfunction exists. When the malfunction
indicator is illuminated, the system may not be able to detect or signal low tire pressure as intended. TPMS
malfunctions may occur for a variety of reasons, including the installation of replacement or alternate tires or wheels
on the vehicle that prevent the TPMS from functioning properly. Always check the TPMS malfunction telltale after
replacing one or more tires or wheels on your vehicle to ensure that the replacement or alternate tires and wheels allow
the TPMS to continue to function properly.
188 07 Wheels and tires
Tire Pressure Monitoring System (TPMS)
NOTE
TPMS indicates low tire pressure but does not replace normal tire maintenance. For information on correct tire
ProCarManuals.com
Page 171 of 239
pressure, please refer to the tables beginning on page 172.
The tire pressure warning light will not identify which tire is under-inflated. Be sure to check all four tires.
A certain amount of air seepage from the tires occurs naturally and tire pressure fluctuates with seasonal changes
in temperature. Always check tire pressure regularly.
Erasing warning messages
When a low tire pressure warning message has been displayed, and the tire pressure warning light has come on:
1. Use a tire pressure gauge to check the inflation pressure of all four tires.
2. Re-inflate the tire(s) to the correct pressure (consult the tire pressure placard or the tables beginning on page 172
).
3. In certain cases, it may be necessary to drive the vehicle for several minutes at a speed of 20 mph (30 km/h) or
faster. This will erase the warning text and the warning light will go out.
WARNING
Incorrect inflation pressure could lead to tire failure, resulting in a loss of control of the vehicle.
Changing wheels with TPMS
Please note the following when changing or replacing the factory installed TPMS wheels/tires on the vehicle:
Only the factory-mounted wheels are equipped with TPMS sensors in the valves.
If the vehicle is equipped with a temporary spare tire, this tire does not have a TPMS sensor.
If wheels without TPMS sensors are mounted on the vehicle, TIRE PRESS SYST SERVICE REQUIRED will be
displayed each time the vehicle is driven above 25 mph (40 km/h) for 10 minutes or more.
Once TPMS sensors are properly installed, the warning message should not reappear. If the message is still
displayed, drive the vehicle for several minutes at a speed of 20 mph (30 km/h) or faster to erase the message.
Volvo recommends that TPMS sensors be fitted on all wheels used on the vehicle. Volvo does not recommend
moving sensors back and forth between sets of wheels.
NOTE
If you change to tires with a different recommended inflation pressure, the TPMS system must be recalibrated to
these tires. This must be done by a trained and qualified Volvo service technician.
If a tire is changed, or if the TPMS sensor is moved to another wheel, the sensor's seal, nut, and valve core should
be replaced.
When installing TPMS sensors, the vehicle must be parked for at least 15 minutes with the ignition off. if the
vehicle is driven within 15 minutes, a TPMS error message will be displayed.
CAUTION
When inflating tires with TPMS valves, press the pump's mouthpiece straight onto the valve to help avoid bending or
otherwise damaging the valve.
189 07 Wheels and tires
This page left intentionally blank.
ProCarManuals.com
Page 174 of 239
NOTE
When washing the car, remember to remove dirt from the drain holes in the doors and sills.
Exterior components
Volvo recommends the use of special cleaning products, available at your Volvo retailer, for cleaning colored plastic,
rubber, or ornamental components such as chromed strips on the exterior of your vehicle. The instructions for using
these products should be followed carefully.Solvents or stain removers should not be used.
CAUTION
Avoid waxing or polishing plastic or rubber components
Polishing chromed strips can wear away or damage the surface
Polishes containing abrasive substances should not be used
193 08 Car care
Washing and cleaning the car
NOTE
During high pressure washing, the spray mouthpiece must never be closer to the vehicle than 13" (30 cm). Do not
spray into the locks.
Dirt, snow, etc., on the headlights can reduce lighting capacity considerably. Clean the headlights regularly, for
example when refueling.
When washing or steam cleaning the engine, avoid spraying water or steam directly on the electrical components
or toward the rear side of the engine. Special moonroof cautions:
Always close the moonroof and sun shade before washing your vehicle.
Never use abrasive cleaning agents on the moonroof.
Never use wax on the rubber seals around the moonroof
Automatic washing - simple and quick
We do NOT recommend washing your car in an automatic wash during the first six months (because the paint will not
have hardened sufficiently). An automatic wash is a simple and quick way to clean your car, but it is worth
remembering that it may not be as thorough as when you yourself go over the car with sponge and water. Keeping the
underbody clean is most important, especially in the winter. Some automatic washers do not have facilities for washing
the underbody.
CAUTION
Before driving into an automatic car wash, turn off the optional rain sensor to avoid damaging the windshield
wipers.
Make sure that side view mirrors, auxiliary lamps, etc, are secure, and that any antenna(s) are retracted or
removed. Otherwise there is risk of the machine dislodging them.
Chromed wheels : Clean chrome-plated wheels using the same detergents used for the body of the vehicle.
Aggressive wheel-cleaning agents can permanently stain chrome-plated wheels.
WARNING
When the car is driven immediately after being washed, apply the brakes several times in order to remove any
ProCarManuals.com