key VOLVO S60 2006 Owner's Manual
[x] Cancel search | Manufacturer: VOLVO, Model Year: 2006, Model line: S60, Model: VOLVO S60 2006Pages: 132, PDF Size: 2.33 MB
Page 55 of 132
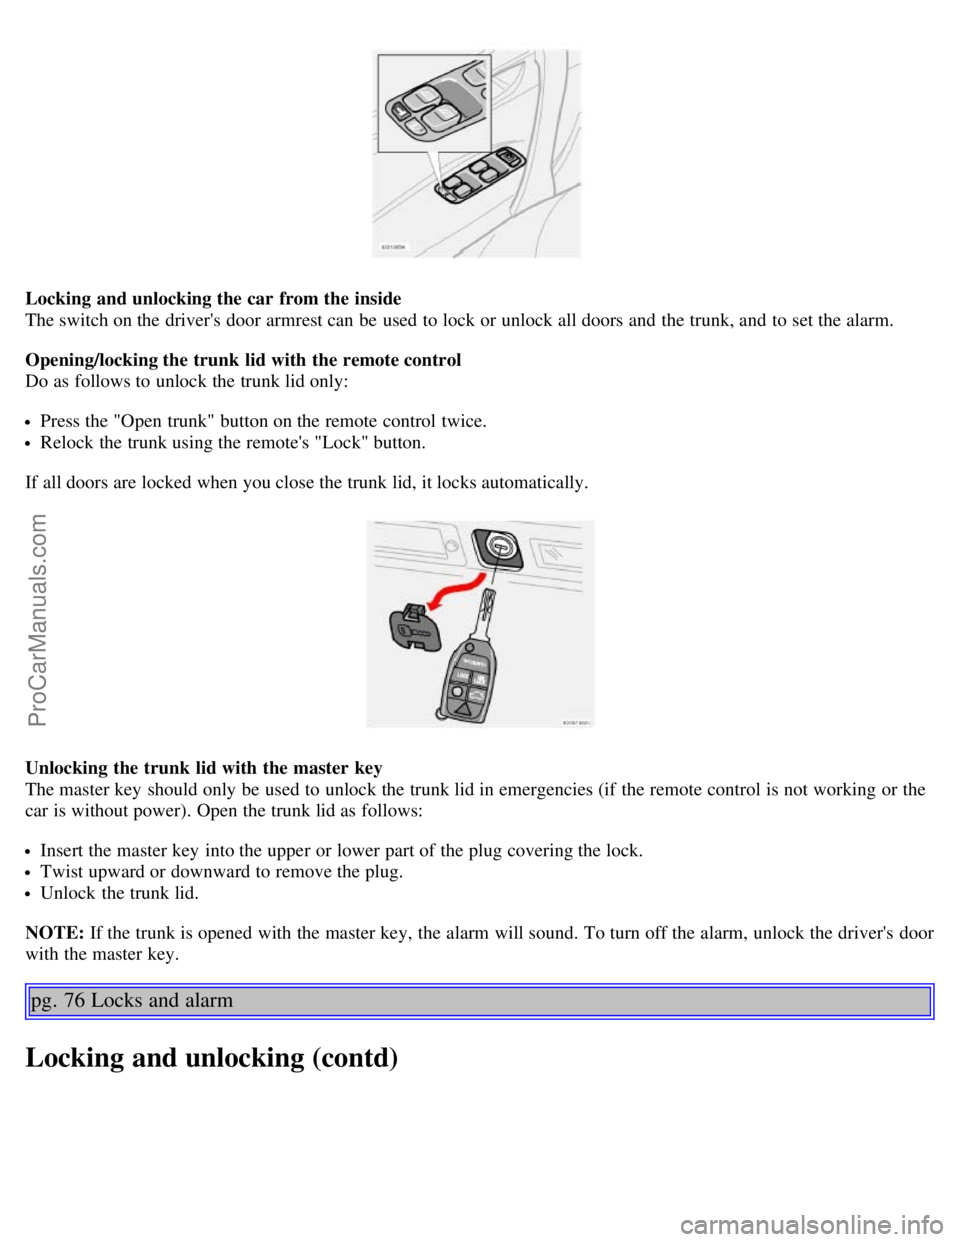
Locking and unlocking the car from the inside
The switch on the driver's door armrest can be used to lock or unlock all doors and the trunk, and to set the alarm.
Opening/locking the trunk lid with the remote control
Do as follows to unlock the trunk lid only:
Press the "Open trunk" button on the remote control twice.
Relock the trunk using the remote's "Lock" button.
If all doors are locked when you close the trunk lid, it locks automatically.
Unlocking the trunk lid with the master key
The master key should only be used to unlock the trunk lid in emergencies (if the remote control is not working or the
car is without power). Open the trunk lid as follows:
Insert the master key into the upper or lower part of the plug covering the lock.
Twist upward or downward to remove the plug.
Unlock the trunk lid.
NOTE: If the trunk is opened with the master key, the alarm will sound. To turn off the alarm, unlock the driver's door
with the master key.
pg. 76 Locks and alarm
Locking and unlocking (contd)
ProCarManuals.com
Page 56 of 132
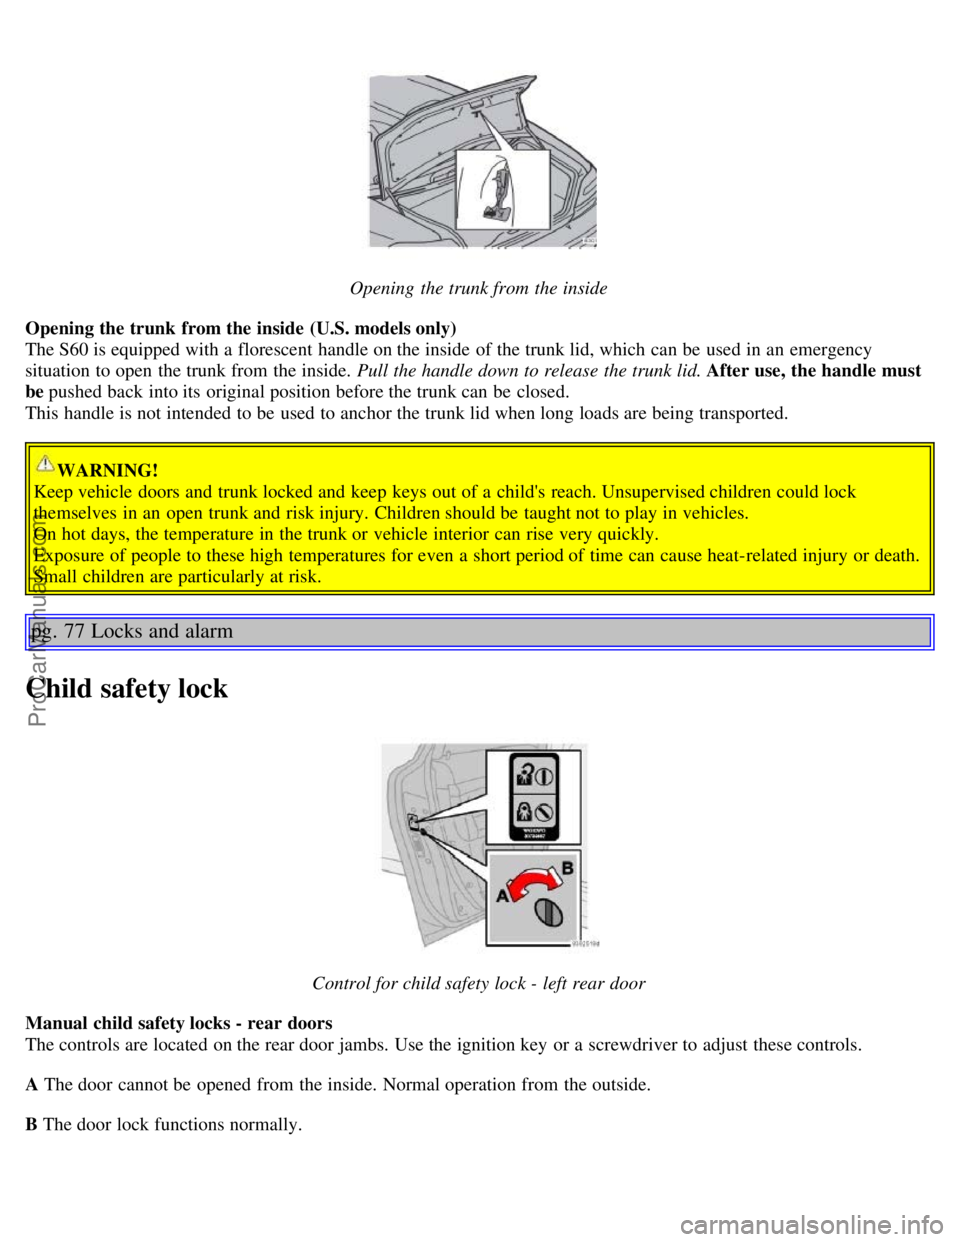
Opening the trunk from the inside
Opening the trunk from the inside (U.S. models only)
The S60 is equipped with a florescent handle on the inside of the trunk lid, which can be used in an emergency
situation to open the trunk from the inside. Pull the handle down to release the trunk lid. After use, the handle must
be pushed back into its original position before the trunk can be closed.
This handle is not intended to be used to anchor the trunk lid when long loads are being transported.
WARNING!
Keep vehicle doors and trunk locked and keep keys out of a child's reach. Unsupervised children could lock
themselves in an open trunk and risk injury. Children should be taught not to play in vehicles.
On hot days, the temperature in the trunk or vehicle interior can rise very quickly.
Exposure of people to these high temperatures for even a short period of time can cause heat-related injury or death.
Small children are particularly at risk.
pg. 77 Locks and alarm
Child safety lock
Control for child safety lock - left rear door
Manual child safety locks - rear doors
The controls are located on the rear door jambs. Use the ignition key or a screwdriver to adjust these controls.
A The door cannot be opened from the inside. Normal operation from the outside.
B The door lock functions normally.
ProCarManuals.com
Page 57 of 132
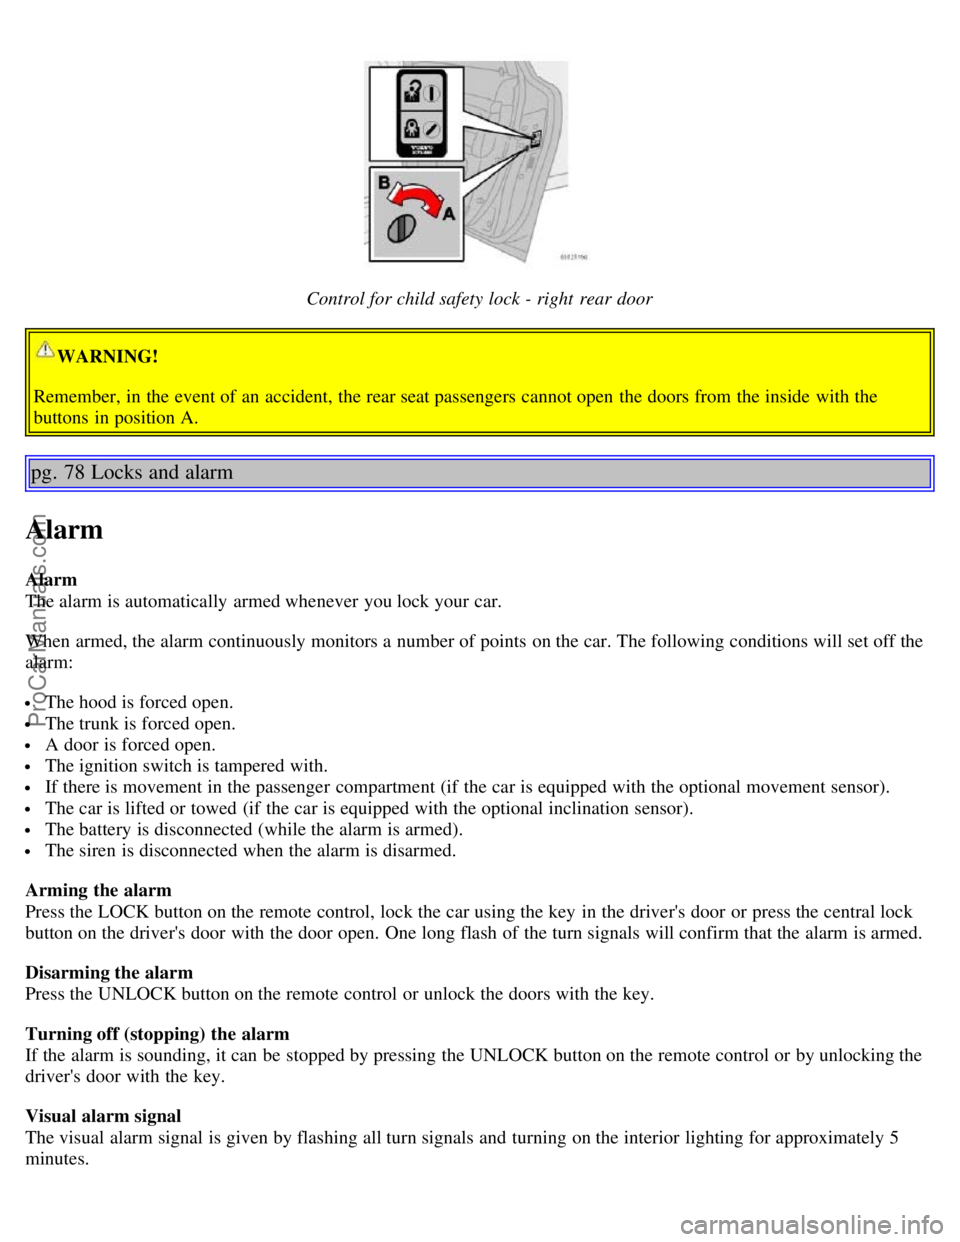
Control for child safety lock - right rear door
WARNING!
Remember, in the event of an accident, the rear seat passengers cannot open the doors from the inside with the
buttons in position A.
pg. 78 Locks and alarm
Alarm
Alarm
The alarm is automatically armed whenever you lock your car.
When armed, the alarm continuously monitors a number of points on the car. The following conditions will set off the
alarm:
The hood is forced open.
The trunk is forced open.
A door is forced open.
The ignition switch is tampered with.
If there is movement in the passenger compartment (if the car is equipped with the optional movement sensor).
The car is lifted or towed (if the car is equipped with the optional inclination sensor).
The battery is disconnected (while the alarm is armed).
The siren is disconnected when the alarm is disarmed.
Arming the alarm
Press the LOCK button on the remote control, lock the car using the key in the driver's door or press the central lock
button on the driver's door with the door open. One long flash of the turn signals will confirm that the alarm is armed.
Disarming the alarm
Press the UNLOCK button on the remote control or unlock the doors with the key.
Turning off (stopping) the alarm
If the alarm is sounding, it can be stopped by pressing the UNLOCK button on the remote control or by unlocking the
driver's door with the key.
Visual alarm signal
The visual alarm signal is given by flashing all turn signals and turning on the interior lighting for approximately 5
minutes.
ProCarManuals.com
Page 58 of 132
Audible alarm signal
An audible alarm signal is given by a battery powered siren. One alarm cycle lasts for 25 seconds.
"Panic" button
In an emergency situation, this feature can be used to attract attention.
Activate the "panic" button by pressing the red button on the remote control (see illustration on page 73
) for at least 3
seconds or by pressing this button twice within 3 seconds. The turn signals will flash, and the car's horn will sound.
The function can be turned off by pressing any of the buttons on the remote control or will stop automatically after 25
seconds. When a button is pressed, there is a 5 second delay before the panic alarm is deactivated.
NOTE: This button will NOT unlock the car.
pg. 79 Locks and alarm
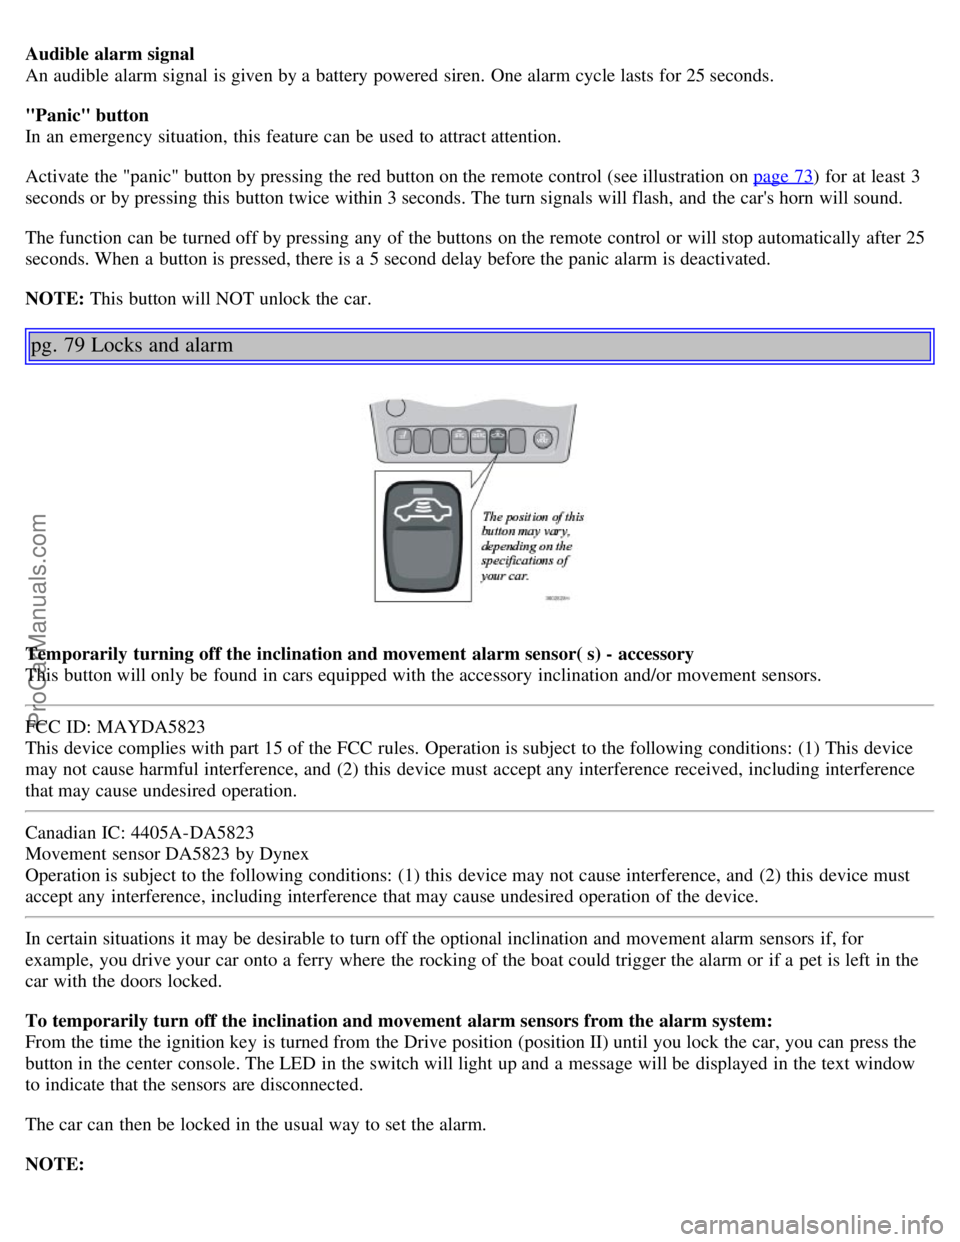
Temporarily turning off the inclination and movement alarm sensor( s) - accessory
This button will only be found in cars equipped with the accessory inclination and/or movement sensors.
FCC ID: MAYDA5823
This device complies with part 15 of the FCC rules. Operation is subject to the following conditions: (1) This device
may not cause harmful interference, and (2) this device must accept any interference received, including interference
that may cause undesired operation.
Canadian IC: 4405A-DA5823
Movement sensor DA5823 by Dynex
Operation is subject to the following conditions: (1) this device may not cause interference, and (2) this device must
accept any interference, including interference that may cause undesired operation of the device.
In certain situations it may be desirable to turn off the optional inclination and movement alarm sensors if, for
example, you drive your car onto a ferry where the rocking of the boat could trigger the alarm or if a pet is left in the
car with the doors locked.
To temporarily turn off the inclination and movement alarm sensors from the alarm system:
From the time the ignition key is turned from the Drive position (position II) until you lock the car, you can press the
button in the center console. The LED in the switch will light up and a message will be displayed in the text window
to indicate that the sensors are disconnected.
The car can then be locked in the usual way to set the alarm.
NOTE:
ProCarManuals.com
Page 63 of 132
systems. Avoid spilling gasoline during refueling. In addition to causing damage to the environment, gasolines
containing alcohol can cause damage to painted surfaces, which may not be covered under the New Vehicle Limited
Warranty.
Do not use gasolines containing methanol (methyl alcohol, wood alcohol). This practice can result in vehicle
performance deterioration and can damage critical parts in the fuel system. Such damage may not be covered under the
New Vehicle Limited Warranty.
* If the fuel filler cap is not closed tightly or if the engine is running when the car is refueled, the Check Engine Light
(malfunction indicator lamp) may indicate a fault. However, your vehicle's performance will not be affected. Use only
Volvo original or approved fuel filler caps.
pg. 85 Starting and driving
Starting the car
Starting the engine
1. Fasten the seat belt.
WARNING!
Before starting, check that the seat, steering wheel and mirrors are adjusted properly. Make sure the brake pedal can
be depressed completely. Adjust the seat if necessary. See pages 58,
60.
2. Apply the parking brake (hand brake) if not already set. The gear selector (automatic transmission) is locked in the
(P )ark position ( SHIFTLOCK ).
Manual transmission: the clutch must be fully depressed.
3. Without touching the accelerator pedal, turn the ignition key* to the starting position. Allow the starter to operate for
up to 10 seconds. Release the key as soon as the engine starts. If the engine fails to start, repeat this step.
NOTE: On certain models, when the car is started, idle speed may be noticeably higher than normal for a short period,
depending on the temperature of the engine. This has been done to help bring components in the emission control
system to their normal operating temperature as quickly as possible, which enables them to function normally.
For cold starts at altitudes above 6000 ft (1800 meters), depress the accelerator pedal halfway and turn the key to the
starting position. Release the pedal slowly when the engine starts.
4. To release the gear selector from the ( P)ark position, the engine must be running (or the ignition key must be in
position II) and the brake pedal must be depressed.
5. Select the desired gear. The gear engages after a very slight delay which is especially noticeable when selecting R.
NOTE: Your car is equipped with a KEYLOCK system (automatic transmission). When the engine is switched off,
the gear selector must be in the ( P)ark position before the key can be removed from the ignition switch.
When starting in cold weather, the transmission may shift up at slightly higher engine speeds than normal until the
automatic transmission fluid reaches normal operating temperature.
CAUTION:
Automatic transmission
The engine should be idling when you move the gear selector. Never accelerate until after you feel the transmission
engage! Accelerating immediately after selecting a gear will cause harsh engagement and premature transmission wear.
ProCarManuals.com
Page 64 of 132
Selecting P or N when idling at a standstill for prolonged periods of time will help prevent overheating of the
automatic transmission fluid.
WARNING!
Always place the gear selector in Park or in reverse on models with a manual transmission, and apply the parking
brake before leaving the vehicle. Never leave the car unattended with the engine running.
Always open garage doors fully before starting the engine inside a garage to ensure adequate ventilation. The
exhaust gases contain carbon monoxide, which is invisible and odorless but very poisonous
Do not race a cold engine immediately after starting.
* If two of the keys to your car are close together, e.g., on the same key ring, when you try to start the car, this could
cause interference in the immobilizer system and result in the car not starting. If this should occur, remove one of the
keys from the key ring before trying to start the car again.
pg. 86 Starting and driving
Starting the car (contd)
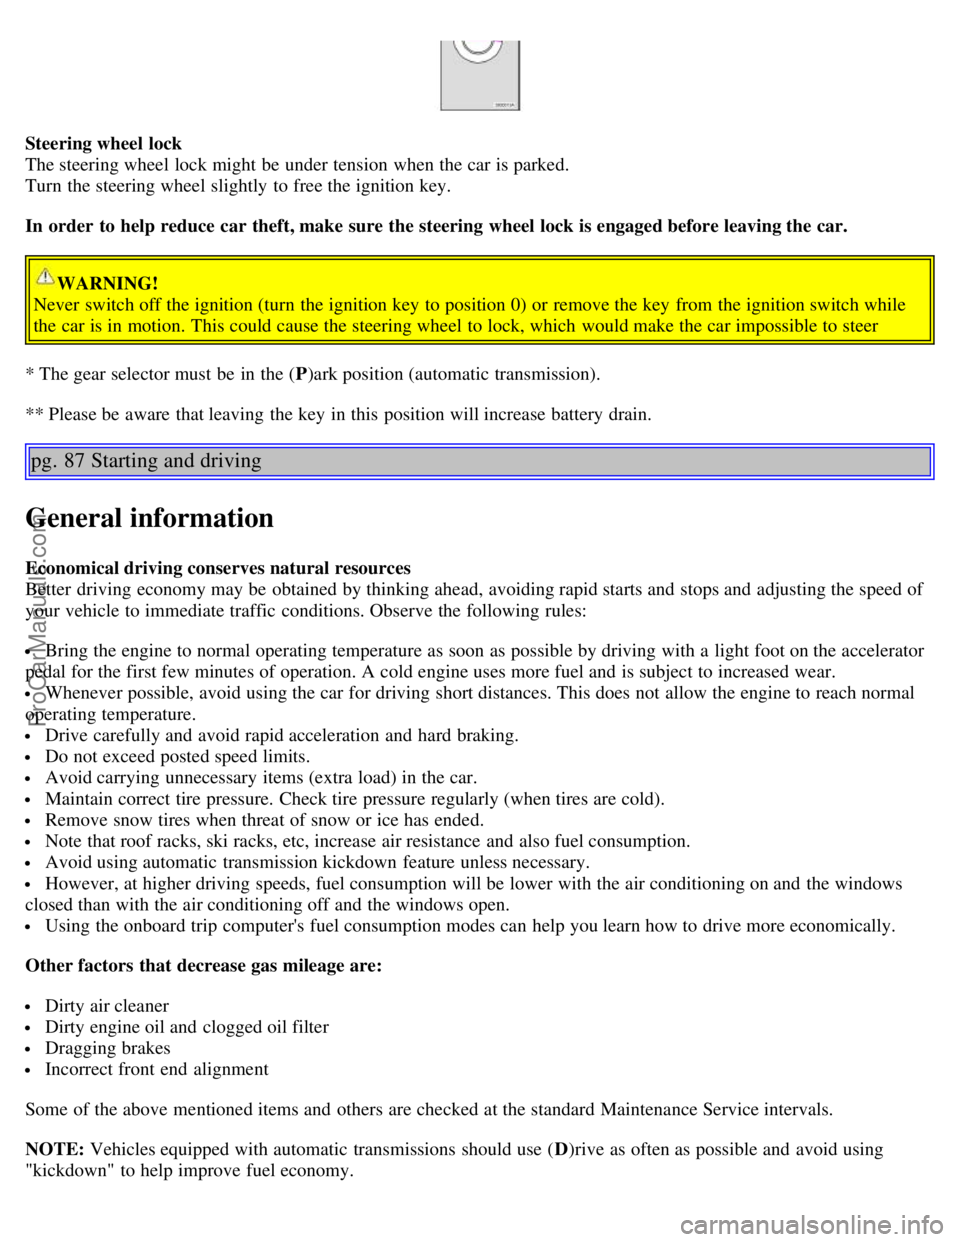
Ignition switch and steering wheel lock
0 - Locked position:
Remove the key to lock the steering wheel*.
WARNING!
Never turn the key to position O while driving or when the car is being towed.
I - Intermediate position** - "radio position":
Certain accessories, radio, etc. on, daytime running lights off.
II - Drive position: The key position when driving. The car's entire electrical system is connected.
III - Start position: Release the key when the engine starts. The key returns automatically to the Drive position.
A chime will sound if the key is left in the ignition and the driver's door is opened.
ProCarManuals.com
Page 65 of 132
Steering wheel lock
The steering wheel lock might be under tension when the car is parked.
Turn the steering wheel slightly to free the ignition key.
In order to help reduce car theft, make sure the steering wheel lock is engaged before leaving the car.
WARNING!
Never switch off the ignition (turn the ignition key to position 0) or remove the key from the ignition switch while
the car is in motion. This could cause the steering wheel to lock, which would make the car impossible to steer
* The gear selector must be in the ( P)ark position (automatic transmission).
** Please be aware that leaving the key in this position will increase battery drain.
pg. 87 Starting and driving
General information
Economical driving conserves natural resources
Better driving economy may be obtained by thinking ahead, avoiding rapid starts and stops and adjusting the speed of
your vehicle to immediate traffic conditions. Observe the following rules:
Bring the engine to normal operating temperature as soon as possible by driving with a light foot on the accelerator
pedal for the first few minutes of operation. A cold engine uses more fuel and is subject to increased wear.
Whenever possible, avoid using the car for driving short distances. This does not allow the engine to reach normal
operating temperature.
Drive carefully and avoid rapid acceleration and hard braking.
Do not exceed posted speed limits.
Avoid carrying unnecessary items (extra load) in the car.
Maintain correct tire pressure. Check tire pressure regularly (when tires are cold).
Remove snow tires when threat of snow or ice has ended.
Note that roof racks, ski racks, etc, increase air resistance and also fuel consumption.
Avoid using automatic transmission kickdown feature unless necessary.
However, at higher driving speeds, fuel consumption will be lower with the air conditioning on and the windows
closed than with the air conditioning off and the windows open.
Using the onboard trip computer's fuel consumption modes can help you learn how to drive more economically.
Other factors that decrease gas mileage are:
Dirty air cleaner
Dirty engine oil and clogged oil filter
Dragging brakes
Incorrect front end alignment
Some of the above mentioned items and others are checked at the standard Maintenance Service intervals.
NOTE: Vehicles equipped with automatic transmissions should use ( D)rive as often as possible and avoid using
"kickdown" to help improve fuel economy.
ProCarManuals.com
Page 68 of 132
Engaging reverse gear
Never engage R while the car is moving.
CAUTION:
Be careful to avoid inadvertently engaging reverse while moving forward.
pg. 90 Starting and driving
Automatic transmission (option)
Automatic transmission AW55- 50 (option)
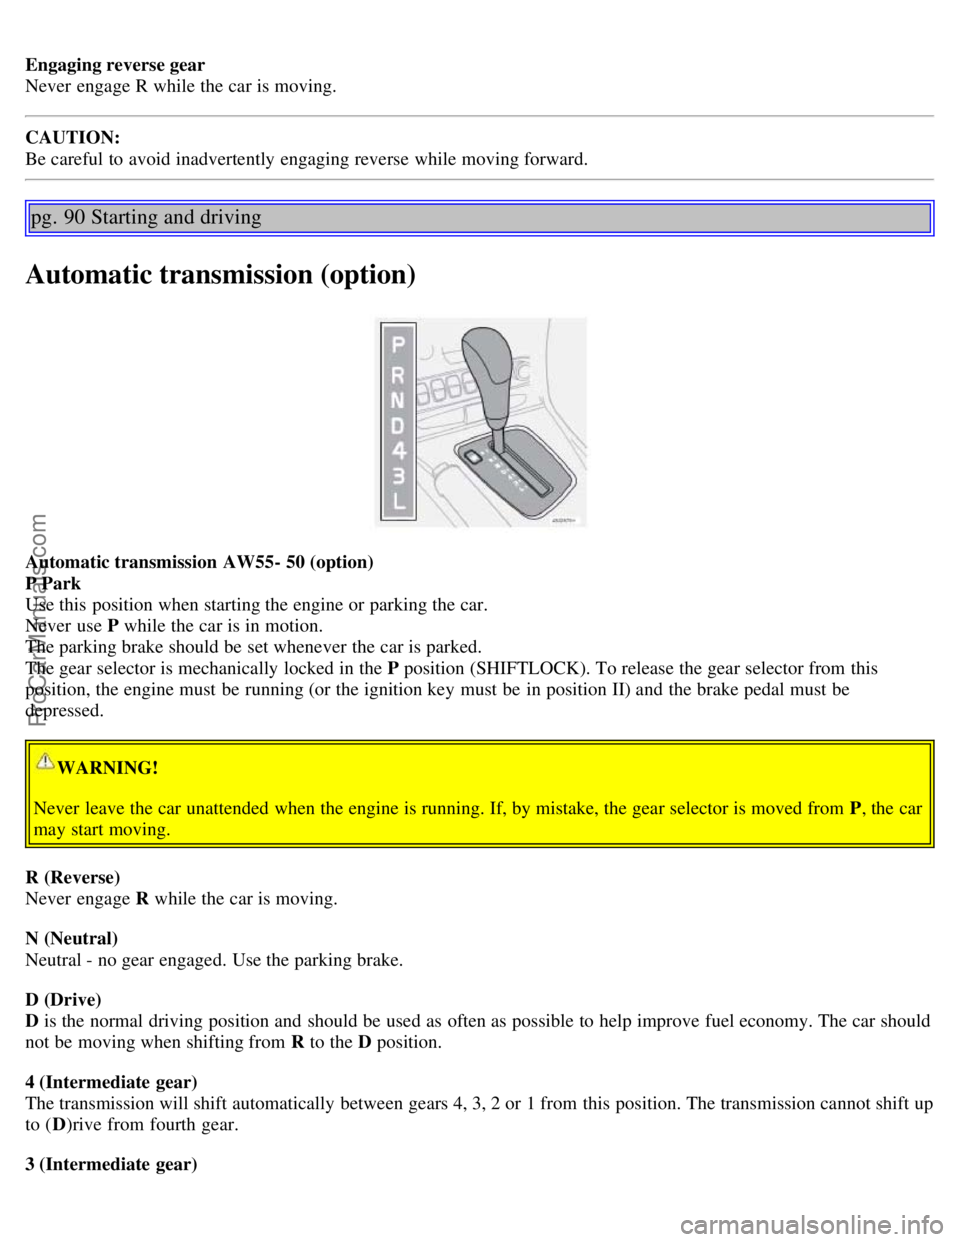
P Park
Use this position when starting the engine or parking the car.
Never use P while the car is in motion.
The parking brake should be set whenever the car is parked.
The gear selector is mechanically locked in the P position (SHIFTLOCK). To release the gear selector from this
position, the engine must be running (or the ignition key must be in position II) and the brake pedal must be
depressed.
WARNING!
Never leave the car unattended when the engine is running. If, by mistake, the gear selector is moved from P , the car
may start moving.
R (Reverse)
Never engage R while the car is moving.
N (Neutral)
Neutral - no gear engaged. Use the parking brake.
D (Drive)
D is the normal driving position and should be used as often as possible to help improve fuel economy. The car should
not be moving when shifting from R to the D position.
4 (Intermediate gear)
The transmission will shift automatically between gears 4, 3, 2 or 1 from this position. The transmission cannot shift up
to ( D)rive from fourth gear.
3 (Intermediate gear)
ProCarManuals.com
Page 70 of 132
Kickdown can be used for maximum acceleration or when passing at highway speeds.
Cold starts
When driving before the engine has reached its normal operating temperature, the transmission will shift up at a
slightly higher engine speeds to heat the three-way catalytic converter as quickly as possible.
pg. 92 Starting and driving
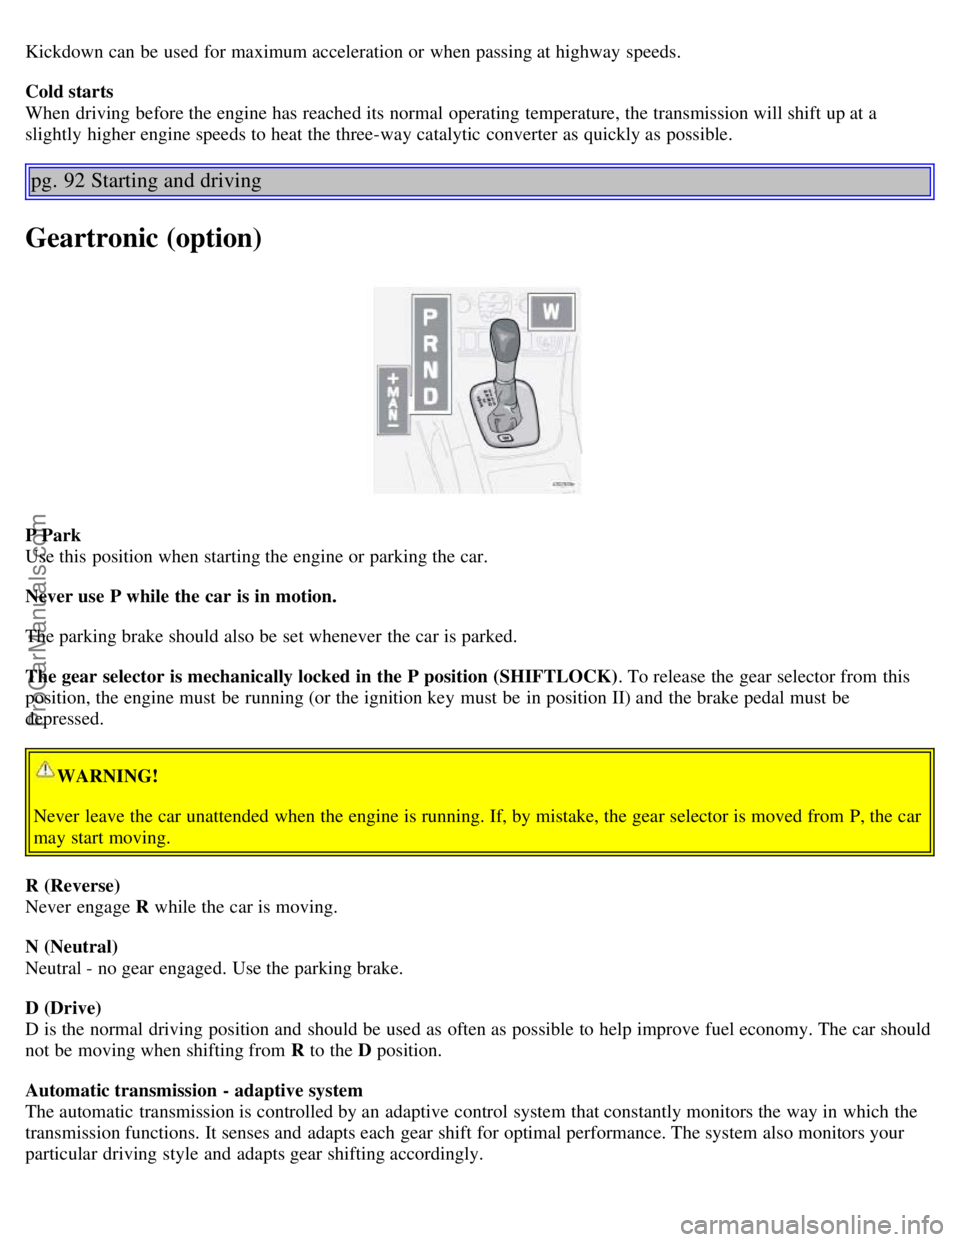
Geartronic (option)
P Park
Use this position when starting the engine or parking the car.
Never use P while the car is in motion.
The parking brake should also be set whenever the car is parked.
The gear selector is mechanically locked in the P position (SHIFTLOCK). To release the gear selector from this
position, the engine must be running (or the ignition key must be in position II) and the brake pedal must be
depressed.
WARNING!
Never leave the car unattended when the engine is running. If, by mistake, the gear selector is moved from P, the car
may start moving.
R (Reverse)
Never engage R while the car is moving.
N (Neutral)
Neutral - no gear engaged. Use the parking brake.
D (Drive)
D is the normal driving position and should be used as often as possible to help improve fuel economy. The car should
not be moving when shifting from R to the D position.
Automatic transmission - adaptive system
The automatic transmission is controlled by an adaptive control system that constantly monitors the way in which the
transmission functions. It senses and adapts each gear shift for optimal performance. The system also monitors your
particular driving style and adapts gear shifting accordingly.
ProCarManuals.com
Page 114 of 132
2 0 0 6
VOLVO S60
Audio
pg. 177 Audio
Introduction 178
Audio system HU -650 - overview179
Audio system HU -850 - overview180
Radio functions HU -650/HU-850181
RBDS functions HU -650/HU-850185
HU -650 - CD player188
HU -850 - internal CD changer189
External CD changer (option)190
Dolby Surround Pro Logic II - HU -850 only191
Audio systems - specifications193
HomeLink® Universal Transceiver (option )194
pg. 178 Audio
Introduction
The audio system in your car is operated with the buttons and knobs in the system's front panel. Certain functions,
such as adjusting the volume, changing radio stations or tracks on a CD, etc, can also be controlled with the optional
steering wheel-mounted keypad.
The audio system is available in two versions:
HU-650
Features: AM/FM radio, single-disc CD player, 4x25W output, six speakers.
HU-850
Features: AM/FM radio, integrated 6-disc CD changer, 4x50W or 4x70W output plus 25W Dolby Pro Logic II, eleven
speakers. A subwoofer mounted under the floor in the cargo area is available as an option. Consult your Volvo retailer.
Compact disc care
Keep the discs clean. Wipe them with a soft, clean, lint-free cloth, working from the center outwards. If necessary,
dampen the cloth with a neutral soap solution. Dry thoroughly before using.
Never use cleaning spray or antistatic liquid. Use only cleaners specifically made for CDs.
Use discs of the correct size only (3.5" discs should never be used). The discs should conform to the norms
EN60908 (IEC60908).
Do not put tape or labels on the disc itself.
Volvo does not recommend the use of plastic outer rings on the disc.
Condensation may occur on discs/optical components of the changer in cold winter weather. The disc can be dried
with a clean, lint-free cloth. Optical components in the CD changer may, however, take up to one hour to dry off.
ProCarManuals.com