VOLVO S60 2008 Owners Manual
Manufacturer: VOLVO, Model Year: 2008, Model line: S60, Model: VOLVO S60 2008Pages: 230, PDF Size: 5.33 MB
Page 191 of 230
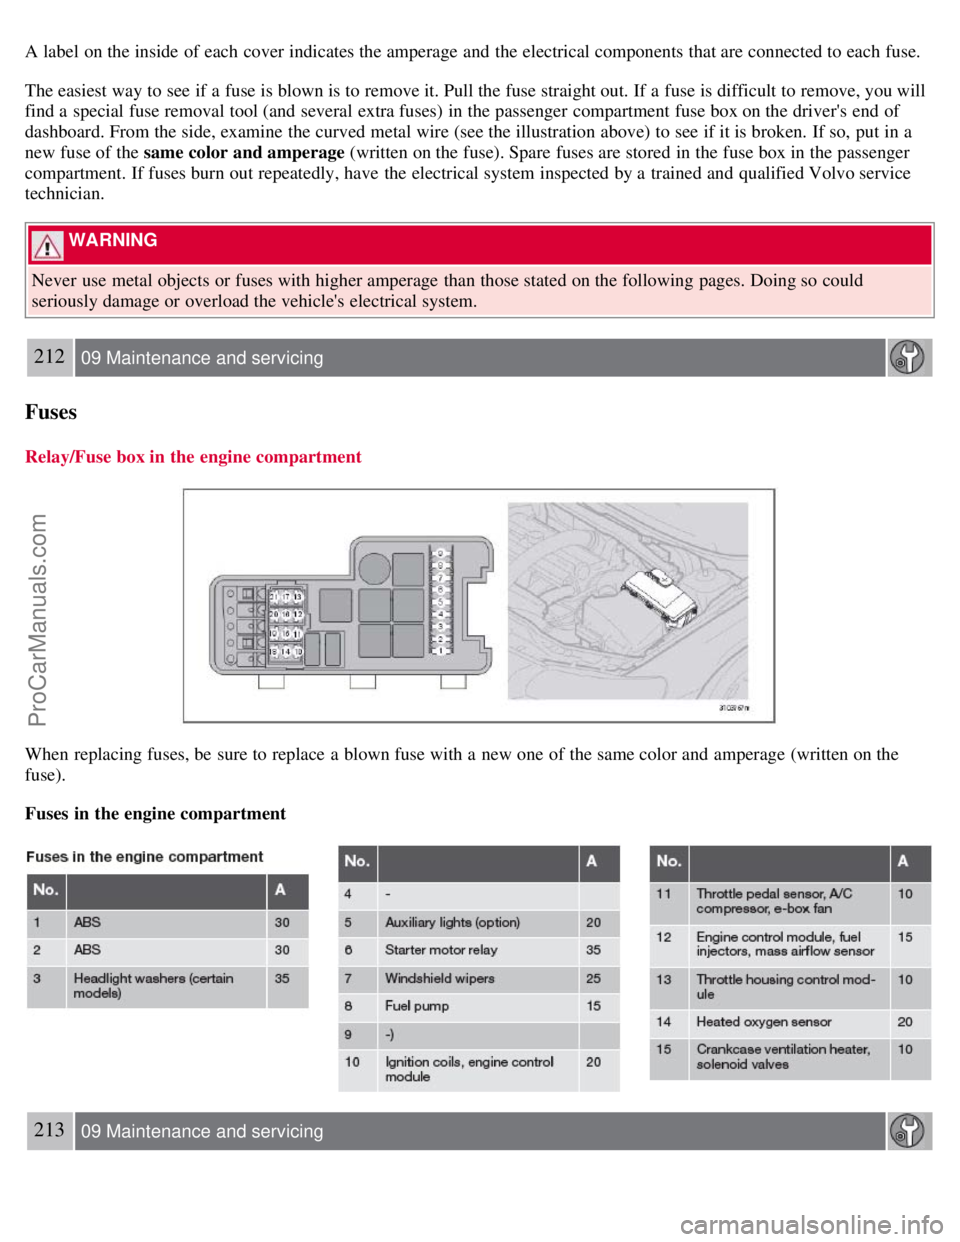
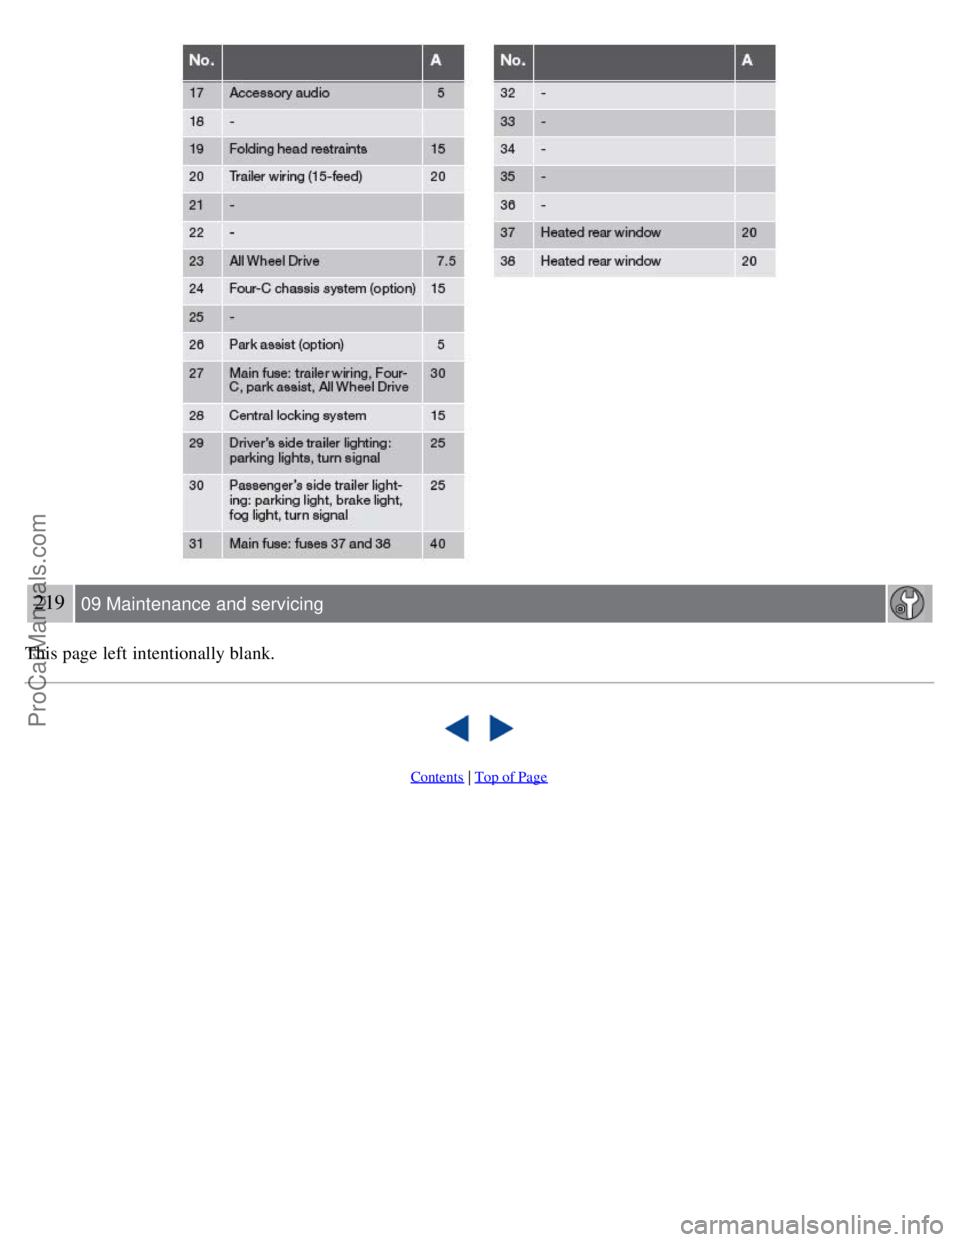
A label on the inside of each cover indicates the amperage and the electrical components that are connected to each fuse.
The easiest way to see if a fuse is blown is to remove it. Pull the fuse straight out. If a fuse is difficult to remove, you will
find a special fuse removal tool (and several extra fuses) in the passenger compartment fuse box on the driver's end of
dashboard. From the side, examine the curved metal wire (see the illustration above) to see if it is broken. If so, put in a
new fuse of the same color and amperage (written on the fuse). Spare fuses are stored in the fuse box in the passenger
compartment. If fuses burn out repeatedly, have the electrical system inspected by a trained and qualified Volvo service
technician.
WARNING
Never use metal objects or fuses with higher amperage than those stated on the following pages. Doing so could
seriously damage or overload the vehicle's electrical system.
212 09 Maintenance and servicing
Fuses
Relay/Fuse box in the engine compartment
When replacing fuses, be sure to replace a blown fuse with a new one of the same color and amperage (written on the
fuse).
Fuses in the engine compartment
213 09 Maintenance and servicing
ProCarManuals.com
Page 192 of 230
Fuses
214 09 Maintenance and servicing
Fuses
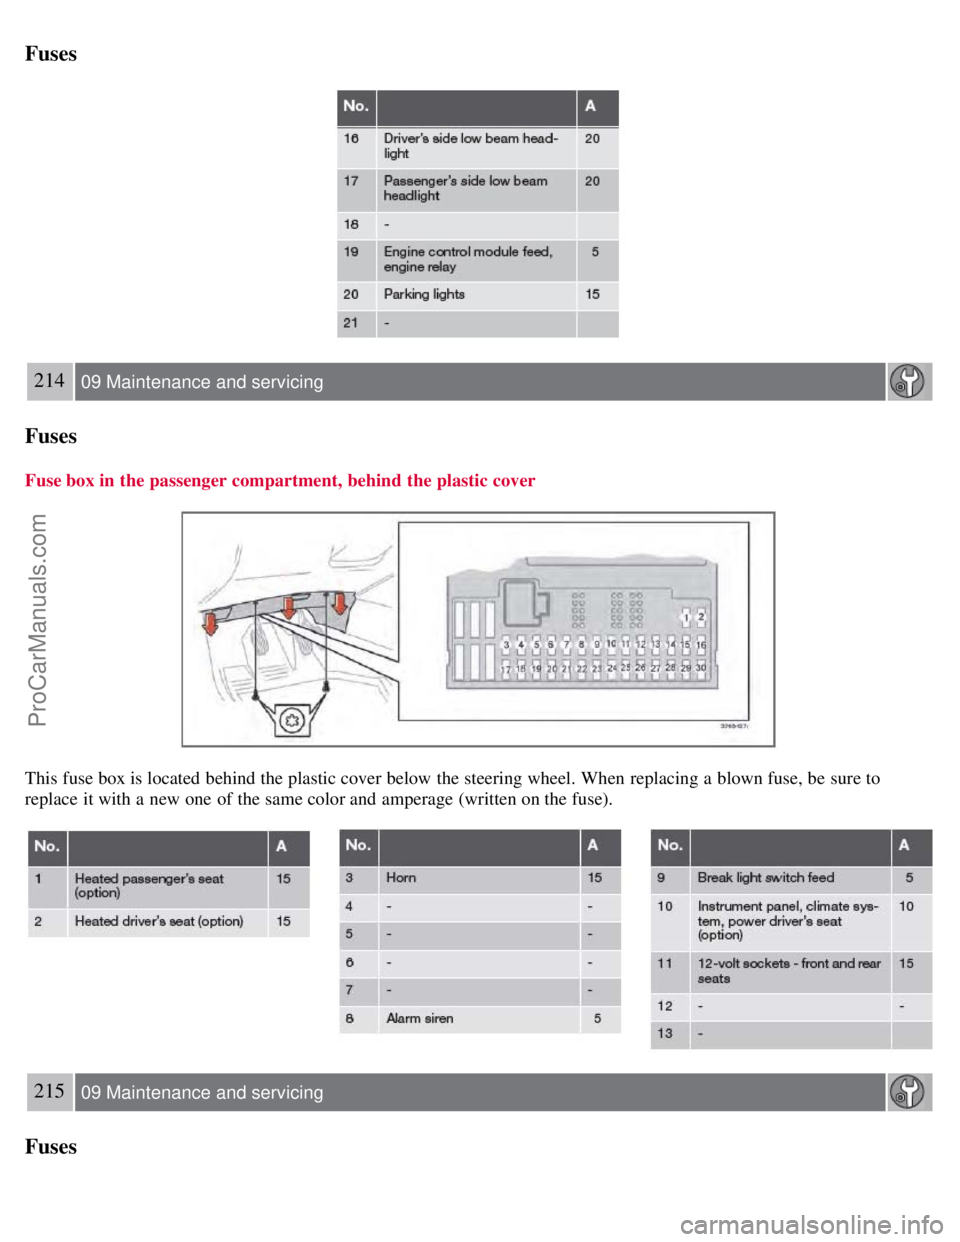
Fuse box in the passenger compartment, behind the plastic cover
This fuse box is located behind the plastic cover below the steering wheel. When replacing a blown fuse, be sure to
replace it with a new one of the same color and amperage (written on the fuse).
215 09 Maintenance and servicing
Fuses
ProCarManuals.com
Page 193 of 230
216 09 Maintenance and servicing
Fuses
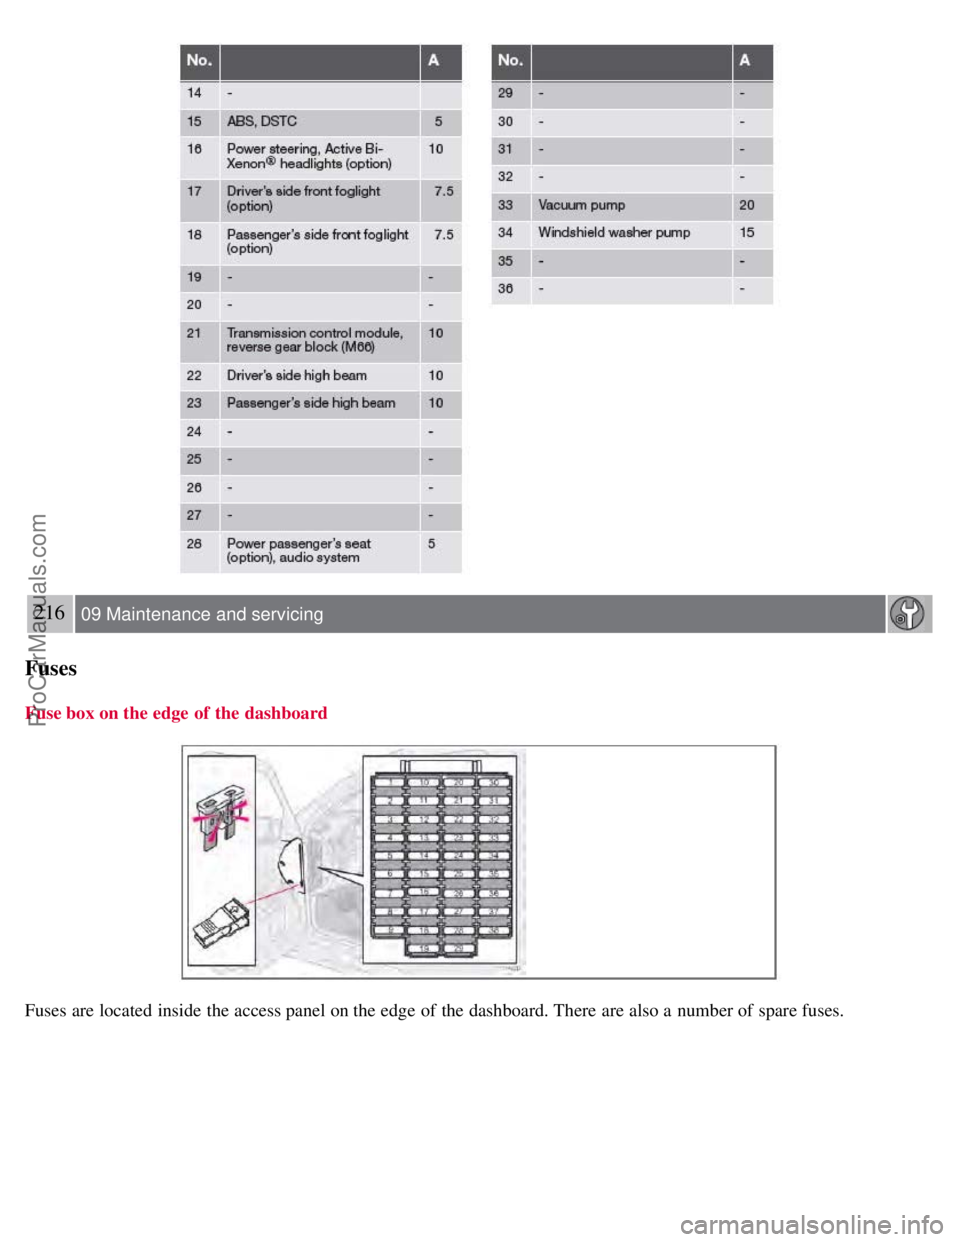
Fuse box on the edge of the dashboard
Fuses are located inside the access panel on the edge of the dashboard. There are also a number of spare fuses.
ProCarManuals.com
Page 194 of 230
217 09 Maintenance and servicing
Fuses
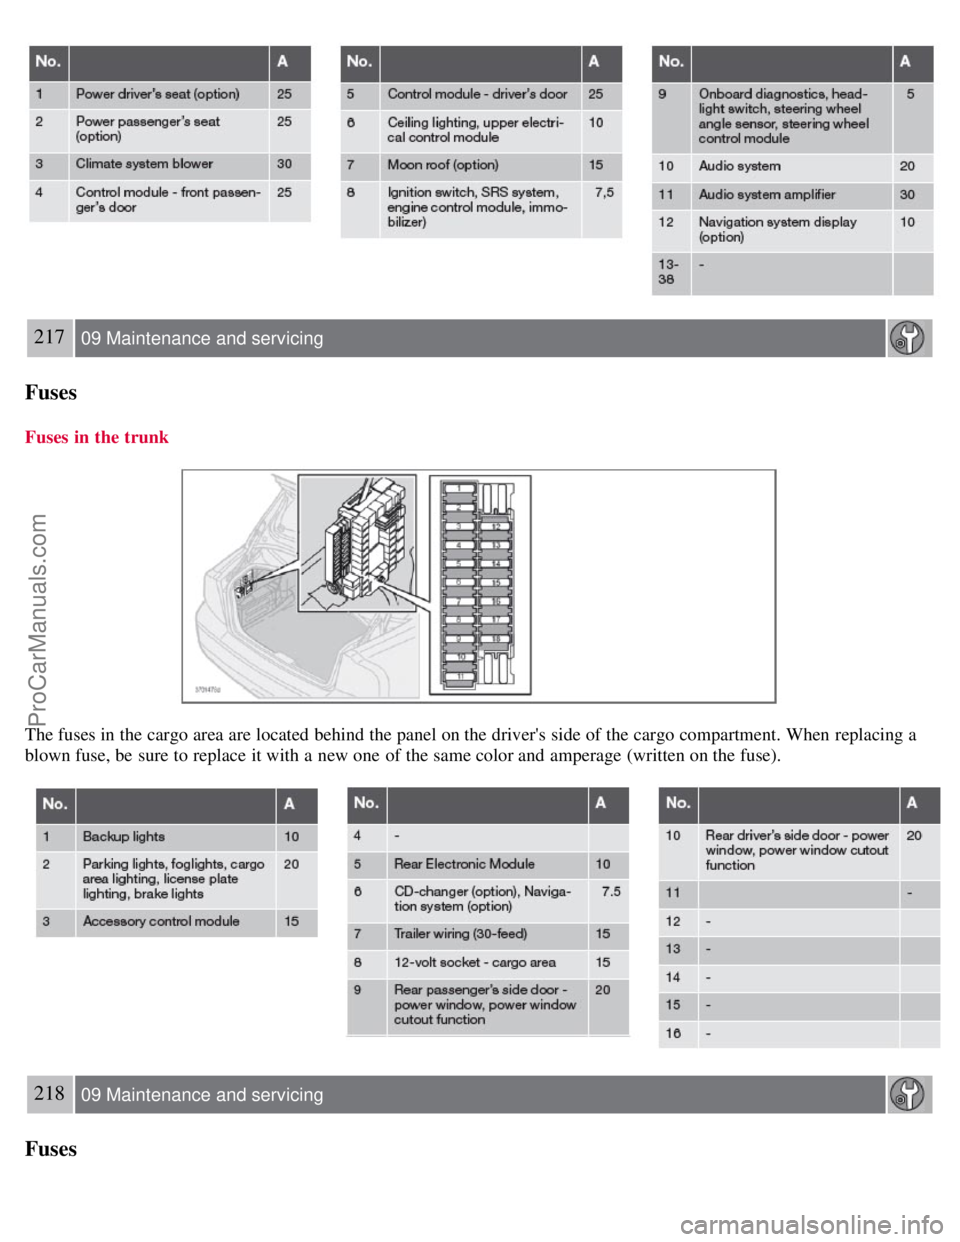
Fuses in the trunk
The fuses in the cargo area are located behind the panel on the driver's side of the cargo compartment. When replacing a
blown fuse, be sure to replace it with a new one of the same color and amperage (written on the fuse).
218 09 Maintenance and servicing
Fuses
ProCarManuals.com
Page 195 of 230
219 09 Maintenance and servicing
This page left intentionally blank.
Contents | Top of Page
ProCarManuals.com
Page 196 of 230
2 0 0 8
VOLVO S60
220 10 Audio
Introduction 222
Audio system HU -650 - overview223
Audio system HU -850 - overview224
Radio functions HU -650/HU-850225
RBDS functions HU -650/HU-850231
HU -650 - CD player234
HU -850 - internal CD changer235
External CD changer (option)236
Dolby Surround Pro Logic II - HU -850 only237
Audio systems - specifications239
221 10 Audio
222 10 Audio
Introduction
The audio system in your vehicle is operated with the buttons and knobs in the system's front panel. Certain functions,
such as adjusting the volume, changing radio stations or tracks on a CD, etc, can also be controlled with the optional
steering wheel-mounted keypad.
The audio system is available in two versions:
HU-650
Features: AM/FM radio, single-disc CD player, 4x25W output, six
1 speakers.
HU-850
Features: AM/FM radio, integrated 6-disc CD changer, 4x50W or 4x70W output plus 25W Dolby Pro Logic II, eleven
speakers.
ProCarManuals.com
Page 197 of 230
Compact disc care
Keep the discs clean. Wipe them with a soft, clean, lint-free cloth, working from the center outwards. If necessary,
dampen the cloth with a neutral soap solution. Dry thoroughly before using.
Never use cleaning spray or antistatic liquid. Use only cleaners specifically made for CDs.
Use discs of the correct size only (3.5" discs should never be used).
The discs should conform to the norms EN60908 (IEC60908). CDR discs can cause listening problems due to the
quality of the disc or recording equipment used.
Do not put tape or labels on the disc itself.
Volvo does not recommend the use of plastic outer rings on the disc.
Condensation may occur on discs/optical components of the changer in cold winter weather. The disc can be dried
with a clean, lint-free cloth. Optical components in the CD changer may, however, take up to one hour to dry off.
Never attempt to play a disc which is damaged in any way.
When not in use, the discs should be stored in their covers. Avoid storing discs in excessive heat, direct sunlight or
dusty locations.
1T5 and 2.5T/2.5T AWD with the Premium package): eight speakers
223 10 Audio
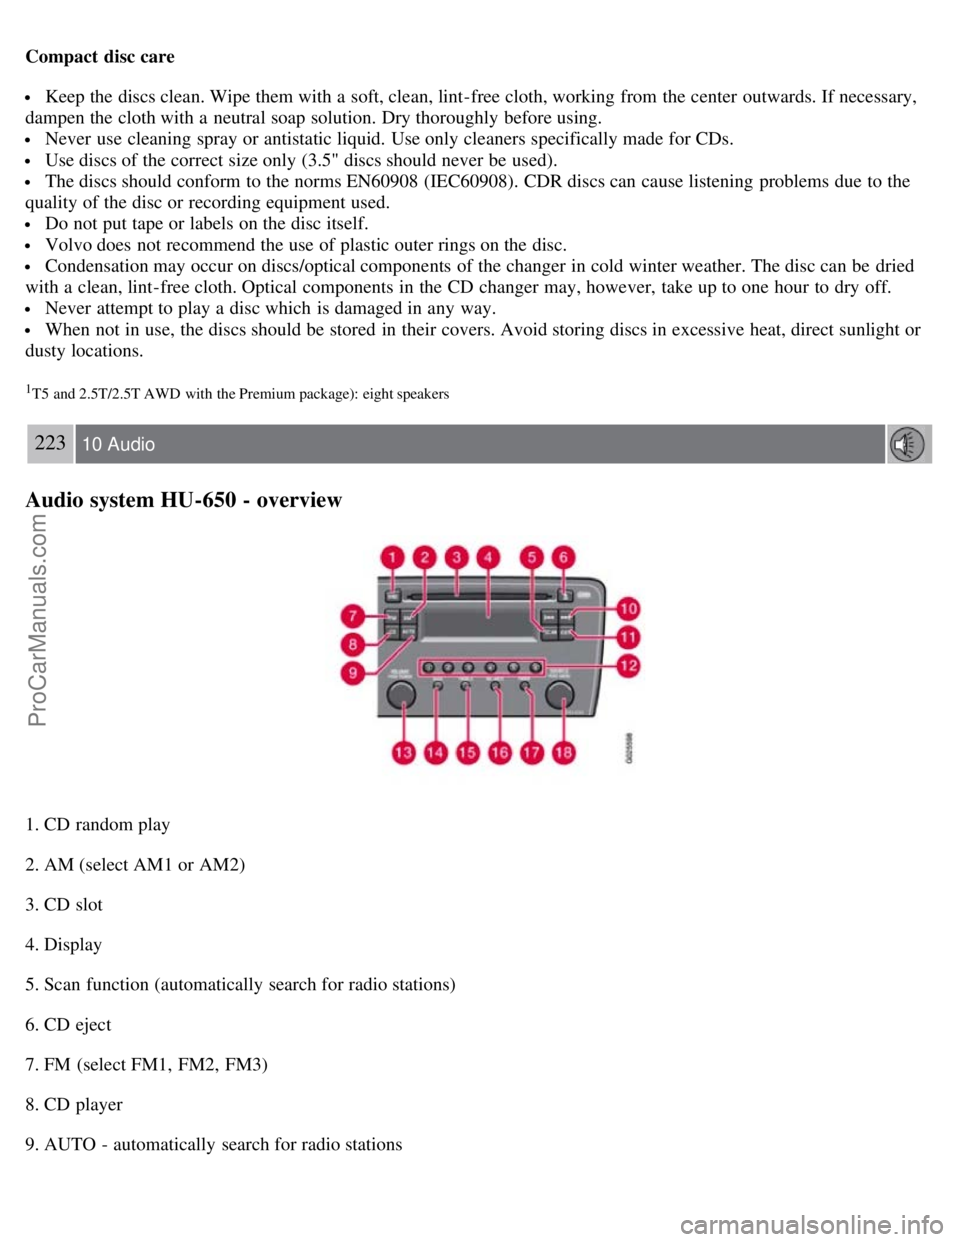
Audio system HU-650 - overview
1. CD random play
2. AM (select AM1 or AM2)
3. CD slot
4. Display
5. Scan function (automatically search for radio stations)
6. CD eject
7. FM (select FM1, FM2, FM3)
8. CD player
9. AUTO - automatically search for radio stations
ProCarManuals.com
Page 198 of 230
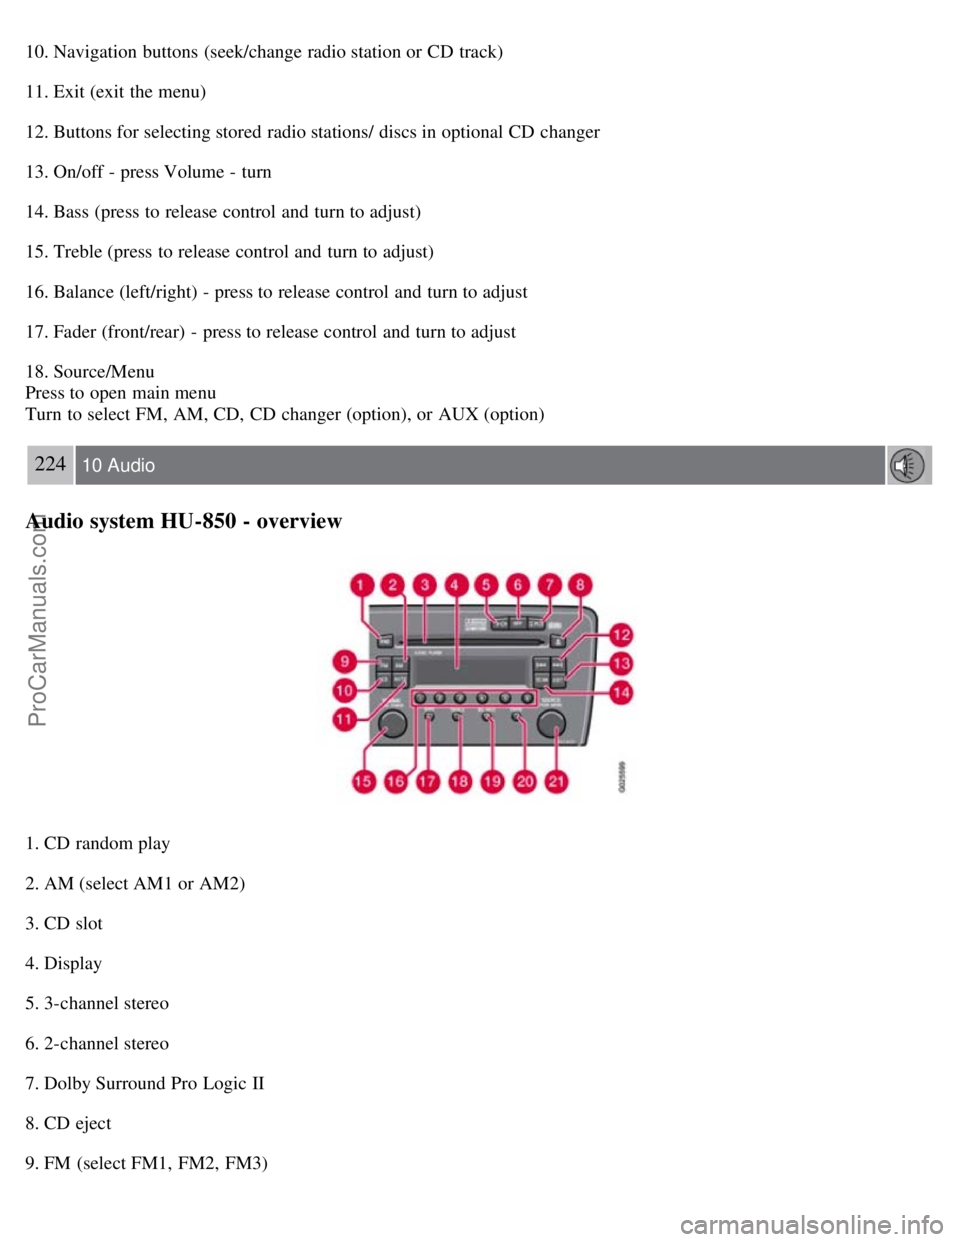
10. Navigation buttons (seek/change radio station or CD track)
11. Exit (exit the menu)
12. Buttons for selecting stored radio stations/ discs in optional CD changer
13. On/off - press Volume - turn
14. Bass (press to release control and turn to adjust)
15. Treble (press to release control and turn to adjust)
16. Balance (left/right) - press to release control and turn to adjust
17. Fader (front/rear) - press to release control and turn to adjust
18. Source/Menu
Press to open main menu
Turn to select FM, AM, CD, CD changer (option), or AUX (option)
224 10 Audio
Audio system HU-850 - overview
1. CD random play
2. AM (select AM1 or AM2)
3. CD slot
4. Display
5. 3-channel stereo
6. 2-channel stereo
7. Dolby Surround Pro Logic II
8. CD eject
9. FM (select FM1, FM2, FM3)
ProCarManuals.com
Page 199 of 230
10. CD player
11. AUTO - automatically search for radio stations
12. Navigation buttons (seek/change radio station or CD track)
13. Exit (exit the menu)
14. Scan function (automatically search for radio stations)
15. On/off - press Volume - turn
16. Buttons for selecting stored radio stations/discs in optional CD changer
17. Bass (press to release control and turn to adjust)
18. Treble (press to release control and turn to adjust)
19. Balance (left/right) - press to release control and turn to adjust
20. Fader (front/rear) - press to release control and turn to adjust
21. Source/Menu
Press to open main menu
Turn to select FM, AM, CD, CD changer (option), or AUX (option)
225 10 Audio
Radio functions HU-650/HU-850
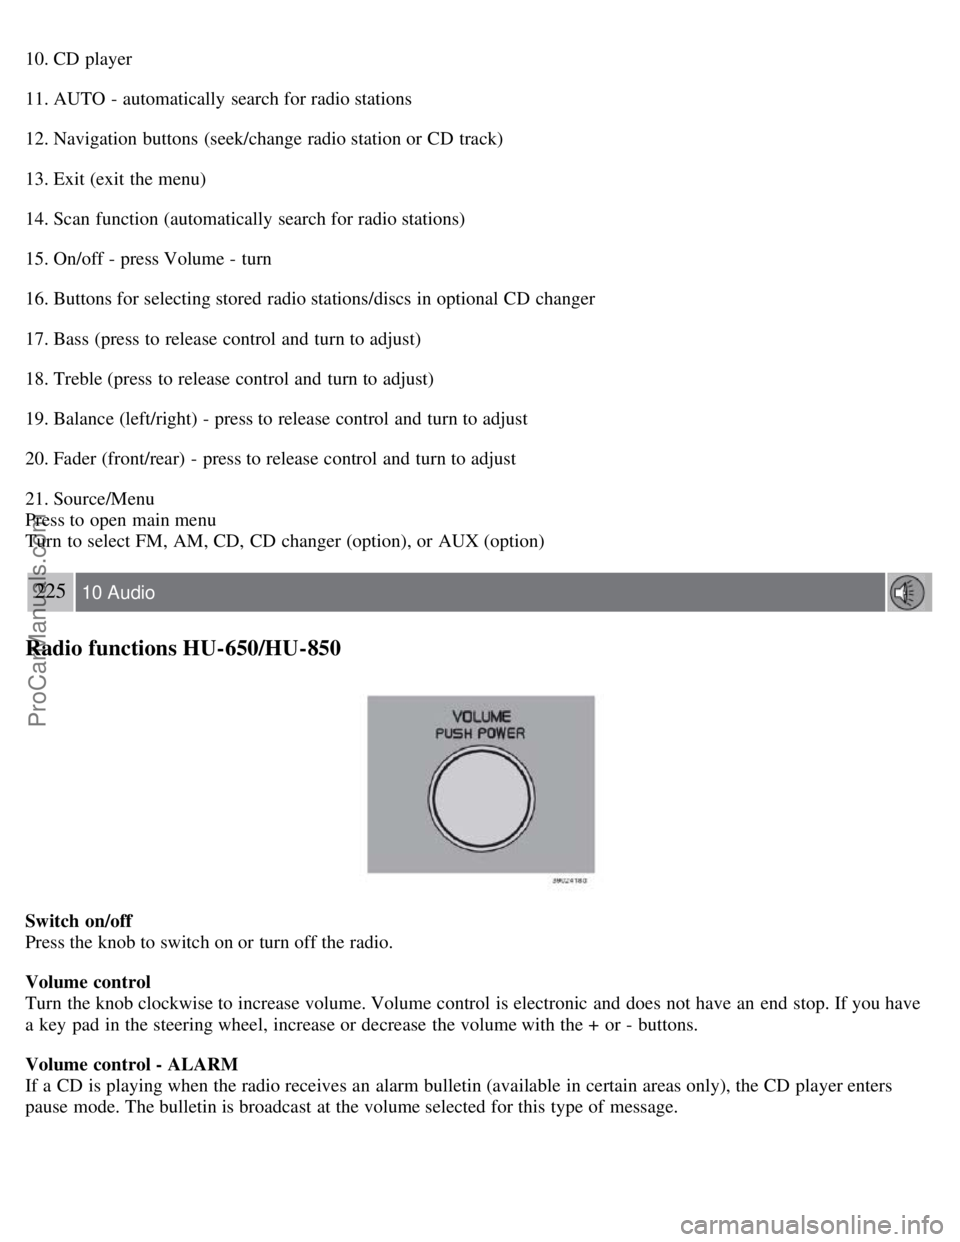
Switch on/off
Press the knob to switch on or turn off the radio.
Volume control
Turn the knob clockwise to increase volume. Volume control is electronic and does not have an end stop. If you have
a key pad in the steering wheel, increase or decrease the volume with the + or - buttons.
Volume control - ALARM
If a CD is playing when the radio receives an alarm bulletin (available in certain areas only), the CD player enters
pause mode. The bulletin is broadcast at the volume selected for this type of message.
ProCarManuals.com
Page 200 of 230
After the bulletin has been completed, the audio system reverts to the originally selected sound.
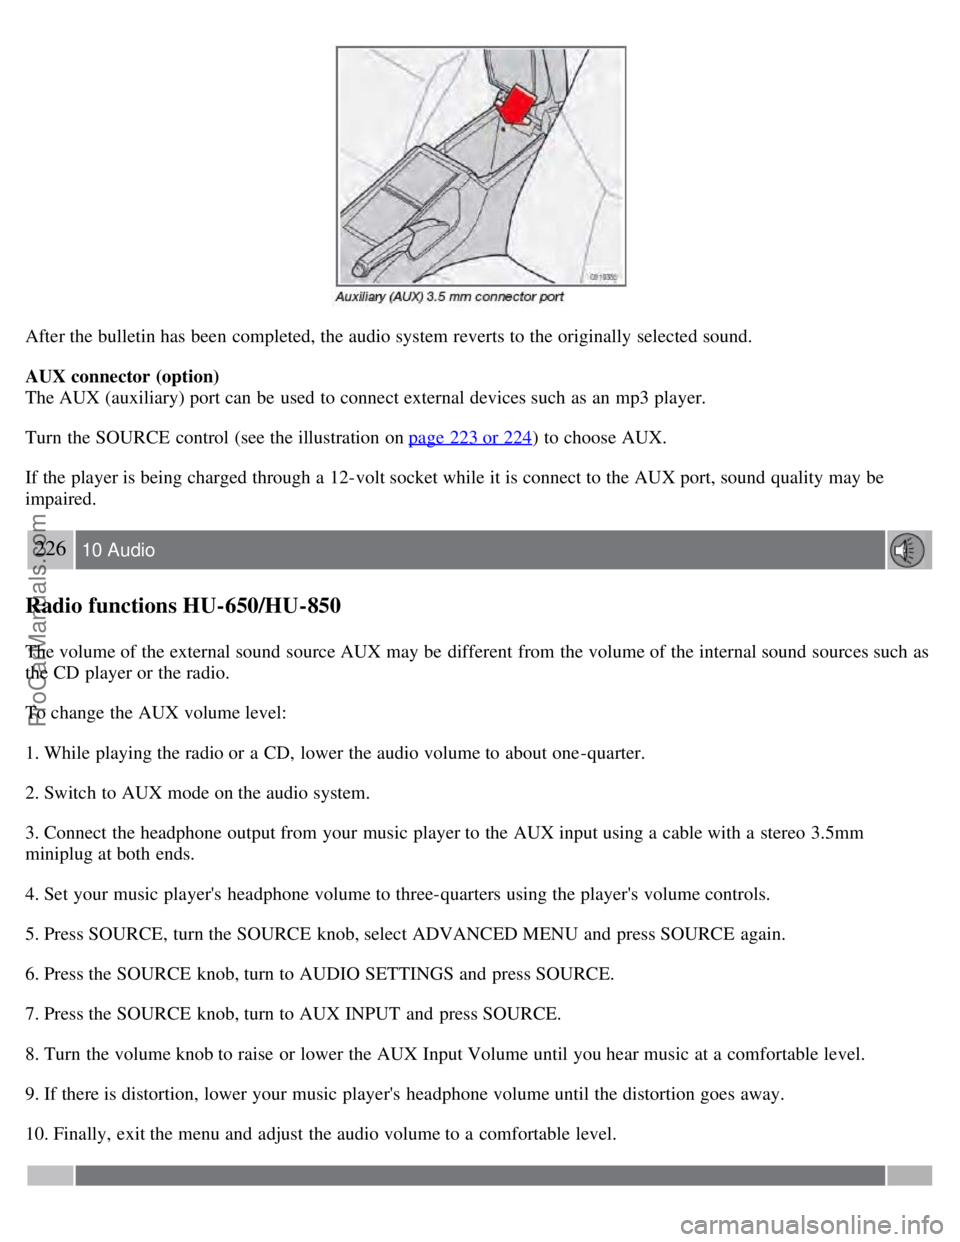
AUX connector (option)
The AUX (auxiliary) port can be used to connect external devices such as an mp3 player.
Turn the SOURCE control (see the illustration on page 223 or 224
) to choose AUX.
If the player is being charged through a 12-volt socket while it is connect to the AUX port, sound quality may be
impaired.
226 10 Audio
Radio functions HU-650/HU-850
The volume of the external sound source AUX may be different from the volume of the internal sound sources such as
the CD player or the radio.
To change the AUX volume level:
1. While playing the radio or a CD, lower the audio volume to about one -quarter.
2. Switch to AUX mode on the audio system.
3. Connect the headphone output from your music player to the AUX input using a cable with a stereo 3.5mm
miniplug at both ends.
4. Set your music player's headphone volume to three-quarters using the player's volume controls.
5. Press SOURCE, turn the SOURCE knob, select ADVANCED MENU and press SOURCE again.
6. Press the SOURCE knob, turn to AUDIO SETTINGS and press SOURCE.
7. Press the SOURCE knob, turn to AUX INPUT and press SOURCE.
8. Turn the volume knob to raise or lower the AUX Input Volume until you hear music at a comfortable level.
9. If there is distortion, lower your music player's headphone volume until the distortion goes away.
10. Finally, exit the menu and adjust the audio volume to a comfortable level.
ProCarManuals.com