change wheel VOLVO S60 2008 Owners Manual
[x] Cancel search | Manufacturer: VOLVO, Model Year: 2008, Model line: S60, Model: VOLVO S60 2008Pages: 230, PDF Size: 5.33 MB
Page 56 of 230
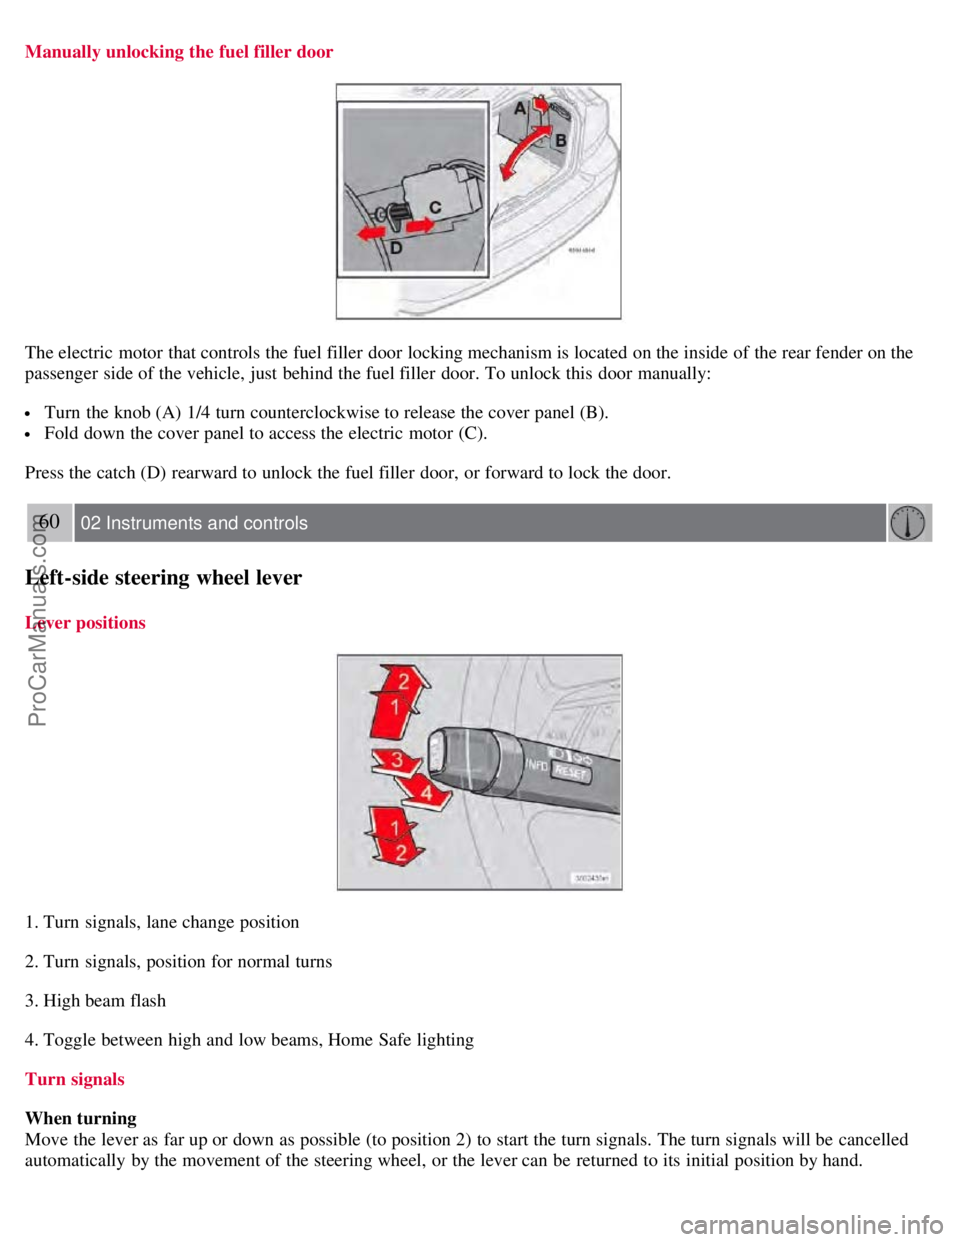
Manually unlocking the fuel filler door
The electric motor that controls the fuel filler door locking mechanism is located on the inside of the rear fender on the
passenger side of the vehicle, just behind the fuel filler door. To unlock this door manually:
Turn the knob (A) 1/4 turn counterclockwise to release the cover panel (B).
Fold down the cover panel to access the electric motor (C).
Press the catch (D) rearward to unlock the fuel filler door, or forward to lock the door.
60 02 Instruments and controls
Left-side steering wheel lever
Lever positions
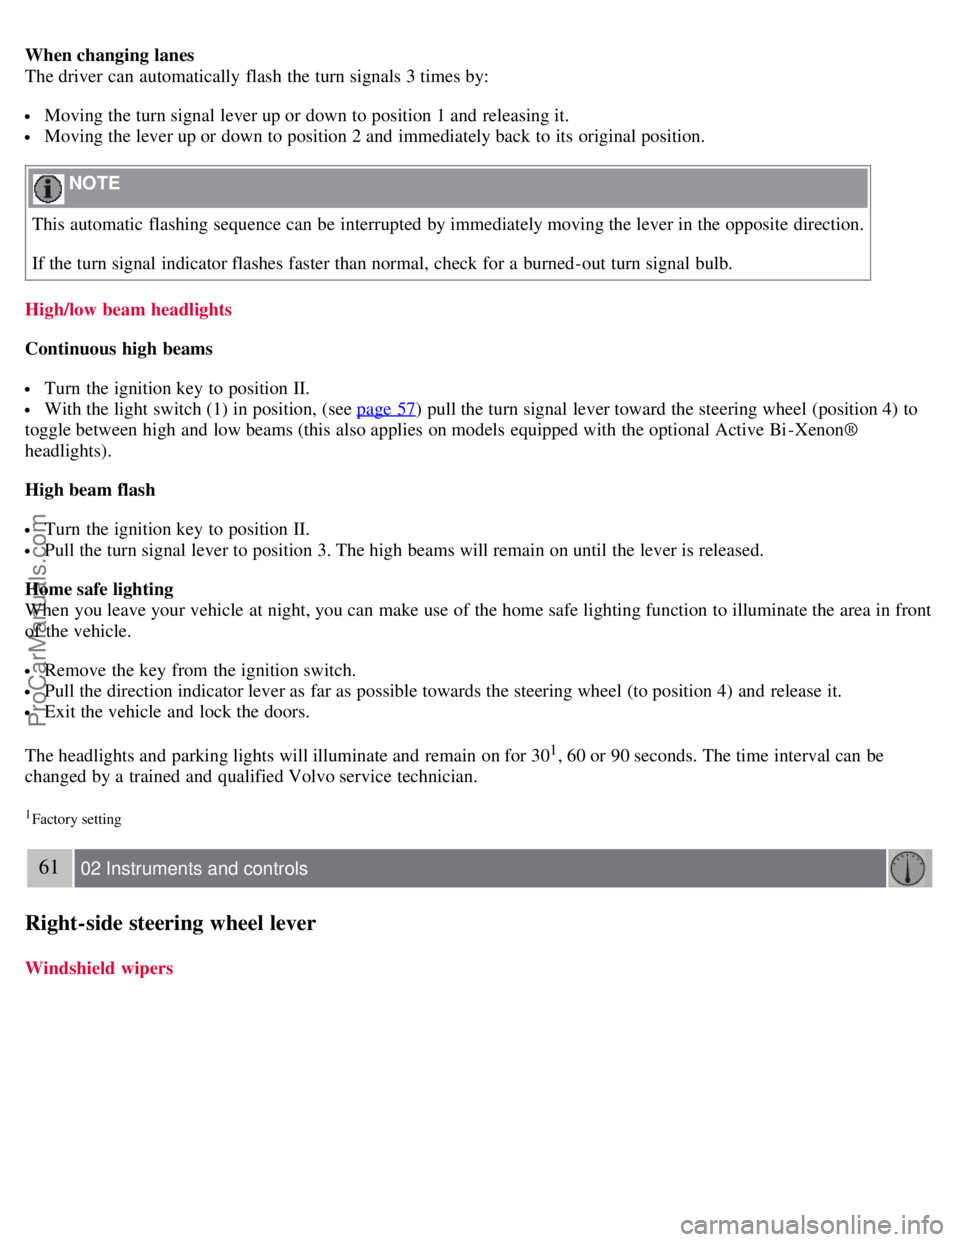
1. Turn signals, lane change position
2. Turn signals, position for normal turns
3. High beam flash
4. Toggle between high and low beams, Home Safe lighting
Turn signals
When turning
Move the lever as far up or down as possible (to position 2) to start the turn signals. The turn signals will be cancelled
automatically by the movement of the steering wheel, or the lever can be returned to its initial position by hand.
ProCarManuals.com
Page 57 of 230
When changing lanes
The driver can automatically flash the turn signals 3 times by:
Moving the turn signal lever up or down to position 1 and releasing it.
Moving the lever up or down to position 2 and immediately back to its original position.
NOTE
This automatic flashing sequence can be interrupted by immediately moving the lever in the opposite direction.
If the turn signal indicator flashes faster than normal, check for a burned-out turn signal bulb.
High/low beam headlights
Continuous high beams
Turn the ignition key to position II.
With the light switch (1) in position, (see page 57) pull the turn signal lever toward the steering wheel (position 4) to
toggle between high and low beams (this also applies on models equipped with the optional Active Bi -Xenon®
headlights).
High beam flash
Turn the ignition key to position II.
Pull the turn signal lever to position 3. The high beams will remain on until the lever is released.
Home safe lighting
When you leave your vehicle at night, you can make use of the home safe lighting function to illuminate the area in front
of the vehicle.
Remove the key from the ignition switch.
Pull the direction indicator lever as far as possible towards the steering wheel (to position 4) and release it.
Exit the vehicle and lock the doors.
The headlights and parking lights will illuminate and remain on for 30
1, 60 or 90 seconds. The time interval can be
changed by a trained and qualified Volvo service technician.
1Factory setting
61 02 Instruments and controls
Right-side steering wheel lever
Windshield wipers
ProCarManuals.com
Page 138 of 230
well as decreasing fuel consumption while the engine is warming up. For winter use, 5W - 30 oil, particularly the
synthetic type1, is recommended. Be sure to use good quality oil but do not use cold-weather oil for hard driving or in
warm weather. See section "Engine oil" for more information.
The load placed on the battery is greater during the winter since the windshield wipers, lighting, etc. are used more
often. Moreover, the capacity of the battery decreases as the temperature drops. In very cold weather, a poorly charged
battery can freeze and be damaged. It is therefore advisable to check the state of charge more frequently and spray an
antirust oil on the battery posts.
Volvo recommends the use of snow tires on all four wheels for winter driving - see section "Wheels and tires."
To prevent the washer fluid reservoir from freezing, add washer solvents containing antifreeze (see page 195 for
the location of the washer fluid reservoir). This is important since dirt is often splashed on the windshield during
winter driving, requiring the frequent use of the washers and wipers. Volvo Washer Solvent should be diluted as
follows:
- Down to 14° F (-10° C): 1 part washer solvent and 4 parts water
- Down to 5° F (-15° C): 1 part washer solvent and 3 parts water
- Down to 0° F (-18° C): 1 part washer solvent and 2 parts water
- Down to -18° F (-28° C): 1 part washer solvent and 1 part water
Use Volvo Teflon Lock Spray in the locks.
1Synthetic oil is not used when the oil is changed at the normal maintenance service intervals.
NOTE
Avoid the use of de -icing sprays as they can cause damage to the locks.
W - Winter/Wet driving mode - enhanced vehicle traction (automatic transmission)
Mode W will only function if the gear selector is in the D position.
Press the button at the base of the gear selector to engage/disengage this driving mode.
An LED in the button will light up to indicate that W is engaged and this will also be displayed in the instrument
panel (see page 48
).
This mode may be selected for starting/moving off on slippery roads.
150 06 Starting and driving
Before a long distance trip
It is always worthwhile to have your vehicle checked by a trained and qualified Volvo service technician before
driving long distances. Your retailer or service technician will also be able to supply you with bulbs, fuses, spark plugs
and wiper blades for your use in the event that problems occur.
As a minimum, the following items should be checked before any long trip:
Check that engine runs smoothly and that fuel consumption is normal.
Check for fuel, oil, and fluid leakage.
Check transmission oil level1.
Check condition of drive belts.
Check state of the battery's charge.
Examine tires carefully (the spare tire as well), and replace those that are worn. Check tire pressures.
The brakes, front wheel alignment, and steering gear should be checked by a trained and qualified Volvo service
technician only.
Check all lights, including high beams.
Reflective warning triangles are legal requirement in some countries.
ProCarManuals.com
Page 146 of 230
Checking tire pressure
A certain amount of air seepage from the tires occurs naturally and tire pressure fluctuates with seasonal changes in
temperature. Always check tire pressure regularly.
Cold tires
Inflation pressure should be checked when the tires are cold.
159 07 Wheels and tires
Tire inflation
The tires are considered to be cold when they have the same temperature as the surrounding (ambient) air.
This temperature is normally reached after the vehicle has been parked for at least 3 hours.
After driving a distance of approximately 1 mile (1.6 km), the tires are considered to be hot. If you have to drive
farther than this distance to pump your tire(s), check and record the tire pressure first and add the appropriate air
pressure when you get to the pump.
If checking tire pressure when the tire is hot, never "bleed" or reduce air pressure. The tires are hot from driving and it
is normal for pressures to increase above recommended cold pressures. A hot tire at or below recommended cold
inflation pressure could be significantly under-inflated.
To check inflation pressure:
1. Remove the cap from the valve on one tire, then firmly press the tire gauge onto the valve.
2. Add air to reach the recommended air pressure.
3. Replace the valve cap.
4. Repeat this procedure for each tire, including the spare.
5. Visually inspect the tires to make sure there are no nails or other objects embedded that could puncture the tire and
cause an air leak.
6. Check the sidewalls to make sure there are no gouges, cuts, bulges or other irregularities.
NOTE
If you overfill the tire, release air by pushing on the metal stem in the center of the valve. Then recheck the pressure
with your tire gauge.
Some spare tires require higher inflation pressure than the other tires. Consult the tire inflation tables on pages 160
and 161, or see the inflation pressure placard.
160 07 Wheels and tires
Tire inflation pressure table - U.S. models
The following tire pressures are recommended by Volvo for your vehicle. Refer to the tire inflation placard for
information specific to the tires installed on your vehicle at the factory.
ProCarManuals.com
Page 155 of 230
Please consult state or provincial regulations restricting the use of studded winter tires before installing such tires.
170 07 Wheels and tires
Temporary spare
The spare tire in your vehicle is called a "Temporary Spare".
Recommended tire pressure (see the placard on the B-pillar or on the fuel filler door) should be maintained irrespective
of which position on the vehicle the temporary spare tire is used on.
In the event of damage to this tire, a new one can be purchased from your Volvo retailer.
WARNING
Current legislation prohibits the use of the "Temporary Spare" tire other than as a temporary replacement for a
punctured tire. It must be replaced as soon as possible by a standard tire. Road holding and handling may be affected
with the "Temporary Spare" in use.
CAUTION
The vehicle must not be driven with wheels of different dimensions or with a spare tire other than the one that came
with the vehicle. The use of different size wheels can seriously damage your vehicle's transmission.
171 07 Wheels and tires
Changing wheels
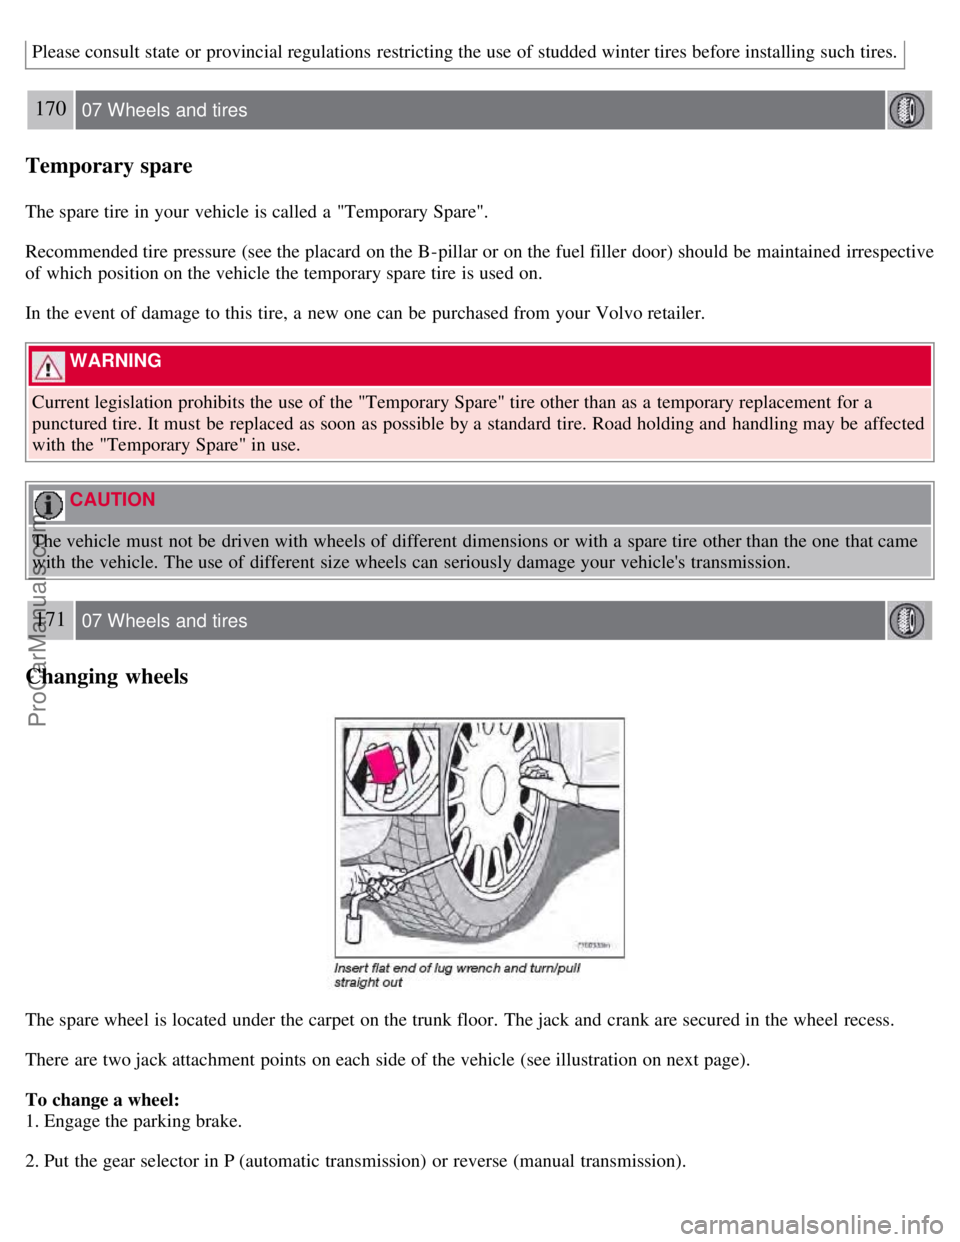
The spare wheel is located under the carpet on the trunk floor. The jack and crank are secured in the wheel recess.
There are two jack attachment points on each side of the vehicle (see illustration on next page).
To change a wheel:
1. Engage the parking brake.
2. Put the gear selector in P (automatic transmission) or reverse (manual transmission).
ProCarManuals.com
Page 156 of 230
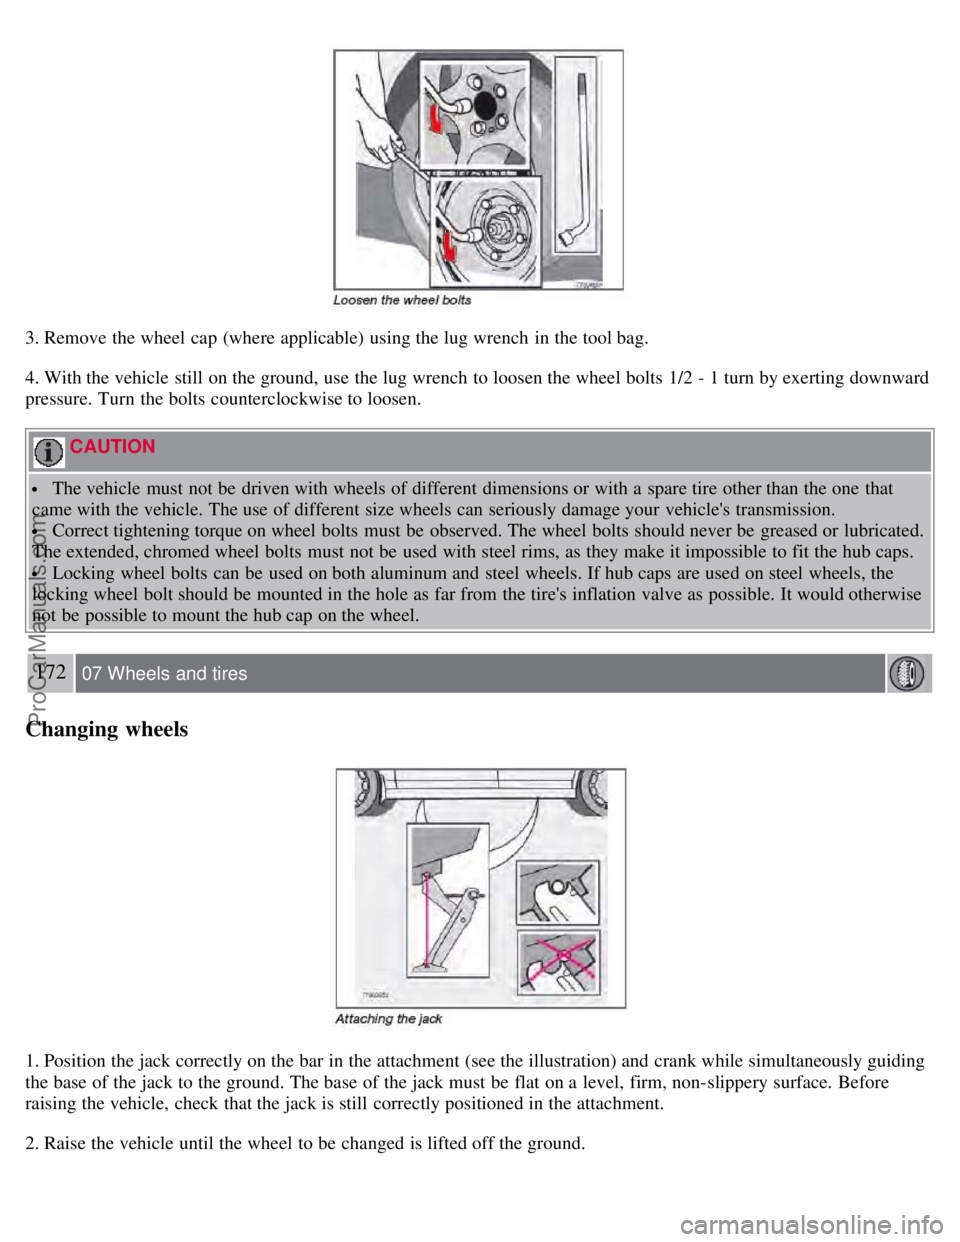
3. Remove the wheel cap (where applicable) using the lug wrench in the tool bag.
4. With the vehicle still on the ground, use the lug wrench to loosen the wheel bolts 1/2 - 1 turn by exerting downward
pressure. Turn the bolts counterclockwise to loosen.
CAUTION
The vehicle must not be driven with wheels of different dimensions or with a spare tire other than the one that
came with the vehicle. The use of different size wheels can seriously damage your vehicle's transmission.
Correct tightening torque on wheel bolts must be observed. The wheel bolts should never be greased or lubricated.
The extended, chromed wheel bolts must not be used with steel rims, as they make it impossible to fit the hub caps.
Locking wheel bolts can be used on both aluminum and steel wheels. If hub caps are used on steel wheels, the
locking wheel bolt should be mounted in the hole as far from the tire's inflation valve as possible. It would otherwise
not be possible to mount the hub cap on the wheel.
172 07 Wheels and tires
Changing wheels
1. Position the jack correctly on the bar in the attachment (see the illustration) and crank while simultaneously guiding
the base of the jack to the ground. The base of the jack must be flat on a level, firm, non-slippery surface. Before
raising the vehicle, check that the jack is still correctly positioned in the attachment.
2. Raise the vehicle until the wheel to be changed is lifted off the ground.
ProCarManuals.com
Page 158 of 230
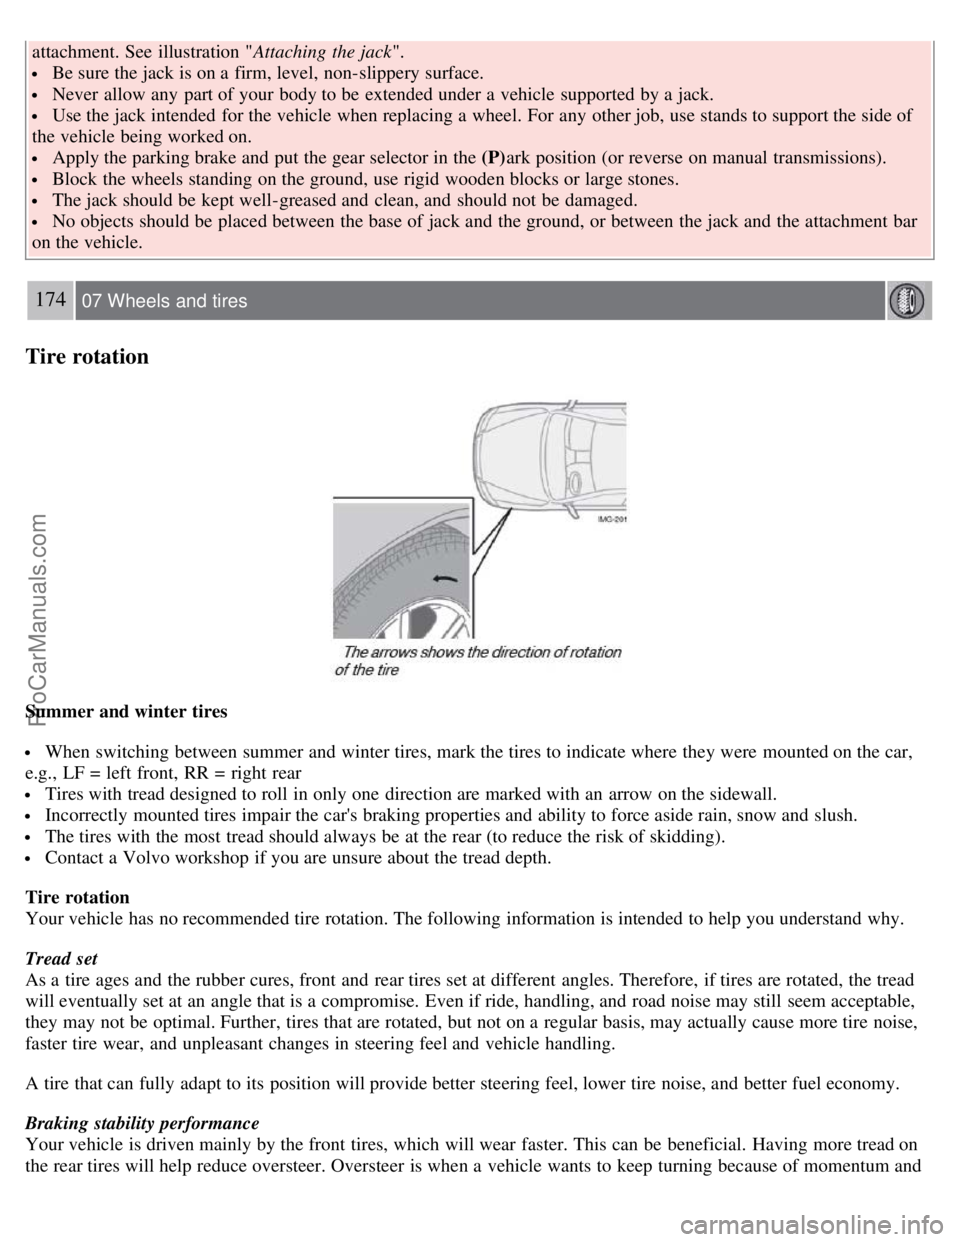
attachment. See illustration "Attaching the jack".
Be sure the jack is on a firm, level, non-slippery surface.
Never allow any part of your body to be extended under a vehicle supported by a jack.
Use the jack intended for the vehicle when replacing a wheel. For any other job, use stands to support the side of
the vehicle being worked on.
Apply the parking brake and put the gear selector in the (P) ark position (or reverse on manual transmissions).
Block the wheels standing on the ground, use rigid wooden blocks or large stones.
The jack should be kept well-greased and clean, and should not be damaged.
No objects should be placed between the base of jack and the ground, or between the jack and the attachment bar
on the vehicle.
174 07 Wheels and tires
Tire rotation
Summer and winter tires
When switching between summer and winter tires, mark the tires to indicate where they were mounted on the car,
e.g., LF = left front, RR = right rear
Tires with tread designed to roll in only one direction are marked with an arrow on the sidewall.
Incorrectly mounted tires impair the car's braking properties and ability to force aside rain, snow and slush.
The tires with the most tread should always be at the rear (to reduce the risk of skidding).
Contact a Volvo workshop if you are unsure about the tread depth.
Tire rotation
Your vehicle has no recommended tire rotation. The following information is intended to help you understand why.
Tread set
As a tire ages and the rubber cures, front and rear tires set at different angles. Therefore, if tires are rotated, the tread
will eventually set at an angle that is a compromise. Even if ride, handling, and road noise may still seem acceptable,
they may not be optimal. Further, tires that are rotated, but not on a regular basis, may actually cause more tire noise,
faster tire wear, and unpleasant changes in steering feel and vehicle handling.
A tire that can fully adapt to its position will provide better steering feel, lower tire noise, and better fuel economy.
Braking stability performance
Your vehicle is driven mainly by the front tires, which will wear faster. This can be beneficial. Having more tread on
the rear tires will help reduce oversteer. Oversteer is when a vehicle wants to keep turning because of momentum and
ProCarManuals.com
Page 176 of 230
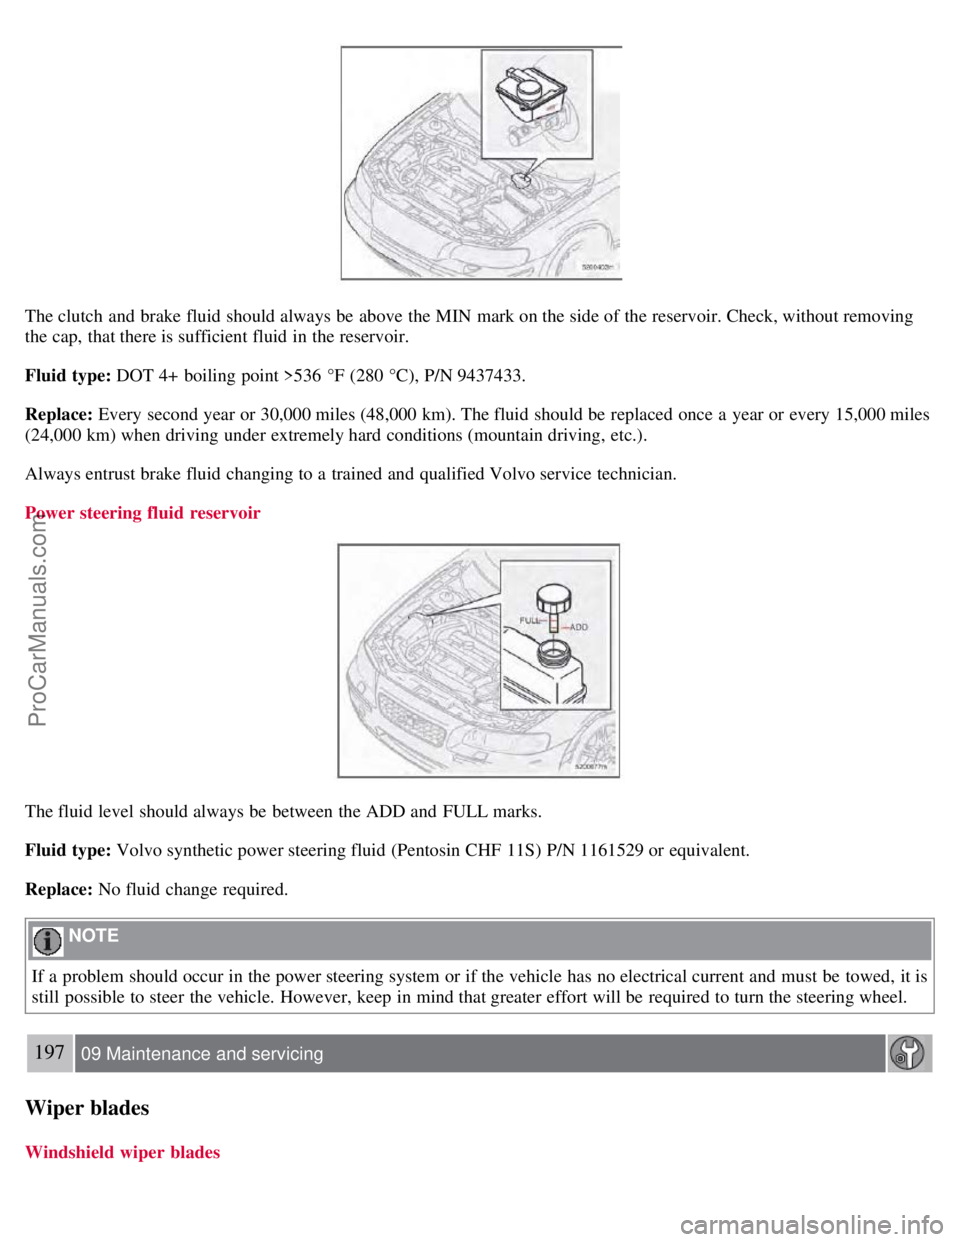
The clutch and brake fluid should always be above the MIN mark on the side of the reservoir. Check, without removing
the cap, that there is sufficient fluid in the reservoir.
Fluid type: DOT 4+ boiling point >536 °F (280 °C), P/N 9437433.
Replace: Every second year or 30,000 miles (48,000 km). The fluid should be replaced once a year or every 15,000 miles
(24,000 km) when driving under extremely hard conditions (mountain driving, etc.).
Always entrust brake fluid changing to a trained and qualified Volvo service technician.
Power steering fluid reservoir
The fluid level should always be between the ADD and FULL marks.
Fluid type: Volvo synthetic power steering fluid (Pentosin CHF 11S) P/N 1161529 or equivalent.
Replace: No fluid change required.
NOTE
If a problem should occur in the power steering system or if the vehicle has no electrical current and must be towed, it is
still possible to steer the vehicle. However, keep in mind that greater effort will be required to turn the steering wheel.
197 09 Maintenance and servicing
Wiper blades
Windshield wiper blades
ProCarManuals.com
Page 196 of 230
2 0 0 8
VOLVO S60
220 10 Audio
Introduction 222
Audio system HU -650 - overview223
Audio system HU -850 - overview224
Radio functions HU -650/HU-850225
RBDS functions HU -650/HU-850231
HU -650 - CD player234
HU -850 - internal CD changer235
External CD changer (option)236
Dolby Surround Pro Logic II - HU -850 only237
Audio systems - specifications239
221 10 Audio
222 10 Audio
Introduction
The audio system in your vehicle is operated with the buttons and knobs in the system's front panel. Certain functions,
such as adjusting the volume, changing radio stations or tracks on a CD, etc, can also be controlled with the optional
steering wheel-mounted keypad.
The audio system is available in two versions:
HU-650
Features: AM/FM radio, single-disc CD player, 4x25W output, six
1 speakers.
HU-850
Features: AM/FM radio, integrated 6-disc CD changer, 4x50W or 4x70W output plus 25W Dolby Pro Logic II, eleven
speakers.
ProCarManuals.com
Page 199 of 230
10. CD player
11. AUTO - automatically search for radio stations
12. Navigation buttons (seek/change radio station or CD track)
13. Exit (exit the menu)
14. Scan function (automatically search for radio stations)
15. On/off - press Volume - turn
16. Buttons for selecting stored radio stations/discs in optional CD changer
17. Bass (press to release control and turn to adjust)
18. Treble (press to release control and turn to adjust)
19. Balance (left/right) - press to release control and turn to adjust
20. Fader (front/rear) - press to release control and turn to adjust
21. Source/Menu
Press to open main menu
Turn to select FM, AM, CD, CD changer (option), or AUX (option)
225 10 Audio
Radio functions HU-650/HU-850
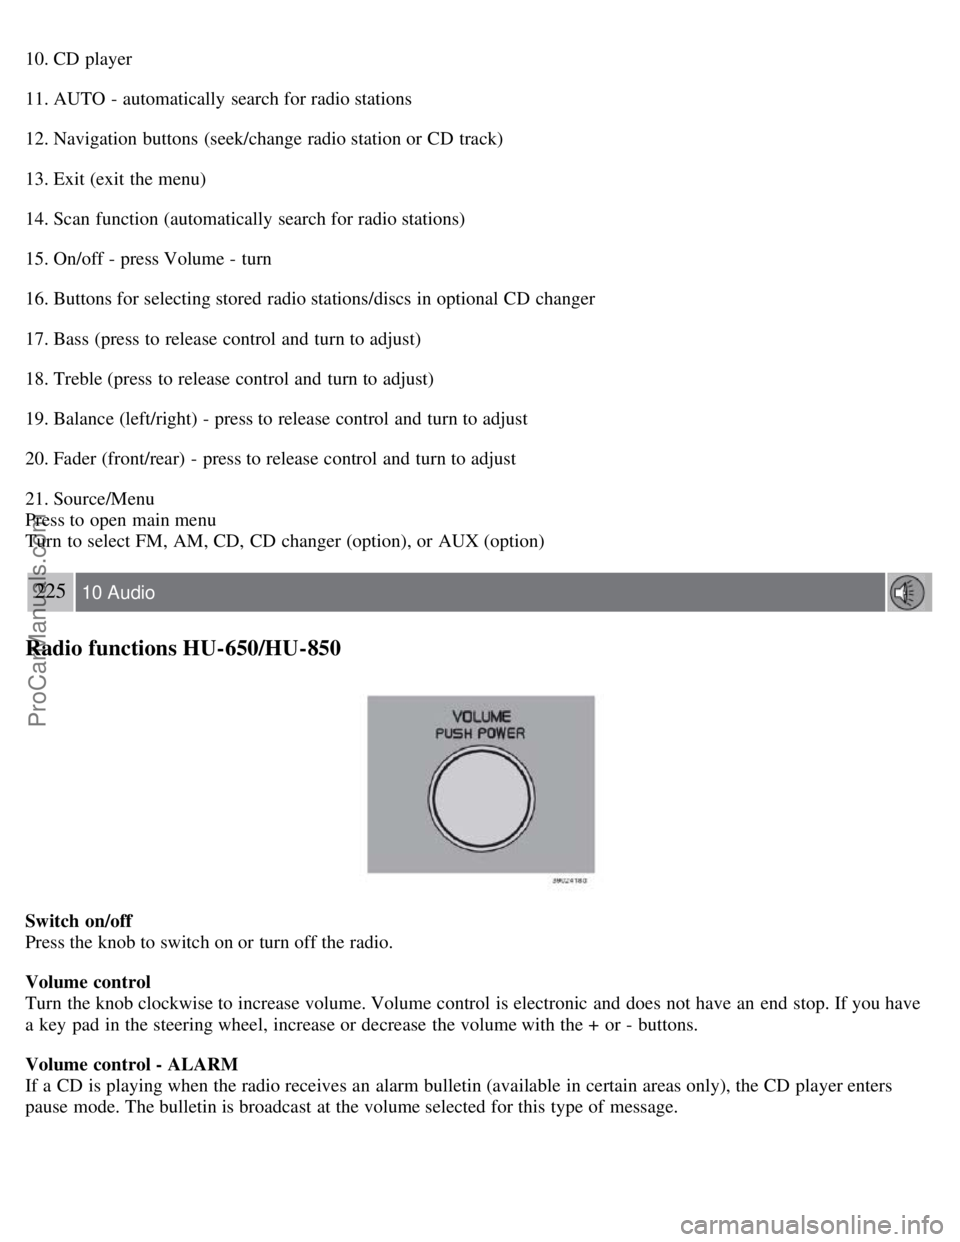
Switch on/off
Press the knob to switch on or turn off the radio.
Volume control
Turn the knob clockwise to increase volume. Volume control is electronic and does not have an end stop. If you have
a key pad in the steering wheel, increase or decrease the volume with the + or - buttons.
Volume control - ALARM
If a CD is playing when the radio receives an alarm bulletin (available in certain areas only), the CD player enters
pause mode. The bulletin is broadcast at the volume selected for this type of message.
ProCarManuals.com