ECU VOLVO S60 2016 Owner´s Manual
[x] Cancel search | Manufacturer: VOLVO, Model Year: 2016, Model line: S60, Model: VOLVO S60 2016Pages: 392, PDF Size: 10.04 MB
Page 58 of 392
||
02 Safety
02
56
Related information
•Child safety (p. 46)
• Infant seats (p. 49)
• Convertible seats (p. 51)
Top tether anchors
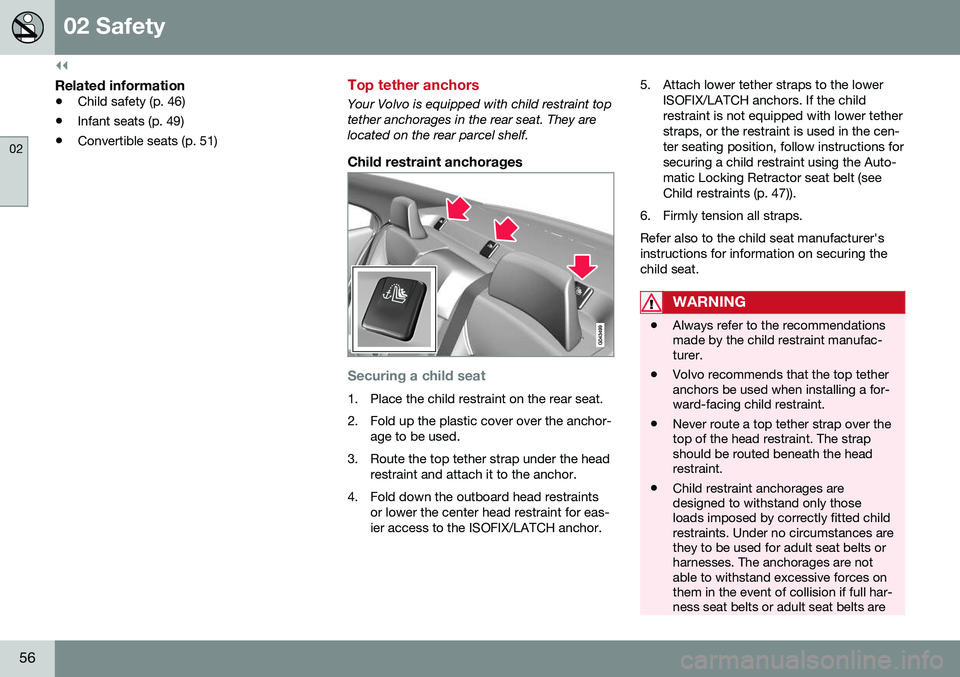
Your Volvo is equipped with child restraint top tether anchorages in the rear seat. They arelocated on the rear parcel shelf.
Child restraint anchorages
Securing a child seat
1. Place the child restraint on the rear seat.
2. Fold up the plastic cover over the anchor-
age to be used.
3. Route the top tether strap under the head restraint and attach it to the anchor.
4. Fold down the outboard head restraints or lower the center head restraint for eas- ier access to the ISOFIX/LATCH anchor. 5. Attach lower tether straps to the lower
ISOFIX/LATCH anchors. If the childrestraint is not equipped with lower tetherstraps, or the restraint is used in the cen-ter seating position, follow instructions forsecuring a child restraint using the Auto-matic Locking Retractor seat belt (seeChild restraints (p. 47)).
6. Firmly tension all straps. Refer also to the child seat manufacturer's instructions for information on securing thechild seat.
WARNING
• Always refer to the recommendations made by the child restraint manufac-turer.
• Volvo recommends that the top tetheranchors be used when installing a for-ward-facing child restraint.
• Never route a top tether strap over thetop of the head restraint. The strapshould be routed beneath the headrestraint.
• Child restraint anchorages aredesigned to withstand only thoseloads imposed by correctly fitted childrestraints. Under no circumstances arethey to be used for adult seat belts orharnesses. The anchorages are notable to withstand excessive forces onthem in the event of collision if full har-ness seat belts or adult seat belts are
Page 76 of 392
||
03 Instruments and controls
03
74* Option/accessory, for more information, see Introduction.
Ignition mode I–With the remote key fully pressed into the ignition slot 8
, press START/STOP
ENGINE briefly.
Ignition mode II–With the remote key fully pressed into the ignition slot 8
, press START/STOP
ENGINE for approximately 2 seconds.
Returning to mode 0To return to mode 0 from mode II or I, press
START/STOP ENGINE briefly.
Starting and stopping the engineSee Starting the engine (p. 245) and Switch- ing off the engine (p. 247) for information onstarting the engine and switching it off.
Emergency towingSee Towing the vehicle (p. 281) for importantinformation about the remote key when thevehicle is being towed.
Related information
•Inserting/removing remote key (p. 72)
Front seats
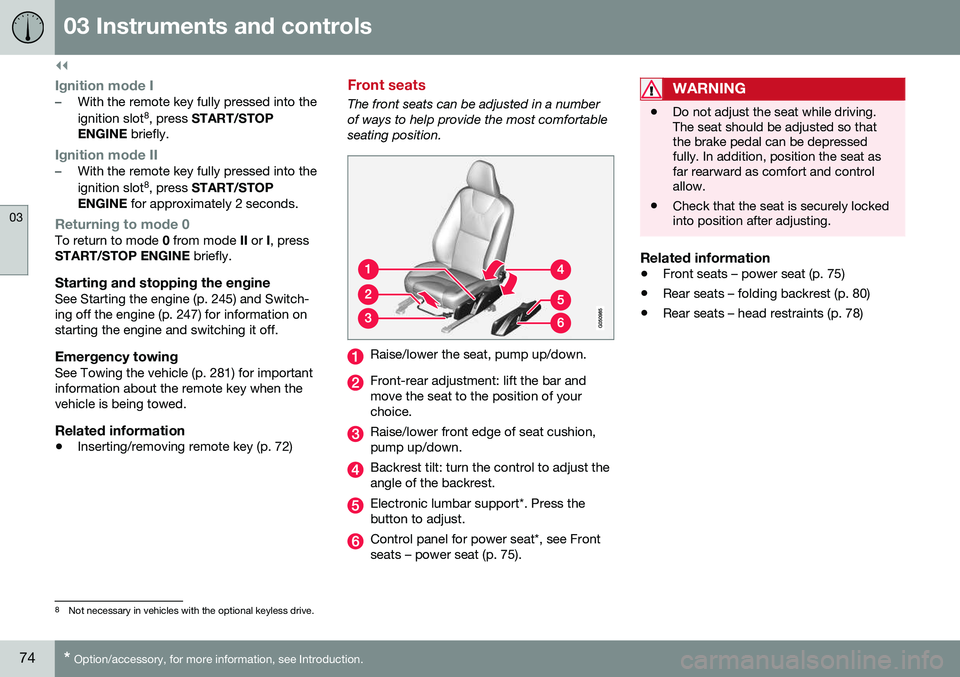
The front seats can be adjusted in a number of ways to help provide the most comfortableseating position.
Raise/lower the seat, pump up/down.
Front-rear adjustment: lift the bar and move the seat to the position of yourchoice.
Raise/lower front edge of seat cushion, pump up/down.
Backrest tilt: turn the control to adjust the angle of the backrest.
Electronic lumbar support*. Press the button to adjust.
Control panel for power seat*, see Front seats – power seat (p. 75).
WARNING
•Do not adjust the seat while driving. The seat should be adjusted so thatthe brake pedal can be depressedfully. In addition, position the seat asfar rearward as comfort and controlallow.
• Check that the seat is securely lockedinto position after adjusting.
Related information
•
Front seats – power seat (p. 75)
• Rear seats – folding backrest (p. 80)
• Rear seats – head restraints (p. 78)
8
Not necessary in vehicles with the optional keyless drive.
Page 77 of 392
03 Instruments and controls
03
}}
* Option/accessory, for more information, see Introduction.75
Front seats – folding backrest* 10
The front passenger's seat backrest can be folded down to make it easier to transportlong objects.
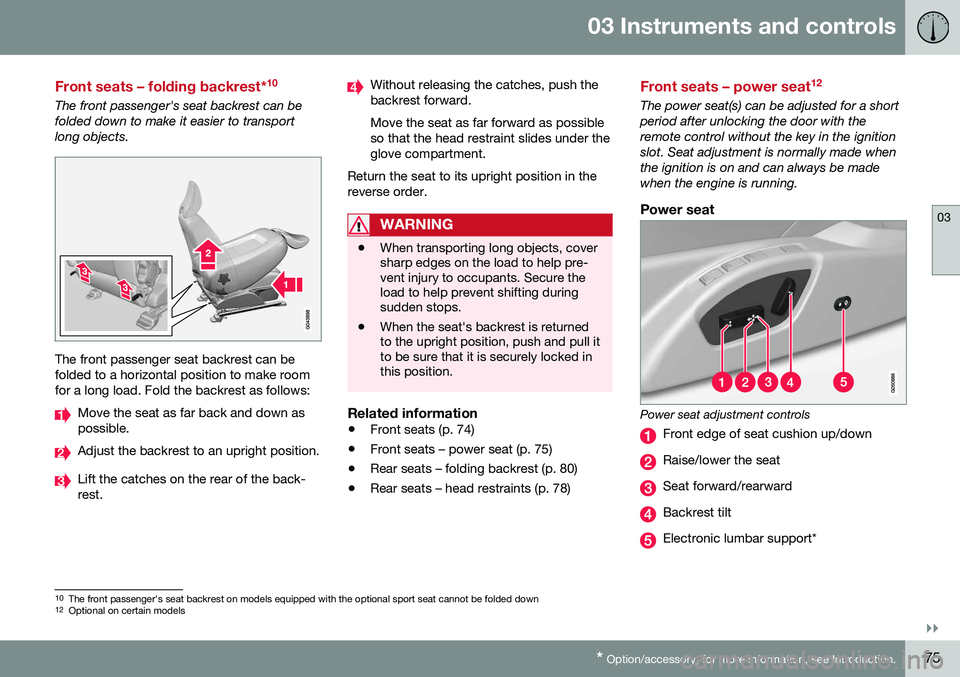
The front passenger seat backrest can be folded to a horizontal position to make roomfor a long load. Fold the backrest as follows:
Move the seat as far back and down as possible.
Adjust the backrest to an upright position.
Lift the catches on the rear of the back- rest.
Without releasing the catches, push the backrest forward. Move the seat as far forward as possible so that the head restraint slides under theglove compartment.
Return the seat to its upright position in thereverse order.
WARNING
• When transporting long objects, cover sharp edges on the load to help pre-vent injury to occupants. Secure theload to help prevent shifting duringsudden stops.
• When the seat's backrest is returnedto the upright position, push and pull itto be sure that it is securely locked inthis position.
Related information
•
Front seats (p. 74)
• Front seats – power seat (p. 75)
• Rear seats – folding backrest (p. 80)
• Rear seats – head restraints (p. 78)
Front seats – power seat 12
The power seat(s) can be adjusted for a short period after unlocking the door with theremote control without the key in the ignitionslot. Seat adjustment is normally made whenthe ignition is on and can always be madewhen the engine is running.
Power seat
Power seat adjustment controls
Front edge of seat cushion up/down
Raise/lower the seat
Seat forward/rearward
Backrest tilt
Electronic lumbar support*
10
The front passenger's seat backrest on models equipped with the optional sport seat cannot be folded down
12 Optional on certain models
Page 82 of 392
03 Instruments and controls
03
80
Rear seats – folding backrest
The rear seat head restraints and backrests can be folded down. The center headrestraint can be raised/lowered according tothe passenger's height.
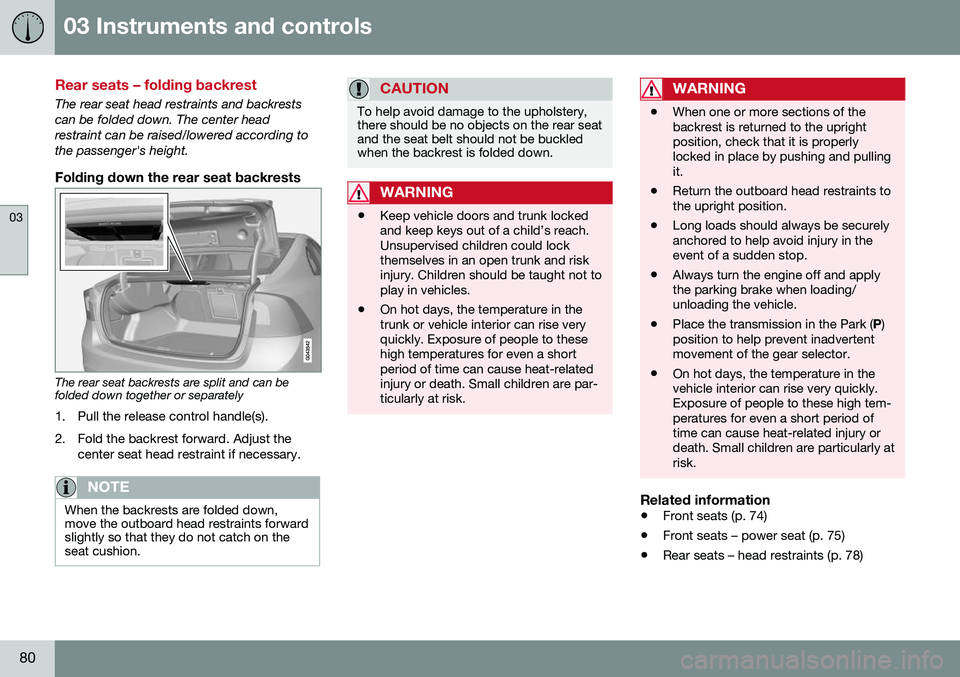
Folding down the rear seat backrests
The rear seat backrests are split and can be folded down together or separately1. Pull the release control handle(s).
2. Fold the backrest forward. Adjust the center seat head restraint if necessary.
NOTE
When the backrests are folded down, move the outboard head restraints forwardslightly so that they do not catch on theseat cushion.
CAUTION
To help avoid damage to the upholstery, there should be no objects on the rear seatand the seat belt should not be buckledwhen the backrest is folded down.
WARNING
•Keep vehicle doors and trunk locked and keep keys out of a child’s reach.Unsupervised children could lockthemselves in an open trunk and riskinjury. Children should be taught not toplay in vehicles.
• On hot days, the temperature in thetrunk or vehicle interior can rise veryquickly. Exposure of people to thesehigh temperatures for even a shortperiod of time can cause heat-relatedinjury or death. Small children are par-ticularly at risk.
WARNING
•
When one or more sections of the backrest is returned to the uprightposition, check that it is properlylocked in place by pushing and pullingit.
• Return the outboard head restraints tothe upright position.
• Long loads should always be securelyanchored to help avoid injury in theevent of a sudden stop.
• Always turn the engine off and applythe parking brake when loading/unloading the vehicle.
• Place the transmission in the Park (
P)
position to help prevent inadvertentmovement of the gear selector.
• On hot days, the temperature in thevehicle interior can rise very quickly.Exposure of people to these high tem-peratures for even a short period oftime can cause heat-related injury ordeath. Small children are particularly atrisk.
Related information
•
Front seats (p. 74)
• Front seats – power seat (p. 75)
• Rear seats – head restraints (p. 78)
Page 102 of 392
||
03 Instruments and controls
03
100* Option/accessory, for more information, see Introduction.
4. Press and hold the button for 3 seconds
until the number of the current magnetic zone is displayed.
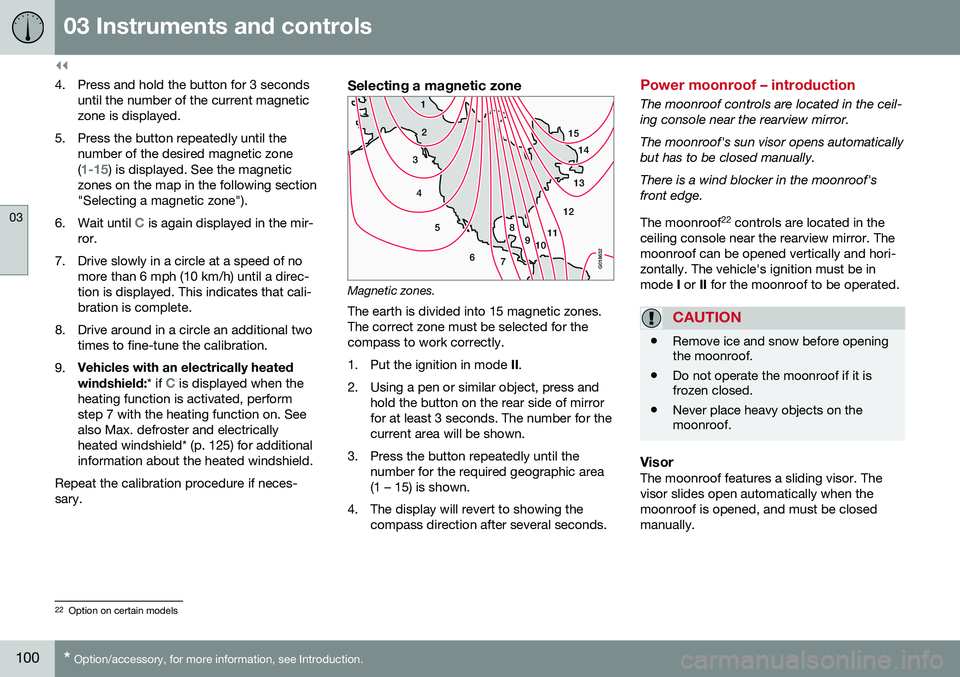
5. Press the button repeatedly until the number of the desired magnetic zone (
1-15) is displayed. See the magnetic
zones on the map in the following section "Selecting a magnetic zone").
6. Wait until
C is again displayed in the mir-
ror.
7. Drive slowly in a circle at a speed of no more than 6 mph (10 km/h) until a direc- tion is displayed. This indicates that cali-bration is complete.
8. Drive around in a circle an additional two times to fine-tune the calibration.
9. Vehicles with an electrically heated windshield:
* if
C is displayed when the
heating function is activated, perform step 7 with the heating function on. Seealso Max. defroster and electricallyheated windshield* (p. 125) for additionalinformation about the heated windshield.
Repeat the calibration procedure if neces-sary.
Selecting a magnetic zone
15 14
13
12
11
9
8
7
6
5
4
3
2
1
10
G018632
Magnetic zones.The earth is divided into 15 magnetic zones. The correct zone must be selected for thecompass to work correctly.
1. Put the ignition in mode II.
2. Using a pen or similar object, press and hold the button on the rear side of mirror for at least 3 seconds. The number for thecurrent area will be shown.
3. Press the button repeatedly until the number for the required geographic area(1 – 15) is shown.
4. The display will revert to showing the compass direction after several seconds.
Power moonroof – introduction
The moonroof controls are located in the ceil- ing console near the rearview mirror. The moonroof's sun visor opens automatically but has to be closed manually. There is a wind blocker in the moonroof's front edge. The moonroof 22
controls are located in the
ceiling console near the rearview mirror. The moonroof can be opened vertically and hori-zontally. The vehicle's ignition must be inmode I or II for the moonroof to be operated.
CAUTION
• Remove ice and snow before opening the moonroof.
• Do not operate the moonroof if it isfrozen closed.
• Never place heavy objects on themoonroof.
VisorThe moonroof features a sliding visor. The visor slides open automatically when themoonroof is opened, and must be closedmanually.
22
Option on certain models
Page 105 of 392
03 Instruments and controls
03
}}
* Option/accessory, for more information, see Introduction.103
WARNING
•
If you use HomeLink ®
to open a
garage door or gate, be sure no one is near the gate or door while it is inmotion.
• When programming a garage dooropener, it is advised to park outside ofthe garage.
• Do not use HomeLink ®
with any
garage door opener that lacks safetystop and reverse features as requiredby U.S. federal safety standards (thisincludes any garage door openermodel manufactured before April 1,1982). A garage door that cannotdetect an object - signaling the door tostop and reverse - does not meet cur-rent U.S. federal safety standards. Formore information, contact HomeLinkat: www.homelink.com.
The HomeLink ®
23
Wireless Control System
provides a convenient way to replace up to three hand-held radio-frequency (RF) trans-mitters used to activate devices such as gateoperators, garage door openers, entry doorlocks, security systems, even home lighting.Additional information can be found on theInternet at, www.homelink.com/www.youtube.com/HomeLinkGentex or byphoning the hotline at 1–800–355–3515. Retain the original transmitter of the RFdevice you are programming for use in othervehicles as well as for future HomeLink pro-gramming. It is also suggested that upon thesale of the vehicle, the programmed Home-Link buttons be erased for security purposes.Refer to “Resetting HomeLink Buttons” in HomeLink
®
Wireless Control System* – pro-
gramming (p. 103).
Using HomeLinkTo operate, simply press and hold the pro- grammed HomeLink button until the traineddevice begins to operate (this may take sev-eral seconds). Activation will now occur forthe trained device (i.e., garage door opener,gate operator, security system, entry doorlock, home/office lighting, etc.). For conven-ience, the hand-held transmitter of the devicemay also be used at any time. In the eventthat there are still programming difficulties orquestions, contact HomeLink at:www.homelink.com/www.youtube.com/HomeLinkGentex or by phoning the hotline at1–800–355–3515.
NOTE
If the ignition is switched off, HomeLink will function for 30 minutes after the driv-er's door has been opened.
HomeLink ®
Wireless Control System*
– programming
The HomeLink Wireless Control System pro- vides a convenient way to replace up to threehand-held radio-frequency (RF) transmittersused to activate devices such as gate opera-tors, garage door openers, entry door locks,security systems, even home lighting. Addi-tional information can be found on the Inter-net atwww.homelink.com/www.youtube.com/HomeLinkGentex or by phoning the hotline at1–800–355–3515.
NOTE
Some vehicles may require the ignition to be switched on or be in the “accessories”position for programming and/or operationof HomeLink. It is also recommended thata new battery be placed in the hand-heldtransmitter of the device being pro-grammed to HomeLink for quicker trainingand accurate transmission of the radio-fre-quency signal. The HomeLink buttonsmust be reset first. When this has beencompleted, Homelink is in learning modeso that you can perform programming.
1. Position the end of your hand-held trans- mitter 1–3 inches (5–14 cm) away from the HomeLink button you wish to pro-gram while keeping the indicator light inview.
23HomeLink and the HomeLink house are registered trademarks of Gentex Corporation.
Page 137 of 392
05 Loading and storage
05
}}
135
Loading – general
The load carrying capacity of your vehicle is determined by factors such as the number ofpassengers, the amount of cargo, the weightof any accessories that may be installed, etc. To increase loading space, the rear seat backrests can be folded down, see Rearseats – folding backrest (p. 80). When loading the trunk, keep the following in mind:The trunk lid can be unlocked anpopped open slightly via the buttonlocated on the lighting panel, see
Locking/unlocking – trunk (p. 155).
• Load objects in the trunk against the backrest whenever possible.
• Unstable loads can be secured to theload anchoring eyelets with straps or weblashings to help keep them from shifting.
• Stop the engine and apply the parkingbrake when loading or unloading longobjects. The gear selector can beknocked out of position by long loads,which could set the vehicle in motion.
WARNING
• Stop the engine, put the gear selector in
P, and apply the parking brake
when loading or unloading longobjects.
• The vehicle's driving characteristicsmay change depending on the weightand distribution of the load.
• A 44-pound (20 kg) object produces aforce of 2,200 pounds (1,000 kg) in ahead-on collision at 30 mph (50 km/h).
• The rear seat should not be loaded toa level higher than 2 in. (5 cm) belowthe upper edge of the rear side win-dows. Objects placed higher than thislevel could impede the function of theVolvo Inflatable Curtain.
Related information
•
Load anchoring eyelets (p. 137)
• Loading – roof load carriers (p. 136)
Ski hatch
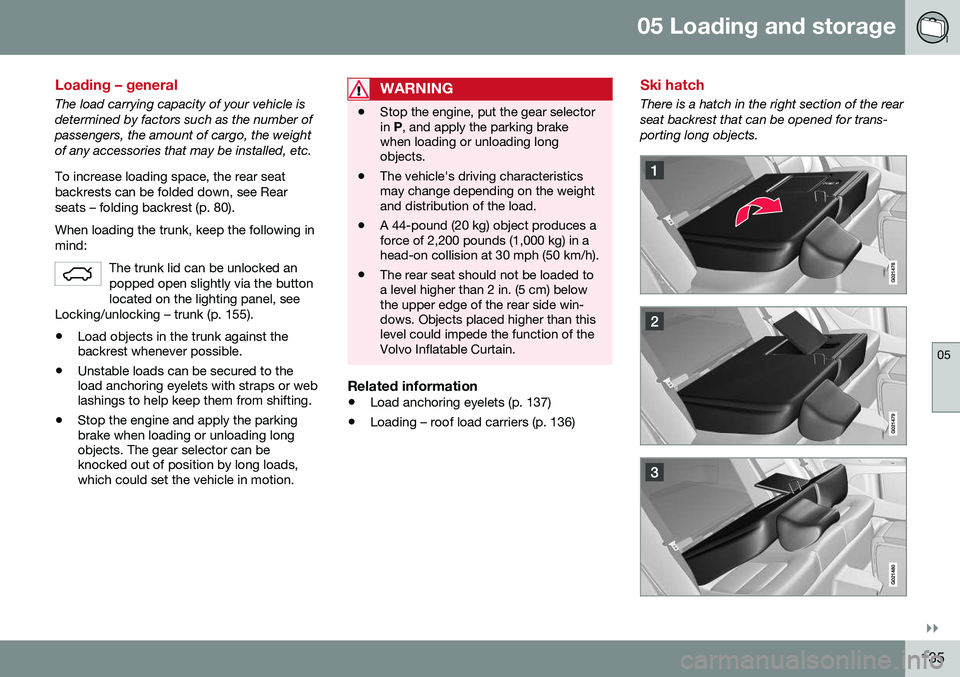
There is a hatch in the right section of the rear seat backrest that can be opened for trans-porting long objects.
Page 138 of 392
||
05 Loading and storage
05
136
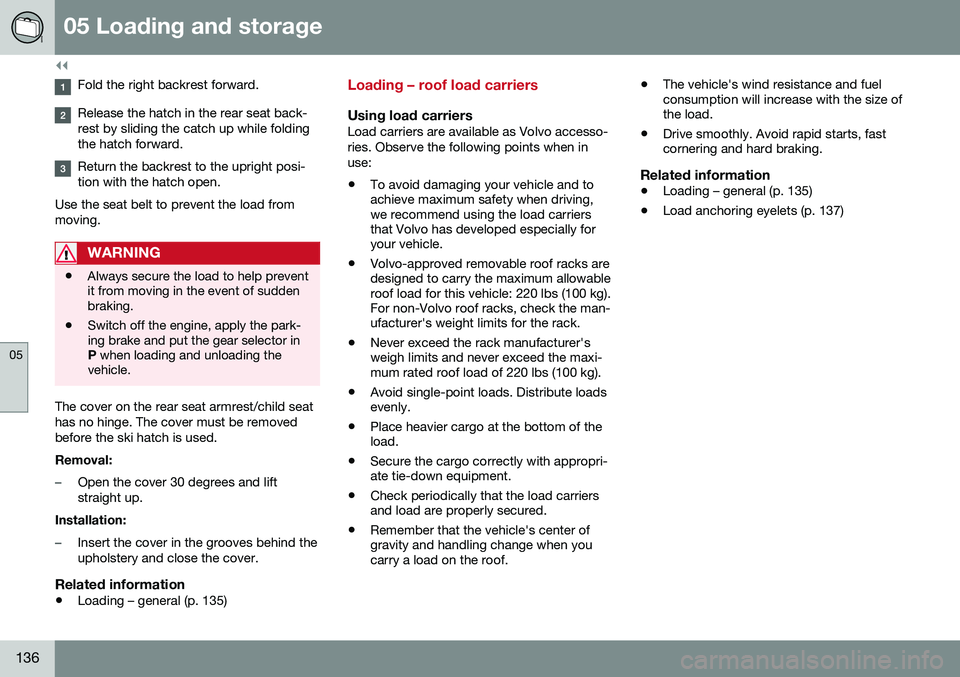
Fold the right backrest forward.
Release the hatch in the rear seat back- rest by sliding the catch up while foldingthe hatch forward.
Return the backrest to the upright posi- tion with the hatch open.
Use the seat belt to prevent the load frommoving.
WARNING
• Always secure the load to help prevent it from moving in the event of suddenbraking.
• Switch off the engine, apply the park-ing brake and put the gear selector inP
when loading and unloading the
vehicle.
The cover on the rear seat armrest/child seat has no hinge. The cover must be removedbefore the ski hatch is used. Removal:
–Open the cover 30 degrees and lift straight up.
Installation:
–Insert the cover in the grooves behind the upholstery and close the cover.
Related information
• Loading – general (p. 135)
Loading – roof load carriers
Using load carriersLoad carriers are available as Volvo accesso- ries. Observe the following points when inuse:
• To avoid damaging your vehicle and to achieve maximum safety when driving,we recommend using the load carriersthat Volvo has developed especially foryour vehicle.
• Volvo-approved removable roof racks aredesigned to carry the maximum allowableroof load for this vehicle: 220 lbs (100 kg).For non-Volvo roof racks, check the man-ufacturer's weight limits for the rack.
• Never exceed the rack manufacturer'sweigh limits and never exceed the maxi-mum rated roof load of 220 lbs (100 kg).
• Avoid single-point loads. Distribute loadsevenly.
• Place heavier cargo at the bottom of theload.
• Secure the cargo correctly with appropri-ate tie-down equipment.
• Check periodically that the load carriersand load are properly secured.
• Remember that the vehicle's center ofgravity and handling change when youcarry a load on the roof. •
The vehicle's wind resistance and fuelconsumption will increase with the size ofthe load.
• Drive smoothly. Avoid rapid starts, fastcornering and hard braking.
Related information
• Loading – general (p. 135)
• Load anchoring eyelets (p. 137)
Page 139 of 392
05 Loading and storage
05
137
Load anchoring eyelets
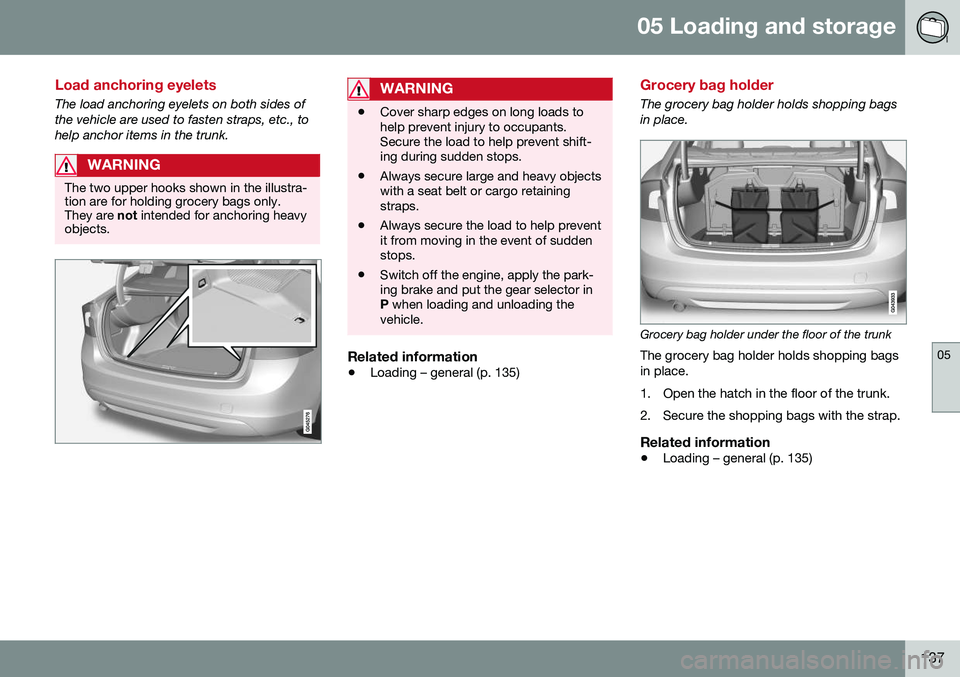
The load anchoring eyelets on both sides of the vehicle are used to fasten straps, etc., tohelp anchor items in the trunk.
WARNING
The two upper hooks shown in the illustra- tion are for holding grocery bags only.They are not intended for anchoring heavy
objects.
WARNING
• Cover sharp edges on long loads to help prevent injury to occupants.Secure the load to help prevent shift-ing during sudden stops.
• Always secure large and heavy objectswith a seat belt or cargo retainingstraps.
• Always secure the load to help preventit from moving in the event of suddenstops.
• Switch off the engine, apply the park-ing brake and put the gear selector inP
when loading and unloading the
vehicle.
Related information
• Loading – general (p. 135)
Grocery bag holder
The grocery bag holder holds shopping bags in place.
Grocery bag holder under the floor of the trunk
The grocery bag holder holds shopping bags in place.
1. Open the hatch in the floor of the trunk.
2. Secure the shopping bags with the strap.
Related information
• Loading – general (p. 135)
Page 183 of 392
07 Driver support
07
}}
181
Radar sensor
The radar sensor is designed to help detect cars or larger vehicles driving in the samedirection as your vehicle, in the same lane.
The radar sensor and its limitationsIn addition to being used by the AdaptiveCruise Control (ACC), the radar sensor is alsoused by Distance Alert (see Distance Alert –introduction (p. 186)) and Collision Warningwith Full Auto-brake and Pedestrian Detec-tion (see Collision warning – introduction(p. 197)).
WARNING
•If there is visible damage to the front grille or you suspect that the radarsensor may be damaged in any way,contact a trained and qualified Volvoservice technician as soon as possible.The radar sensor may only functionpartially (or not at all) if it is damagedor is not securely fastened in place.
• Accessories or other objects, such asextra headlights, must not be installedin front of the grille.
• Modification of the radar sensor couldmake its use illegal.
The radar sensor's capacity to detect vehi- cles ahead is impeded:
• if the radar sensor is obstructed and can- not detect other vehicles, for example in heavy rain, or if snow or other objects areobscuring the radar sensor.
NOTE
Keep the area in front of the radar sensor clean.
•
if the speed of vehicles ahead is signifi- cantly different from your own speed.
Related information
•Adaptive Cruise Control – introduction(p. 172)
• Collision warning – introduction (p. 197)
• Distance Alert – introduction (p. 186)
Adaptive Cruise Control – limitations
The ACC cannot cover all driving situations and traffic, weather and road conditions.
Situations where ACC may not function optimally
WARNING
• The radar sensor has a limited field of vision. In some situations it may detecta vehicle later than expected or notdetect other vehicles at all.
• If ACC is not functioning properly,cruise control will also be disabled.