sensor VOLVO S60 2017 Owner´s Manual
[x] Cancel search | Manufacturer: VOLVO, Model Year: 2017, Model line: S60, Model: VOLVO S60 2017Pages: 398, PDF Size: 9.46 MB
Page 322 of 398

||
WHEELS AND TIRES
320
WARNING
•Never stand next to the tire being inflated when the compressor is in operation.
• If cracks, bubbles, etc. form on the tire,switch off the compressor immediately.
• If there is visible damage to the sidewall orthe rim, the tire cannot be repaired. Thevehicle should not be driven if this occurs.Contact a towing service or Volvo On CallRoadside Assistance if applicable.
NOTE
The air pressure gauge will temporarily show an increase in pressure to approximately88 psi (6 bar) while the sealing compound isbeing pumped into the tire. The pressureshould return to a normal level after approxi-mately 30 seconds.
9. Within seven minutes, inflate the tire to
between 22—44 psi (1.8—3.0 bar). Switch off the compressor briefly to get a clearreading from the pressure gauge.
CAUTION
The compressor should not be used for more than 10 minutes at a time to avoid overheat-ing.
WARNING
If the pressure remains below 22 psi (1.8 bar) after approximately seven minutes, turn offthe compressor. In this case, the hole is toolarge to be sealed and the vehicle should notbe driven.
10. Switch off the compressor and disconnect the electrical wire from the 12-volt socket.
11. Unscrew the hose from the tire's inflation valve and put the cover on the hose back into place to help prevent seepage of residualsealing compound in the hose. Reinstall thevalve cap.
CAUTION
•After inflating the tires, always reinstall the valve cap to help avoid damage to thevalve from dirt, gravel, etc.
• Use plastic valve caps only. Metal capscould corrode and become difficult toremove.
12. Immediately drive the vehicle for approxi-
mately 2 miles (3 km) at a maximum speed of 50 mph (80 km/h) to distribute the seal-ing compound in the tire.
CAUTION
If your vehicle is equipped with the Tire Pres- sure Monitoring System (TPMS), the use ofthe sealing compound may lead to incorrecttire pressure readings or in rare cases, dam-age to the tire pressure sensor. Use the tiresealing system to check and adjust the dam-aged tire's inflation pressure.
NOTE
• Safely stow the tire sealing system in a convenient place as it will soon be usedagain to check the tire
Page 334 of 398
||
MAINTENANCE AND SERVICING
* Option/accessory, for more information, see Introduction.
332
G021737
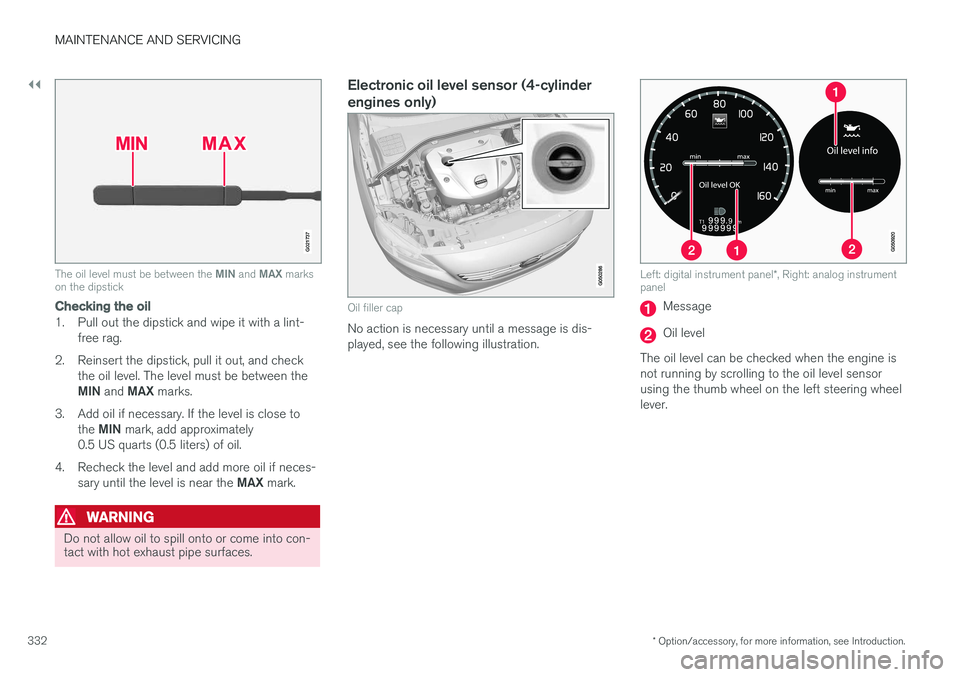
The oil level must be between the MIN and MAX marks
on the dipstick
Checking the oil
1. Pull out the dipstick and wipe it with a lint-
free rag.
2. Reinsert the dipstick, pull it out, and check the oil level. The level must be between the MIN and MAX marks.
3. Add oil if necessary. If the level is close to the MIN mark, add approximately
0.5 US quarts (0.5 liters) of oil.
4. Recheck the level and add more oil if neces- sary until the level is near the MAX mark.
WARNING
Do not allow oil to spill onto or come into con- tact with hot exhaust pipe surfaces.
Electronic oil level sensor (4-cylinder engines only)
Oil filler cap
No action is necessary until a message is dis- played, see the following illustration.
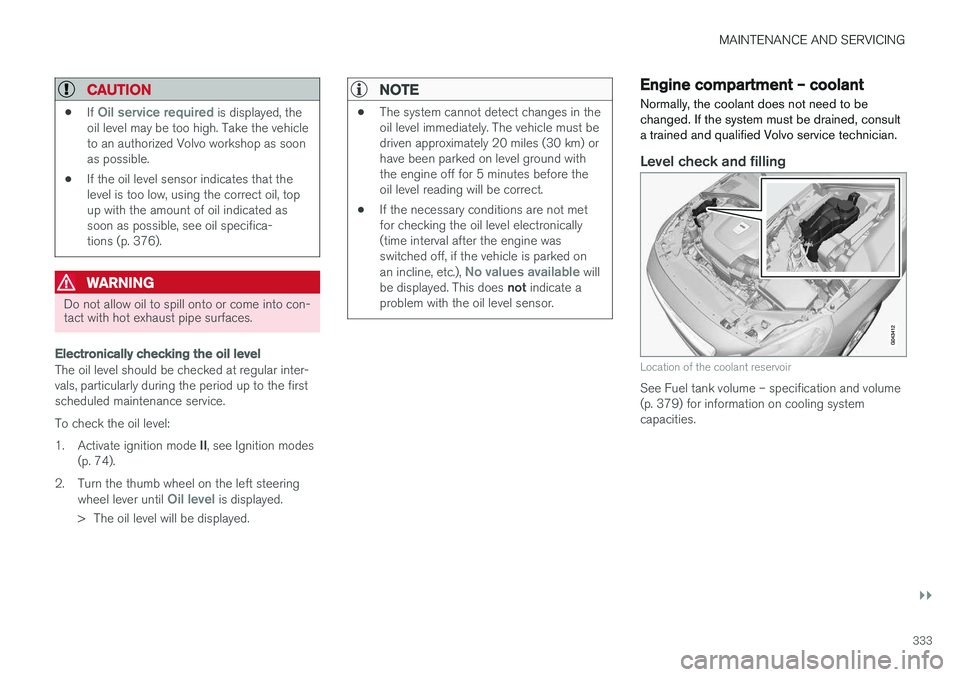
Left: digital instrument panel *, Right: analog instrument
panel
Message
Oil level
The oil level can be checked when the engine is not running by scrolling to the oil level sensorusing the thumb wheel on the left steering wheellever.
Page 335 of 398
MAINTENANCE AND SERVICING
}}
333
CAUTION
•If Oil service required is displayed, the
oil level may be too high. Take the vehicle to an authorized Volvo workshop as soonas possible.
• If the oil level sensor indicates that thelevel is too low, using the correct oil, topup with the amount of oil indicated assoon as possible, see oil specifica-tions (p. 376).
WARNING
Do not allow oil to spill onto or come into con- tact with hot exhaust pipe surfaces.
Electronically checking the oil level
The oil level should be checked at regular inter- vals, particularly during the period up to the firstscheduled maintenance service. To check the oil level:1.
Activate ignition mode II, see Ignition modes
(p. 74).
2. Turn the thumb wheel on the left steering wheel lever until
Oil level is displayed.
> The oil level will be displayed.
NOTE
• The system cannot detect changes in the oil level immediately. The vehicle must bedriven approximately 20 miles (30 km) orhave been parked on level ground withthe engine off for 5 minutes before theoil level reading will be correct.
• If the necessary conditions are not metfor checking the oil level electronically(time interval after the engine wasswitched off, if the vehicle is parked on an incline, etc.),
No values available will
be displayed. This does not indicate a
problem with the oil level sensor.
Engine compartment – coolant
Normally, the coolant does not need to be changed. If the system must be drained, consulta trained and qualified Volvo service technician.
Level check and filling
Location of the coolant reservoir
See Fuel tank volume – specification and volume (p. 379) for information on cooling systemcapacities.
Page 356 of 398
||
MAINTENANCE AND SERVICING
354
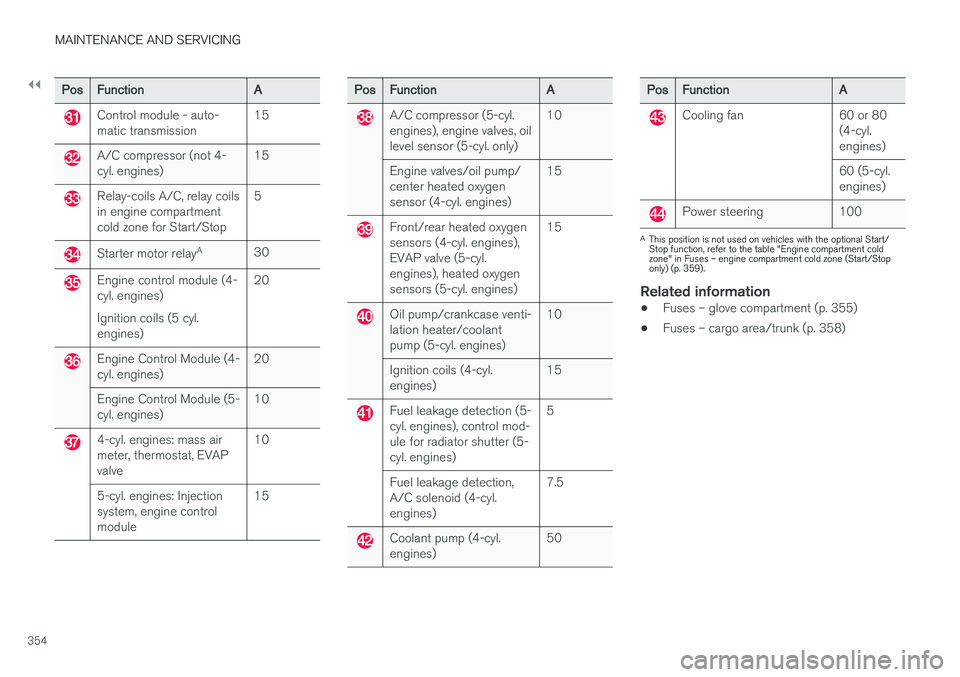
PosFunctionA
Control module - auto- matic transmission15
A/C compressor (not 4- cyl. engines)15
Relay-coils A/C, relay coils in engine compartmentcold zone for Start/Stop5
Starter motor relayA30
Engine control module (4- cyl. engines) Ignition coils (5 cyl. engines)20
Engine Control Module (4- cyl. engines)20
Engine Control Module (5- cyl. engines)10
4-cyl. engines: mass air meter, thermostat, EVAPvalve10
5-cyl. engines: Injection system, engine controlmodule15
PosFunctionA
A/C compressor (5-cyl. engines), engine valves, oillevel sensor (5-cyl. only)10
Engine valves/oil pump/ center heated oxygensensor (4-cyl. engines)15
Front/rear heated oxygen sensors (4-cyl. engines),EVAP valve (5-cyl.engines), heated oxygensensors (5-cyl. engines)15
Oil pump/crankcase venti- lation heater/coolantpump (5-cyl. engines)10
Ignition coils (4-cyl. engines)15
Fuel leakage detection (5- cyl. engines), control mod-ule for radiator shutter (5-cyl. engines)5
Fuel leakage detection, A/C solenoid (4-cyl.engines)7.5
Coolant pump (4-cyl. engines)50
PosFunctionA
Cooling fan60 or 80 (4-cyl.engines)
60 (5-cyl. engines)
Power steering100
A
This position is not used on vehicles with the optional Start/ Stop function, refer to the table "Engine compartment coldzone" in Fuses – engine compartment cold zone (Start/Stoponly) (p. 359).
Related information
• Fuses – glove compartment (p. 355)
• Fuses – cargo area/trunk (p. 358)
Page 358 of 398
||
MAINTENANCE AND SERVICING
* Option/accessory, for more information, see Introduction.
356
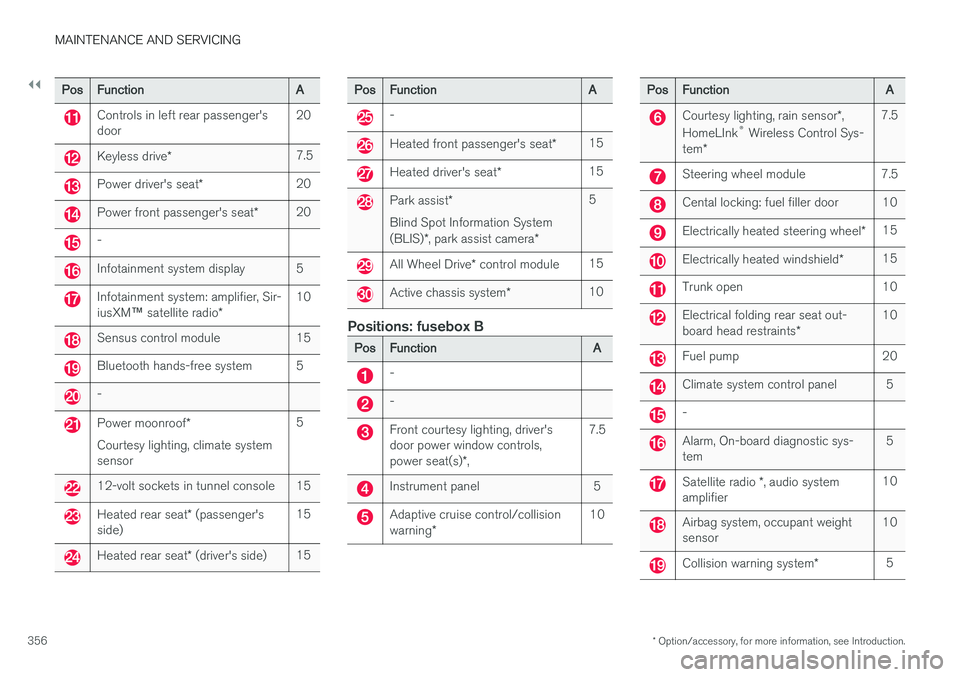
PosFunctionA
Controls in left rear passenger's door20
Keyless drive *7.5
Power driver's seat *20
Power front passenger's seat *20
-
Infotainment system display5
Infotainment system: amplifier, Sir- iusXM™ satellite radio *10
Sensus control module15
Bluetooth hands-free system5
-
Power moonroof *
Courtesy lighting, climate system sensor5
12-volt sockets in tunnel console15
Heated rear seat * (passenger's
side)15
Heated rear seat * (driver's side)15
PosFunctionA
-
Heated front passenger's seat *15
Heated driver's seat*15
Park assist*
Blind Spot Information System (BLIS) *, park assist camera *5
All Wheel Drive* control module15
Active chassis system *10
Positions: fusebox B
PosFunctionA
-
-
Front courtesy lighting, driver's door power window controls, power seat(s)*,7.5
Instrument panel5
Adaptive cruise control/collision warning *10
PosFunctionA
Courtesy lighting, rain sensor *,
HomeLInk ®
Wireless Control Sys-
tem *7.5
Steering wheel module7.5
Cental locking: fuel filler door10
Electrically heated steering wheel *15
Electrically heated windshield*15
Trunk open10
Electrical folding rear seat out- board head restraints*10
Fuel pump20
Climate system control panel5
-
Alarm, On-board diagnostic sys- tem5
Satellite radio *, audio system
amplifier10
Airbag system, occupant weight sensor10
Collision warning system *5
Page 359 of 398
MAINTENANCE AND SERVICING
* Option/accessory, for more information, see Introduction.357
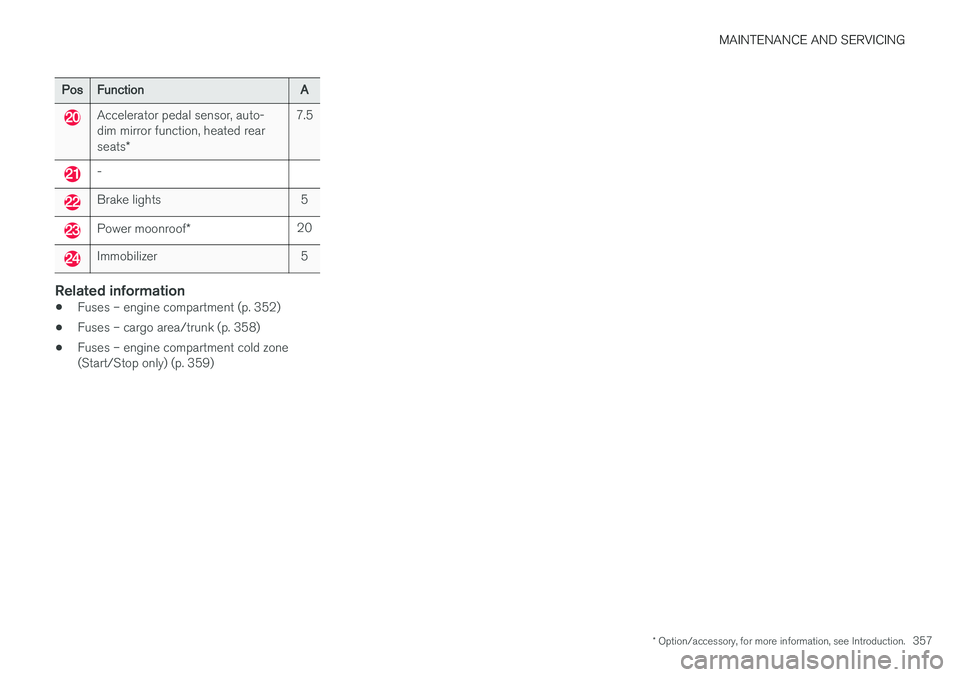
PosFunctionA
Accelerator pedal sensor, auto- dim mirror function, heated rear seats*7.5
-
Brake lights5
Power moonroof *20
Immobilizer5
Related information
•Fuses – engine compartment (p. 352)
• Fuses – cargo area/trunk (p. 358)
• Fuses – engine compartment cold zone (Start/Stop only) (p. 359)
Page 364 of 398
||
MAINTENANCE AND SERVICING
362
CAUTION
•Avoid waxing or polishing plastic or rub- ber components
• Polishing chromed strips can wear awayor damage the surface
• Polishes containing abrasive substancesshould not be used
Related information
• Polishing and waxing (p. 363)
• Cleaning the interior (p. 363)
Automatic car wash
The vehicle should be washed at regular inter- vals since dirt, dust, insects and tar spotsadhere to the paint and may cause damage. Tohelp prevent corrosion, it is particularly importantto wash the car frequently in the wintertime.
• We do NOT recommend washing your car in an automatic wash during the first fewmonths (because the paint will not havehardened sufficiently).
• An automatic wash is a simple and quick wayto clean your car, but it is worth rememberingthat it may not be as thorough as when youyourself go over the car with sponge andwater. Keeping the underbody clean is mostimportant, especially in the winter. Someautomatic washers do not have facilities forwashing the underbody.
NOTE
Condensation may form temporarily on the inside of the lenses of exterior lights such asheadlights, fog lights, or taillights. This is nor-mal and the lights are designed to withstandmoisture. Normally, condensation will dissi-pate after the lights have been on for a shorttime.
CAUTION
•
Before driving into an automatic car wash, turn off the optional rain sensor toavoid damaging the windshield wipers.
• Make sure that side view mirrors, auxiliarylamps, etc, are secure, and that anyantenna(s) are retracted or removed. Oth-erwise there is risk of the machine dis-lodging them.
• Chromed wheels:
Clean chrome-plated
wheels using the same detergents usedfor the body of the vehicle. Aggressivewheel-cleaning agents can permanentlystain chrome-plated wheels.
WARNING
• When the vehicle is driven immediately after being washed, apply the brakes,including the parking brake, several timesin order to remove any moisture from thebrake linings.
• Engine cleaning agents should not beused when the engine is warm. This con-stitutes a fire risk.
Related information
•
Polishing and waxing (p. 363)
• Cleaning the interior (p. 363)
• Washing the car (p. 361)
Page 386 of 398
||
SPECIFICATIONS
* Option/accessory, for more information, see Introduction.
384
Symbols in the main instrument panel
Warning symbols in the instrument panel
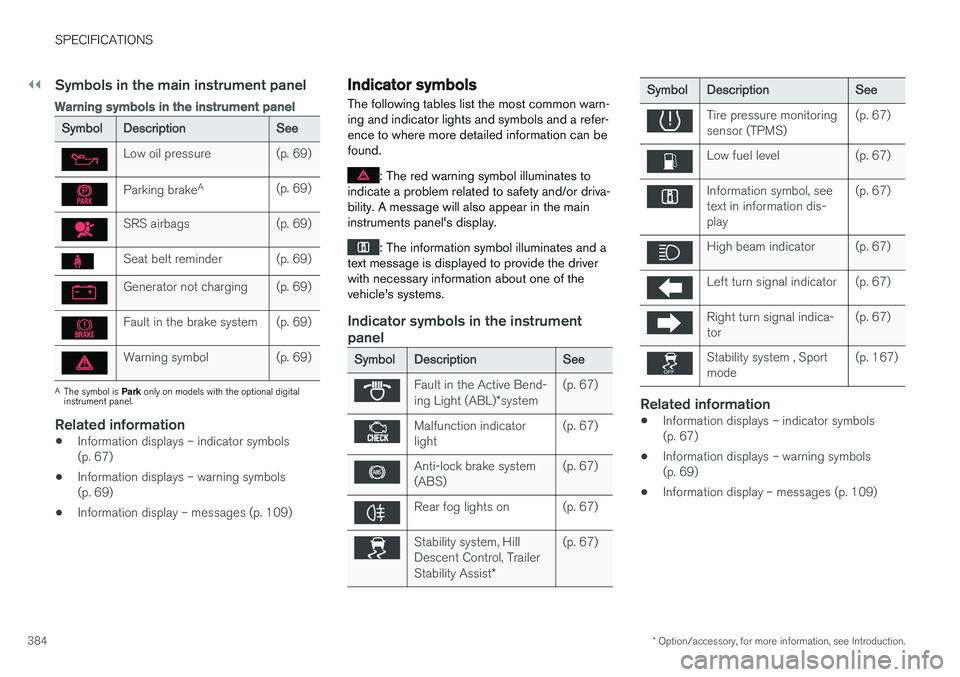
SymbolDescriptionSee
Low oil pressure(p. 69)
Parking brake A(p. 69)
SRS airbags(p. 69)
Seat belt reminder(p. 69)
Generator not charging(p. 69)
Fault in the brake system(p. 69)
Warning symbol(p. 69)
A
The symbol is Park only on models with the optional digital
instrument panel.
Related information
• Information displays – indicator symbols (p. 67)
• Information displays – warning symbols(p. 69)
• Information display – messages (p. 109)
Indicator symbols
The following tables list the most common warn- ing and indicator lights and symbols and a refer-ence to where more detailed information can befound.
: The red warning symbol illuminates to
indicate a problem related to safety and/or driva- bility. A message will also appear in the maininstruments panel's display.
: The information symbol illuminates and a
text message is displayed to provide the driver with necessary information about one of thevehicle's systems.
Indicator symbols in the instrument panel
SymbolDescriptionSee
Fault in the Active Bend- ing Light (ABL) *system(p. 67)
Malfunction indicator light(p. 67)
Anti-lock brake system (ABS)(p. 67)
Rear fog lights on(p. 67)
Stability system, Hill Descent Control, Trailer Stability Assist *(p. 67)
SymbolDescriptionSee
Tire pressure monitoring sensor (TPMS)(p. 67)
Low fuel level(p. 67)
Information symbol, see text in information dis-play(p. 67)
High beam indicator(p. 67)
Left turn signal indicator(p. 67)
Right turn signal indica- tor(p. 67)
Stability system , Sport mode(p. 167)
Related information
•Information displays – indicator symbols (p. 67)
• Information displays – warning symbols(p. 69)
• Information display – messages (p. 109)
Page 387 of 398
SPECIFICATIONS
* Option/accessory, for more information, see Introduction.385
Information symbols
The following tables list the most common warn- ing and indicator lights and symbols and a refer-ence to where more detailed information can befound.
: The red warning symbol illuminates to
indicate a problem related to safety and/or driva- bility. A message will also appear in the maininstruments panel's display.
: The information symbol illuminates and a
text message is displayed to provide the driver with necessary information about one of thevehicle's systems.
Information symbols in the instrument panel
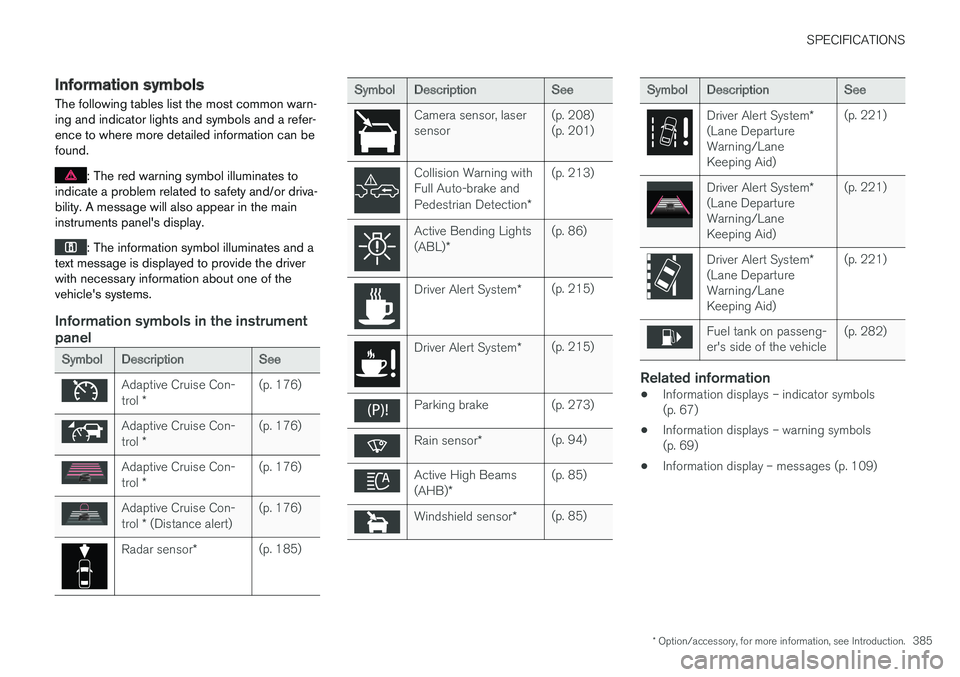
SymbolDescriptionSee
Adaptive Cruise Con- trol *(p. 176)
Adaptive Cruise Con- trol *(p. 176)
Adaptive Cruise Con- trol *(p. 176)
Adaptive Cruise Con- trol * (Distance alert)(p. 176)
Radar sensor *(p. 185)
SymbolDescriptionSee
Camera sensor, laser sensor(p. 208) (p. 201)
Collision Warning with Full Auto-brake and Pedestrian Detection *(p. 213)
Active Bending Lights (ABL)*(p. 86)
Driver Alert System *(p. 215)
Driver Alert System*(p. 215)
Parking brake(p. 273)
Rain sensor*(p. 94)
Active High Beams (AHB)*(p. 85)
Windshield sensor *(p. 85)
SymbolDescriptionSee
Driver Alert System *
(Lane Departure Warning/LaneKeeping Aid)(p. 221)
Driver Alert System *
(Lane Departure Warning/LaneKeeping Aid)(p. 221)
Driver Alert System *
(Lane Departure Warning/LaneKeeping Aid)(p. 221)
Fuel tank on passeng- er's side of the vehicle(p. 282)
Related information
• Information displays – indicator symbols (p. 67)
• Information displays – warning symbols(p. 69)
• Information display – messages (p. 109)
Page 388 of 398
SPECIFICATIONS
* Option/accessory, for more information, see Introduction.
386
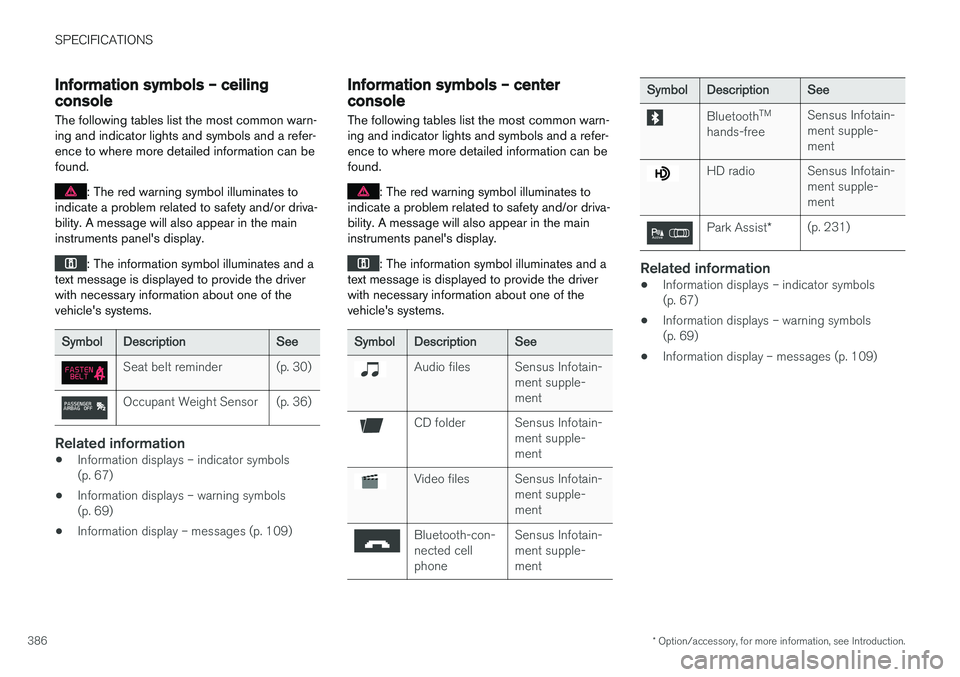
Information symbols – ceiling console
The following tables list the most common warn- ing and indicator lights and symbols and a refer-ence to where more detailed information can befound.
: The red warning symbol illuminates to
indicate a problem related to safety and/or driva- bility. A message will also appear in the maininstruments panel's display.
: The information symbol illuminates and a
text message is displayed to provide the driver with necessary information about one of thevehicle's systems.
SymbolDescriptionSee
Seat belt reminder(p. 30)
Occupant Weight Sensor(p. 36)
Related information
• Information displays – indicator symbols (p. 67)
• Information displays – warning symbols(p. 69)
• Information display – messages (p. 109)
Information symbols – center console
The following tables list the most common warn- ing and indicator lights and symbols and a refer-ence to where more detailed information can befound.
: The red warning symbol illuminates to
indicate a problem related to safety and/or driva- bility. A message will also appear in the maininstruments panel's display.
: The information symbol illuminates and a
text message is displayed to provide the driver with necessary information about one of thevehicle's systems.
SymbolDescriptionSee
Audio filesSensus Infotain- ment supple-ment
CD folderSensus Infotain- ment supple-ment
Video filesSensus Infotain- ment supple-ment
Bluetooth-con- nected cellphoneSensus Infotain- ment supple-ment
SymbolDescriptionSee
Bluetooth TM
hands-freeSensus Infotain- ment supple-ment
HD radioSensus Infotain- ment supple-ment
Park Assist *(p. 231)
Related information
•Information displays – indicator symbols (p. 67)
• Information displays – warning symbols(p. 69)
• Information display – messages (p. 109)