ECO mode VOLVO S60 TWIN ENGINE 2019 Owner's Manual
[x] Cancel search | Manufacturer: VOLVO, Model Year: 2019, Model line: S60 TWIN ENGINE, Model: VOLVO S60 TWIN ENGINE 2019Pages: 645, PDF Size: 13.96 MB
Page 123 of 645

DISPLAYS AND VOICE CONTROL
121
Button modes
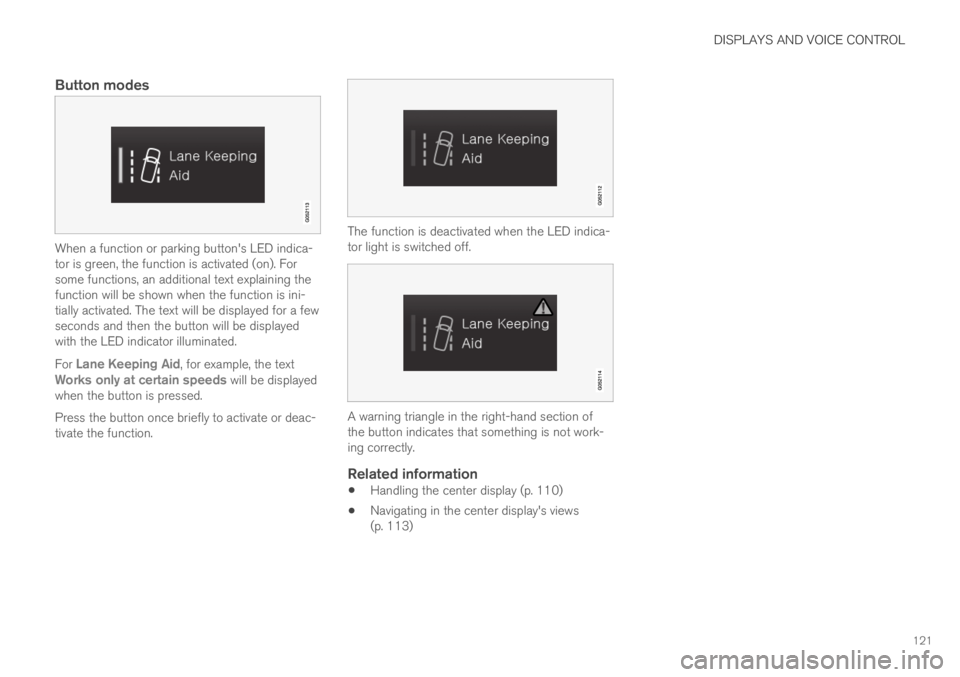
When a function or parking button's LED indica-tor is green, the function is activated (on). Forsome functions, an additional text explaining thefunction will be shown when the function is ini-tially activated. The text will be displayed for a fewseconds and then the button will be displayedwith the LED indicator illuminated.
For Lane Keeping Aid, for example, the textWorks only at certain speeds will be displayedwhen the button is pressed.
Press the button once briefly to activate or deac-tivate the function.
The function is deactivated when the LED indica-tor light is switched off.
A warning triangle in the right-hand section ofthe button indicates that something is not work-ing correctly.
Related information
Handling the center display (p. 110)
Navigating in the center display's views(p. 113)
Page 125 of 645

DISPLAYS AND VOICE CONTROL
* Option/accessory.123
SymbolMeaning
Vehicle modem activated.
USB sharing active.
Action in progress.
Timer for preconditioning active.A
Audio source being played.
Audio source paused.
Phone call in progress.
Audio source muted.
News broadcasts from current radio
station.B
Traffic information being received.B
Clock.
AOnly hybrid models.BNot available in all markets.
Related information
Navigating in the center display's views(p. 113)
Messages in the center display (p. 138)
Internet-connected vehicle* (p. 494)
Connecting a device via the USB port(p. 477)
Phone (p. 484)
Date and time (p. 91)
Page 147 of 645

DISPLAYS AND VOICE CONTROL
}}
145
Commands for specific functions, such as phoneand audio, are described in the sections relatedto that function.
Numbers
Number commands can be given in differentways depending on the function to be controlled:
Phone numbers and zip codes should begiven by stating each number individually, e.g.zero three one two two four four three(03122443).
Addresses can be given by stating eachnumber individually or in a group, e.g. two twoor twenty-two (22). For English and Dutchlanguage settings, groups of numbers canalso be said in sequence, e.g. twenty-twotwenty-two (22 22). For English, double ortriple digits can also be used, e.g. doublezero (00). Numbers in the range 0-2300 canbe used.
Frequencies can be given as ninety-eightpoint eight (98.8), one hundred four pointtwo, or hundred four point two (104.2).
Speech rate and repeat mode
The speed at which the voice commands aregiven can be adjusted.
With repeat mode on, the system will repeat whatyou have said.
To change the speech rate or activate/deactivaterepeat mode:
1.Tap Settings in the Top view.
2.Tap SystemVoice Control and selectsettings.
Repeat Voice Command
Speech Rate
Related information
Voice control (p. 143)
Voice control for cellular phones (p. 145)
Voice control for radio and media (p. 146)
Climate control system voice commands(p. 197)
Voice control settings (p. 147)
Voice control for cellular phones17
Call a contact in the phone book, have a textmessage read aloud or dictate short messagesusing voice commands to a Bluetooth-con-nected phone.
To access a contact in the phone book, the voicecommand must contain the contact informationentered in the phone book. If a contact, e.g.Robyn Smith, has several phone numbers listedin the phone book, a number category such ashome or cellular can also be specified, i.e. "CallRobyn Smith cellular".
Tap and say one of the following commands:
"Call [contact]" - call the selected contactfrom the phone book.
"Call [phone number]" - call a phone num-ber.
"Recent calls" - display the list of recentcalls.
"Read message" - read a text messagealoud. If there are several messages, selectthe message to read aloud.
"Message to [contact]" - the user isprompted to dictate a short message. Themessage will then be read aloud and the
user can choose to send18 or re-dictate themessage. The vehicle must be connected tothe Internet to access this function.
Page 152 of 645

LIGHTING
* Option/accessory.150
Lighting control and panel
The lighting panel and controls can be used toadjust both exterior and interior lighting. Thelighting ring on the left-side steering wheel levercan be used to activate and adjust the exteriorlighting. The brightness of the interior lightingcan be adjusted using the thumb wheel on thedashboard.
Exterior lighting
Lighting ring position.
When the vehicle's ignition is in mode II, thelighting ring positions have the following func-tions:
PositionMeaning
US: Daytime running lights andparking lights are off.
Canada: Daytime running lights andparking lights are on.
High beam flash can be used.
Parking lights when the vehicle isparked.
US: Daytime running lights are off.
Canada: Daytime running lights areon.
High beam flash can be used.
Low beams and parking lights.
High beams can be activated.
High beam flash can be used.
PositionMeaning
Daytime running lights and parking
lights in daylight conditions.A
Low beams and parking lights inweak daylight or dark conditions orwhen the front fog lights* and/orrear fog light are activated.
Active high beam can be activated.
High beams can be activated whenlow beams are on.
High beam flash can be used.
Active high beams on/off.
AUS models only: Daytime running lights and parking lights canbe deactivated in the center display.
NOTE
Volvo recommends use of Daytime RunningLights in the US. Its use is mandatory in Can-ada.
Volvo recommends using position whenthe vehicle is in motion.
Page 155 of 645

LIGHTING
* Option/accessory.153
Daytime running lights
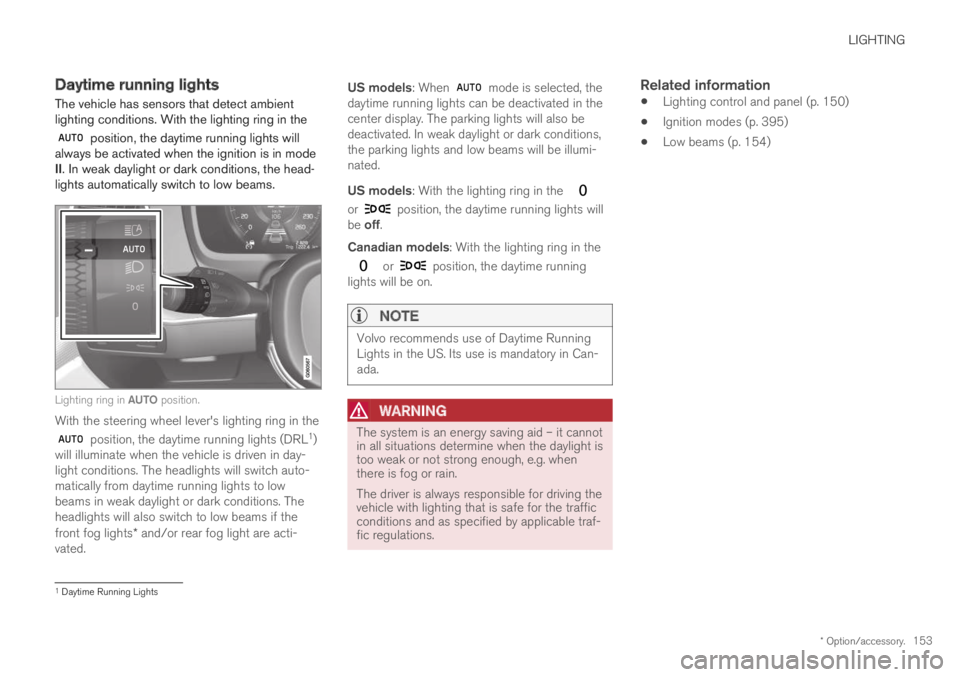
The vehicle has sensors that detect ambientlighting conditions. With the lighting ring in the
position, the daytime running lights willalways be activated when the ignition is in modeII. In weak daylight or dark conditions, the head-lights automatically switch to low beams.
Lighting ring in AUTO position.
With the steering wheel lever's lighting ring in the
position, the daytime running lights (DRL1)will illuminate when the vehicle is driven in day-light conditions. The headlights will switch auto-matically from daytime running lights to lowbeams in weak daylight or dark conditions. Theheadlights will also switch to low beams if thefront fog lights* and/or rear fog light are acti-vated.
US models: When mode is selected, thedaytime running lights can be deactivated in thecenter display. The parking lights will also bedeactivated. In weak daylight or dark conditions,the parking lights and low beams will be illumi-nated.
US models: With the lighting ring in the
or position, the daytime running lights willbe off.
Canadian models: With the lighting ring in the
or position, the daytime runninglights will be on.
NOTE
Volvo recommends use of Daytime RunningLights in the US. Its use is mandatory in Can-ada.
WARNING
The system is an energy saving aid – it cannotin all situations determine when the daylight istoo weak or not strong enough, e.g. whenthere is fog or rain.
The driver is always responsible for driving thevehicle with lighting that is safe for the trafficconditions and as specified by applicable traf-fic regulations.
Related information
Lighting control and panel (p. 150)
Ignition modes (p. 395)
Low beams (p. 154)
1Daytime Running Lights
Page 157 of 645

LIGHTING
}}
155
High beams
The high beams can be activated when the
lighting ring is in mode 2 or .Activate high beams by moving the steeringwheel lever forward. Deactivate by movingthe steering wheel lever backward.
When the high beams are activated, the symbol will be illuminated in the instrument panel.
Related information
Lighting control and panel (p. 150)
Active high beam (p. 155)
Active high beam
Active high beams is a function that uses cam-era sensors in the upper edge of the windshieldto detect the headlights of approaching vehiclesor the taillights of the vehicle directly ahead.When either of these is detected, the vehicle'sheadlights will automatically switch from highbeams to low beams.
Active high beams is indicated by the symbol.
This function can be used in dark conditionswhen the vehicle's speed is approx. 20 km/h(approx. 12 mph) or higher. The function can alsodetect street lighting. When the camera sensorno longer detects an approaching vehicle or avehicle ahead, the headlights will return to highbeams after a second or two.
Activating active high beams
Active high beams can be activated and deacti-vated by turning the lighting ring on the right-side
steering wheel lever to position . The light-
ing ring will then return to . When active
high beams are activated, a white symbolwill be displayed in the instrument panel. Whenhigh beams are on, the symbol will be blue.
If active high beams are deactivated when thehigh beams are on, the headlights will automati-cally switch to low beams.
Limitations for active high beams
The camera sensor on which the function isbased has limitations.
If this symbol and the message ActiveHigh Beam Temporarilyunavailable is displayed in the instru-ment panel, switching between highand low beams must be done manually. The
symbol will go out when the message isdisplayed.
The same applies if this symbol alongwith the message Windscreensensor Sensor blocked, seeOwner's manual is displayed.
Active high beams may be temporarily unavailablein certain situations, e.g. heavy fog or rain. When
2When the low beams are on.
Page 164 of 645

||
LIGHTING
* Option/accessory.162
Mood lighting *
The vehicle is equipped with LEDs that providefaint lighting in various colors. This lighting is onwhen the engine is running. Mood lighting can beadjusted in the center display and also fine-tunedusing the thumb wheel in the dashboard.
Lighting in the door storage
compartments
Lighting in the door storage compartmentscomes on when the doors are opened and goesout when the vehicle is locked. The brightnesscan be adjusted using the thumb wheel in thedashboard.
Lighting in the tunnel console's front
cup holder
The lighting in front console cup holdersswitches on when the vehicle is unlocked and offwhen the vehicle is locked. The brightness canbe adjusted using the thumb wheel in the dash-board.
Related information
Adjusting interior lighting (p. 162)
Lighting control and panel (p. 150)
Ignition modes (p. 395)
Passenger compartment interior (p. 544)
Adjusting interior lighting
Illumination in the vehicle varies depending onignition mode. The interior lighting can beadjusted with a thumb wheel in the dashboardand certain light functions can also be adjustedvia the center display.
The thumb wheel on the dash-board to the left of the steeringwheel can be used to adjustthe brightness of the displaylighting, instrument lights,ambient lighting and moodlighting*.
Adjust ambient decor lighting
1.Tap Settings in the Top view in the centerdisplay.
2.Tap My CarLights and LightingInterior Lighting.
3. Choose from among the following settings:
Under Ambient Light Intensity, selectOff, Low or High.
Under Ambient Light Level, selectReduced or Full.
Adjusting mood lighting *
The vehicle is equipped with several LEDs thatprovide faint lighting in various colors. This light-ing is on when the engine is running.
Changing the brightness
1.Tap Settings in the Top view in the centerdisplay.
2.Tap My CarLights and Lighting
Interior LightingInterior Mood Lighting.
3.Under Interior Mood Light Intensity, selectOff, Low or High.
Changing the color of the light
1.Tap Settings in the Top view in the centerdisplay.
2.Tap My CarLights and Lighting
Interior LightingInterior Mood Lighting.
3.Choose By Temperature or By Color tochange the color of the light.
If By Temperature is selected, the light willchange according to the temperature set forthe passenger compartment.
If By Color is selected, the subcategoryTheme Colors can be used to make furtheradjustments.
Related information
Interior Lighting (p. 160)
Adjusting light functions via the center dis-play (p. 151)
Ignition modes (p. 395)
Page 167 of 645

WINDOWS, GLASS AND MIRRORS
}}
* Option/accessory.165
Using sun curtains* (p. 167)
Panoramic roof* (p. 170)
Reset procedure for pinchprotection
If you experience any problems with the electri-cal functions for the power windows, you can tryto perform a reset.
WARNING
If the starter battery is disconnected, the func-tion for automatic opening and closing mustbe reset to function correctly. A reset isrequired in order for the pinch protection towork.
If the problem persists or if it affects the panor-
amic roof or sunroof, contact a workshop2.
Resetting a power window
1. Start with the window in the closed position.
2. Then move the control in manual mode threetimes upward toward the closed position.
> The system will be automatically activated.
Related information
Pinch protection for windows and sun cur-tains (p. 164)
Operating the power windows (p. 166)
Using sun curtains* (p. 167)
Power windows
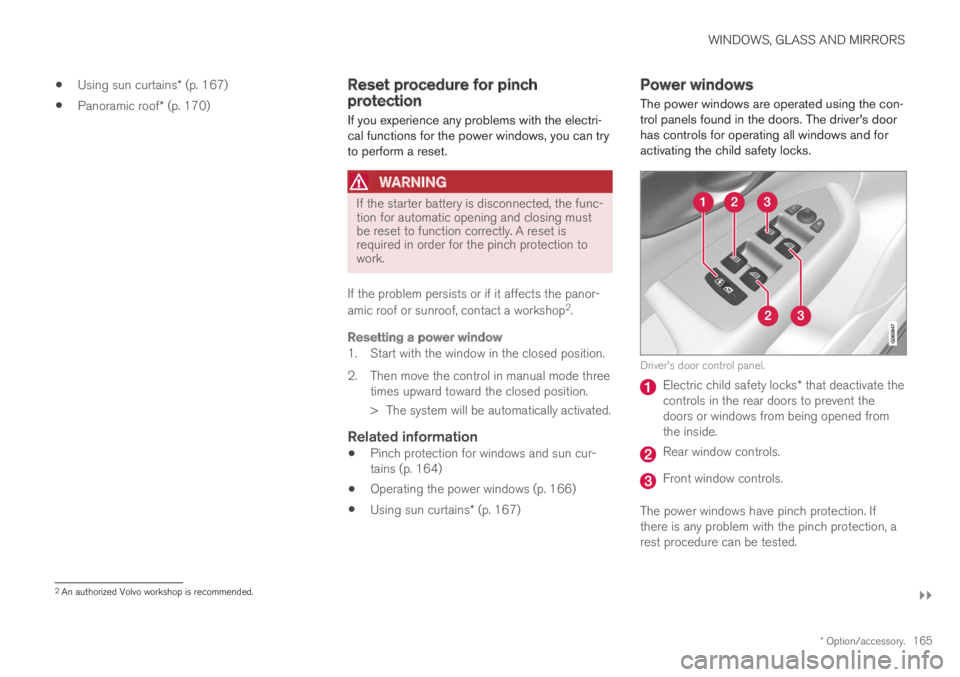
The power windows are operated using the con-trol panels found in the doors. The driver's doorhas controls for operating all windows and foractivating the child safety locks.
Driver's door control panel.
Electric child safety locks* that deactivate thecontrols in the rear doors to prevent thedoors or windows from being opened fromthe inside.
Rear window controls.
Front window controls.
The power windows have pinch protection. Ifthere is any problem with the pinch protection, arest procedure can be tested.
2An authorized Volvo workshop is recommended.
Page 168 of 645

||
WINDOWS, GLASS AND MIRRORS
* Option/accessory.166
WARNING
Children, other passengers or objects can betrapped by the moving parts.
Always operate the windows with caution.
Do not allow children to play with theoperating controls.
Never leave a child alone in the vehicle.
Remember to always cut the current tothe power windows by setting the vehi-cle's electrical system to ignition mode 0and then taking the remote key with youwhen leaving the vehicle.
Never stick objects or body parts outthrough the windows, even if the vehicleelectrical system is completely turned off.
Related information
Operating the power windows (p. 166)
Pinch protection for windows and sun cur-tains (p. 164)
Reset procedure for pinch protection(p. 165)
Operating the power windows
All power windows can be operated using thecontrol panel in the driver's door. The controlpanels in the other doors can be used to oper-ate that particular door.
The power windows have pinch protection. Ifthere is any problem with the pinch protection, arest procedure can be tested.
WARNING
Children, other passengers or objects can betrapped by the moving parts.
Always operate the windows with caution.
Do not allow children to play with theoperating controls.
Never leave a child alone in the vehicle.
Remember to always cut the current tothe power windows by setting the vehi-cle's electrical system to ignition mode 0and then taking the remote key with youwhen leaving the vehicle.
Never stick objects or body parts outthrough the windows, even if the vehicleelectrical system is completely turned off.
Operating the power windows.
Operating manually. Move one of the controlsslightly up or down. The power windows goup or down while the control is held in posi-tion.
Operating with automatic controls. Move oneof the controls up or down to its end positionand release it. The window moves automati-cally to its fully closed/open position.
To use the power windows, the ignition must bein at least mode I or II. After the ignition hasbeen switched off, the power windows can beoperated for several minutes or until a door isopened. Only one control can be operated at atime.
It can also be operated using keyless opening*with the door handle.
Page 171 of 645

WINDOWS, GLASS AND MIRRORS
}}
* Option/accessory.169
which work together to identify and eliminateglare. The forward-pointing sensor monitorsambient light, while the rearward-pointing sensormonitors light from the headlights of followingvehicles.
For the door mirrors to be equipped with auto-dim, the rearview mirror must also be equippedwith auto-dim.
NOTE
If the sensors are obstructed by e.g. a parkingpermit, transponder, sunshade or objects onthe seats or parcel shelf in a way that pre-vents light from reaching the sensors, theauto-dim function in the rearview and doormirrors will be reduced.
Related information
Rearview/door mirrors (p. 168)
Adjusting the door mirrors (p. 169)
Adjusting the door mirrors
To improve visibility to the rear, the door mirrorsneed to be adjusted to the driver's height andseating position. There are several automaticsettings that can also be connected to the mem-ory function buttons for the power seat*.
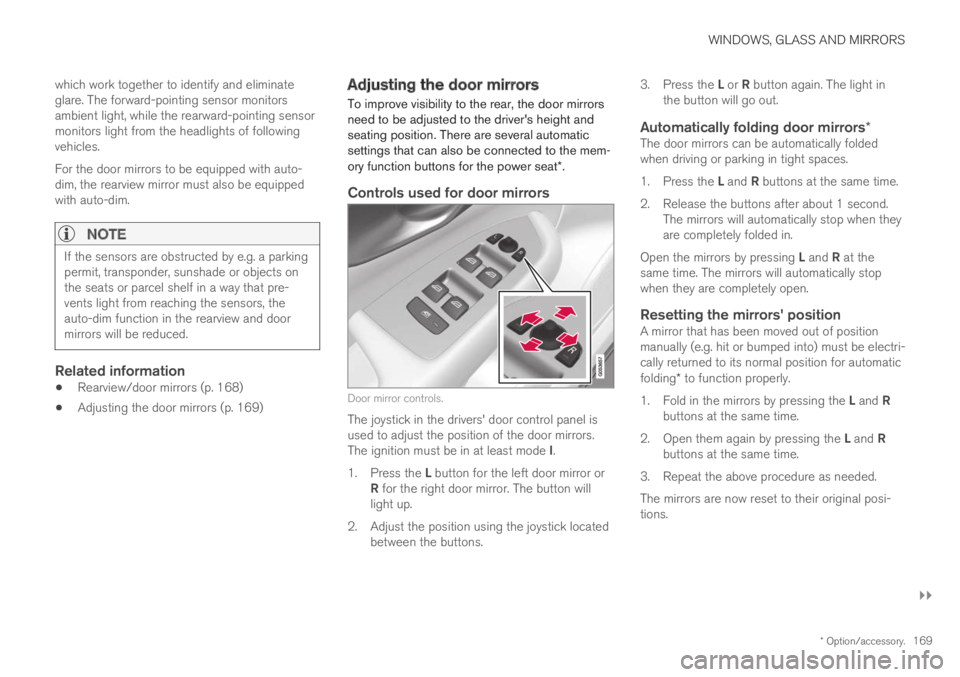
Controls used for door mirrors
Door mirror controls.
The joystick in the drivers' door control panel isused to adjust the position of the door mirrors.The ignition must be in at least mode I.
1.Press the L button for the left door mirror orR for the right door mirror. The button willlight up.
2.Adjust the position using the joystick locatedbetween the buttons.
3.Press the L or R button again. The light inthe button will go out.
Automatically folding door mirrors *
The door mirrors can be automatically foldedwhen driving or parking in tight spaces.
1.Press the L and R buttons at the same time.
2. Release the buttons after about 1 second.The mirrors will automatically stop when theyare completely folded in.
Open the mirrors by pressing L and R at thesame time. The mirrors will automatically stopwhen they are completely open.
Resetting the mirrors' position
A mirror that has been moved out of positionmanually (e.g. hit or bumped into) must be electri-cally returned to its normal position for automaticfolding* to function properly.
1.Fold in the mirrors by pressing the L and Rbuttons at the same time.
2.Open them again by pressing the L and Rbuttons at the same time.
3. Repeat the above procedure as needed.
The mirrors are now reset to their original posi-tions.