engine VOLVO S60 TWIN ENGINE 2019 Owner's Manual
[x] Cancel search | Manufacturer: VOLVO, Model Year: 2019, Model line: S60 TWIN ENGINE, Model: VOLVO S60 TWIN ENGINE 2019Pages: 645, PDF Size: 13.96 MB
Page 106 of 645

||
DISPLAYS AND VOICE CONTROL
104
MessageMeaning
Regular main-tenance
Maintenanceoverdue
Time for service - contact
a workshopB. Shown whenthe date for service haspassed.
Temporarily
offAA function has been tem-porarily deactivated andwill be reactivated auto-matically while driving orafter the engine is restar-ted.
APart of message, shown along with information on the locationof the problem.BAn authorized Volvo workshop is recommended.
Related information
Handling messages in the instrument panel(p. 104)
Handling messages saved from the instru-ment panel (p. 105)
Messages in the center display (p. 138)
Handling messages in theinstrument panel
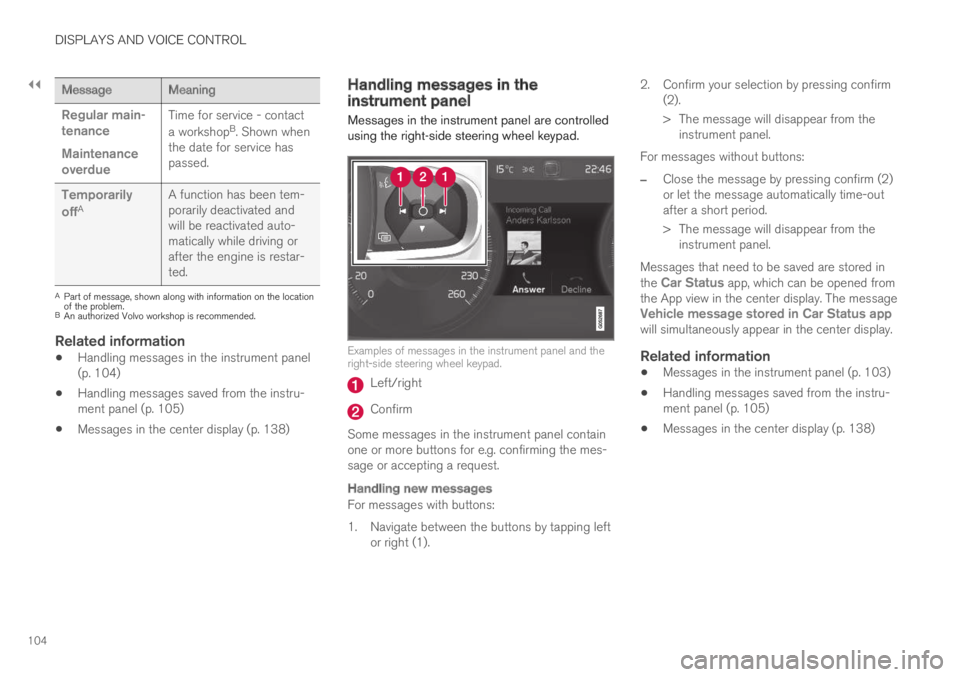
Messages in the instrument panel are controlledusing the right-side steering wheel keypad.
Examples of messages in the instrument panel and theright-side steering wheel keypad.
Left/right
Confirm
Some messages in the instrument panel containone or more buttons for e.g. confirming the mes-sage or accepting a request.
Handling new messages
For messages with buttons:
1. Navigate between the buttons by tapping leftor right (1).
2. Confirm your selection by pressing confirm(2).
> The message will disappear from theinstrument panel.
For messages without buttons:
–Close the message by pressing confirm (2)or let the message automatically time-outafter a short period.
>The message will disappear from theinstrument panel.
Messages that need to be saved are stored inthe Car Status app, which can be opened fromthe App view in the center display. The messageVehicle message stored in Car Status appwill simultaneously appear in the center display.
Related information
Messages in the instrument panel (p. 103)
Handling messages saved from the instru-ment panel (p. 105)
Messages in the center display (p. 138)
Page 107 of 645

DISPLAYS AND VOICE CONTROL
}}
105
Handling messages saved from theinstrument panel
Messages saved from the instrument panel andcenter displays are handled in the center display.
Saved messages can be viewed in the Car Status app.
The messages displayed in theinstrument panel that need tobe saved are stored in the CarStatus app in the center dis-play. The message Vehiclemessage stored in CarStatus app will simultaneouslyappear in the center display.
Reading saved messages
To read a saved message immediately:
–Tap the button to the right of the messageVehicle message stored in Car Statusapp in the center display.
>The saved message will be displayed inthe Car Status app.
To read saved messages at a later time:
1.Open the Car Status app from App view inthe center display.
>The app will open in the bottom tile ofHome view.
2.Select the Messages tab in the app.
>A list of saved messages will be displayed.
3. Tap a message to expand/minimize it.
> More information about the message willappear in the list and the image to the leftof the app will display information aboutthe message in graphic form.
Handling saved messages
In expanded form, some messages have two but-tons available for booking service or reading theOwner's Manual.
Booking service for saved messages:
–With the message in expanded form, tapRequest appoint.Call to make
Appointment4 for assistance booking serv-ice.
>With Request appoint.: TheAppointments tab will open in the appand create a request for a service/repairappointment.
With Call to make Appointment: Thephone app will open and call a servicecenter to make an appointment for serviceor repairs.
Reading the Owner's Manual for saved mes-sages:
–With the message in expanded form, tapOwner's manual to read relevant informa-tion about the message in the Owner's Man-ual.
>The Owner's Manual will open in the cen-ter display and provide information relatedto the message.
Saved messages in the app are automaticallydeleted each time the engine is started.
4Market dependent. Volvo ID and selected workshop also need to be registered
Page 115 of 645

DISPLAYS AND VOICE CONTROL
}}
* Option/accessory.113
Activating and deactivating thecenter display
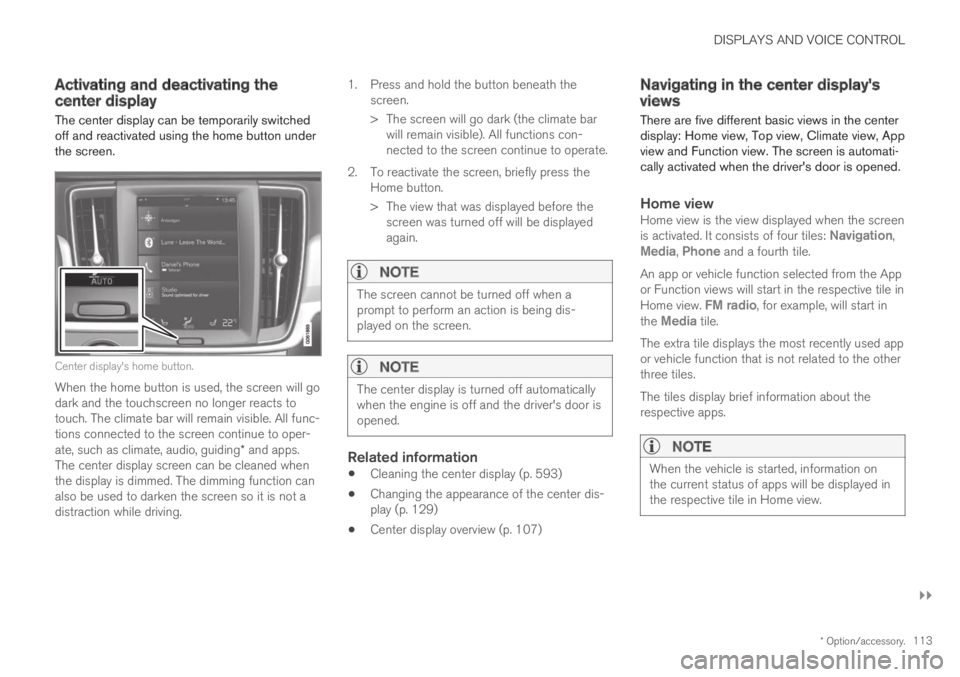
The center display can be temporarily switchedoff and reactivated using the home button underthe screen.
Center display's home button.
When the home button is used, the screen will godark and the touchscreen no longer reacts totouch. The climate bar will remain visible. All func-tions connected to the screen continue to oper-ate, such as climate, audio, guiding* and apps.The center display screen can be cleaned whenthe display is dimmed. The dimming function canalso be used to darken the screen so it is not adistraction while driving.
1.Press and hold the button beneath thescreen.
> The screen will go dark (the climate barwill remain visible). All functions con-nected to the screen continue to operate.
2. To reactivate the screen, briefly press theHome button.
> The view that was displayed before thescreen was turned off will be displayedagain.
NOTE
The screen cannot be turned off when aprompt to perform an action is being dis-played on the screen.
NOTE
The center display is turned off automaticallywhen the engine is off and the driver's door isopened.
Related information
Cleaning the center display (p. 593)
Changing the appearance of the center dis-play (p. 129)
Center display overview (p. 107)
Navigating in the center display'sviews
There are five different basic views in the centerdisplay: Home view, Top view, Climate view, Appview and Function view. The screen is automati-cally activated when the driver's door is opened.
Home view
Home view is the view displayed when the screenis activated. It consists of four tiles: Navigation,Media, Phone and a fourth tile.
An app or vehicle function selected from the Appor Function views will start in the respective tile inHome view. FM radio, for example, will start inthe Media tile.
The extra tile displays the most recently used appor vehicle function that is not related to the otherthree tiles.
The tiles display brief information about therespective apps.
NOTE
When the vehicle is started, information onthe current status of apps will be displayed inthe respective tile in Home view.
Page 159 of 645

LIGHTING
}}
* Option/accessory.157
Active Bending Lights*
Active Bending Lights (ABL) are designed tohelp provide maximum illumination in curves andintersections. Depending on equipment level,
vehicles with LED3 headlights* may be equippedwith Active Bending Lights.
Headlight pattern with function deactivated (left) andactivated (right).
Active Bending Lights follow the movement ofthe steering wheel to help provide maximum illu-mination in curves and intersections, helping toimprove visibility for the driver.
The function is automatically activated when theengine is started. If a fault is detected in the sys-
tem, the symbol will illuminate in theinstrument panel and a message will be dis-played.
The function is only active in weak daylight ordark conditions and only when the vehicle is mov-ing and the low beams are on.
Deactivating/activating the function
The function is activated as the default factorysetting and can be activated and deactivated inthe center display's Function view:
Tap the Active BendingLights button.
Related information
Adjusting light functions via the center dis-play (p. 151)
Front fog lights/cornering illumination*(p. 157)
Front fog lights/cornering
illumination*
The front fog lights have a stronger beam thanlow beam, making them particularly effective infog.
Front fog lights button.
The front fog lights can be turned on when theignition is in mode II and the lighting ring is in
position , or .
Tap the button to activate or deactivate the func-
tion. The symbol in the instrument panelcomes on when the front fog lights are on.
The front fog lights turn off automatically whenthe ignition is switched off or when the lighting
ring is in position .
3LED (Light Emitting Diode)
Page 162 of 645

LIGHTING
* Option/accessory.160
Using home safe lighting
Some of the exterior lights remain on to illumi-nate the area around the vehicle. This is calledhome safe lighting.
To activate home safe lighting:
1.Switch off the ignition.
2. Push the left-side steering wheel levertoward the dashboard and release.
3. Exit the vehicle and lock the doors.
When the function is activated, a symbol will beshown in the instrument panel and the parkinglights, outer door handle lights* and the licenseplate lights will be illuminated.
The length of time home safe lighting remainsilluminated can be set in the center display.
Related information
Adjusting light functions via the center dis-play (p. 151)
Welcome Light (p. 160)
Welcome Light
Approach lighting is activated when the vehicleis unlocked and can be used to provide light asyou walk toward the vehicle.
The function is activated when the remote key isused for unlocking. The parking lights, outer doorhandle lights*, license plate lights, interior ceilinglights, footwell lighting and trunk/cargo compart-ment lighting will be illuminated. If a door isopened while the function is activated, the light-ing in the outer door handle* and the interiorlighting will remain illuminated for a longer periodof time.
This function can be activated and deactivated inthe center display.
Related information
Adjusting light functions via the center dis-play (p. 151)
Using home safe lighting (p. 160)
Remote key (p. 230)
Interior Lighting
The interior is equipped with several differenttypes of lighting to improve the experience. Thisincludes reading lamps, glove box lighting andground lighting.
All lighting in the passenger compartment can beturned on and off manually within 5 minutesafter:
the engine has been switched off and theignition is in mode 0.
the vehicle is unlocked but the engine hasnot been started.
Front ceiling lighting
The controls in the ceiling console for the front readinglights and courtesy lighting.
Reading light left side
Passenger compartment lighting
Page 163 of 645

LIGHTING
}}
* Option/accessory.161
Courtesy lighting auto switch
Reading light right side
Reading lights
The reading lights on the right and left sides areswitched on and off by briefly pressing the but-tons in the ceiling console. To adjust the bright-ness, press and hold the button.
Passenger compartment lighting
Briefly press the button in the ceiling console toswitch on or off the footwell lighting and ceilinglighting.
Courtesy lighting auto switch
Activate the auto switch by briefly pressing theAUTO button in the ceiling console. With Autoactivated, the indicator light in the button and thecourtesy lighting come on and are turned off asfollows.
Courtesy lighting is switched on when:
the vehicle is unlocked
the vehicle is switched off
a side door is opened
remains on for 2 minutes if any of the sidedoors are open.
Courtesy lighting is switched off when:
the vehicle is locked
the engine is started
a side door is closed.
Rear roof lighting
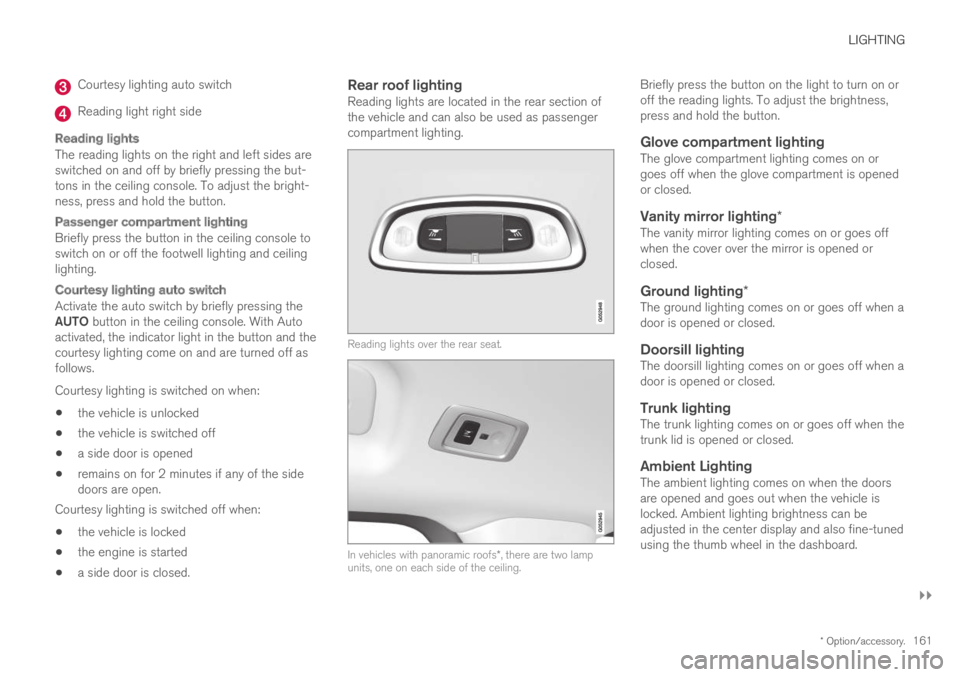
Reading lights are located in the rear section ofthe vehicle and can also be used as passengercompartment lighting.
Reading lights over the rear seat.
In vehicles with panoramic roofs*, there are two lampunits, one on each side of the ceiling.
Briefly press the button on the light to turn on oroff the reading lights. To adjust the brightness,press and hold the button.
Glove compartment lighting
The glove compartment lighting comes on orgoes off when the glove compartment is openedor closed.
Vanity mirror lighting *
The vanity mirror lighting comes on or goes offwhen the cover over the mirror is opened orclosed.
Ground lighting *
The ground lighting comes on or goes off when adoor is opened or closed.
Doorsill lighting
The doorsill lighting comes on or goes off when adoor is opened or closed.
Trunk lighting
The trunk lighting comes on or goes off when thetrunk lid is opened or closed.
Ambient Lighting
The ambient lighting comes on when the doorsare opened and goes out when the vehicle islocked. Ambient lighting brightness can beadjusted in the center display and also fine-tunedusing the thumb wheel in the dashboard.
Page 164 of 645

||
LIGHTING
* Option/accessory.162
Mood lighting *
The vehicle is equipped with LEDs that providefaint lighting in various colors. This lighting is onwhen the engine is running. Mood lighting can beadjusted in the center display and also fine-tunedusing the thumb wheel in the dashboard.
Lighting in the door storage
compartments
Lighting in the door storage compartmentscomes on when the doors are opened and goesout when the vehicle is locked. The brightnesscan be adjusted using the thumb wheel in thedashboard.
Lighting in the tunnel console's front
cup holder
The lighting in front console cup holdersswitches on when the vehicle is unlocked and offwhen the vehicle is locked. The brightness canbe adjusted using the thumb wheel in the dash-board.
Related information
Adjusting interior lighting (p. 162)
Lighting control and panel (p. 150)
Ignition modes (p. 395)
Passenger compartment interior (p. 544)
Adjusting interior lighting
Illumination in the vehicle varies depending onignition mode. The interior lighting can beadjusted with a thumb wheel in the dashboardand certain light functions can also be adjustedvia the center display.
The thumb wheel on the dash-board to the left of the steeringwheel can be used to adjustthe brightness of the displaylighting, instrument lights,ambient lighting and moodlighting*.
Adjust ambient decor lighting
1.Tap Settings in the Top view in the centerdisplay.
2.Tap My CarLights and LightingInterior Lighting.
3. Choose from among the following settings:
Under Ambient Light Intensity, selectOff, Low or High.
Under Ambient Light Level, selectReduced or Full.
Adjusting mood lighting *
The vehicle is equipped with several LEDs thatprovide faint lighting in various colors. This light-ing is on when the engine is running.
Changing the brightness
1.Tap Settings in the Top view in the centerdisplay.
2.Tap My CarLights and Lighting
Interior LightingInterior Mood Lighting.
3.Under Interior Mood Light Intensity, selectOff, Low or High.
Changing the color of the light
1.Tap Settings in the Top view in the centerdisplay.
2.Tap My CarLights and Lighting
Interior LightingInterior Mood Lighting.
3.Choose By Temperature or By Color tochange the color of the light.
If By Temperature is selected, the light willchange according to the temperature set forthe passenger compartment.
If By Color is selected, the subcategoryTheme Colors can be used to make furtheradjustments.
Related information
Interior Lighting (p. 160)
Adjusting light functions via the center dis-play (p. 151)
Ignition modes (p. 395)
Page 170 of 645

WINDOWS, GLASS AND MIRRORS
* Option/accessory.168
Rearview/door mirrors
The rearview mirror and door mirrors can beused to improve the driver's visibility behind thevehicle.
Rearview mirror
The rearview mirror can be adjusted manually.The rearview mirror can be equipped with Home-Link*, auto-dim* and compass*.
Door mirrors
WARNING
The door mirror on the passenger side iscurved to improve visibility. Objects in the mir-ror may appear farther away than they actuallyare.
The joystick in the drivers' door control panel isused to adjust the position of the door mirrors.There are also several automatic settings thatcan also be connected to the memory functionbuttons for the power seat*.
Related information
HomeLink®* (p. 440)
Compass* (p. 443)
Adjusting the rearview mirror dimming func-tion (p. 168)
Adjusting the door mirrors (p. 169)
Storing positions for seats, mirrors and head-up display* (p. 182)
Activating and deactivating the heated rearwindow and door mirrors (p. 213)
Adjusting the rearview mirrordimming function
Bright light entering the vehicle from behind, e.g.from the headlights of following vehicles, couldreflect in the rearview mirror and door mirrorsand cause a glare. Use the dimming functionwhen light from behind is distracting.
Auto-dim
If bright light enters the vehicle from behind, thedoor mirrors will automatically dim. Auto-dim isalways active when the engine is running, exceptwhen reverse gear is engaged.
NOTE
Adjustments to the sensitivity level will not benoticeable immediately but will instead takeeffect after a short period of time.
The sensitivity level for dimming will affect boththe rearview mirror and door mirrors.
To change the dimming sensitivity level:
1.Tap Settings in the Top view in the centerdisplay.
2.Tap My CarMirrors and Convenience.
3.Under Rearview Mirror Auto Dimming,select Normal, Dark or Light.
The rearview mirror instead has two sensors -one pointing forward and one pointing rearward -
Page 177 of 645

WINDOWS, GLASS AND MIRRORS
}}
175
Using the windshield wipers
The windshield wipers clean the windshield. Theright-side steering wheel lever is used to adjustwindshield wiper settings.
Right-hand steering wheel lever.
The thumb wheel is used to set rain sensorsensitivity and interval wiper speed.
Single sweep
Move the lever down and release for asingle sweep.
Wipers off
Move the lever to position 0 to turn offthe windshield wipers.
Interval wipers
Set the number of sweeps per time unitwith the thumb wheel when interval wip-ers are selected.
Continuous wipers
Move the lever upward for the wipers tooperate at normal speed.
Move the lever upward again for the wip-ers to operate at high speed.
CAUTION
Before activating the wipers, make sure thatthe wiper blades are not frozen in place andthat any snow or ice on the windshield hasbeen scraped away.
CAUTION
Use plenty of washer fluid when the wipersclean the windshield. The windshield must bewet when the windshield wipers are working.
Related information
Using the rain sensor (p. 175)
Using the windshield and headlight washers(p. 177)
Wiper blades and washer fluid (p. 174)
Using the rain sensor's memory function(p. 176)
Filling washer fluid (p. 609)
Windshield wipers in the service position(p. 608)
Replacing windshield wiper blades (p. 607)
Using the rain sensor
The rain sensor monitors the amount of water onthe windshield and automatically starts the wind-shield wipers. Rain sensor sensitivity can beadjusted using the thumb wheel on the right-hand steering wheel lever.
Right-hand steering wheel lever.
Rain sensor button
Thumb wheel, sensitivity/interval wiper speed
When the rain sensor is activated, the rainsensor symbol will be displayed in the instrumentpanel.
Activating the rain sensor
When the rain sensor is activated, the enginemust be running or the ignition in mode I or IIwhile the windshield wiper lever is in position 0 orin the single sweep position.
Page 178 of 645

||
WINDOWS, GLASS AND MIRRORS
176
Activate the rain sensor by pressing the rain sen-
sor button .
Move the lever downward for an extra wipersweep.
Turn the thumb wheel upward for increased sen-sitivity and downward for decreased sensitivity.The wipers will make one extra sweep when thethumb wheel is turned upward.
Deactivate the rain sensor
Deactivate the rain sensor by pressing the rain sensor button or moving the lever upward toanother wiper mode.
The rain sensor is automatically deactivated inignition mode 0 or when the engine is switchedoff.
The rain sensor is also automatically deactivatedwhen the wiper blades are put in the serviceposition. The rain sensor will reactivate whenservice mode is switched off.
CAUTION
The windshield wipers may start inadvertentlyand be damaged in automatic car washes.Deactivate the rain sensor when the engine isrunning or when the ignition is in mode I or II.The symbol in the instrument panel will goout.
Related information
Using the windshield and headlight washers(p. 177)
Wiper blades and washer fluid (p. 174)
Using the rain sensor's memory function(p. 176)
Filling washer fluid (p. 609)
Windshield wipers in the service position(p. 608)
Replacing windshield wiper blades (p. 607)
Using the windshield wipers (p. 175)
Using the rain sensor's memoryfunction
The rain sensor monitors the amount of water onthe windshield and automatically starts the wind-shield wipers.
Activating/deactivating memory
function
The rain sensor's memory function can be set toactivate so that the rain sensor button does notneed to be pressed each time the engine isstarted:
1.Tap Settings in the Top view in the centerdisplay.
2.Tap My CarWipers.
3.Select Rain Sensor Memory to activate/deactivate the memory function.
Related information
Using the rain sensor (p. 175)
Using the windshield and headlight washers(p. 177)
Wiper blades and washer fluid (p. 174)
Filling washer fluid (p. 609)
Windshield wipers in the service position(p. 608)
Replacing windshield wiper blades (p. 607)
Using the windshield wipers (p. 175)