turn signal VOLVO S60 TWIN ENGINE 2019 Owner's Manual
[x] Cancel search | Manufacturer: VOLVO, Model Year: 2019, Model line: S60 TWIN ENGINE, Model: VOLVO S60 TWIN ENGINE 2019Pages: 645, PDF Size: 13.96 MB
Page 339 of 645

DRIVER SUPPORT
}}
337
Lane Keeping Aid
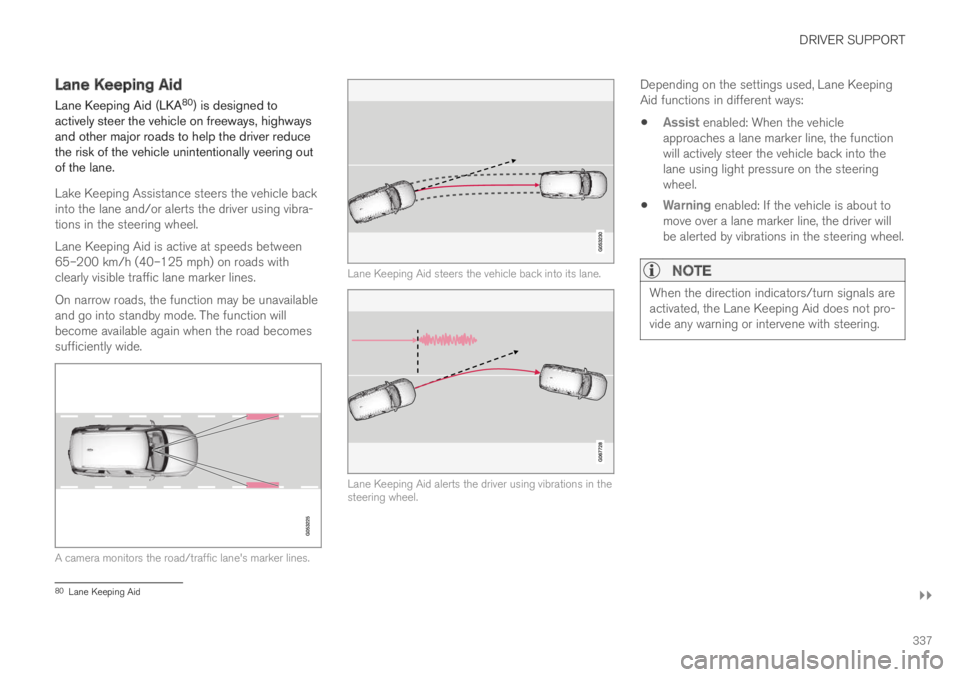
Lane Keeping Aid (LKA80) is designed toactively steer the vehicle on freeways, highwaysand other major roads to help the driver reducethe risk of the vehicle unintentionally veering outof the lane.
Lake Keeping Assistance steers the vehicle backinto the lane and/or alerts the driver using vibra-tions in the steering wheel.
Lane Keeping Aid is active at speeds between65–200 km/h (40–125 mph) on roads withclearly visible traffic lane marker lines.
On narrow roads, the function may be unavailableand go into standby mode. The function willbecome available again when the road becomessufficiently wide.
A camera monitors the road/traffic lane's marker lines.
Lane Keeping Aid steers the vehicle back into its lane.
Lane Keeping Aid alerts the driver using vibrations in thesteering wheel.
Depending on the settings used, Lane KeepingAid functions in different ways:
Assist enabled: When the vehicleapproaches a lane marker line, the functionwill actively steer the vehicle back into thelane using light pressure on the steeringwheel.
Warning enabled: If the vehicle is about tomove over a lane marker line, the driver willbe alerted by vibrations in the steering wheel.
NOTE
When the direction indicators/turn signals areactivated, the Lane Keeping Aid does not pro-vide any warning or intervene with steering.
80Lane Keeping Aid
Page 340 of 645

||
DRIVER SUPPORT
338
WARNING
The function is supplementary driver sup-port intended to facilitate driving and helpmake it safer – it cannot handle all situa-tions in all traffic, weather and road condi-tions.
The driver is advised to read all sectionsin the Owner's Manual about this functionto learn of its limitations, which the drivermust be aware of before using the func-tion.
Driver support functions are not a substi-tute for the driver's attention and judg-ment. The driver is always responsible forensuring the vehicle is driven in a safemanner, at the appropriate speed, with anappropriate distance to other vehicles,and in accordance with current trafficrules and regulations.
Lane Keeping Aid does not intervene
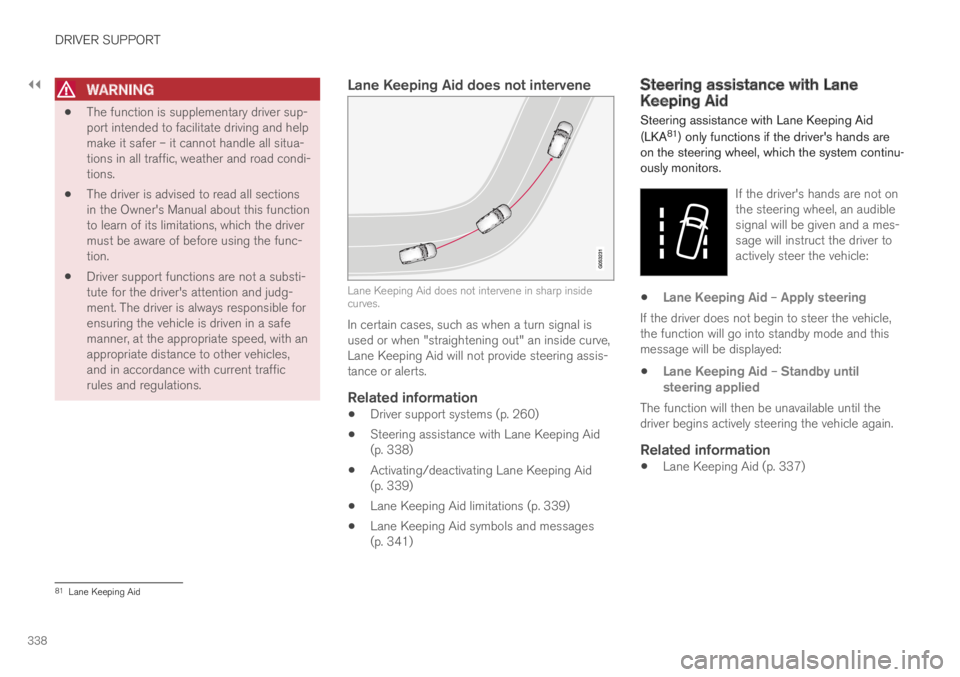
Lane Keeping Aid does not intervene in sharp insidecurves.
In certain cases, such as when a turn signal isused or when "straightening out" an inside curve,Lane Keeping Aid will not provide steering assis-tance or alerts.
Related information
Driver support systems (p. 260)
Steering assistance with Lane Keeping Aid(p. 338)
Activating/deactivating Lane Keeping Aid(p. 339)
Lane Keeping Aid limitations (p. 339)
Lane Keeping Aid symbols and messages(p. 341)
Steering assistance with LaneKeeping Aid
Steering assistance with Lane Keeping Aid
(LKA81) only functions if the driver's hands areon the steering wheel, which the system continu-ously monitors.
If the driver's hands are not onthe steering wheel, an audiblesignal will be given and a mes-sage will instruct the driver toactively steer the vehicle:
Lane Keeping Aid – Apply steering
If the driver does not begin to steer the vehicle,the function will go into standby mode and thismessage will be displayed:
Lane Keeping Aid – Standby untilsteering applied
The function will then be unavailable until thedriver begins actively steering the vehicle again.
Related information
Lane Keeping Aid (p. 337)
81Lane Keeping Aid
Page 348 of 645

||
DRIVER SUPPORT
346
Steering assistance with braking
Intervention with steering assistance and braking.
Braking intervention assists in situations wheresteering assistance alone is not sufficient. Brak-ing force is automatically adapted according tothe situation at the moment the vehicle begins torun off the road.
Related information
Steering assistance at risk of collision(p. 344)
Run-Off Mitigation with steeringassistance
Steering assistance has several sub-functions.Run-Off Mitigation with steering assistance canhelp the driver and reduce the risk of the vehicleinadvertently running off the road by activelysteering the vehicle back onto the road.
The function is active at speeds between65-140 km/h (40-87 mph) on roads with clearlyvisible traffic lane markings/lines.
The system uses a camera to monitor the edgesof the road and the painted side marker lines. Ifthe vehicle is about to cross the edge of the road,the function will attempt to steer the vehicle backonto the road. If this is not sufficient to keep thevehicle on the road, the brakes will also beapplied.
However, the function will not provide eithersteering assistance or braking if the turn signal isused. The function will also not be activated if itdetects that the driver is actively operating thevehicle.
After the system has automatically intervened,this text message will appear in the instrumentpanel:
Collision avoidance assistance –Automatic intervention
WARNING
The function is supplementary driver sup-port intended to facilitate driving and helpmake it safer – it cannot handle all situa-tions in all traffic, weather and road condi-tions.
The driver is advised to read all sectionsin the Owner's Manual about this functionto learn of its limitations, which the drivermust be aware of before using the func-tion.
Driver support functions are not a substi-tute for the driver's attention and judg-ment. The driver is always responsible forensuring the vehicle is driven in a safemanner, at the appropriate speed, with anappropriate distance to other vehicles,and in accordance with current trafficrules and regulations.
Related information
Steering assistance at risk of collision(p. 344)
Page 349 of 645

DRIVER SUPPORT
347
Steering assistance during collisionrisks from oncoming traffic
Steering assistance has several sub-functions.Steering assistance during collision risks fromoncoming traffic can help a distracted driverwho has not noticed that the vehicle is veeringout of the lane.
The function provides assistance by swerving your vehi-cle back into your own lane.
Oncoming vehicles
Own vehicle
When steering assistance is activated, collisionwarning for driver support will also be activated.However, the brake pedal pulsations that are partof collision warning will not be activated.
The function is active at speeds between60-140 km/h (37-87 mph) on roads with clearlyvisible traffic lane markings/lines.
If your vehicle is starting to veer from your ownlane and a vehicle is approaching from the oppo-site direction, this function can help the driversteer the vehicle back into its own lane.
However, the function will not provide steeringassistance if the turn signal is used. The functionwill also not be activated if it detects that thedriver is actively operating the vehicle.
After the system has automatically intervened,this text message will appear in the instrumentpanel:
Collision avoidance assistance –Automatic intervention
WARNING
The function is supplementary driver sup-port intended to facilitate driving and helpmake it safer – it cannot handle all situa-tions in all traffic, weather and road condi-tions.
The driver is advised to read all sectionsin the Owner's Manual about this functionto learn of its limitations, which the drivermust be aware of before using the func-tion.
Driver support functions are not a substi-tute for the driver's attention and judg-ment. The driver is always responsible forensuring the vehicle is driven in a safemanner, at the appropriate speed, with anappropriate distance to other vehicles,and in accordance with current trafficrules and regulations.
Related information
Steering assistance at risk of collision(p. 344)
Collision risk warning from driver support(p. 290)
Page 354 of 645

||
DRIVER SUPPORT
* Option/accessory.352
The distance monitored extendsapprox. 1.5 meters (5 ft) behind the vehicle.
The Parking Assist system's rear sensors will beautomatically deactivated if the vehicle is backingup with a trailer connected to the vehicle's elec-trical system.
NOTE
When reversing with e.g. a trailer or bike car-rier on the trailer hitch – without Volvo originaltrailer cables – the Parking Assist system mayhave to be turned off manually to prevent thesensors from reacting to these.
Side sensors
The warning signal will begin pulsating rapidly when theobstacle is less than approx. 25 cm (0.8 ft) from thevehicle.
Park Assist's side sensors are automatically acti-vated when the engine is started. They are activeat speeds below 10 km/h (6 mph).
The distance monitored is approx. 25 cm (0.8 ft)out from the sides.
The detection area of the side sensors increasessignificantly, however, when the steering angle ofthe front wheel increases and depending on theposition of the steering wheel, obstacles up toapprox. 90 cm (3 ft) diagonally behind or in frontof the vehicle can be detected.
Related information
Park Assist* (p. 350)
Sensor field from Park Assist for Park AssistCamera (p. 360)
Activating/deactivating Park Assist*
The Park Assist Pilot function can be activated/deactivated.
Park Assist's front and side sensors are automat-ically activated when the engine is started. Therear sensors are activated if the vehicle is movingbackward or reverse gear is engaged.
Activate or deactivate the func-tion using this button in thecenter display's Function view.
GREEN button indicator light – the functionis activated.
GRAY button indicator light – the function isdeactivated.
In vehicles equipped with Park Assist Camera*,Park Assist can also be activated or deactivatedfrom the relevant camera view.
Related information
Park Assist* (p. 350)
Page 369 of 645

DRIVER SUPPORT
}}
367
1.Tap Park In in Function view or in Cameraview.
>PAP will search for a potential parkingspace and measure it to determine if it isbig enough.
2. Be prepared to stop the vehicle when agraphic and message in the center displayindicate that a suitable parking space hasbeen found.
> A pop-up window will appear.
3.Select Parallel parking or Perpendicularparking and engage reverse gear.
NOTE
The function searches for space for parking,shows instructions and guides the vehicle onits passenger side. But, if so desired the vehi-cle can be parked on the driver's side of thestreet:
Activate the turn signals on the driver'sside – the system will then search forspace to park on that side of the vehicleinstead.
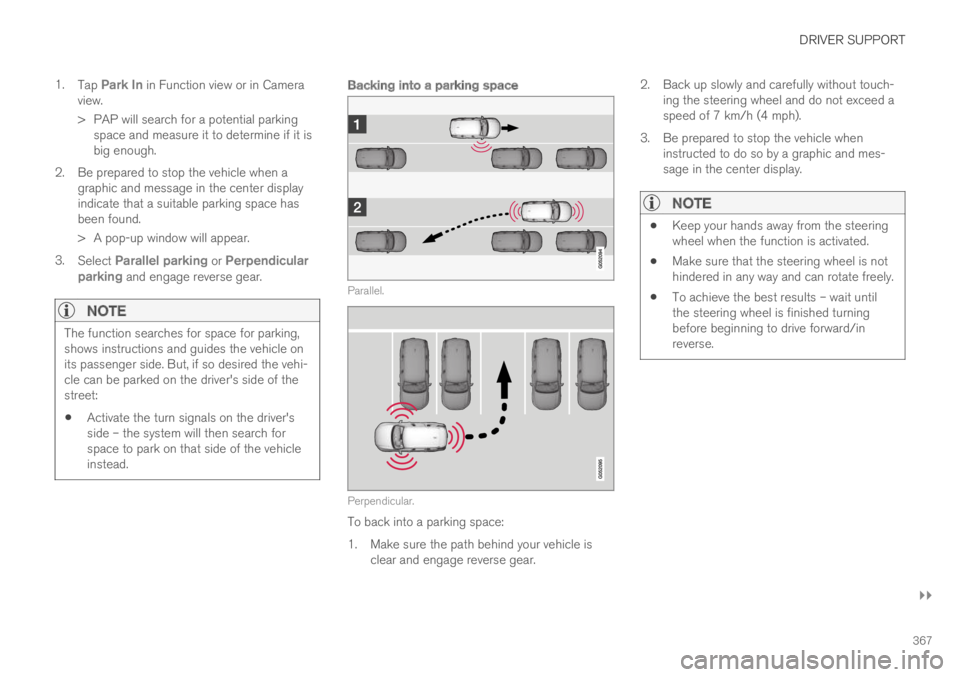
Backing into a parking space
Parallel.
Perpendicular.
To back into a parking space:
1.Make sure the path behind your vehicle isclear and engage reverse gear.
2. Back up slowly and carefully without touch-ing the steering wheel and do not exceed aspeed of 7 km/h (4 mph).
3. Be prepared to stop the vehicle wheninstructed to do so by a graphic and mes-sage in the center display.
NOTE
Keep your hands away from the steeringwheel when the function is activated.
Make sure that the steering wheel is nothindered in any way and can rotate freely.
To achieve the best results – wait untilthe steering wheel is finished turningbefore beginning to drive forward/inreverse.
Page 404 of 645

STARTING AND DRIVING
402
Settings for automatically activatingthe parking brake
Choose whether the parking brake should beactivated automatically when the vehicle isswitched off.
To change this setting:
1.Tap Settings in the center display's Topview.
2.Tap My CarParking Brake andSuspension and select or deselect theAuto Activate Parking Brake function.
Related information
Activating and deactivating the parking brake(p. 400)
Parking brake (p. 400)
Parking on a hill
Always use the parking brake when parking on ahill.
WARNING
Always apply the parking brake when parkingon an incline. Selecting a gear or putting theautomatic transmission in P may not be suffi-cient to keep the vehicle stationary in all sit-uations.
If the vehicle is pointing uphill:
Turn the front wheels so they are pointingaway from the curb.
If the vehicle is pointing downhill:
Turn the front wheels so they are pointingtoward the curb.
Heavy load uphill
Heavy loads, such as a trailer, could cause thevehicle to roll backward when the parking brakeis released automatically on steep uphill gradi-ents. To help avoid this, pull the control upwardwhile you are driving away. Release the controlwhen the vehicle gains traction.
Related information
Activating and deactivating the parking brake(p. 400)
Parking brake malfunction
If you are unable to deactivate or activate theparking brake after several attempts, contact anauthorized Volvo workshop.
A audible warning signal will sound if the parkingbrake is activated while the vehicle is beingdriven.
If the vehicle must be parked before the problemis rectified, turn the wheels as when parking onan incline and put the gear selector in P.
Low battery charge level
If the battery charge level is too low, it will not bepossible to activate or deactivate the parkingbrake. Connect an auxiliary battery to the vehicleif the battery is discharged.
Replacing brake pads
Due to the design of the electric parking brake,the rear brake pads must be replaced by a work-shop. An authorized Volvo workshop is recom-mended.
Page 439 of 645

STARTING AND DRIVING
}}
* Option/accessory.437
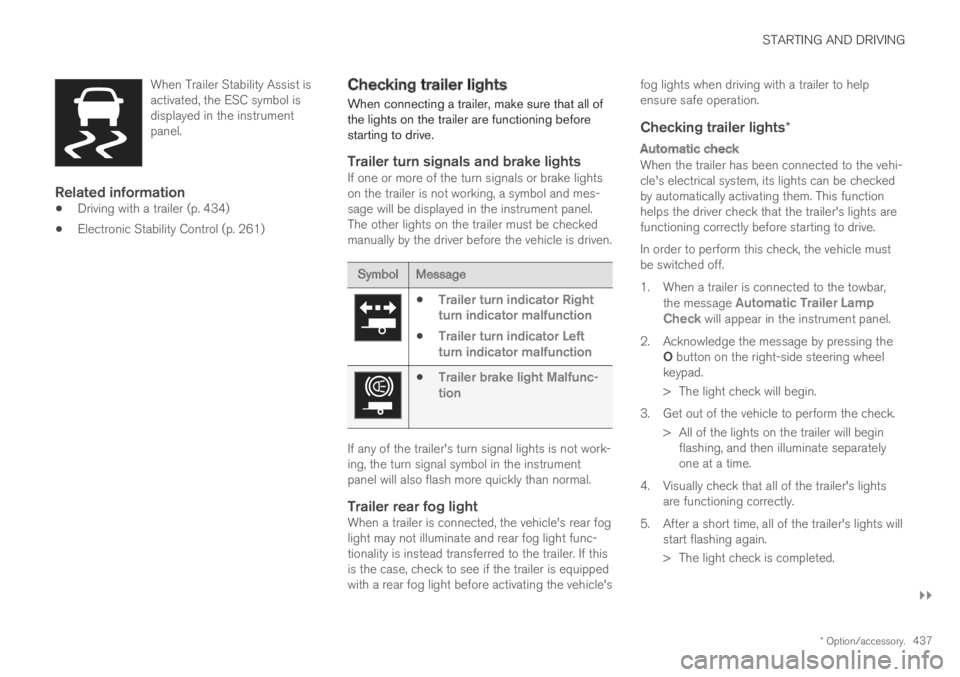
When Trailer Stability Assist isactivated, the ESC symbol isdisplayed in the instrumentpanel.
Related information
Driving with a trailer (p. 434)
Electronic Stability Control (p. 261)
Checking trailer lights
When connecting a trailer, make sure that all ofthe lights on the trailer are functioning beforestarting to drive.
Trailer turn signals and brake lights
If one or more of the turn signals or brake lightson the trailer is not working, a symbol and mes-sage will be displayed in the instrument panel.The other lights on the trailer must be checkedmanually by the driver before the vehicle is driven.
SymbolMessage
Trailer turn indicator Rightturn indicator malfunction
Trailer turn indicator Leftturn indicator malfunction
Trailer brake light Malfunc-tion
If any of the trailer's turn signal lights is not work-ing, the turn signal symbol in the instrumentpanel will also flash more quickly than normal.
Trailer rear fog light
When a trailer is connected, the vehicle's rear foglight may not illuminate and rear fog light func-tionality is instead transferred to the trailer. If thisis the case, check to see if the trailer is equippedwith a rear fog light before activating the vehicle's
fog lights when driving with a trailer to helpensure safe operation.
Checking trailer lights *
Automatic check
When the trailer has been connected to the vehi-cle's electrical system, its lights can be checkedby automatically activating them. This functionhelps the driver check that the trailer's lights arefunctioning correctly before starting to drive.
In order to perform this check, the vehicle mustbe switched off.
1. When a trailer is connected to the towbar,the message Automatic Trailer LampCheck will appear in the instrument panel.
2.Acknowledge the message by pressing theO button on the right-side steering wheelkeypad.
> The light check will begin.
3. Get out of the vehicle to perform the check.
> All of the lights on the trailer will beginflashing, and then illuminate separatelyone at a time.
4. Visually check that all of the trailer's lightsare functioning correctly.
5. After a short time, all of the trailer's lights willstart flashing again.
> The light check is completed.
Page 444 of 645

||
STARTING AND DRIVING
* Option/accessory.442
Programming individual buttons
To program an individual HomeLink® button:
1. Press and hold the desired button for about20 seconds.
2.When the indicator light on HomeLink®
starts flashing slowly, it is possible to pro-gram as usual.
Note: If the button you are reprogrammingdoes not program with a new device, it willreturn to the previously saved programming.
Resetting the HomeLink ®
buttons
It is only possible to reset all HomeLink® buttonsat once. It is not possible to reset individual but-tons. Individual buttons can only be reprogram-med.
–Press and hold the outer buttons (1 and 3)
on HomeLink® for about 10 seconds.
>When the indicator light goes from asteady glow to flashing, the buttons havebeen reset and are ready for reprogram-ming.
Related information
Using HomeLink®* (p. 442)
HomeLink®* (p. 440)
Type approval for HomeLink®* (p. 443)
Using HomeLink®*18
Once HomeLink® is programmed, it can beused instead of the separate remote controls.
Press and hold the programming button. Thegarage door, gate, alarm system, etc. will be acti-vated (this may take several seconds). If the but-ton is held down for more than 20 seconds,reprogramming will begin. The indicator light willglow steadily or flash when the button has beenpressed. The original remote controls may be
used concurrently with HomeLink® if desired.
NOTE
When the ignition is switched off, HomeLink®
will be active for at least 7 minutes.
NOTE
HomeLink® cannot be used if the vehicle islocked and the alarm is armed* from the out-side.
WARNING
If you use HomeLink® to open a garagedoor or gate, be sure no one is near thegate or door while it is in motion.
Do not use HomeLink® with any garagedoor opener that lacks safety stop andreverse features as required by US fed-eral safety standards (this includes anygarage door opener model manufacturedbefore April 1, 1982). A garage door thatcannot detect an object - signaling thedoor to stop and reverse - does not meetcurrent U.S. federal safety standards. Formore information, contact HomeLink at:www.homelink.com.
Related information
HomeLink®* (p. 440)
Programming HomeLink®* (p. 441)
Type approval for HomeLink®* (p. 443)
18Certain markets only.
Page 634 of 645

INDEX
632
limitations 339
see Lane Keeping Aid 337
select assistance option 339
steering assistance 338
Symbols and messages 341, 343
Language 130
Large Animal Detection (LAD) 309
Leather upholstery, cleaning instructions 596
Leveling control
settings 420
suspension 418
License agreement 96, 501
Lifting tools 527
Light bulbs
changing 572
Light control 150, 162
Lighting
Active Bending Lights 157
approach lighting 160
automatic high beam 155
brake lights 159
control, instrument, display 162
controls 150, 160
cornering illumination 158
daytime running lights 153
emergency brake lights 159
front fog lights 157
Hazard warning flashers 159
high beams154, 155
home safe lighting160
in passenger compartment160
low beams154
position lights152
rear fog light158
settings151
Turn signals156
Lighting, replacing bulbs572
Limp home406
Load anchoring eyelets
cargo compartment553
Load anchoring hooks553
Load carriers552
Load index516
Loading
general551
load anchoring eyelets553
long load552
Lock indication 228
setting229
Locking/unlocking
trunk lid233, 247
Locking wheel bolts527
Locks
Locking232
unlocking232
Long-term storage389
Low battery charge level
start battery432
Low beams 154
Low oil level 570
M
Maintained climate comfort222
start/stop222
Maintenance556
corrosion protection604
Max. axle weight617
Max. roof load617
Media player470, 472
compatible file formats477, 478
voice control146
Messages and symbols
Adaptive Cruise Control279
Assistance at risk of collision 349
BLIS324
City Safety319
Cross Traffic Alert328
Lane Keeping Aid341, 343
Park Assist Camera363
Park Assist Pilot372
Parking Assist354