ECU VOLVO S60 TWIN ENGINE 2019 Workshop Manual
[x] Cancel search | Manufacturer: VOLVO, Model Year: 2019, Model line: S60 TWIN ENGINE, Model: VOLVO S60 TWIN ENGINE 2019Pages: 645, PDF Size: 13.96 MB
Page 576 of 645

MAINTENANCE AND SERVICE
574
Start battery
The vehicle has a single-pole electrical systemthat uses the chassis and engine mount as con-ductors.
The start battery is used to start the electricalsystem and power electrical equipment in thevehicle. The hybrid battery is used to start thecombustion engine.
The start battery should only be replaced by a
workshop17.
The start battery is a 12 V AGM (Absorbed GlassMat) battery, dimensioned for regenerative charg-ing and to support the function of the vehicle'svarious systems.
The service life and performance of the start bat-tery are affected by factors such as driving style,driving conditions, climate, battery discharges,number of starts, etc.
Never disconnect the start battery while theengine is running.
Make sure the cables to the start battery arecorrectly connected and the clamps aresecurely tightened.
WARNING
Batteries generate hydrogen gas, whichis flammable and explosive.
Do not connect the jumper cable to anypart of the fuel system or to any movingparts. Avoid touching hot manifolds.
Battery fluid contains sulfuric acid. Do notallow battery fluid to contact eyes, skin,fabrics or painted surfaces.
If contact occurs, flush the affected areaimmediately with water. Obtain medicalhelp immediately if eyes are affected.
Never expose the battery to open flameor electric spark. Do not smoke near thebattery. Failure to follow the instructionsfor jump starting can lead to injury.
Connection points
WARNING
California Proposition 65
Operating, servicing and maintaining a pas-senger vehicle can expose you to chemicalsincluding engine exhaust, carbon monoxide,phthalates, and lead, which are known to theState of California to cause cancer and birthdefects or other reproductive harm. To mini-mize exposure, avoid breathing exhaust, donot idle the engine except as necessary, serv-ice your vehicle in a well ventilated area andwear gloves or wash your hands frequentlywhen servicing your vehicle. For more infor-mation go to www.P65Warnings.ca.gov/passenger-vehicle.
Use the vehicle's connection points in the enginecompartment to connect an external start batteryor battery charger.
The battery terminals on the car's start battery inthe luggage/cargo area must not be used.
17An authorized Volvo workshop is recommended.
Page 578 of 645

||
MAINTENANCE AND SERVICE
576
NOTE
If the starter battery becomes discharged toomany times, it will shorten its service life.
The service life of the starter battery is affec-ted by several factors, such as driving condi-tions and climate. The starting capacity of thebattery reduces gradually over time. The bat-tery must therefore be recharged if the vehi-cle is not used or a long period of time or if itis only driven short distances. Severe cold fur-ther limits the starting capacity.
To keep the starter battery in a good condi-tion, the vehicle should be driven at least15 minutes per week or the battery should beconnected to a battery charger with automatictrickle charging.
A starter battery that is always kept fullycharged has the maximum service life.
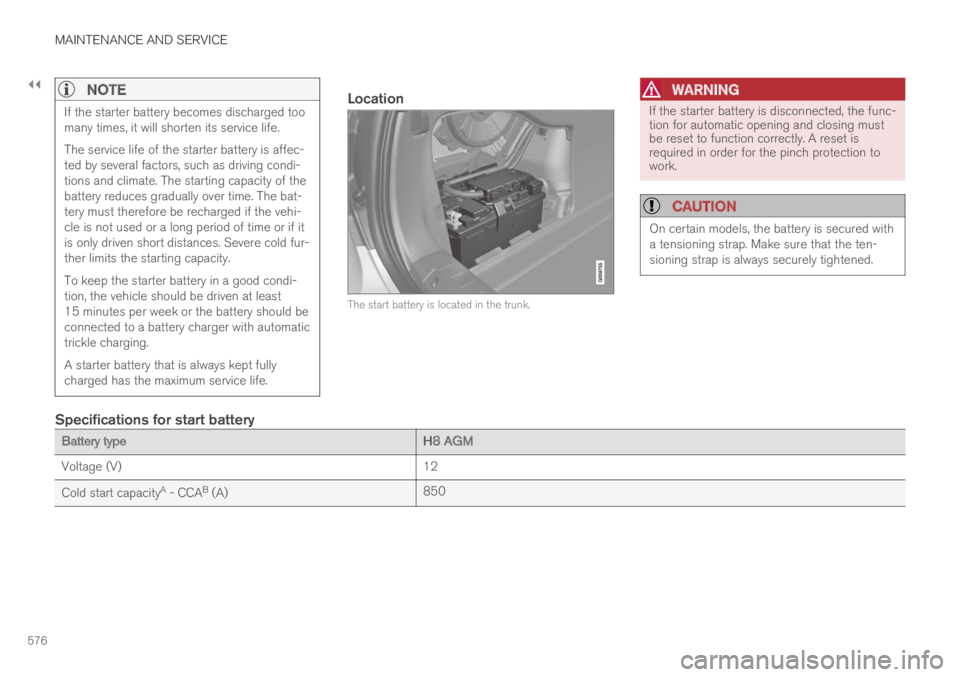
Location
The start battery is located in the trunk.
WARNING
If the starter battery is disconnected, the func-tion for automatic opening and closing mustbe reset to function correctly. A reset isrequired in order for the pinch protection towork.
CAUTION
On certain models, the battery is secured witha tensioning strap. Make sure that the ten-sioning strap is always securely tightened.
Specifications for start battery
Battery typeH8 AGM
Voltage (V)12
Cold start capacityA - CCAB (A)850
Page 597 of 645

MAINTENANCE AND SERVICE
}}
595
Cleaning fabric upholstery andceiling liner
Only use cleaning agents and car care productsrecommended by Volvo. Clean regularly andtreat stains immediately for best results. It isimportant to vacuum before using a cleaningagent.
Fabric upholstery and ceiling liner
Never scrape or rub a stain, as this could damagethe upholstery or ceiling liner. Never use strongstain removers, as this could change the color ofthe upholstery or ceiling liner.
Use soapy water or a similar detergent. For moredifficult stains caused by oil, ice cream, shoe pol-ish, etc., use a stain remover. Consult with yourVolvo retailer.
Related information
Cleaning the interior (p. 593)
Cleaning the center display (p. 593)
Cleaning the seat belt (p. 595)
Cleaning floor mats and inlay mats (p. 595)
Cleaning leather upholstery (p. 596)
Cleaning the leather steering wheel(p. 597)
Cleaning interior plastic, metal and wood sur-faces (p. 598)
Cleaning the seat belt
Only use cleaning agents and car care productsrecommended by Volvo. Clean regularly andtreat stains immediately for best results. It isimportant to vacuum before using a cleaningagent.
Seat belts
Use water and a synthetic soap solution. Spe-cially designed textile cleaning agents are availa-ble for purchase at Volvo retailers. Make sure thebelt is dry before it is retracted.
Related information
Cleaning the interior (p. 593)
Cleaning the center display (p. 593)
Cleaning fabric upholstery and ceiling liner(p. 595)
Cleaning floor mats and inlay mats (p. 595)
Cleaning leather upholstery (p. 596)
Cleaning the leather steering wheel(p. 597)
Cleaning interior plastic, metal and wood sur-faces (p. 598)
Cleaning floor mats and inlay mats
Only use cleaning agents and car care productsrecommended by Volvo. Clean regularly andtreat stains immediately for best results. It isimportant to vacuum before using a cleaningagent.
Inlay mats and floor mats
Remove the inlay mats to clean the floor matsand inlay mats separately. Use a vacuum toremove dust and dirt.
NOTE
Do not swing or strike the inlay mats violentlyagainst another object to remove dirt as thiscould damage the mats.
Each inlay mat is secured into place with pins.
Remove the inlay mat by grasping the inlay matat each pin and lifting the mat straight up.
Put the inlay mat back into place by pressing it inat each pin.
Page 598 of 645

||
MAINTENANCE AND SERVICE
* Option/accessory.596
WARNING
Never use more than one inlay mat at atime on the driver's floor. If any other typeof floor mat is used, remove the originalmat from the driver's seat floor beforedriving. All types of mats must be securelyanchored in the attachment points in thefloor. Make sure the floor mat does notimpede the movement of the brake pedalor accelerator pedal in any way, as thiscould be a serious safety hazard.
Volvo's floor mats are specially manufac-tured for your vehicle. They must be prop-erly secured in the attachment points inthe floor to help ensure they cannot slideand become trapped under the pedals.
After vacuuming, a specially designed textilecleaning agent should be used to remove stainson floor mats. Floor mats should be cleaned withproducts recommended by Volvo retailers.
Related information
Cleaning the interior (p. 593)
Cleaning the center display (p. 593)
Cleaning fabric upholstery and ceiling liner(p. 595)
Cleaning the seat belt (p. 595)
Cleaning leather upholstery (p. 596)
Cleaning the leather steering wheel(p. 597)
Cleaning interior plastic, metal and wood sur-faces (p. 598)
Cleaning leather upholstery
Only use cleaning agents and car care productsrecommended by Volvo. Clean regularly andtreat stains immediately for best results. It isimportant to vacuum before using a cleaningagent.
Leather upholstery *
Volvo's leather upholstery is treated to protect itsoriginal appearance. Over time, sunlight, grease,dirt, etc. could break down the protective layer.This could result in scratches and cracking.
Leather upholstery is a natural product thatchanges and acquires a beautiful patina overtime. Regular cleaning and treatments arerequired to preserve the qualities and color of theleather. Volvo offers a comprehensive product,Volvo Leather Care KitWipes, for cleaning andtreating leather upholstery. When used as direc-ted, it helps preserve the leather's protective coa-ting.
For optimal results, Volvo recommends cleaningand applying protective cream one to four times ayear (or more often as needed). Volvo LeatherCare Kit 951 0251 and Volvo Leather Softener943 7429 are available for purchase at Volvoretailers.
Page 603 of 645

MAINTENANCE AND SERVICE
601
Automatic car washes
The vehicle should be washed as soon as itbecomes dirty. This makes the vehicle easier toclean because dirt does not attach as strongly. Italso reduces the risk of scratches and keeps thevehicle looking new.
An automatic car wash is a fast and easy way tokeep your vehicle clean, but it does not reach allareas of the vehicle. For best results, Volvo rec-ommends hand washing your vehicle or supple-menting automatic car washes with a hand wash.
NOTE
Volvo recommends not washing the vehicle inan automatic car wash during the first fewmonths; the paintwork on new vehicles takessome time to fully harden.
CAUTION
Before driving the vehicle into a car wash,deactivate the Automatic Braking when Sta-tionary and Automatic Parking Brake Applica-tion functions. If the functions are not deacti-vated, the brake system will seize when thevehicle is stationary and the vehicle will not beable to roll.
CAUTION
For automatic car washes in which the vehicleis pulled forward on rolling wheels:
1.Before washing the vehicle, make surethat the automatic rain sensor is deacti-vated. If it is not deactivated and inadver-tently starts, the wiper arms could bedamaged.
2. To help prevent damage from the auto-matic car wash machinery, make surethat the door mirrors are folded in, anten-nas retracted or removed, and any auxili-ary lights secured.
3. Drive into the automatic car wash.
4. Turn off the "Automatic Braking when
Stationary" function using the buttonin the tunnel console.
5.Turn off the "Automatic Parking BrakeApplication" function in the center dis-play's Top view.
6. Turn off the engine by turning the startknob in the tunnel console clockwise.Hold the knob in position for at least2 seconds.
The vehicle is now ready for the automatic carwash.
CAUTION
The system will automatically change to Pmode if the above steps are not followed. In Pmode, the wheels are locked, which theyshould not be when the vehicle is beingwashed in a car wash.
Related information
Cleaning the exterior (p. 598)
Polishing and waxing (p. 599)
Hand washing (p. 599)
High-pressure washing (p. 602)
Cleaning the wiper blades (p. 602)
Cleaning exterior plastic, rubber and trimcomponents (p. 603)
Cleaning rims (p. 604)
Corrosion protection (p. 604)
Page 609 of 645

MAINTENANCE AND SERVICE
607
Replacing windshield wiper blades
The wiper blades help remove water from thewindshield. Along with the washer fluid, theyclean the glass and help improve visibility whiledriving. The wiper blades can be replaced.
Replacing wiper blades
1. Raise the wiper arms to the service position.Service position is activated/deactivated viathe function view in the center display whenthe car is stationary and the windshield wip-ers are not on.
2. Put the wiper blade in removal positionby folding it out from the wiper arm until itclicks.
3. Press and hold the button on the wiperblade attachment and pull the wiper blade
straight out , parallel with the wiper arm.
4.Slide in the new wiper blade until it clicksinto place.
5. Fold the blade back toward the arm until itclicks into place. The blade is no longer in itsremoval position and can once again bemoved.
6. Check to make sure the wiper blade issecurely in place.
7. Press the wiper blade back against the wind-shield.
Wiper blades come in varying lengths
NOTE
When changing wiper blades, make sure thatthe blades are of different lengths. The bladeon the driver's side is longer than the one onthe passenger side.
Related information
Using the rain sensor (p. 175)
Using the windshield and headlight washers(p. 177)
Using the rain sensor's memory function(p. 176)
Filling washer fluid (p. 609)
Windshield wipers in the service position(p. 608)
Using the windshield wipers (p. 175)
Wiper blades and washer fluid (p. 174)
Page 637 of 645

INDEX
635
head restraint 191
heating 209
Rearview/door mirrors
adjusting door mirrors 169
dimming 168
heating 213
interior 168
Rearview mirror 168
dimming 168
Rear window
heating 213
sun shade 167
Recalls 45
Recommendations when driving 424
Recommendations when loading 551
Recovery 440
Red Key
restricted remote key 238
settings 239
Refrigerant 566
climate system 622
Refueling
filling 426
fuel filler door, fuel flap 425
Remote immobilizer 243
Remote key 230
battery replacement 234
connecting to driver profile136
detachable key blade240
loss238
Range234
Remote updates559
Reporting safety defects44
Resetting door mirrors169
Resetting settings132
change of owner132
Driver profile137
Resetting trip odometer90
Road Sign Information329
activating/deactivating330
display330
limitations334
Sensus Navigation331
settings331
speed camera information333
Speed warning333
Road trip424
Roof load, max. weight617
Run-off Mitigation346
S
Safety42
pregnancy43
Safety belt, see Seat belt 47
Safety defects, reporting 44
Safety mode 61
starting/moving 62
Sealing compound 534
Seat, see Seats 180
Seat belt reminder 51
Seat belts 47
Automatic locking retractor/Emergency
locking retractor 65
buckling/unbuckling 48
pregnancy 43
seat belt reminder 51
seat belt tensioner 50
securing child restraint systems 67, 69, 71
Seat belt tensioner 50
resetting 51
Seats
heating 208, 209
manual front seat 180
power front seats 181
store position 182, 183
ventilation 209
whiplash protection 46
Page 638 of 645

INDEX
636
Security code 253
Sensors
air quality 200
Camera unit 299
climate 196
Radar unit 297
Sensus
connection and entertainment 30
Sensus Navigation
Road Sign Information 331
Service position 608
Service program 556
Set time interval for Distance Alert 292
settings
Categories 133
contextual 131
resetting 132
Shiftlock 409
Side airbag 60
Side Impact Protection System 60
SIM card 497
SIPS (Side Impact Protection System) 60
Sirius Satellite radio
Travel link 464
SiriusXM® Satellite radio
traffic information 460, 461, 463
Ski hatch554
Slippery conditions424
Slippery road conditions424
Snow chains533
Software updates33
Sound experience449
Sound settings448, 491
phone492
playing media470, 472
text message491
Spare tire531
handling532
Speed camera information333
Speed Limiter
change speed293
Speed symbols, tires516
Spin control261
Stability and traction control system 261
sport mode262, 263
Symbols and messages264
Stains593, 595, 596, 597, 598
Start and lock system
type designations243
Start battery432, 574
overload432
Start engine392
Starting the engine
after a collision62
Start the vehicle 392
Steering assistance at risk of collision 344
Steering power level, see Steering wheel
resistance 260
Steering wheel 192, 193
heating 210
keypad 192
paddle 192
steering wheel adjustment 193
Steering wheel keypad 192
Steering wheel paddles 408
Steering wheel resistance, speed-depend-
ent260
Stone chips and scratches 605, 606
Storage compartments 544
center console 545
glove compartment 549
sun visor 550
Sunroof
pinch protection 164
Sun shade
panoramic roof 170, 174
pinch protection 164
rear window 167
Page 639 of 645

INDEX
637
Sun visor 550
mirror lighting 161
Switching target vehicles
with Adaptive Cruise Control 291
with Pilot Assist 291
Symbols
dynamic 82
indicator symbols 92
warning symbols 95
Symbols and messages
center display's status bar 122
hybrid-related 387
parking climate 223
system updates 559
T
Technician certification38
Temperature
adjusting215, 216
perceived197
Temperature monitoring 380
Temporary Spare 531
Temporary tire sealing system 534
execution, checking 535
Inflating tires 539
Terms and conditions
services35
users500
Tire dimensions 516
when changing wheels 526
Tires 512
direction of rotation 514
glossary of terms 515
inflation pressure table 623
mounting 530
pressure 623
removal 528
rotation when changing 512
specifications 516, 623
storage 512
tread wear indicator 515
winter tires 533
Tire sealing system
Inflating tires 539
use 535
Tire tread 515
Tools 526
Top tether anchors (child restraint sys-
tems)72
Top view 130
Total airing function 230
Towing 438
Towing capacity and towball load 618
Towing eyelet439
TPMS - Tire Pressure Monitoring System521
Traction control 261
Traffic information 456
Trailer
driving with a trailer 434
Lamps 437
swaying 436
Trailer Stability Assist 262
trailer 436
Trailer stabilizer 262, 436
Transmission 406
automatic 406
Transmission fluid
grade 621
Travel Link 464
Notifications 467
Sports 469
weather 466
Tread depth 515
winter tires 533
Tread wear indicator 515
Trip computer 87
display in instrument panel 89
Trip odometer 87
Trip odometer resetting 90
Page 641 of 645

INDEX
639
starter battery not charging 95
WARNING 95
Warning sound
parking brake 402
warning symbols 95
Warning symbols
safety 42
Warranties 556
Washer
Headlights 177
washer fluid, filling 609
Windshield 177
Washer fluid 174, 609
Waxing 599
Weights
Curb weight 617
Wheel bolts 527
Wheels
cleaning 604
mounting 530
removal 528
Snow chains 533
Wheels and tires
Load index and speed symbol 516
Whiplash protection 46
Whiplash Protection System 46
WHIPS (Whiplash Protection System) 46
Wi-Fi
connecting vehicle to Internet495
delete network499
sharing Internet connection, tethering,
hotspot497
technology and security499
Windows and glass164
Windshield
projected image140, 142
Windshield washing177
Windshield wipers175
rain sensor175, 176
Winter driving424
Snow chains533
winter tires533
Wiper blade174
replacing607
service position608
Wiper blade and washing fluid174
Wiper blades, heated174