ECU VOLVO S60 TWIN ENGINE 2019 User Guide
[x] Cancel search | Manufacturer: VOLVO, Model Year: 2019, Model line: S60 TWIN ENGINE, Model: VOLVO S60 TWIN ENGINE 2019Pages: 645, PDF Size: 13.96 MB
Page 73 of 645
SAFETY
}}
71
WARNING
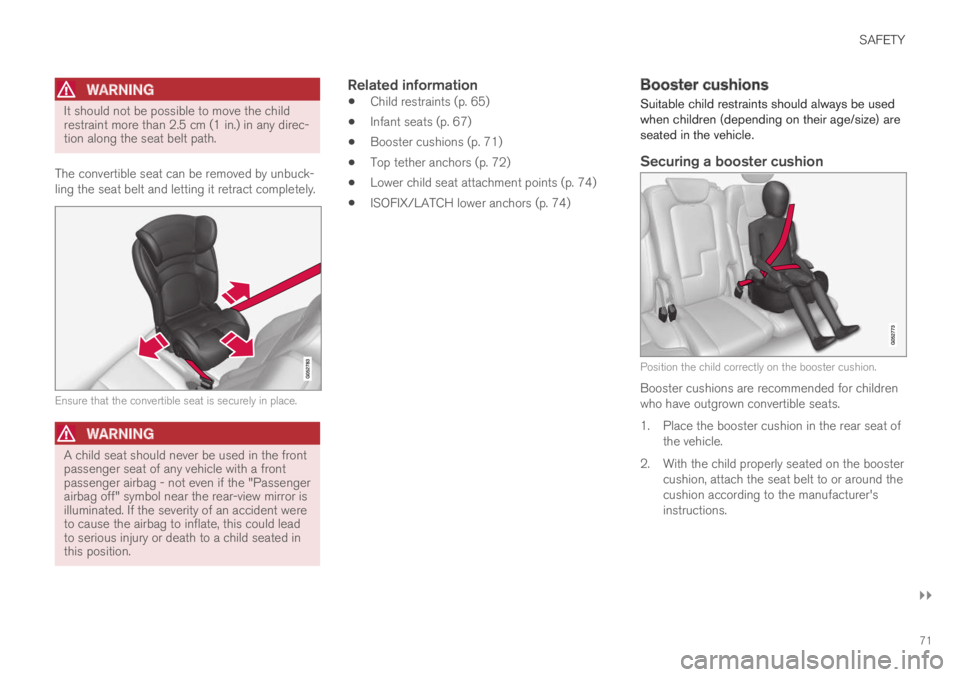
It should not be possible to move the childrestraint more than 2.5 cm (1 in.) in any direc-tion along the seat belt path.
The convertible seat can be removed by unbuck-ling the seat belt and letting it retract completely.
Ensure that the convertible seat is securely in place.
WARNING
A child seat should never be used in the frontpassenger seat of any vehicle with a frontpassenger airbag - not even if the "Passengerairbag off" symbol near the rear-view mirror isilluminated. If the severity of an accident wereto cause the airbag to inflate, this could leadto serious injury or death to a child seated inthis position.
Related information
Child restraints (p. 65)
Infant seats (p. 67)
Booster cushions (p. 71)
Top tether anchors (p. 72)
Lower child seat attachment points (p. 74)
ISOFIX/LATCH lower anchors (p. 74)
Booster cushions
Suitable child restraints should always be usedwhen children (depending on their age/size) areseated in the vehicle.
Securing a booster cushion
Position the child correctly on the booster cushion.
Booster cushions are recommended for childrenwho have outgrown convertible seats.
1.Place the booster cushion in the rear seat ofthe vehicle.
2. With the child properly seated on the boostercushion, attach the seat belt to or around thecushion according to the manufacturer'sinstructions.
Page 75 of 645

SAFETY
73
Securing a child seat
1. Place the child restraint on the rear seat.
2. Route the top tether strap under the headrestraint and attach it to the anchor.
3. Attach the strap for the lower tether anchorsin the lower ISOFIX/LATCH attachmentpoints. If the child restraint is not equippedwith straps for the lower tether anchors, or ifthe child restraint is used on the center seat-ing position, follow the instructions forattaching a child restraint using the auto-matic locking seat belt.
4. Firmly tension all straps.
Refer also to the child seat manufacturer'sinstructions for information on securing the childseat.
WARNING
Always refer to the recommendationsmade by the child restraint manufacturer.
Volvo recommends that the top tetheranchors be used when installing a for-ward-facing child restraint.
Never route a top tether strap over thetop of the head restraint. The strapshould be routed beneath the headrestraint.
Child restraint anchorages are designedto withstand only those loads imposed bycorrectly fitted child restraints. Under nocircumstances are they to be used foradult seat belts or harnesses. The ancho-rages are not able to withstand excessiveforces on them in the event of collision iffull harness seat belts or adult seat beltsare installed to them. An adult who uses abelt anchored in a child restraint anchor-age runs a great risk of suffering severeinjuries should a collision occur.
Do not install rear speakers that requirethe removal of the top tether anchors orinterfere with the proper use of the toptether strap.
Related information
Child restraints (p. 65)
Lower child seat attachment points (p. 74)
ISOFIX/LATCH lower anchors (p. 74)
Page 77 of 645
SAFETY
75
To access the anchors
1. Put the child restraint in position.
2. Kneel on the child restraint to press downthe seat cushion and locate the anchors byfeel.
3. Fasten the attachment on the childrestraint's lower straps to the ISOFIX/LATCHlower anchors.
4. Firmly tension the lower child seat strapsaccording to the manufacturer's instructions.
WARNING
Volvo's ISOFIX/LATCH anchors conform toFMVSS/CMVSS standards. Always refer tothe child restraint system's manual for weightand size ratings.
NOTE
The rear center seat is not equipped withISOFIX/LATCH lower tether anchors. If achild restraint is used in this seat, attachthe restraint's upper anchor strap (ifequipped with these) to the top tetheranchor point for this strap and secure thechild restraint with the vehicle's centerseat belt.
Always follow your child seat manufactur-er's installation instructions, and use bothISOFIX/LATCH lower anchors and toptethers whenever possible.
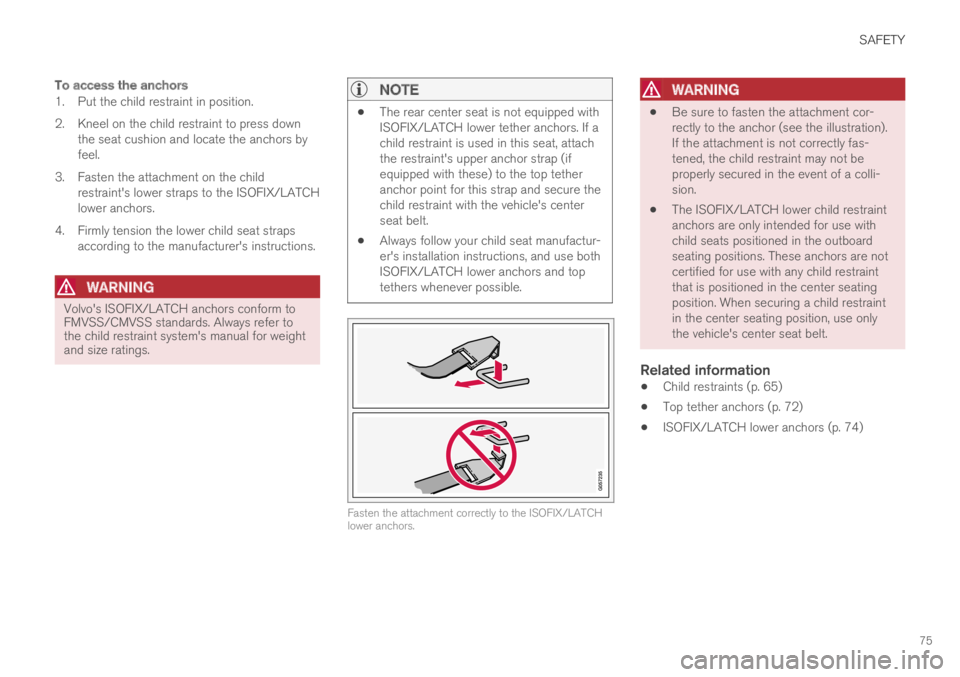
Fasten the attachment correctly to the ISOFIX/LATCHlower anchors.
WARNING
Be sure to fasten the attachment cor-rectly to the anchor (see the illustration).If the attachment is not correctly fas-tened, the child restraint may not beproperly secured in the event of a colli-sion.
The ISOFIX/LATCH lower child restraintanchors are only intended for use withchild seats positioned in the outboardseating positions. These anchors are notcertified for use with any child restraintthat is positioned in the center seatingposition. When securing a child restraintin the center seating position, use onlythe vehicle's center seat belt.
Related information
Child restraints (p. 65)
Top tether anchors (p. 72)
ISOFIX/LATCH lower anchors (p. 74)
Page 93 of 645
DISPLAYS AND VOICE CONTROL
91
Trip statistics settings
Trip statistics settings can be reset or adjusted.
1.Open the Driver performance app in theApp view to display trip statistics.
2.Tap Preferences to
change the graph scale. Select 1, 10 or100 km/miles for the bar.
reset data after each trip. Performed whenthe vehicle remains stationary for morethan 4 hours.
reset data for current trip.
Trip statistics, calculated average consump-tion, and total driving time are always resetsimultaneously.
Unit standards for distance, speed, etc. can bechanged via system settings in the center display.
Related information
Displaying trip statistics in the center display(p. 90)
Trip computer (p. 87)
Resetting the trip odometer (p. 90)
Date and time
The clock is displayed in both the instrumentpanel and the center display.
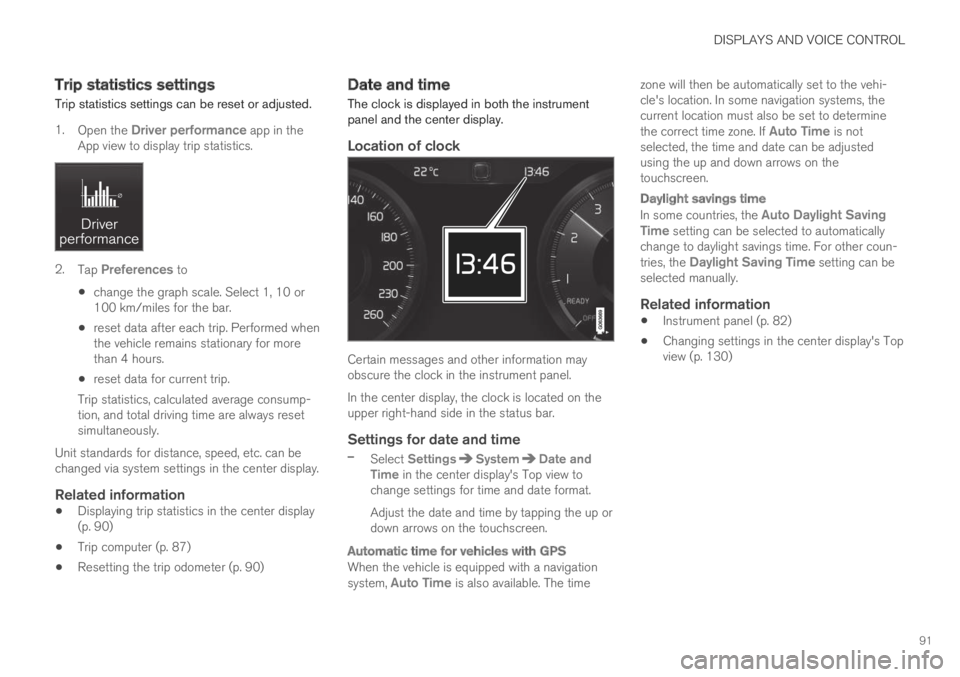
Location of clock
Certain messages and other information mayobscure the clock in the instrument panel.
In the center display, the clock is located on theupper right-hand side in the status bar.
Settings for date and time
–Select SettingsSystemDate andTime in the center display's Top view tochange settings for time and date format.
Adjust the date and time by tapping the up ordown arrows on the touchscreen.
Automatic time for vehicles with GPS
When the vehicle is equipped with a navigationsystem, Auto Time is also available. The time
zone will then be automatically set to the vehi-cle's location. In some navigation systems, thecurrent location must also be set to determinethe correct time zone. If Auto Time is notselected, the time and date can be adjustedusing the up and down arrows on thetouchscreen.
Daylight savings time
In some countries, the Auto Daylight SavingTime setting can be selected to automaticallychange to daylight savings time. For other coun-tries, the Daylight Saving Time setting can beselected manually.
Related information
Instrument panel (p. 82)
Changing settings in the center display's Topview (p. 130)
Page 98 of 645
DISPLAYS AND VOICE CONTROL
96
Instrument panel licenses
A license is an agreement on the right to con-duct a certain activity or the right to use some-one else's right according to terms and condi-tions specified in the agreement. The followingtext is Volvo's agreement with the manufactureror developer.
Boost Software License 1.0
Permission is hereby granted, free of charge, toany person or organization obtaining a copy ofthe software and accompanying documentationcovered by this license (the "Software") to use,reproduce, display, distribute, execute, andtransmit the Software, and to prepare derivativeworks of the Software, and to permit third-partiesto whom the Software is furnished to do so, allsubject to the following: The copyright notices inthe Software and this entire statement, includingthe above license grant, this restriction and thefollowing disclaimer, must be included in allcopies of the Software, in whole or in part, and allderivative works of the Software, unless suchcopies or derivative works are solely in the formof machine-executable object code generated bya source language processor.
THE SOFTWARE IS PROVIDED "AS IS",WITHOUT WARRANTY OF ANY KIND,EXPRESS OR IMPLIED, INCLUDING BUT NOTLIMITED TO THE WARRANTIES OFMERCHANTABILITY, FITNESS FOR APARTICULAR PURPOSE, TITLE AND NON-INFRINGEMENT. IN NO EVENT SHALL THE
COPYRIGHT HOLDERS OR ANYONEDISTRIBUTING THE SOFTWARE BE LIABLEFOR ANY DAMAGES OR OTHER LIABILITY,WHETHER IN CONTRACT, TORT OROTHERWISE, ARISING FROM, OUT OF OR INCONNECTION WITH THE SOFTWARE OR THEUSE OR OTHER DEALINGS IN THESOFTWARE.
BSD 4-clause "Original" or "Old" License
Copyright (c) 1982, 1986, 1990, 1991, 1993The Regents of the University of California. Allrights reserved.
Redistribution and use in source and binaryforms, with or without modification, are permittedprovided that the following conditions are met:
1. Redistributions of source code must retainthe above copyright notice, this list ofconditions and the following disclaimer.
2. Redistributions in binary form mustreproduce the above copyright notice, this listof conditions and the following disclaimer inthe documentation and/or other materialsprovided with the distribution.
3. All advertising materials mentioning featuresor use of this software must display thefollowing acknowledgement: This productincludes software developed by theUniversity of California, Berkeley and itscontributors.
4. Neither the name of the University nor thenames of its contributors may be used to
endorse or promote products derived fromthis software without specific prior writtenpermission.
THIS SOFTWARE IS PROVIDED BY THEREGENTS AND CONTRIBUTORS ``AS IS'' ANDANY EXPRESS OR IMPLIED WARRANTIES,INCLUDING, BUT NOT LIMITED TO, THEIMPLIED WARRANTIES OF MERCHANTABILITYAND FITNESS FOR A PARTICULAR PURPOSEARE DISCLAIMED. IN NO EVENT SHALL THEREGENTS OR CONTRIBUTORS BE LIABLEFOR ANY DIRECT, INDIRECT, INCIDENTAL,SPECIAL, EXEMPLARY, OR CONSEQUENTIALDAMAGES (INCLUDING, BUT NOT LIMITED TO,PROCUREMENT OF SUBSTITUTE GOODS ORSERVICES; LOSS OF USE, DATA, OR PROFITS;OR BUSINESS INTERRUPTION) HOWEVERCAUSED AND ON ANY THEORY OF LIABILITY,WHETHER IN CONTRACT, STRICT LIABILITY,OR TORT (INCLUDING NEGLIGENCE OROTHERWISE) ARISING IN ANY WAY OUT OFTHE USE OF THIS SOFTWARE, EVEN IFADVISED OF THE POSSIBILITY OF SUCHDAMAGE.
Page 100 of 645

||
DISPLAYS AND VOICE CONTROL
98
FreeType Project License
1. 1 Copyright 1996-1999 by David Turner,Robert Wilhelm, and Werner LembergIntroduction The FreeType Project isdistributed in several archive packages; someof them may contain, in addition to theFreeType font engine, various tools andcontributions which rely on, or relate to, theFreeType Project. This license applies to allfiles found in such packages, and which donot fall under their own explicit license. Thelicense affects thus the FreeType fontengine, the test programs, documentationand makefiles, at the very least. This licensewas inspired by the BSD, Artistic, and IJG(Independent JPEG Group) licenses, whichall encourage inclusion and use of freesoftware in commercial and freewareproducts alike. As a consequence, its mainpoints are that: o We don't promise that thissoftware works. However, we are beinterested in any kind of bug reports. (`as is'distribution) o You can use this software forwhatever you want, in parts or full form,without having to pay us. (`royalty-free'usage) o You may not pretend that you wrotethis software. If you use it, or only parts of it,in a program, you must acknowledgesomewhere in your documentation thatyou've used the FreeType code. (`credits')We specifically permit and encourage theinclusion of this software, with or withoutmodifications, in commercial products,
provided that all warranty or liability claimsare assumed by the product vendor. LegalTerms 0. Definitions Throughout this license,the terms `package', `FreeType Project', and`FreeType archive' refer to the set of filesoriginally distributed by the authors (DavidTurner, Robert Wilhelm, and WernerLemberg) as the `FreeType project', be theynamed as alpha, beta or final release. `You'refers to the licensee, or person using theproject, where `using' is a generic termincluding compiling the project's source codeas well as linking it to form a `program' or`executable'. This program is referred to as `aprogram using the FreeType engine'. Thislicense applies to all files distributed in theoriginal FreeType archive, including all sourcecode, binaries and documentation, unlessotherwise stated in the file in its original,unmodified form as distributed in the originalarchive. If you are unsure whether or not aparticular file is covered by this license, youmust contact us to verify this. The FreeTypeproject is copyright (C) 1996-1999 by DavidTurner, Robert Wilhelm, and WernerLemberg. All rights reserved except asspecified below. 1. No Warranty THEFREETYPE ARCHIVE IS PROVIDED `AS IS'WITHOUT WARRANTY OF ANY KIND,EITHER EXPRESSED OR IMPLIED,INCLUDING, BUT NOT LIMITED TO,WARRANTIES OF MERCHANTABILITY ANDFITNESS FOR A PARTICULAR PURPOSE.
IN NO EVENT WILL ANY OF THEAUTHORS OR COPYRIGHT HOLDERS BELIABLE FOR ANY DAMAGES CAUSED BYTHE USE OR THE INABILITY TO USE, OFTHE FREETYPE PROJECT. As you have notsigned this license, you are not required toaccept it. However, as the FreeType projectis copyrighted material, only this license, oranother one contracted with the authors,grants you the right to use, distribute, andmodify it. Therefore, by using, distributing, ormodifying the FreeType project, you indicatethat you understand and accept all the termsof this license.
2. Redistribution Redistribution and use insource and binary forms, with or withoutmodification, are permitted provided that thefollowing conditions are met: o Redistributionof source code must retain this license file(`licence.txt') unaltered; any additions,deletions or changes to the original filesmust be clearly indicated in accompanyingdocumentation. The copyright notices of theunaltered, original files must be preserved inall copies of source files. o Redistribution inbinary form must provide a disclaimer thatstates that the software is based in part ofthe work of the FreeType Team, in thedistribution documentation. We alsoencourage you to put an URL to theFreeType web page in your documentation,though this isn't mandatory. These conditionsapply to any software derived from or based
Page 182 of 645
SEATS AND STEERING WHEEL
* Option/accessory.180
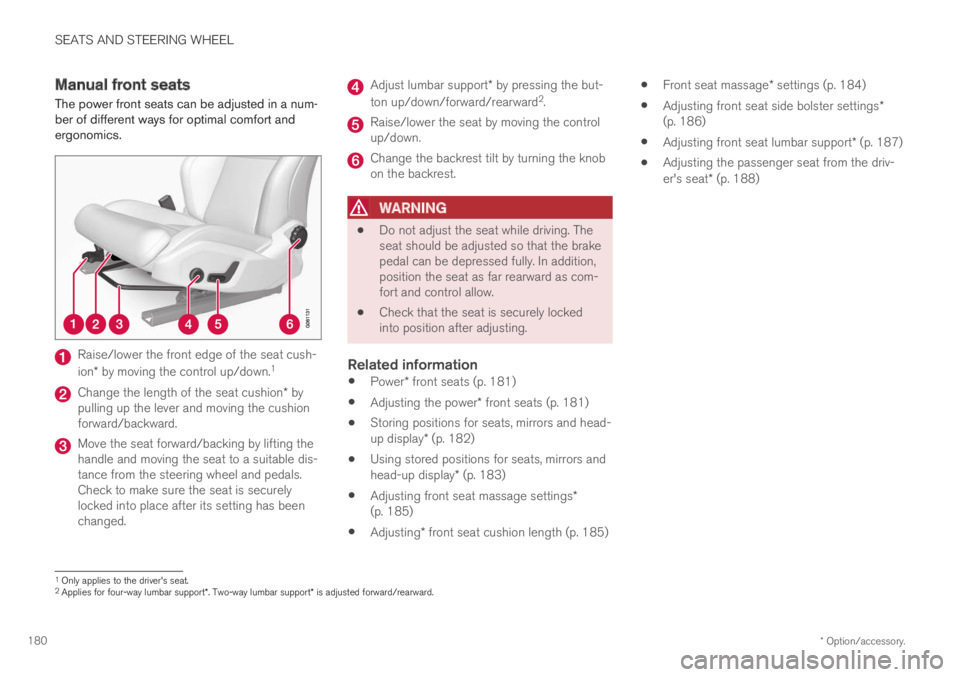
Manual front seats
The power front seats can be adjusted in a num-ber of different ways for optimal comfort andergonomics.
Raise/lower the front edge of the seat cush-
ion* by moving the control up/down.1
Change the length of the seat cushion* bypulling up the lever and moving the cushionforward/backward.
Move the seat forward/backing by lifting thehandle and moving the seat to a suitable dis-tance from the steering wheel and pedals.Check to make sure the seat is securelylocked into place after its setting has beenchanged.
Adjust lumbar support* by pressing the but-
ton up/down/forward/rearward2.
Raise/lower the seat by moving the controlup/down.
Change the backrest tilt by turning the knobon the backrest.
WARNING
Do not adjust the seat while driving. Theseat should be adjusted so that the brakepedal can be depressed fully. In addition,position the seat as far rearward as com-fort and control allow.
Check that the seat is securely lockedinto position after adjusting.
Related information
Power* front seats (p. 181)
Adjusting the power* front seats (p. 181)
Storing positions for seats, mirrors and head-up display* (p. 182)
Using stored positions for seats, mirrors andhead-up display* (p. 183)
Adjusting front seat massage settings*(p. 185)
Adjusting* front seat cushion length (p. 185)
Front seat massage* settings (p. 184)
Adjusting front seat side bolster settings*(p. 186)
Adjusting front seat lumbar support* (p. 187)
Adjusting the passenger seat from the driv-er's seat* (p. 188)
1Only applies to the driver's seat.2Applies for four-way lumbar support*. Two-way lumbar support* is adjusted forward/rearward.
Page 191 of 645

SEATS AND STEERING WHEEL
}}
* Option/accessory.189
Move the passenger seat forward/rearwardby moving the control forward/rearward.
Change the backrest tilt of the passengerseat by moving the control forward/back-ward.
Related information
Manual front seats (p. 180)
Power* front seats (p. 181)
Adjusting the power* front seats (p. 181)
Storing positions for seats, mirrors and head-up display* (p. 182)
Using stored positions for seats, mirrors andhead-up display* (p. 183)
Adjusting front seat massage settings*(p. 185)
Adjusting* front seat cushion length (p. 185)
Front seat massage* settings (p. 184)
Adjusting front seat side bolster settings*(p. 186)
Adjusting front seat lumbar support* (p. 187)
Folding down the rear seat
backrests*
The rear seat backrest is split into two sections.The two sections can be folded forward individu-ally.
WARNING
Adjust the seat and ensure it locks intoposition before driving. Use caution whenadjusting the seat. Uncontrolled or care-less adjustments could lead to injury.
Long objects must always be securelytied down to help prevent injury or dam-age in the event of sudden braking.
Always turn off the engine and apply theparking brake when loading or unloadingthe vehicle.
Put the gear selector in P to help preventthe gear selector from being inadvertentlymoved.
CAUTION
When the backrest is folded down, make surethere are no objects in the rear seat, and theseat belts are not buckled. Otherwise there isa risk of damage to the upholstery.
Page 192 of 645

||
SEATS AND STEERING WHEEL
* Option/accessory.190
CAUTION
The armrest* in the center seat must beraised before the seat backrest is foldeddown.
The ski hatch* must be closed before theseat backrest is folded down.
NOTE
The rear seat must be in the upright positionwhen private locking is activated in order forthe seats to lock. Seats in the folded-downposition will not lock.
NOTE
The front seats may need to be pushed for-ward and/or the backrest adjusted so that therear seat backrests can be fully lowered.
Folding down the backrests
The vehicle must be stationary and at least oneof the rear doors must be open before a backrestcan be folded down.
Buttons for folding down the seats, located on the topsection of the left-side rear seat.
1. Make sure that the rear seat is unoccupiedand that there are no objects on the seat.
2.Push down the center seat's head restraintmanually.
3. Press and hold one of the buttons located onthe left side of the parcel shelf in the rearwindow.
4. The backrest lock will release but the back-rest will remain in the same position. Thehead restraint will fold down automatically.
5. Manually fold the backrest down to its hori-zontal position.
Folding up the backrest
To fold up the backrest to the upright positionmanually:
1. Move the backrest upward/rearward.
2. Press the backrest until it locks into position.
3. Fold up the head restraints manually.
4. Adjust the center head restraint if necessary.
WARNING
Make sure that the rear seat backrest andhead restraint are locked securely in placeafter the seat is folded up.
The head restraints at the outer seats mustalways be raised when there is a passenger inone of these spots of the rear seat.
Related information
Adjusting the rear seat head restraints(p. 191)
Private Locking (p. 253)
Activating and deactivating private locking(p. 253)
Page 199 of 645

CLIMATE CONTROL
}}
* Option/accessory.197
On vehicles equipped with the Interior Air QualitySystem*, there is also an air quality sensor in theclimate system's air intake.
Related information
Climate (p. 196)
Interior Air Quality System* (p. 200)
Perceived temperature
The climate control system regulates the climatein the passenger compartment based on per-ceived temperature, not actual temperature.
The selected passenger compartment tempera-ture is based on the physical perception of thecurrent ambient temperature, airflow speed,humidity, sunlight in the passenger compartment,etc.
The system has a sunlight sensor that detectswhich side of the vehicle the sunlight is shiningon and adjusts the temperature accordingly. Thismeans that the temperature of the air coming outof the vents may be different for the left and rightsides, even if the temperature setting is the samefor both sides.
Related information
Climate (p. 196)
Climate control system voice
commands1
Voice commands can be used for the climatecontrol system to e.g. change temperature, acti-vate seat heating* or change blower speed.
Tap and say one of the following commands:
"Climate" - starts a command dialog for cli-mate controls and provides examples ofcommands that can be used.
"Set temperature to X degrees" - setsdesired temperature.
"Raise temperature"/"Lowertemperature" - raises/lowers the set tem-perature.
"Sync temperature" – synchronizes thetemperature for all climate zones in the vehi-cle with the temperature set for the driver'sside.
"Air on feet"/"Air on body" - opens thedesired air vent.
"Air on feet off"/"Air on body off" - closesthe desired air vent.
"Set fan to max"/"Turn off fan" - changesblower speed to Max/Off.
"Raise fan speed"/"Lower fan speed" -raises/lowers the set blower speed.
1Certain markets only.