battery location VOLVO S60 TWIN ENGINE 2020 Owners Manual
[x] Cancel search | Manufacturer: VOLVO, Model Year: 2020, Model line: S60 TWIN ENGINE, Model: VOLVO S60 TWIN ENGINE 2020Pages: 657, PDF Size: 13.6 MB
Page 8 of 657

6
Activating and deactivating the heated steering wheel*212
Activating and deactivating auto-matic steering wheel heating *212
Activating auto climate control 213
Activating and deactivating recir- culation 213
Activating and deactivating therecirculation timer setting 214
Activating and deactivating maxdefroster 214
Activating and deactivating theheated rear window and door mirrors 215
Automatically activating and deac-tivating the heated rear windowand door mirrors 216
Setting the blower speed for thefront seats 216
Setting the temperature for thefront seats 217
Synchronize temperature 218
Activating and deactivating airconditioning 219
Parking climate 219
Preconditioning 220
Starting and stopping preconditioning 220
Preconditioning timer 221
Adding and editing timer settingsfor preconditioning 222
Activating and deactivating pre- conditioning timer223
Deleting preconditioning timersettings 223
Climate comfort retaining function 224
Starting and switching off the cli-mate retaining function when parking 224
Parking climate symbols and mes-sages 226
Heater 227
Parking heater 227
Additional heater 227
Activating and deactivating theauxiliary heater 228
KEY, LOCKS AND ALARM
Lock indication
230
Lock confirmation settings 231
Remote key 232
Locking and unlocking using the remote key 234
Settings for remote and insidedoor unlock 235
Remote key range 235
Replacing the remote key's battery 236
Ordering additional remote keys 239
Red Key - restricted remote key *
240
Settings for Red Key *
241
Detachable key blade 242
Locking and unlocking withdetachable key blade 243
Electronic immobilizer 244
Start and lock system type desig-nations 245
Keyless and touch-sensitive surfaces *
246
Keyless locking and unlocking *
247
Keyless unlock settings *
248
Keyless trunk lid unlock *
249
Antenna locations for the startand lock system 249
Locking and unlocking from insidethe vehicle 250
Page 11 of 657

9
Park Assist Camera*
354
Location and field of vision of Park Assist Cameras * 355
Park Assist Camera trajectory lines *
357
Park Assist sensor field 359
Activating Park Assist Camera 360
Park Assist Camera symbols and messages 362
Park Assist Pilot *
363
Types of parking with Park Assist Pilot * 364
Using Park Assist Pilot *
365
Leaving a parallel parking spacewith Park Assist Pilot *368
Park Assist Pilot * limitations
368
Park Assist Pilot * messages
371
HYBRID INFORMATION
General information about Twin Engine 374
Charging the hybrid battery 375
Charging current 377
Charge cable 377
Charging cable residual current device 379
Charging cable temperature moni-toring 380
Opening and closing the chargingsocket cover 380
Initiating hybrid battery charging 380
Charging status in the vehicle'scharging socket 382
Charging status in the chargingcable's charging module 383
Charging status in the instrumentpanel 384
Stopping hybrid battery charging 386
Twin Engine symbols and mes-sages in the instrument panel 388
Long-term storage of vehicleswith hybrid batteries 390
STARTING AND DRIVING
Starting the vehicle
392
Switching off the vehicle 394
Ignition modes 395
Selecting ignition mode 396
Brake functions 397
Brakes 397
Brake Assist System 399
Braking on wet roads 399
Braking on salted roads 400
Maintenance of the brake system 400
Parking brake 400
Activating and deactivating the parking brake 401
Settings for automatically activat-ing the parking brake 402
Parking on a hill 403
Parking brake malfunction 403
Auto-hold brakes 404
Activating and deactivating Auto-hold at a standstill 405
Hill Start Assist 405
Braking assist after a collision 406
Transmission 406
Automatic transmission 406
Gear selector positions for auto-matic transmissions 407
Page 82 of 657

DISPLAYS AND VOICE CONTROL
* Option/accessory.
80
Instrument panel The instrument panel displays information related to the vehicle and driving.
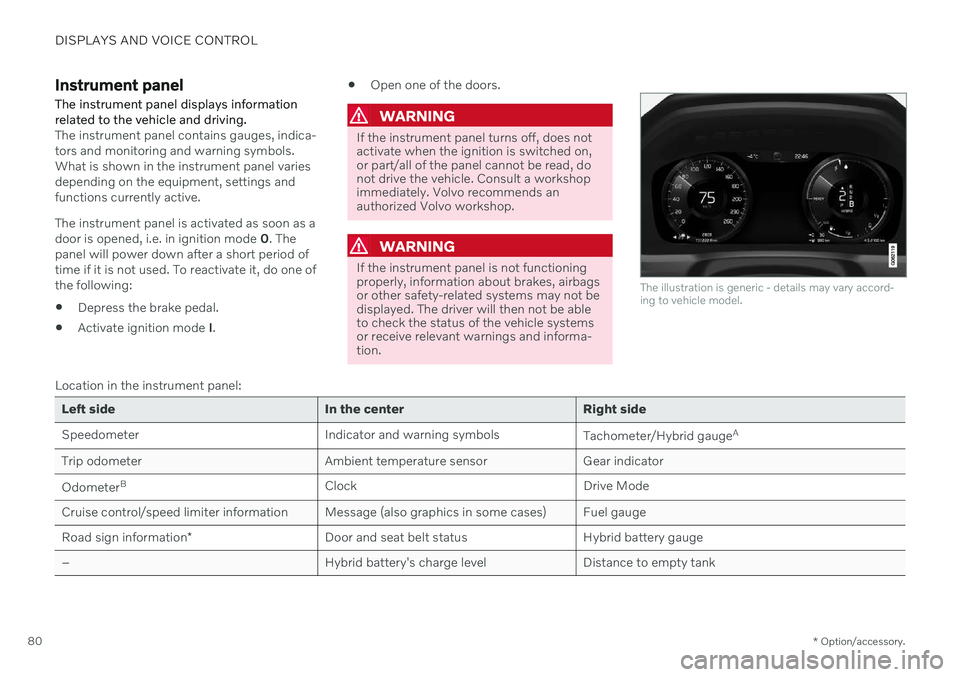
The instrument panel contains gauges, indica- tors and monitoring and warning symbols.What is shown in the instrument panel variesdepending on the equipment, settings andfunctions currently active. The instrument panel is activated as soon as a door is opened, i.e. in ignition mode 0. The
panel will power down after a short period oftime if it is not used. To reactivate it, do one ofthe following:
Depress the brake pedal.
Activate ignition mode
I.
Open one of the doors.
WARNING
If the instrument panel turns off, does not activate when the ignition is switched on,or part/all of the panel cannot be read, donot drive the vehicle. Consult a workshopimmediately. Volvo recommends anauthorized Volvo workshop.
WARNING
If the instrument panel is not functioning properly, information about brakes, airbagsor other safety-related systems may not bedisplayed. The driver will then not be ableto check the status of the vehicle systemsor receive relevant warnings and informa-tion.
The illustration is generic - details may vary accord- ing to vehicle model.
Location in the instrument panel:
Left side In the center Right side
Speedometer Indicator and warning symbols
Tachometer/Hybrid gaugeA
Trip odometer Ambient temperature sensor Gear indicator Odometer B
Clock Drive Mode
Cruise control/speed limiter information Message (also graphics in some cases) Fuel gauge Road sign information * Door and seat belt status Hybrid battery gauge
– Hybrid battery's charge level Distance to empty tank
Page 83 of 657

DISPLAYS AND VOICE CONTROL
* Option/accessory.81
Left side In the center Right side – Media player Distance to discharged battery
– Navigation system map*Current fuel consumption
– PhoneApp menu (activated using steering wheel keypad)
– Voice Control –
A
Depends on selected drive mode.
B Total distance.
Dynamic symbolDynamic symbol in basic mode.
In the center of the instrument panel is a dynamic symbol that changes appearanceaccording to the type of message displayed.The severity of the control or warning symbolis indicated by a red or amber-colored markingaround the symbol.
Example with indicator symbol.
An animation may be used to change the sym- bol into a graphic image to depict the locationof a problem or to clarify information.
Related information
Instrument panel settings (p. 82)
Warning symbols in the instrument panel(p. 94)
Indicator symbols in the instrument panel(p. 91)
Trip computer (p. 85)
Messages in the instrument panel(p. 103)
Handling the App menu in the instrumentpanel (p. 102)
Drive modes (p. 413)
Page 238 of 657

||
KEY, LOCKS AND ALARM
* Option/accessory.
236 approx. 1.5 meter (5 feet) along the sides of the vehicle or approx. 1 meter (3 feet) from thetrunk lid.
NOTE
The functions of the remote control key can be disrupted by ambient radio waves,buildings, topographical conditions, etc.The vehicle can always be locked/unlockedusing the key blade.
If the remote key is removed from the vehicle
If the remote key is removed from the vehicle while the engine is run- ning, the warning message
Vehicle
key not found Removed from
vehicle will be displayed in the instrument
panel and an audible signal will sound when the last door is closed.
The message will disappear when the key is returned to the vehicle and the O button on
the right-side steering wheel keypad ispressed or when the last door is closed again.
Related information
Remote key (p. 232)
Antenna locations for the start and locksystem (p. 249)
Keyless and touch-sensitive surfaces
*
(p. 246)
Replacing the remote key's battery
The battery in the remote key must be replaced when it is discharged.
NOTE
All batteries have a limited service life and must eventually be replaced (does notapply for Key Tag). The battery's service lifevaries depending on how often thevehicle/key is used.
The remote key battery should be replaced if
the information symbol illuminates and the message
Vehicle key bat. low is dis-
played in the instrument panel
the locks do not react after several attempts to lock or unlock the vehicleusing the remote key within approx.20 meter (65 feet) from the vehicle.
NOTE
Move closer to the vehicle and try to unlock it again.
The battery in the smaller key without but- tons 7
(the Key Tag) cannot be replaced. A new key can be ordered from an authorized Volvo workshop.
CAUTION
An end-of-life Key Tag must be turned in to an authorized Volvo workshop. The keymust be deleted from the vehicle becauseit can still be used to start the vehicle viabackup start.
Opening the key and replacing the battery
Hold the remote key with the front side
(with the Volvo logo) facing up and move the button on the key ring section to theright. Slide the front cover slightly upward.
The cover will loosen and can be
removed from the key.
Page 245 of 657

KEY, LOCKS AND ALARM
}}
243
Locking and unlocking with detachable key blade
The detachable key blade can be used to unlock the vehicle from the outside, e.g. if thebattery in the remote key is discharged.
Unlocking
Pull the front left-hand door handle to its end position to access the lock cylinder.
Put the key in the lock cylinder.
Turn the key clockwise 45 degrees so that the key blade is pointing straight rear-ward.
Turn the key blade back 45 degrees to its original position. Remove the key from thelock cylinder and release the handle sothat it returns to its original positionagainst the vehicle.
5. Pull the door handle. > The door will open. Lock the door in the same way, but turn thekey 45 degrees counterclockwise in step (3).
Disarming the alarm and starting the vehicle
NOTE
When the door is unlocked using the detachable key blade and then opened, thealarm will be triggered.
Location of the backup key reader in the cup holder.
Turn off the alarm by:
1. Place the remote control key on the key
symbol in the backup reader in the bottom of the cup holder in the tunnel console.
2. Turn the start knob clockwise and release it.
> The alarm signal will stop and the alarmwill switch off.
LockingThe vehicle can also be locked using the remote key's detachable key blade, e.g. ifeither the vehicle's or remote key's batteriesare discharged. The left-hand front door can be locked by inserting the detachable key into the door'slock cylinder. This is the only door with a lock cylinder. The other doors have lock mechanisms in the sideof the door that must be pushed in using thekey blade. The door will then be lockedmechanically and cannot be opened from theoutside. The doors can still be opened from inside.
Manual door lock. This is not the child lock.
Page 260 of 657

||
KEY, LOCKS AND ALARM
* Option/accessory.
258
Disarming the alarmUnlock and disarm the vehicle alarm by
pressing the unlock button on the remote key
.
grip a door handle or lightly press the trunk lid's rubberized button 15
.
Disarming the alarm without a functioning
remote key
The vehicle can be unlocked and disarmed even if the remote key is not functioning, e.g. ifthe battery is discharged.
1. Open the driver's door using the detacha- ble key blade.
> This will trigger the alarm.
Location of the backup key reader in the cup holder.
2. Place the remote key on the key symbol inthe backup reader in the tunnel console's cup holder. 3. Turn the start knob clockwise and release.
> The alarm will be disarmed.
Turning off a triggered alarm–Press the unlock button on the remote key or put the ignition into mode I by turning
the start knob clockwise and then releas-ing it.
Automatically arming and disarming the alarm
Automatically arming the alarm helps prevent inadvertently leaving the vehicle without alarmprotection. If the vehicle is unlocked using the remote key (and the alarm is disarmed) but none of thedoors or trunk lid is opened within twominutes, the alarm will be automaticallyrearmed. The vehicle will also re-lock. On some markets, the alarm will be automati- cally armed following a slight delay after thedriver's door has been opened and closedwithout being locked. To change this setting:1. Tap
Settings in the center display's Top
view.
2. Tap
My CarLocking.
3. Select
Passive Arming Deactivation to
temporarily deactivate the function.
Related information
Alarm (p. 256)
15
Vehicles with keyless locking and unlocking *.
Page 384 of 657

||
HYBRID INFORMATION
3822. The charging cable handle will lock into
place and charging will begin within 5 seconds. When charging starts, thegreen LED light in the charging socket willbegin to flash. The approximate remainingcharging time or the charging status willbe displayed in the instrument panel. Charging may be temporarily interrupted if the vehicle is unlocked:
and a door is open
‒ charging will
restart within a few minutes.
if no door is opened
‒ the vehicle will
automatically relock. Charging willresume after 1 minute.
CAUTION
Never detach the charging cable from the 120/240 V outlet (AC, alternating current)while charging is in progress – the120/240 V outlet could be damaged insuch circumstances. Always interruptcharging first and then disconnect thecharging cable – first from the vehicle'scharging socket and then from the120/240 V outlet.
During charging, condensation from the air conditioning may form under the vehicle. Thisis normal and is caused by the hybrid batterycooling.
Related information
Charging the hybrid battery (p. 375)
Opening and closing the charging socketcover (p. 380)
Charging status in the vehicle's chargingsocket (p. 382)
Charging status in the instrument panel(p. 384)
Charging status in the charging cable's charging module (p. 383)
Stopping hybrid battery charging (p. 386)
Charging status in the vehicle's charging socket
The charging status is indicated by an LED light in the charging socket.
Location of the LED indicator light in the vehicle's charging socket.
The LED indicator light shows the current charge status during charging. If the LED indi-cator light is not illuminated, check to makesure the cable is securely connected in thewall outlet and in the outlet in the vehicle. Awhite, red or yellow light illuminates when thepassenger compartment lighting is activatedand will remain illuminated for a short timeafter the passenger compartment lighting hasgone out.
Page 392 of 657

HYBRID INFORMATION
390
Long-term storage of vehicles with hybrid batteries To help minimize degradation of the hybrid battery if the vehicle is not driven for a pro-longed period (longer than 1 month) thehybrid battery charge level should be kept atapprox. 25% according to the gauge in theinstrument panel.
Do as follows:
1. If the hybrid battery charge level is high,drive the vehicle until the charge level is approximately 25%. If the charge level islow, charge the battery until the level rea-ches approximately 25%. 2. If the vehicle is not driven for more than 6
months or the hybrid battery's chargelevel is noticeably below the 25% mark,charge the battery to about 25% to helpcompensate for the natural battery dis-charge that occurs in long-term storage.Regularly check the charge level using thegauge in the instrument display.
NOTE
Store the vehicle in as cool a location as possible to minimize battery aging duringlong-term storage. In the summer, park thevehicle indoors or in a shady location,whichever is cooler.
Related information
Initiating hybrid battery charging (p. 380)
Hybrid battery gauge (p. 84)
Charging the hybrid battery (p. 375)
Page 395 of 657

STARTING AND DRIVING
}}
393
will go out and the selected theme will be dis- played to indicate that the electric motor isactivated. In some situations, such as in cold weather or if the hybrid battery's charge level is too low,the gasoline engine will start instead.
Error messagesIf the Vehicle key not found message is
shown in the instrument panel at start, place the remote key at the backup reader and thenmake a new start attempt.
Location of the backup reader in the tunnel console.
NOTE
When the remote key is placed in the backup reader, make sure that no othervehicle keys, metal objects or electronicdevices (e.g. cellular phones, tablets, lap-tops or chargers) are in the backup reader.Multiple vehicle keys close to each other inthe backup reader can disrupt their func-tionality.
If Vehicle start System check, wait is dis-
played in the instrument panel while attempt- ing to start the vehicle, wait until the messagedisappears and try again to start the vehicle.
CAUTION
If the engine has not responded after 3 attempts – wait for 3 minutes before star-ting a new attempt. Starting capabilityincreases if the starter battery is given timeto recover.
NOTE
The vehicle cannot be started if the hybrid battery is discharged.
WARNING
Never remove the remote control key from
the vehicle while driving.
WARNING
Always remove the remote key from the passenger compartment when youleave the vehicle and make sure theignition is in mode
0.
Always put the gear selector in
P and
apply the parking brake before leavingthe vehicle. Never leave the vehicleunsupervised while the engine is run-ning.
Always open the garage door fully andmake sure that ventilation is very goodbefore starting the engine in a garage.The exhaust fumes produced by thevehicle contain carbon monoxide,which is invisible and odorless but verytoxic.